A Google Sheets mail merge is one of — if not the — best ways to send out personalized, individual emails at scale.
In fact, back in 2015, when I realized that feature wasn’t built into Google Sheets and Gmail, it’s what inspired me to create GMass.
And today, 300,000+ active users and 7,500+ five-star reviews later, the ability to run a quick, easy, but powerful mail merge from a Google Sheet is still one of GMass’s most popular features.
Using GMass to send a simple (or complex) Gmail mail merge is the ideal solution. It’s much, much easier (and much, much, much more feature-rich) than trying to implement and tweak a Google Apps Script to handle the process.
GMass is also more streamlined, intuitive, and powerful than the Google Sheets add-ons in the Google Workspace Marketplace that offer mail merge options.
In fact… we can have you sending your mail merge emails within the next 5 to 10 minutes!
In this article, I’ll show you how to use GMass for effortless mail merges in Gmail using Google Sheets. I’ll also cover five of GMass’s advanced features and answer some FAQs related to Google Sheets mail merges.
Google Sheets Mail Merge: Table of Contents
- How to Send a Google Sheets Mail Merge in Gmail with GMass
- 5 Advanced Features for Gmail Mail Merge Wizards
- Google Sheets Mail Merge FAQs
Check out my 45-second tutorial on performing a Gmail mail merge with Google Sheets:
Let’s dive in.
How to Send a Google Sheets Mail Merge in Gmail with GMass
GMass is a powerful email marketing tool that lets you run mail merge campaigns inside Gmail to send a personalized email to every recipient on your list.
The software’s advanced outreach capabilities have made it a popular mass email tool used by employees at powerhouses like Uber, Twitter, LinkedIn, and even Google itself.
Its ease of use and affordable pricing make it the perfect email tool for startups, institutions, and individuals.
Instead of wasting time creating a Google script to build an email template for your mail merge (or hiring a Google developer expert to build it for you), you can use GMass to send even better multiple email campaigns even faster!
To begin using GMass, download the GMass Google Chrome extension and sign up for a free trial with your Gmail account or Google Workspace (previously G Suite) account. There’s no credit card required to get started — you don’t even need to fill out a form.
(Note: You will need the desktop version of Gmail and Google Chrome, not the mobile Google app.)
Here’s a walkthrough guide on how to send a mail merge with Google Sheets in GMass:
Step 1: Format your spreadsheet
First, you’ll need to create a spreadsheet with everyone on your mailing list.
⚠️ Important: This needs to be a Google Sheets file, not an XLS or CSV file you’re viewing inside Google Sheets.
When creating the spreadsheet, it’s important to properly format the rows and columns for the best possible results.
Keep these pointers in mind when preparing your spreadsheet:
- The first row should contain column header names, like FirstName, LastName, EmailAddress, Company, etc. For best results, the headers shouldn’t contain spaces or special characters — stick with numbers and letters for your column headings.
- The actual data should start on the second row.
- At least one column must contain email addresses — GMass will auto-detect this column and use it as the recipient address column.
For example, here’s the Google Sheet I’ll be using as my data file:

Note: If your sheet has multiple columns with addresses, keep the column containing the recipient email addresses to the left of the other columns. Here are instructions if you want columns for CCing or BCCing extra recipients on your mail merge emails — that will ensure the right emails wind up in the right inbox.
Step 2: Click to connect
Log in to your Gmail account.
If you’ve already signed up for GMass, it’s time to load the mail merge data from your Google Sheet.
You can load recipient data in two ways:
1. Click the Sheets button near the search bar to open a dialog window showing a list of Google Sheet files.

Or…
2. Open a new compose window in Gmail, then click the new GMass button in the upper-right corner. (You can connect the Sheet before or after you write your email template draft.)
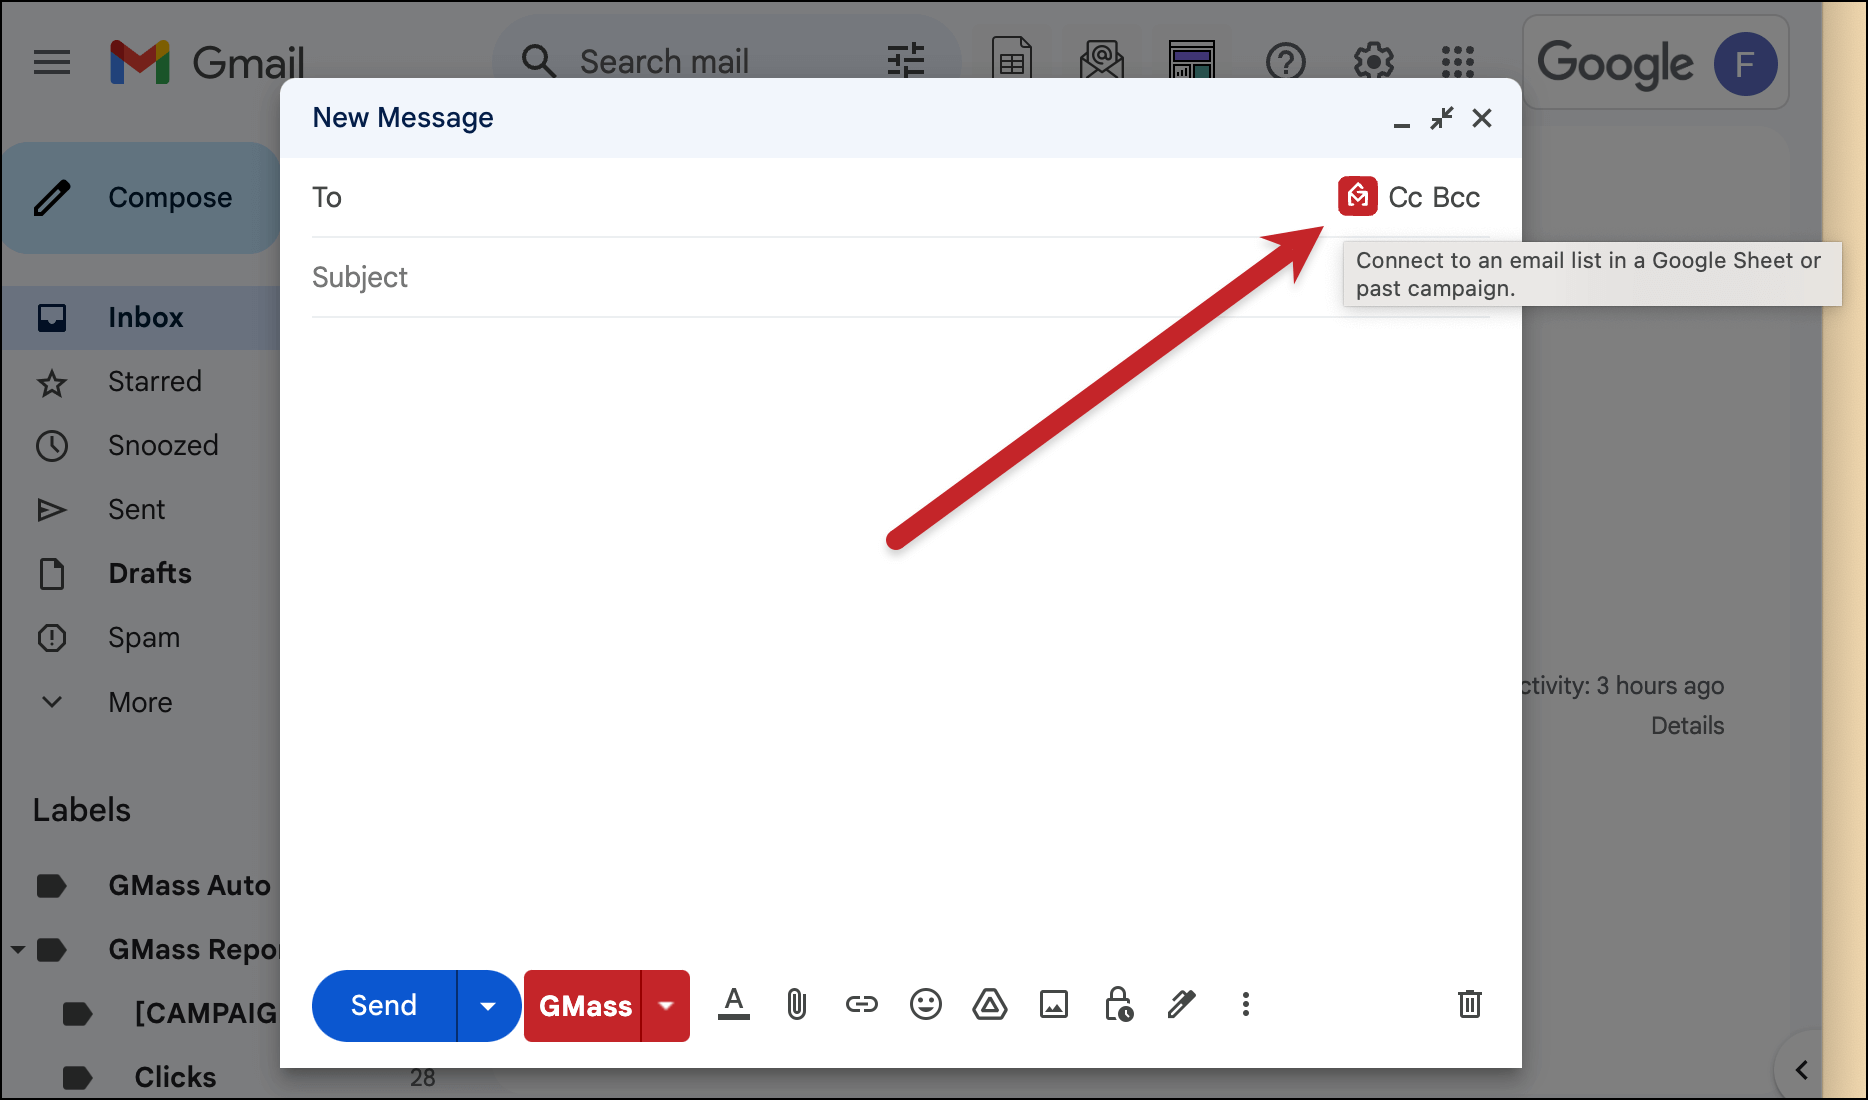
That will bring up a window giving you three different options for the type of list you’d like to connect to your GMass campaign. Choose From a Google Sheet.

Regardless of whether you went with option 1 or option 2, both paths will lead to the same place: A pop-up window where you’ll select your Google Sheet.
Step 3: Choosing your Google Sheet
Next up you’ll select the Google Sheet that contains your mailing list.
You have a few options here which are all in place to make sure you can find your Google Sheet no matter where it might be living in Google Drive (and no matter what security restrictions your organization might have in place).
The dropdown menu

We’ll start with the dropdown menu, which is a fast way to choose your Sheet if everything in your account is nice and tidy.
For instance: You’re accessing your own Google Sheet or a Sheet that someone directly shared with you, you don’t put your Google Sheets into folders in your Google Drive, and you don’t have any security restrictions on your account.
In most cases and for most GMass users, your Google Sheet should be here in the dropdown menu. And if it’s the most recent sheet you edited, it should be at the top of the dropdown menu.
The dropdown menu also has a built-in search function, which you can use to search through your Google Sheets as well.
Note: The drop-down menu won’t show any Excel files that are in your Google Drive. GMass doesn’t connect to an Excel file directly, but you can easily convert your Excel spreadsheet (or an existing CSV file) to a Google Sheet.
The spreadsheet picker

The spreadsheet picker launches Google’s native Drive interface.
This is particularly useful if you organize your Google Sheets into folders, or if you’re looking for Sheets in shared folders on your organization’s Google Drive.
You can also use Google’s search function here for an even deeper search into your Google Drive than the search in the GMass dropdown.
Manual entry

The third way of choosing a Google Sheet is via manual entry.
Here, you’ll paste in the ID number of a Google Sheet (which you can grab from its URL).

This allows you to connect to a Sheet that’s public but hasn’t been shared directly with your account.
(“Public” is a loose term here as well. Let’s say you have 100 GMass accounts and you want all 100 to be able to use the same Sheet, but don’t want to take the time to share that Sheet with all the accounts. You could make it “public” but, of course, only you would know the URL. Then you could paste it in as you connect to campaigns.)
Interface for security-restricted accounts
While most users will see all three options detailed above, if you’re at a larger organization or one with extremely tight security restrictions, your Google Workspace admins may lock down access to your Google Sheets.
Which means: GMass won’t be able to directly access those Sheets and use them to populate the dropdown menu.
In that case, you’ll see a different interface where your only option is to enter a Google Sheet ID manually.
You can read more about the security settings that cause this scenario (and how your admins can turn them off) here.
Step 4: Choosing your worksheet (optional)
If your Google Sheet has multiple worksheets, a worksheets drop-down menu will appear, which allows you to select the specific worksheet you need.

Step 5: Send to all rows or a filtered set of rows (optional)
Time to configure mail merge settings for your campaign.
First up…
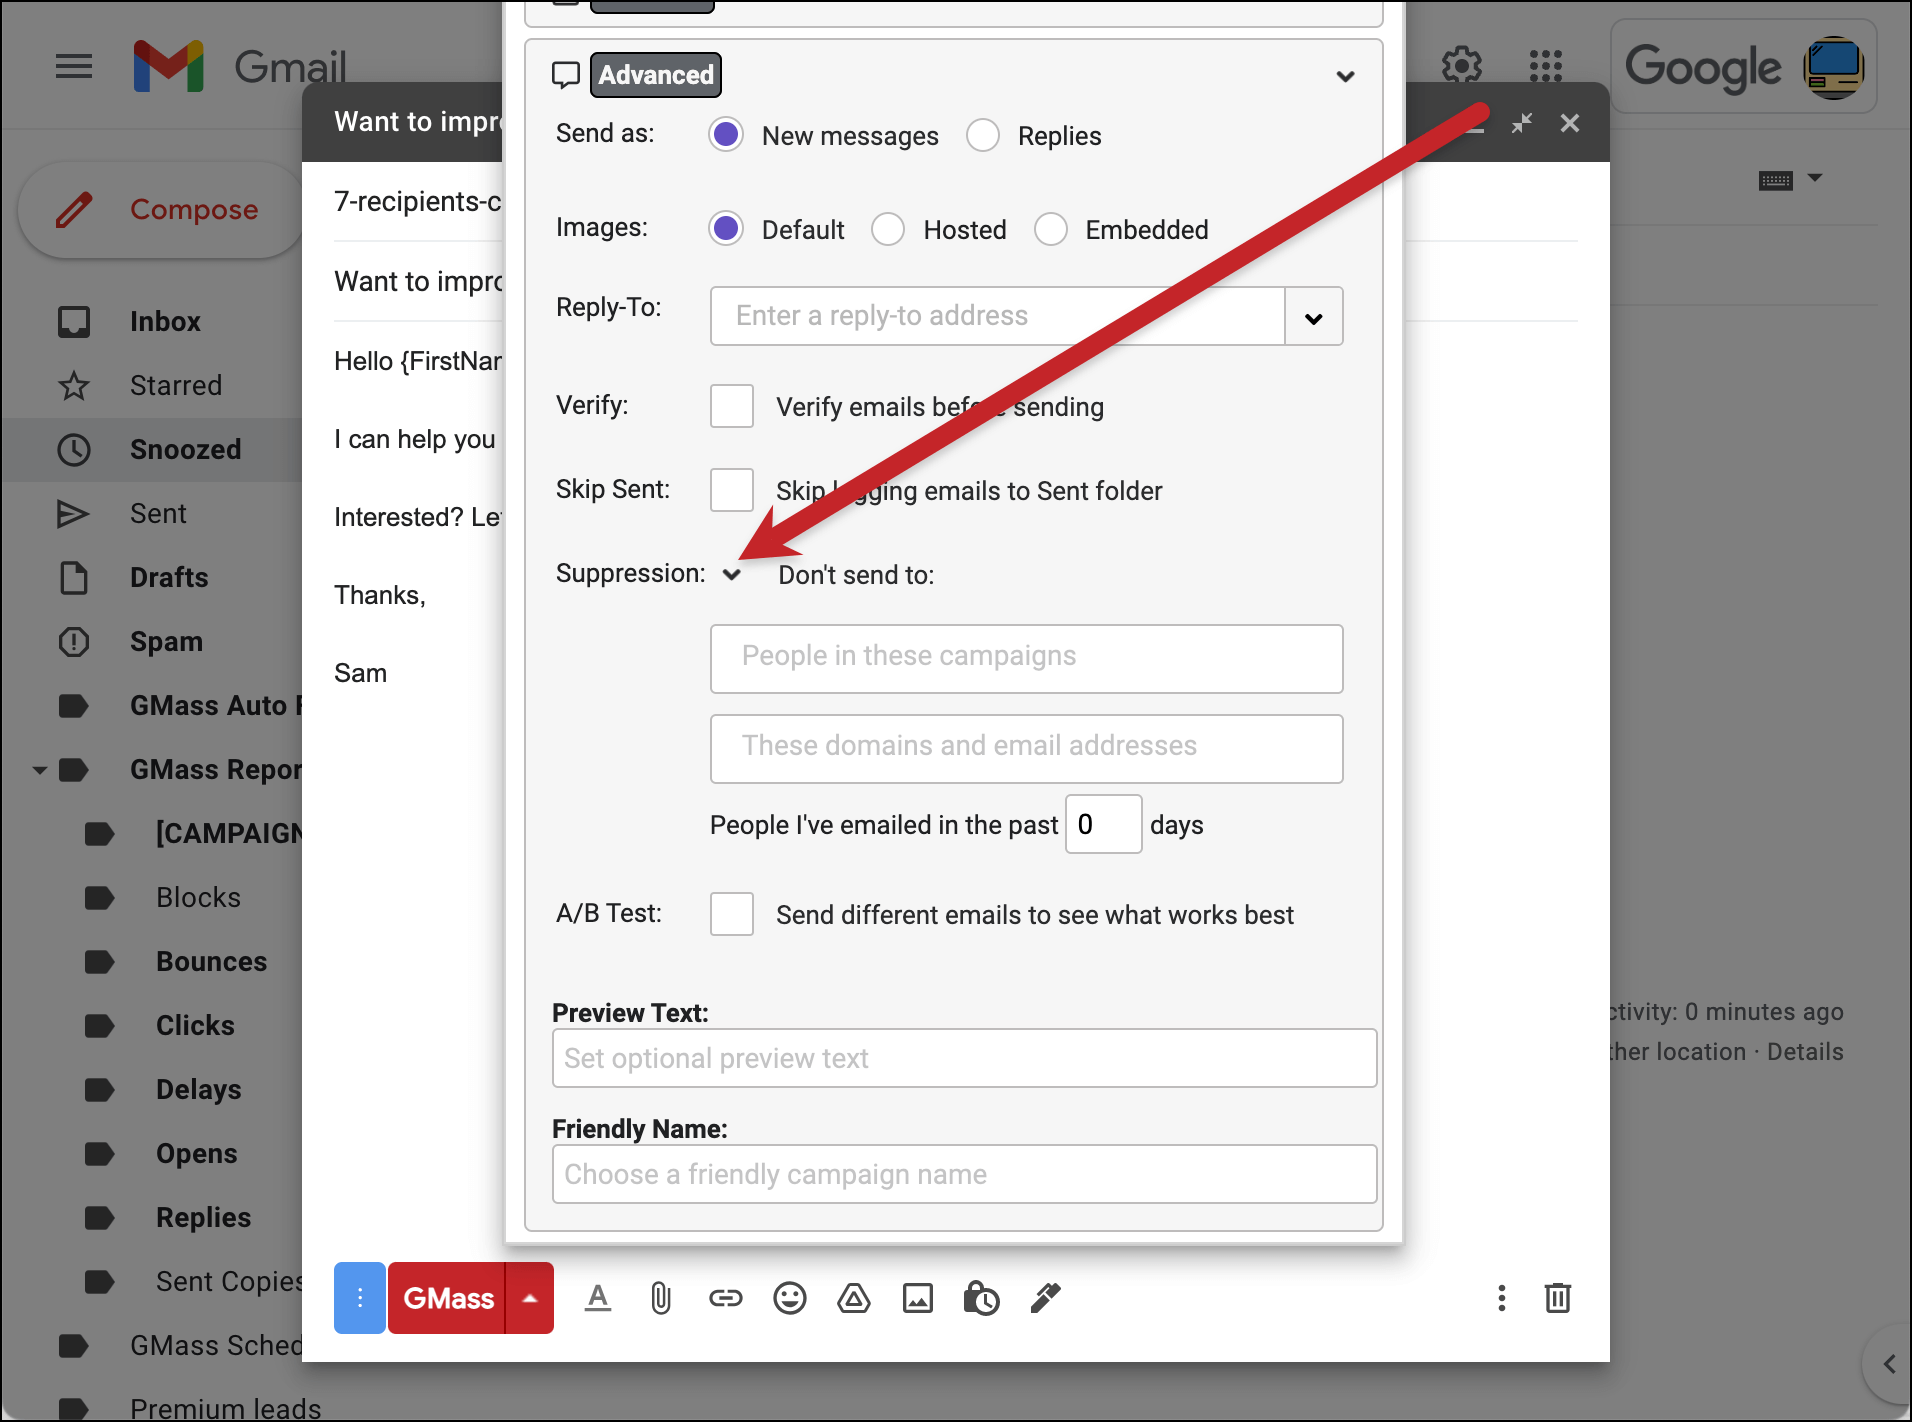
Sometimes, you may want to send emails only to particular recipients in your Google Sheet.
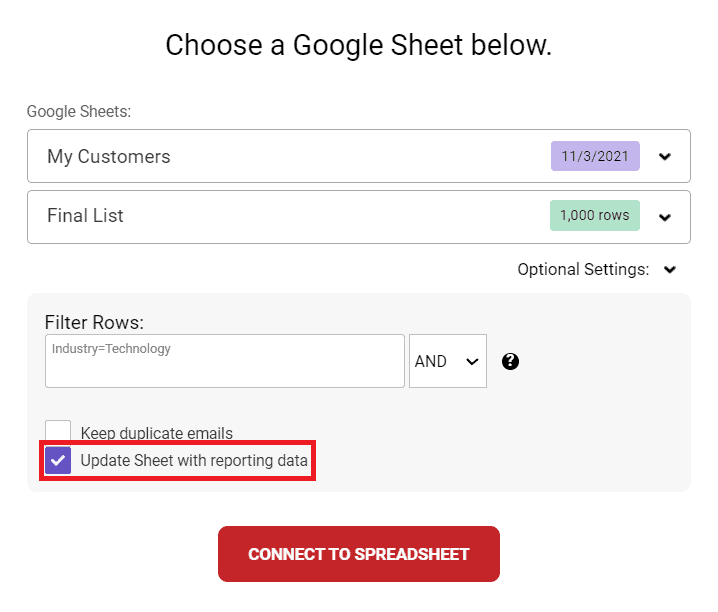
In such scenarios, you can filter the rows that are a part of the campaign by adding filter criteria (name/value pairs) in the Filter Rows box under Optional Settings.
In the example below, my Google Sheet has a column called Industry. And I’ve decided to send emails only to customers who have “Technology” in that column.

Don’t worry about filtering out addresses who have unsubscribed, bounced, or thrown up an address block on past campaigns. GMass automatically suppresses your messages to them.
Step 6: Decide whether to keep duplicates (optional)
Your spreadsheet might have some rows with duplicate email addresses. And when you’re sending your mail merge campaign, you may want those duplicate email addresses to be filtered out. (We assume you will, so that’s the default setting.)
However, sometimes you may want to send duplicate emails.
For example, say you’re in charge of the after-school activities program, and you’ve got to email the parents of children who registered for this program.
Now, what if one of the parents has registered multiple children?
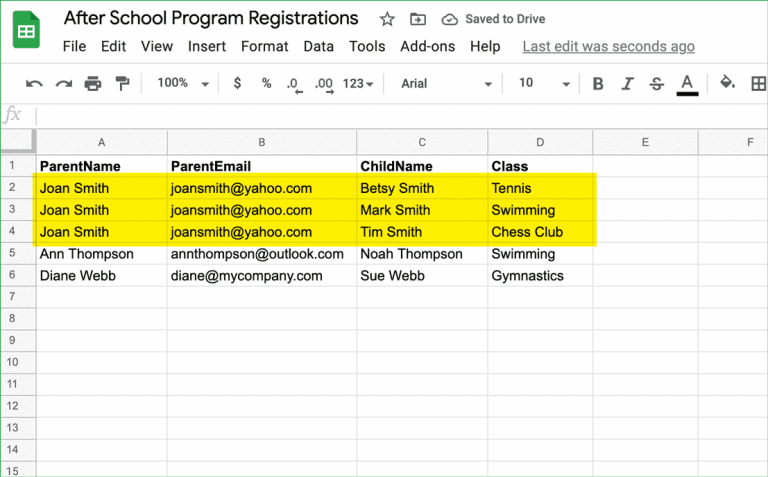
In the spreadsheet above, Joan Smith has three children registered for three different classes. Here, you’ll want Joan Smith to receive three different personalized emails, one with each child’s class registration information.
To send duplicate emails, tick the Keep duplicate emails checkbox.
![]()
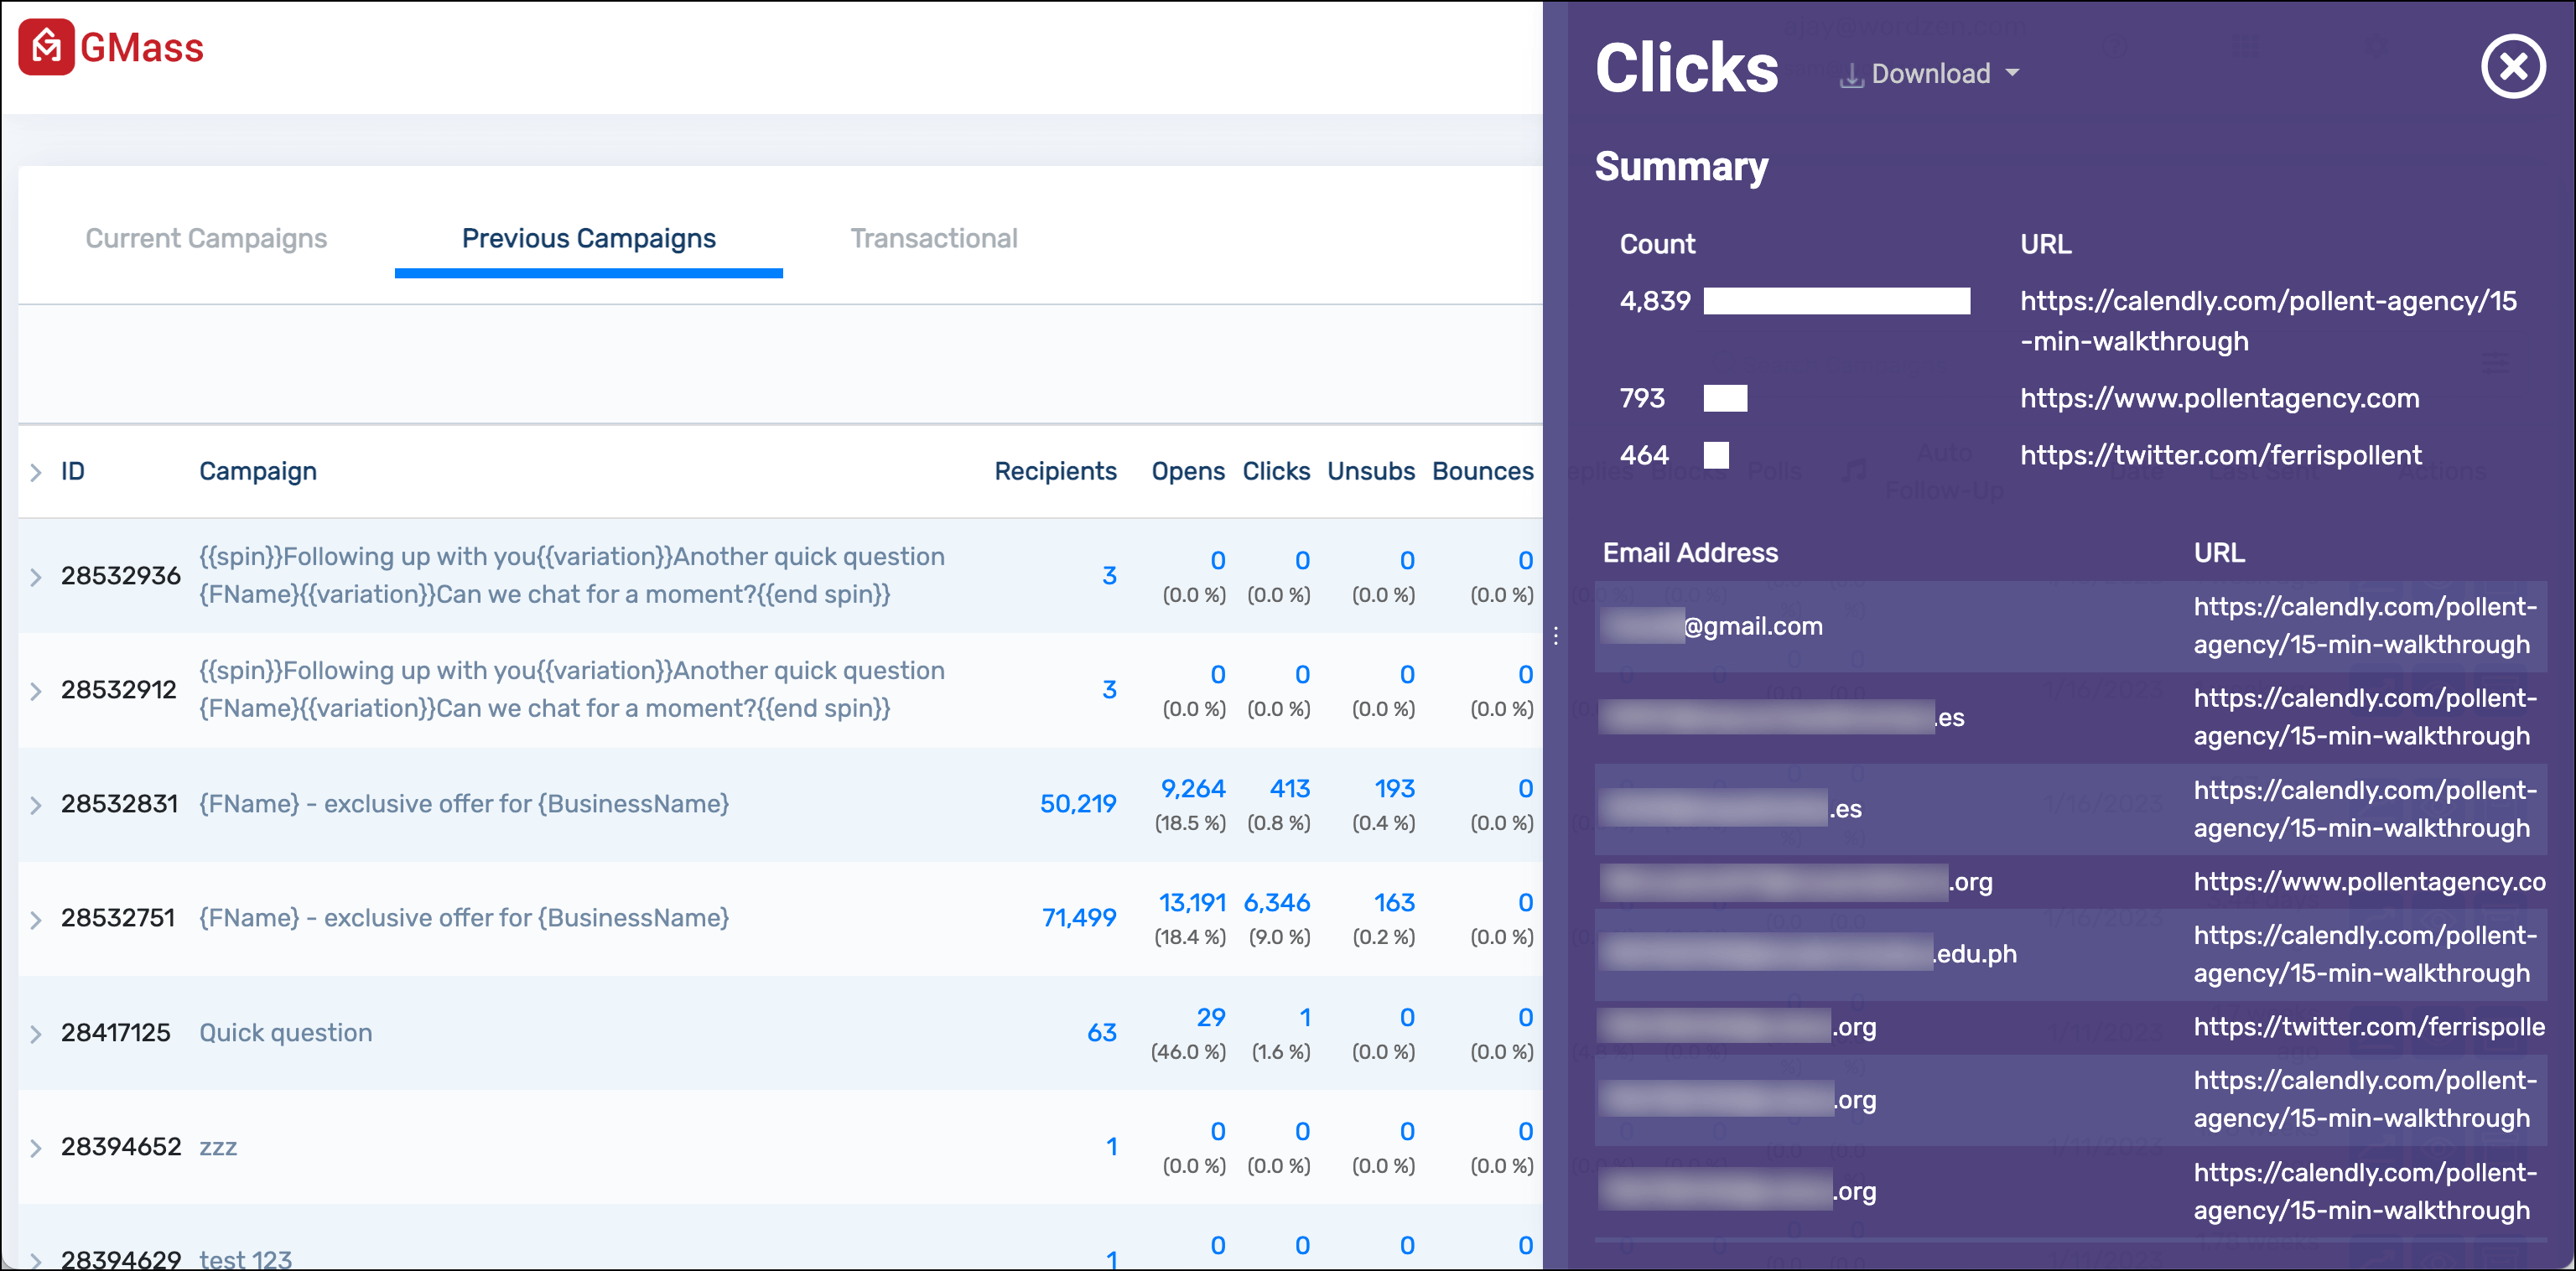
Step 7: Update your spreadsheet with open, click, and reply data (optional)
GMass has great reporting options — ones that are far easier to use and access than Google Anayltics.
One of the most convenient ways to see how your campaign is doing? GMass can automatically update your Google Sheet after you’ve sent the campaign and your email recipients open, click, reply, or take other engagement actions on your email.

To have GMass create a few additional columns in your Sheet to add the email tracking data, tick the Update Sheet with reporting data checkbox.
Note: If you haven’t already given permission to write to your Sheets, a pop-up dialog box will appear asking you to grant that permission. Check out our guide to updating your Google Sheet with campaign data for more details.
After clicking the CONNECT TO SPREADSHEET button, GMass will read the email addresses and other data from your spreadsheet. It’ll then load the list of recipients into the To field.
Note: In GMass, each email sent is delivered as an individual email — this means that you don’t have to add email addresses in the Bcc field to preserve recipients’ privacy.
Now that you’ve connected one Google Sheet, you could also connect multiple lists in other Google Sheets for your campaign.
Step 8: Personalizing your email with merge tags (optional)
GMass is now prepared to send individual emails to each row on your Google Sheet.
But that’s not where the mail merging ends, of course. You can also send personalized emails with ease.
Just insert merge variables in your email message or subject wherever you want to personalize.
The syntax for merge variables (or placeholders) is: the Google Sheet column header surrounded by curly brackets. For example, if the column is called Name, then you would write {Name} in your email template to personalize based on that merge field.
But you don’t have to try to remember what your Google Sheets column headers are. If you type a left curly bracket character ({) in your draft email, and a flyout menu will appear with your merge tag options.

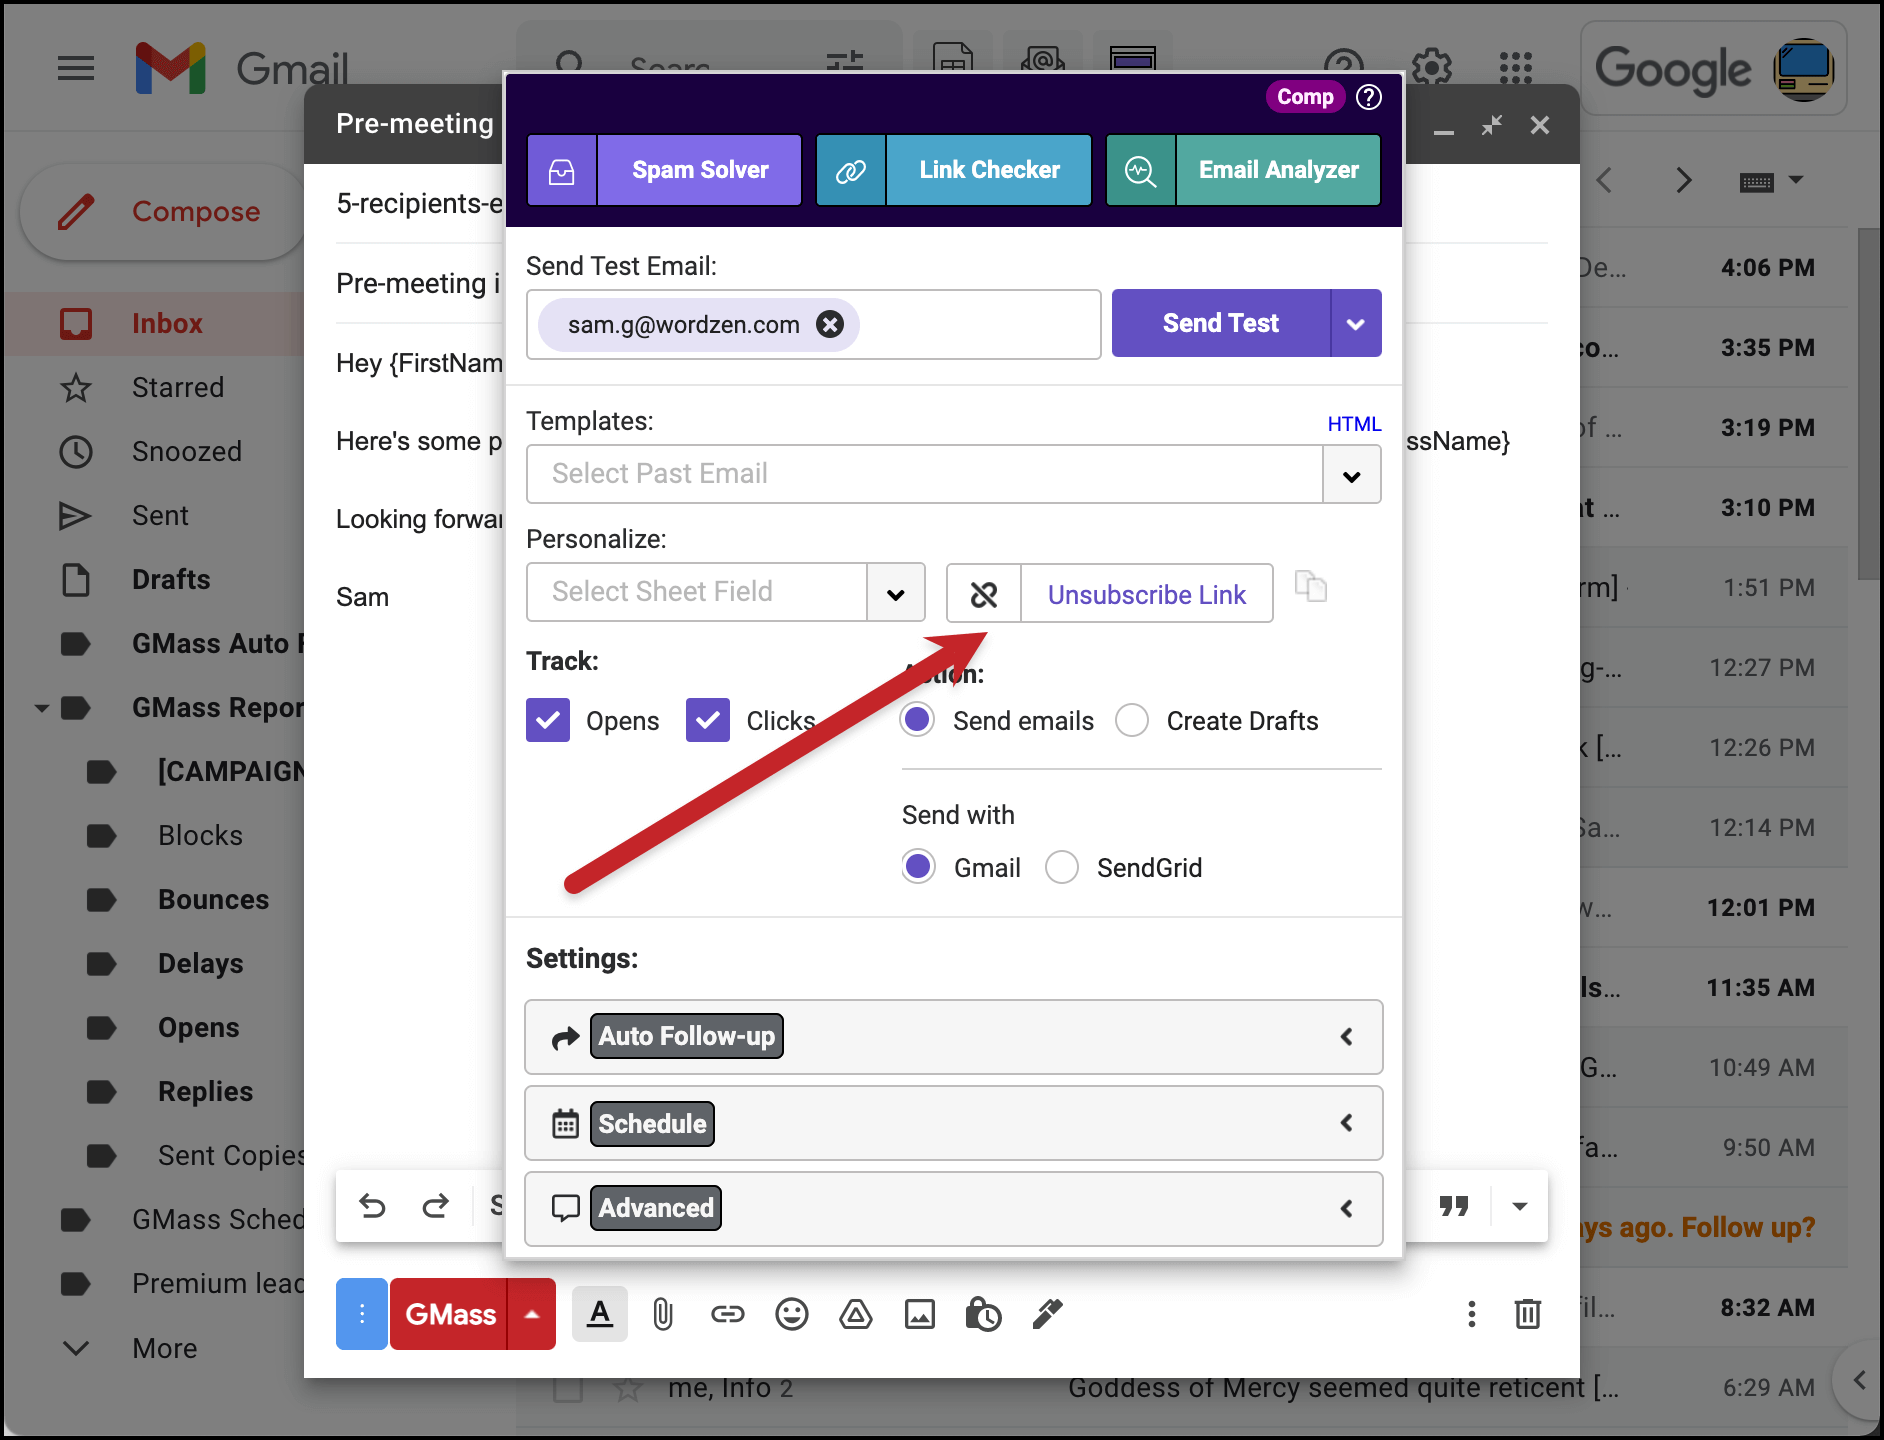
Another way to grab a merge tag: Click on the downward-facing arrow next to the GMass button to access GMass Settings.
Next, choose the merge field (or variable) you want to insert into the Gmail template by clicking the Personalize drop-down menu. When you click on a mail merge field, it automatically gets copied to your clipboard.

You can then easily paste the personalization variable or placeholder into your subject line or email body by pressing CTRL+V or CMD+V on your keyboard.
Note: If you’re not using a spreadsheet, the {FirstName}, {LastName}, and {EmailAddress} tags are defaults when using a Google Contact list (or Gmail Contacts).
Step 9: Start the mail merge and send your emails
Hit the GMass button — ⚠️ NOT THE BLUE GMAIL SEND BUTTON — to start mail merge and send out your campaign.
Your mail merged emails will either go out now (or later, if you set the Scheduling section).

And you can see every email sent in your Gmail Sent folder.
In addition to simplifying the mail merging process, GMass offers other features to optimize your email campaigns. I’ll cover some of those features next.
5 Advanced Features for Mail Merge Wizards
Here are five powerful GMass features that can take your Gmail mail merge campaigns to the next level:
1. Automatic follow-ups
Not everyone will respond to your email campaign — some may have forgotten about it, while others were too busy to respond.
Whatever be the case, GMass can help you improve recipient engagement by automating your email follow-ups.
You can customize everything about these emails in the GMass settings box for your email campaign, including the total number of email follow-ups to send, frequency of following up, and more.
One popular option: You can either send follow-ups as replies to the first email (as pictured below)… or send follow-ups with new subject lines in their own threads.

2. Advanced personalization
The problem with most bulk emails is that they’re not personalized for each recipient. As a result, your emails may come across as generic or irrelevant, and the recipient will likely decide not to engage with them.
Fortunately, GMass can help you create personalized mass emails effortlessly— you can automatically personalize names, paragraphs, links, images, file attachments (e.g., PDF files), and more.

Get creative! You could even put an individual greeting line or anecdote in your sheet so your multiple recipients all get a unique, rapport-building, personalized email.
3. Bypass Gmail’s sending limits
Gmail isn’t a bulk email tool — at least not natively.
Google puts caps on how many messages you can send each day. A regular Gmail account can send up to 500 emails per rolling 24 hours, a Google Workspace (formerly G Suite) account can send up to 2,000 emails per rolling 24 hours.
GMass, however, lets you surpass this sending limit by allowing you to send 10,000 emails — or more.
How?
It automatically distributes these emails over multiple days based on your Google account’s sending limits.

And you can send virtually unlimited emails in Gmail using GMass’s SMTP integration feature.
4. Recurring automated campaigns
Manually re-sending email campaigns to new additions to your spreadsheet is tiring and inefficient.
Fortunately, GMass lets you create automated campaigns connected to a Google Sheets spreadsheet.
You can connect a campaign to a particular mail merge sheet, and whenever a new recipient is added to the sheet, GMass automatically adds them to your campaign.

5. Advanced deliverability tools
One of the most common issues for cold emailers and email marketers is: How do I make sure my messages are going to the inbox, not the spam folder?
99% of GMass users report the highest deliverability they’ve ever had.
How? There are two main reasons.
One, because GMass is baked into Gmail, your emails are going through Google’s ultra-reliable, high-reputation servers.
And two, GMass offers a suite of deliverability tools that get your emails to the inbox. Those tools include:
Spam Solver, which evaluates your email before you send, determines its inbox/spam likelihood, suggests tweaks, then re-evaluates when you make those tweaks.
Free email address verification before you send.
Custom tracking domains — use your own, unique domain to track opens and clicks. (This is the single best thing you can do to improve deliverability! Plus GMass is one of the only email platforms to automatically obtain a SSL certificate for your tracking domain, boosting deliverability even more.)
And embedded images, which are a signal of a real, non-spam email message — as if you were sending a one-on-one message to someone from the Google App and not sending multiple emails.
GMass also offers other robust functionalities that’ll change your outlook on what an email outreach tool can do, like:
- Detailed Reports: track email opens, click-throughs, replies, bounces, and unsubscribes through comprehensive analytics reports generated in your Gmail inbox.
- Scheduling: schedule emails to go out at optimal times — when recipients are most likely to respond.
- Sentiment Analysis: identify who your most interested prospects are by looking at the sentiment scores for your responses.
- A/B Testing: compare the performance of different test emails to discover which email campaign can bring you the best results.
- Email Lists: quickly build email lists using Gmail labels, search, or transactional email notifications.
- Email Polls: add simple one-question surveys to your emails.
- Triggered Emails: send instant emails when someone opens, clicks on, or replies to a campaign — so you know they’re in their inbox at that moment.
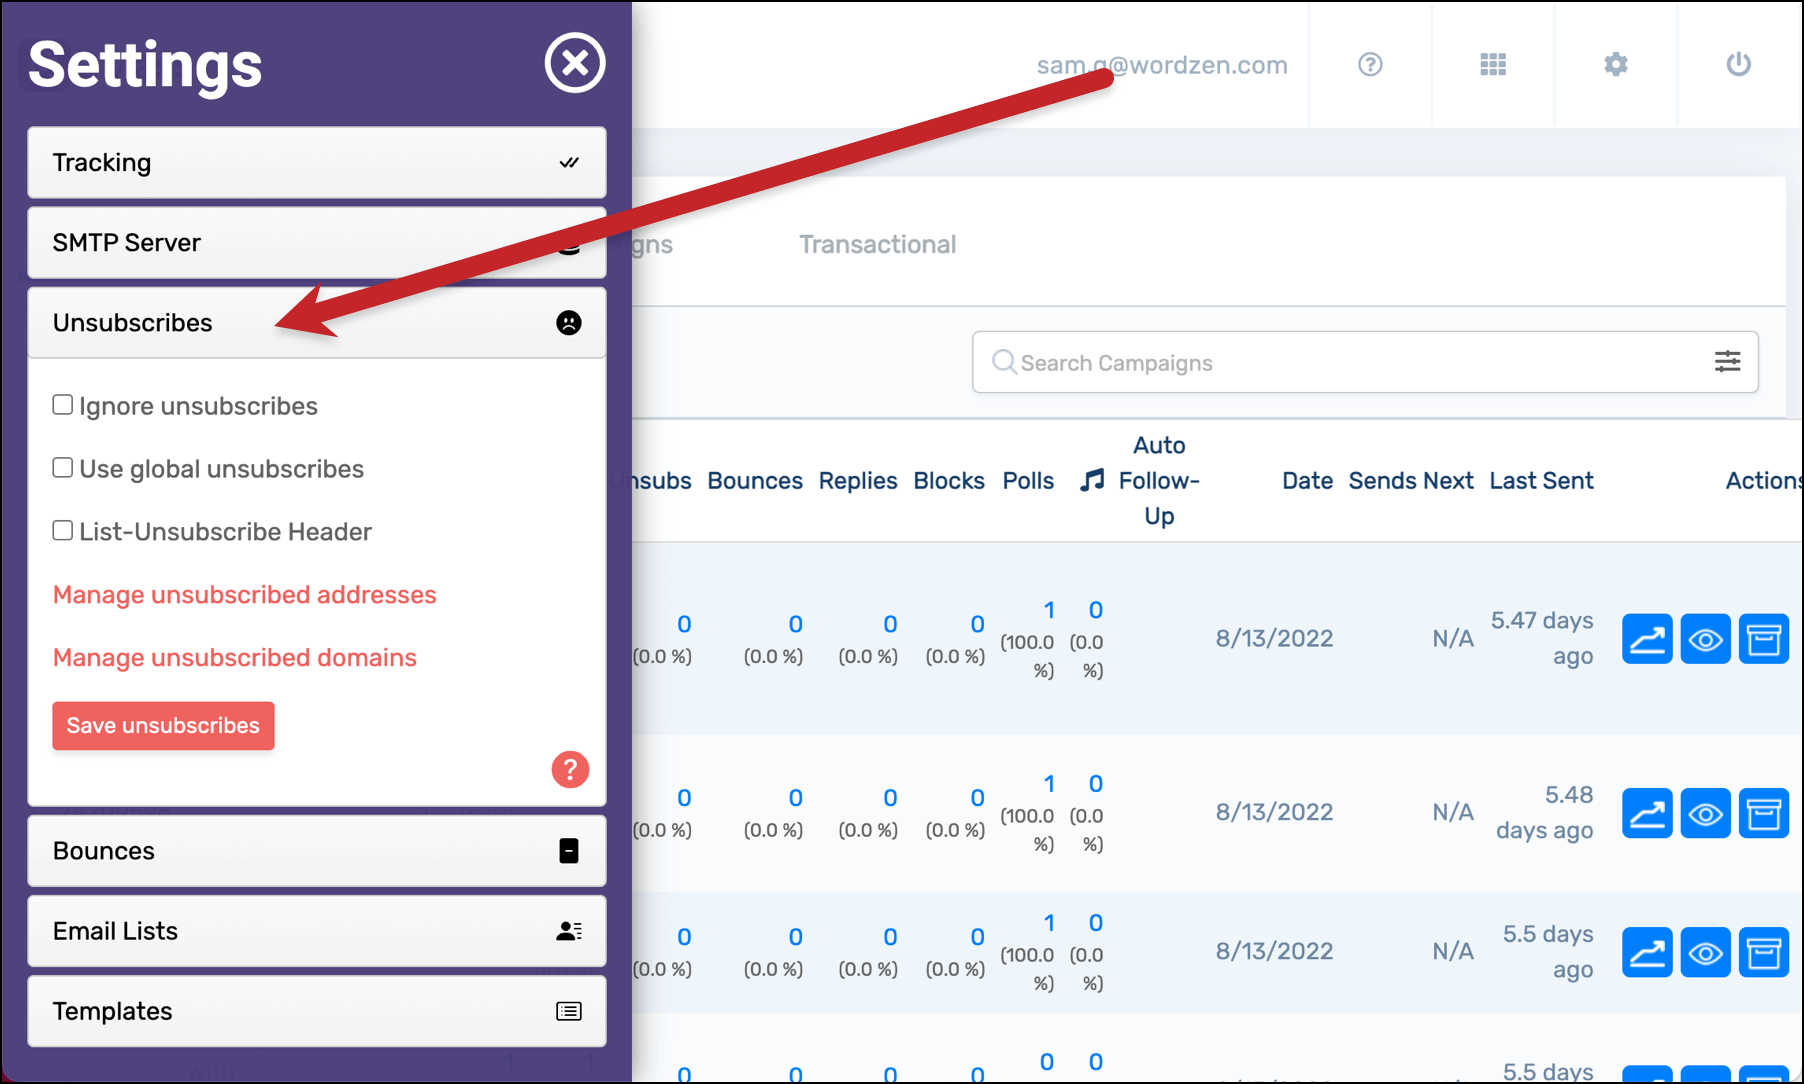
- Unsubscribe and bounce management: If someone unsubscribes, or a message bounces, GMass will automatically suppress future messages you attempt to send them. No address block or unsubscribe will catch you twice! Plus, with global unsubscribes and bounces, you can share lists across your team.
Next, I’ll answer a few FAQs about doing a Google Sheets mail merge in Gmail:
Google Sheets Mail Merge FAQs
Here are answers to some commonly asked questions related to Gmail mail merges with Google Sheets:
1. What is a mail merge?
A mail merge is an automated process that fetches recipient details from a data file to insert them into a mail merge template.
This data file can be a spreadsheet or a database file containing the recipient’s name, email address, personal greeting line, and other details. (If you use a Google Form, even its results can be the data for your mail merge.)
And the mail merge template can be a Google Doc, Google Slide presentation, Microsoft Word document, or Gmail draft. Basically… if it’s more substantive than a Slack message or Google Chat, it’s ready for merging.
In any case, when you initiate a mail merge, the sheet data is automatically entered into your mail merge template.
Mail merging can save you tons of time when sending personalized mass email campaigns as you’re not manually entering the email addresses of multiple recipients and their personalization details.
2. How does the timing work in Gmail mail merges?
To understand how timing works in a Gmail mail merge when using GMass, let’s consider two scenarios:
Scenario 1
You used the Sheets connector button (see screenshot below) to pull the email addresses from the data file, and you sent a standard one-time broadcast email campaign. In this scenario, you only send email to addresses in the To field.

Unless altered, your To field and the data file would contain the same email addresses.
Scenario 2
You connect the Google spreadsheet using the Sheets button, configure your campaign, and schedule it to go out 24 hours from now. But an hour after scheduling, you add a few rows of email addresses to your Google Sheet.
When the campaign goes out at the scheduled time, it won’t have the addresses you just added.
Why?
Because those new addresses weren’t part of the “pull” when you connected to the Sheet. As a result, those addresses aren’t present in the To field.
You can solve this problem in two ways:
- Add addresses directly to the To field (and the data file to ensure personalization works).
- Use the Repeat option under Schedule Settings to automatically send customized emails to the newly added recipients the next day.

3. How many mail merges do we perform daily?
Here’s a table of live counts of mail merges GMass has performed over the last 7 days. This data is updated daily at midnight GMT.
| Month | Day | Year | Merges |
|---|---|---|---|
| 4 | 24 | 2024 | 7,849 |
| 4 | 23 | 2024 | 7,930 |
| 4 | 22 | 2024 | 9,397 |
| 4 | 21 | 2024 | 1,416 |
| 4 | 20 | 2024 | 1,605 |
| 4 | 19 | 2024 | 6,608 |
| 4 | 18 | 2024 | 9,014 |
Google Sheets Mail Merge: Takeaways and Next Steps
Performing a mail merge using a Google Apps Script can be unnecessarily time-consuming and complicated.
The mail merge tools in the Google Workspace Marketplace lack essential features and often involve a cumbersome sending process.
A far easier alternative is to do your Gmail mail merge using Google Sheets combined with GMass.
GMass makes it incredibly easy to send email messages that are customized at scale and maximize your conversions. You’ll have everything you need to quickly send, manage, and follow up on your multiple emails.
Don’t take my word for it.
Download the GMass extension today and experience it yourself!
There’s no credit card required and you can send up to 50 emails per day during the free trial. You’ll be set up and sending your mail merge message in a matter of minutes.
Further Reading:
GMass is the only tool for marketing emails, cold emails, and mail merge — all inside Gmail. Tons of power but easy to learn and use.
TRY GMASS FOR FREE
Download Chrome extension - 30 second install!
No credit card required

Ajay is the founder of GMass and has been developing email sending software for 20 years.