
As a recruiter, do you live in your inbox? At least as much as you live in your actual house? It’s fine, I’m sure your inbox is a charming mid century modern.
Our mission here at GMass: Find solutions to make email work faster and easier for you. Recruiters are some of our absolute favorite folks to solve for because, well, recruiters send a wider variety of emails than virtually anyone else.
So we had recruiters in mind as we were developing our newest tool, The Reply Project. It’s a one-of-a-kind email client that helps you blaze through the emails that pour into your inbox every single day.
I’ve talked to several recruiters over the past year to learn more about how you use email and what you want and need from your email tools.
And I’ve put together this guide on how you can use The Reply Project to respond to your emails 10 TIMES FASTER than you’ve ever done before.
The Reply Project for Recruiters: Table of Contents
- The Basics: Getting Started with The Reply Project
- 5 Ways The Reply Project Can Help Recruiters Respond to Emails Faster
- 1. Shooting quick replies to candidate questions, company inquiries, and more
- 2. Creating your own templates to send out new jobs, schedule interviews, and handle other repeating messages
- 3. Using partial templates to add scheduling links into emails asking for meetings
- 4. Using ChatGPT to write personalized replies at scale (like gentle rejections to keep relationships alive)
- 5. Using The Reply Project to respond to replies from a specific GMass cold email, email marketing, or mail merge campaign
- Recruiters and The Reply Project: Respond to Emails 10x Faster Than Ever Before
The Basics: Getting Started with The Reply Project
Already using The Reply Project like thousands of others and want to jump into the specific use cases for recruiters? Click here to skip this introductory tutorial.
The Reply Project is built to be a substitute for the standard Gmail website for responding to emails.
You’ll still be sending and receiving email through your Gmail account, you’re just not replying to your emails en masse in the Gmail window in your browser. It’s like using the Mail app on your iPhone, or using an app like Mailbird or Spark on your computer.
You’ll log into The Reply Project with your Gmail or Google Workspace account and you’ll see all the emails in your inbox open on one screen.
You won’t have to click to open each one — which is a surprisingly big time saver and makes you more likely to respond to them.
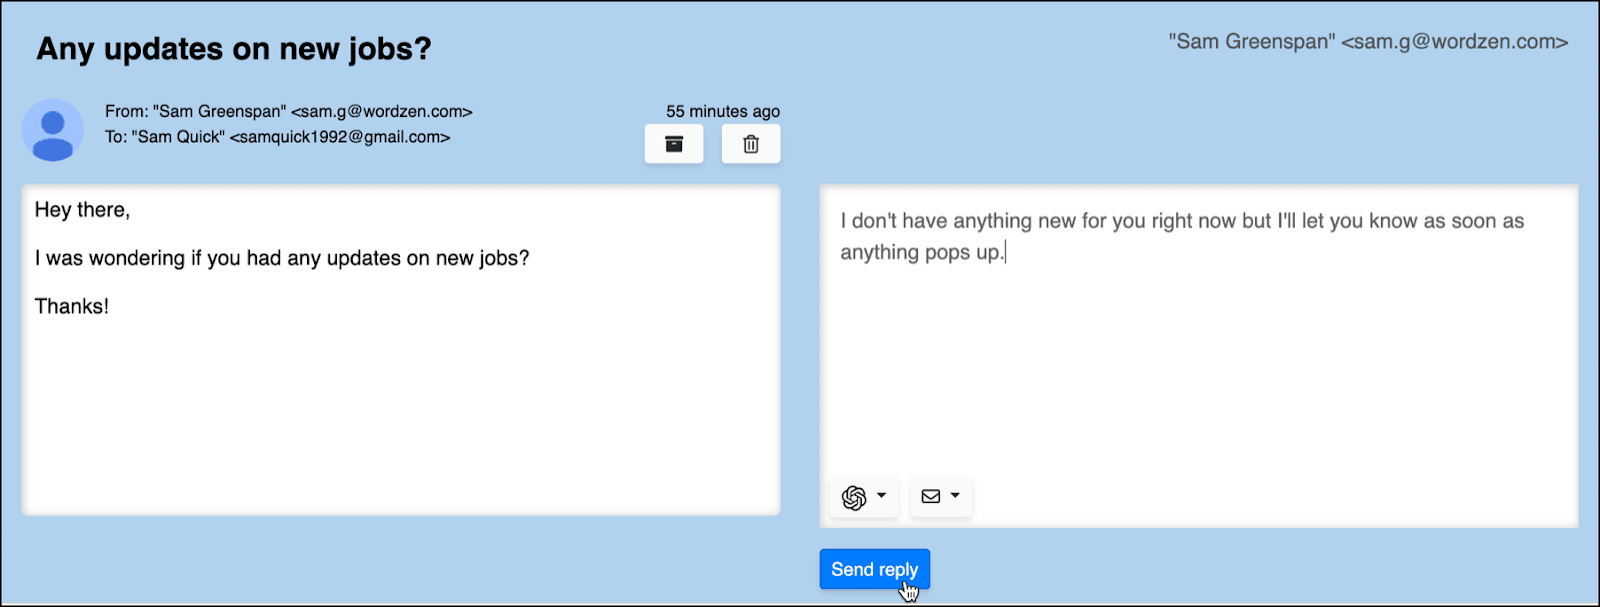
Each email has a text box next to it where you can knock out a quick reply.
You can also create reusable templates for even quicker replies — or use ChatGPT to write customized replies for you.
Here’s the three-step process to get started.
1. Go to The Reply Project website
Head to The Reply Project website at https://gmass.co/reply or by typing reply.new into your browser. (That’s how I do it.) Both will take you straight to The Reply Project.
2. Connect your Gmail account
Google will need you to give The Reply Project permission to access your account. Never fear, our rock solid privacy policy is here. GMass has 400,000+ active users and, after eight years in business and counting, we’ve never had a single privacy complaint — we take your privacy that seriously.
3. Start replying to your emails
Now that you’re logged in, The Reply Project will open up all the emails in your inbox.
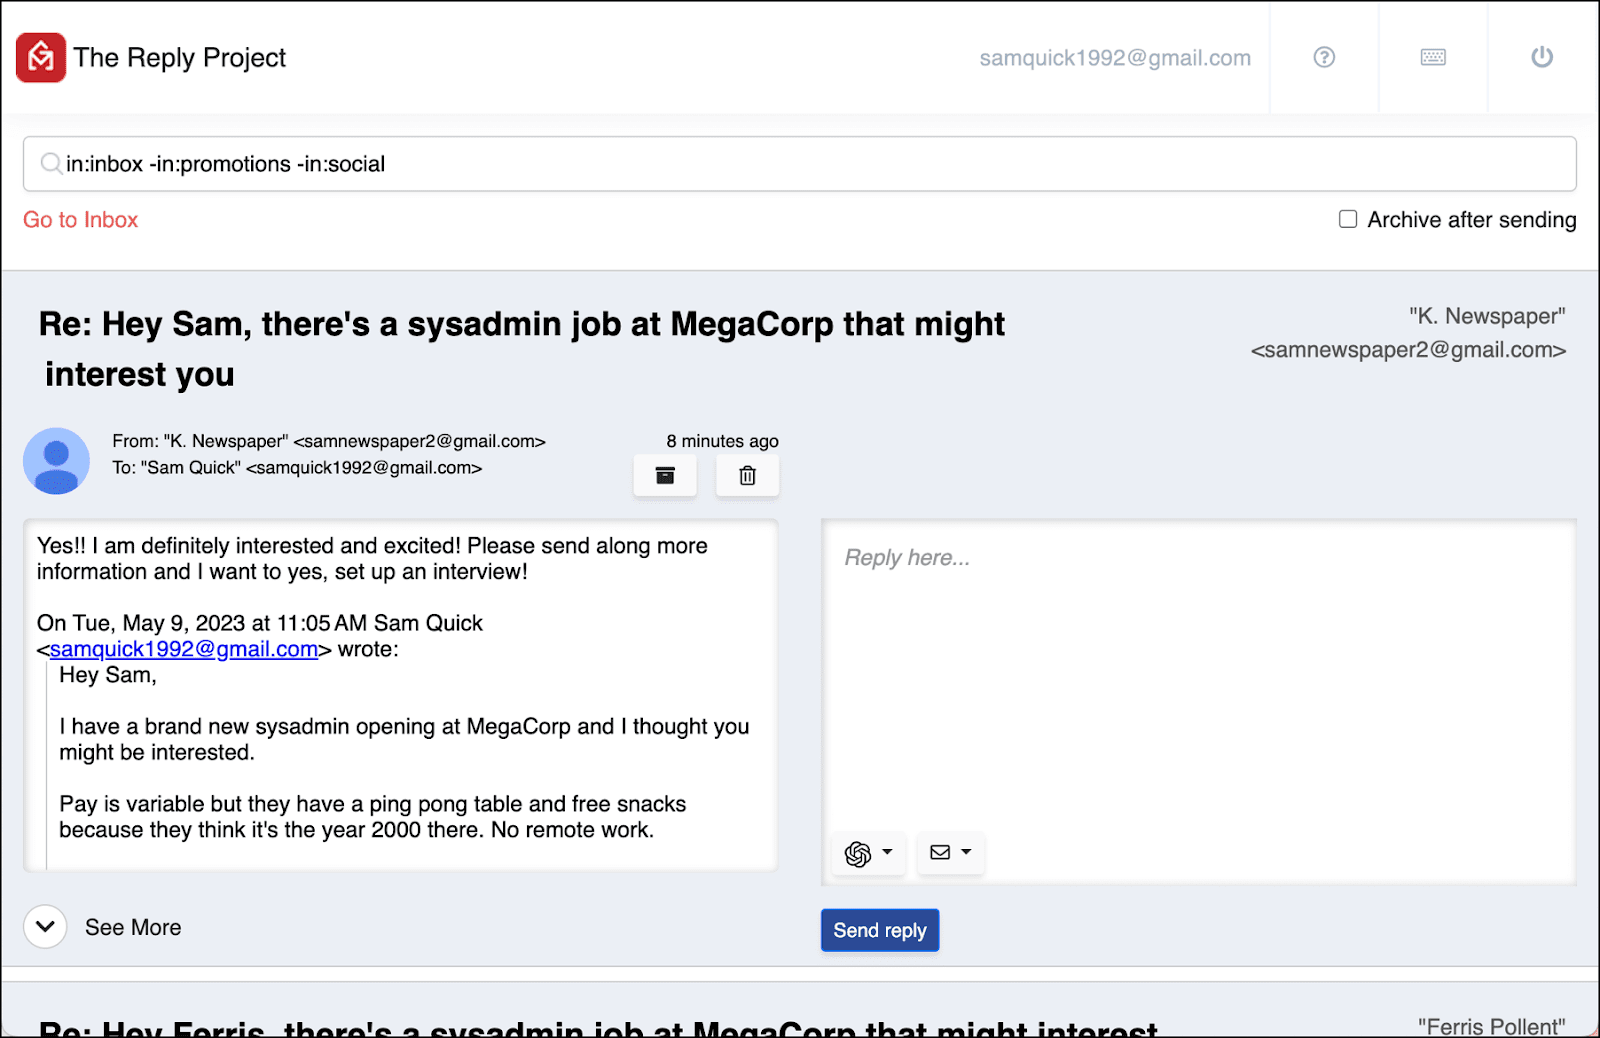
You’ll notice there’s a search box at the top of the page. You can run searches in there just like you would in Gmail — all the Gmail search terms work there — if you want to narrow things down. (There’s an example later in this article where I’ll show you the search feature in action.)
You can also use that if you want to search for then reply to emails that aren’t in your inbox.

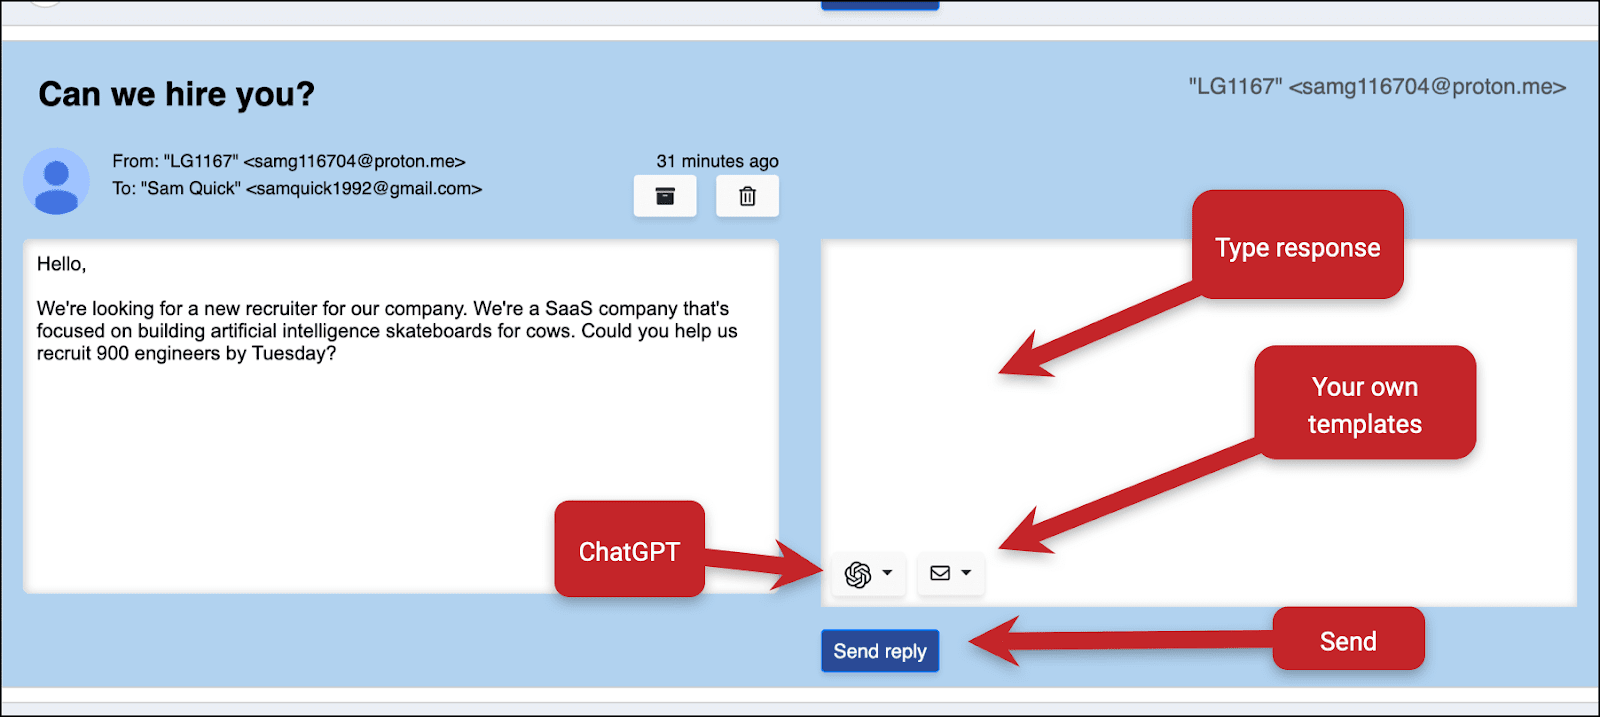
You can now reply to any message by typing a response in the text box next to the message. Click the ChatGPT icon to use ChatGPT to respond, or click the envelope icon to create then use your own template.
Once you’ve written your response, click the Send reply button to respond to that email. The Reply Project will minimize it on the screen and the message you sent will be in your Gmail Sent folder.
Repeat the process and plow through your inbox until you’re done.
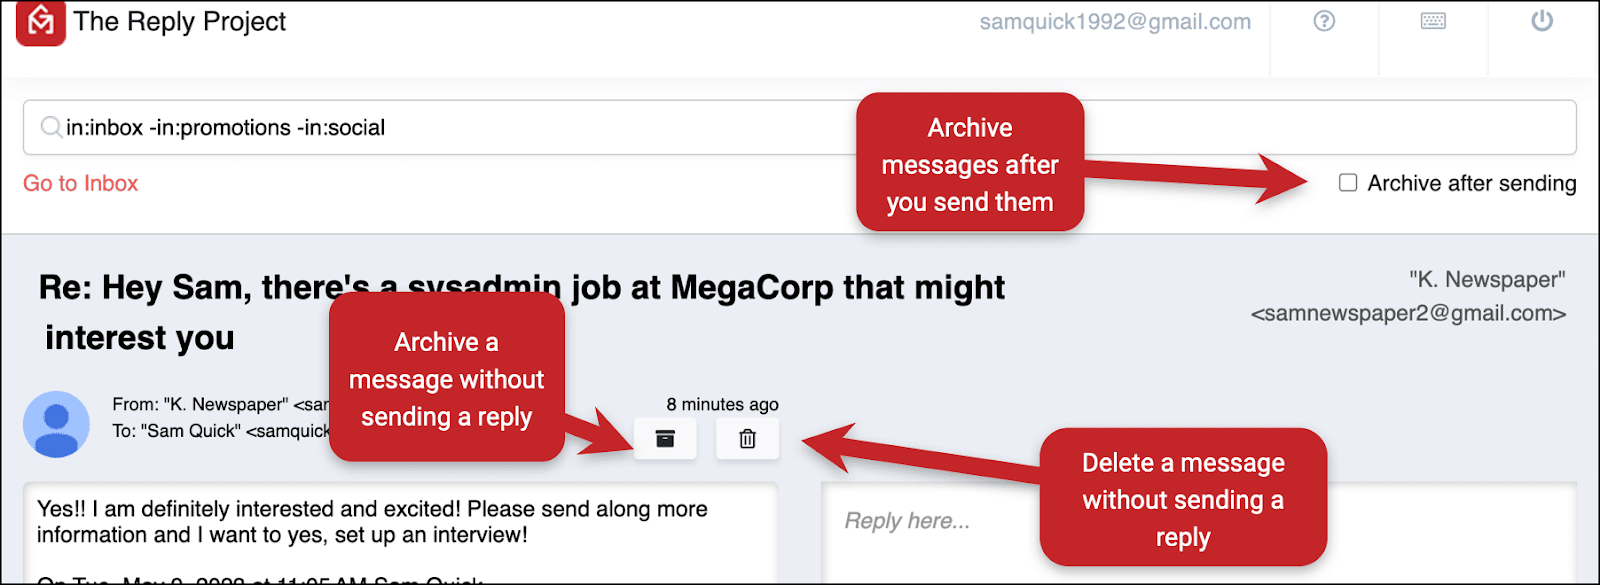
You can also archive messages. Check the box under the search box at the top of the screen to set the global preference of archiving each message after you send it.
Or archive a message without sending a reply by clicking the archive icon. (Delete a message without sending a reply by clicking its delete icon — it will go to Gmail’s trash folder.)
That’s the basic interface and usage of The Reply Project.
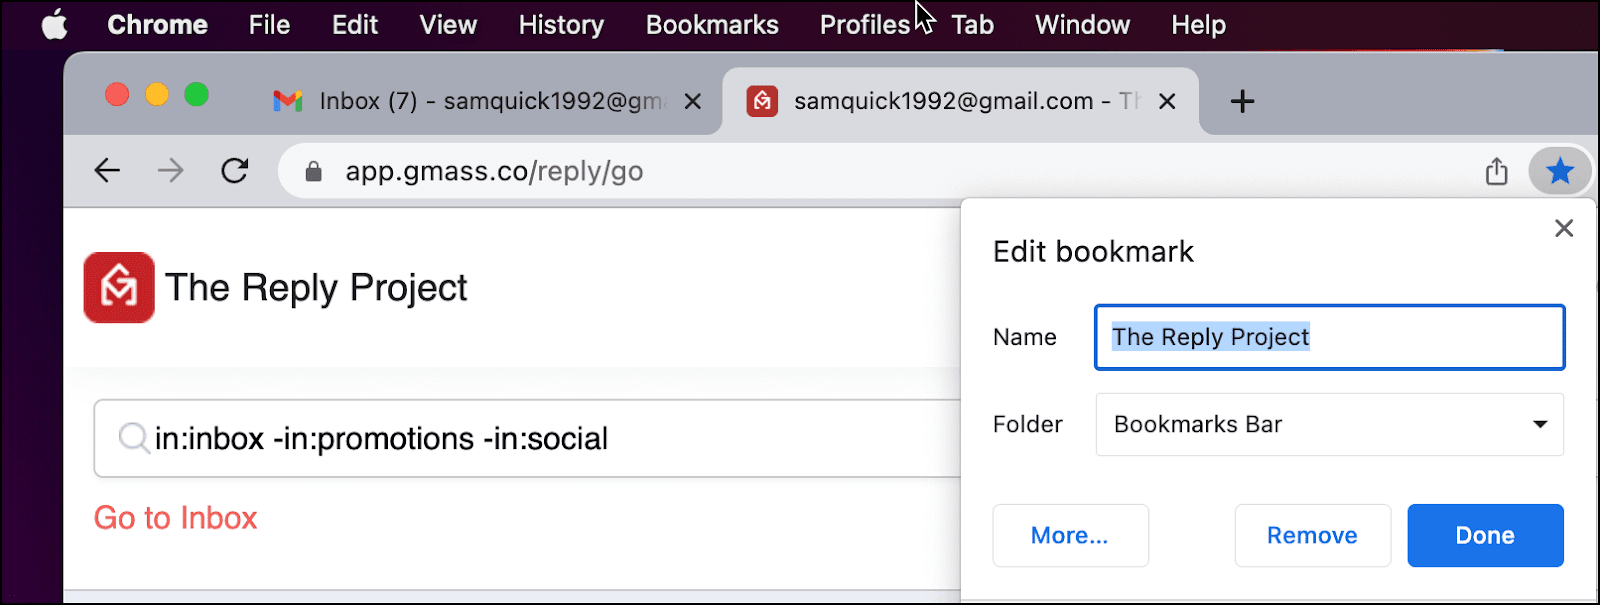
You can come back anytime by typing reply.new into your browser. Recommendation: Add it to the bookmarks bar in your browser. We’ve found that shortcut helps people remember to use it. (It’s hard to form a new email habit, but this one is worthwhile!)
Now I’ll cover five of the different ways you can use The Reply Project to speed up the process of replying to your daily deluge of emails.
5 Ways The Reply Project Can Help Recruiters Respond to Emails Faster
1. Shooting quick replies to candidate questions, company inquiries, and more
There are plenty of emails in your inbox that only need a sentence or two back from you. Really, the biggest hurdle — for whatever reason — is clicking them to open them. No one knows why.
That’s where you’re going to find The Reply Project’s simplest feature is its most helpful. Your email is already open. There’s a text box sitting next to it, waiting for a reply. And you can just knock out your response in a few sentences and move on.
Whether you’re replying to candidates who are checking in for info, companies asking follow ups, teammates asking for help, your boss looking for a status update, or anyone else — you can get through your replies to them more efficiently than ever.
Also, if you’ve set a signature in Gmail, The Reply Project will pull it in automatically and add it to your messages. (You can also delete it from any messages in The Reply Project where you might not want it.)
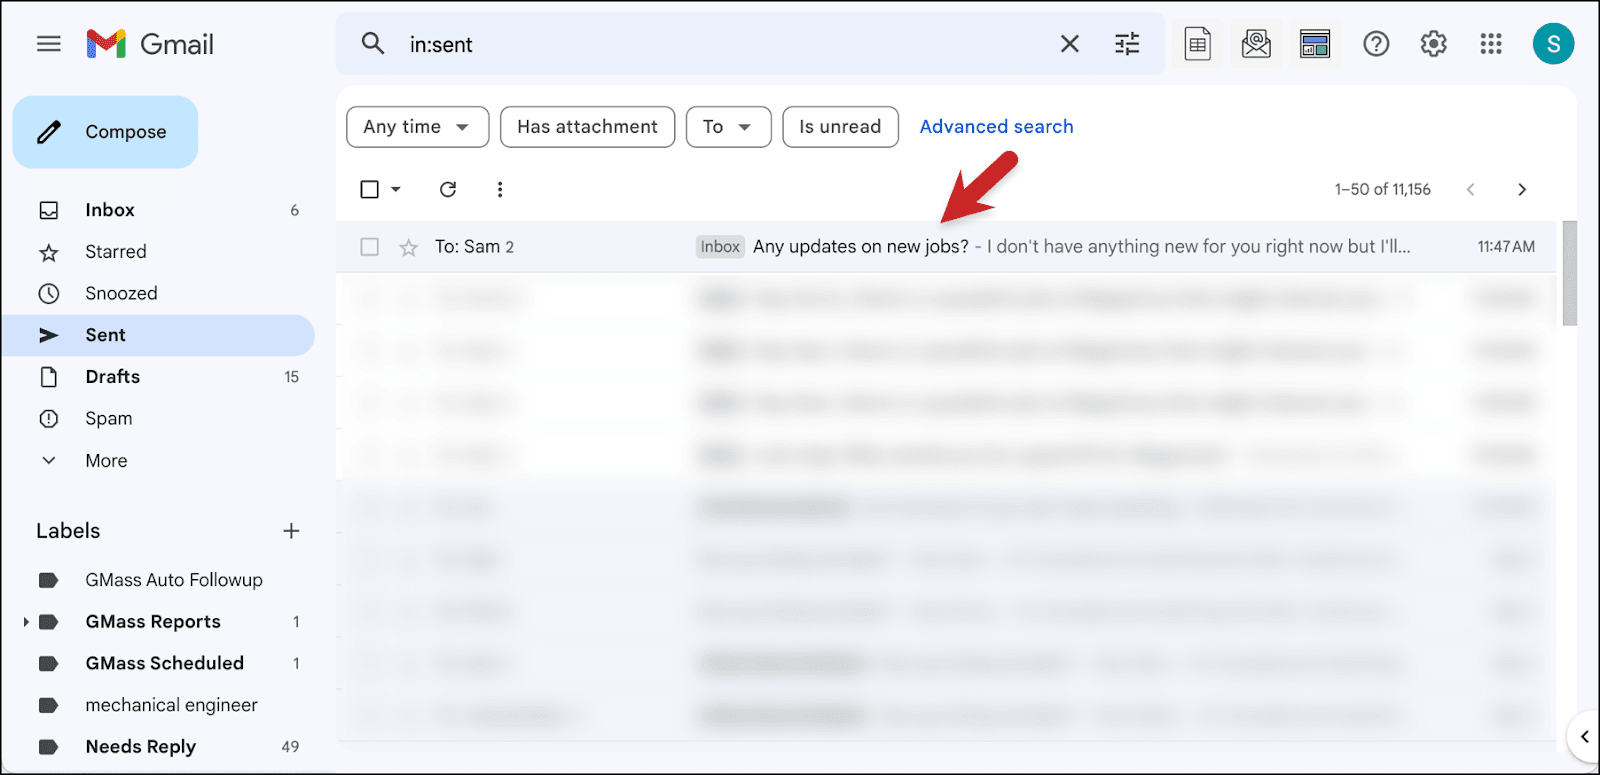
After you send a message in The Reply Project, you’ll find that message in your Sent folder back in Gmail.
So… you can mow through your emails quickly typing out responses one-by-one in The Reply Project. But in the upcoming examples I’ll show you how to get through even faster.
2. Creating your own templates to send out new jobs, schedule interviews, and handle other repeating messages
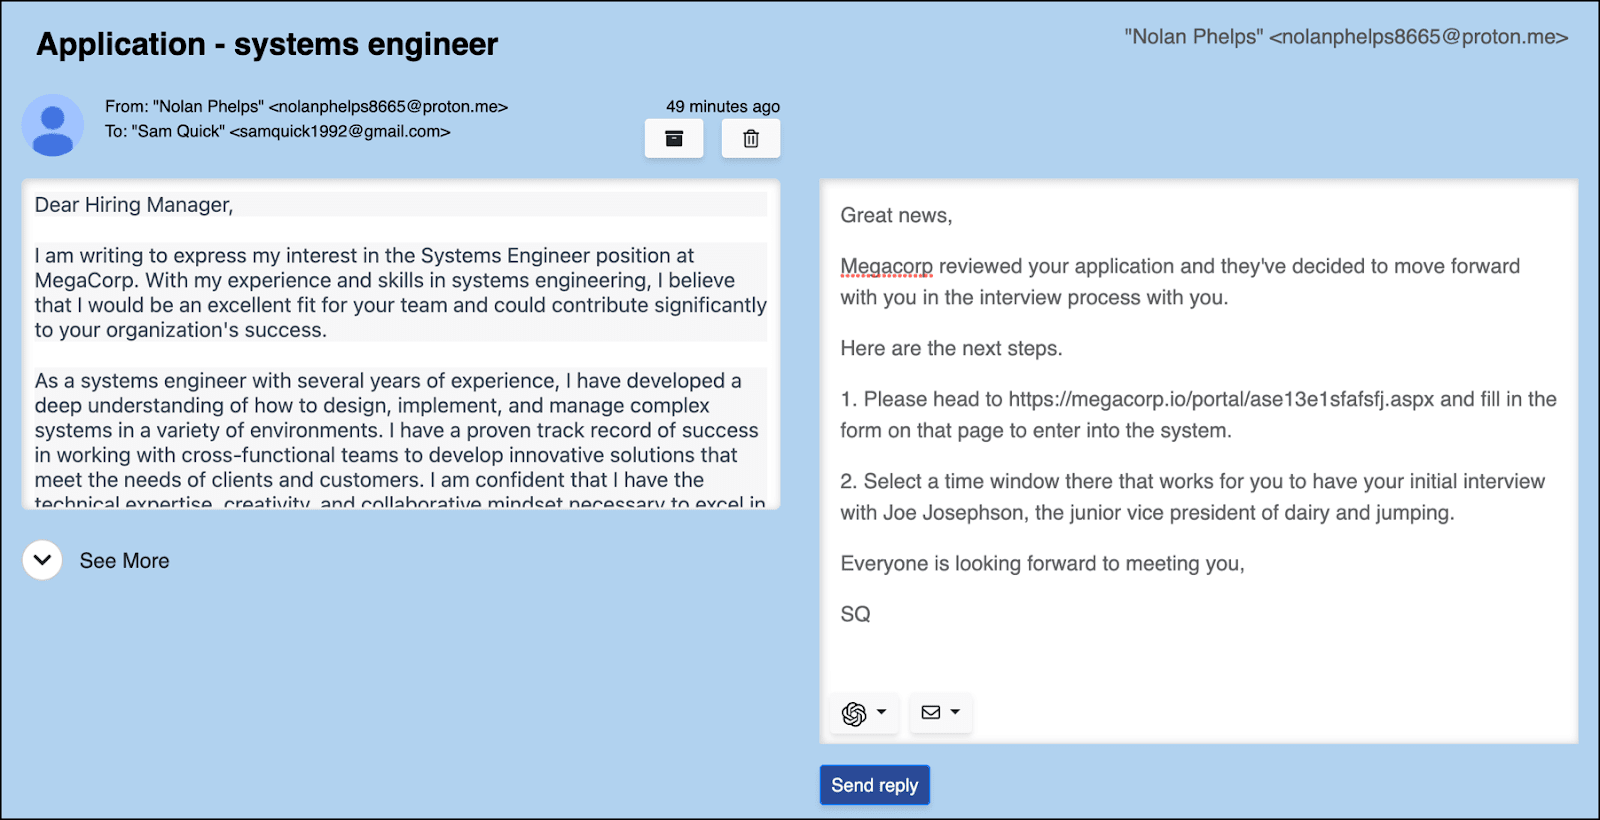
You almost certainly have situations where you have to copy and paste identical responses over and over to different people. For instance, let’s say you needed to reach out to several candidates to let them know they’re moving forward to the next phase of the interview process and needed to pass along several pieces of information.
With templates in The Reply Project, you can avoid that tedious, manual process.
You can create a template, re-use it over and over, then delete it when you’re done. (Or never delete it — The Reply Project will store it, even if you leave and come back in the future.)
How to create a template
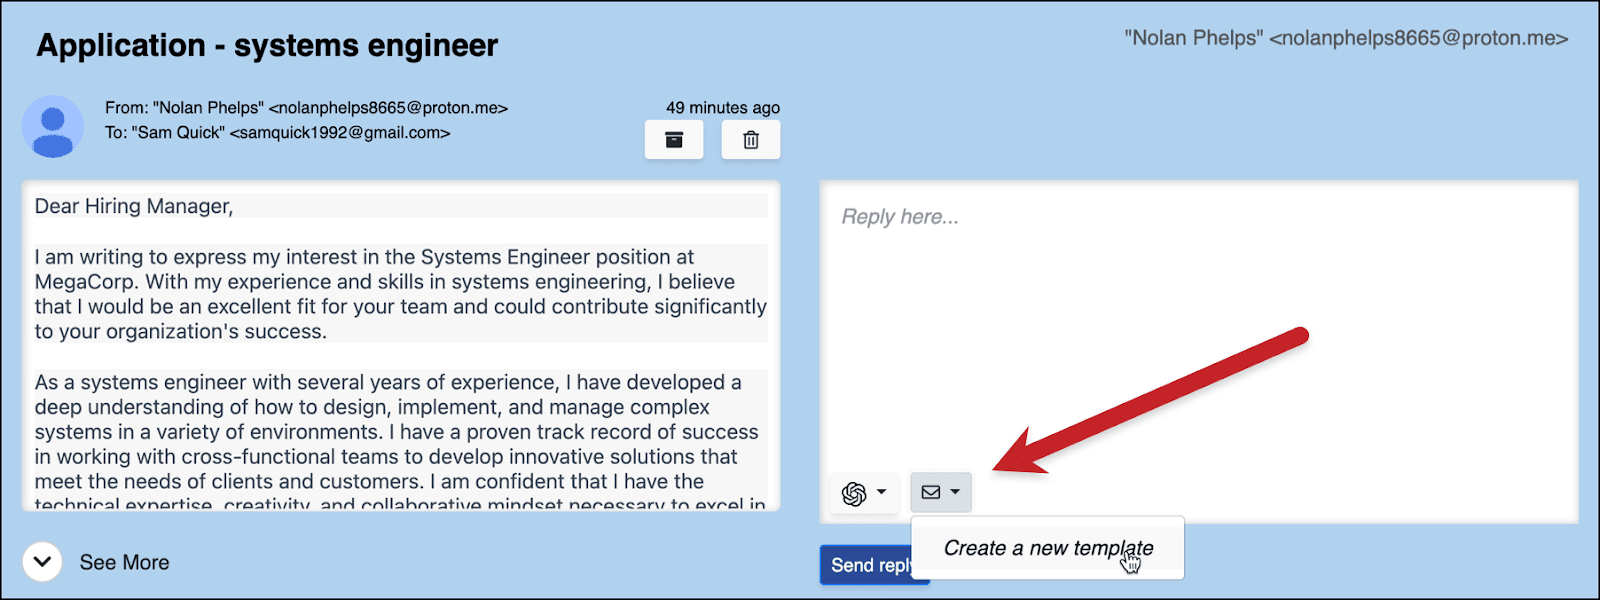
To create a response template, click on the envelope icon in the response box.
Then click on Create a new template.
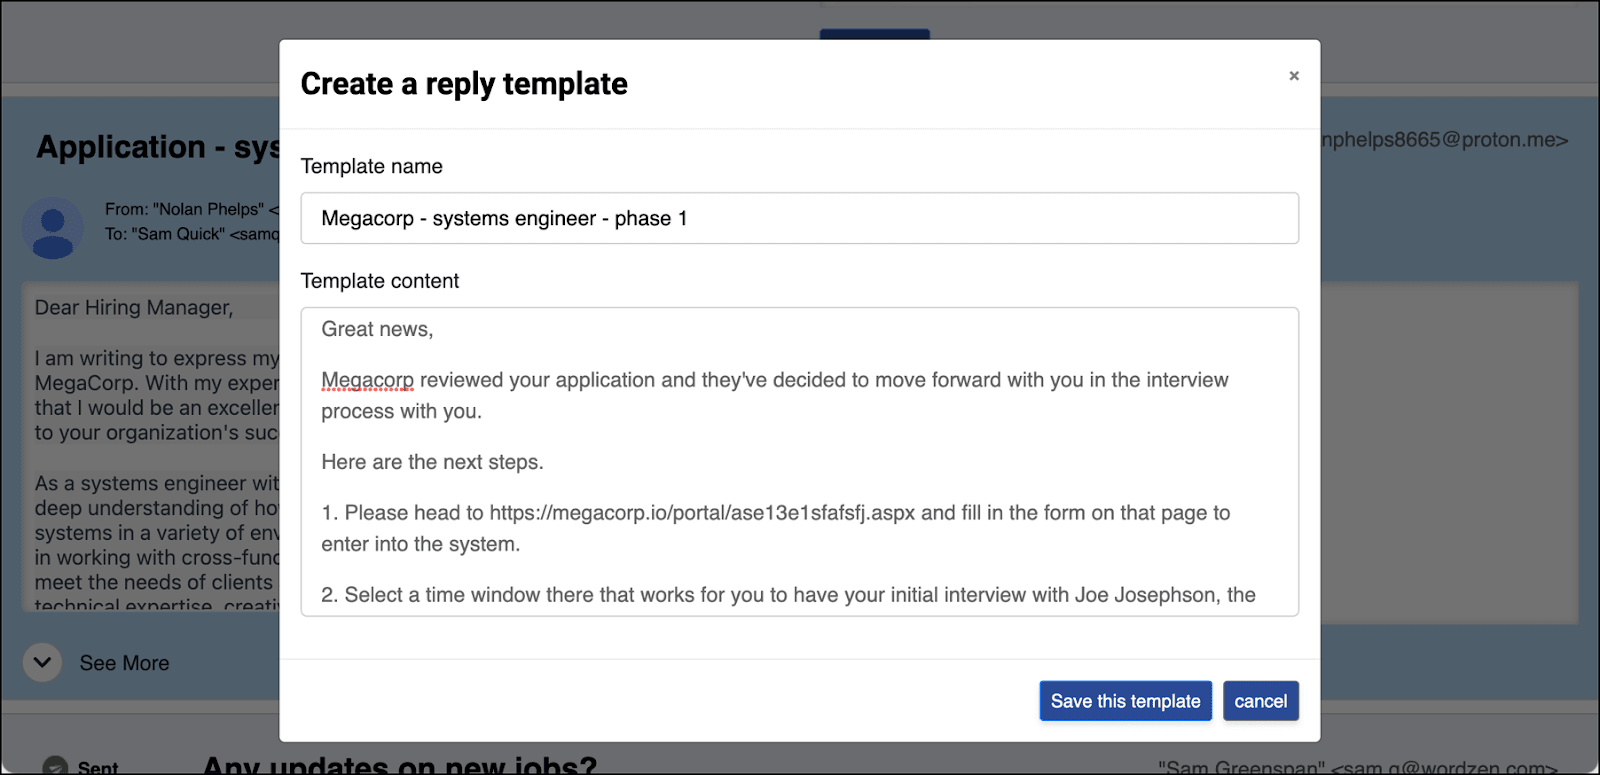
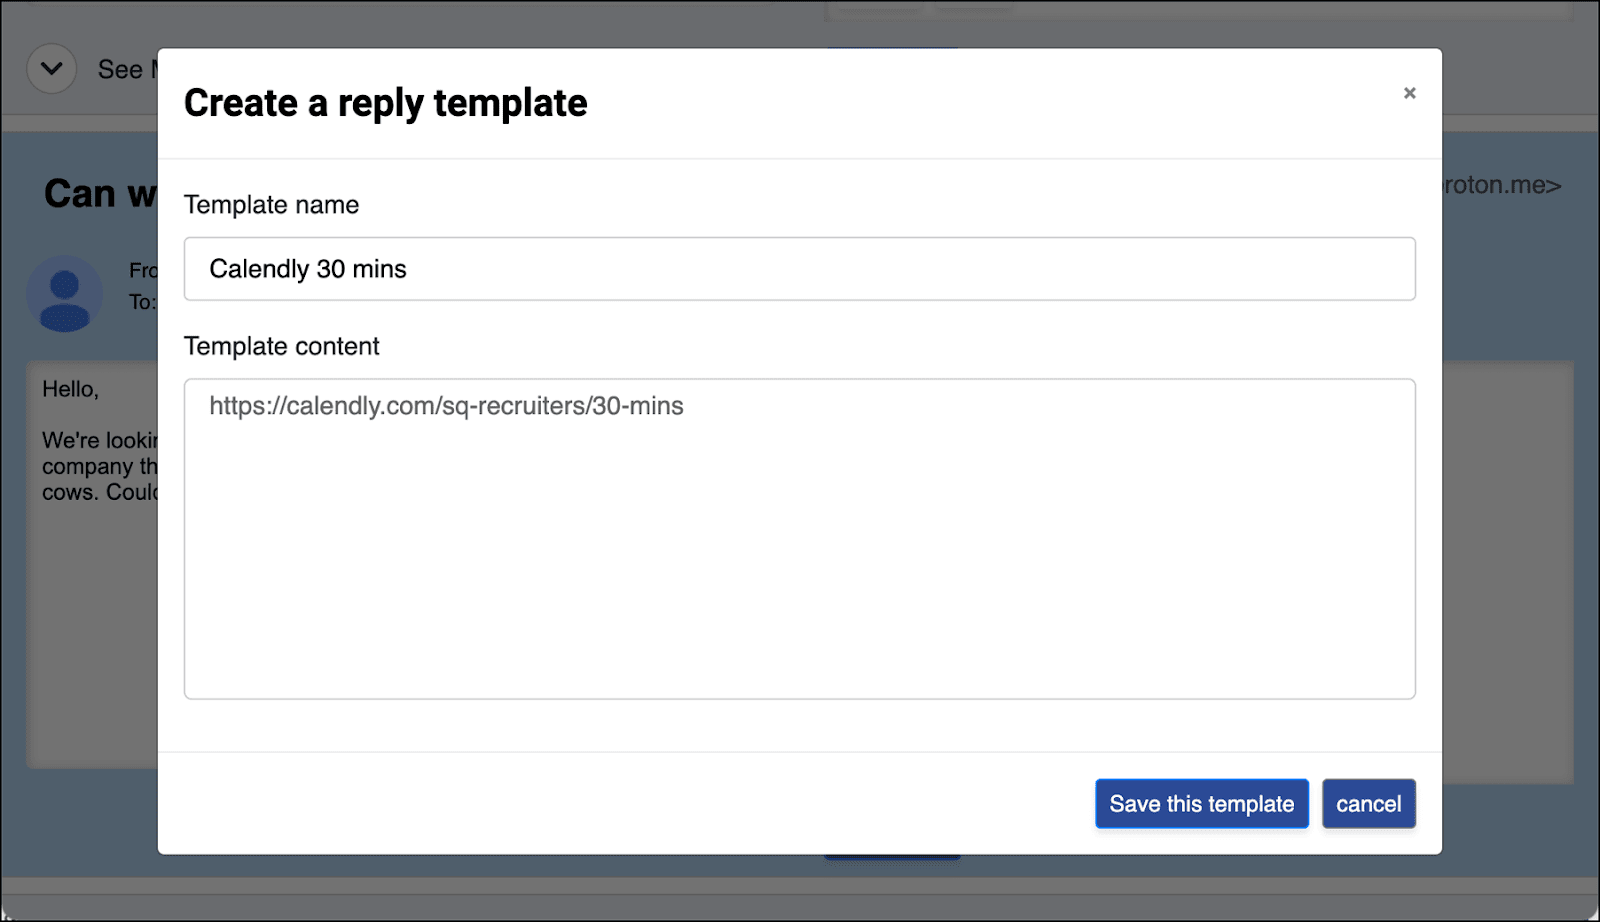
A pop-up window will appear. Give your template a name which you can use to identify it (no one will see the name but you). Then type in your template, and when you’re done, click Save this template.
Using your templates in The Reply Project
You can now use your template to respond to this email or any future email in The Reply Project. Click the envelope icon again and your list of templates will appear.
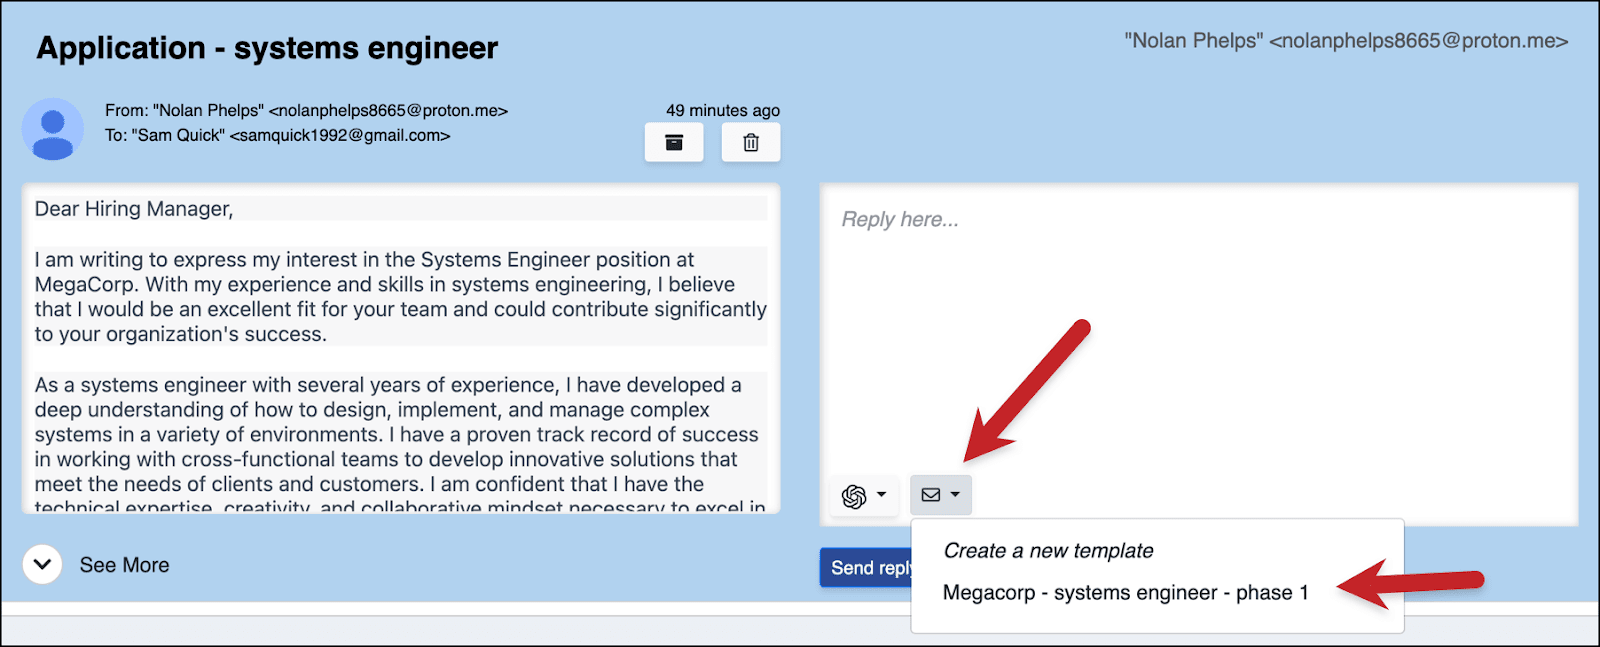
Select this template and it will fill the reply box.
Note: If you’ve typed anything in the text box, the template will replace it. In the #3 section of this article I’ll demonstrate how to insert a template at the cursor without replacing the current contents of the reply box.
You can now tweak or edit the message however you want before sending; that will not affect the template itself.
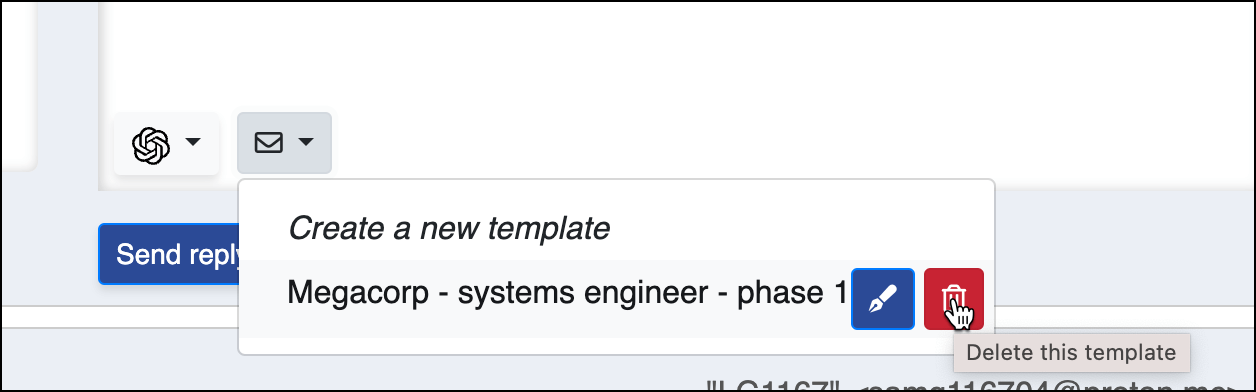
And once you’re sure you’ll never use the template again on any future messages, you can delete it by clicking the envelope icon in any reply box on any email, mousing over the template name, and clicking the trash can icon.
Using The Reply Project search with a templates
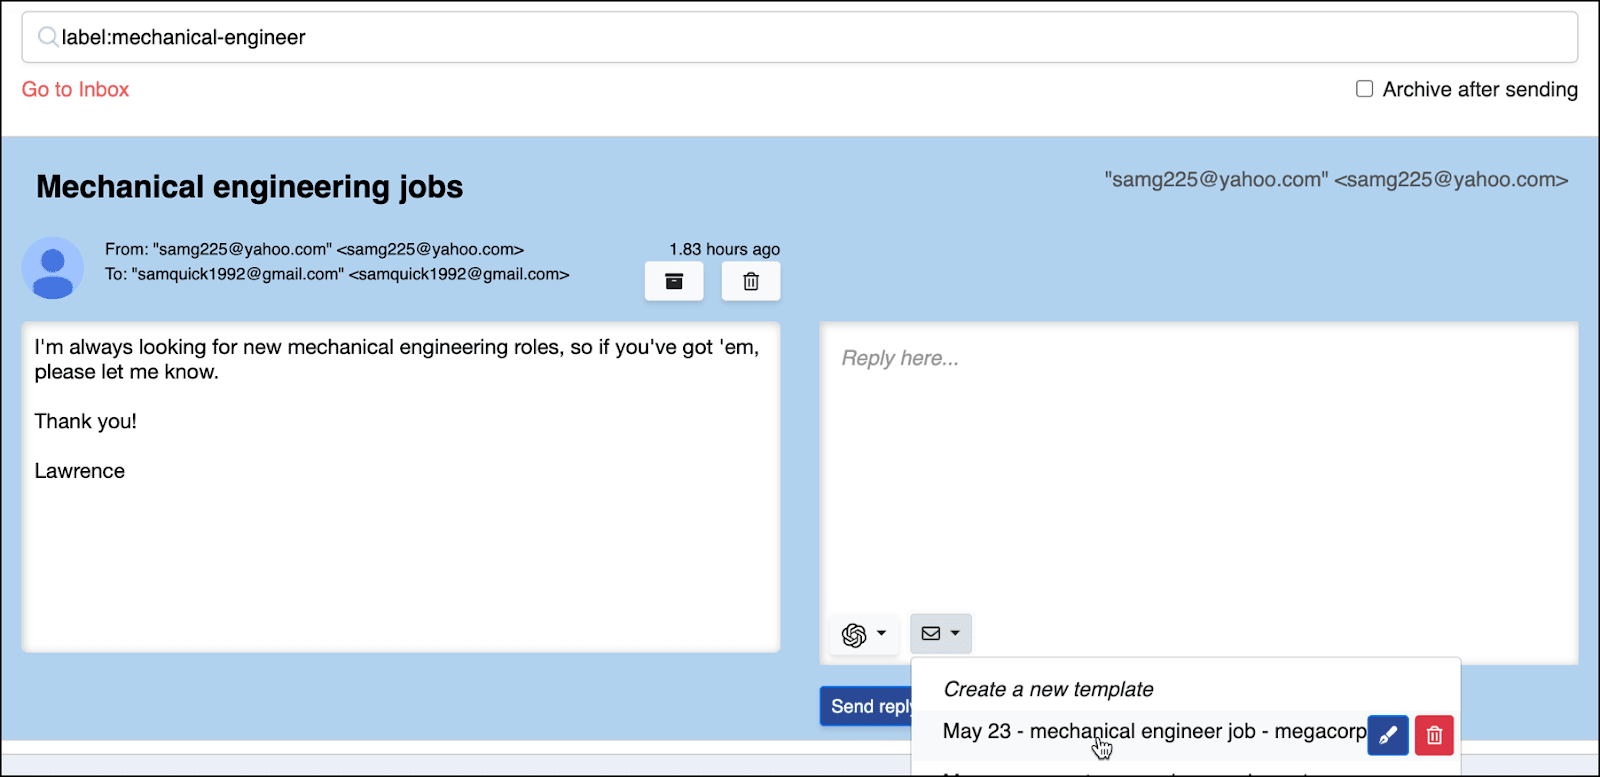
Templates can also be quite handy when you’ve used The Reply Project’s search feature.
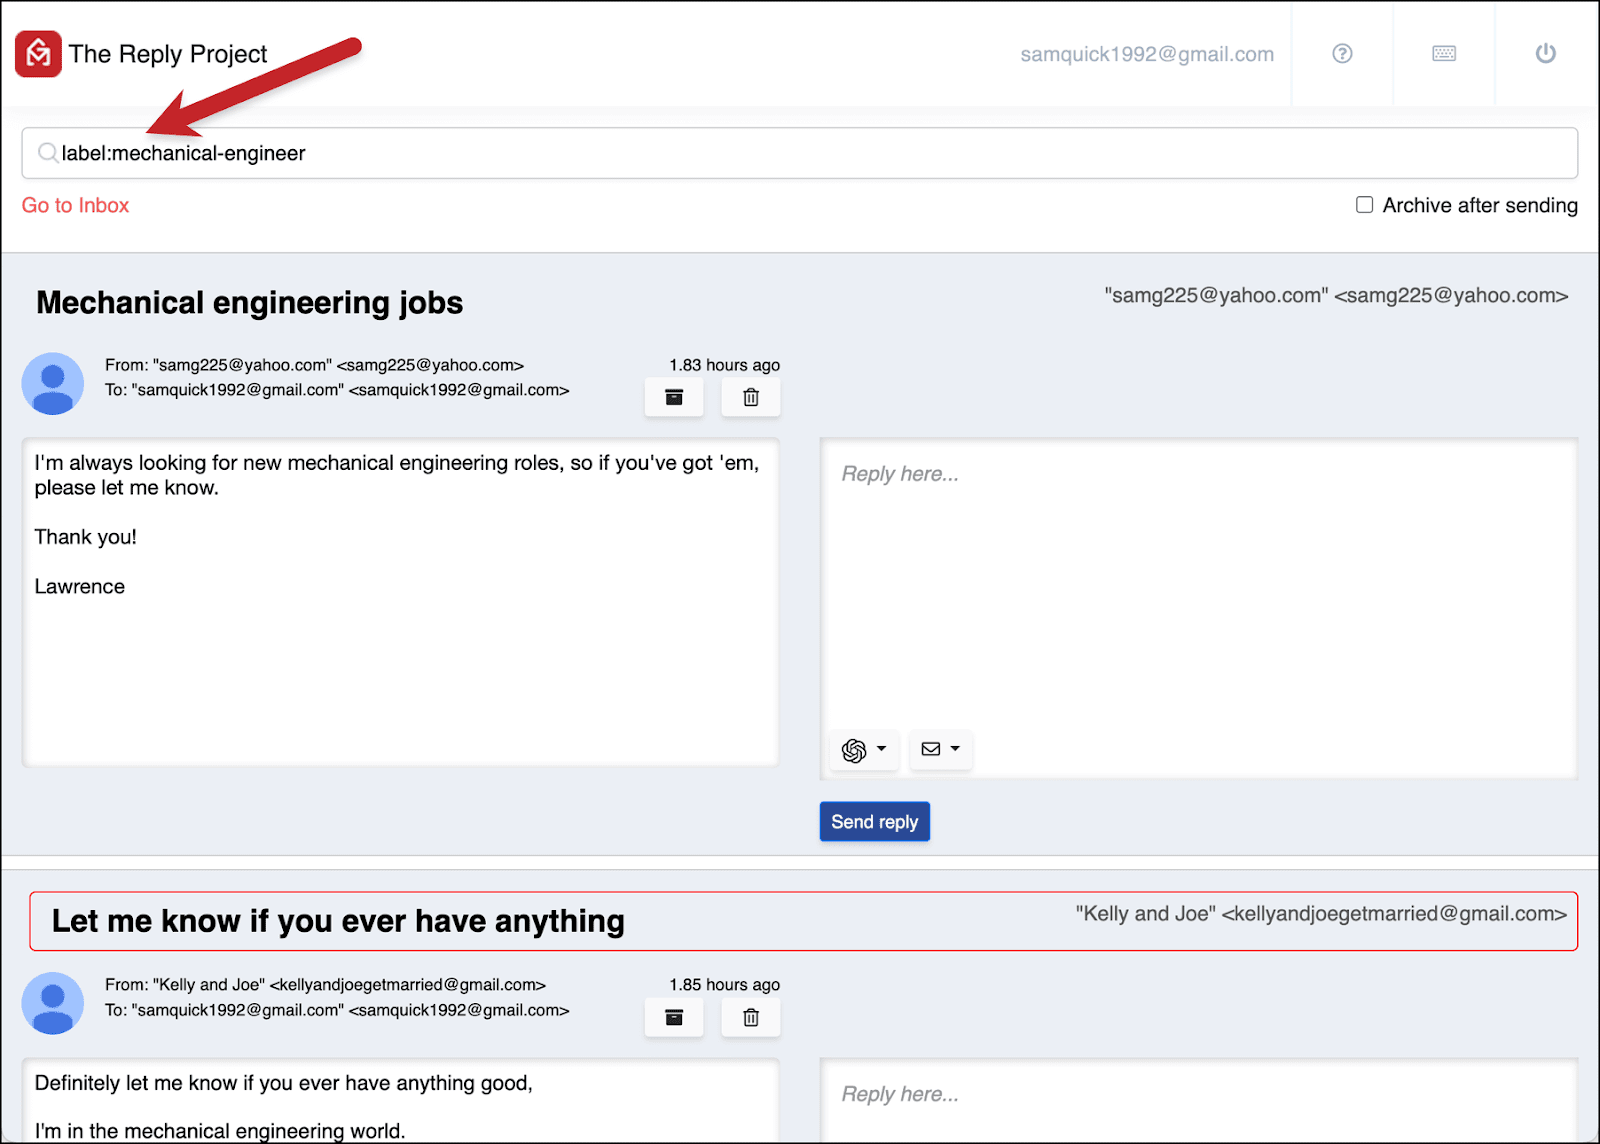
You can run a search just like you would in Gmail in The Reply Project. Then create and use a template to reply to all the emails that come up in the results.
For example, let’s say you have a new mechanical engineer job you’re hiring for and you’re looking for candidates. And you’ve used Gmail labels to add a “mechanical-engineer” label to every qualified candidate matching that description with whom you’ve corresponded in the past.
You could run a search in The Reply Project for that label, finding old messages that aren’t even in the inbox.
Now you could create a template and send information about the new job to everyone who came up in that search.
3. Using partial templates to add scheduling links into emails asking for meetings
Sometimes you’ll need to use long templates, like the examples above with long job interview details or job postings.
But sometimes, you may only need to drop your Calendly scheduling link into an email. That’s not a full template — we’ll call that a “partial” template.
And The Reply Project’s template system is set up to handle that as well. It works similarly to the full template system — you’ll build it the same way, only you’ll insert it into your message a little differently.
Creating your partial template
Much like when you’re creating a full template, to create a partial template you’ll click the envelope icon and click on Create a new template.
In the pop-up window, give your partial template a title. And in the Template content area, enter your snippet. When you’re done, click Save this template.
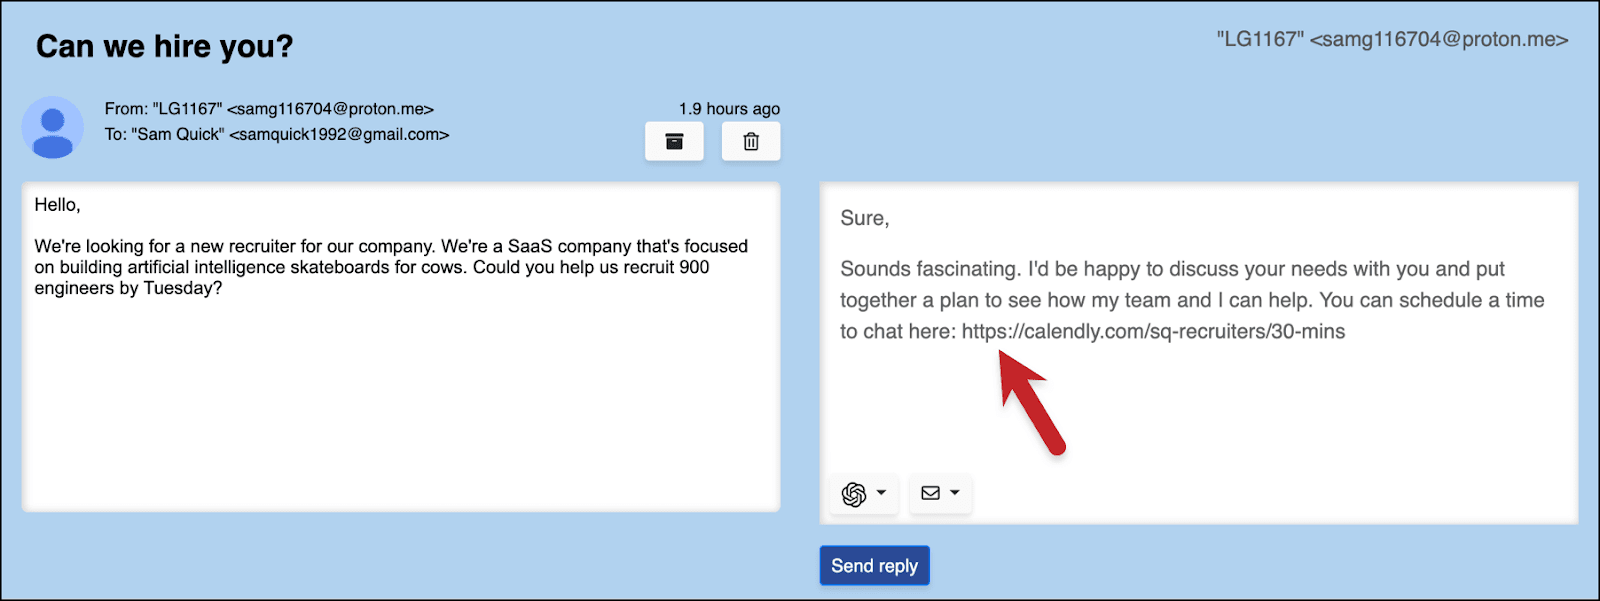
For example, here’s what you could do for your scheduling link.
How to insert your partial template at the cursor
As I mentioned earlier, when you use a template in The Reply Project, by default it will replace everything in the reply text box. We don’t want that for a partial template. Here, we want the template to go in a certain spot.
Position the cursor in the reply box where you want the template to go. Then click the envelope icon and mouse over your partial template. Click the pen icon that appears — and that will insert the template at the cursor position.

And now your partial template will be in the correct place in your reply.
4. Using ChatGPT to write personalized replies at scale (like gentle rejections to keep relationships alive)
There are some scenarios where you need to write basically the same response to several people — but a template won’t do.
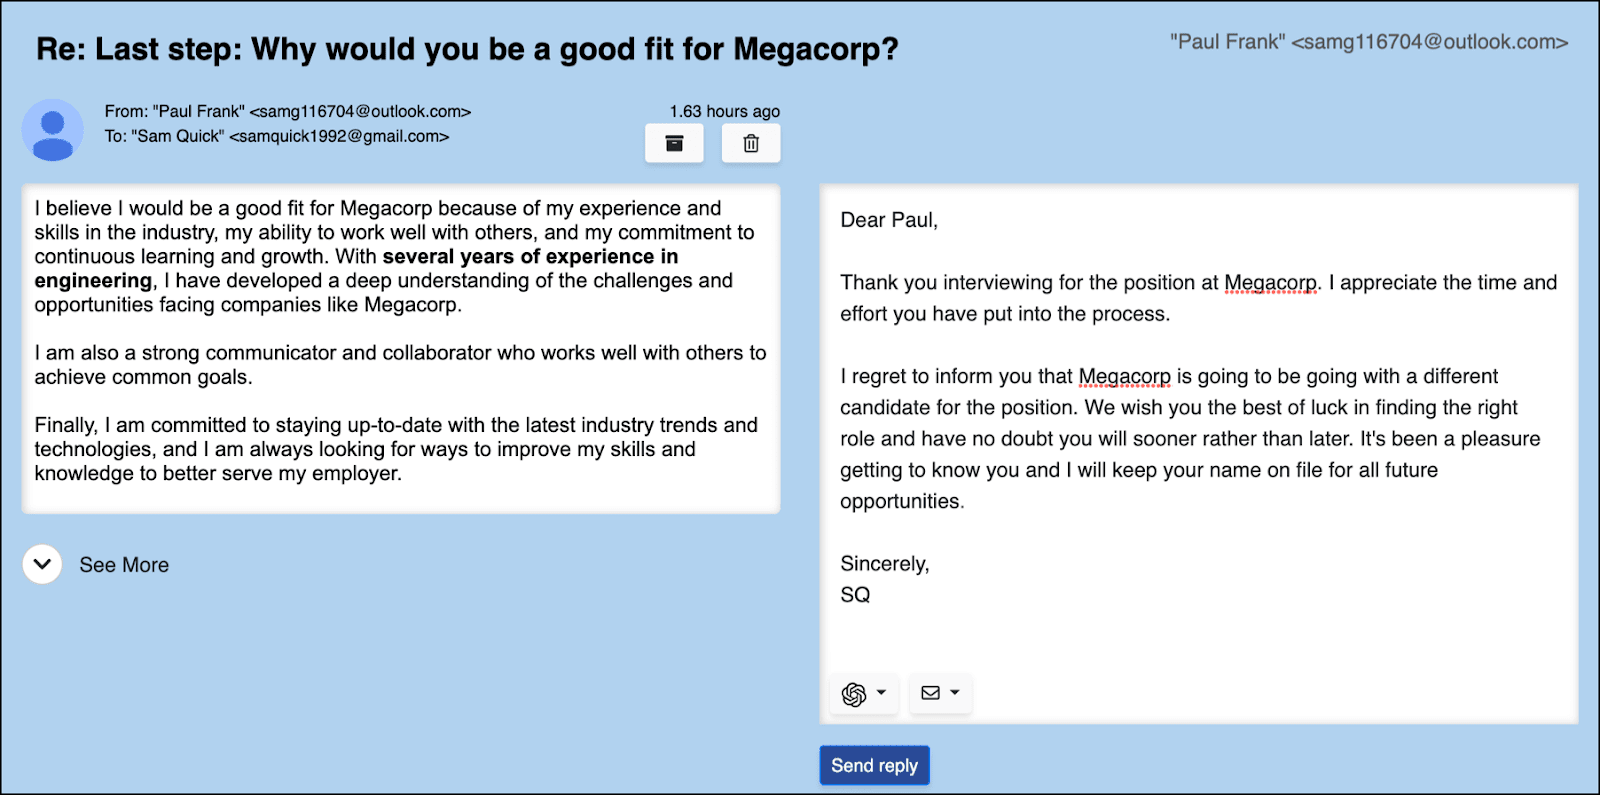
Like, say, writing a series of emails telling people they didn’t get a job. You want the emails to have a personal touch, out of courtesy and to preserve the connection — but also don’t want to carve out half your day writing basically the same thing over and over.
That’s the perfect situation to use The Reply Project’s built-in ChatGPT integration.
ChatGPT can write your replies — or the first draft of replies, if you still don’t love its writing style — for you. And you won’t need to log in with your own ChatGPT credentials or pay for API access; we got you.
It’s great when you need help getting started on a draft or when you’re running out of creative ways to write the same basic message over and over.
Using ChatGPT inside The Reply Project
To let ChatGPT take a crack at writing your response, click on the ChatGPT icon in the reply box for an email.
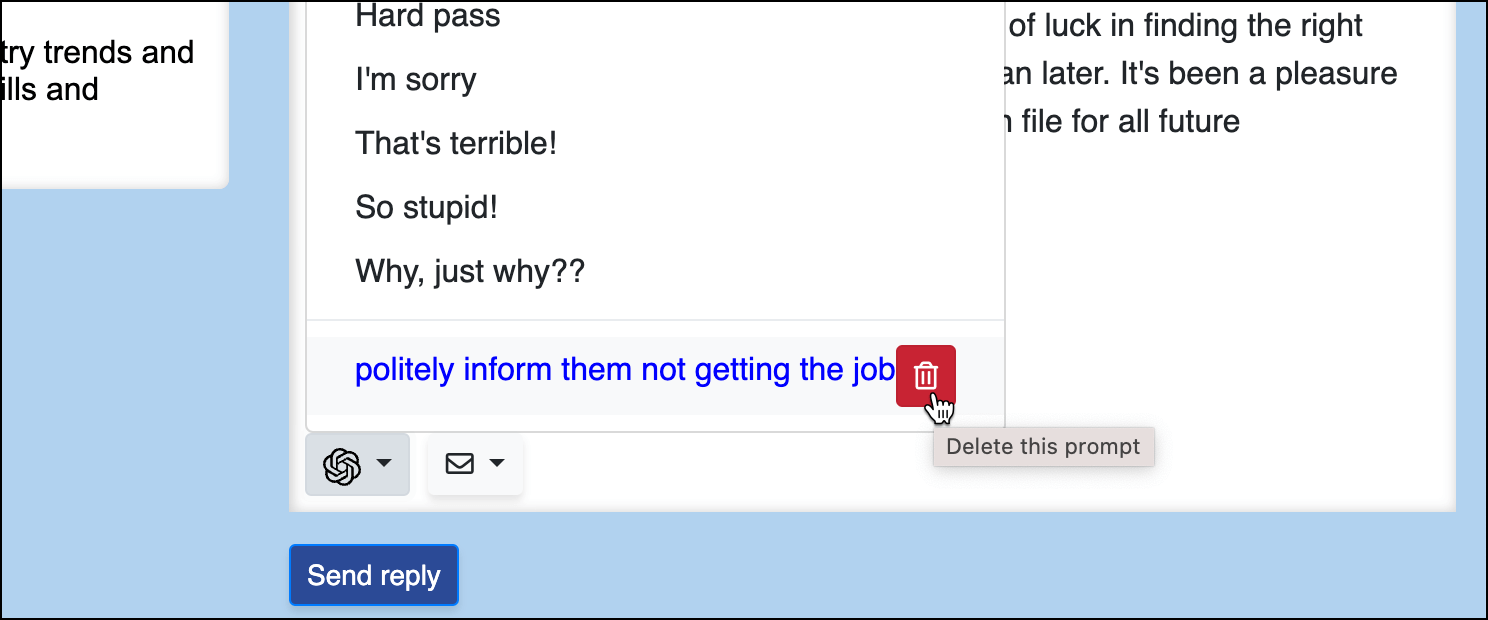
That will bring up a list of pre-written prompts. You can choose one of those, or type your own prompt at the top of the list.
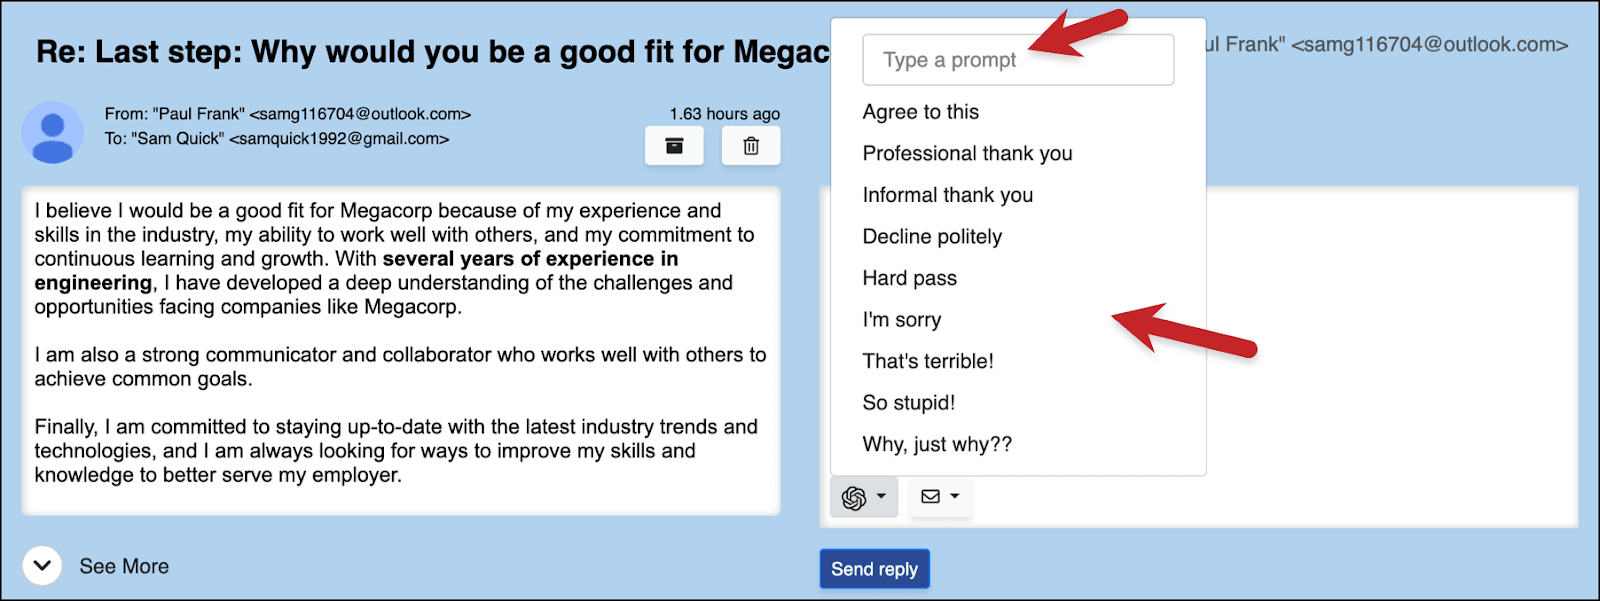
ChatGPT will write a response. You can send it as-is, or edit it as you see fit.
Any custom prompts you write will be available in the future at the bottom of the ChatGPT prompts list. (And much like templates, you can delete them by mousing over, then clicking the trash icon.)
5. Using The Reply Project to respond to replies from a specific GMass cold email, email marketing, or mail merge campaign
You don’t have to be a GMass user to be a Reply Project user. However, we know there’s a lot of crossover (since GMass is quite popular with recruiters.)
In case you’re not familiar with GMass, it turns your Gmail or Google Workspace into a full-on cold email, email marketing, and mail merge platform. So you can send all your email campaigns easily from right there inside your regular email account.
Recruiters love GMass because they can stop using separate tools for all those different types of emails — as I said at the beginning of this article, there are few jobs that send a wider variety of emails than recruiters.
And if you are using GMass, there’s a special integration between The Reply Project and GMass that makes it extra simple to send responses when people reply to your cold email campaigns, your mass emails, your marketing messages, and any other mail merges you might send.
How to use The Reply Project to respond to replies to a campaign you sent with GMass
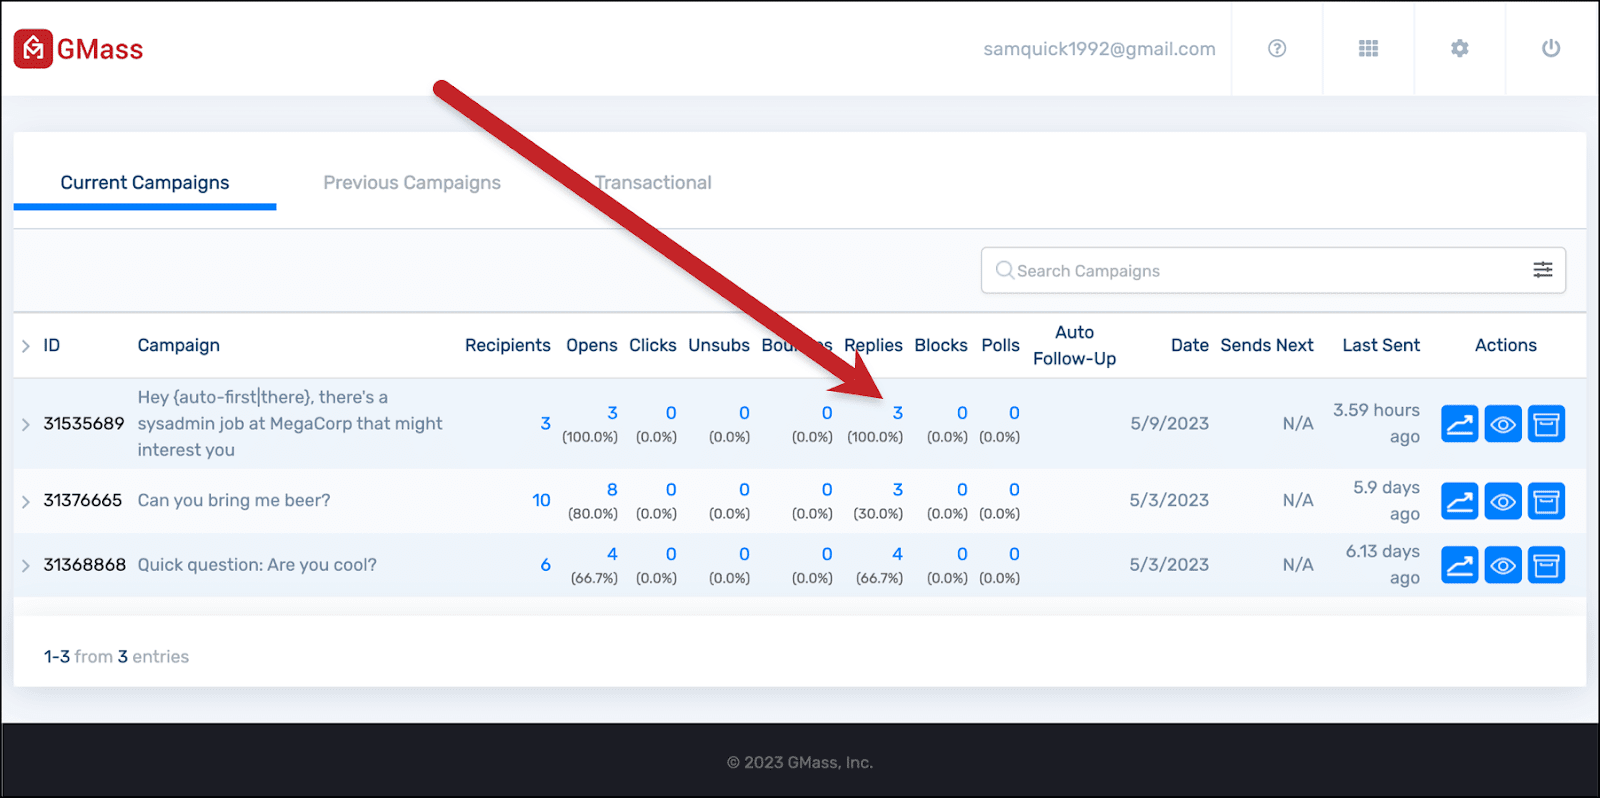
After you send a GMass campaign and the responses have started coming in, you’ll want to head to one of these two campaign reports.
Either go to the GMass dashboard and click on the number of replies for your campaign.
Or go to the web-based campaign report and click on the number of replies for the campaign in there.
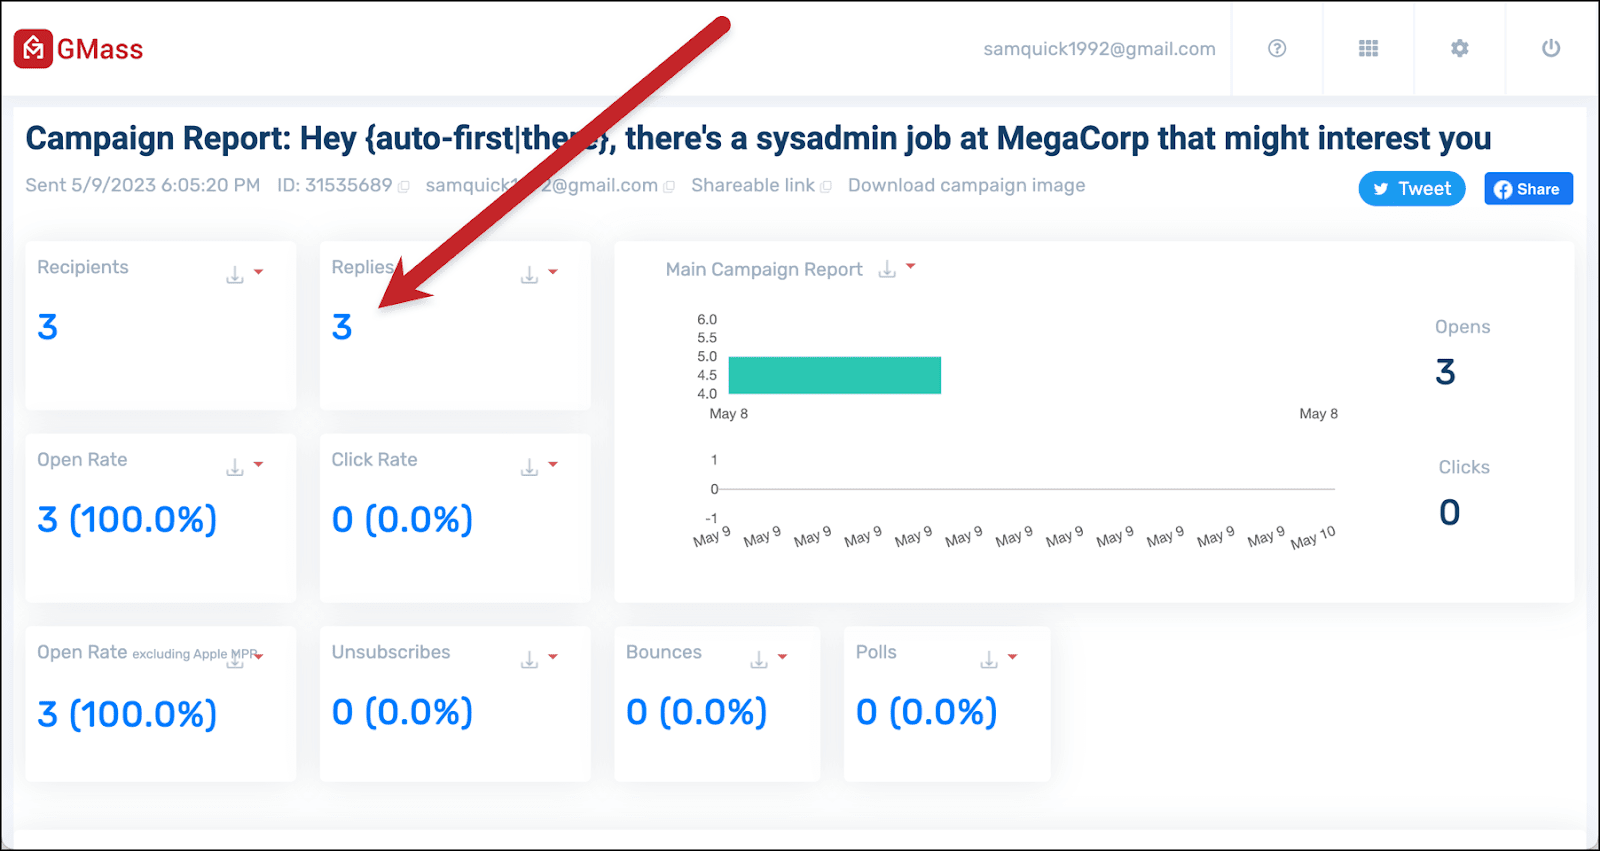
Clicking on the number in both of those reports will bring up a flyout panel on the right side of the screen that will show you details on the replies to your campaign. You’ll see who replied, a snippet of their reply, plus a sentiment analysis on whether their response was likely positive, negative, or neutral.
At the top of the flyout panel, you’ll see a link that says Reply to these emails with The Reply Project.
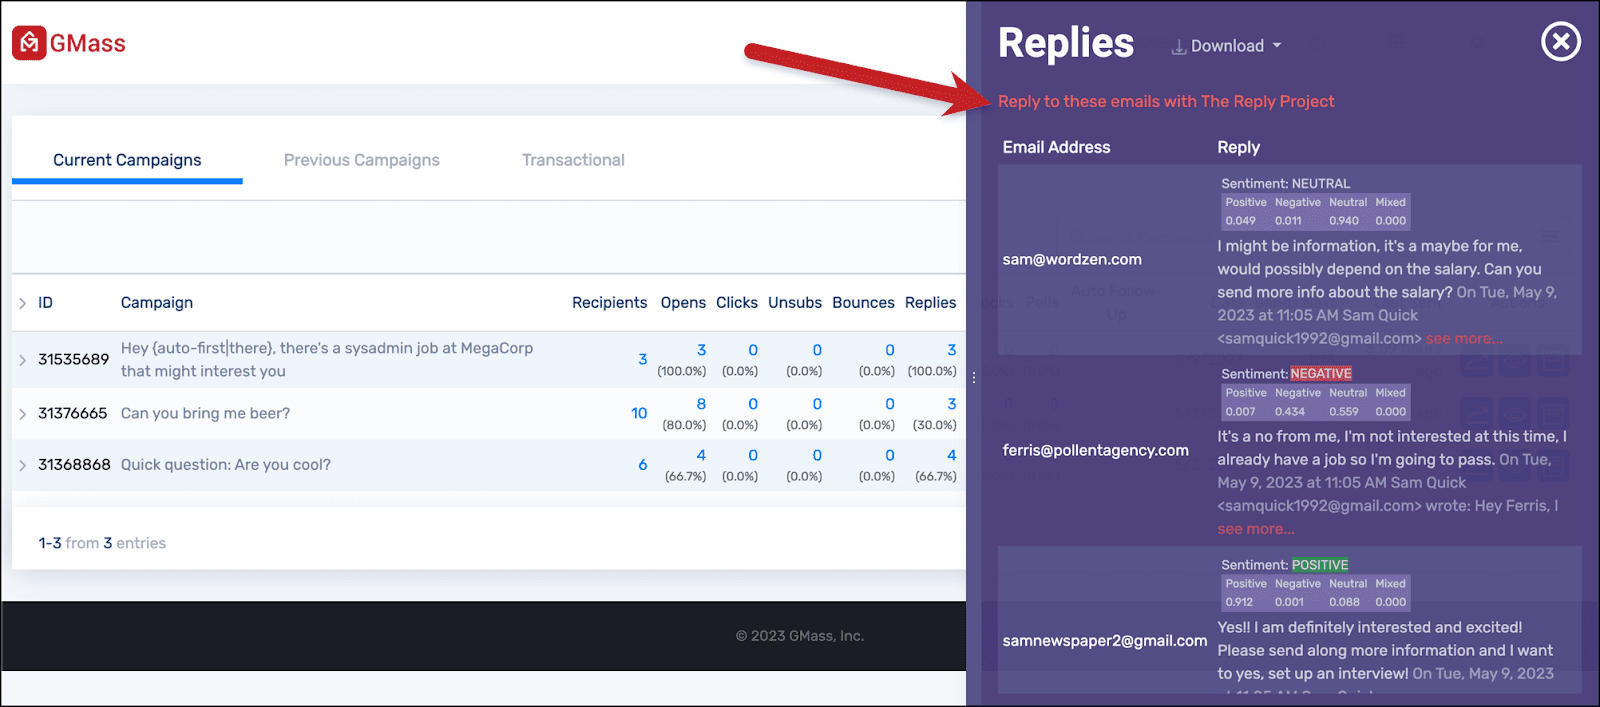
When you click that link, GMass will open a special version of The Reply Project that only shows the replies from this specific campaign. As a result, there’s no search bar on top.
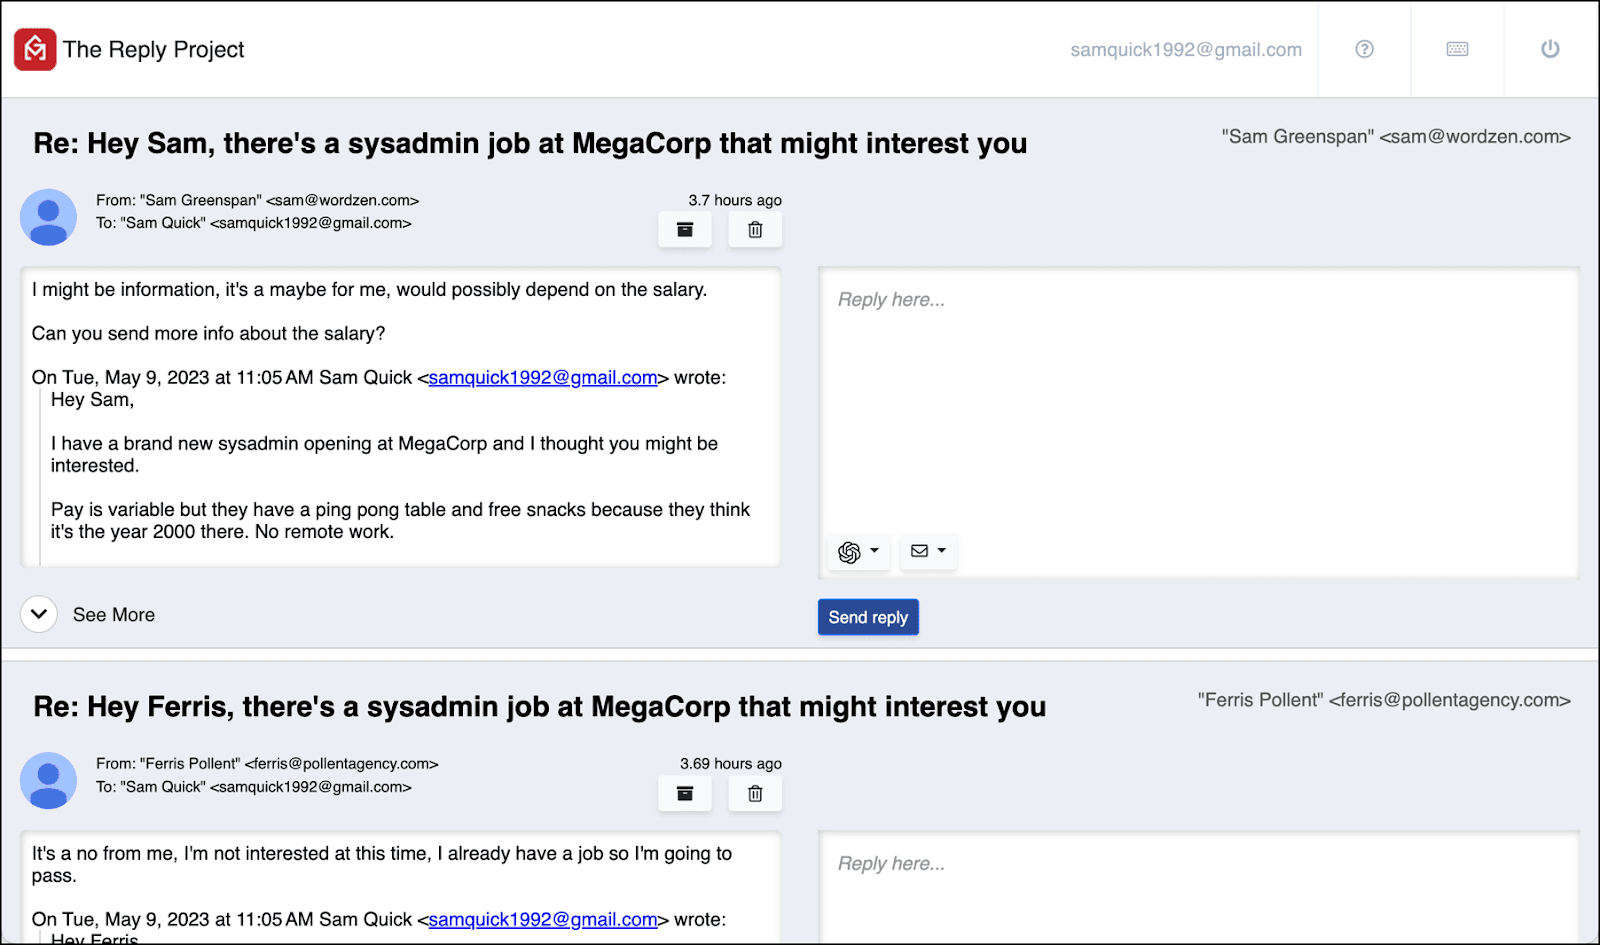
Now you can send all-important responses to the replies to your campaign through The Reply Project. And you can use all the standard features of The Reply Project here, including full and partial templates and ChatGPT.
Recruiters and The Reply Project: Respond to Emails 10x Faster Than Ever Before
We built The Reply Project with full intentions of having it replace the standard Gmail website as your preferred option for responding to your emails.
And we know breaking a habit like using the regular Gmail website takes time — but after you try out The Reply Project and see just how much faster you get through your inbox every day, you’ll be hooked.
Plus, we’ve made The Reply Project available for FREE.
We know you’ve got so much email to juggle and so many different things to keep organized as a recruiter — so let us free up more of your time to focus on your really high-value work.
You can give The Reply Project a try by going to reply.new.
You’ll be logged in and sending your first reply in a matter of 30 seconds — and you’ll probably have your inbox cleared in five minutes or less.
Only GMass packs every email app into one tool — and brings it all into Gmail for you. Better emails. Tons of power. Easy to use.
TRY GMASS FOR FREE
Download Chrome extension - 30 second install!
No credit card required
The project aims to understand how effective personalized messages from recruiters are in engaging candidates.
The Recruiters Reply Project by GMass is a fantastic initiative to improve email response rates. Kudos to the team for addressing such a crucial aspect of recruitment!