
I’m going to walk you through how to set up DKIM in this article, and it’s not going to take too long.
Even if you don’t really know what DKIM is.
In this guide, I’ll take you through the entire DKIM setup process, including:
- Generating your DKIM key
- Setting up DKIM for your domain
- Testing to make sure everything worked
And we should be able to do this in less than five minutes (assuming you know all your account passwords, which is the part that always slows me down).
Do note: This guide is written for GMass users who are sending through a Google Workspace account. If you’re a GMass user sending through an external SMTP server (usually to break Gmail’s limits), there are special settings for you which we’ll cover here as well.
How to Set Up DKIM: Table of Contents
- What Is DKIM in Under 100 Words?
- Step 1: Getting Your DKIM Key
- Step 2: Adding Your DKIM Record to Your Domain
- Step 3: Authenticating and Verifying Your DKIM Record
- If You’re Using a Third-Party SMTP Service with GMass
- How to Set Up DKIM: Next Steps
What Is DKIM in Under 100 Words?
DomainKeys Identified Mail (DKIM) is a digital signature attached to your emails which allows a mail server to determine if that email was authorized for your domain.
For example, if a spammer spoofs your domain and sends messages from an unauthorized server, they would fail DKIM authentication. A recipient’s mail server could/should then send the message to spam or not deliver it at all.
That’s why having DKIM set up for your domain can be good for your deliverability — it helps prove you are who you say you are.
How do SPF and DMARC relate to DKIM?
DKIM is one of the three primary email authentication methods. The others are:
- Sender Policy Framework (SPF)
- Domain-based Message Authentication, Reporting, and Conformance (DMARC)
SPF, like DKIM, is a domain record which mail servers use to determine whether a sender using your domain was authorized to do so.
DMARC is a different type of record. It’s a policy you create that works with SPF and/or DKIM. The DMARC record shares whether your emails are using SPF and/or DKIM as authentication methods, and lets a mail server know what to do with messages that fail those methods.
Do I need to set up DKIM?
As of February 1st, 2024, Google and Yahoo/AOL’s new sender policies require anyone who sends using their own domain name (e.g., whatever@yourdomain.com) to have either a SPF or DKIM record in place.
So you do need to set up DKIM or SPF.
If you’re a bulk sender — defined as sending 5,000+ emails per day to gmail.com addresses or a “significant volume” to Yahoo/AOL addresses — you need to have both SPF and DKIM records. You’ll also need DMARC in place.
I heard Google will use a default DKIM key if I don’t have one set up… so do I still need to do any of this?
You heard right. If you’re using Google Workspace, Google will automatically sign your message with its default DKIM key, d=*gappssmtp.com.
The good news: If you don’t go through the steps in this article, you’ll still pass DKIM.
But… if you want to use DMARC authentication to boost your deliverability, then we recommend you still go through the process of setting up your own DKIM key. That way you can hit DKIM alignment.
And as I’ll keep saying through this article, if you’re going to use a third-party SMTP service to send messages through Gmail with GMass, follow these instructions to set up DKIM the right way for that scenario.
Will having a DKIM record help deliverability?
Having DKIM in place can help with deliverability — that is, it helps your emails reach the inbox, not the spam folder.
Google says so, point blank: “Without DKIM, messages sent from your organization or domain are more likely to be marked as spam by receiving mail servers.”
DKIM alone does not, however, guarantee every email you send will reach the inbox.
There are lots of factors that go into deliverability, ranging from your sender reputation to the contents of your email to whether recipients in the past have engaged with your messages. That being said, having DKIM and the other authentication methods set up is absolutely a piece of the deliverability puzzle.
Do I need to set up DKIM if I have a gmail.com email address?
You cannot set up DKIM if you have a gmail.com address — because you can’t.
Setting up DKIM (or SPF, or DMARC) requires you to create a DNS record for your domain. (Again, don’t worry, I’ll show you how to do that later in this article.)
You can’t create DNS records for the gmail.com domain because, of course, that’s Google’s. And they already have SPF and DKIM set up.
So if you’re sending from a gmail.com account, you’re all set. There’s no need for you to do anything in this article.
What do I do if I don’t control my own domain name?
It’s possible that you don’t control your own domain name. For example: Maybe you work for a company and send emails through them.
In those cases, it’s unlikely that you’ll be able to get into the DNS records yourself to set up your DKIM record.
So you’ll need to talk to whoever’s in charge — your boss, the IT department, or someone else — to explain that DKIM is important and they need to set up the record so your emails will be in compliance with Google and Yahoo’s sender requirements.
Step 1: Getting Your DKIM Key
Note: If you use GMass with a third-party SMTP server, follow these instructions instead.
First up, let’s check to see if you already have a DKIM record in place. If so, you won’t have to do any of this.
How to check if you have a DKIM record
You can use GMass’s free email analyzer tool to figure out whether you already have DKIM set up for your domain.
Head over to the tool, then grab the email address it gives you.
Send an email to that address from your email account.
Once GMass processes the email (should take a few seconds), the screen will show you all the technical details of your email. The Headers tab will let you know the DKIM information.
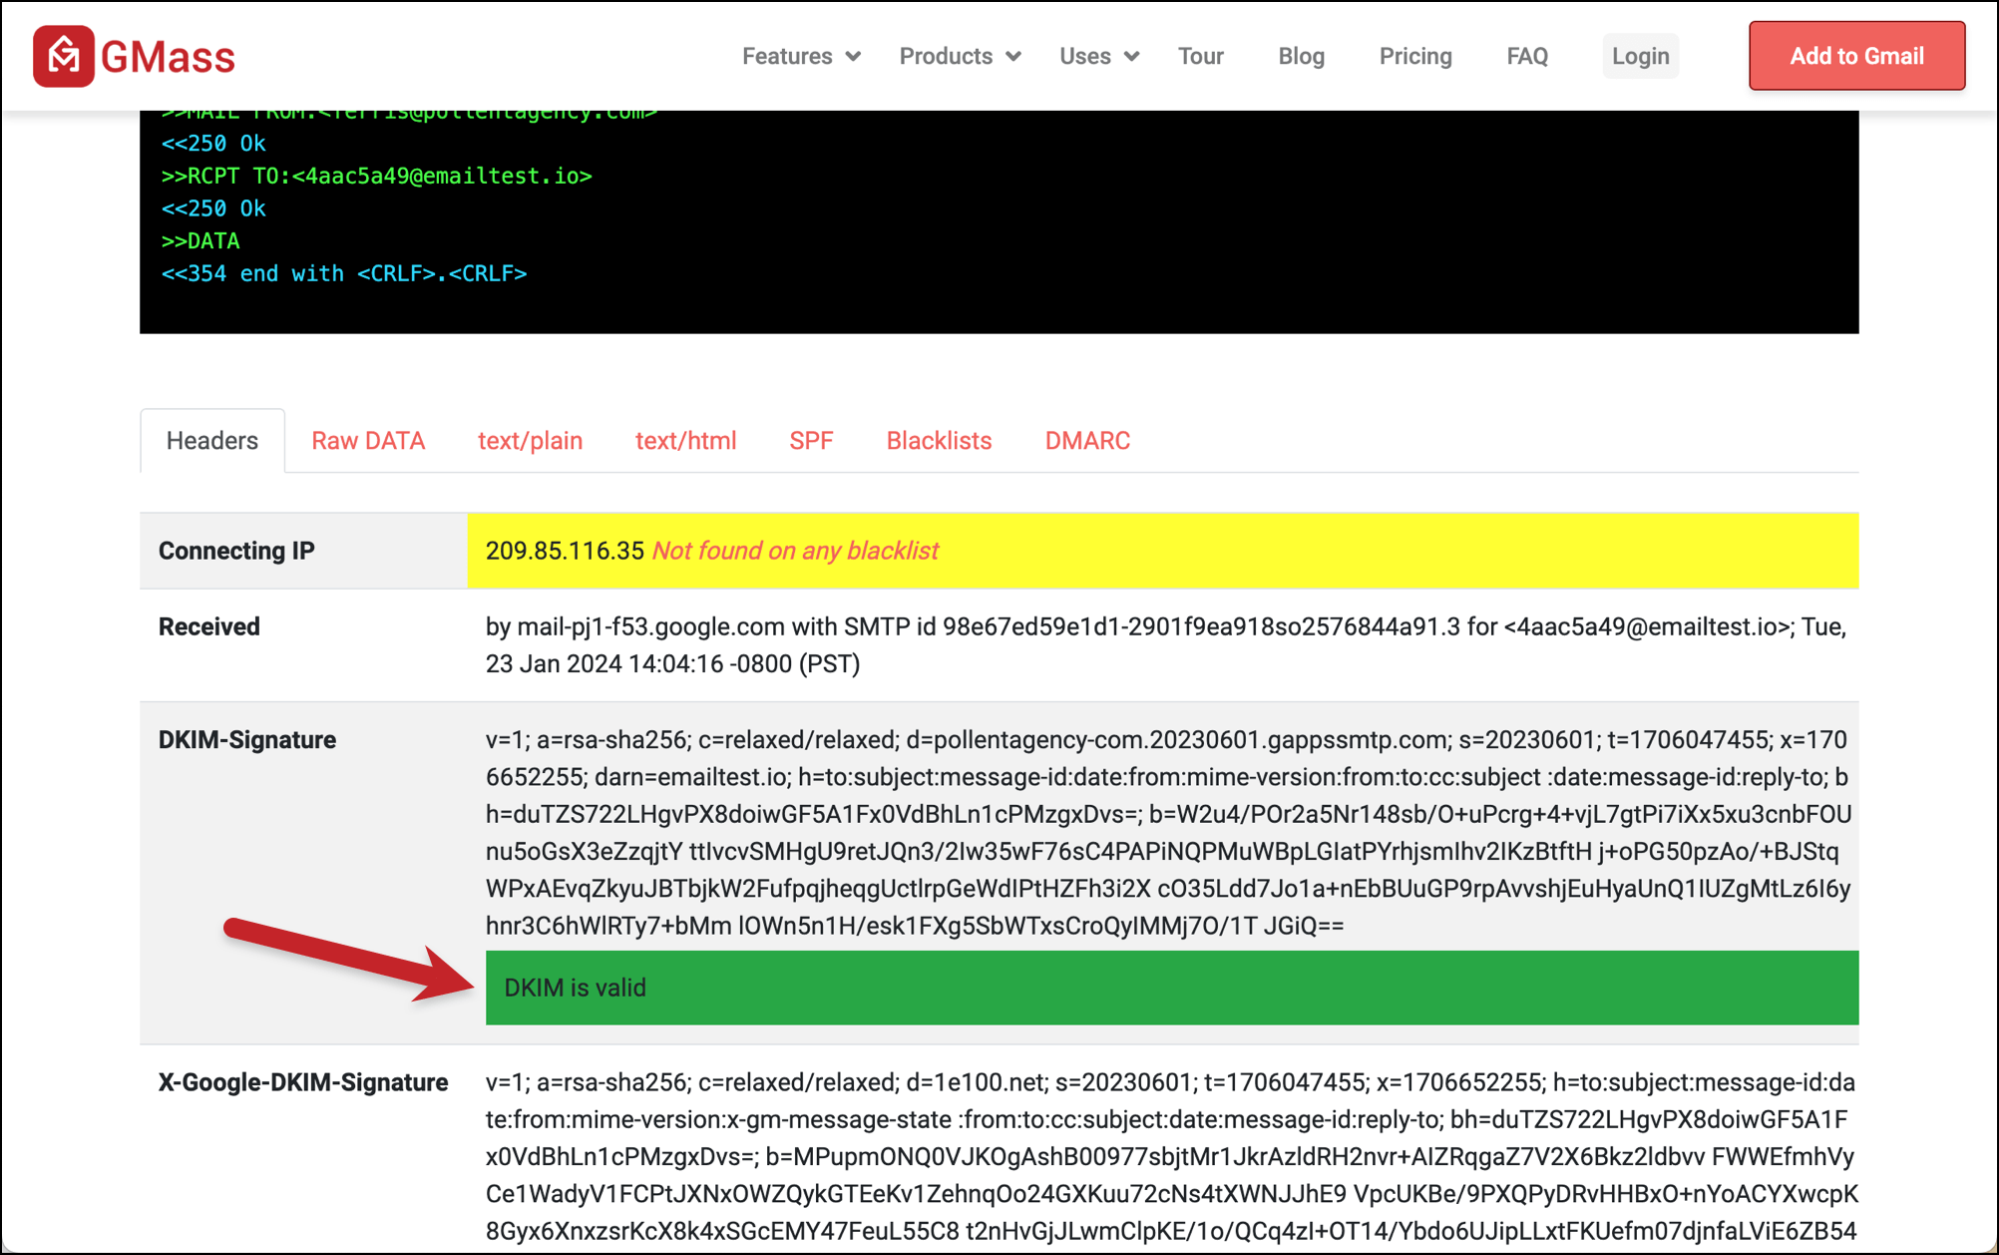
If you have a valid record, and you’ve never set one up, odds are it’s Google’s default DKIM record.
Still, it’s smart to still set up your own, especially for deliverability purposes (and if you plan to also set up DMARC and achieve DKIM alignment).
Also note: You can have multiple DKIM signatures, perhaps set through Google Workspace and another with an SMTP provider.
Creating a DKIM record
Again: If you use GMass with a third-party SMTP server, follow these instructions instead.
The first step to creating a DKIM record is getting your key from the Google Admin console. You’ll need to be logged into the domain as a super administrator; if someone else owns or controls the domain, they’ll need to go through this process.
But assuming you are the top level administrator, go to the Google Admin console, then go to Apps > Google Workspace > Gmail.
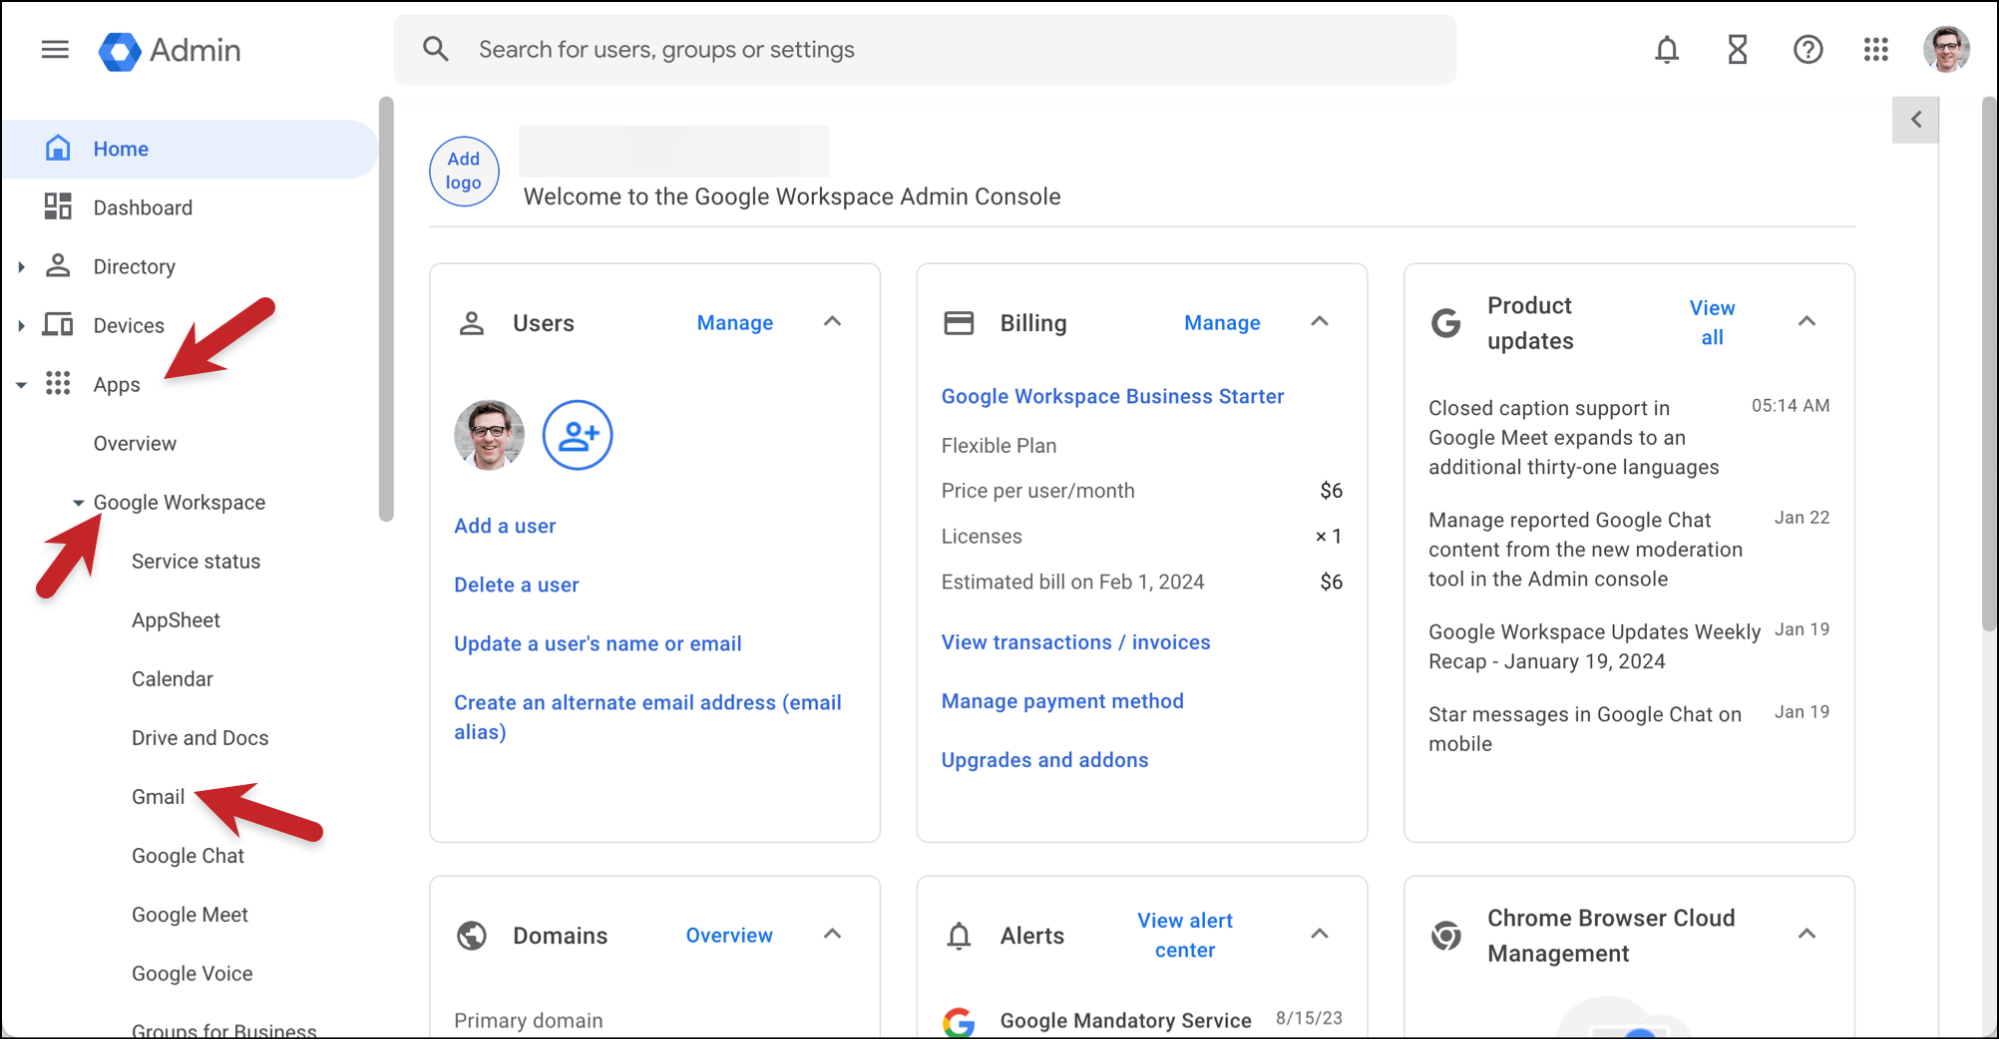
Click Gmail, then scroll down to Authenticate email and click.
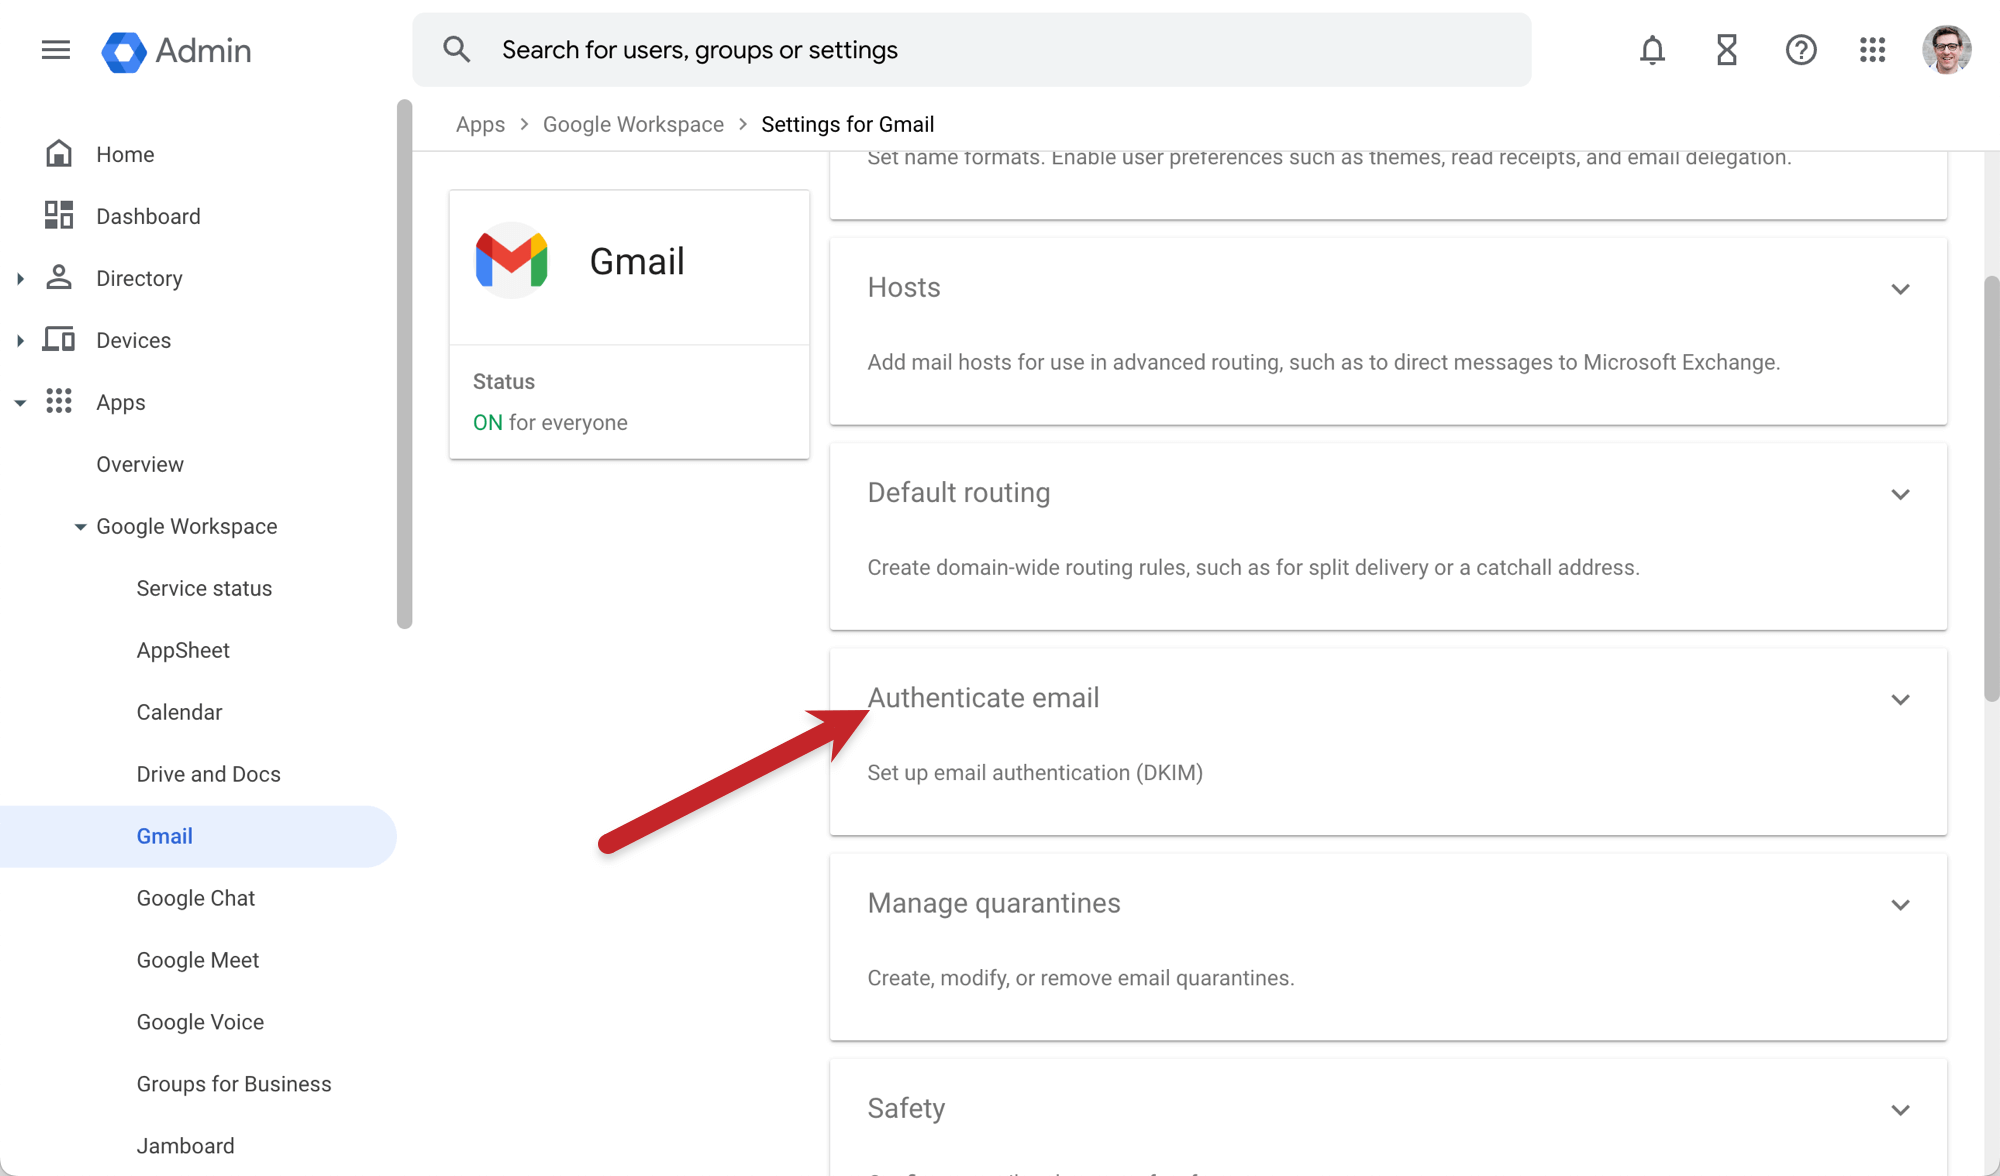
Select the domain you’re authenticating from the dropdown. Then click Generate New Record.
In the selection box, choose your settings. Most modern domain providers will take 2048-bit keys, so choose that. And while you could set your own prefix, going with their default of google follows their recommendations. Then click Generate.
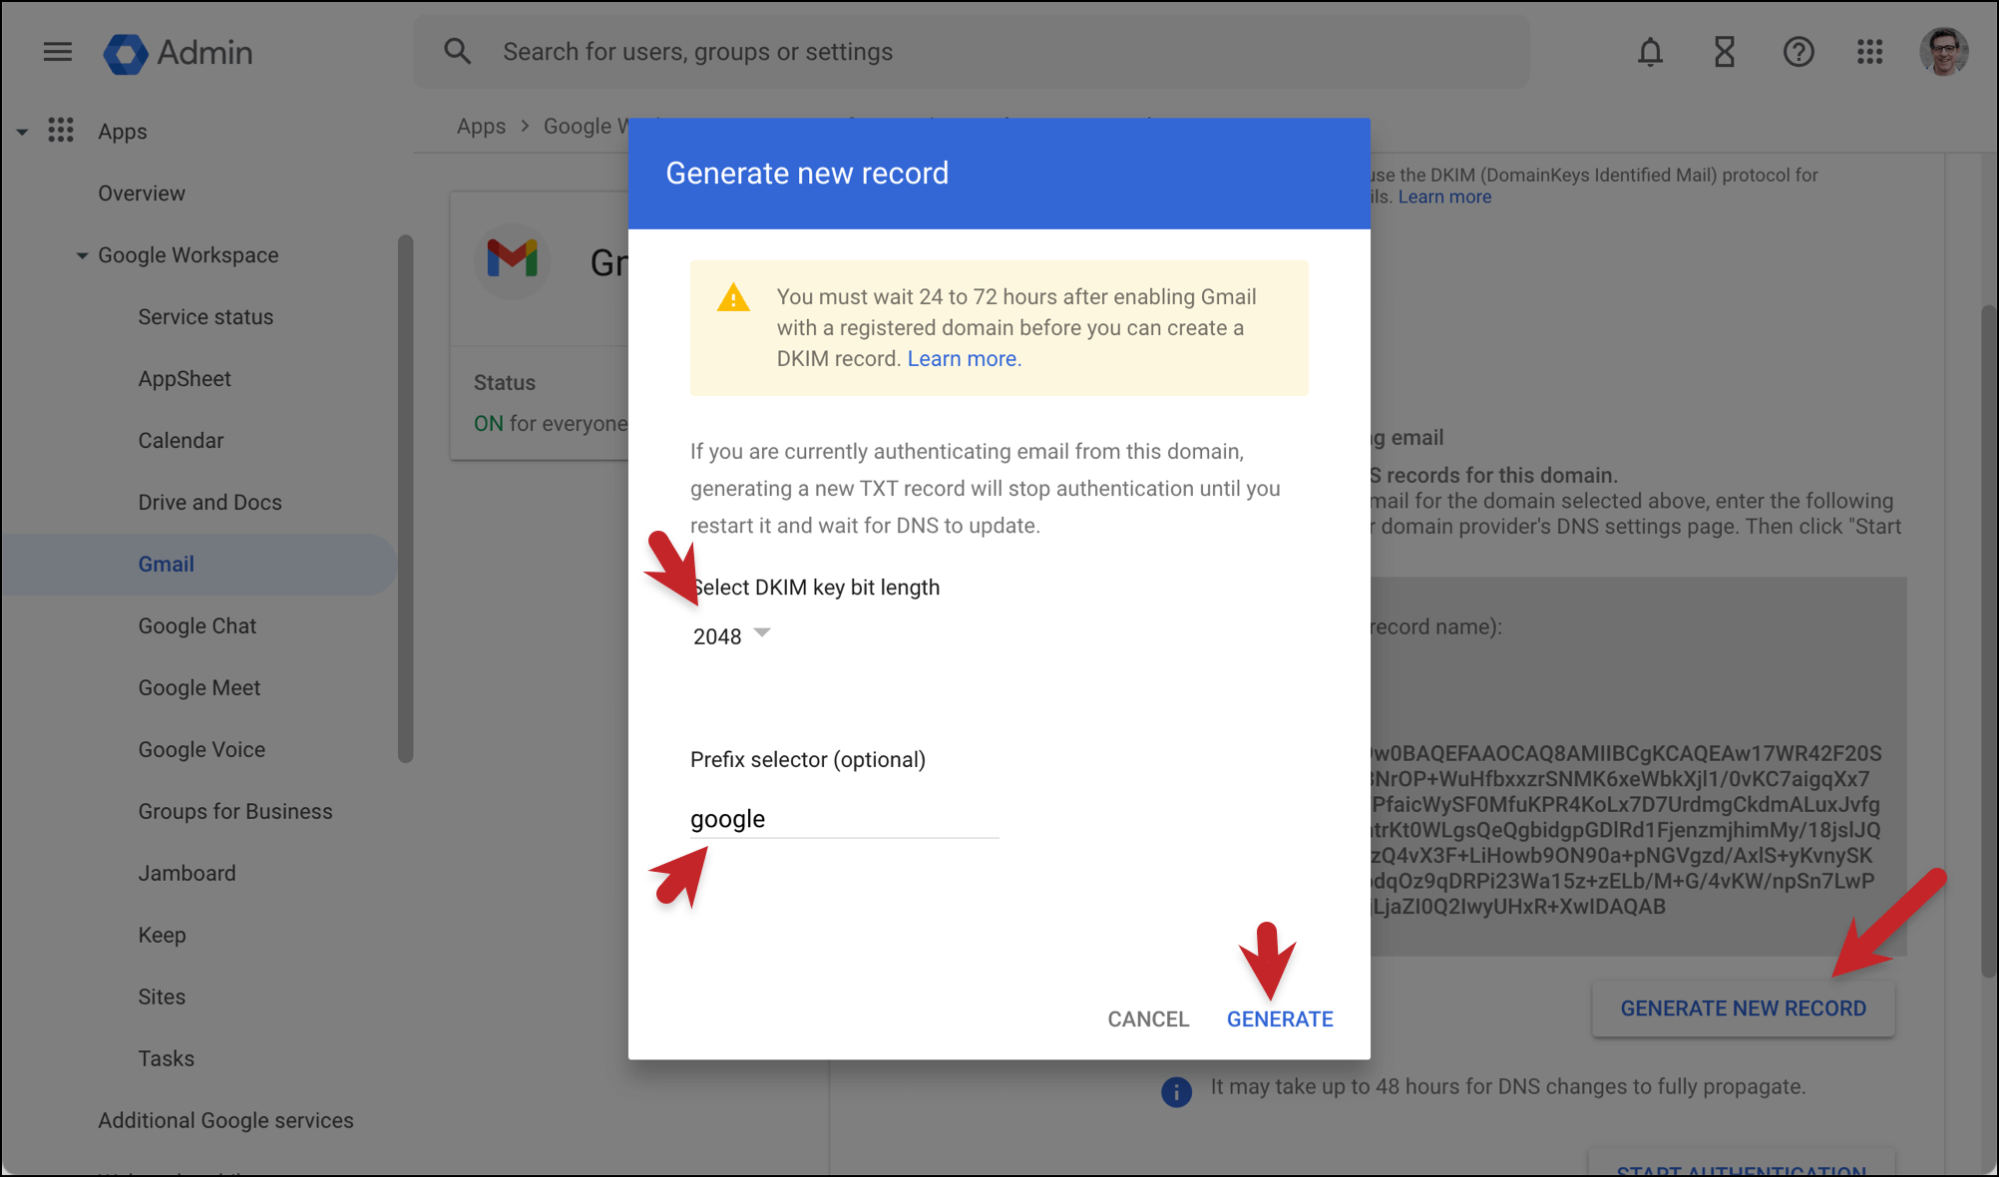
Google will give you a DNS Host name and TXT record value. Keep this window open, because you’ll need those for our next step.
Step 2: Adding Your DKIM Record to Your Domain
Now that you’ve generated your DKIM key, you’re ready to add it to your domain.
As a beginner, odds are you’re going to enter it at your domain registrar (e.g., GoDaddy, Namecheap, and so on). You should start there, anyway; they’ll let you know if they’re not actually managing your Domain Name System (DNS) settings.
If you’re using a web host, it’s possible they are handing DNS for your domain. If you try to add the DNS record at your registrar and they say someone else is managing it, head over to your web host. (Their support can also help you with this as needed.)
As a beginner, it’s unlikely there’s a different third-party managing your DNS settings.
How to input a DKIM record at your domain registrar
I’ll show you an example of DNS management here with GoDaddy. While your registrar won’t look exactly like this, the basic concept is the same (go to your domain, go to its DNS settings, add a record).
Log into your domain registrar, then find your domain. Enter the DNS management settings for that domain. Then click whatever link or button you see to add a new record.
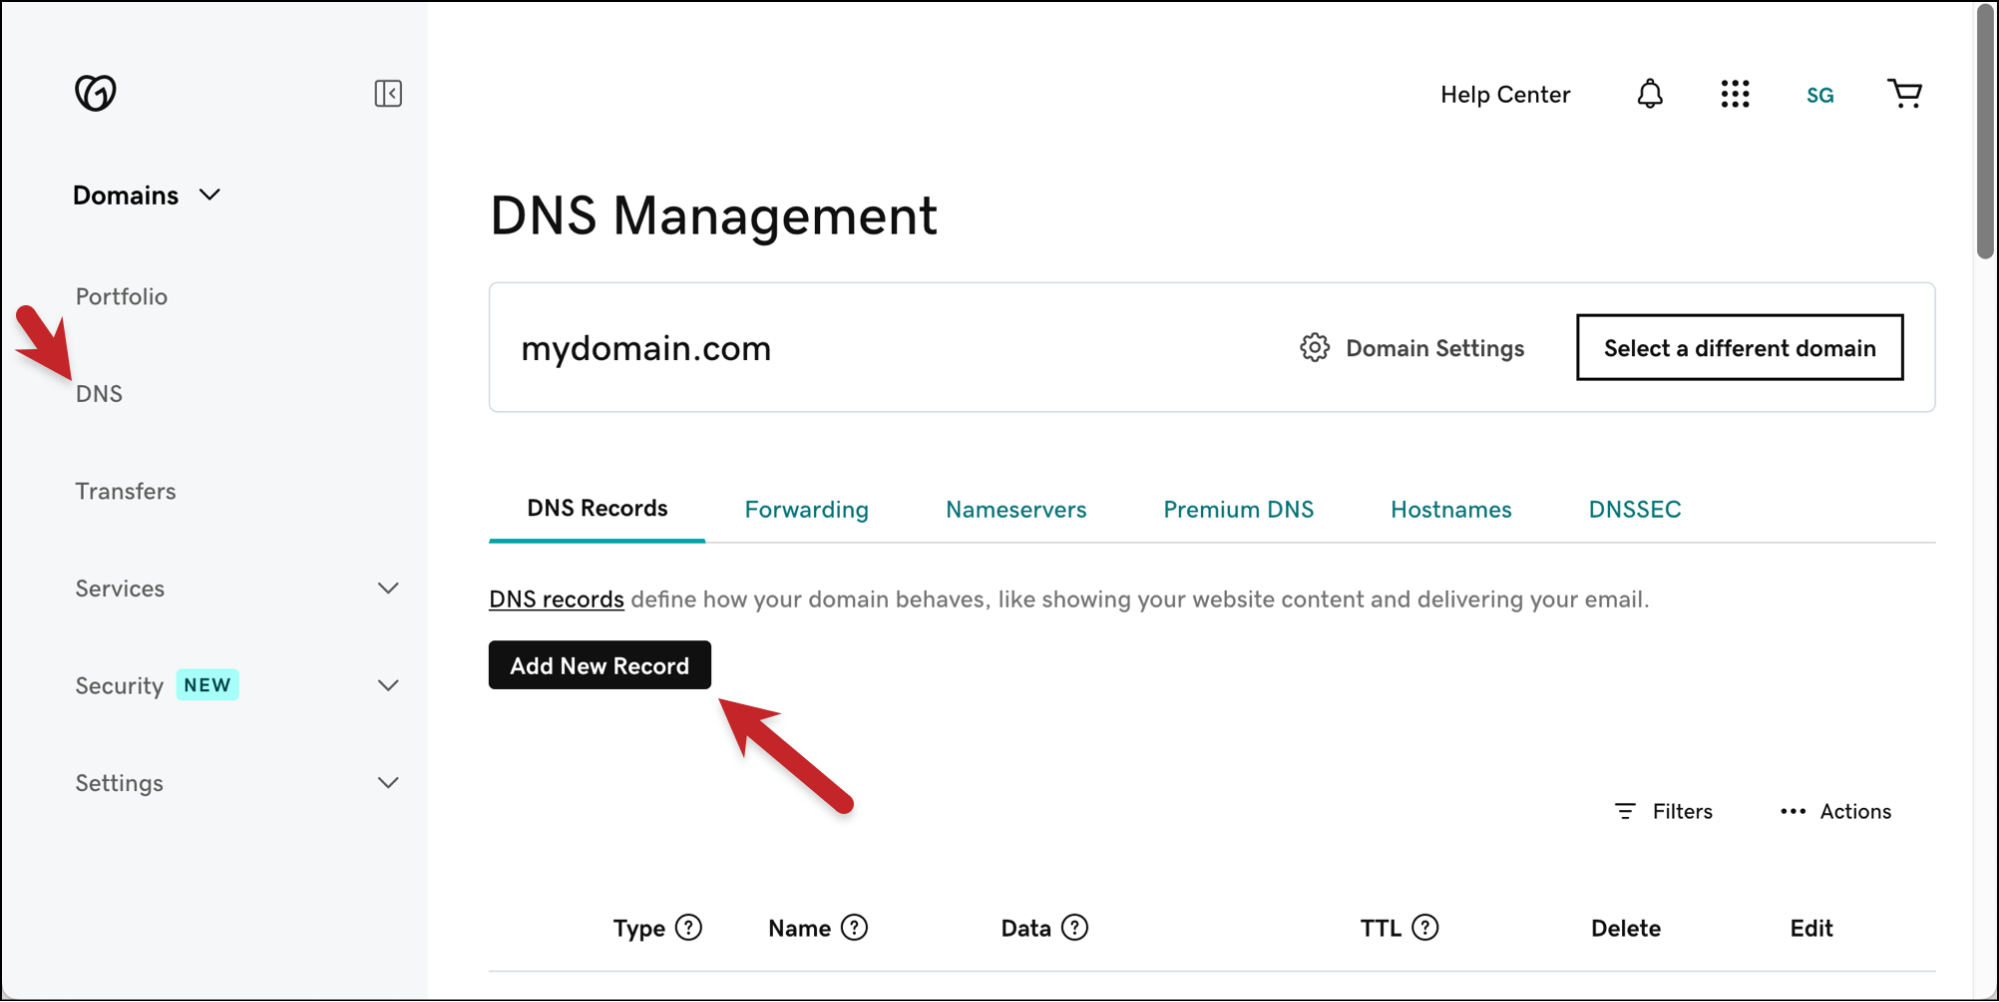
Now you’ll enter the following things:
- Type: TXT
- Name/Host: The DNS Host name (TXT record name) from Google
- Value: The TXT record value from Google
- Time-to-Live (TTL): 1 hour or 3600 seconds
Then save your new record.
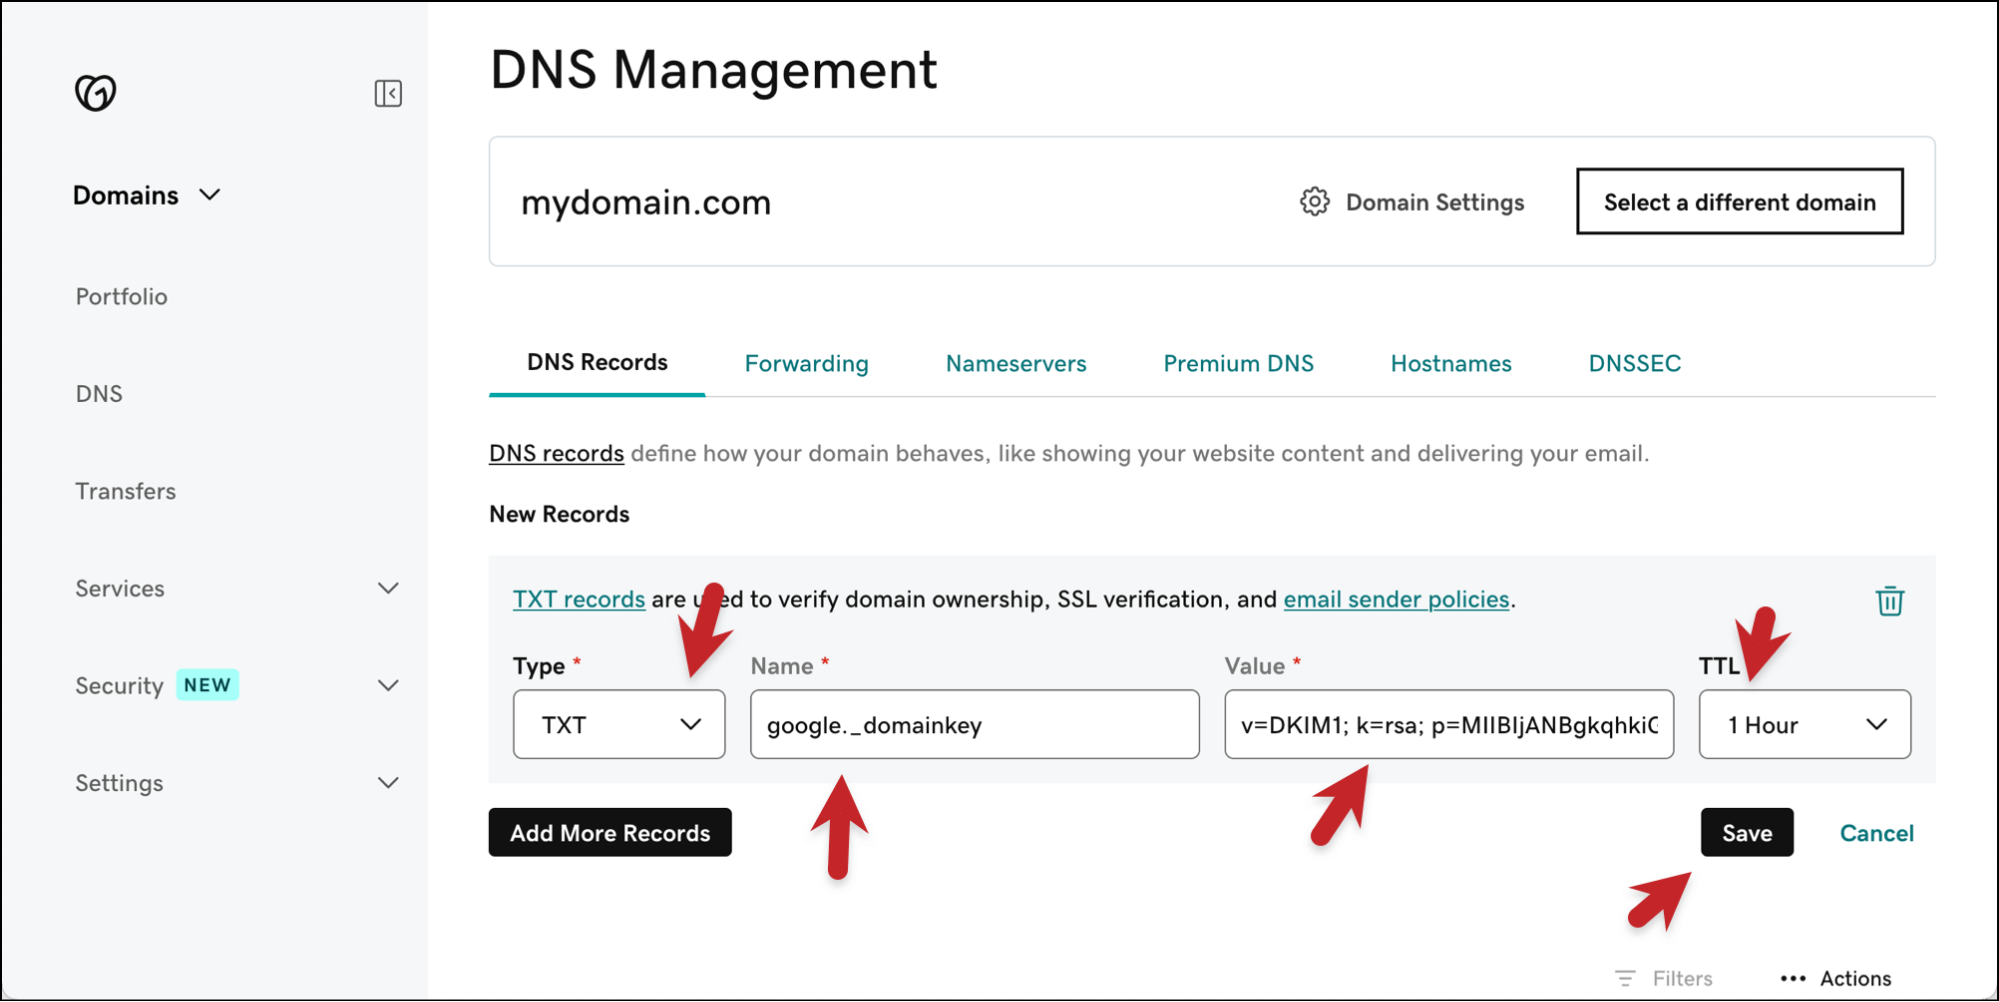
You can scroll through the list of DNS records at your registrar. You’ll find your new TXT record there.
Step 3: Authenticating and Verifying Your DKIM Record
Now that you’ve created your DKIM record… it’s time to wait.
It can take up to 48 hours for DNS changes to propagate through the internet. In my experience, they don’t usually take that long, but they do take some time. I usually try in about four hours, then eight hours, then if it’s still not working, the following day.
Eventually, though, you’ll be able to run Google’s authentication.
Authenticating in Google Admin
Go back to the Authenticate email section of the Google Admin console and click the Start Authentication button.
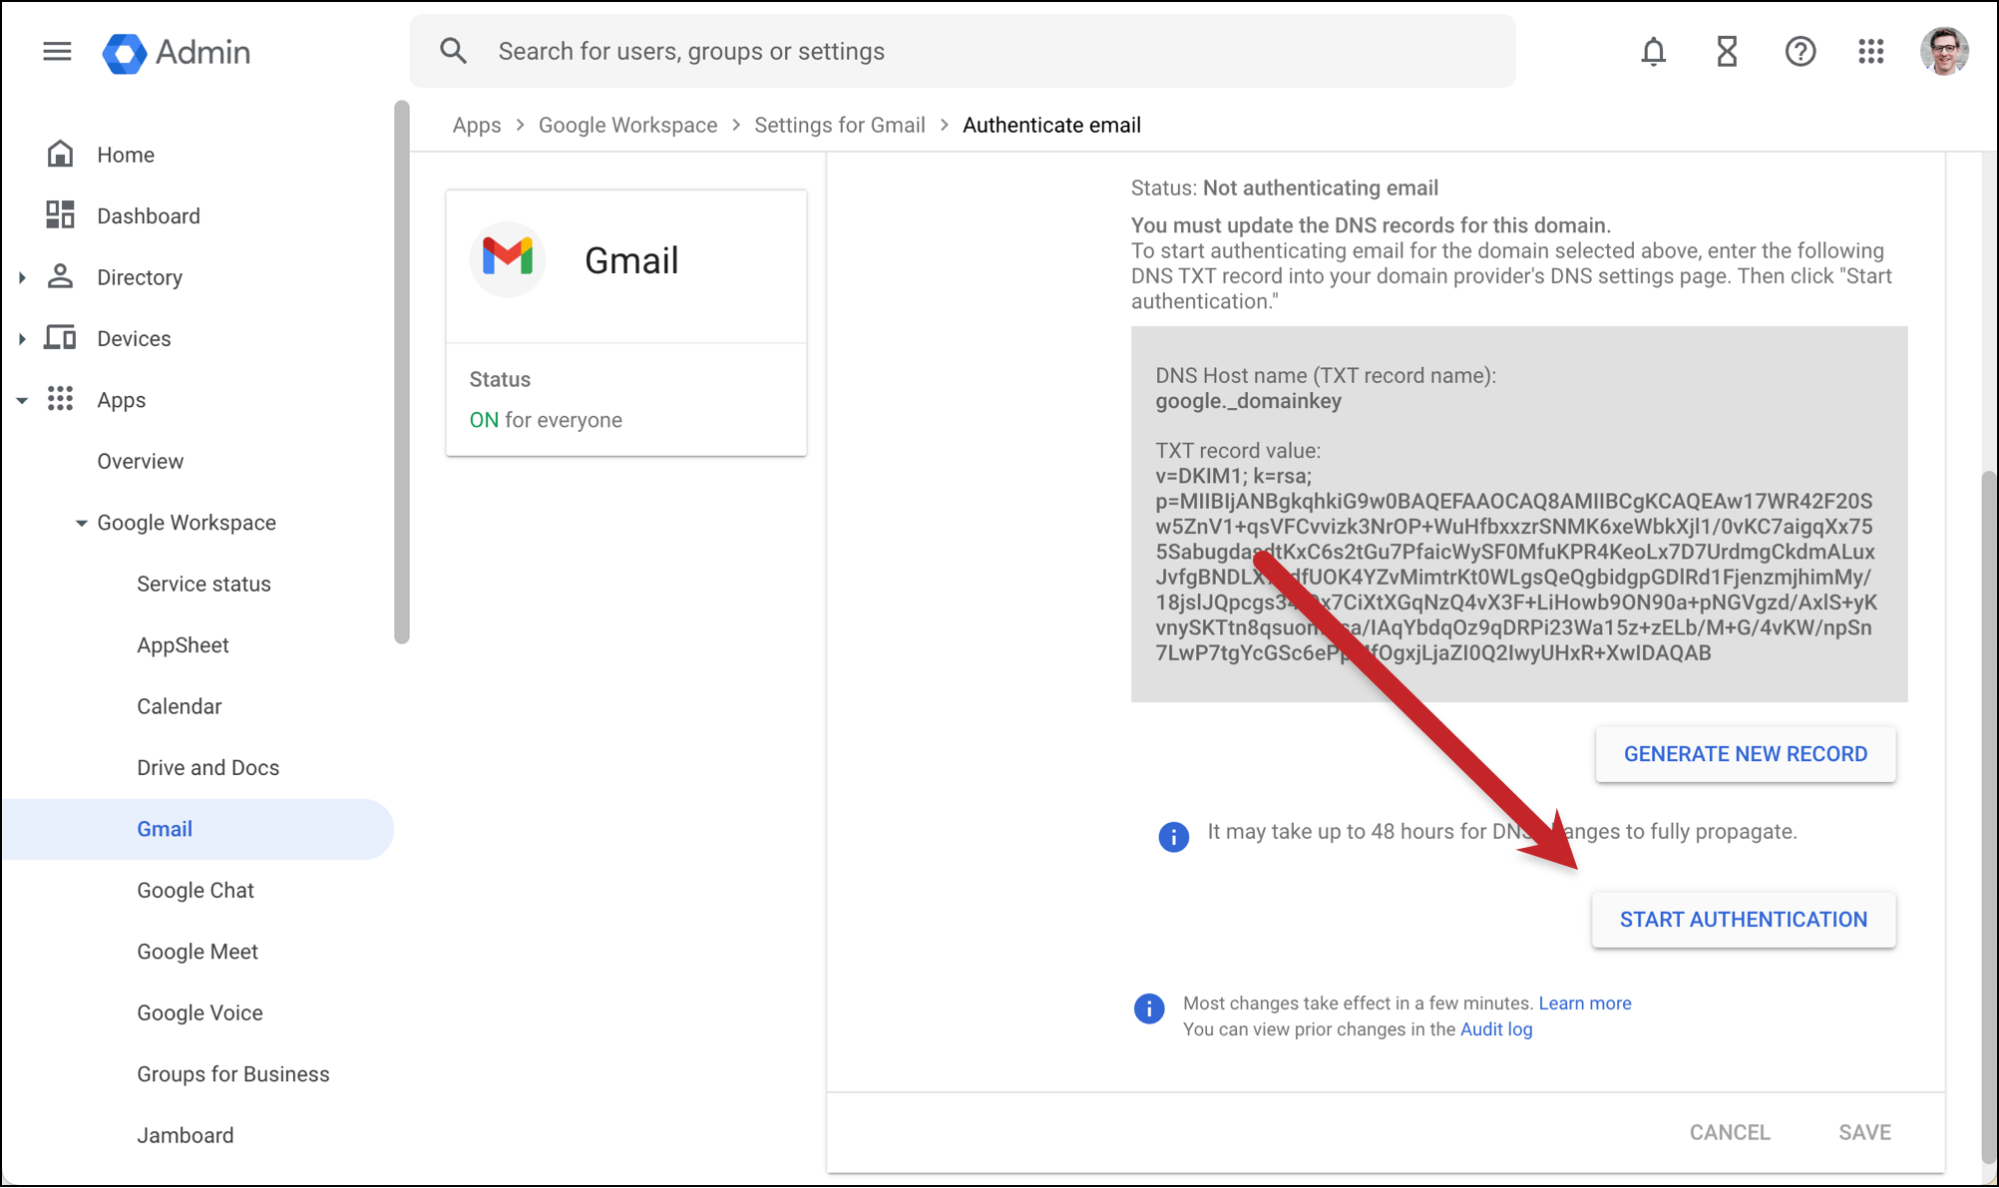
If you’ve waited long enough (and no one ever waits long enough the first time, don’t feel bad) into the 48-hour period, you should get a success message.
You can then double-check DKIM using GMass’s email analyzer, like you did in step one.
If You’re Using a Third-Party SMTP Service with GMass
If you’re using a third-party SMTP service like Amazon SES, ReachMail, or even GMass’s own in-house option of SMTPGM, follow the instructions in this article to set up DKIM through GMass.
When you go through that process, GMass will be able to pass along your DKIM headers to your SMTP service (assuming it’s one that does not strip them out) and you’ll be able to pass DMARC.
How to Set Up DKIM: Next Steps
You have now successfully set up DKIM authentication for your domain.
With that, you are in compliance with Google and Yahoo’s requirements for all senders. (If you’re a bulk sender, you also need SPF and DMARC.)
And while you’re in your domain registrar editing DNS settings, we might as well set up a few more things to help your deliverability.
You can set up SPF even faster than setting up DKIM. And all it requires is adding another TXT record to your domain.
You should set up DMARC, since it works with your SPF/DKIM records and is a deliverability boost. Setting it up will also just take one more TXT record to your domain.
And finally, this is a great time to set up a custom tracking domain. A custom tracking domain replaces the shared domains for your open tracking, click tracking, and unsubscribe link — and it can be a major deliverability boost. Once again, all it will take is adding one more DNS record.
These are all smart ways to boost your deliverability — but there’s always more you can do, and we can help.
If you’re not a GMass user, join us — 99% of users report the best deliverability they’ve ever had.
It’s really simple to sign up for a free trial of GMass. Just download the Chrome extension and you’ll be ready to go. It works inside of your Gmail account so there’s no new software to learn, and you can send up to 50 emails per day during your free trial.
Email marketing, cold email, and mail merge all in one tool — that works inside Gmail
TRY GMASS FOR FREE
Download Chrome extension - 30 second install!
No credit card required

Ajay is the founder of GMass and has been developing email sending software for 20 years.