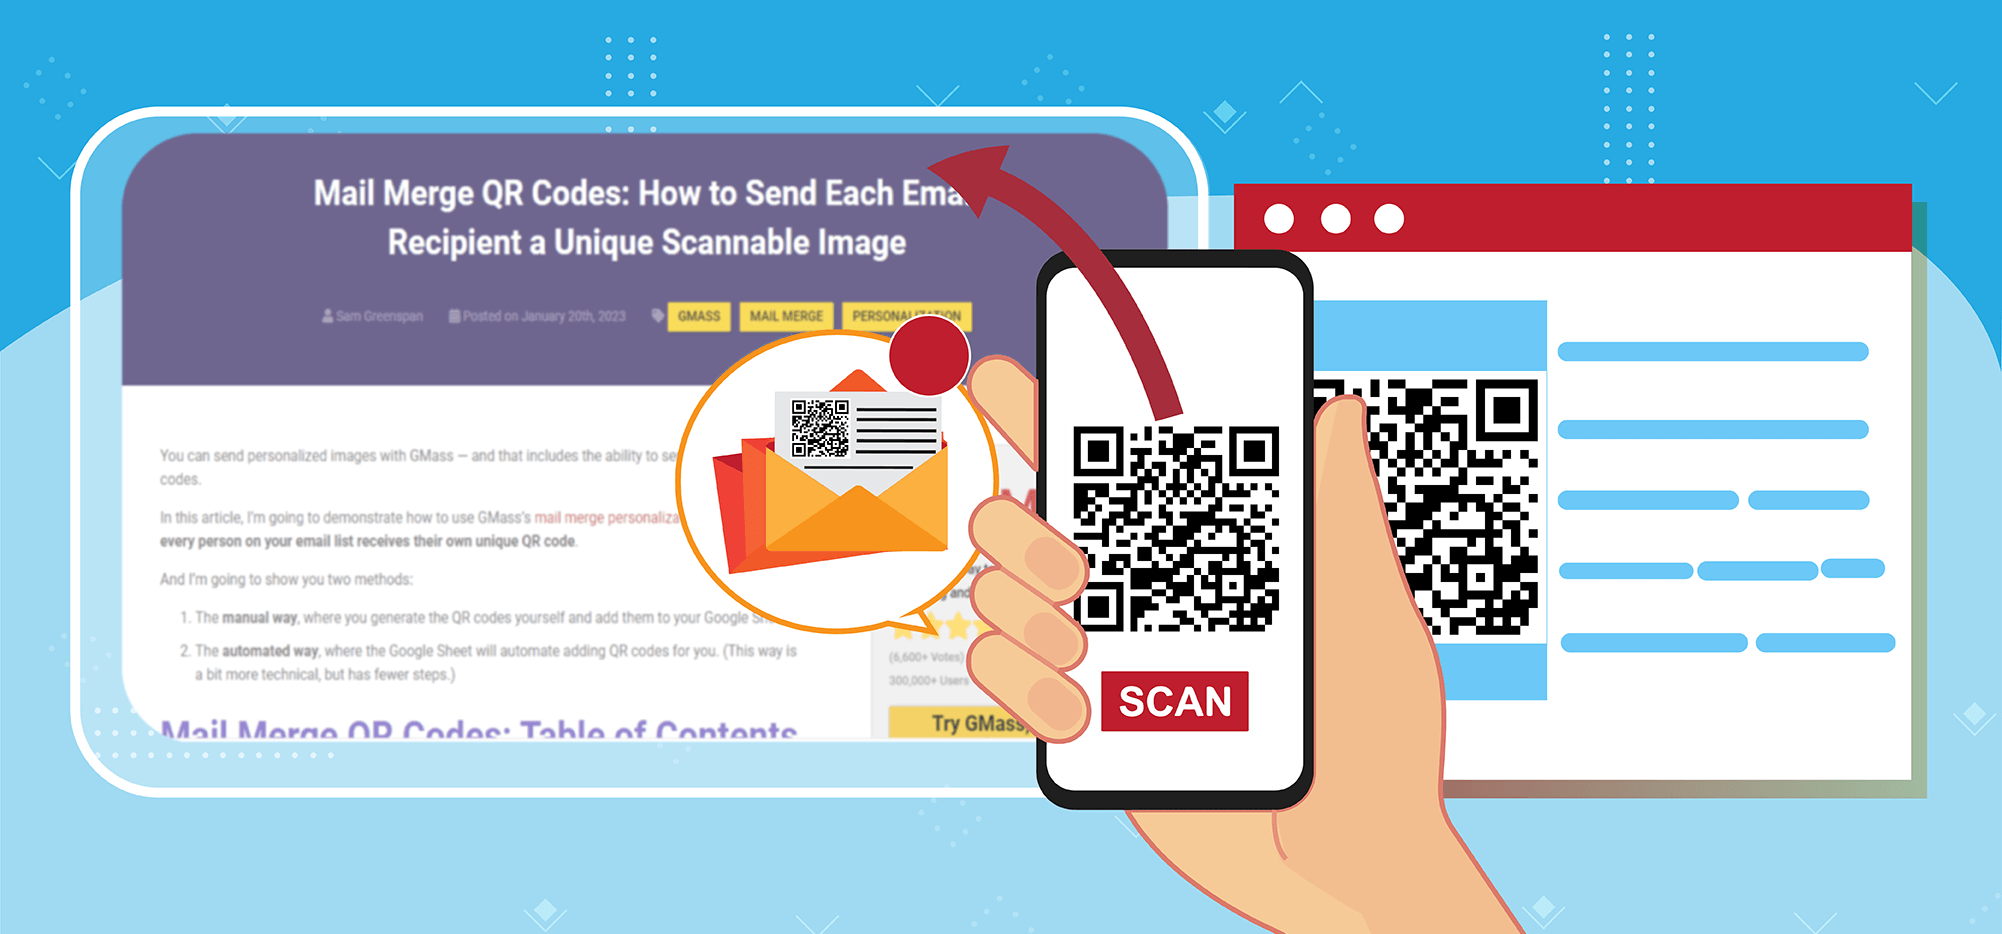
You can send personalized images with GMass — and that includes the ability to send mail merge QR codes.
In this article, I’m going to demonstrate how to use GMass’s mail merge personalization features so every person on your email list receives their own unique QR code.
And I’m going to show you two methods:
- The manual way, where you generate the QR codes yourself and add them to your Google Sheet.
- The automated way, where the Google Sheet will automate adding QR codes for you. (This way is a bit more technical, but has fewer steps.)
Mail Merge QR Codes: Table of Contents
- Before You Begin: Google Drive Permissions and Folders
- Option 1: Manually Creating and Entering Your QR Codes
- Option 2: Having Google Sheets Generate QR Codes, Upload Them, and Create Image Links for You
- The Last Step: Sending Your Mail Merge Email with Personalized QR Codes
- Mail Merge QR Codes: Next Steps
Before You Begin: Google Drive Permissions and Folders
In this article, I’m going to use Google Drive as a place to store and host my mail merge QR codes. It’s generally the tidiest solution and keeps everything — your sheet of contacts, your email campaign, and your QR code images — inside of Google’s ecosystem together.
And you’ll need to give GMass permission to access your Google Drive to insert the QR codes in your emails. Plus you need a folder on your Google Drive to store those QR codes.
So we’ll take care of both of those steps first.
Giving GMass permission to grab the QR code images from Google Drive
At GMass, never want to ask your permission for something we don’t need — which is why we only ask for Google Drive permission if you’re planning to use it. In this case, you are.
So before you get started, click this link to give GMass the proper Drive access permissions.
If you want to host your QR code images elsewhere, like Dropbox or your own server, you can do that as well. (Check out instructions in our personalized images article.) However, for this demo, we’re using Google Drive.
Creating a folder in Google Drive to store your QR code images
Go to Google Drive. Navigate to wherever you want to create your folder for the QR codes. (I’m just putting mine in the default My Drive folder.)
Click on the New button in the top left, then choose New Folder.
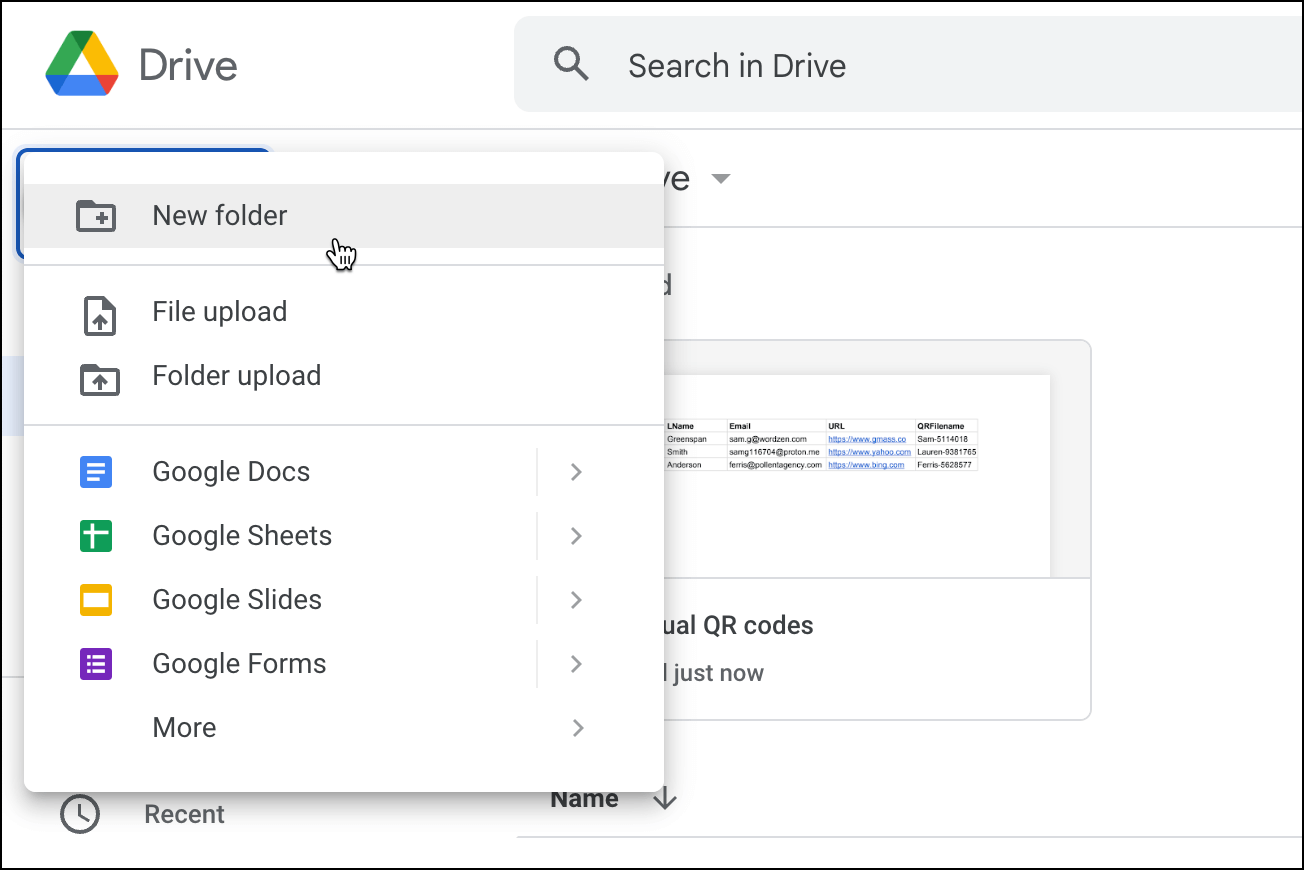
Google Drive is now ready to go.
Time to make some QR codes.
Option 1: Manually Creating and Entering Your QR Codes
For the first option, I’m going to show you how you can manually create QR codes and put them into your Google Sheet of contacts to send out a mail merge email with those personalized codes in GMass.
Create your QR codes
The easiest way to prepare QR codes at scale is to enter the QR code data into a spreadsheet, export the sheet as a CSV file, then upload it to a bulk QR code generator.
QRExplore.com has a free bulk generator for creating up to 100 QR codes at a time. Based on my research, that’s about as good as you’re going to do for free.
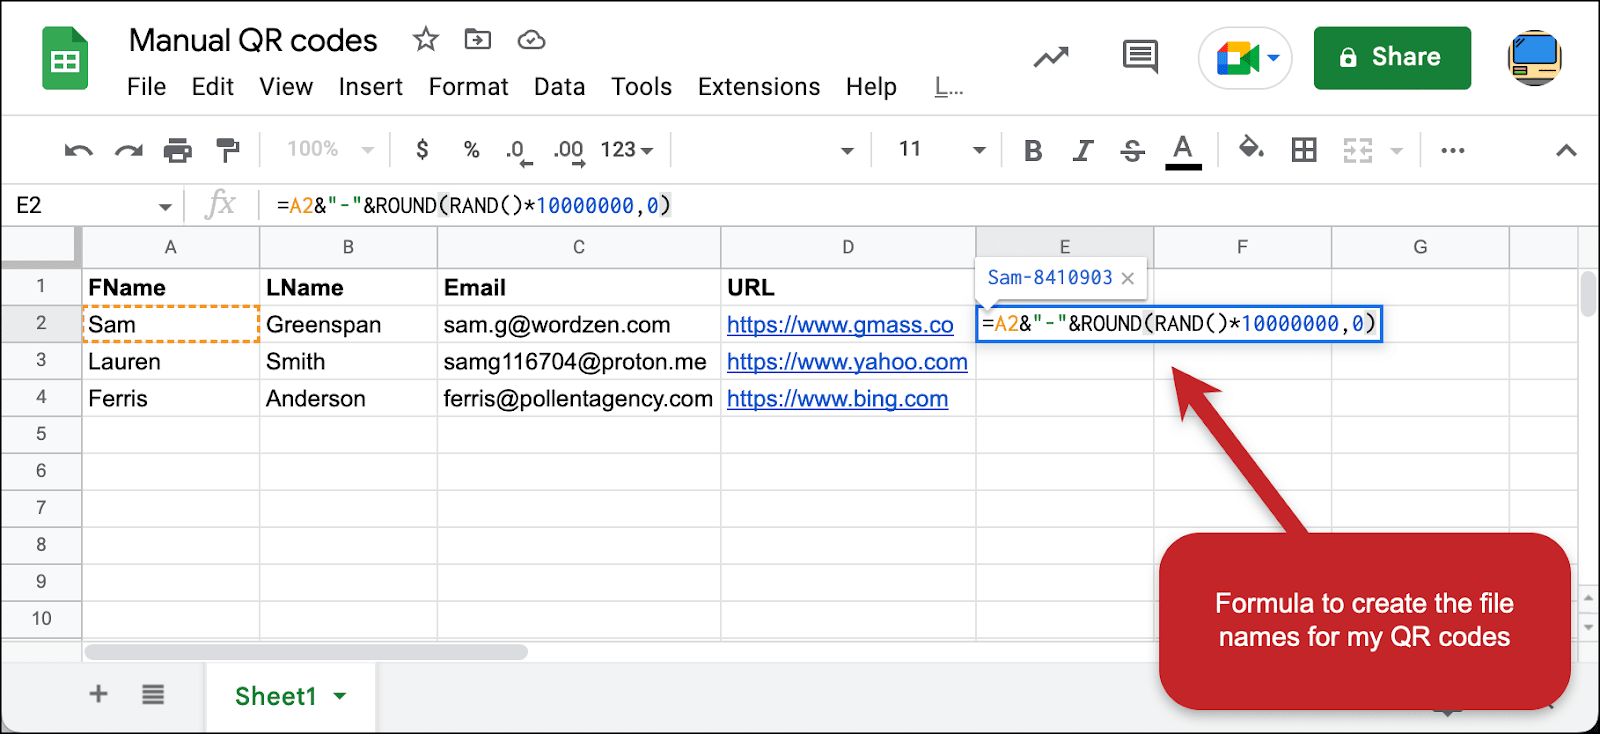
Prepare your data by creating a Google Sheet with two columns: the URL you want each QR code to link to, and a file name for that QR code.
Here’s how I did it.
Open the spreadsheet for my campaign featuring the contacts. It has the URLs I want to use in each of their QR codes in the URL column.
Then use Google Sheets functions to create file names with each contact’s first name plus a random number. (My formula was =A2&"-"&ROUND(RAND()*10000000,0).)
Copy the URL column and file names columns to a new sheet (Sheet2) and paste the results as values.
Now download Sheet2 as a CSV file.

At QRExplore’s Bulk QR Code Generator, drag the CSV into the QR code window to upload it.
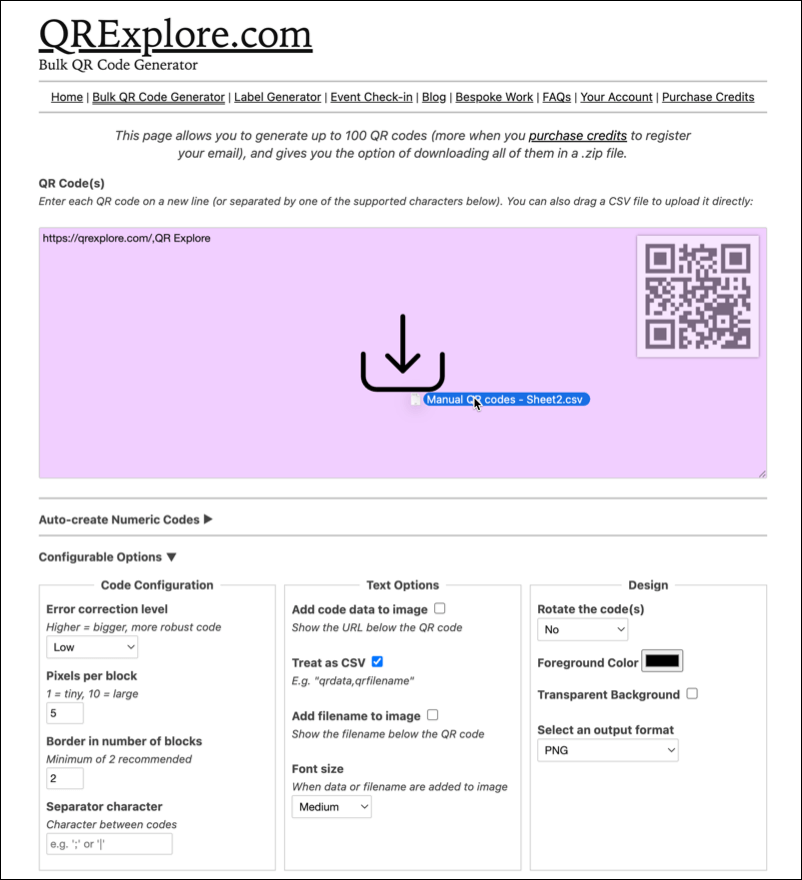
When all looks correct, generate your QR codes.
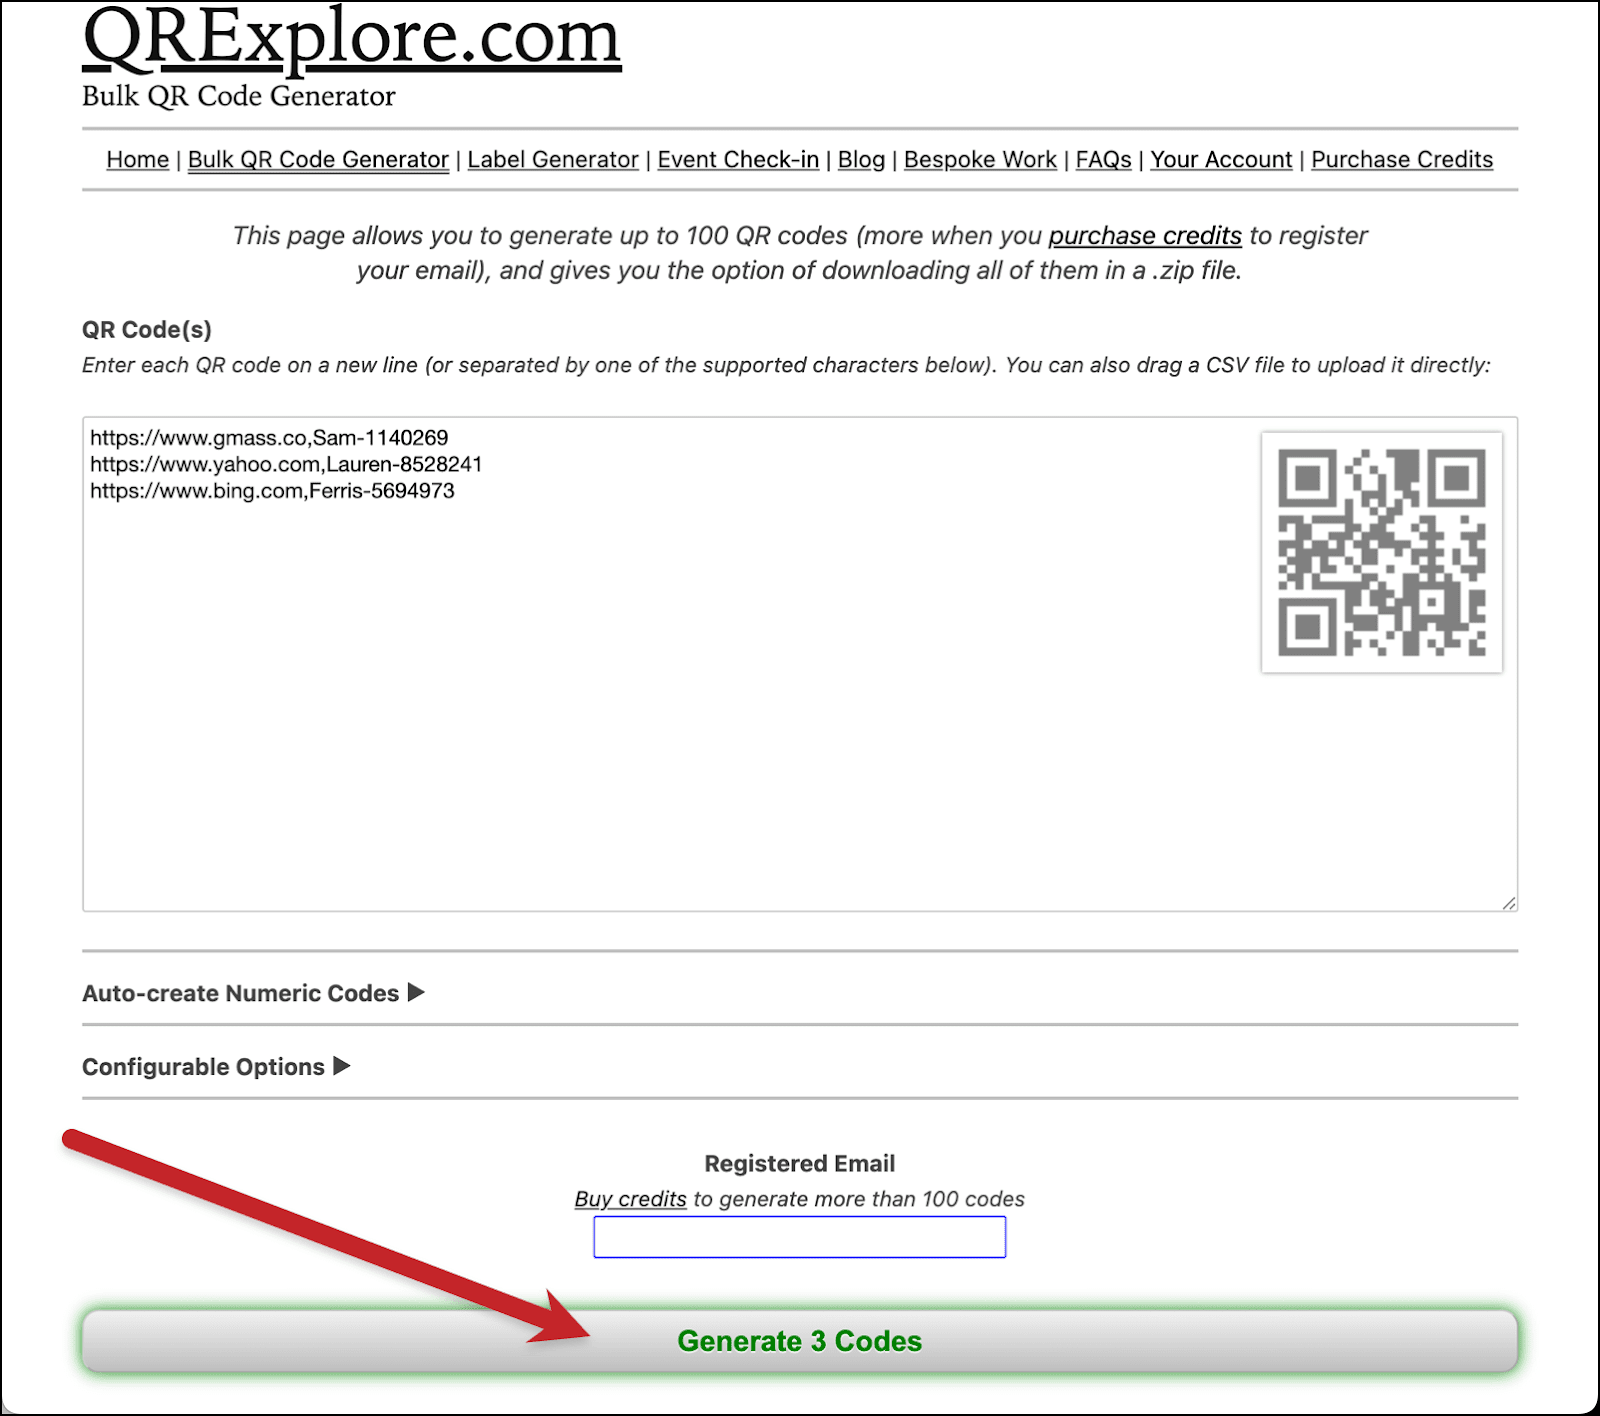
Then download the zip file of all the codes.
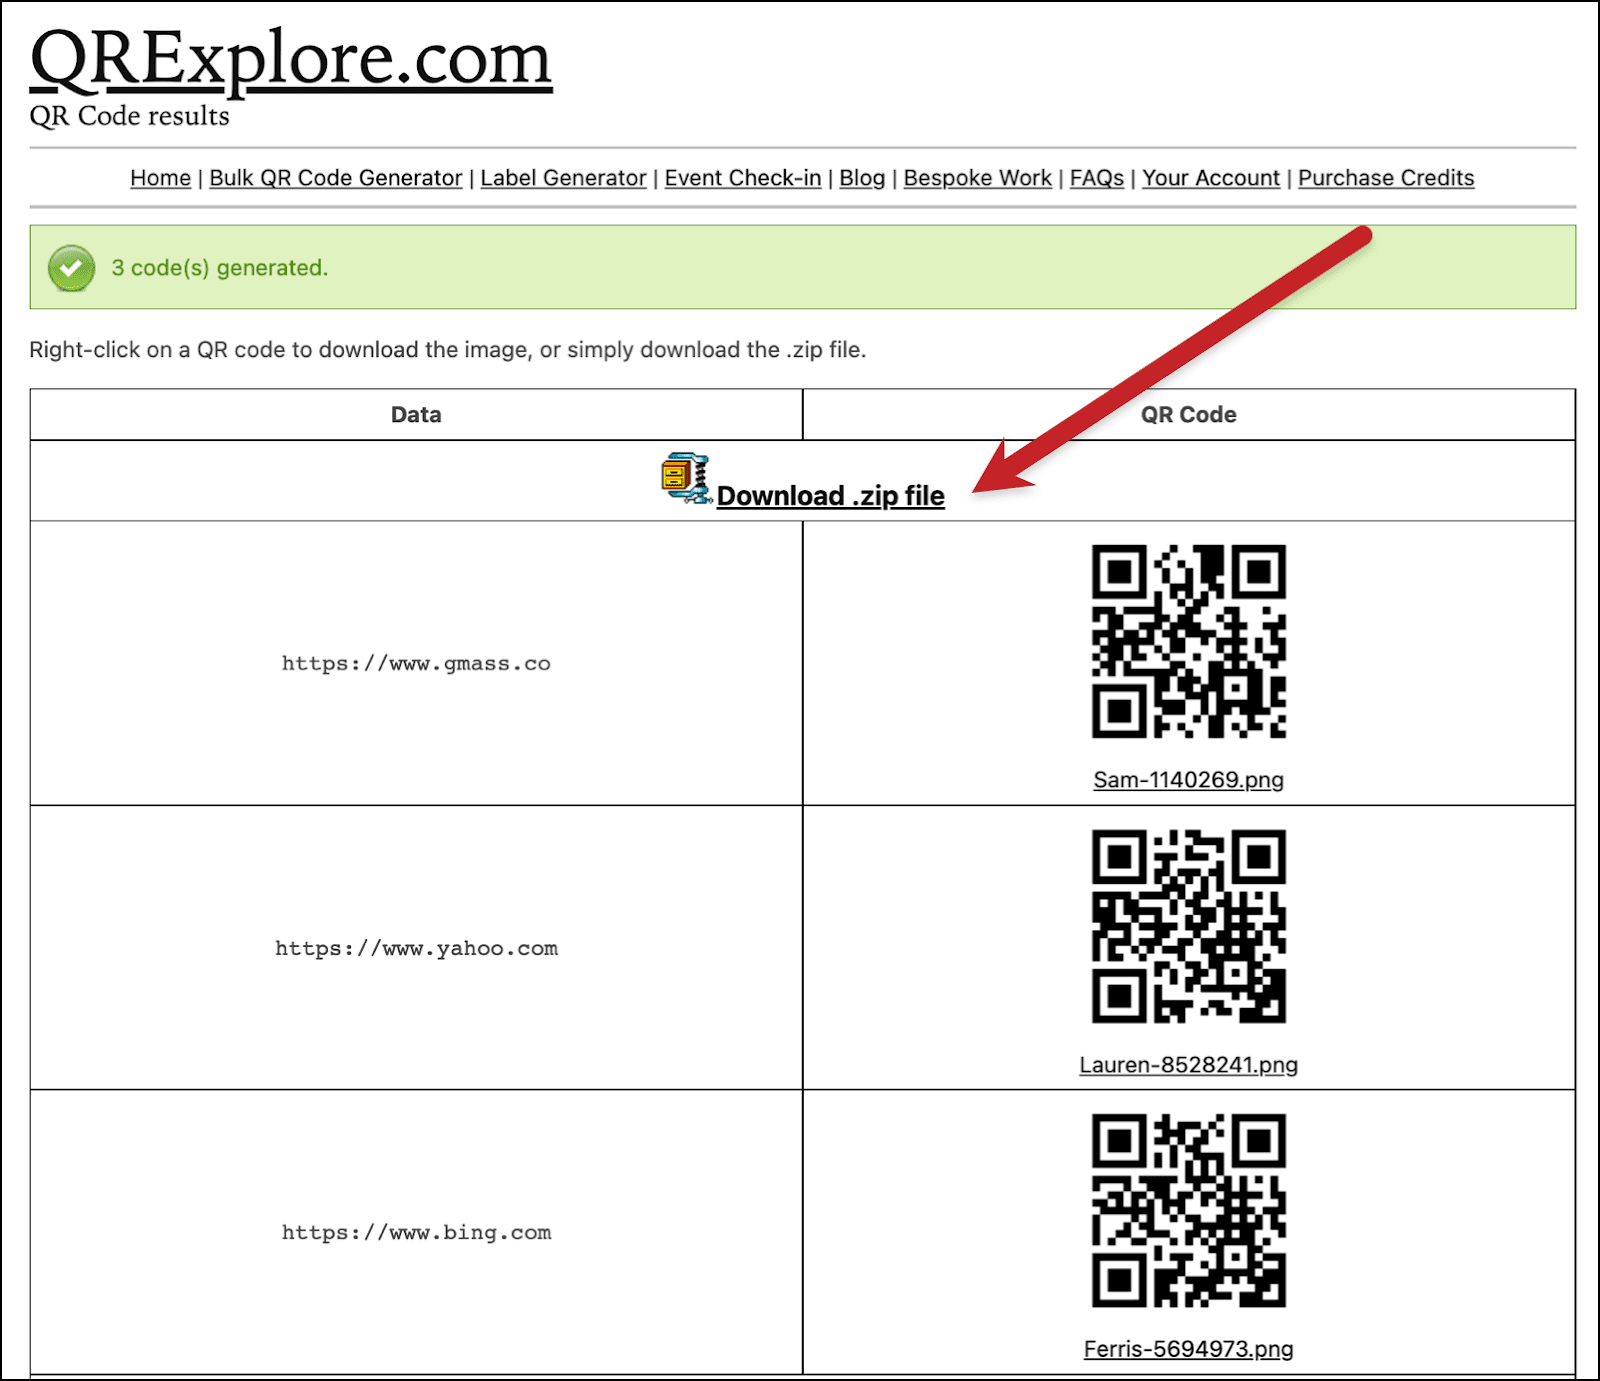
Unzip the file and you should have all the PNG files ready to upload.
Uploading the QR codes to Google Drive
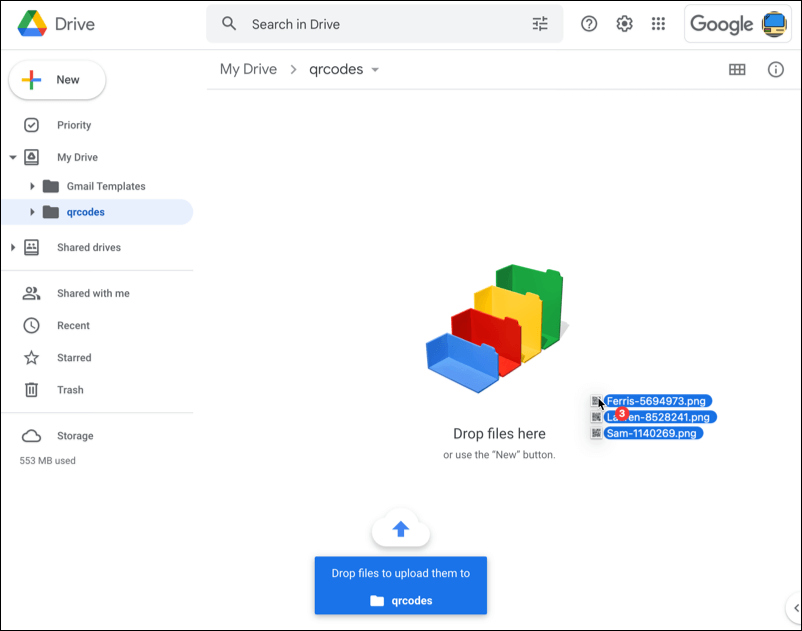
Go back to Google Drive and open the folder you created to store your QR code images.
Now drag in the QR code images from your hard drive. Don’t drag in the zip file, drag in the individual QR images.
Next we have to make sure anyone has permission to view these files. Select all three files. (Click on the one at the top of the list, hold the Shift key, then click on the one at the bottom of the list.)
Right click to bring up the options menu. Choose Share.
Under General access, switch from Restricted to Anyone with the link. Give anyone with the link Viewer permission. (That’s the default.)
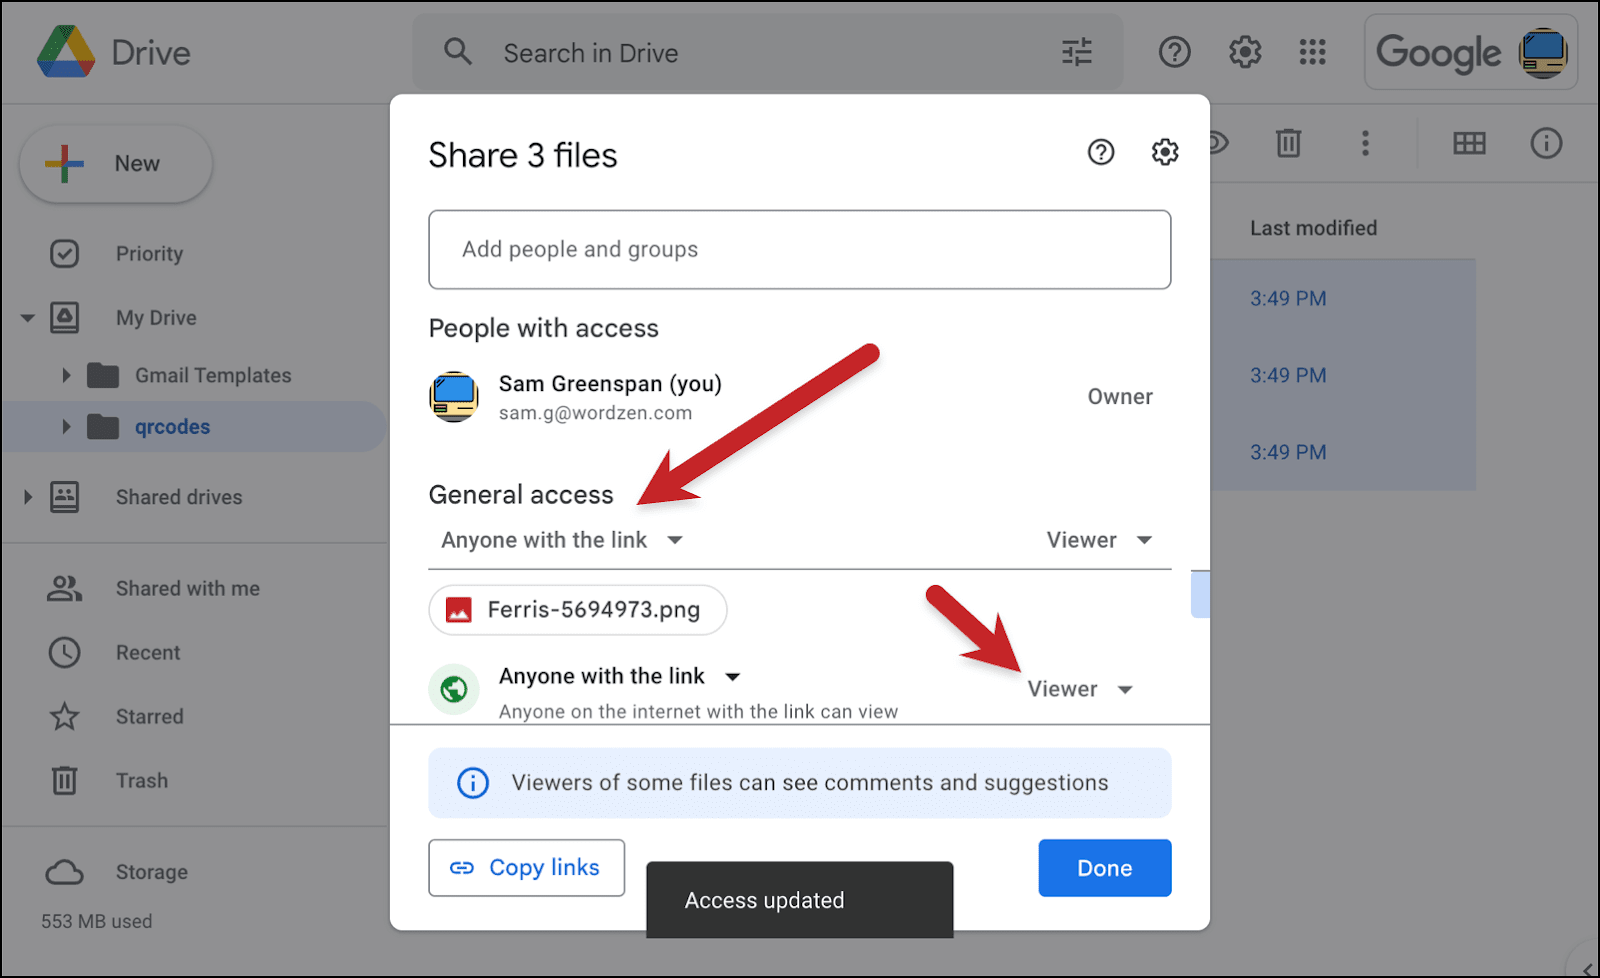
Next hit the Copy links button on the bottom left of the window.
Once it tells you the links are copied, click the Done button.
Adding the QR code links to your Google Sheet
Now return to your Google Sheet of contacts. Create a new sheet, Sheet3. This is where we’ll prep the links from Google Drive for the mail merge.
We have to do a few annoying copy/paste techniques because of how Google Drive prepares the copied files. It turns them all into a comma-separated list.
So we’ll need to…
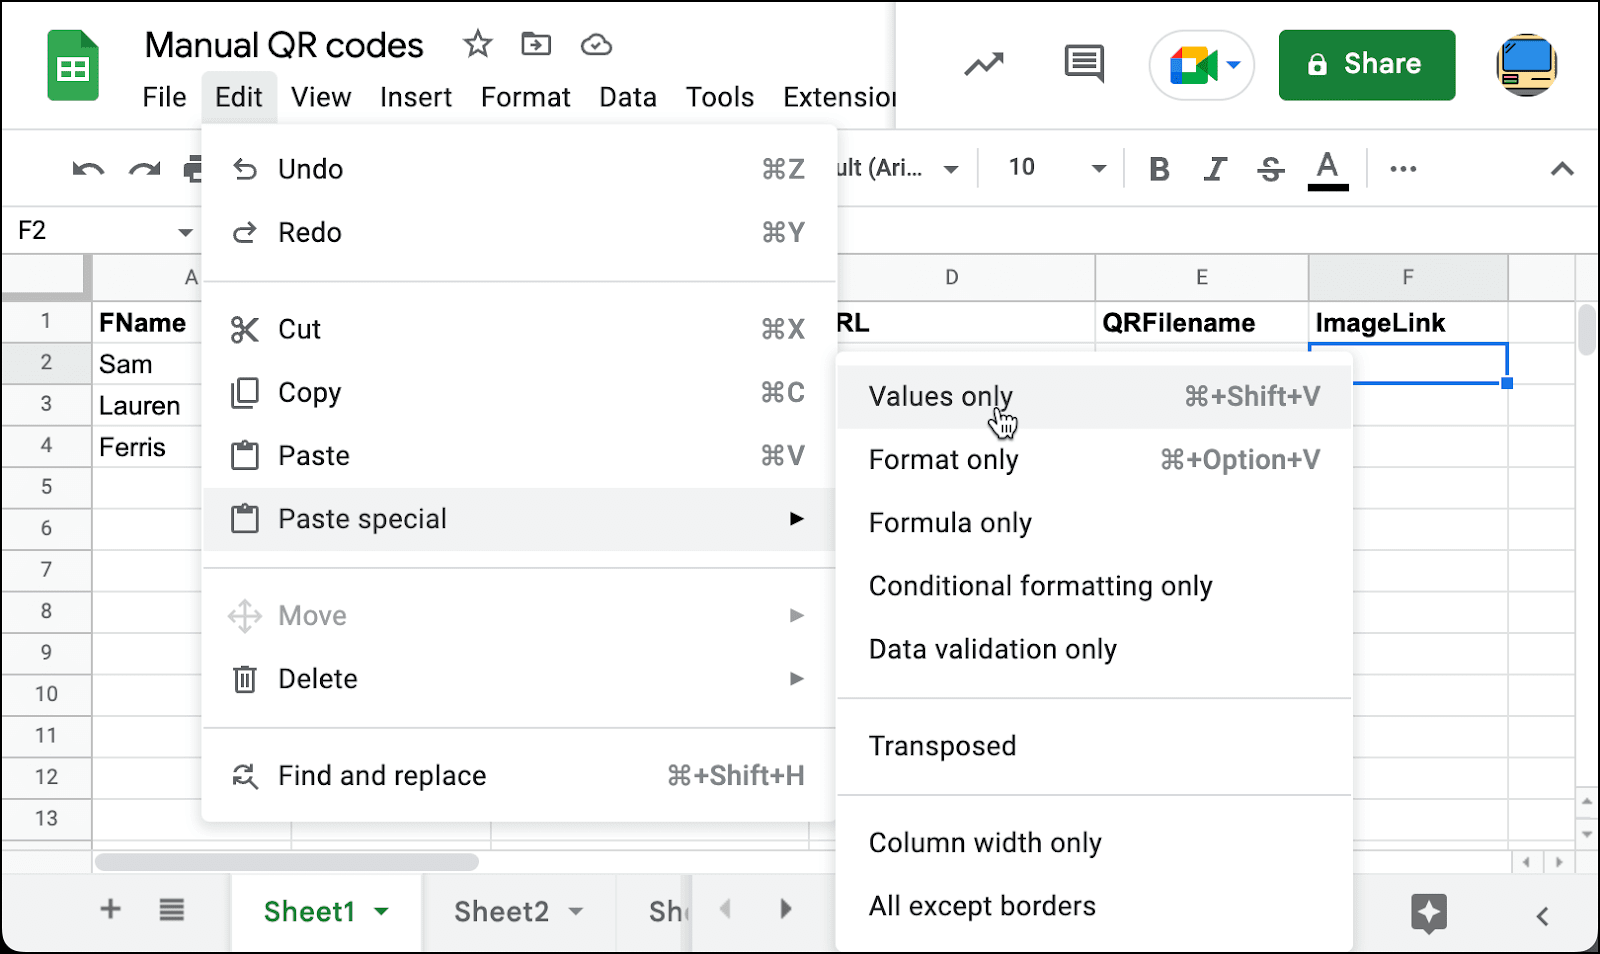
- Click into cell A1 on Sheet3 and hit paste.
- In cell A2, enter this formula:
=SPLIT(A1,", "). Don’t forget the space after the comma that’s inside the quotes. - Select everything in the second row. Click Copy.
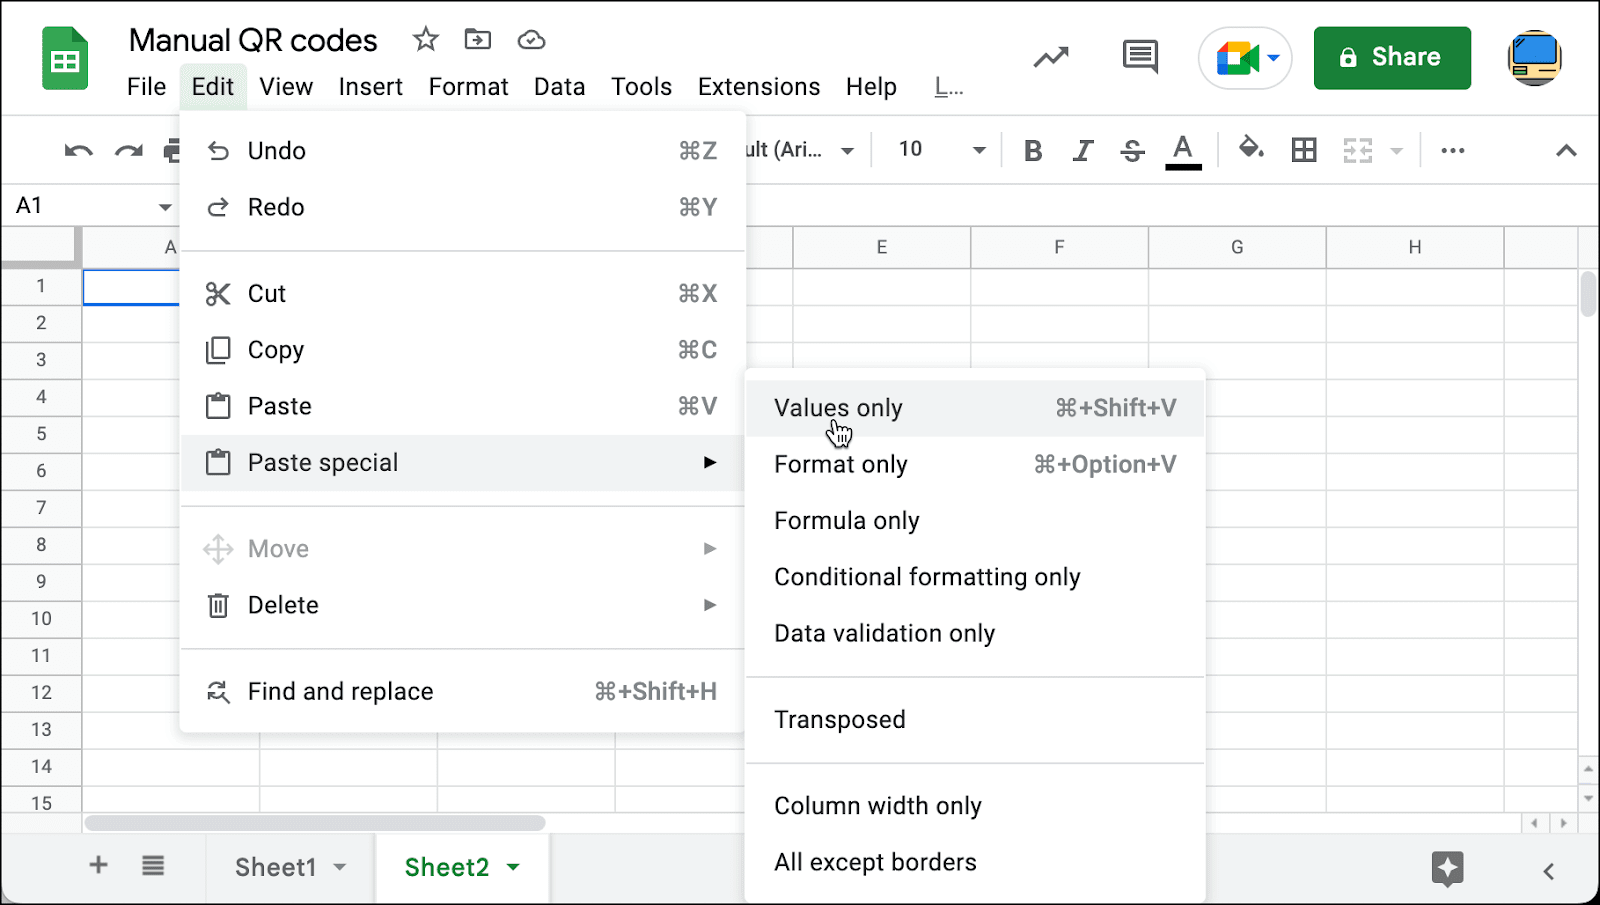
- In cell A3, click Edit > Paste special > Values only.
- Select everything in the third row. Click Copy.
- In cell A4, click Edit > Paste special > Transposed.
Now we have each Google Drive link on its own line.
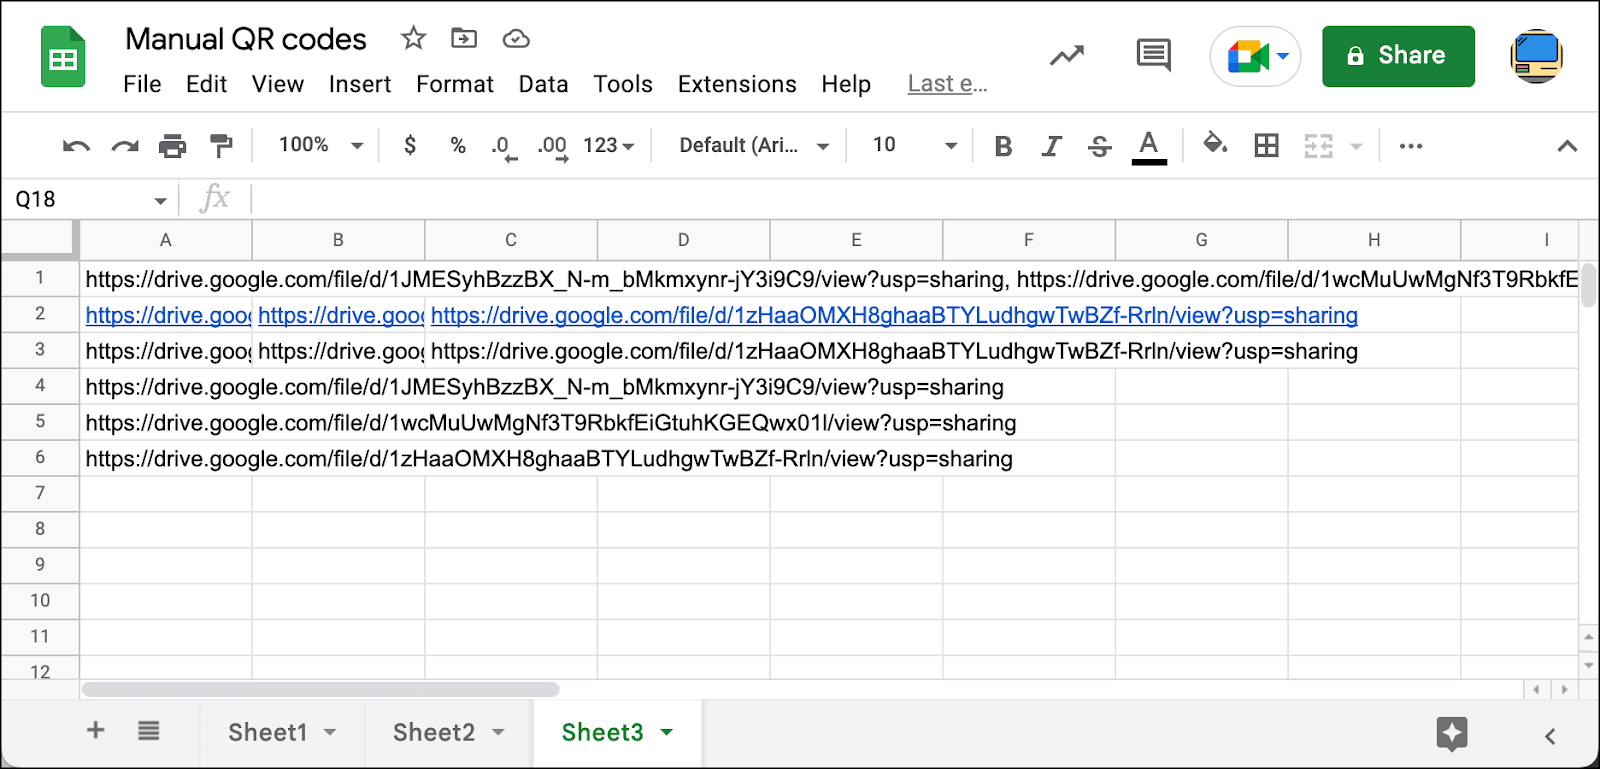
Delete rows 1, 2, and 3. That will leave you with just the URLs as they’re supposed to be.
Once that’s done, we can now adapt these for mail merge. Because, you see, Google didn’t give you direct links to the images. They gave you links to Google Drive pages featuring those images. And to mail merge QR codes (or any images), we need to grab the image links themselves.
Yes, I recognize this is cumbersome.
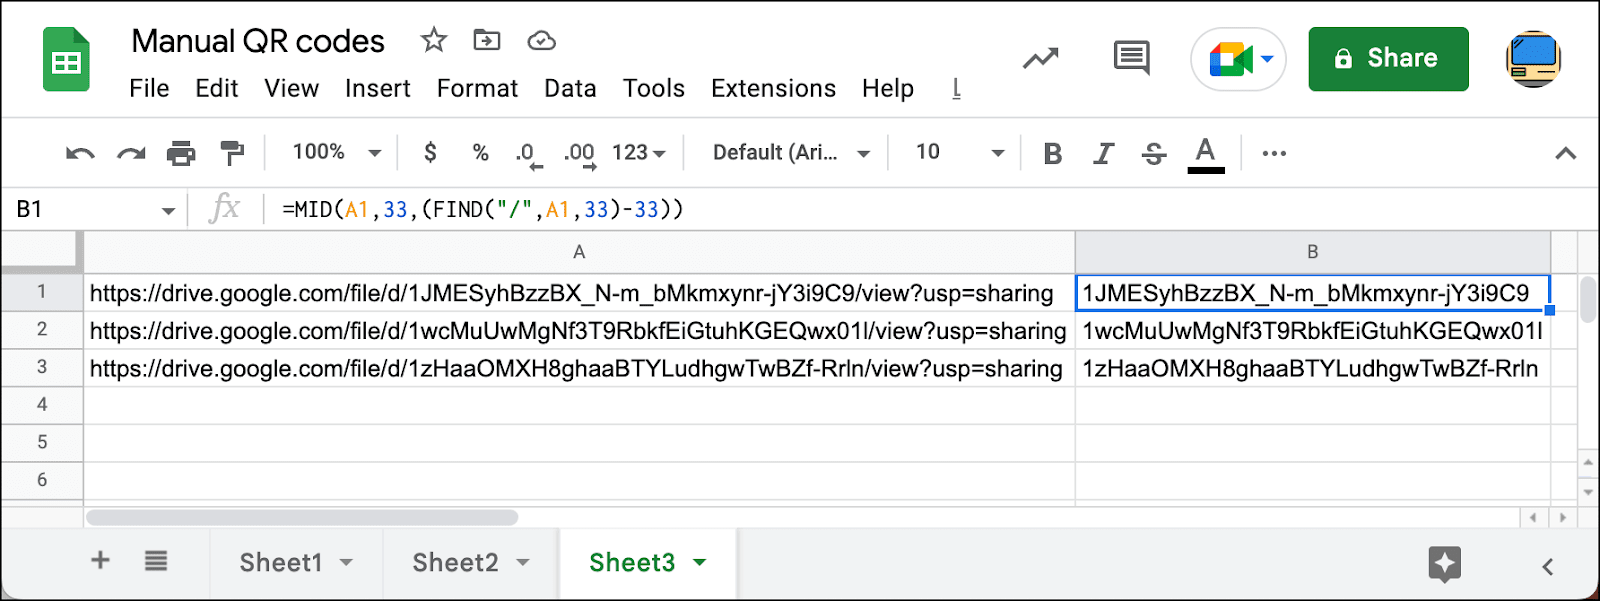
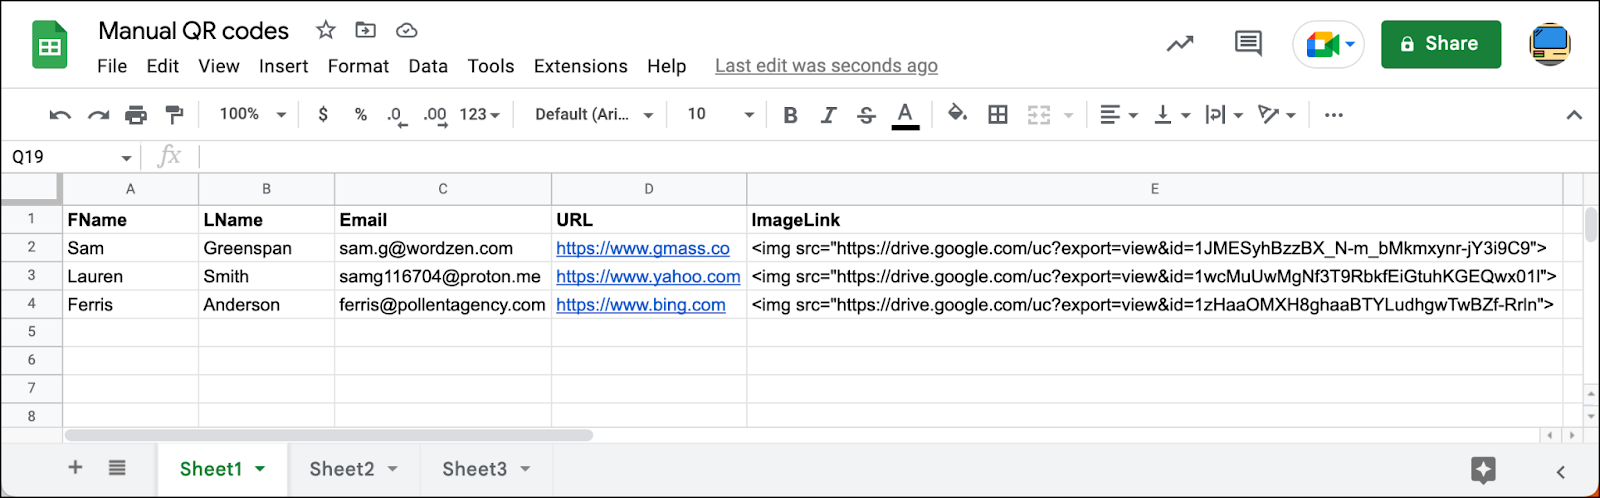
In B1, type in the following formula: =MID(A1,33,(FIND("/",A1,33)-33)). We’re extracting the file ID from the string. We know it starts at the 33rd character and we’re accounting for the possibility it could be any length. Then drag that formula down to the rest of the rows.
We’re ready to build our mail merge links.
In C1, type the following =CONCATENATE("<img src=""https://drive.google.com/uc?export=view&id=",B1,""">") . You need all those double quotes in there because that’s how you escape quotation marks in this particular Google Sheets scenario. Now drag that formula down to the rest of the cells in the column.
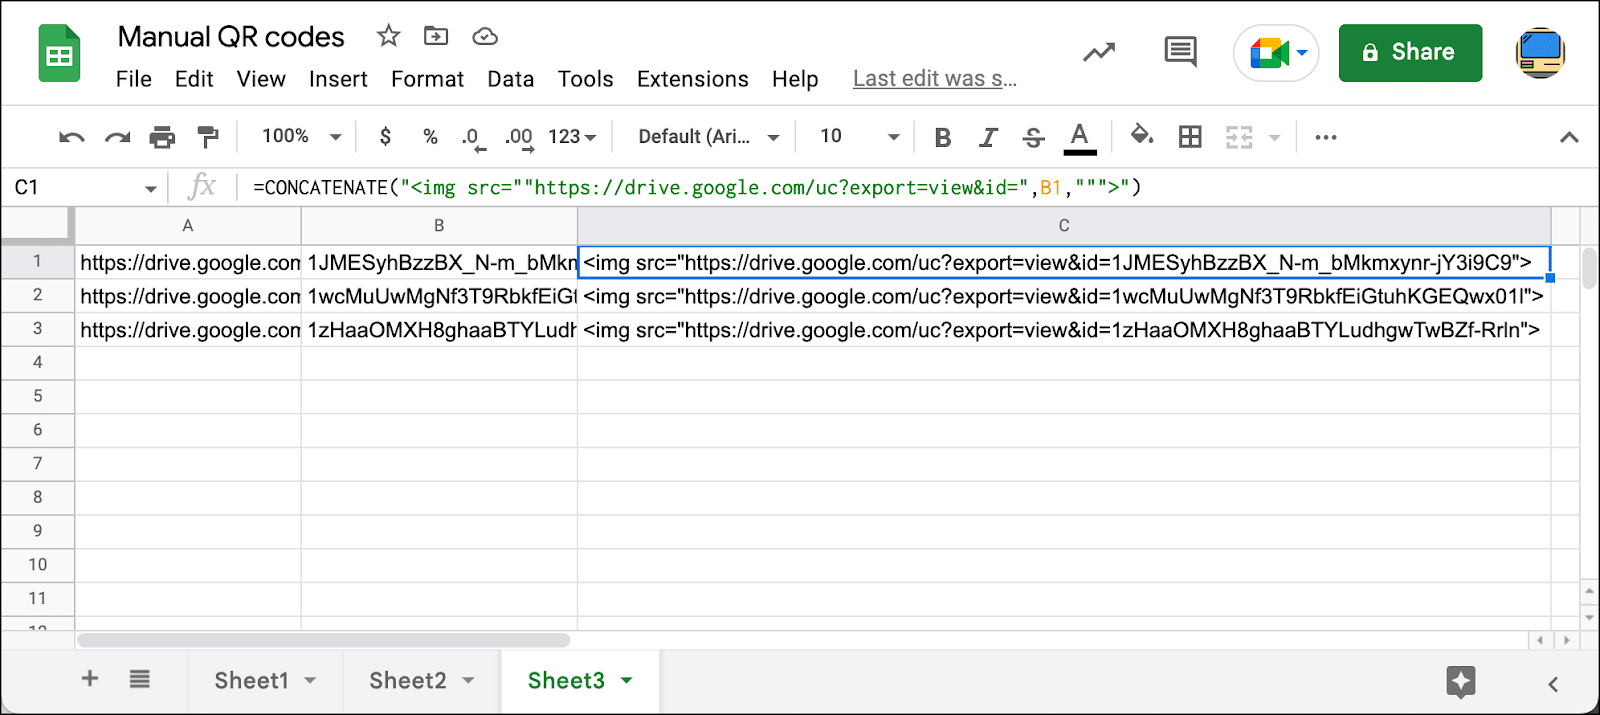
And finally, copy everything in column C.
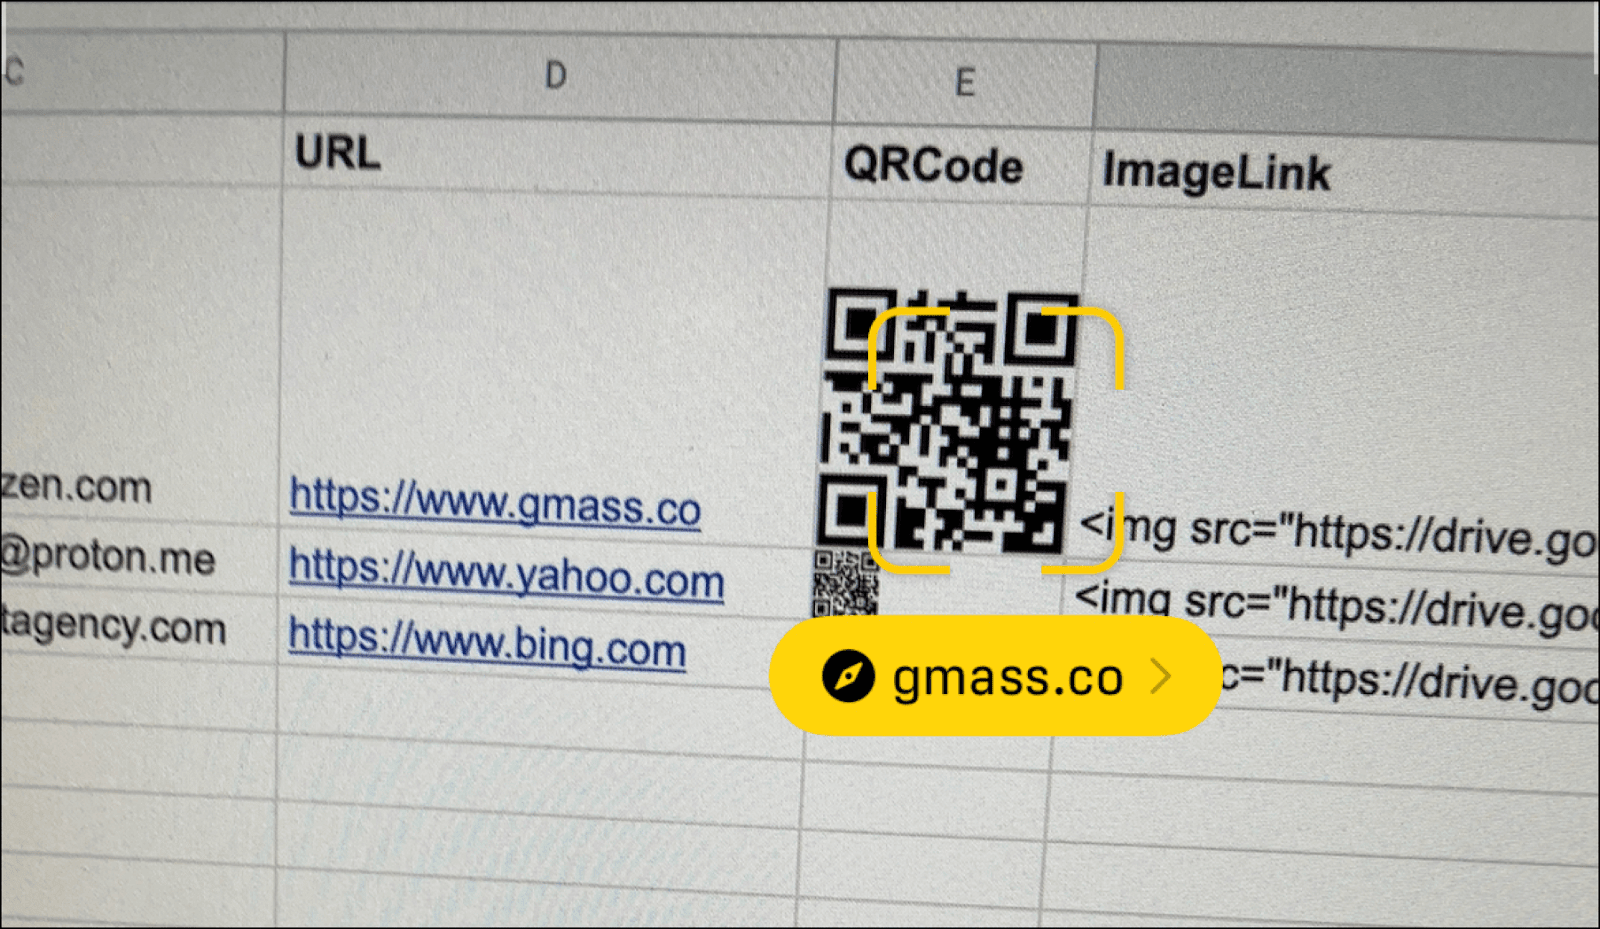
Go to Sheet1. Create a new column called ImageLink. Then, in the second row of that column, use Edit > Paste special > Values only to paste in your ready-for-mergin’ QR code links.
You can also delete the QRFilename column, as we won’t need that anymore. Which leaves us with a glorious final result of…
You can also delete Sheet2 and Sheet3 if you want.
And you’re ready to send… so you can now skip down to the section on sending your mass email with personalized QR codes.
Option 2: Having Google Sheets Generate QR Codes, Upload Them, and Create Image Links for You
Here’s the other way to add QR codes to your mail merge campaigns: Let the machines handle most of the steps from above.
I wrote a Google Apps Script that automatically generates QR code for each contact in your Google Sheet using the free API from goQR.me… uploads those images to your Google Drive… gives the images proper viewer permissions… then writes formatted image links back to your Google Sheet.
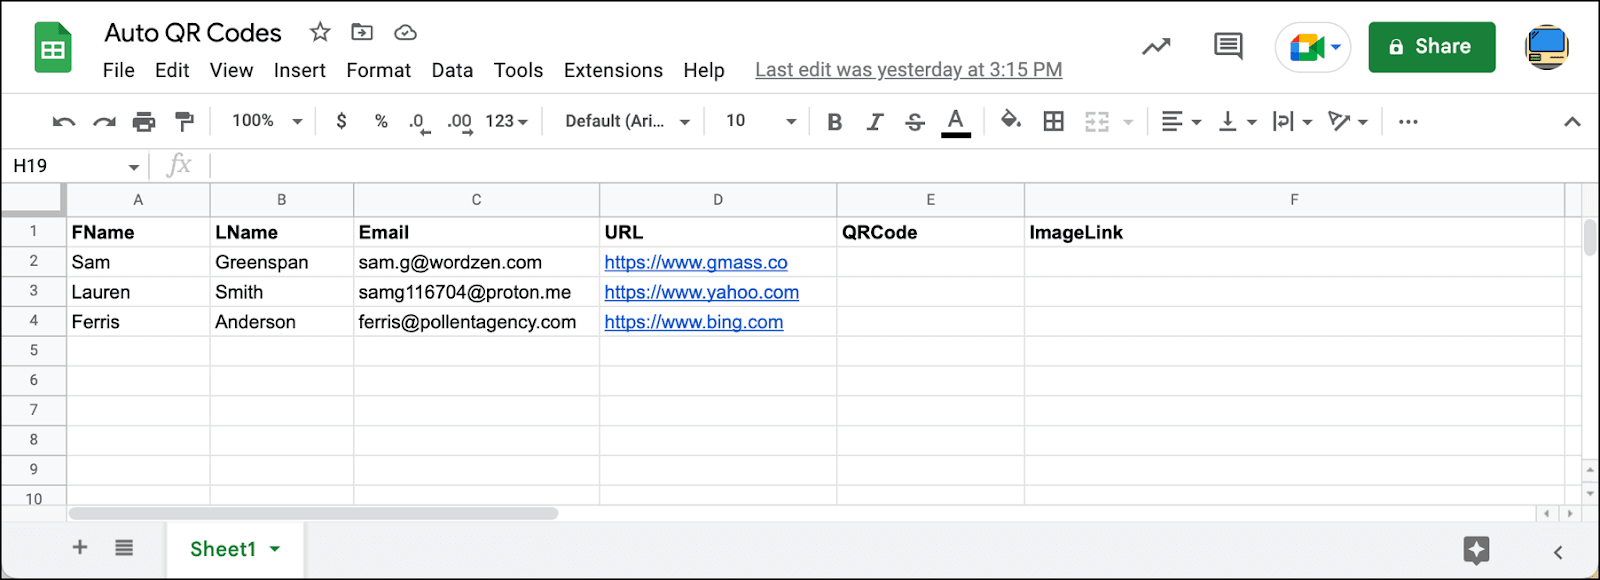
Create a Google Sheet with a few extra columns
Create a new spreadsheet in Google Sheets, or use your current spreadsheet. The URL column is the link you want for your QR code.
I’ve also created two new columns at the end: QRCode, which will be filled in with the actual images of the QR codes so you can preview them… and ImageLink, which will be filled in with the ready-to-merge image link.
Note: If you use different column names, you’ll need to change the Google Apps Script to reflect those column names. You’ll do that in lines 11-14 of the Script if needed.
Create the Google Apps Script (it’s a copy/paste job)
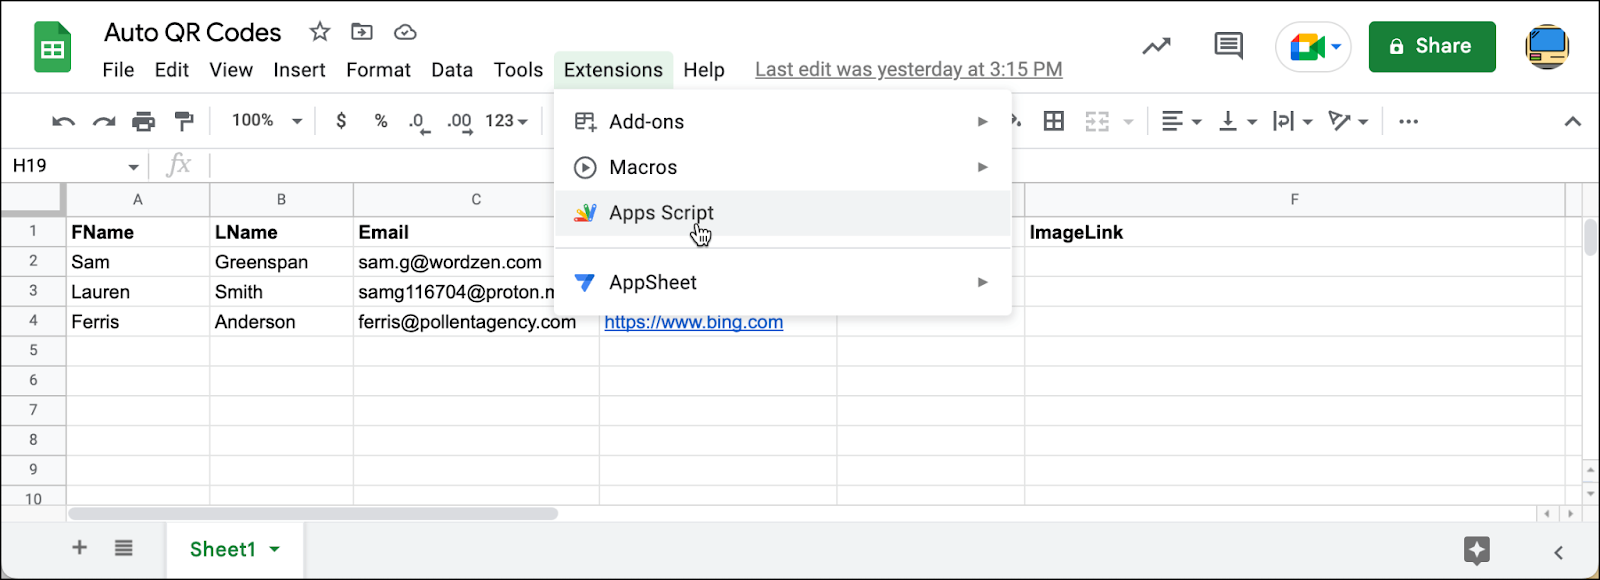
In Google Sheets, go to Extensions > Apps Script.
That will bring up the Apps Script interface.
You can replace Untitled Project with whatever you want (I named mine “QR Code Generator”).
Delete everything in the script window (function myFunction () { }).
Then copy the entire script below and paste it in.
See the Pen
Untitled by Sam G (@samgmass1)
on CodePen.
Your window should now look like this:

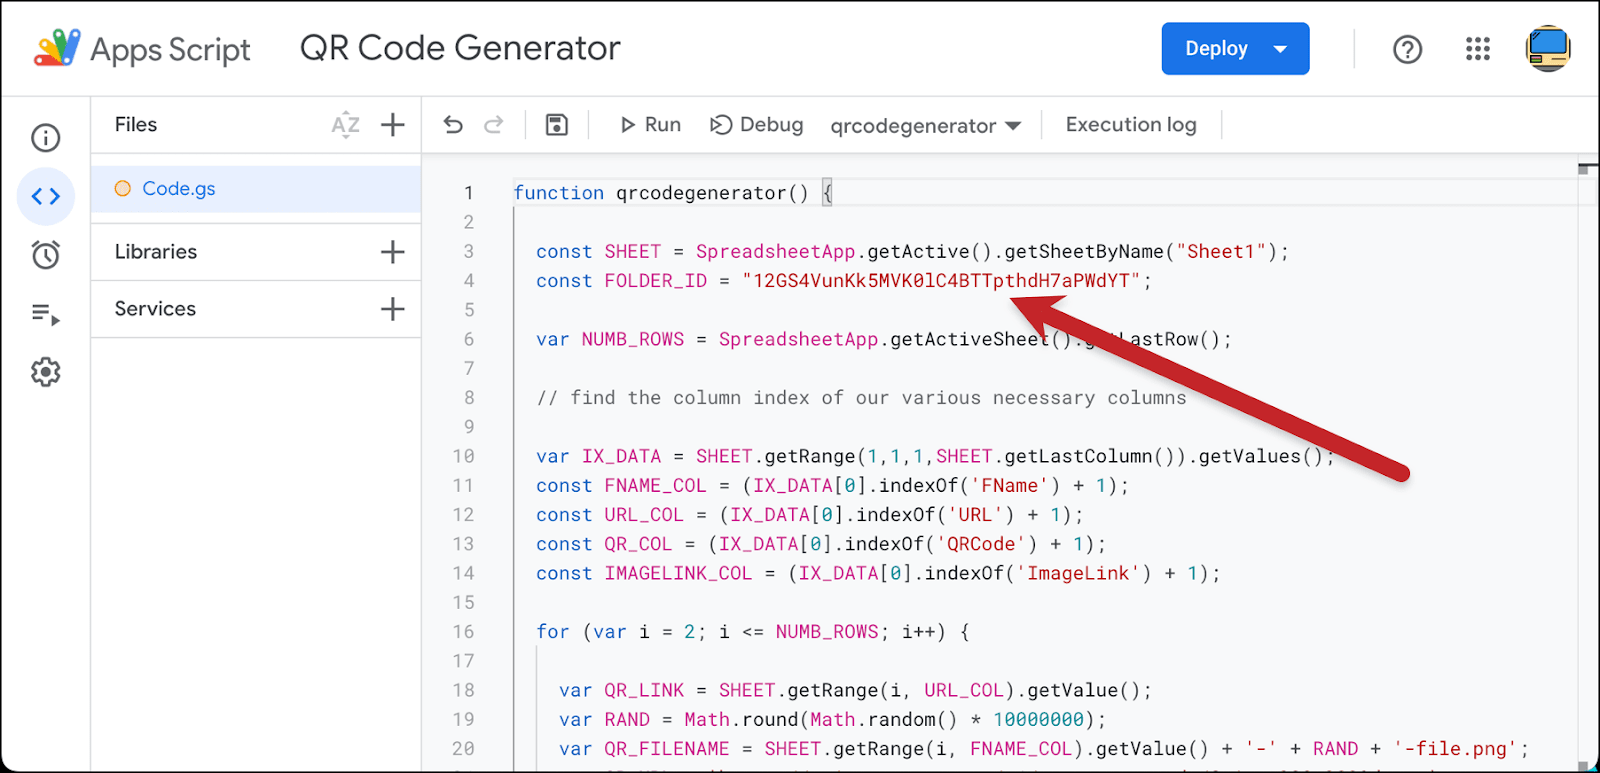
We need to do one thing to the script before it’s ready to roll: Enter the ID of the Google Drive folder where you’re storing the QR code images.
Go to Google Drive and navigate to the folder you created to store these QR codes. In the URL bar, copy the long string of letters and numbers at the end. I’ve highlighted it in the image below.
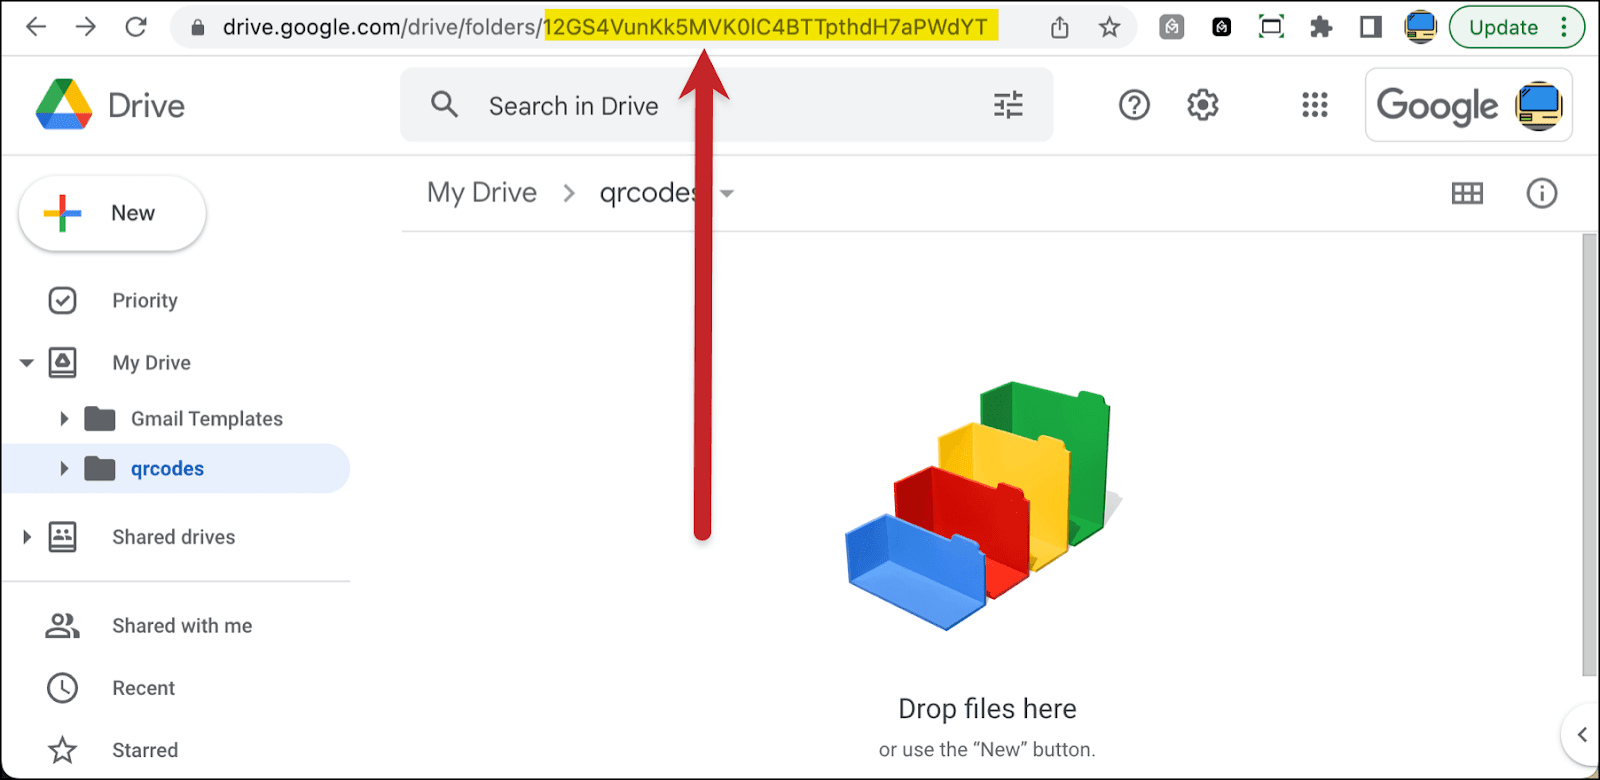
Now paste that long folder ID into the spot in the Google Apps Script where it says REPLACE-THIS-WITH-YOUR-FOLDER-ID.
As I mentioned earlier, if you changed any of the names of the columns in your Google Sheet from the ones I used, you need to add those names in lines 11-14 of this Script. The Script needs to know what your columns are called. It’s case sensitive, so type carefully.
Click the little floppy disk icon above the script window to save your Google Apps Script.
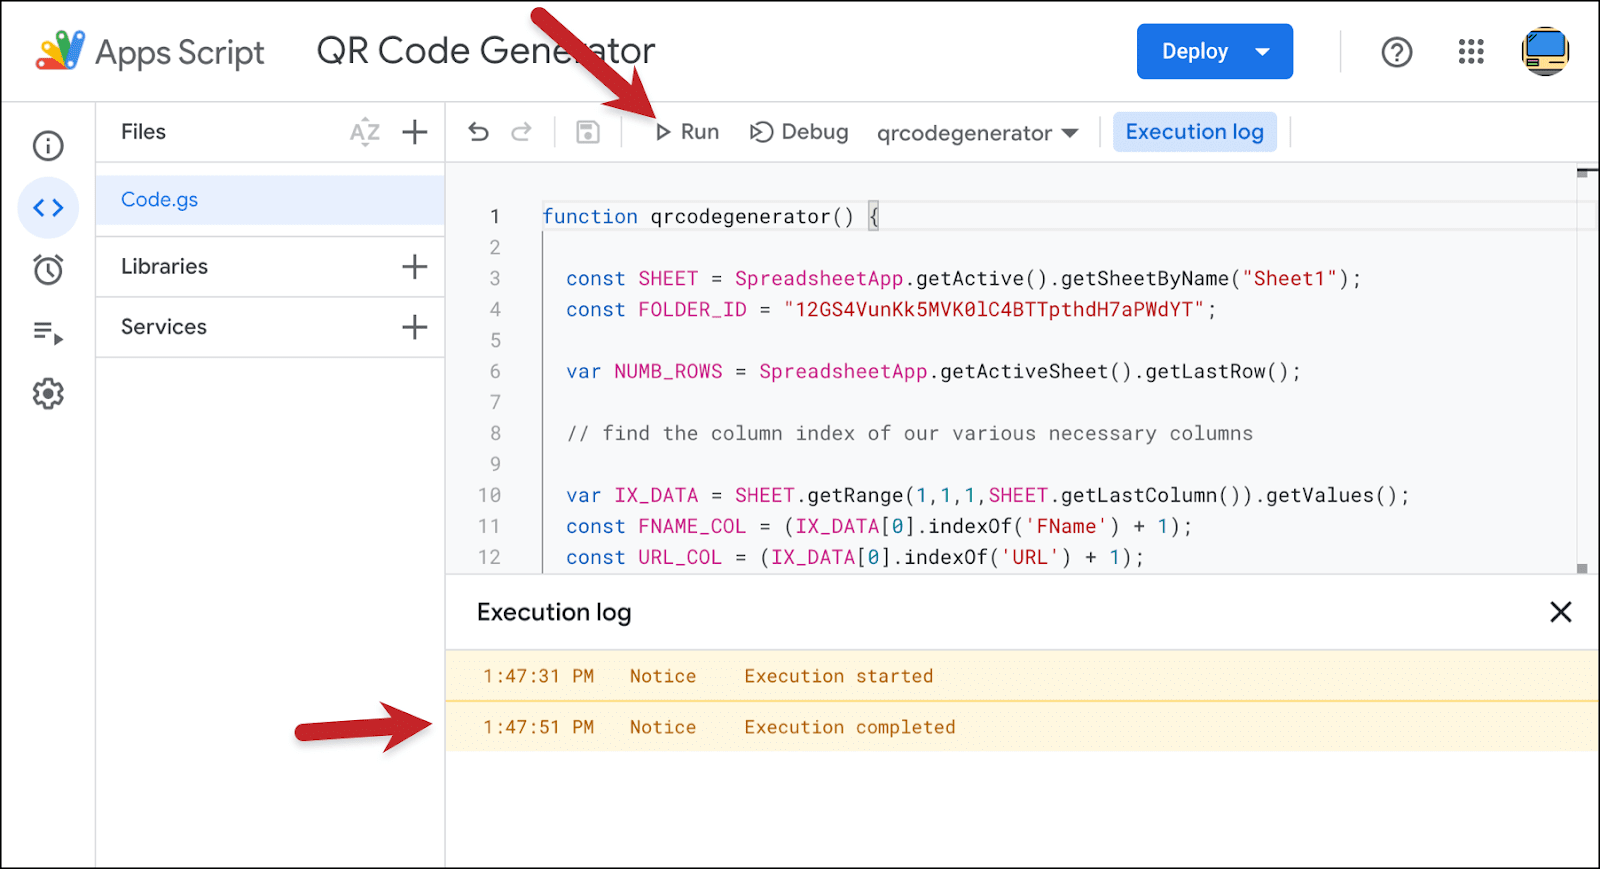
Run the Google Apps Script to generate your QR codes
Hit the Run button above the code window in the Google Apps Script window. It will take a little while, depending on how many QR codes you’re generating — the goQR API has to create them one-by-one.
But when it’s all done, you should see a message in the Execution log window saying it’s complete.
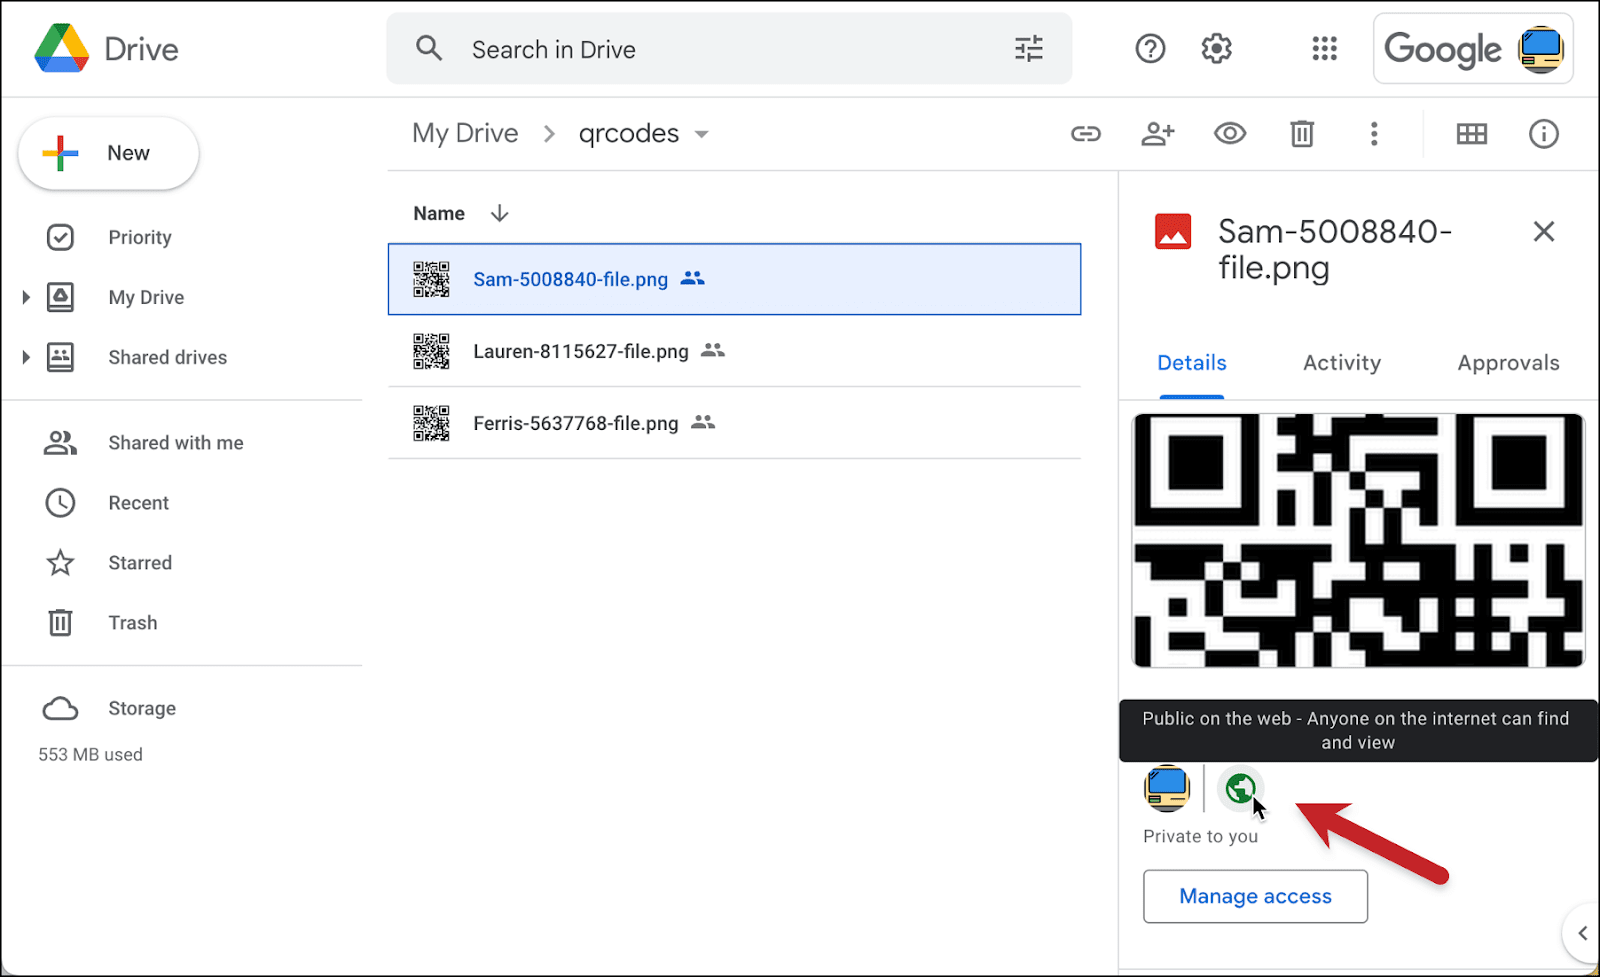
Check your folder in Google Drive. (You may need to refresh.) You should see all your QR code images in the folder. And if you click on one, you’ll see it has the proper permissions.
And in your Google Sheet, you will see little QR code images in the QRCode column and ready-to-mail-merge links in the ImageLink column.

If you want to try out the QR codes there, expand the size of the row, then use your phone to test.
If you ever want to add more rows to the spreadsheet, change the URLs in the QR codes, or make any other alterations, you can just run the same Google Apps Script again. There’s no need to create a new script or paste it in fresh. This script will work any time you want it to on this Google Sheet.
Time to send the mail merge QR codes email.
The Last Step: Sending Your Mail Merge Email with Personalized QR Codes
Whether you entered the codes manually or had Google Sheets create them for you, you’re now ready to send your email campaign.
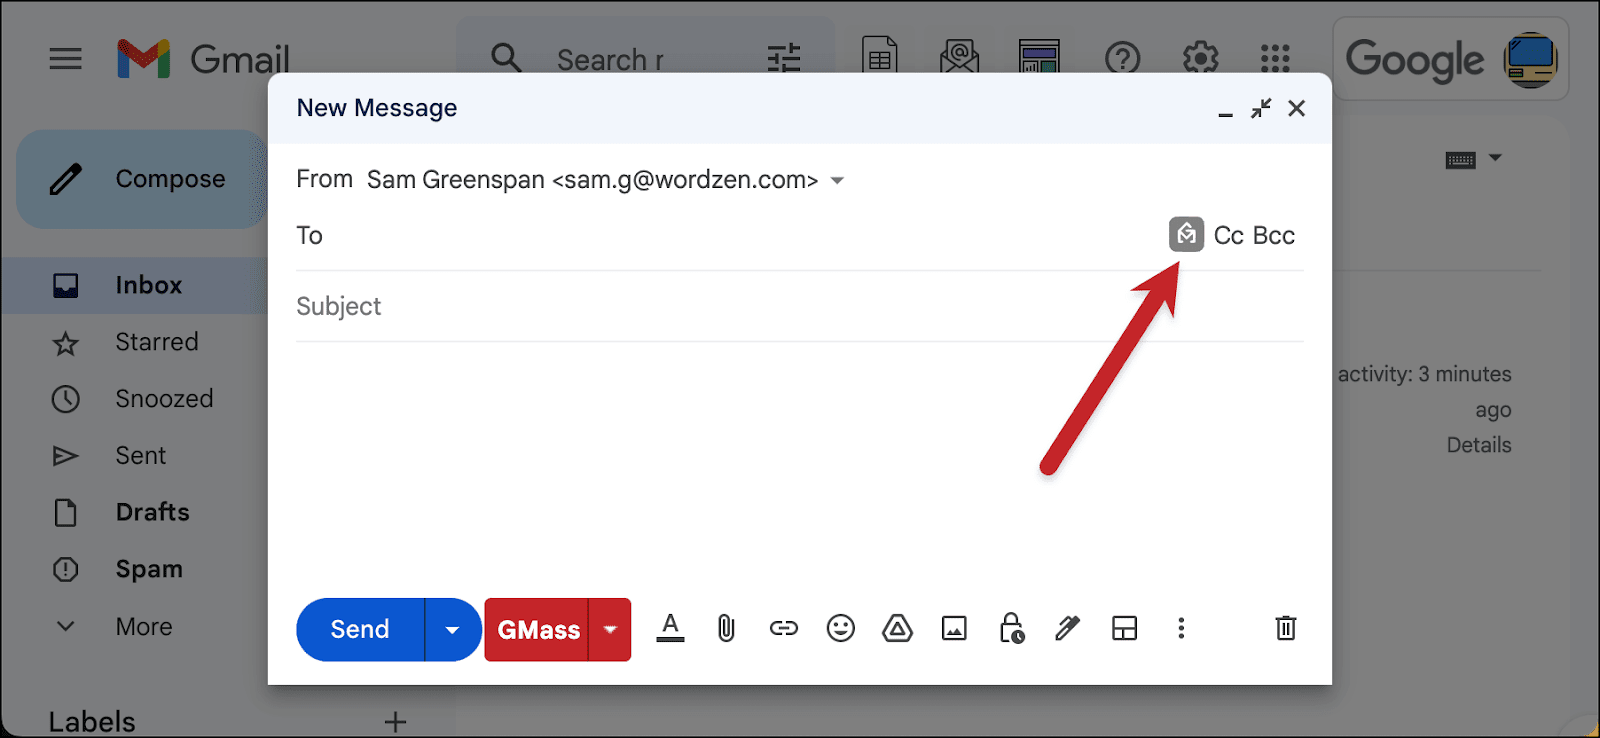
Open a new compose window in Gmail. Then click into the To field, and click the GMass icon to connect to your Google Sheet.
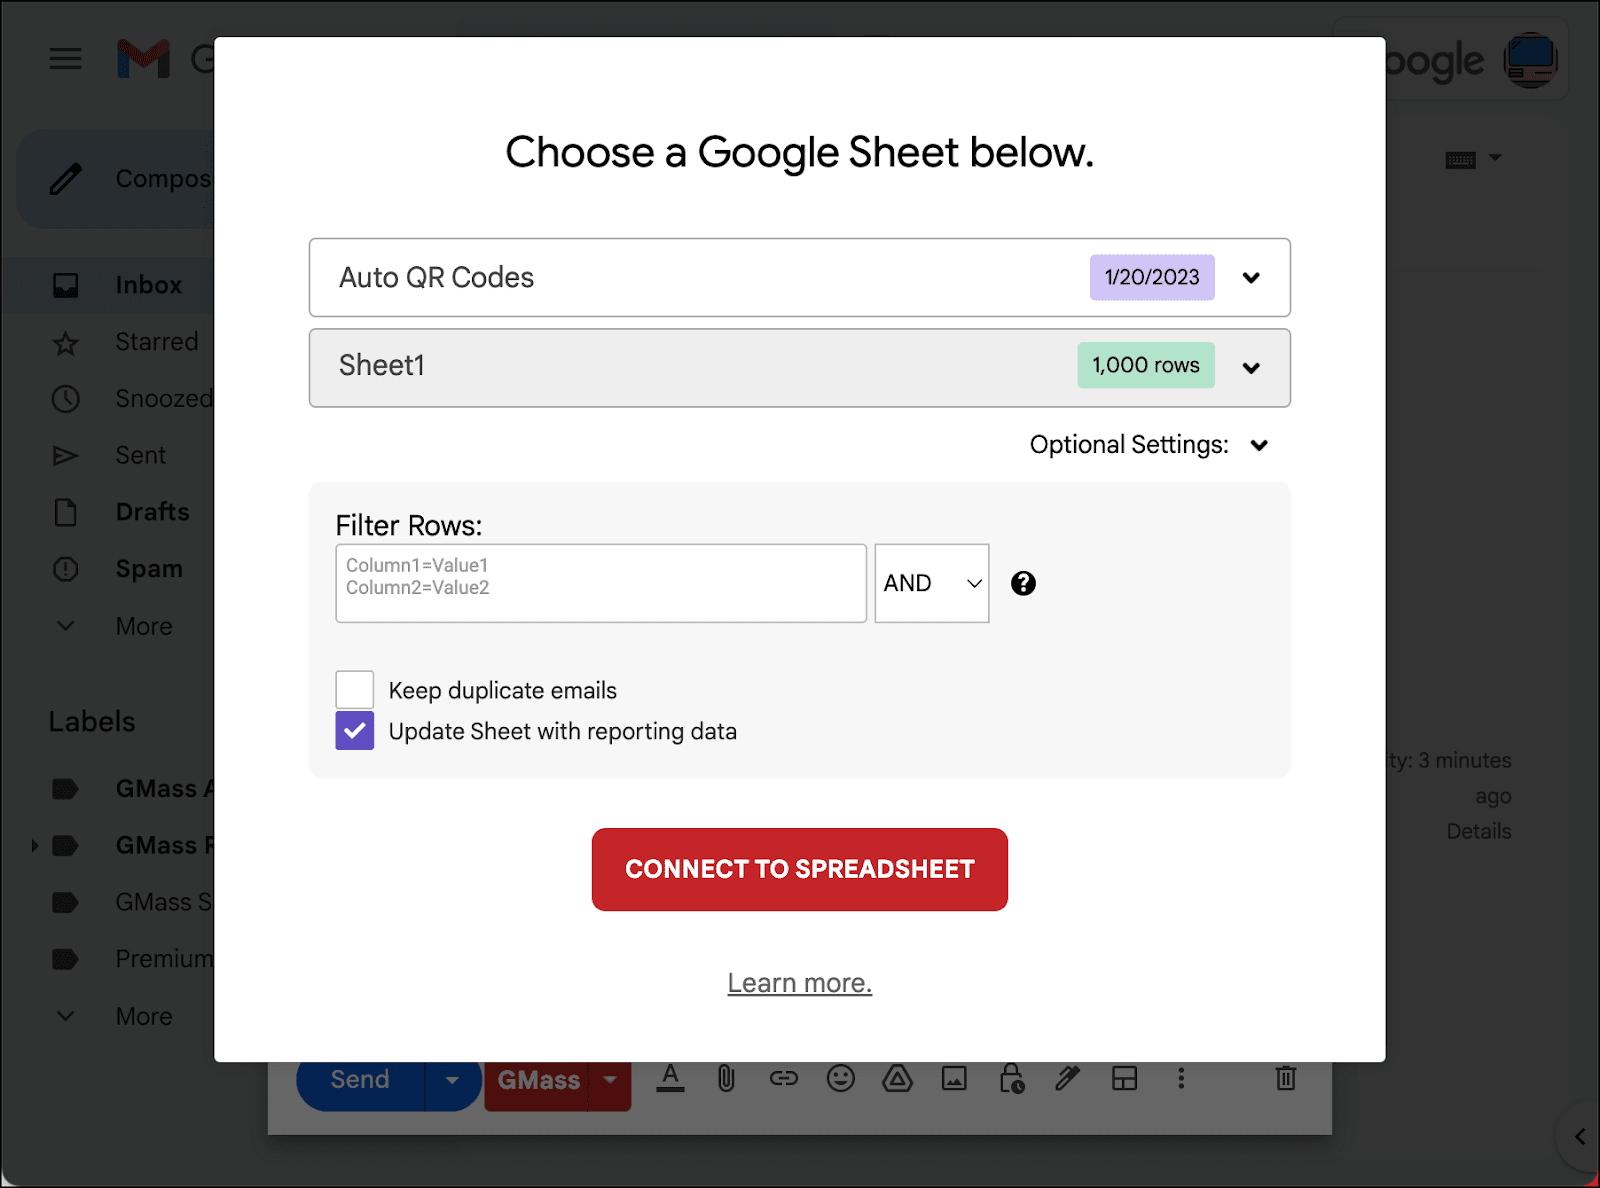
Choose your Google Sheet. If you did the manual method and have multiple sheets within your Google Sheet, make sure to pick Sheet1.
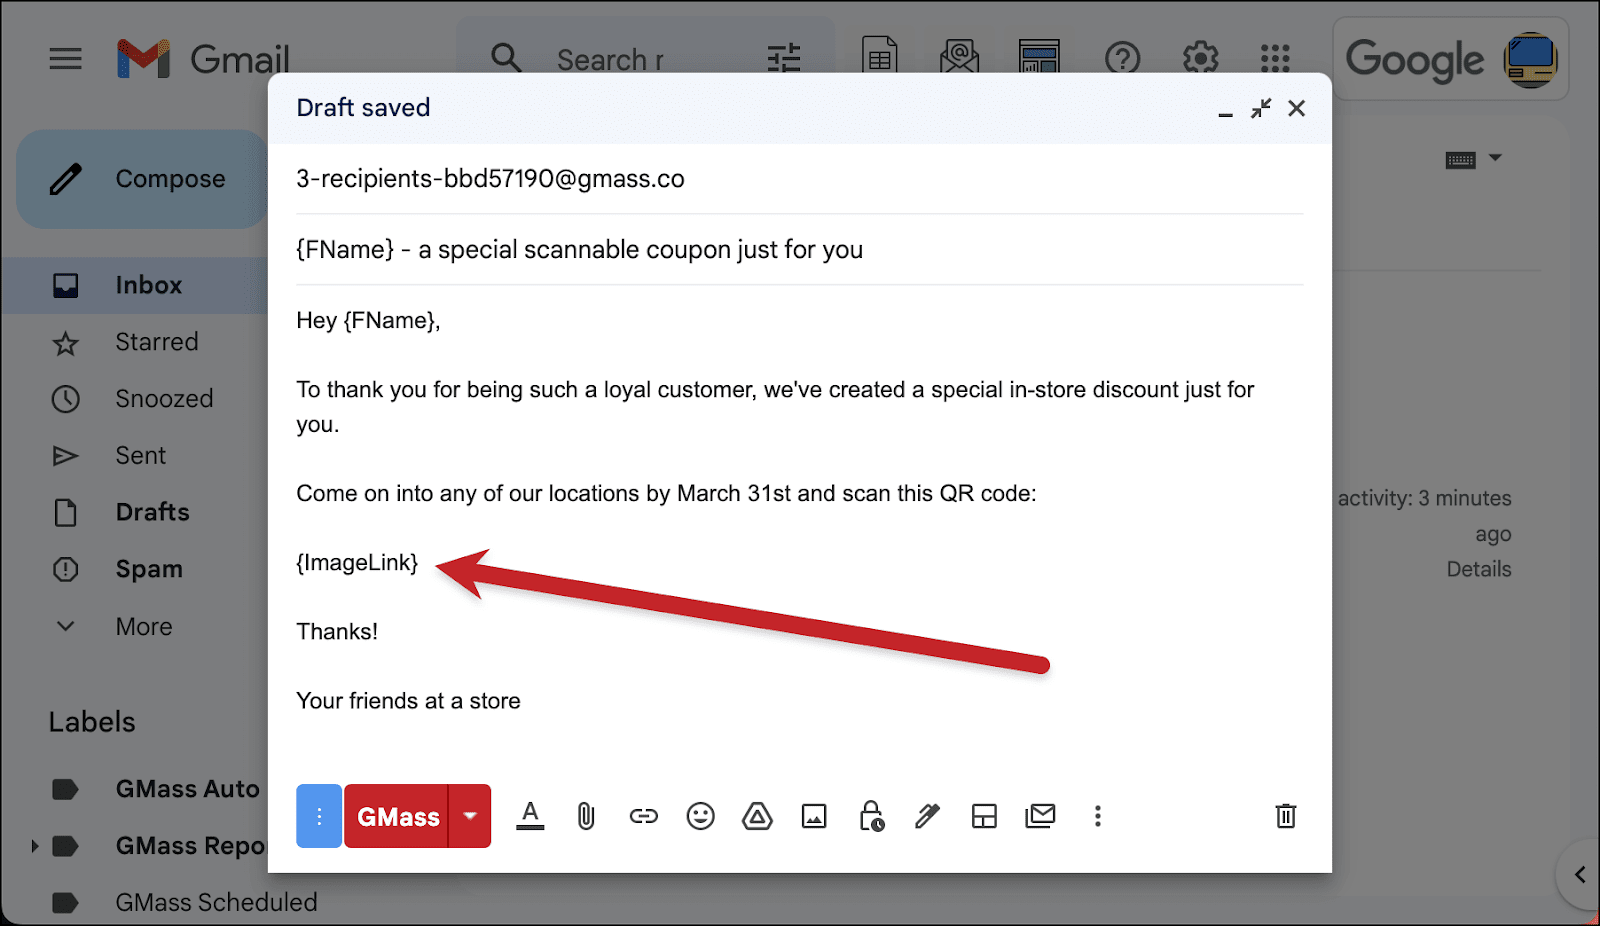
Now compose your email. Use the `{ImageLink}` merge tag in the spot where you want your QR code to go.
Once your email is all set and you’ve adjusted any other settings, click the GMass button to send the mail merge.
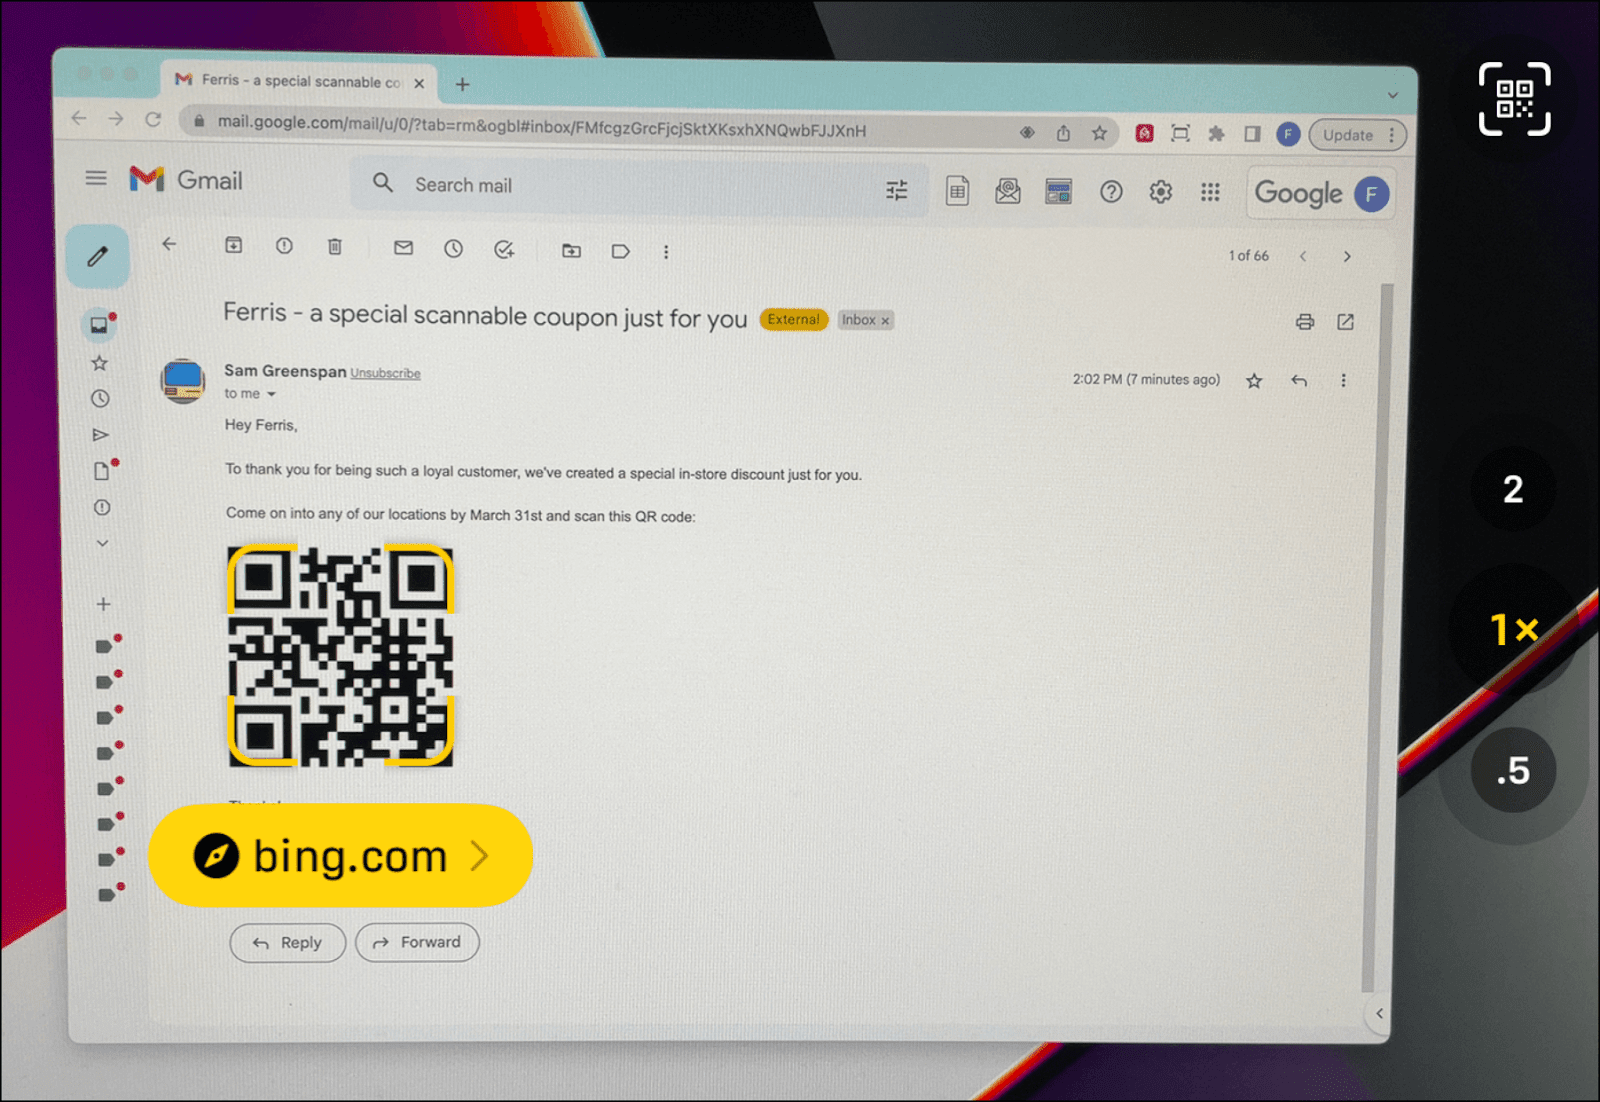
You can look in your sent folder to see the individual emails with their QR codes.
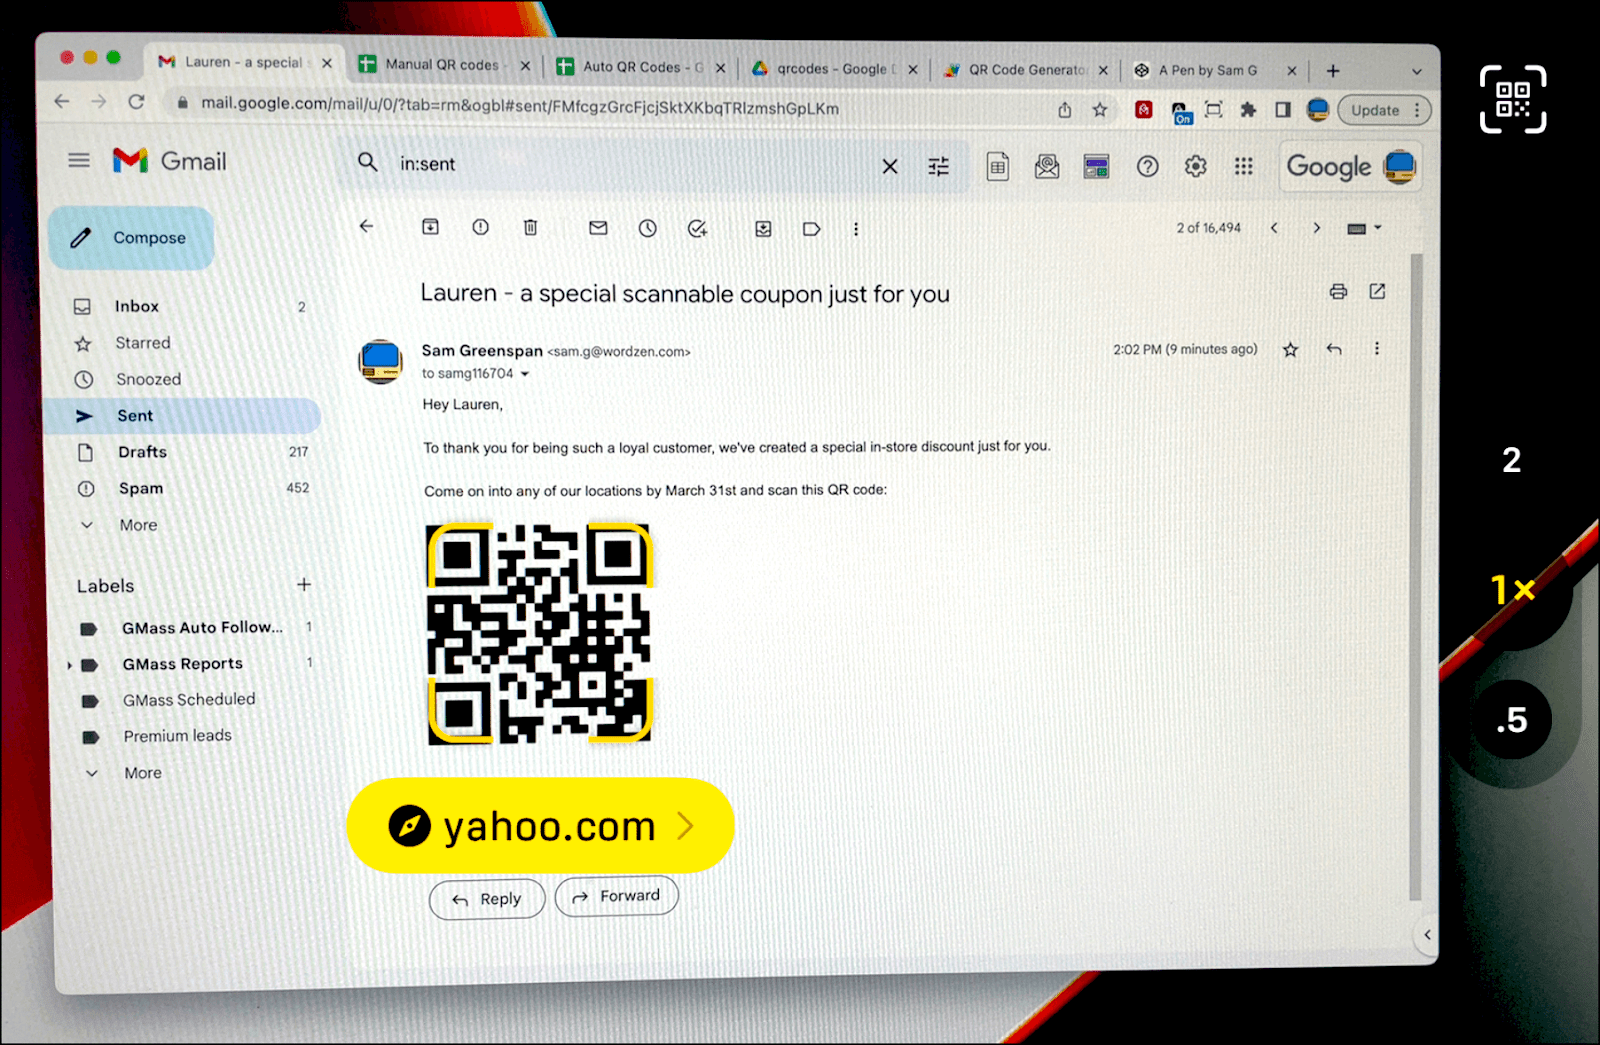
And your recipients will be able to scan the QR codes in their emails.
Mail Merge QR Codes: Next Steps
You should now be all set to send unique mail merge QR codes to every recipient on your list.
And personalized QR code images are just one of the many, many high-level mail merge personalization options available with GMass. You can also send personalized paragraphs, attachments, links, and more.
To get started with GMass, you can download the extension from the Chrome Web Store. It’s free to try — no credit card required — and you can send up to 50 emails a day during the free trial. Both techniques I’ve described in this email will work on the free trial.
Or, to fit the theme of this article… scan here to go straight to the extension in the Chrome Web Store.
Of course, you need to be on a desktop to install the extension and QR codes are inherently mobile… but, hey, I had to run with the bit anyway.
Send incredible emails & automations and avoid the spam folder — all in one powerful but easy-to-learn tool
TRY GMASS FOR FREE
Download Chrome extension - 30 second install!
No credit card required