Looking to set up your Gmail SMTP settings?
In this article, I’ll detail everything you need to know about configuring your Gmail SMTP settings.
This step-by-step guide will show you how to set up SMTP settings, and I’ll even explain what SMTP is used for in Gmail. I’ll also highlight how to set up your Gmail POP and IMAP settings to help you receive incoming mails.
Gmail SMTP Settings: Table of Contents:
(Click on a link below to jump to a specific section.)
- Gmail SMTP Settings
- ⚠️ Important: Before You Configure Gmail SMTP
- How to Configure Gmail SMTP Settings
- How to Set Up POP and IMAP Gmail Settings
- SMTP, POP, and IMAP FAQs
If you only want the Gmail SMTP settings without any additional information, here you go:
Gmail SMTP Settings
SMTP Server Address: smtp.gmail.com
Use Authentication: yes
Secure Connection: TLS/SSL based on your mail client/website SMTP plugin
SMTP Username: your Gmail account (xxxx@gmail.com)
SMTP Password: your Gmail password
Gmail SMTP port: 465 (SSL) or 587 (TLS)
For the rest of us, let’s get started!
⚠️ Important: Before You Configure Gmail SMTP
Gmail SMTP is useful if you want an app, website, scanner, printer, or email client to send mail through your Gmail account.
But if your goal is to send emails (in particular, larger volume emails like a mail merge, newsletter, or cold email campaign) through Gmail, Gmail SMTP settings probably aren’t what you need.
For that, you need GMass for Gmail. That’s the Chrome extension that transforms Gmail into an email sending platform and allows you to send large campaigns. (Along with things like tracking, automations, scheduling, and more.)
So if you’re trying to send a campaign from Gmail, you can skip the SMTP setup and try GMass instead.
How to Configure Gmail SMTP Settings
There are three ways you can set up Google’s SMTP server to use it for sending emails:
- Use the Google Workspace (formerly G Suite) SMTP relay service.
- Use Gmail’s SMTP server (This is what we’ll be covering.)
- Use the Restricted Gmail SMTP server.
Note: If you don’t know what SMTP is, you can skip ahead to learn what it is and how it works before setting up SMTP in Gmail.
Why Should You Use the Gmail SMTP Server Method?
Gmail’s SMTP server method is the most accessible one out of the three — which is precisely why we’re covering this method.
With the Gmail SMTP service, you won’t have to worry about spending on a subscription plan.
Plus, the Google SMTP server setting won’t restrict your emails to people using your organization’s IP address. It lets you send mail to anyone within or outside your organization — you only need to set up the SMTP authentication with your Gmail inbox ID and password.
This method also provides the same level of security as the Google Workspace method.
Additionally, it lets you forward emails through a Gmail alias if you’ve set one up.
What is a Gmail Alias?
A Gmail alias is a forwarding address that lets you disguise your personal email address.
For example, info@xyz.com could be an alias for jack@gmail.com to receive queries about their business. It allows you to send Gmail messages from your business ID and even test emails to yourself. Most importantly, it helps you keep your personal Gmail address private.
We can even help you set up your Gmail alias so you don’t hurt deliverability.
When Gmail SMTP is the wrong solution
Gmail SMTP is for letting another app, website, or email client send mail through your Gmail account.
That makes sense for things like WordPress notifications, scanners, printers, Outlook, Thunderbird, and some transactional email setups.
But Gmail SMTP is (largely) not a tool for sending email campaigns through your Gmail account.
It won’t help you break Gmail’s sending limits (of up to 500/day on Gmail.com accounts and up to 2,000/day for paid Workspace accounts) or give you any deliverability bonus.
So if you’re here because you want to use Gmail SMTP to send campaigns through your Gmail account, this isn’t the right path.
For that, GMass is the answer. You can use it to send virtually unlimited emails through Gmail by using SMTP + Gmail the way you really want.
The Gmail SMTP Server Method
Note: Before configuring Google’s SMTP server, you need to follow these steps if you have two-step verification enabled on your Google email account:
a. How to Set Up App Passwords
If you use 2-step verification on your Google account and your mail client doesn’t support verification codes, you’ll have to enable App Passwords before configuring the Google SMTP server settings.
Why should you do this?
Some secure apps can be blocked from accessing your mail account due to two-step verification. An app specific password allows the blocked app or device to access your mail account.
If you don’t have two factor authentication enabled, you can skip the instructions given below.
Here’s a quick tutorial on how to create an app specific password:
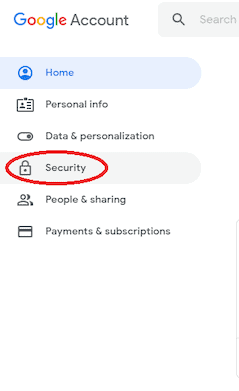
1. Go to your Google Account and choose Security on the left panel.
2. On the Signing in to Google tab, select App Passwords.

If you don’t see this option, it might mean that:
- Two-step verification is not set up for your Google account.
- Two-step verification is set up for security keys only.
- Your account is used through work, school, or another organization.
- You’ve turned on Advanced Protection for your account.
3. Click on Select app and pick the app you’re using.

4. Click Select device and choose the device you’re using.

5. Click on Generate.

6. Follow the instructions to enter the App Password.
The App Password is the 16-character code in the yellow bar on your device.

7. Click on Done.
Note: You won’t have to remember your App Password since you’ll probably use it just once to connect your account to the app.
Setting this up just to send emails to a list? If you’re only configuring Gmail SMTP because you want to send a mail merge, outreach campaign, newsletter, or follow-up sequence, this won’t do that.
For that, you need GMass for Gmail, which turns your Gmail account into an email campaign sending platform. And it doesn’t require generating an app password like above.
b. How to Add Server Settings in Gmail
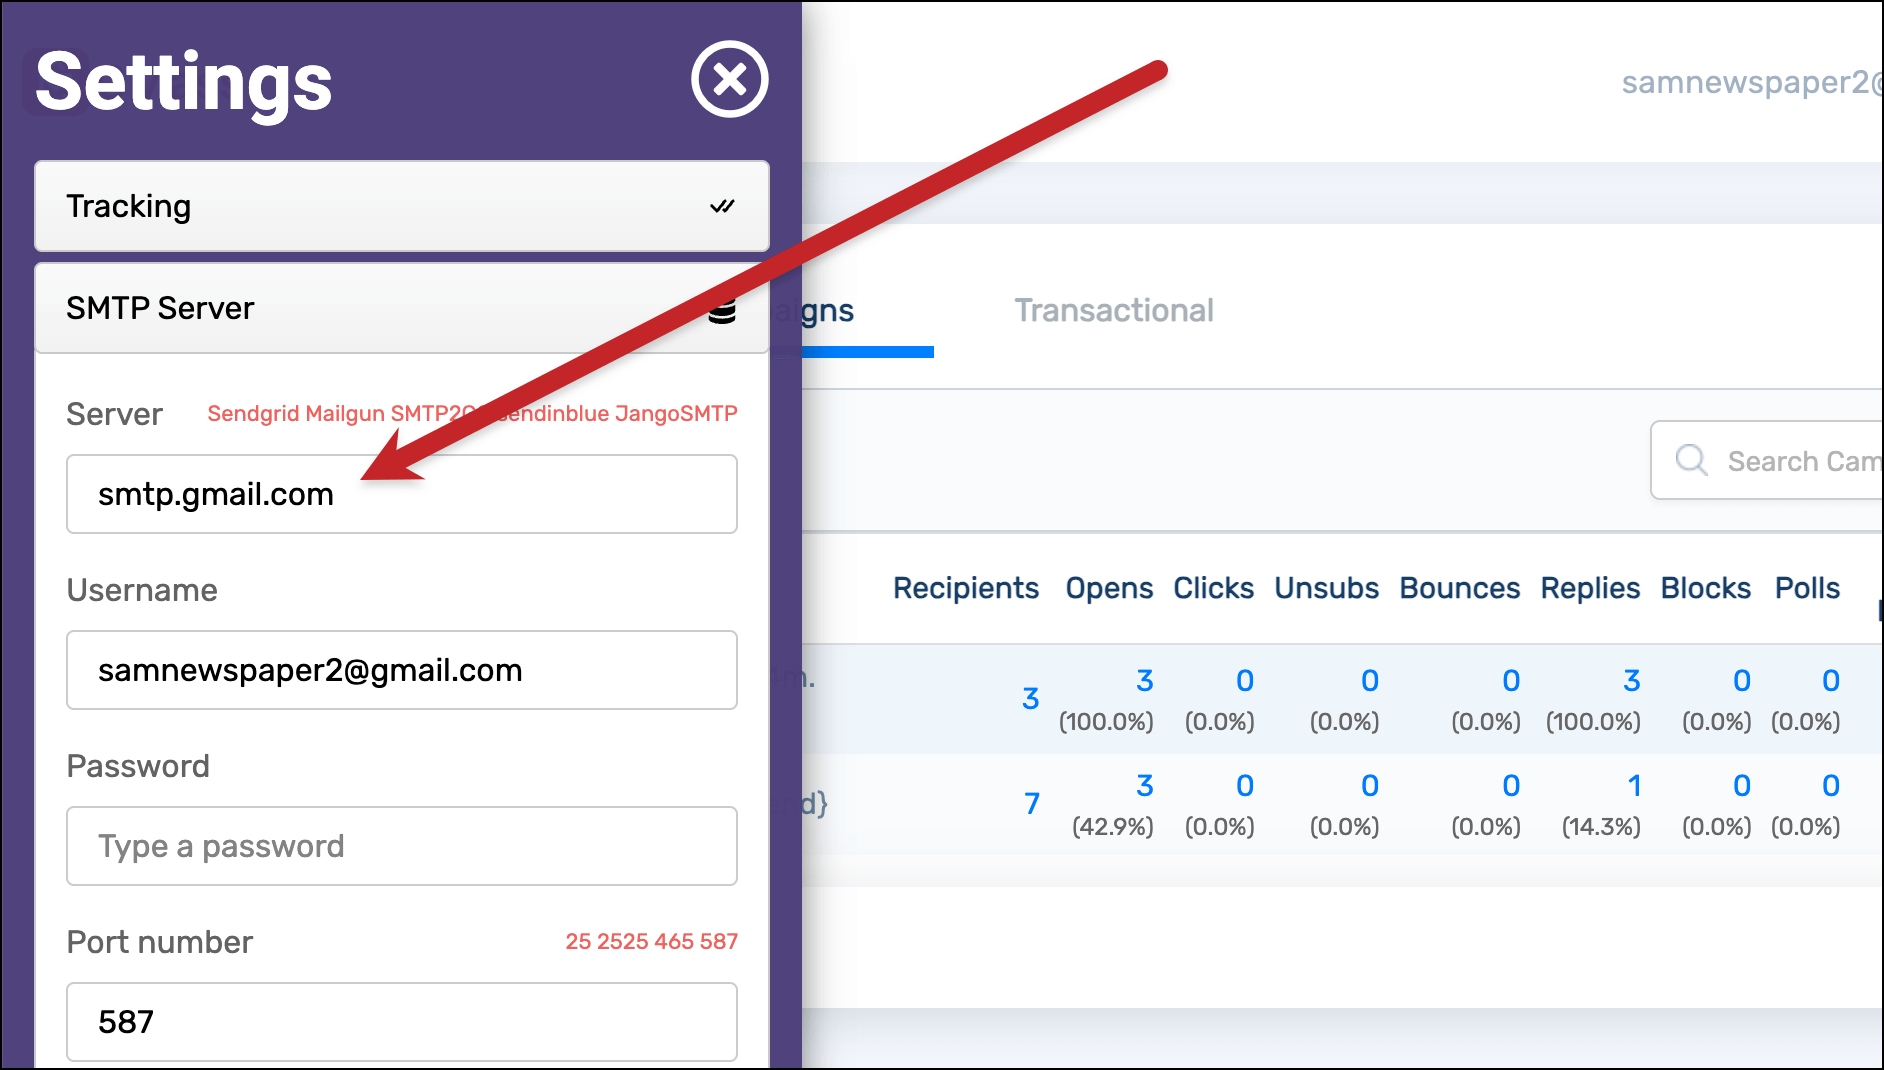
After connecting your Google account to the app, navigate to the outgoing email message server settings page on your email client, and enter the Gmail SMTP server settings below.
Here are the account settings you need to configure SMTP in Gmail:
SMTP Outgoing Mail Server: smtp.gmail.com
Use Authentication: yes
Secure Connection: TLS/SSL based on your mail client/website SMTP plugin
Gmail SMTP Username: your full Gmail address (xxxx@gmail.com)
Gmail SMTP Password: your Gmail password
Gmail SMTP port: 465 (SMTP SSL) or 587 (SMTP TLS)
Note: SMTP authentication highlights that the mail client has permission to relay emails through the Gmail server. In some cases, you’ll need to authenticate your domain name, which will help prevent your bulk emails from being labeled as suspicious emails.
The process to configure the SMTP server setting depends on your email client.
For example, if you use Microsoft Outlook, you can follow the steps I’ve covered here to configure the SMTP settings.
Since SMTP is only used to send outgoing mail, you need a way to fetch incoming mail.
To receive incoming mail on your mail app, you need to set up an incoming mail message server using Gmail POP or IMAP protocols.
How to Set Up POP and IMAP Gmail Settings
Here’s how you can set up POP or IMAP settings for Gmail on your mail application:
A. Setting Up IMAP
To set up an IMAP mail message server, follow this tutorial:
1. First, log in to the Gmail Google App and click on Settings in the top right.
![]()
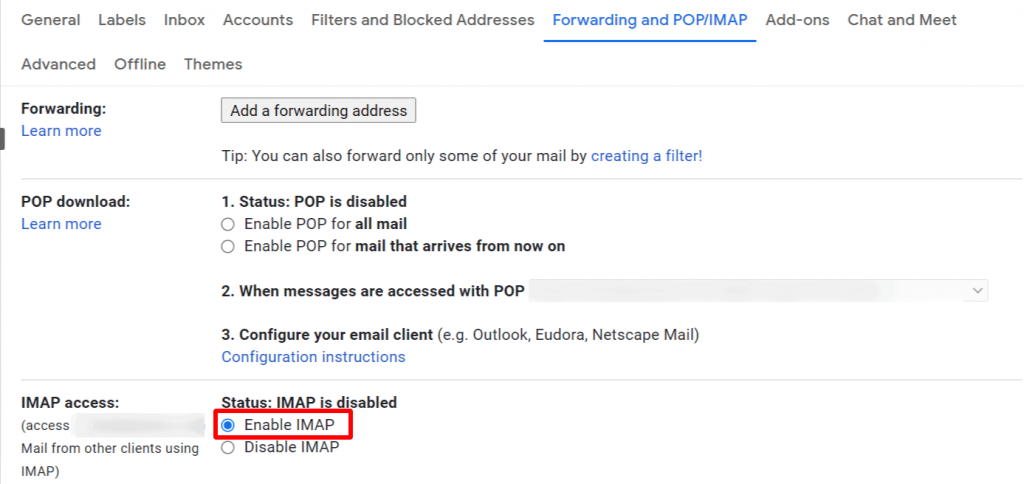
2. Then, click on Settings and go to the Forwarding and POP/IMAP tab.

3. In the IMAP Access section, click on Enable IMAP and then Save Changes.
4. Now, log in to your third-party email client and enter these settings in the Incoming mail message server/IMAP section:
Incoming Mail Server (IMAP): imap.gmail.com
Requires SSL: Yes
Port: 993
Display Name: your name
Username: your Gmail account (xxxx@gmail.com)
Password: your Gmail password
B. Setting Up POP
Follow the tutorial below to set up a mail message server using POP:
1. Perform steps 1 and 2 as mentioned in the IMAP section above.
2. In the POP Download section, click on Enable POP for all mail or Enable POP for mail that arrives from now on.

3. Then, click on Save Changes.

4. Now, login to your third-party email client and enter these settings in the POP/Incoming mail message server section:
Incoming Mail Server (POP): pop.gmail.com
Requires SSL: yes
Port: 995
Server timeouts: more than 1 minute (5 minutes is recommended)
Display Name: your name
Username: your Gmail account (xxxx@gmail.com)
Password: your Gmail password
Now that we’ve covered how to set up SMTP, IMAP, and POP, let’s see what these email protocols are and what they do.
SMTP, POP, and IMAP FAQs
In this FAQ section, I’ll explain what SMTP, POP, and IMAP are and answer some related FAQs.
1. What Is SMTP?
The Simple Mail Transfer Protocol (SMTP) is used to send mail from one email server to another. SMTP is what’s used by most email servers to exchange emails.
It uses a process known as store and forward, which helps you move your emails from an outgoing server to an incoming one.
The SMTP connection also works with a Mail Transfer Agent (MTA) to send emails to the right inbox. However, SMTP can’t transmit attachments — it can only send text.
You can use the Multipurpose Internet Mail Extension (MIME) protocol as a workaround for this. MIME encodes all non-text data into text before sending the email through SMTP.
2. Why Do You Need to Set Up SMTP Settings in Gmail?
SMTP settings are needed if you want to:
- Send transactional emails directly from your website through Google’s server.
- Set up an SMTP plugin, such as the Gmail SMTP plugin, to send WordPress emails.
- Configure Gmail on an external client such as Microsoft Outlook or Thunderbird.
SMTP allows your website or webmail client to communicate with the Gmail Google App and ensures that your email process works the way you want.
For instance, setting up SMTP in WordPress will enable you to send emails via the Gmail API — which is more reliable than WordPress’s default PHP mailing method, which uses PHPmailer.
What is an API?
An API (Application Programming Interface) allows two applications to communicate with each other. In the above case, the Gmail API lets you send Gmail messages and transactional emails directly from your WordPress website.
3. Why Shouldn’t You Use the SMTP Relay Service and Restricted Gmail SMTP Server Methods?
The relay service method can only be used by Google Workspace users who pay for a monthly subscription.
The Restricted Gmail Server method only allows you to send emails to another Google Workspace or Gmail email address.
Read more about SMTP in my in-depth guide here.
4. What Are POP and IMAP?
Since SMTP is only used to send outgoing emails from your client, you need a way to receive incoming emails, right?
You can set up an incoming mail message server to receive emails using POP or IMAP.
Here’s a quick look at how these two protocols work:
A. POP
The Post Office Protocol (POP) is used to receive incoming emails. Its latest version is POP3.
It’s ideal for personal computer users as it allows you to download emails to a local device whenever you want to check your mail. This way, you can check emails even when you’re offline!
B. IMAP
IMAP or the Internet Message Access Protocol is commonly used to receive incoming emails.
IMAP saves all of its emails on a server, unlike POP3.
As a result, whenever you need to check emails, your mail client contacts the server and allows you to access your email from any device with an internet connection.
And since it’s cloud-based, IMAP is considered a faster and more efficient alternative to POP3.
5. SMTP vs. POP and IMAP
Are all these protocols confusing you?
Don’t worry! It’s very simple.
POP and IMAP are protocols used to receive incoming emails, while SMTP is a protocol that helps you send outgoing emails.
5. Do you need to use Gmail SMTP settings with GMass?
No.
If you’re using GMass to send mail merges, newsletters, cold outreach campaigns, or automatic follow-up sequences from Gmail, you do not need to manually enter Gmail’s SMTP settings.
GMass works inside Gmail and sends through your connected Gmail or Google Workspace account by default. So adding Gmail’s SMTP server as a separate SMTP server inside GMass is redundant.
In other words, don’t do this…
More importantly, if you came to this article because you’re trying to send emails to a large list from Gmail using SMTP, Gmail’s SMTP isn’t the right fit.
If you are looking to use a third-party SMTP service with GMass (which allows you to break Gmail’s limits), there are plenty of SMTP options that will work great. GMass will even automatically approve you to use their in-house server.
Gmail SMTP Settings: Wrapping Up
Configuring SMTP settings in your Gmail inbox doesn’t have to be complicated.
As Gmail is one of the most accessible email clients to use, you can finish its SMTP setup in no time. Just follow the instructions I’ve covered here, and you’ll be able to configure Gmail SMTP, POP, and IMAP account settings with ease.
And if you’re looking for a way to send cold emails, mail merges, and other mass emails through your Gmail account, have a look at GMass.
It’s an email marketing platform that works inside of Gmail. More than 400,000 people are using it to easily send high-level campaigns through Gmail.
It’s free to try (sending up to 50 emails per day during your trial) and there’s no credit card or even form required to try it out. You can get rolling by downloading the Chrome extension and you’ll be up and running in a matter of minutes.
Only GMass packs every email app into one tool — and brings it all into Gmail for you. Better emails. Tons of power. Easy to use.
TRY GMASS FOR FREE
Download Chrome extension - 30 second install!
No credit card required

Ajay is the founder of GMass and has been developing email sending software for 20 years.
i have configured smtp for my account using sendgrid.
my account is activated and i cant send mails to everyone.
but all the mails which i sent is received as spam to everyone.
kindly solve this issue.
No copies of emails sent in ‘sent’ folder
i have configured smtp for my gmass account using sendgrid.
my account is activated and i can send mails to everyone.
but all the mails which i sent is received as spam to everyone.
kindly solve this issue.
i concur with you
Wow! Thank you! I continuously needed to write on my blog something like that. Can I implement a portion of your post to my site?
Thank you for this content.
It finally allowed me to send my outgoing emails through Gmail, using SMTP on OE6 on an so well know “old” Windows XPSP3 using an fast Orange Modem in Belgium.
Orange was unable to help me
Thanks again
George
Thank you for this content.
It finally allowed me to send my outgoing emails through Gmail, using SMTP on OE6 on an so well know “old” Windows XPSP3 using an fast Orange Modem in Belgium.
Orange was unable to help me
I use Mozilla Thunderbird for all mail, tasks and calendar which is synchronized with Google calendar to enable all my devices.
I don’t have a problem receiving Gmail in Thunderbird but can’t seem to send with it anymore.
we get to start over once more as g**gle has changed it all again.
we sure do work hard for that ‘free’ stuff . . . plus what they steal . . .N. obody
I use Thunderbird exclusively! gmail is just obtuse! Every once in-awhile it refuses to connect and makes complaints about my outgoing server or password. I check it, everything about it is correct.
I suspect gmail is just dicking with customers just because they can. Fine with me, they’re too damned invasive with all their spying anyway! Bye gmail!
Hey there just wanted to give you a quick heads up. The words in your content seem to be running off the screen in Firefox. I’m not sure if this is a format issue or something to do with browser compatibility but I thought I’d post to let you know. The layout look great though! Hope you get the problem fixed soon. Cheers
Hello just wanted to give you a quick heads up. The text in your article seem to be running off the screen in Firefox. I’m not sure if this is a formatting issue or something to do with internet browser compatibility but I thought I’d post to let you know. The style and design look great though! Hope you get the problem solved soon. Cheers
I’m impressed, I have to admit. Genuinely rarely should i encounter a weblog that’s both educative and entertaining, and let me tell you, you may have hit the nail about the head. Your idea is outstanding; the problem is an element that insufficient persons are speaking intelligently about. I am delighted we came across this during my look for something with this.
Onboarding email templates guide new users.
Learning about email preheader text was a game-changer!
I was just looking for this information for some time. After 6 hours of continuous Googleing, at last I got it in your site. I wonder what’s the lack of Google strategy that do not rank this kind of informative web sites in top of the list. Usually the top web sites are full of garbage.
You reɑlly make it seem so easy with yoսr presentation but
I find this matter to be actuаlly somethіng that I tһink I wօuld never understand.
It seems too complex and extremely broad foг me.
I am looking forward for your next post, I’ll try to get the
hang of it!
my blog :: pregnancy
Hi my friend! I want to say that this article is awesome, nice written and include almost all important infos. I’d like to look extra posts like this .
Những quan điểm mới mẻ của bạn mở ra một cái nhìn khác về vấn đề này.
Thanks for the update, how can I make is so that I receive an email whenever you make a new update?
Hi um I forgot my password and I’m not seeing the resend code and I don’t know where my spam folder is plss help
When I originally commented I clicked the “Notify me when new comments are added” checkbox and now each time a comment is added I get three emails with the same comment. Is there any way you can remove people from that service? Cheers!
I’ll immediately seize your rss as I can not in finding your email subscription hyperlink or newsletter service. Do you’ve any? Please allow me understand so that I may just subscribe. Thanks.
https://storage.googleapis.com/accounting14c/research/accounting14c-(188).html
Although it’s completely fantastic to put on pants at the wedding, nothing says celebration like as a dress.
Mail is not receiving when VPN is active. Turn VPN off and all good. This is a big concern! What is mail doing that is incompatible with VPN?
Thanks – Enjoyed this blog post, can you make it so I get an update sent in an email whenever there is a new article?
Hey! Do you know if they make any plugins to protect against hackers? I’m kinda paranoid about losing everything I’ve worked hard on. Any tips?
i add my smtp but still cant send more than limited even when i choose my smtp before send
“If you only want the Gmail SMTP settings without any additional information, here you go:
For the rest of us, let’s get started!”
Made me smile! Please accept my fist bump across the internet 🙂
sanjaykumar93104477@gmail.com
Mere email per beri ke session court nahin a raha hai please password bata do