
A Gmail alias lets you send an email from any address inside your gmail.com or Google Workspace account.
That alias can be another Gmail or Google Workspace address — or an address from another email provider, from Outlook or Yahoo to your school or work or small business.
That’s the good news.
The bad news? When you use any non-Gmail or non-Google Workspace alias, you’re looking at a potential deliverability hit.
- If you set up your email alias the way that Google expects you to set up your alias — by entering its SMTP server, username, and password — you’ll send your messages from Gmail through that email provider’s servers. And its servers are almost certainly not as naturally high-deliverability at Google’s.
- If you set up your email alias using a workaround to still send through Google’s servers, you’ll have SPF misalignment, missing DKIM, and failed DMARC authentication — also a deliverability buster.
So we’re here to help.
In this article I’ll cover both ways to set up an email alias I’ve described above. And I’ll also give some tips for deliverability to make it so sending through an alias is not instant bad news.
Plus, I’ll show you how you can even use GMass to send your mail merge campaigns using your alias email and take advantage of our suite of deliverability tools.
Gmail Alias Set Up: Table of Contents
- Setting Up Your Gmail Alias to Send Through the Third Party’s Servers
- Setting Up Your Gmail Alias to Send Through Gmail’s Servers
- Using Your New Alias to Send a Gmail Mail Merge Campaign
- Gmail Alias: Deliverability Tips to Set Yourself Up for Successful Sending
Setting Up Your Gmail Alias to Send Through the Third Party’s Servers
If you want to use another Gmail or Google Workspace account as an alias, then you’re fine — because it’s also a Google-based email account, it will send through Google’s servers.
But if you want your alias to be an address from Outlook or Yahoo or even your own mail server — then you need to send through that server in order to pass authentication.
Here are Google’s instructions to set it up, but I’ll also give you a quick walkthrough…
Add another email address in Gmail
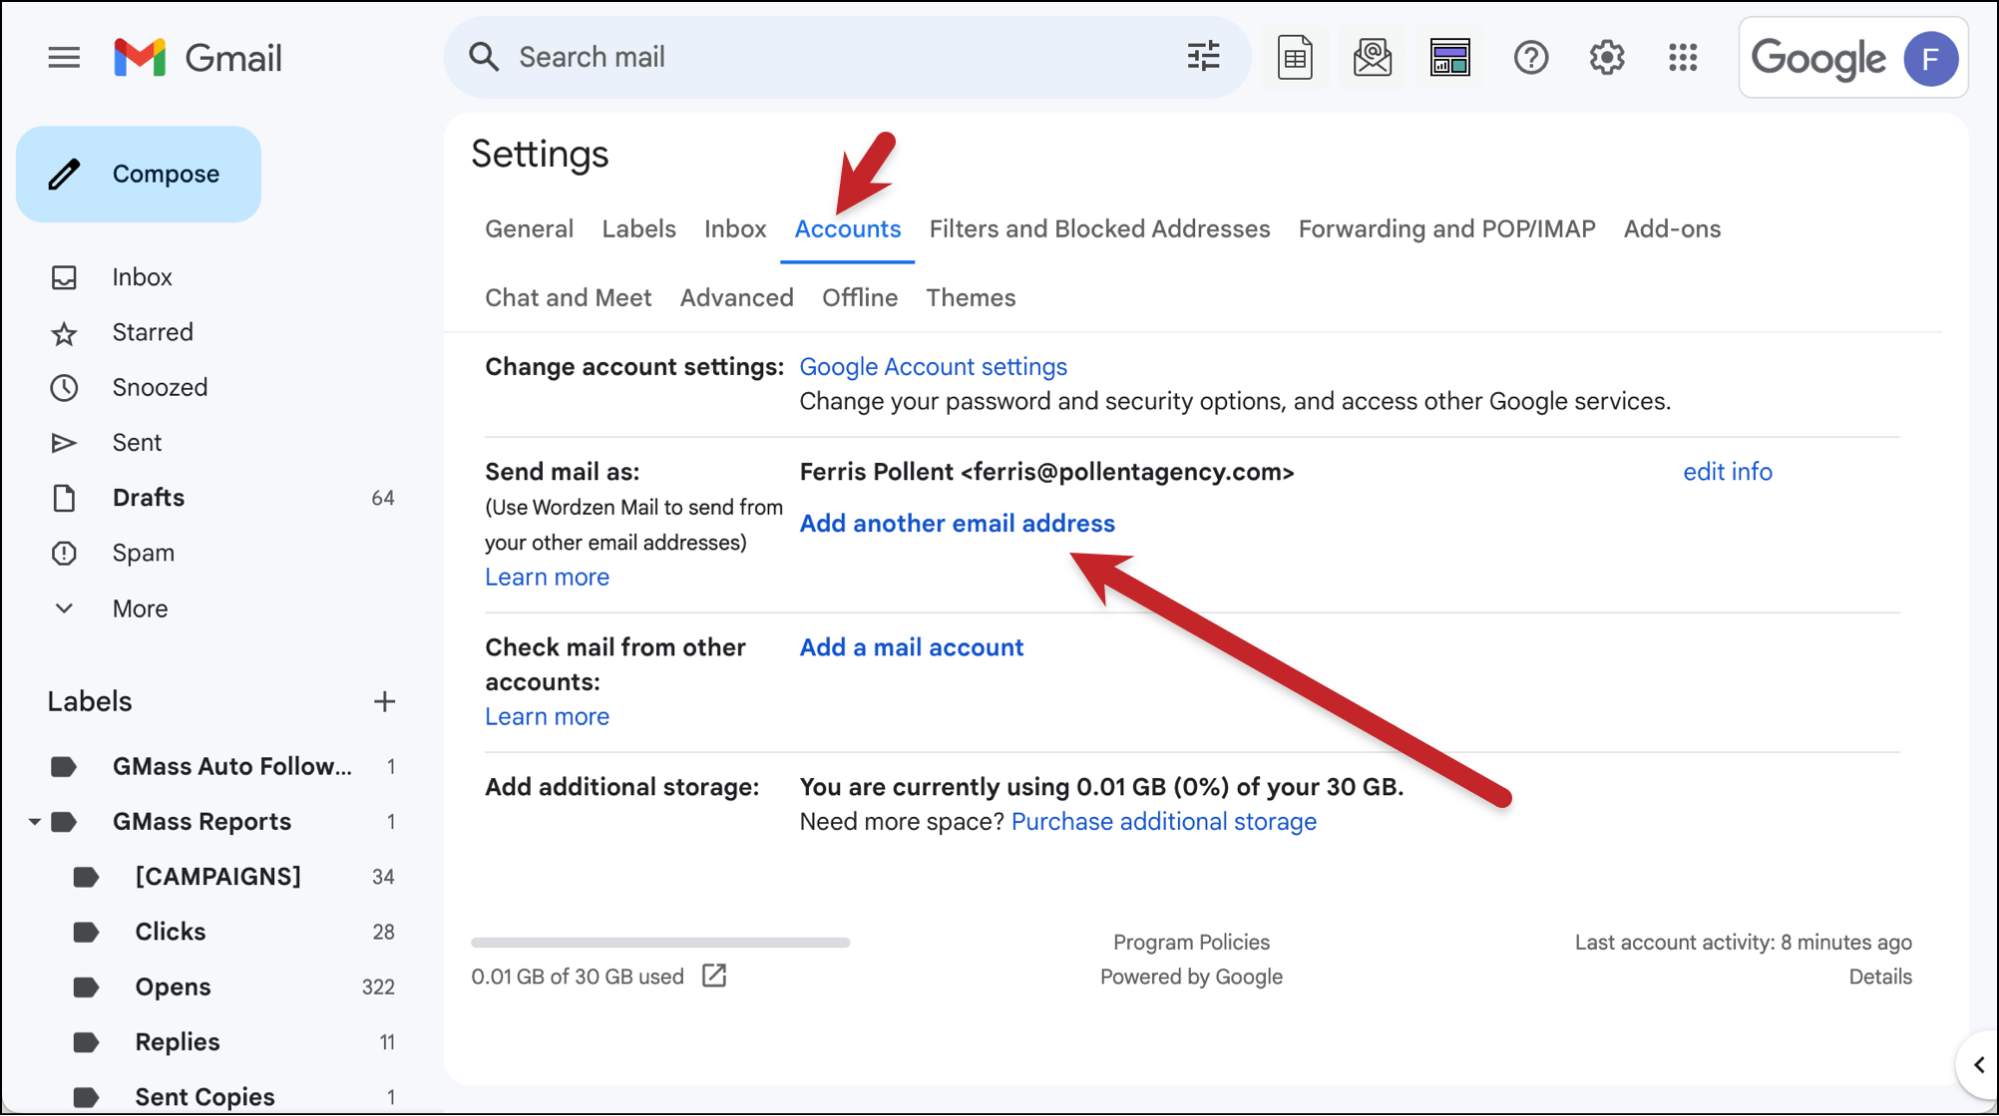
In your primary Gmail or Google Workspace account, go to the Settings.
Click See all settings. Go to the Accounts tab.
Then click on Add another email address.

Verifying that account
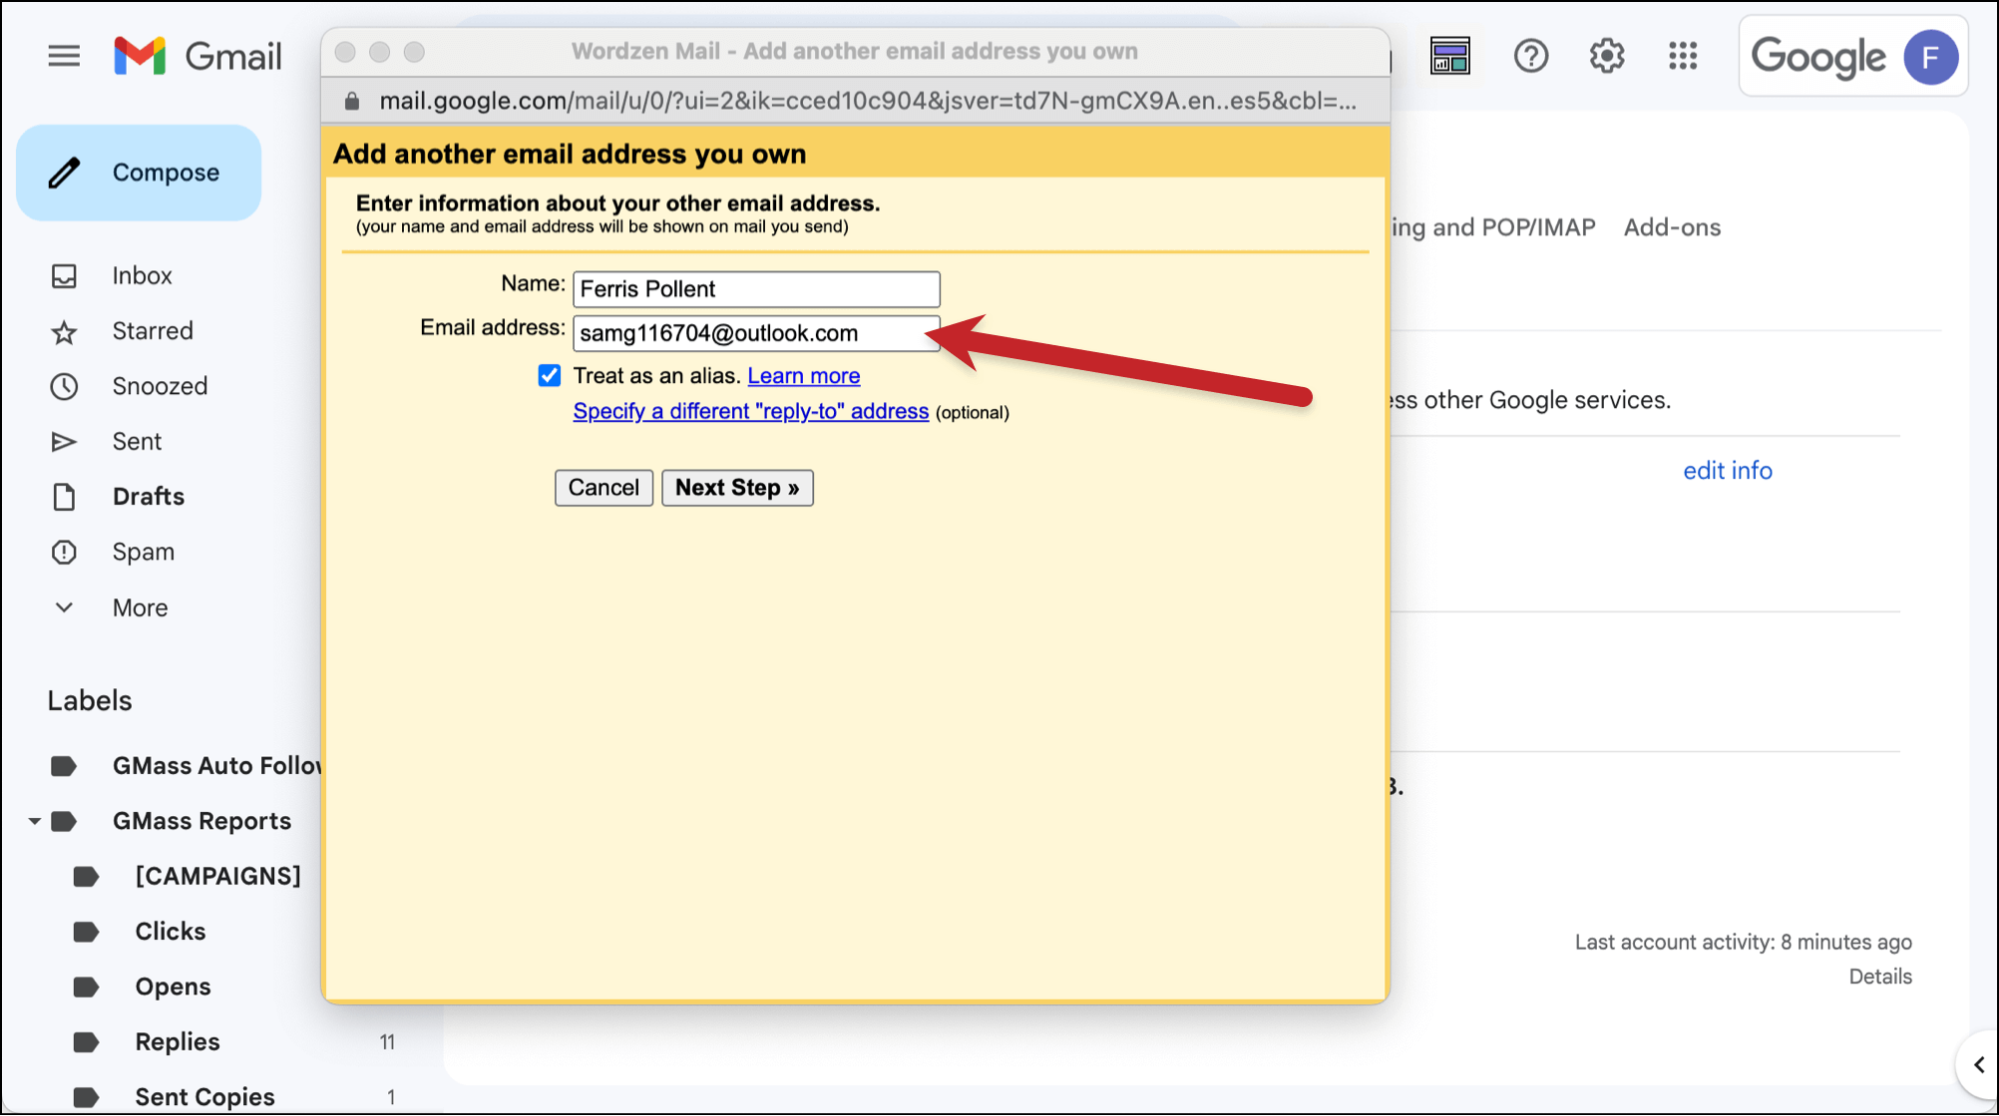
In the pop-up window, enter the sender name and email address of that third-party email.
Make sure the box is checked for Treat as an alias. Then click the Next Step button.

Google may or may not be able to figure out the correct SMTP server for your email.
Unfortunately, I’ve found it usually takes a little trial and error here, but ultimately you’ll figure out the right combo of the server, port, username, and password. (Probably. The other email providers really don’t love people doing this.)
Sending with that account
Now when you are sending an email, you’ll be able to choose which account to send through.
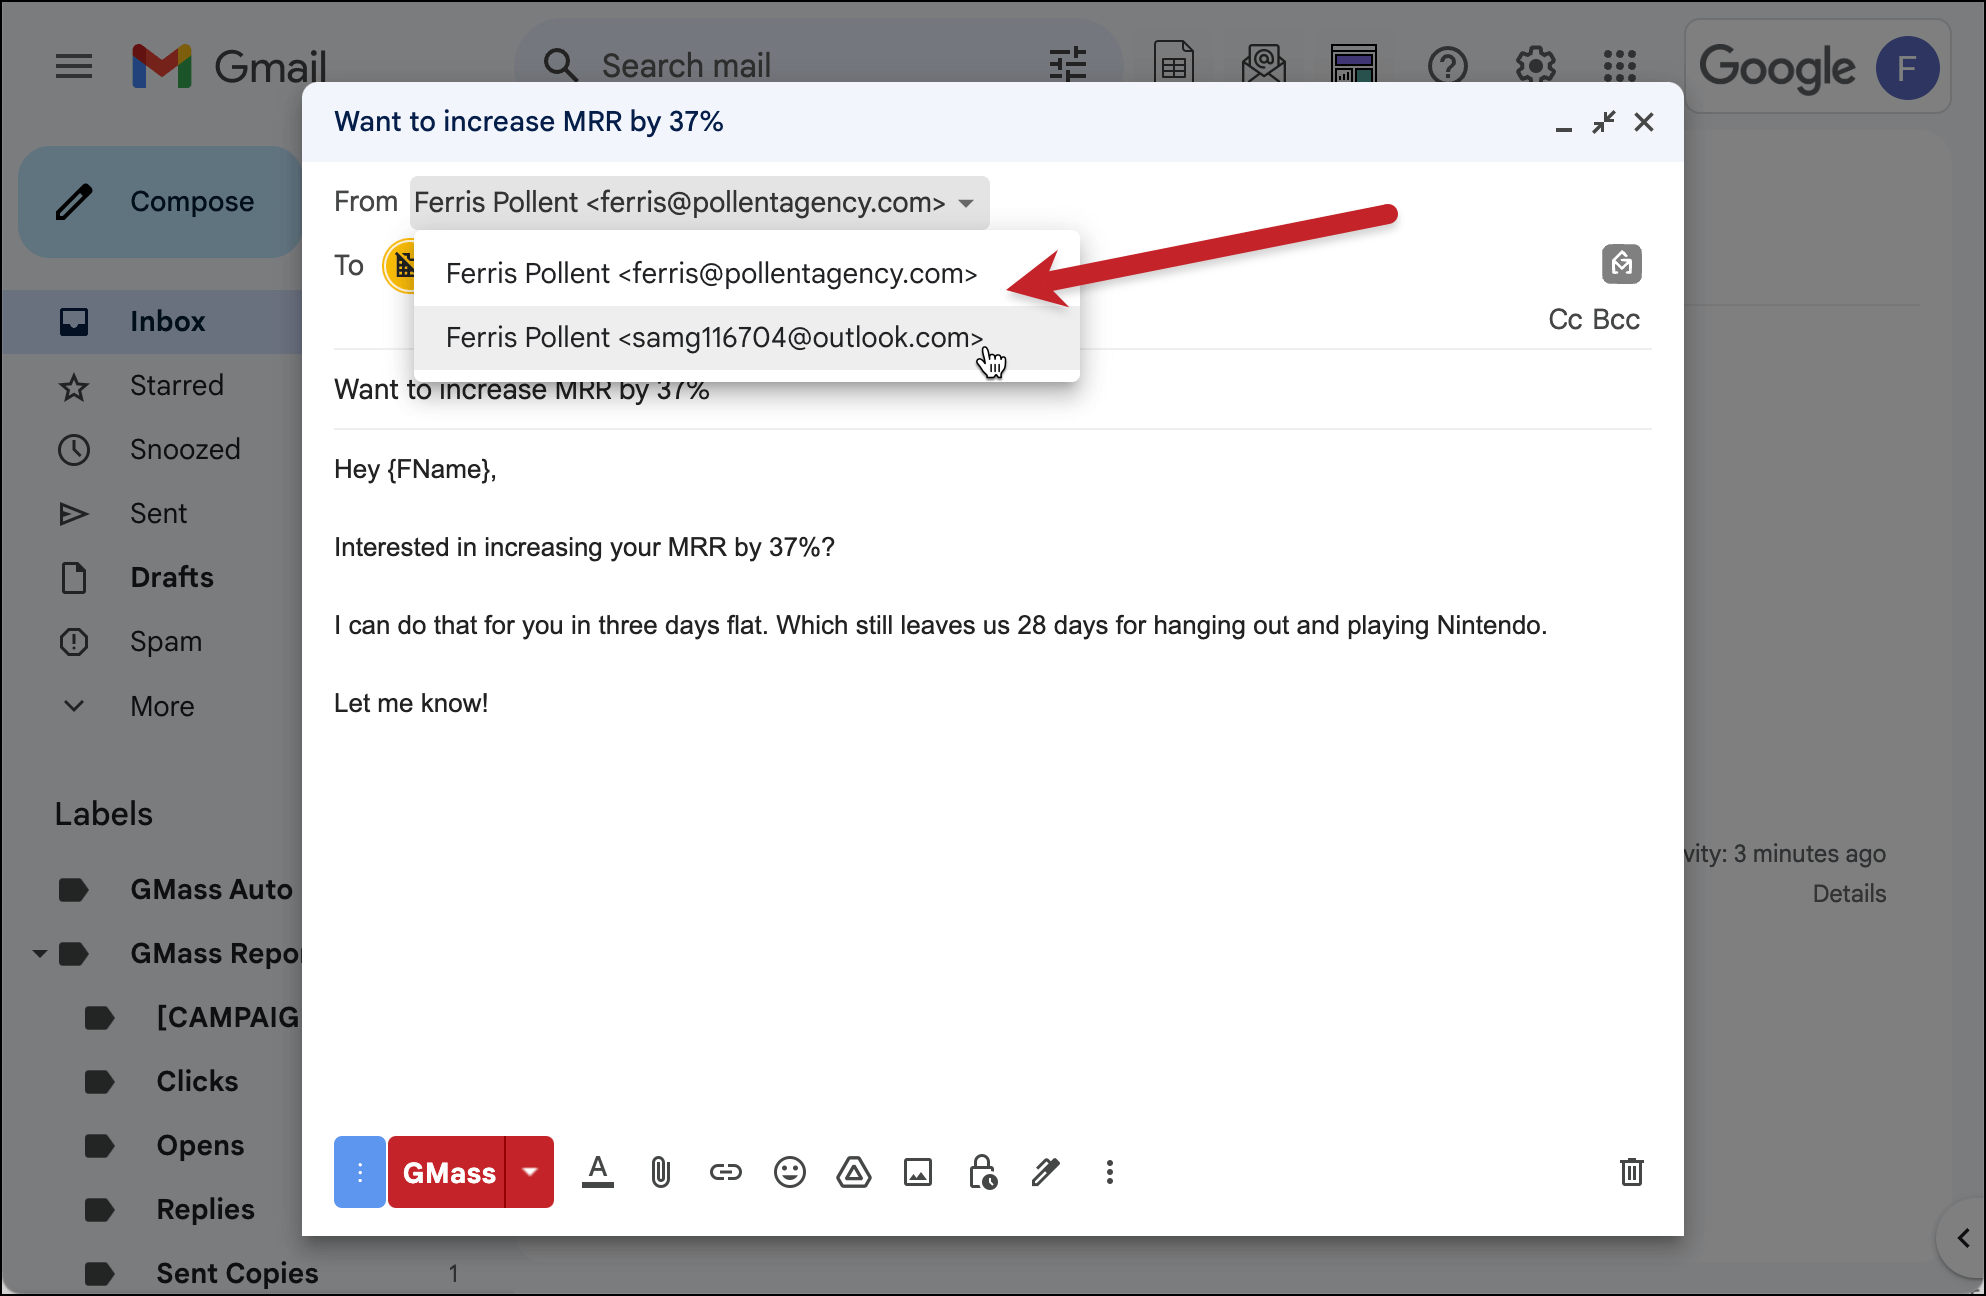
You’ll be able to use the Gmail interface but your emails will go through the external servers (like in my case, Microsoft’s).
I recommend now skipping down to my section on using your alias to send a campaign, as you won’t need the next batch of instructions about setting up your alias to send through Gmail.
Setting Up Your Gmail Alias to Send Through Gmail’s Servers
We don’t recommend this method. It feels like it should be better… but unfortunately, you’ll fail the different email authentication protocols. That kinda kills this one.
Still, if you want to try it, here’s how to set up an alias but still send it through Gmail.
Step 1: Setting up 2-step verification
There are two techniques you can use to prep your Gmail/Google Workspace account for our Gmail SMTP workaround.
The first involves allowing less secure apps to sign into your account. While that’s probably not going to cause problems, it might feel unsettling.
So we’ll go with the other option: 2-step verification.
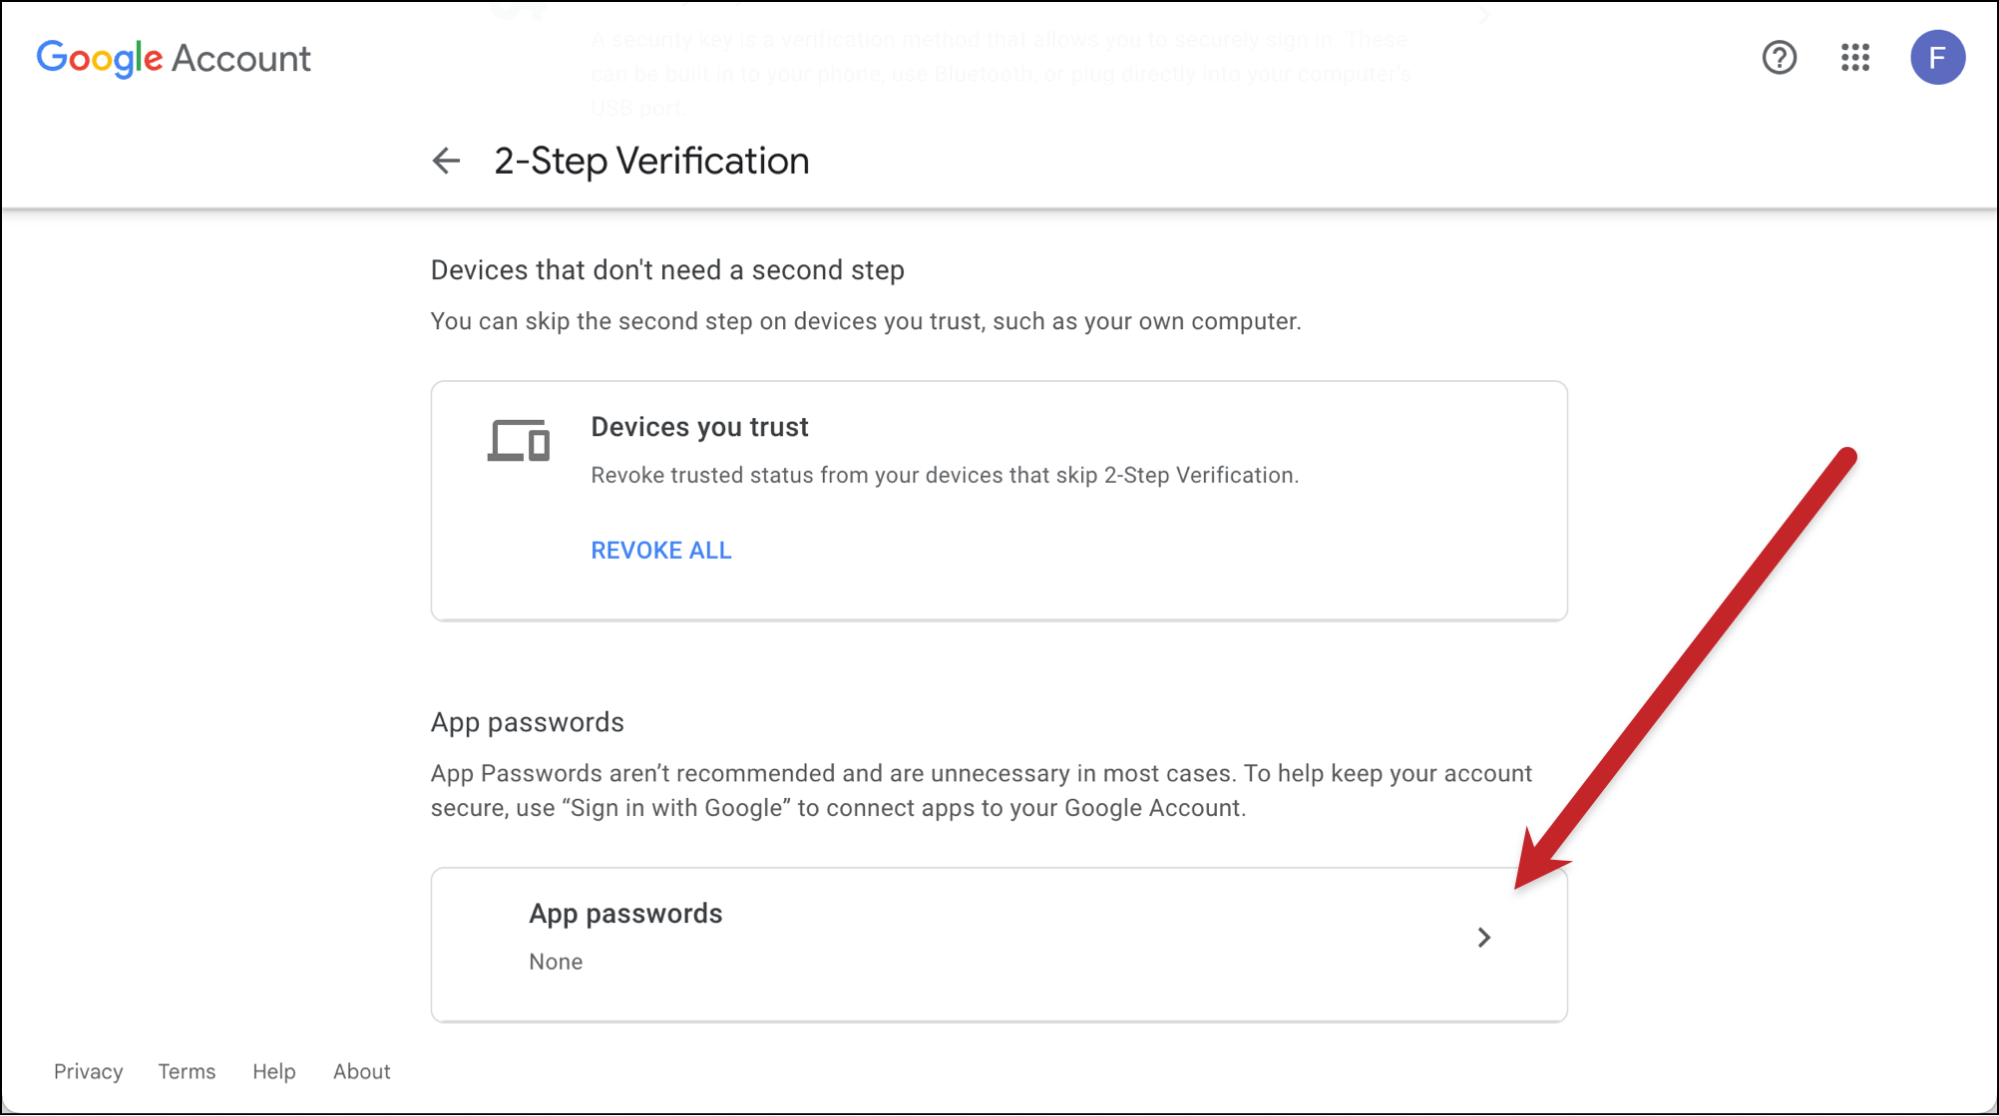
Head to the security settings for your Google account (https://myaccount.google.com/security) or by going to the nine-dot Google Apps menu in the top right corner of any Google screen, clicking Account, then clicking Security on the left sidebar.
Not too far down that page you’ll see 2-Step Verification settings. Click the arrow to enter your settings.

If you’ve set up Google’s version of two-factor authentication already, you can move on to step two.
If you haven’t set up 2-step verification before (like me in the screenshot above), you’ll need to do so now by entering your phone number and choosing texts or phone calls for account security.
Step 2: Getting an app password
Once your security is squared away, re-enter the 2-step verification settings again. This time scroll down to the section called App passwords and click the arrow to enter.
In the Select app dropdown, choose Other (custom name). Give the app a name. You can choose anything here.
Since I’m setting this all up so I can send campaigns via GMass using my alias, I’m going to call this app GMass. But again, this doesn’t matter — it’s for your own record keeping purposes only.
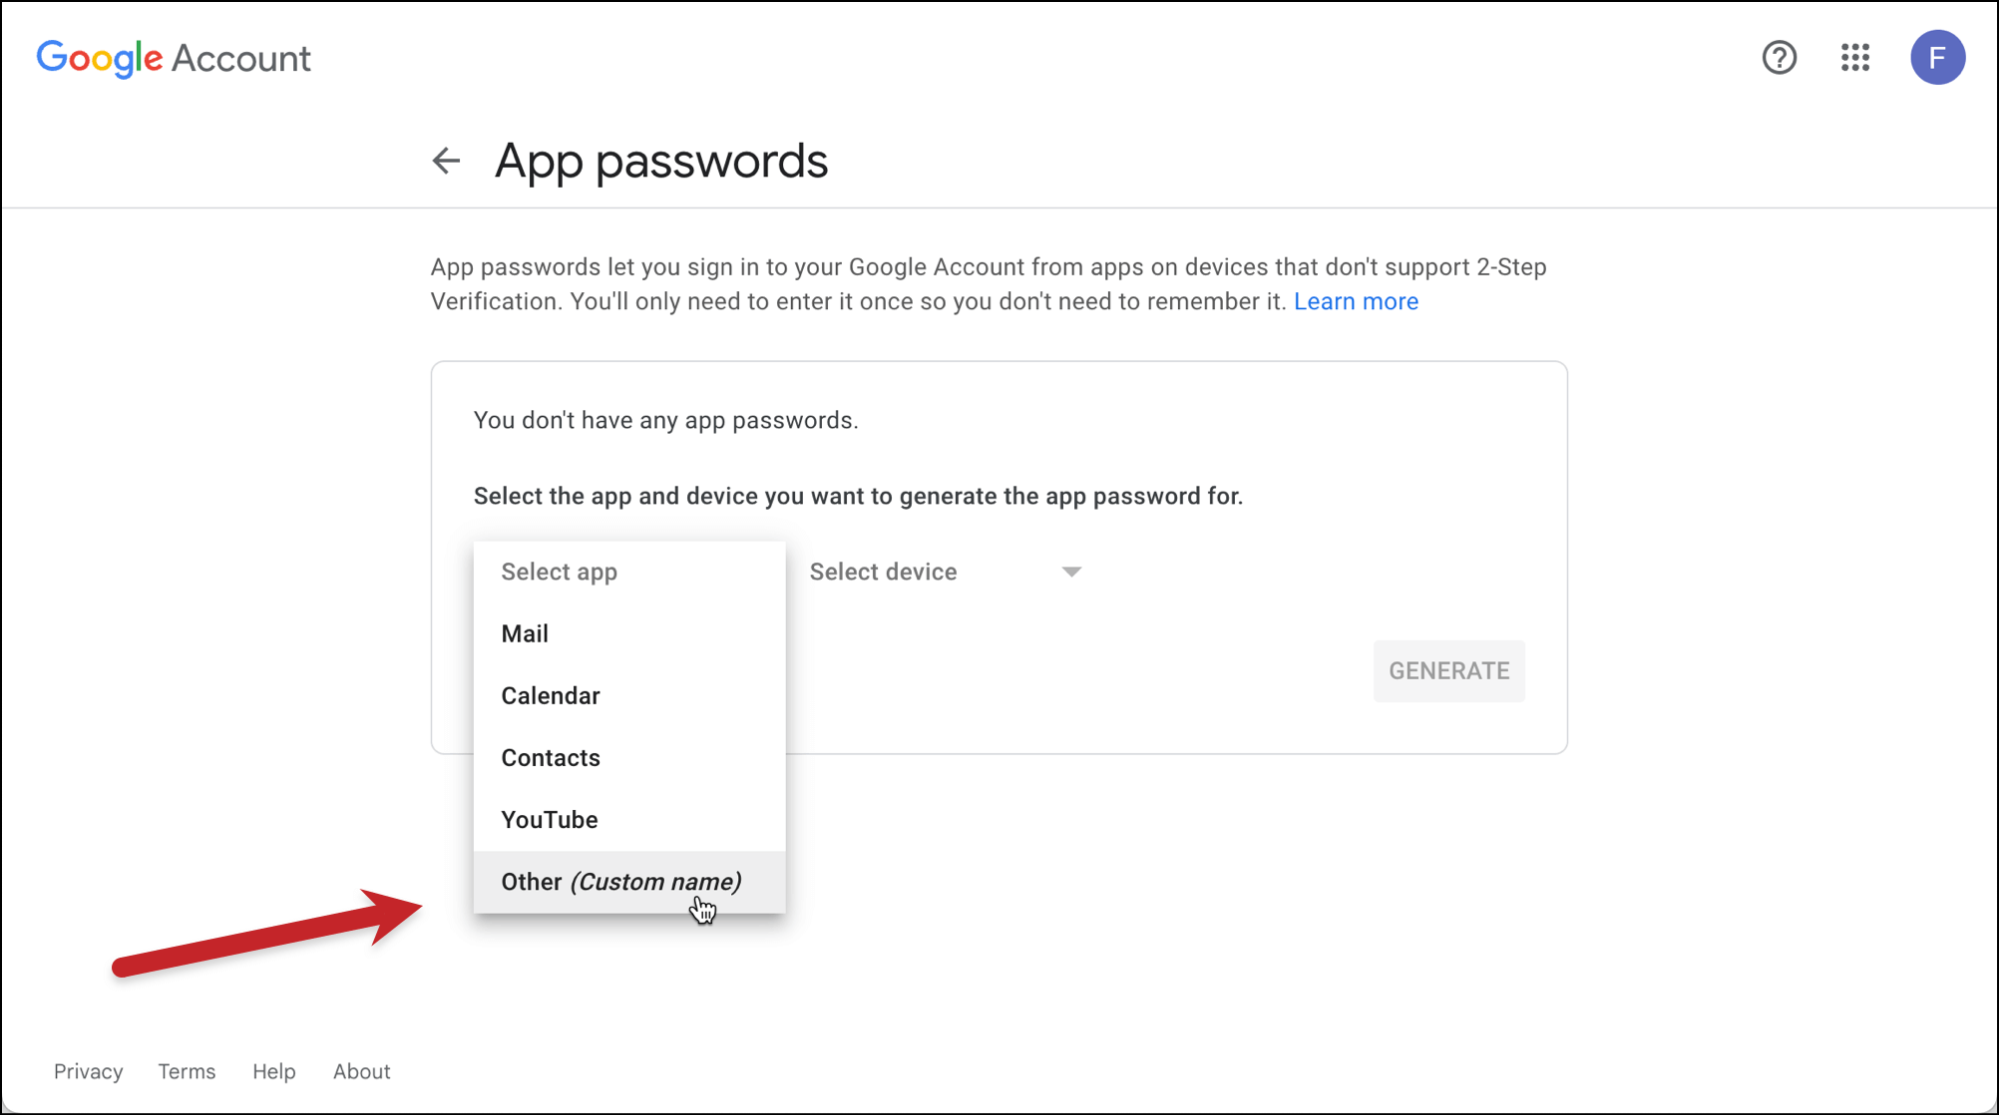
Then click the Generate button.
Google will generate a 16-character app password. Copy that app password, you’ll need it shortly. (I’ve blurred mine in the screenshot below.)
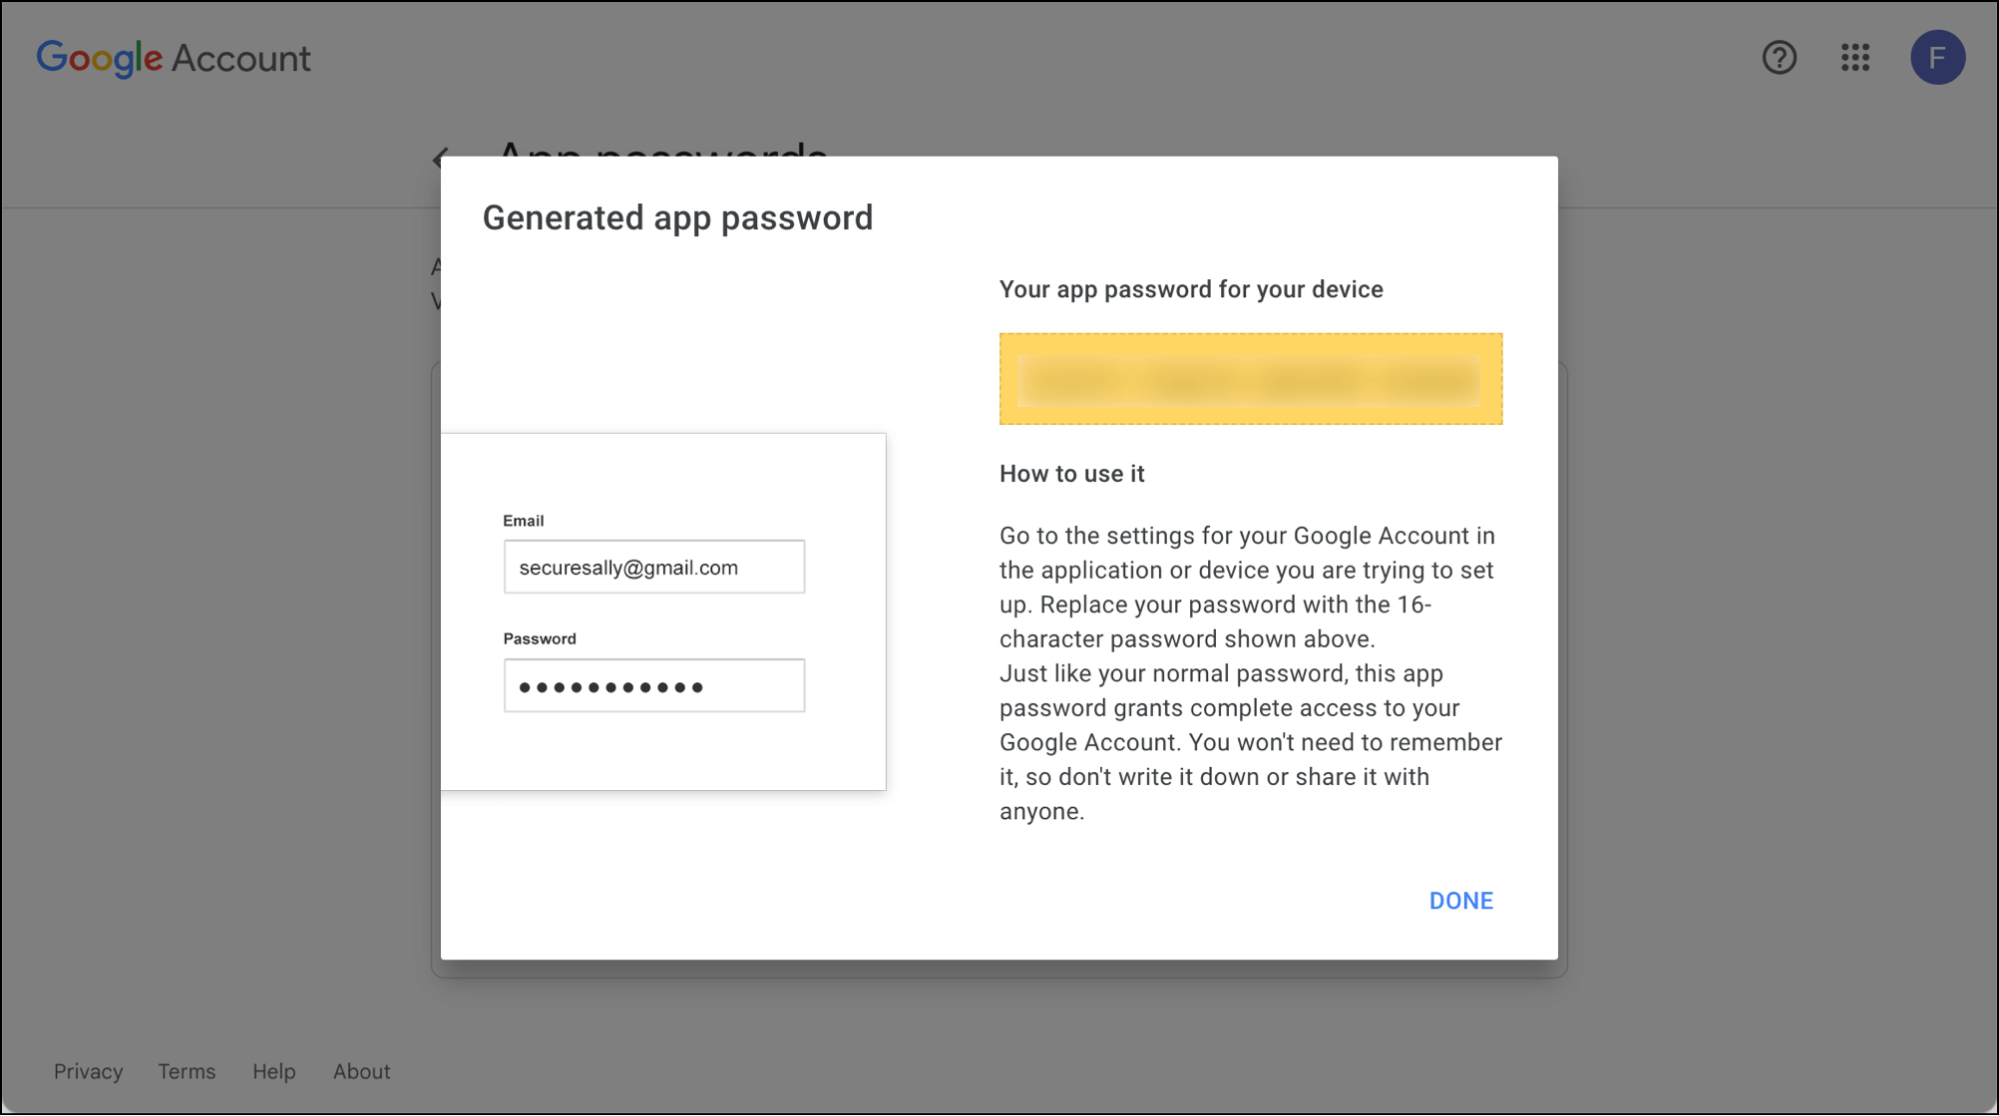
Now click Done. We’re ready to set up the alias.
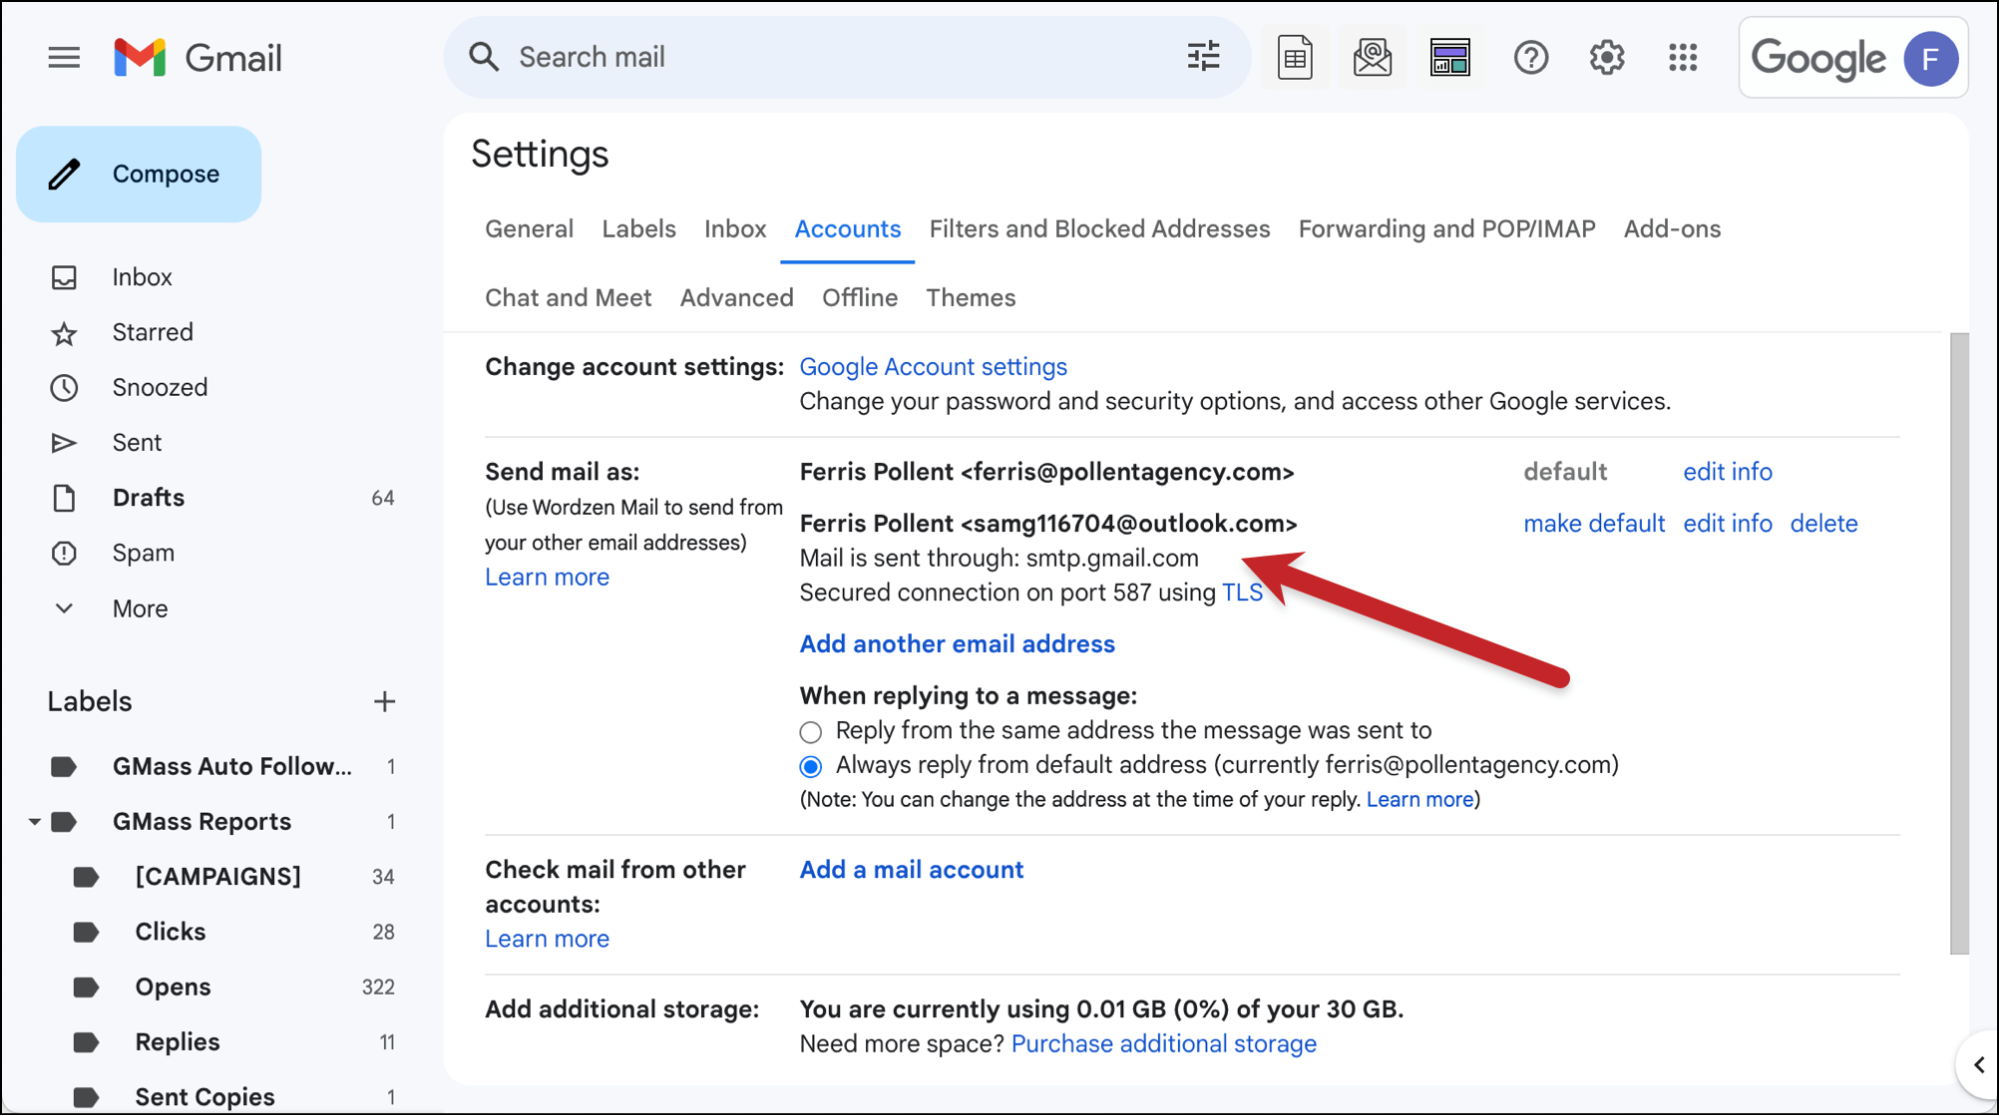
Step 3: Setting up your alias in Gmail
Head back to your Gmail inbox and go to the Gmail settings.
Go to the Accounts section and click Add another email address.
In the pop-up window, enter the other email address from which you want to send email. I’m going to enter one of my Outlook addresses.
Leave the box checked for Treat as an alias.
Then click Next Step.
This will bring up a window where Google pre-populates some fields for you because, as I mentioned earlier, it wants your alias to send through its own SMTP server. But we don’t want that. So… we’re going to delete the pre-populated suggestions.

Instead, we’re going to go with the following values (which are basically the standard Gmail SMTP settings):
- SMTP Server: smtp.gmail.com
- Port: 587
- Username: your Gmail/Google Workspace address
- Password: the 16-character app password you generated earlier
- Secured connection using TLS

Now click Add Account.
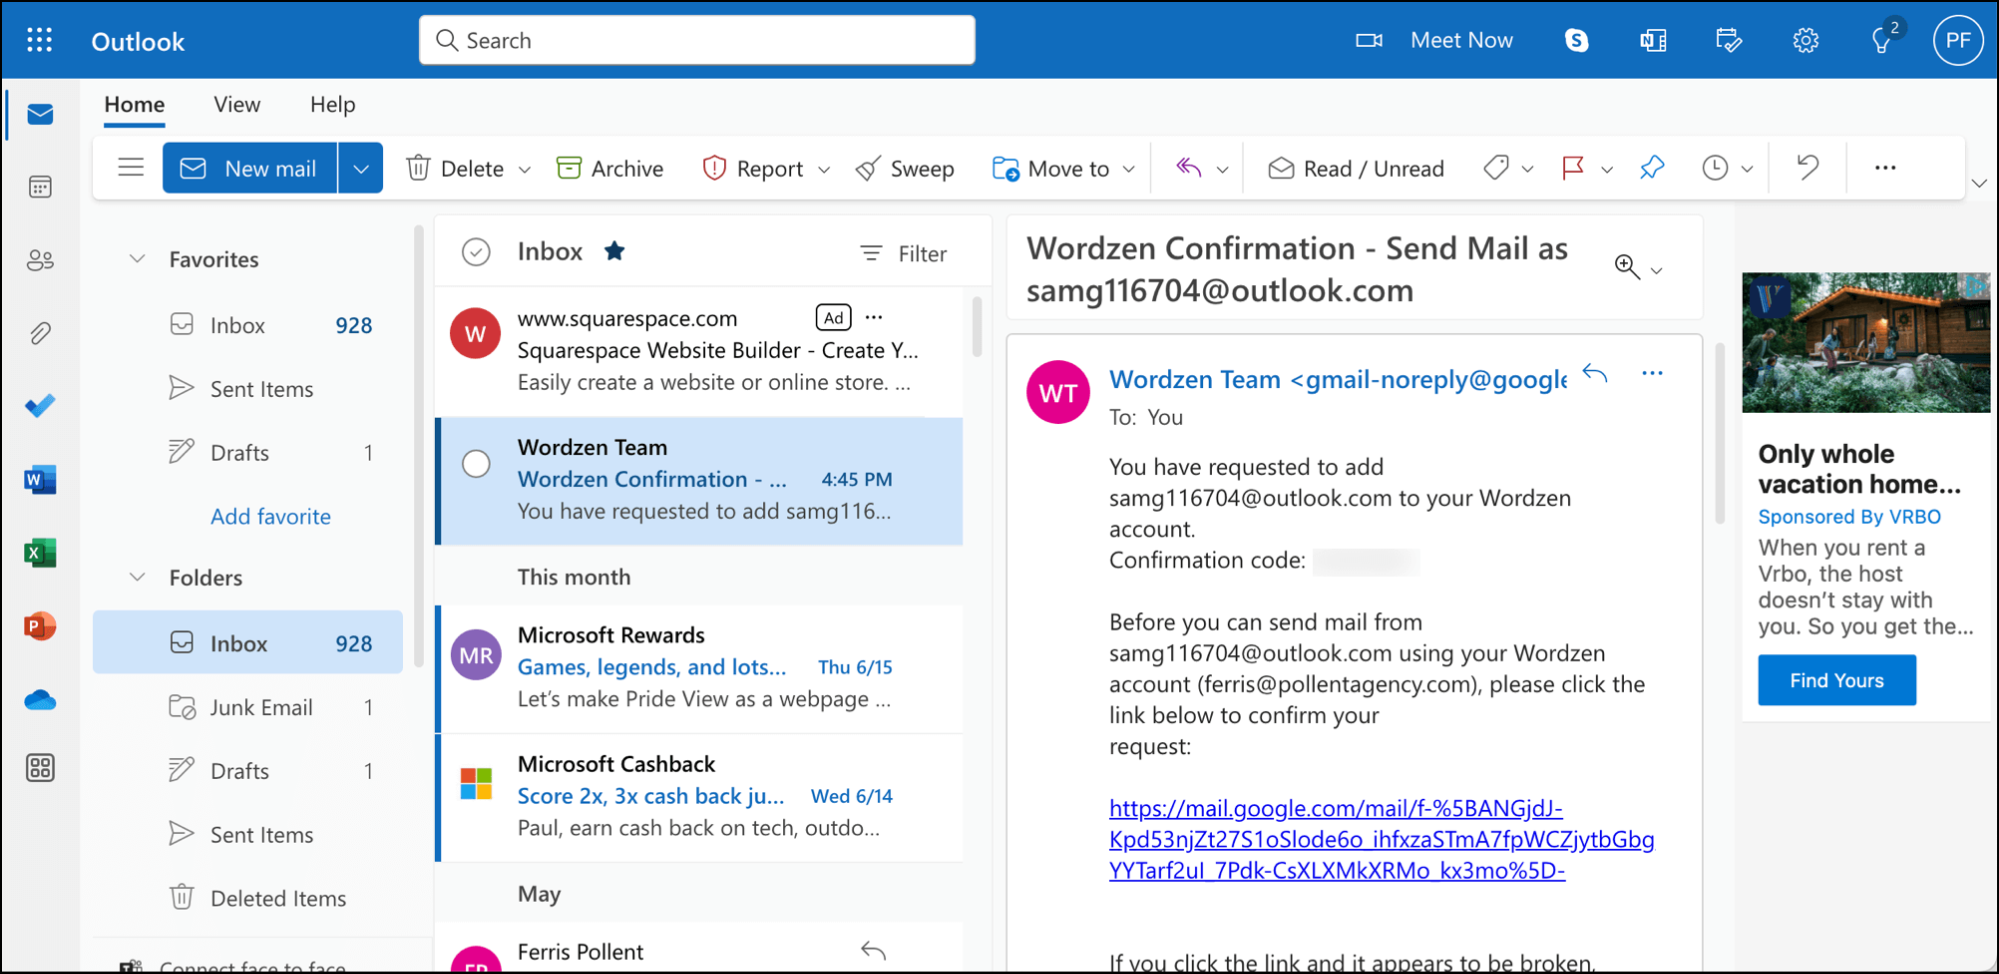
Assuming all went right, Google will say “Congratulations” and tell you they’ve mailed a verification code to your other email address. (You know, to make sure it really is your email address before they start using it to send emails.)
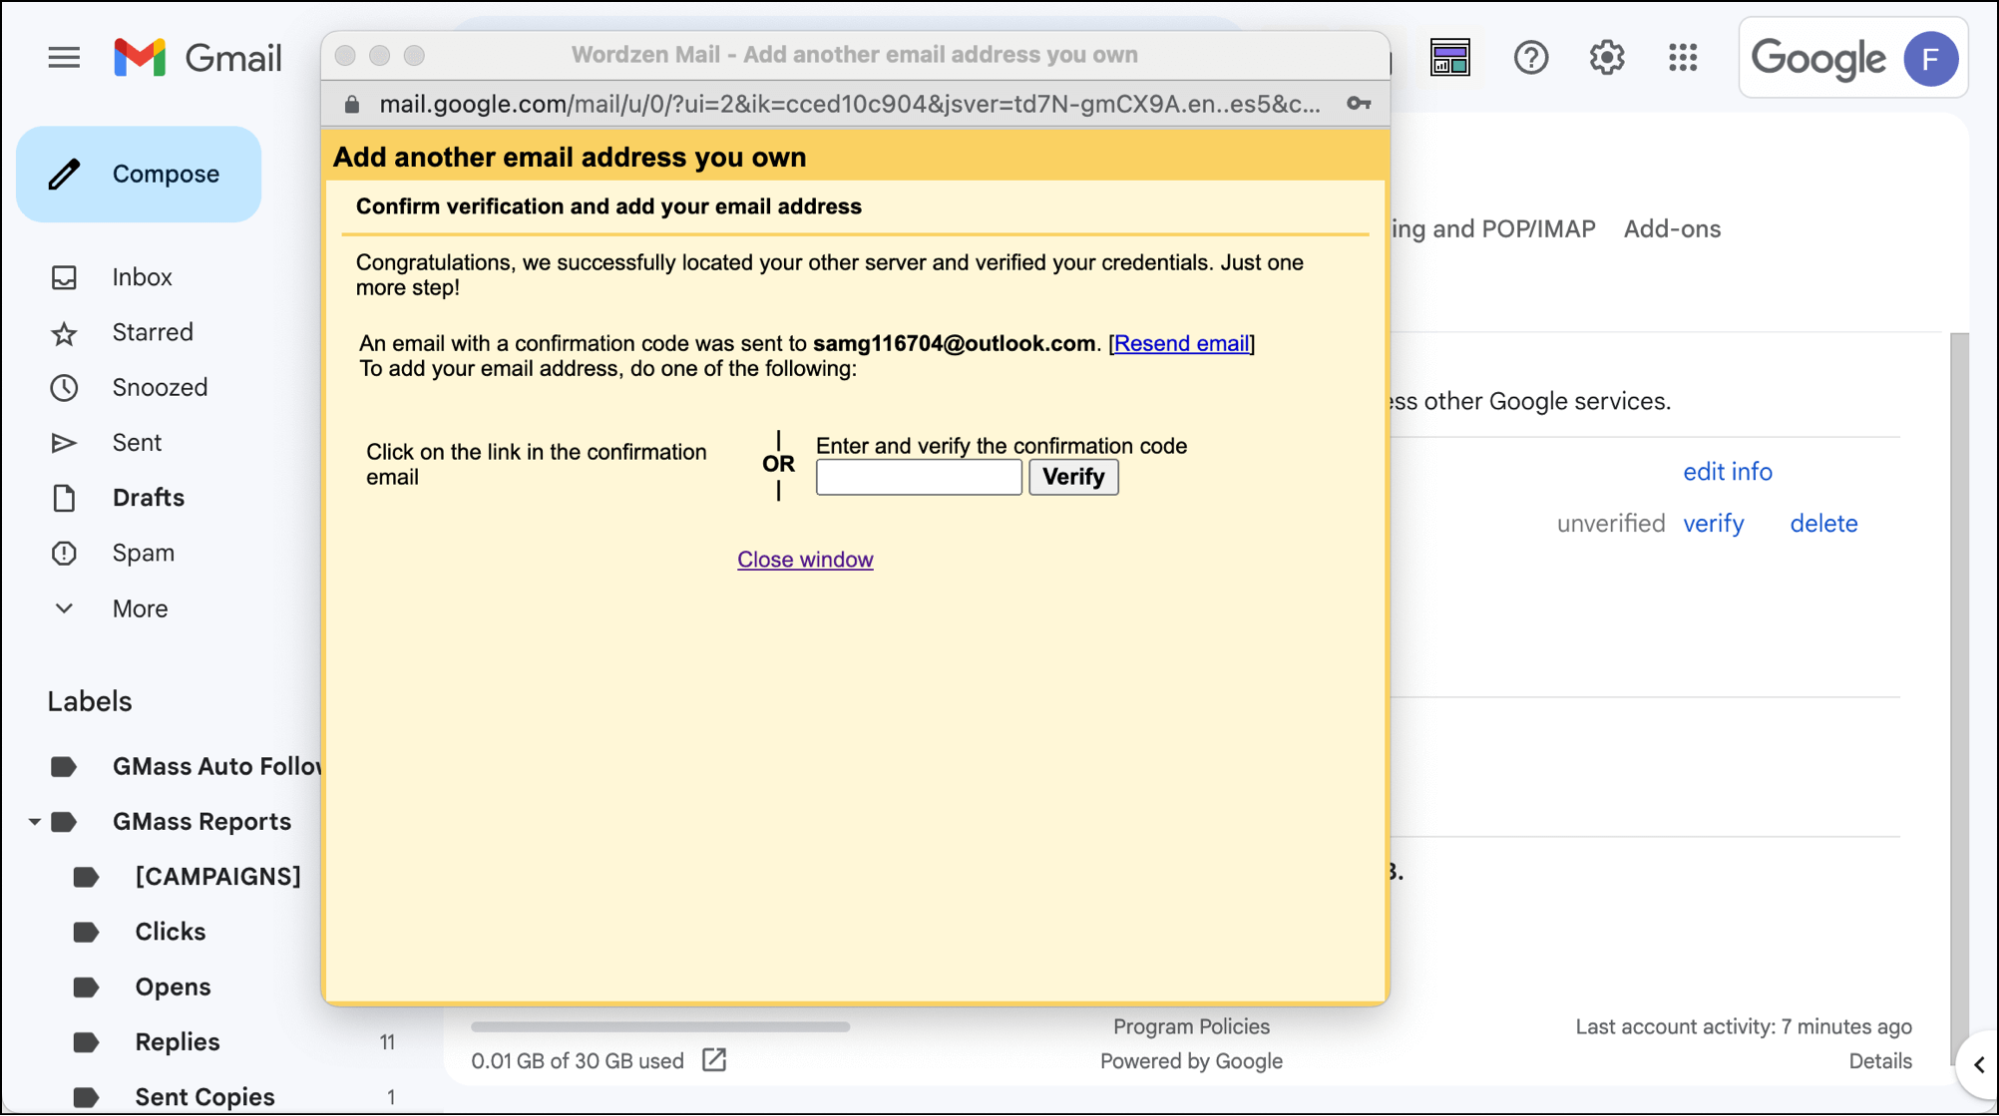
So head on over to your other email account to grab the verification code.
Once you enter it, you should see your other email address is now listed as a sending option in your account.
You can now use your alias to send emails from that address in your Gmail account and send them through Gmail’s servers.
Using Your New Alias to Send a Gmail Mail Merge Campaign
And… your alias is available to send a cold outreach, email marketing, or other mail merge campaign through Gmail with GMass.
If you don’t have GMass installed, it’s a Chrome extension that takes less than a minute to install and set up (no credit card required — you don’t even have to fill out a form). Follow the quickstart guide to learn the basics of connecting Google Sheets with your contacts to a new campaign.
When you’re creating your GMass campaign, choose your alias from the from address dropdown.
When everything is ready, hit the red GMass button to send your campaign with your alias.
Gmail Alias: Deliverability Tips to Set Yourself Up for Successful Sending
Now that you’ve set up your alias and learned how to use it to send campaigns through Gmail, here are some times for maximizing deliverability.
1. Make sure your alias address has a good reputation
The first thing I need to cover is a strange one for any email sending platform to say: Deliverability largely falls on you.
We do as much as we can. But so much of deliverability falls to you, the user, and your reputation.
So if you create a brand new Outlook account, connect it as an alias to Gmail, and immediately try to send a 1,000-person cold outreach campaign — it’s almost certain you’ll head straight to spam.
Use your other address to send emails to warm recipients and gradually build up your sending volume. That will prepare your email address for better success.
2. If applicable, make sure SPF, DKIM, and DMARC are set up properly
If you’re using an email provider with your own domain as an alias (e.g., yourname@yourcompany.com), make sure you have authentication properly configured.
If you need help, here are our step-by-step guides to set up SPF, set up DKIM, and set up DMARC for authenticated sending.
3. Use GMass’s deliverability tools like email verification and Spam Solver
Since you’re sending your campaigns through GMass, take advantage of the key deliverability tools in place.
Two big ones:
- GMass can validate every email address before you send to it, helping to limit the bounces that can hurt your reputation.
- GMass’s Spam Solver is a powerful tool that tests your campaign by sending it to a few dozen mailboxes… checking its inbox vs. spam results… then giving you tips to improve that ratio.
To get started with GMass, download the Chrome extension (if you’re in the mood, you can check out the 7,500+ reviews which give GMass an average of 4.8/5 stars while you’re over there).
You can get going for a free trial and send your first mail merge campaign (from an alias, if you’re so inclined) in a matter of minutes.
Only GMass packs every email app into one tool — and brings it all into Gmail for you. Better emails. Tons of power. Easy to use.
TRY GMASS FOR FREE
Download Chrome extension - 30 second install!
No credit card required
cheers particularly for the quickstart vids, I was so excited after downloading the tools that you cannot imagine how disappointed I was to discover I couldn’t get them to work! You came to my rescue and saved the day!
Hi Ajay, with the new multisend feature, how do we ensure that the emails will be sent from the alias instead of the sign in account?
Thanks for this!
I couldn’t find App Passwords under two factor security – but was able to find the setting my typing into the Search Google Account box at the top of the Google Account page.
naturally like your web-site but you need to check the spelling on quite a few of your posts. Many of them are rife with spelling issues and I find it very bothersome to inform the truth on the other hand I will surely come back again.
I’ll right away grab your rss as I can’t find your e-mail subscription hyperlink or newsletter service. Do you’ve any? Kindly let me recognise in order that I may just subscribe. Thanks.
An impressive share, I just given this onto a colleague who was doing a little bit evaluation on this. And he in reality ordered me breakfast due to the fact I discovered it for him.. smile. Consequently allow me alter that: Thanks for the deal with! Having said that yeah thanks for spending the time to chat about this, I really feel strongly about it and adore reading additional on this topic. If possible, as you turn into expertise, would you mind updating your weblog with additional details? It?s quite useful for me. Giant thumb up for this internet page publish!
An impressive share, I just with all this onto a colleague who was doing a small analysis on this. And that he in reality bought me breakfast due to the fact I came across it for him.. smile. So permit me to reword that: Thnx for that treat! But yeah Thnkx for spending enough time to go over this, I’m strongly regarding this and enjoy reading more on this topic. When possible, as you become expertise, can you mind updating your website with additional details? It really is extremely great for me. Huge thumb up because of this short article!
Spot up with this write-up, I truly think this website requirements a lot more consideration. I’ll oftimes be again to read additional, thank you that info.
Hi, followed this process for my Dad using James’s addition above and it worked so thanks!
Only issue is my Dad is now getting delivery failures on emails he is trying to send due to the sending domain not passing dmarc verification.
Does anyone have any advice on how to fix
this?
Cheers, Andy
I’m not certain the place you are getting your information, however great topic. I must spend a while learning more or working out more. Thank you for magnificent info I was searching for this info for my mission.
There are a few fascinating points at some point in this article but I don’t know if I see them all center to heart. There may be some validity but I most certainly will take hold opinion until I consider it further. Great post , thanks and we want more! Added onto FeedBurner at the same time
Spot i’ll carry on with this write-up, I truly believe this website wants additional consideration. I’ll more likely be once more to see additional, thank you that info.
An interesting discussion will probably be worth comment. I’m sure that you ought to write much more about this topic, may possibly not become a taboo subject but usually everyone is not enough to communicate on such topics. To the next. Cheers
Umm,OK. But my point is that I don’t understand what it is about the last sentence you don’t understand? Please explain. What do you mean by “average”?
Super info it is actually. My friend has been seeking for this information.
Write more, thats all I have to say. Literally, it seems as though you relied on the video to make your point. You clearly know what youre talking about, why throw away your intelligence on just posting videos to your blog when you could be giving us something informative to read?
I’d constantly want to be update on new content on this website, bookmarked!
hey there and thank you for your information — I’ve certainly picked up anything new from right here. I did however expertise a few technical points using this website, as I experienced to reload the site many times previous to I could get it to load correctly. I had been wondering if your hosting is OK? Not that I am complaining, but slow loading instances times will sometimes affect your placement in google and could damage your quality score if ads and marketing with Adwords. Anyway I’m adding this RSS to my email and can look out for a lot more of your respective intriguing content. Ensure that you update this again very soon..
Resources this kind of as the one you mentioned here will be incredibly helpful to myself! I will publish a hyperlink to this page on my particular blog. I am sure my site visitors will discover that very beneficial.
i am now going to using gmass for cold email,but stop on the alias setting,could you please point me out below problem?
Authentication failed. Please check your username/password.
Server returned error: “534-5.7.9 Application-specific password required. For more information, go to 534 5.7.9 https://support.google.com/mail/?p=InvalidSecondFactor d2e1a72fcca58-736b75d573csm9145292b3a.26 – gsmtp , code: 534″
Almost all of what you say is astonishingly legitimate and it makes me wonder the reason why I had not looked at this in this light before. This article really did turn the light on for me as far as this particular subject goes. Nevertheless at this time there is one particular point I am not too comfy with so while I make an effort to reconcile that with the central theme of your issue, allow me observe just what the rest of the readers have to point out.Nicely done.