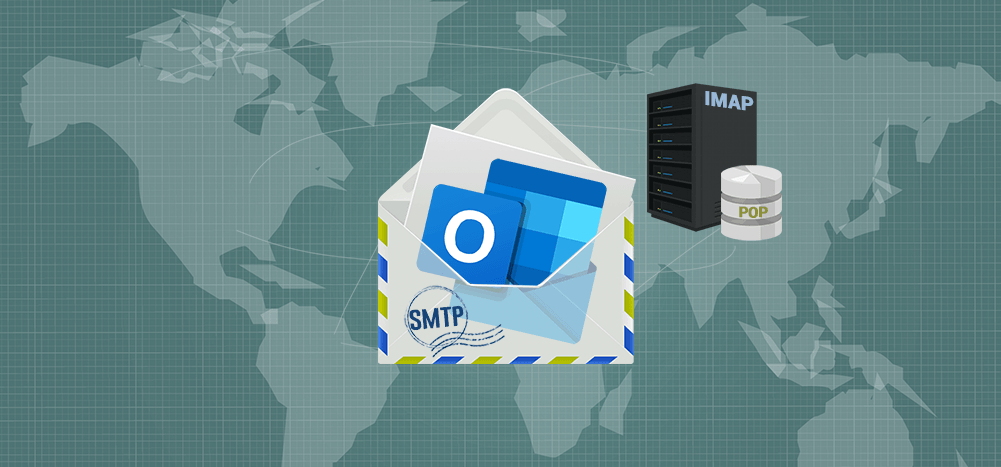
Microsoft Outlook’s SMTP settings let you configure the email client of your choice (Gmail, Yahoo, Thunderbird, etc.) to send emails from your Outlook address.
Alternatively, you can configure your Outlook account’s SMTP and POP or IMAP settings to send and receive emails using a non-Outlook email address.
In this article, I’ll go over the SMTP settings for Outlook and walk you through the process of setting up your Outlook SMTP as well as IMAP and POP server settings.
Finally, I’ll mention the disadvantages of using a Microsoft Outlook SMTP server and highlight a better alternative to Microsoft Outlook to streamline your email sending activities.
This Article Contains:
(Click on links to jump to specific sections)
- Outlook SMTP Settings
- How to Set Up SMTP Server Settings in Microsoft Outlook
- How to Set Up IMAP and POP Server Settings in Microsoft Outlook
- 5 Email Setting FAQs
- Why Outlook Isn’t the Best Email Client + A Great Alternative
Let’s get started.
Outlook SMTP Settings
When you need to add your Outlook.com account (or Microsoft account / Hotmail account / Live.com account / MSN account) to another mail app (like Gmail), you’ll need to use the following SMTP settings:
- SMTP Server Name: smtp.office365.com
- SMTP Port Number: 587
- SMTP Encryption Method: STARTTLS
Once you add these SMTP settings, you should be able to use another mail app to send emails from your Outlook account.
But how do you receive incoming emails?
To receive incoming emails, you’ll need to configure the IMAP settings or POP settings of the mail app you’ll be using.
Here are the IMAP settings for Outlook:
- IMAP Server Name: outlook.office365.com
- IMAP Port: 993
- IMAP Encryption Method: TLS
And here are the POP settings for Outlook:
- POP Server Name: outlook.office365.com
- POP Port: 995
- POP Encryption Method: TLS
However, to use POP, you’ll need to enable its access in Outlook.
How to Enable POP Access in Outlook
1. Launch the Outlook mail app (web version), and sign in with your account credentials.
2. Click on the Settings icon on the top of your toolbar in the Inbox window.

3. From the dropdown menu, click on View all Outlook Settings.
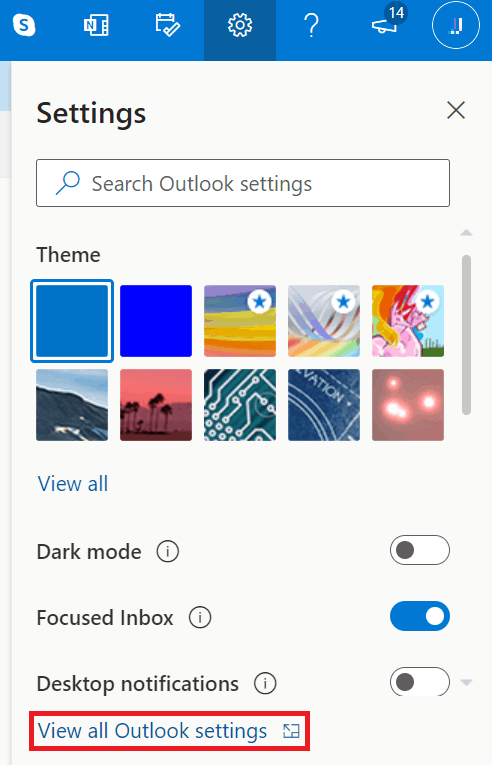
4. In the Settings window, click on Mail and then Sync Mail.

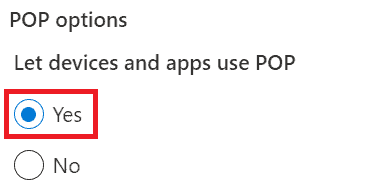
5. Choose the Yes radio button under POP options, and then click Save.
Note: Ensure your internet service provider hasn’t blocked the SMTP, IMAP, and POP port numbers.
Now that you know how to configure another mail app to send emails from your Outlook address, I’ll show you how to send emails from another mail app account using Outlook:
How to Set Up SMTP Server Settings in Microsoft Outlook
Generally, there are three ways to set up email settings in your Outlook account:
- Using direct send.
- Using the SMTP authentication method (this is what I’ll talk about).
- Using a dedicated relay to send your emails through the Outlook SMTP relay.
Note: If you want to know what SMTP is first, click here to jump down to that section. After you’ve understood what it is, you can come back here to learn how to set it up.
Why Should You Use the SMTP Client Method?
Because it’s the best method to use!
Here’s why you shouldn’t use the direct send method or dedicated relay method:
- Direct send only supports communication within your organization. As a result, you can’t use it to communicate with people outside your business.
- If your company uses a line-of-business (LOB) tool, you need a static IP address to authenticate the Outlook mail app with the relay server method.
And here’s why you should use the SMTP client submission method:
Unlike direct send, the SMTP authentication (SMTP AUTH) submission method lets you email anyone with a full email address inside or outside your organization.
Besides, you don’t need to worry about having a static IP address for your LOB app with SMTP authentication
How to Set Up the SMTP Server in Outlook
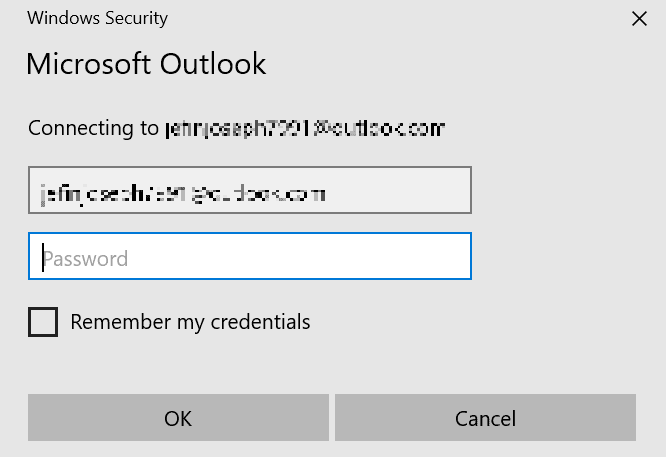
1. Launch the Outlook desktop mail app, and sign in with your username and app password.
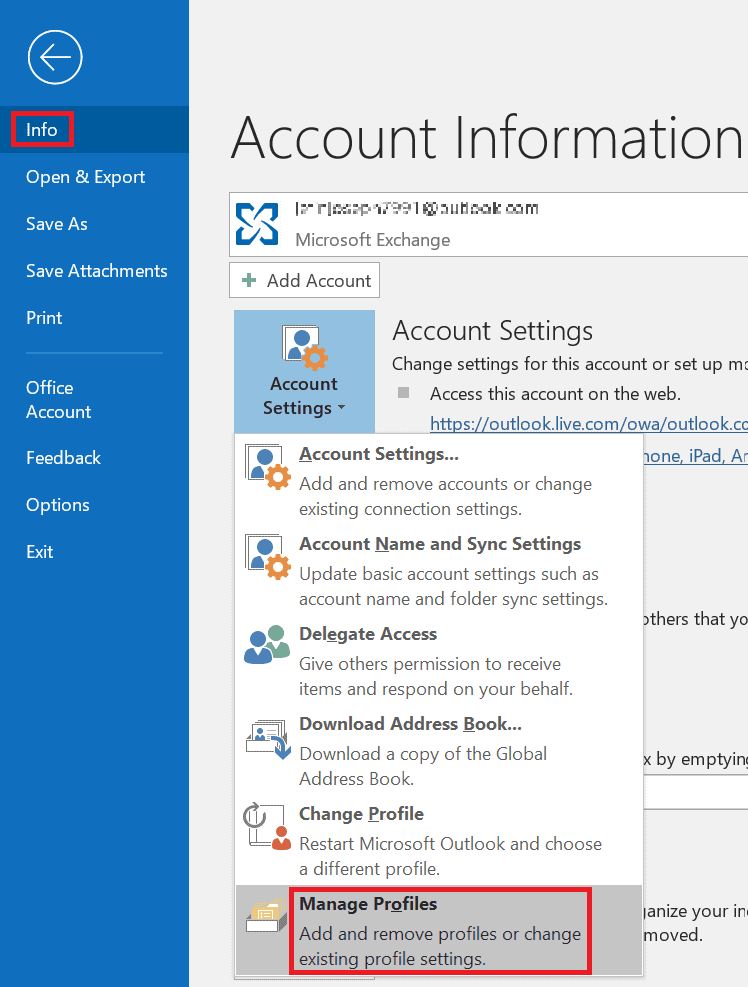
2. Click on the File menu, then select Info and click on Account Settings.

3. From the Account Settings dropdown menu, select Manage Profiles, and a Mail Setup window will appear.
4. Next, click on the Email Accounts button within the Mail Setup window.

5. Select your e mail account and click Change.

6. In the Change Account window that appears, click on More Settings.
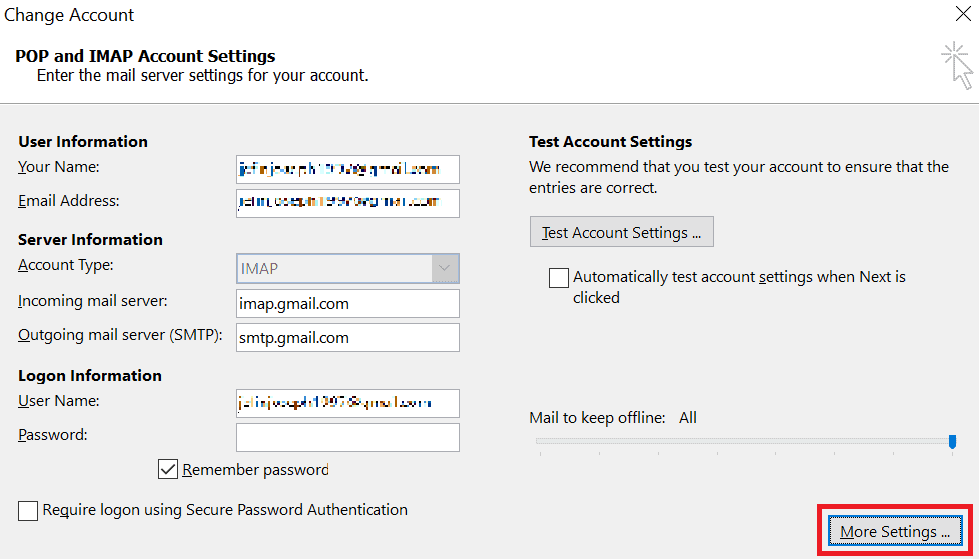
Note: I’m using a Gmail account here. That’s why the “Incoming mail Server” says imap.gmail.com and the “Outgoing mail Server” says smtp.gmail.com.
7. From the Internet Email Settings window, select the Outgoing Server tab.

8. Under the Outgoing Server tab, tick the checkbox that says “My outgoing server (SMTP) requires authentication” and click the Log on using radio button.
Insert the username (the email address from which you send the email) and password into their respective fields. Moreover, ensure that the “Require Secure Password Authentication” box is unchecked.

Note: Outlook.com doesn’t require Secure Password Authentication (SPA). SPA is a proprietary Microsoft protocol used to authenticate Microsoft mail clients with servers. But don’t worry, since you’re using Outlook, it won’t be an issue for you!
9. Next, click on the Advanced tab.
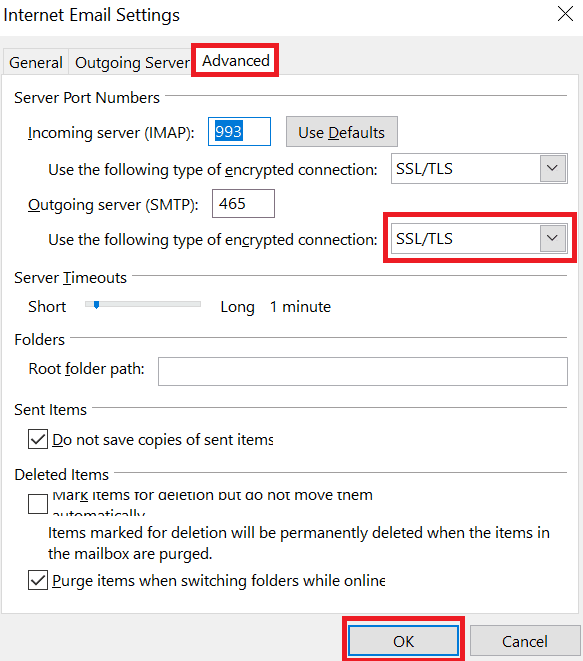
In the Advanced tab, choose the SSL/TSL encrypted connection from under the “Use the following type of encrypted connection” dropdown list and click OK.
That’s it — you’ve completed the configuration of your SMTP settings to send emails from a non-Outlook account through Outlook!
Now, let’s go over managing the configuration of your IMAP and POP server settings:
How to Set Up IMAP and POP Server Settings in Microsoft Outlook
You can set up your SMTP settings to send outgoing emails, but that isn’t enough to fetch incoming emails.
To do that, you need to set up an incoming mail server using:
Let’s jump right into it.
A. How to Set Up the Incoming Server Settings with IMAP
1. Launch the Outlook mail app on your desktop.
2. Click on the File menu, then select Info, and click on Add Account.

3. In the Outlook login window that opens, tick the checkbox that says “Let me set up my account manually” and click Connect.

4. From the Advanced setup window that appears, choose the IMAP account type.

Your account will get added to Microsoft Outlook.

B. How to Set Up the Incoming Server Settings with POP
1. Launch Outlook on your desktop.
2. Click the File menu, select Info, and click on Add Account.
3. In the Outlook login window that opens, tick the checkbox that says “Let me set up my account manually” and click Connect.
4. From the Advanced setup window that appears, choose the POP account type.

5. Type in the credentials in the Internet Email window that opens, and click OK.

6. In the POP Account Settings window that appears, verify that the POP port number is 995 and the encryption method used is SSL/TLS.
Once you’ve verified these server information fields, click Next.
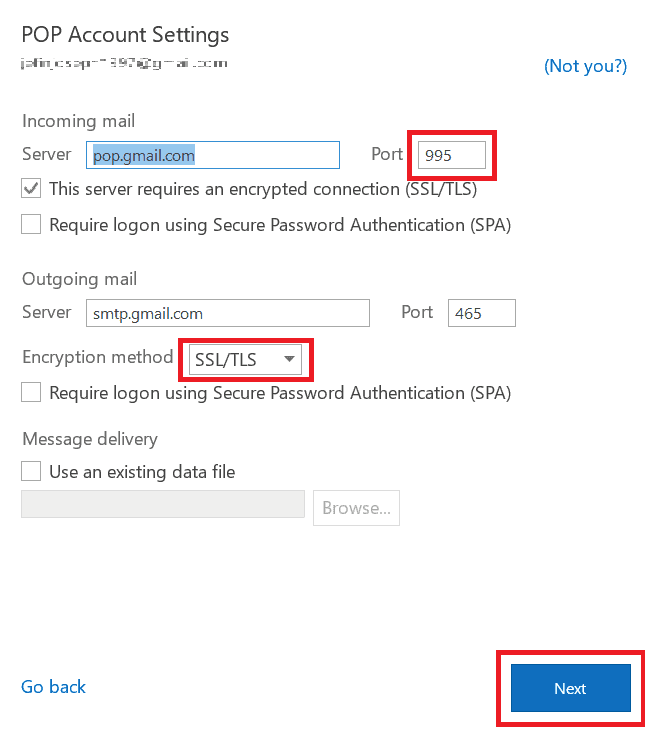
Note: I’m using a Gmail account here. That’s why the “Incoming mail Server” says pop.gmail.com, and the “Outgoing mail Server” says smtp.gmail.com.
Your account should be set up and ready to use.

Note: Keep in mind that you may need to be assigned permissions before performing some of the abovementioned steps. To know what permissions you may need, check out the entries under “POP3 Settings” and “IMAP4 Settings” in mobile devices and clients permissions.
Now that you know how to set up a mail server using SMTP, POP, and IMAP, I’ll answer some FAQs related to the SMTP, IMAP, and POP email protocols:
5 Email Setting FAQs
Here are answers to five commonly asked questions about the SMTP, IMAP, and POP protocols:
1. What Is SMTP?
The Simple Mail Transfer Protocol (SMTP) is used to send emails from one email server to another. SMTP is used by most e mail account servers to exchange email messages.
SMTP uses a “store and forward” process that helps you move emails from one mail server to another.
It works with a Mail Transfer Agent (MTA) — also known as an SMTP relay — to send your outgoing mail to the right inbox. Using an SMTP relay guarantees that your mail is delivered to the recipients’ inbox.
It’s a lot like the postal service using their postal networks to deliver your mail to the right person.
2. How Does SMTP Handle Email?
SMTP utilizes codes and commands to simplify sending emails across servers. SMTP relay servers transfer outgoing mail across several computer systems before it reaches a recipient’s inbox.
This is similar to a letter going through multiple post offices and agents before getting delivered.
However, SMTP can’t send attachments. It can only transmit text.
You can overcome this through Multipurpose Internet Mail Extensions (MIME), which encodes all non-text data in an internet e-mail to text before sending it through SMTP.
Want to learn more about SMTP?
Read my ultimate guide to SMTP for everything you need to know.
3. What Is POP?
Post Office Protocol (POP) is a protocol widely used to receive incoming mail. There have been several versions of POP, the latest being the POP3 server. This protocol downloads email onto a local device whenever you want to check email.
This way, granting POP access to your mail client lets you check your mail even when you’re offline!
4. What Is IMAP?
The Internet Message Access Protocol (IMAP) is the most commonly used protocol for receiving incoming mail.
Unlike a POP3 server, where you have to download an email to your local storage, IMAP saves all emails on its email servers. And so whenever you need to check email, your mail client contacts the server and lets you check your email.
This makes the IMAP protocol quicker and more efficient than using the POP3 protocol.
5. How Is POP/IMAP Different from SMTP?
Are all these protocols confusing you?
Don’t worry — it’s all very simple.
The POP protocol and IMAP protocol help you set up an incoming mail server to receive incoming emails. On the flip side, SMTP is a protocol that allows you to send outgoing emails.
Now that we’ve gone over the basics of SMTP, IMAP, and POP, I’ll explain why you should choose an alternative email client to Outlook:
Why Outlook Isn’t the Best Email Client + A Great Alternative
While you can set up your SMTP settings to use Outlook as your email provider, it’s not the best mail client out there.
Here’s why Gmail is a much better mail client than Outlook:
1. Gmail Offers More Functionality and a Cleaner Interface
Gmail is renowned for its user-friendly interface.
While Outlook tries to offer a similar interface, it’s far from the streamlined look of Google Gmail and even lacks some useful features.
While Gmail provides a secure connection for your emails, it also has tons of AI-powered features like smart compose — something you won’t find in Outlook.
2. Gmail Offers a Ton of Powerful Extensions
Microsoft Outlook works best when paired with the other Office 365 applications. This means that if you need extra features from Outlook, you’ll have to turn to one of the Office 365 apps. And while some of those are helpful, it’s still a very limited selection!
However, Gmail features a ton of functional extensions to increase your email productivity.
One such extension is GMass.
It’s the perfect email extension for anyone looking to send bulk emails from their Gmail account.
What Is GMass?

GMass is a powerful bulk email tool and email marketing automation platform used by employees in tech giants like Twitter, Google, Uber, and LinkedIn. It’s also used by solopreneurs, small business owners, sales professionals, casual email senders, and so on.
Essentially, anyone can use GMass!
And the best part?
GMass works right inside Gmail, which means you don’t have to familiarize yourself with yet another tool.
To get started with GMass, just download the Chrome extension, and sign up for free with your Gmail account.
With GMass in your toolkit, you can:
- Automatically personalize your outgoing emails at scale, including their subject lines, paragraphs, attachments, images, and more.
- A/B test your email outreach campaigns to see which campaign will get you the most positive responses.
- Set up workflows to keep sending automatic follow-up emails till your recipient opens, replies, or clicks on a link inside your Gmail. Additionally, you can adjust the frequency and number of follow-ups to send.
- Send behavior-based email campaigns that are automatically customized to how a recipient responded to your previous emails.
- Use the Email List Builder feature to create a mailing list effortlessly from your inbox.
- Analyze how your email deliverability and engagement metrics through detailed analytics reports to identify any opportunities for improvement.
- Schedule your bulk emails to go out at optimal times so that they reach the recipient’s inbox when there’s the highest chance of engagement.
- Create and send drip campaigns to your recipients to improve your engagement rates.
- Access powerful bulk emailing and automation features on your Android device (smartphone, tab, etc.) using the GMass add-on for the Gmail app.
I’ll now explain the steps involved in the configuration of SMTP settings in GMass:
How to configure your SMTP Settings in GMass
You can always use Gmail’s SMTP servers for your emails.
But why do that when you can set up your own SMTP outgoing mail server on GMass?
This will even let you send unlimited mass emails to recipients!
Here’s how you can set it up:
1. Choosing How to Set Up the SMTP Server
You can set up SMTP settings in GMass using three different methods:
A. Use the GMass SMTP Server
If the emails you send are either:
- Non-commercial.
- Completely organically developed.
You can easily set up SMTP through GMass’s own SendGrid account. You can contact the GMass team to request this service.
B. Set Up Your Own SMTP Account
If you feel like you need your own SMTP account, or if your emails don’t fit the criteria above — don’t worry!
You can easily set up your own SMTP account with third-party providers like SendGrid. Then, just tweak the account setting to your liking and set it up with GMass.
Read my reviews of popular SMTP services:
C. Set Up a Private SMTP Outgoing Mail Server
If you have the technical knowledge, you can set up custom SMTP server settings for your business. However, setting up your own server can be time-consuming and requires advanced technical knowledge.
If you’re an expert-level developer, you’ll want to read my technical review of popular SMTP services.
2. Setting Up Your SMTP Account
Here’s how GMass connects to SMTP servers:
Step 1
GMass connects to your server without TLS/SSL. You can decide on the port number — most SMTP service providers will allow you to connect to port number 25 or 2525.
Note: Ensure your internet service provider hasn’t blocked the port number.
Step 2
Ensure the “track email opens and clicks” option is turned off. This is required because GMass does all the email tracking for you.
Ensure that the outgoing mail server (SMTP) doesn’t alter the emails in any way but just lets them pass through.
Step 3
Look for any email send quota restrictions in your SMTP account setup. If there are any, ensure that you remove them or that they don’t limit your general or cold email campaigns.
Step 4
In this step, you’ll have to check which RETURN-PATH address your server is using. This address is also called a MAIL-FROM address or an Envelope Form.
Depending on your SMTP provider, you’ll have to verify your domain name — because the same domain name is used in the MAIL-FROM address and the “from” address.
This may require you to alter your DMARC, DKIM, and SPF records.
Step 5
Make sure you turn on Bounce notifications. Don’t forget to set your bounce notifications to go to the “From” address.
This helps GMass to process the email bounces and show them to you when required.
3. Setting Up GMass to Send Emails through the SMTP Server
This is the last stage in configuring GMass with an external server.
Here’s how you can do it:
Step 1
Reload Gmail to make sure you have the latest GMass version. Install the Chrome extension if you don’t have GMass already. Then, click on the Compose window.
Step 2
Insert smtp@gmass.co as the “To” field of the new email message.
Step 3
Insert the word “set” as the subject and wait for this form to load in the message area.
Step 4
Enter the relevant details after the colons. If your SMTP server requires no authentication, set the User name to “noauth” and leave the password field blank.
Step 5
Click the GMass button.
After you complete these steps, GMass will try to send a test message to your inbox. If the email is successful, the SMTP email message server will be set for your Gmail account.
Then, you’re ready to send out emails on GMass through your external SMTP server!
Final Thoughts
Configuring your Outlook SMTP settings doesn’t have to be complicated.
Just follow the instructions I have outlined above, and you’ll have your Outlook mail server settings up and running in no time!
But remember, Outlook may not be the ideal email client for you — it lacks some functionality, supports limited extensions, and boxes you into the Microsoft 365 Suite.
Instead of using a limited mail app like Microsoft Outlook, you can easily handle your emails through Gmail and GMass instead.
With GMass, you can automatically personalize your emails, automate your email follow-ups, perform A/B testing, access powerful email capabilities on your Android device, and do so much more.
Why not try GMass today and take your email performance to the next level?
Only GMass packs every email app into one tool — and brings it all into Gmail for you. Better emails. Tons of power. Easy to use.
TRY GMASS FOR FREE
Download Chrome extension - 30 second install!
No credit card required

Ajay is the founder of GMass and has been developing email sending software for 20 years.
There is no way Gmail offers more functionality that Outlook.
I have tried to set up an email using imap and it comes up saying we couldnt connect to the ourtgoint (SMTP) server. Please check the outgoint (SMTP) server settings and try again. Have you any suggestions how to resolve the problem?
windows live account configure in outlook 2010
please update outgoing server and port
Hi Shahir,
Those ports and server information are correct. Please refer to Microsoft’s support article that outlines the same server and ports for both SMTP and IMAP: https://support.microsoft.com/en-us/office/add-your-outlook-com-account-in-outlook-for-windows-642c1902-bdd9-4dc3-abe7-76d60b148b23#ID0EBBH=Office_2007_-_2010
not new outlook. it’s not 2025 / 2024
Hello,
I currently have a program that generates mass emails at the end of each month when sending customer invoices. The program uses Outlook as its interface for sending emails, and Outlook is configured with G‑Suite IMAP/SMTP settings.
My question is: how can GMass be utilized in this scenario, given that I am not directly connected to Gmail but only through Google’s incoming and outgoing servers? Specifically, is it possible to configure GMass to send more than 2,000 emails per day, since Google currently caps me at that number?
Thank you for your guidance.