
Odds are, you’re using GMass to run a Google Sheets mail merge — where you connect your Google Sheet of contacts to a campaign and build your campaign from there.
So let’s make sure we connect everything perfectly.
In this guide, I’ll walk you through the entire process of connecting a Google Sheet to a GMass campaign.
Connect a Google Sheet to GMass: Table of Contents
- Step 1: Format Your Spreadsheet
- Step 2: Click to Connect
- Step 3: Choose Your Google Sheet
- Step 4: Choose Your Worksheet (Optional)
- Step 5: Optional Settings
- Step 6: Connecting to the Spreadsheet
- Now You’re Set to Create Your Campaign
Step 1: Format Your Spreadsheet
First, you’ll need to create a Google Sheet with everyone on your mailing list.
⚠️ Important: This needs to be a Google Sheets file, not an XLS or CSV file you’re viewing inside Google Sheets.
You can check out our in-depth guide on best practices for formatting a Google Sheet for mail merge campaigns, but for now, here are some of the key basics to remember.
- The first row should contain column header names, like FirstName, LastName, EmailAddress, Company, etc. For best results, the headers shouldn’t contain spaces or special characters; stick with numbers and letters for your column headings.
- The actual data should start on the second row.
- At least one column must contain email addresses. GMass will auto-detect this column and use it as the recipient address column.
For example, here’s the Google Sheet I’ll be using as my data file:

Note: If your sheet has multiple columns with addresses, keep the column containing the recipient email addresses to the left of the other columns. Here are instructions if you want columns for CCing or BCCing extra recipients on your mail merge emails — that will ensure the right emails wind up in the right inbox.
Step 2: Click to Connect
Head over to Gmail.
If you’ve already signed up for GMass, it’s time to load the mail merge data from your Google Sheet. (If you haven’t, it takes less than a minute. Install the Chrome extension to get rolling.)
You can load recipient data in two ways:
1. Click the Sheets button near the search bar to open a dialog window showing a list of Google Sheet files.

Or…
2. Open a new compose window in Gmail, then click the new GMass button in the upper-right corner. (You can connect the Sheet before or after you write your email template draft.)
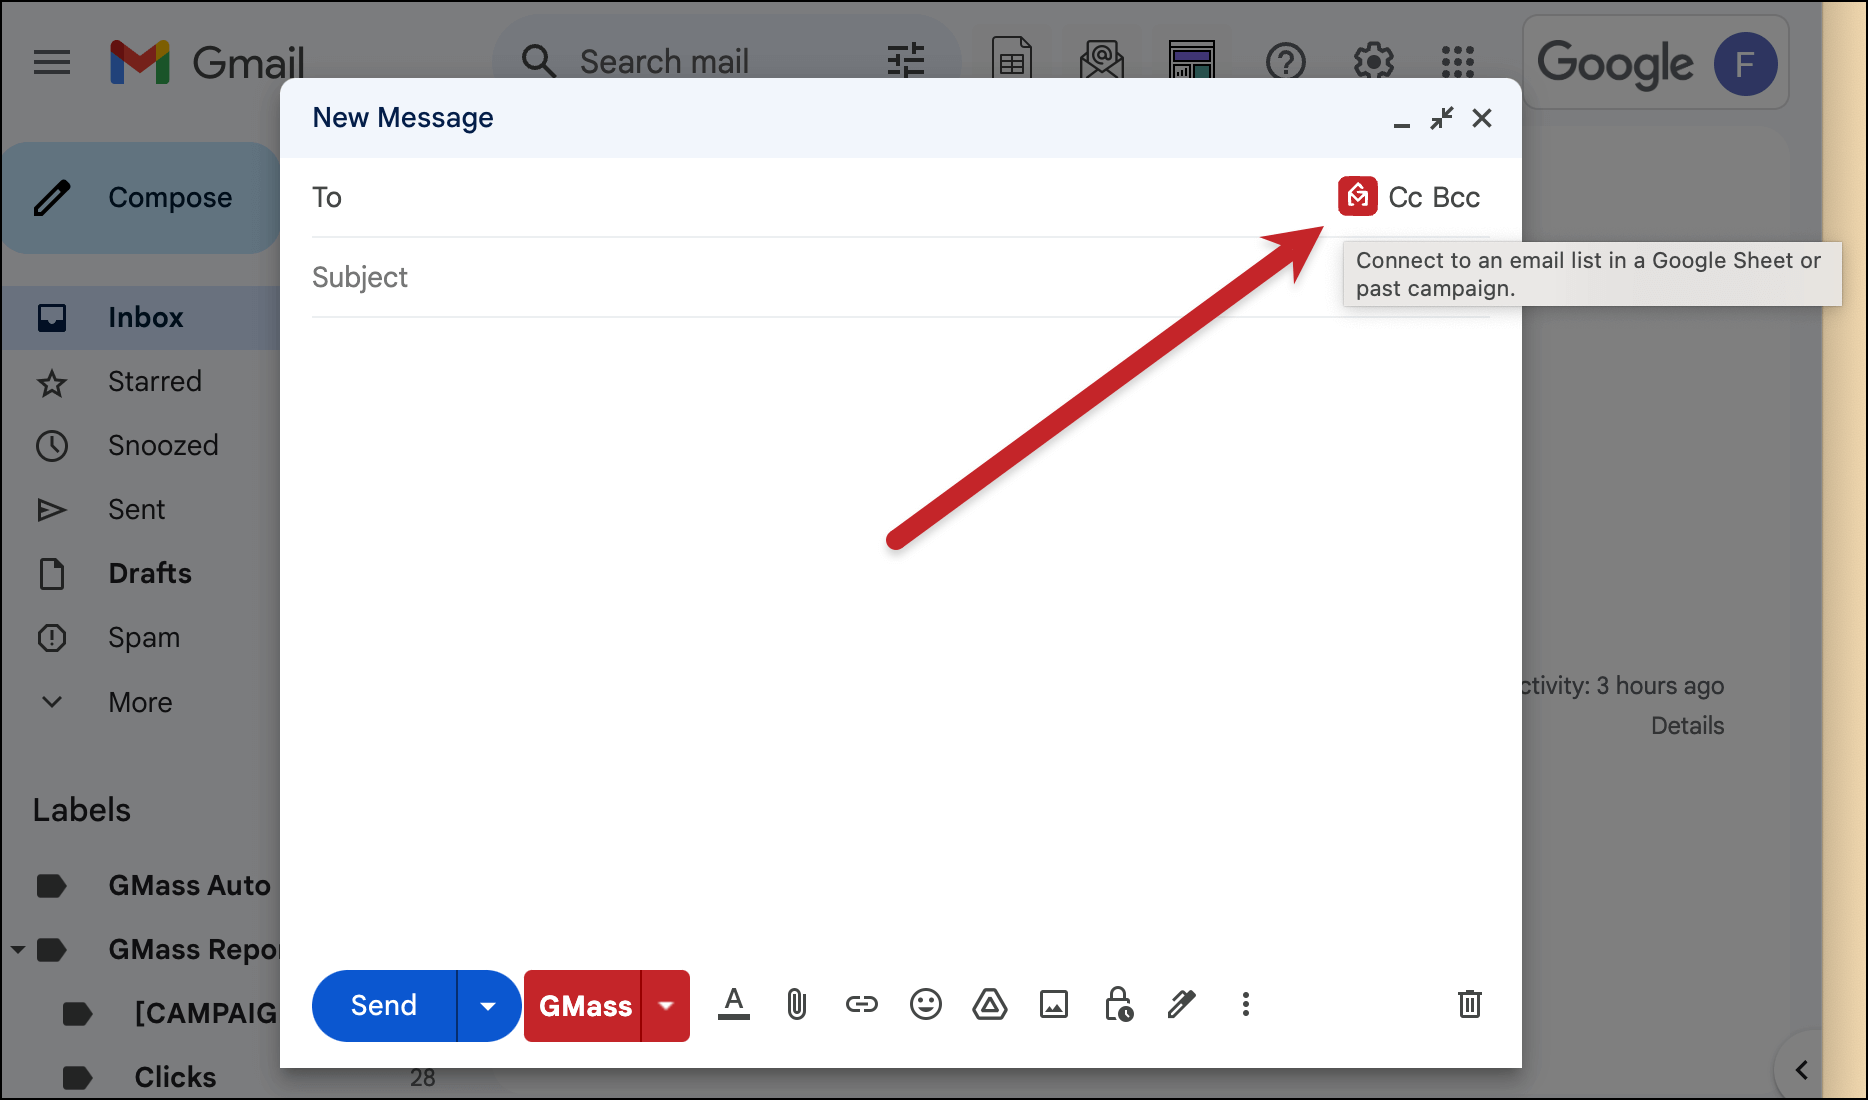
That will bring up a window giving you three different options for the type of list you’d like to connect to your GMass campaign. Choose From a Google Sheet.

Regardless of whether you went with option 1 or option 2, both paths will lead to the same place: A pop-up window where you’ll select your Google Sheet.
Step 3: Choose Your Google Sheet
Next up you’ll select the Google Sheet that contains your mailing list.
You have a few options here which are all in place to make sure you can find your Google Sheet no matter where it might be living in Google Drive (and no matter what security restrictions your organization might have in place).
The dropdown menu

We’ll start with the dropdown menu, which is a fast way to choose your Sheet if everything in your account is nice and tidy.
For instance: You’re accessing your own Google Sheet or a Sheet that someone directly shared with you, you don’t put your Google Sheets into folders in your Google Drive, and you don’t have any security restrictions on your account.
In most cases and for most GMass users, your Google Sheet should be here in the dropdown menu. And if it’s the most recent sheet you edited, it should be at the top of the dropdown menu.
The dropdown menu also has a built-in search function, which you can use to search through your Google Sheets as well.
Note: The drop-down menu won’t show any Excel files that are in your Google Drive. GMass doesn’t connect to an Excel file directly, but you can easily convert your Excel spreadsheet (or an existing CSV file) to a Google Sheet.
The spreadsheet picker

The spreadsheet picker launches Google’s native Drive interface.
This is particularly useful if you organize your Google Sheets into folders, or if you’re looking for Sheets in shared folders on your organization’s Google Drive.
You can also use Google’s search function here for an even deeper search into your Google Drive than the search in the GMass dropdown.
Manual entry

The third way of choosing a Google Sheet is via manual entry.
Here, you’ll paste in the ID number of a Google Sheet (which you can grab from its URL).

This allows you to connect to a Sheet that’s public but hasn’t been shared directly with your account.
(“Public” is a loose term here as well. Let’s say you have 100 GMass accounts and you want all 100 to be able to use the same Sheet, but don’t want to take the time to share that Sheet with all the accounts. You could make it “public” but, of course, only you would know the URL. Then you could paste it in as you connect to campaigns.)
Interface for security-restricted accounts
While most users will see all three options detailed above, if you’re at a larger organization or one with extremely tight security restrictions, your Google Workspace admins may lock down access to your Google Sheets.
Which means: GMass won’t be able to directly access those Sheets and use them to populate the dropdown menu.
In that case, you’ll see a different interface where your only option is to enter a Google Sheet ID manually.
You can read more about the security settings that cause this scenario (and how your admins can turn them off) here.
Step 4: Choose Your Worksheet (Optional)
If your Google Sheet has multiple worksheets, a worksheets drop-down menu will appear, which allows you to select the specific worksheet you need.

Step 5: Optional Settings
Now that you’ve selected your Google Sheet (and worksheet, if applicable), we can look at the other options here in the connection box.
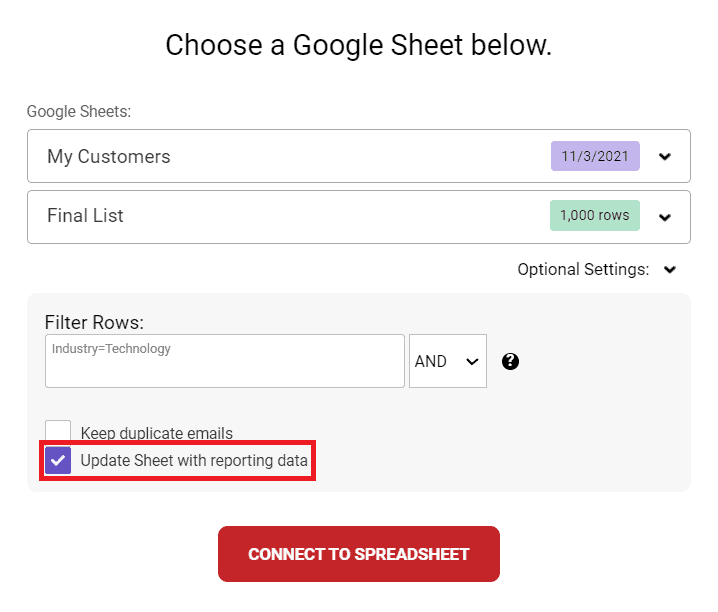
Filter rows
Sometimes, you may want to send emails only to particular recipients in your Google Sheet.
In such scenarios, you can filter the rows that are a part of the campaign by adding filter criteria (name/value pairs) in the Filter Rows box under Optional Settings. That link has the full details on the notation to use for filters.
In the example below, my Google Sheet has a column called Industry. And I’ve decided to send emails only to customers who have “Technology” in that column.

Don’t worry about filtering out addresses who have unsubscribed, bounced, or thrown up an address block on past campaigns. GMass automatically suppresses your messages to them.
Keep duplicates
Your spreadsheet might have some rows with duplicate email addresses. And when you’re sending your mail merge campaign, you may want those duplicate email addresses to be filtered out. (We assume you will, so that’s the default setting.)
However, sometimes you may want to send duplicate emails.
For example, say you’re in charge of the after-school activities program, and you’ve got to email the parents of children who registered for this program.
Now, what if one of the parents has registered multiple children?
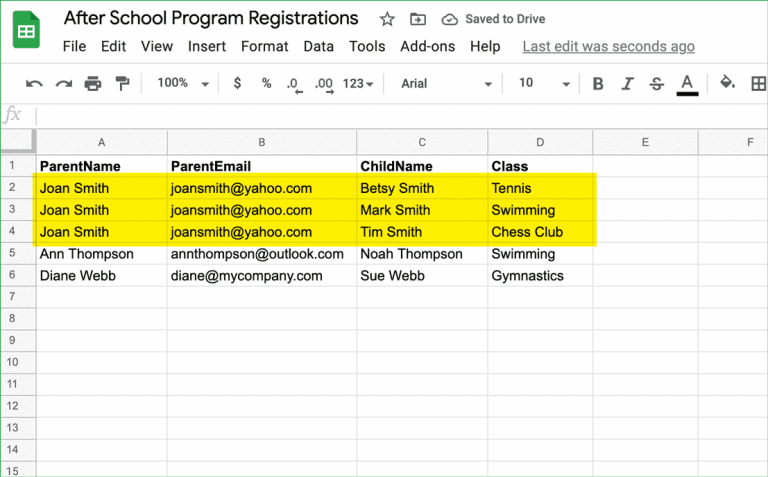
In the spreadsheet above, Joan Smith has three children registered for three different classes. Here, you’ll want Joan Smith to receive three different personalized emails, one with each child’s class registration information.
To send duplicate emails, tick the Keep duplicate emails checkbox.
![]()
Update Sheet with reporting data
GMass has great reporting options — ones that are far easier to use and access than Google Analytics.
One of the most convenient ways to see how your campaign is doing? GMass can automatically update your Google Sheet after you’ve sent the campaign and your email recipients open, click, reply, or take other engagement actions on your email.

To have GMass create a few additional columns in your Sheet to add the email tracking data, tick the Update Sheet with reporting data checkbox.
Note: If you haven’t already given permission to write to your Sheets, a pop-up dialog box will appear asking you to grant that permission. Check out our guide to updating your Google Sheet with campaign data for more details.
Step 6: Connecting to the Spreadsheet
After clicking the CONNECT TO SPREADSHEET button, GMass will read the email addresses and other data from your spreadsheet. It’ll then load the list of recipients into the To field.
Note: In GMass, each email sent is delivered as an individual email — this means that you don’t have to add email addresses in the BCC field to preserve recipients’ privacy.
Now that you’ve connected one Google Sheet, you could also connect multiple lists in other Google Sheets for your campaign.
Now You’re Set to Create Your Campaign
Well done! You’ve now connected your Google Sheet to your campaign and successfully set up any optional settings like filtering, handling duplicate addresses, and updating the sheet with reporting data.
Now you’re ready to get to work on your campaign.
One thing you might want to check out next: Dynamic lists. This will enable you to use your Google Sheet as the “source of truth” for your campaign where any addresses you add or remove from the sheet are added or removed from the campaign.
And if you haven’t signed up for GMass yet… give it a try!
You can get started for free — no credit card required! — and start connecting your Google Sheets and sending campaigns in a matter of minutes.
Join the nearly 400,000 people who rely on GMass for everything from cold outreach to newsletters and see why they give GMass an average of 4.8 out of 5 stars across tens of thousands of reviews.
Only GMass packs every email app into one tool — and brings it all into Gmail for you. Better emails. Tons of power. Easy to use.
TRY GMASS FOR FREE
Download Chrome extension - 30 second install!
No credit card required