
We’ve got good news and bad news on how to send mass email from Excel.
The good news? It’s possible.
The bad news? It can get a bit convoluted and requires bringing Microsoft Word into the equation when you’re sending through Microsoft Outlook. (And in complex cases, you might even need to bring Excel VBA and at least one VBA macro into the equation.)
More good news: There’s a simple solution to send your email blast which we’ll cover in this article.
In this article, I’ll show you how to perform a mail merge using an Excel spreadsheet to send your personalized mass email messages whether they’re cold email, email marketing, or any other type of email campaign.
I’ll also go into detail about common merge issues with MS Excel, as well as the fixes for those problems.
How to Send Mass Email from Excel: Table of Contents
(Click on the links below to jump to a specific section)
- How Does a Mail Merge Work?
- How to Send Mass Emails with Excel — The Easier Way
- How to Send a Mass Email with Excel — The More Complicated Way
- Conclusion
How Does a Mail Merge Work?
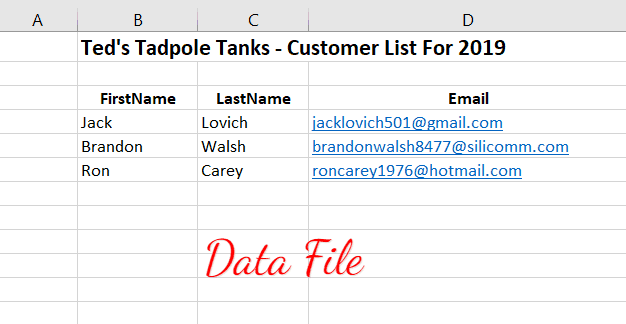
A mail merge automatically fetches data from a spreadsheet (or other data source) and inserts it into an email template. This data can be your contacts’ names, company names, or any other details. (You’ll need a list of addresses; it’s most common to put them in column A.)
To send a mail merge, you need two files:
- A data file. Obviously in this article we’re covering a Microsoft Excel file but we’ll also get into Google Sheets. Really, your data file can be any spreadsheet or database that contains your contacts’ information.
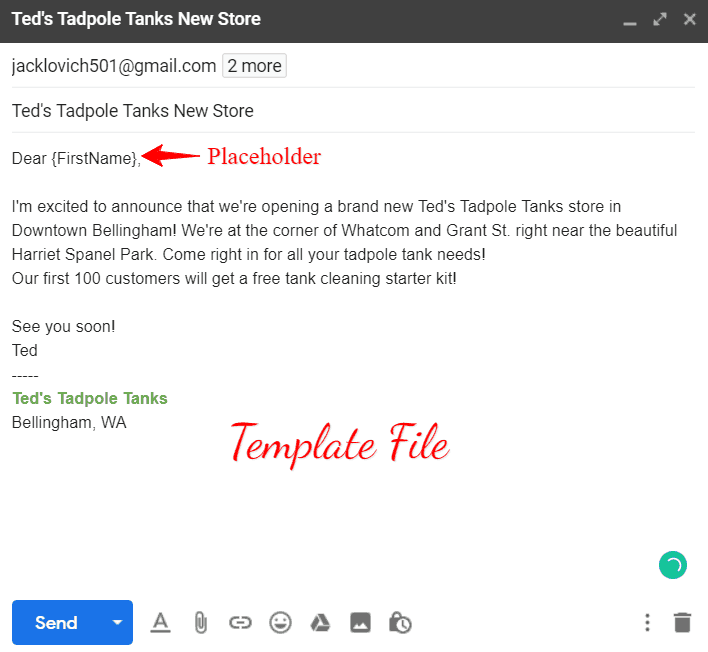
- A template file. The main document that has placeholders for inserting the data that is fetched from your data file. For our purposes here, we’re focusing on an email template.
Here’s what your template file might look like.
When you’re sending email with a mail merge, your data file will be the spreadsheet that contains all your contacts’ details.
The mail merge function would then combine the email template with your data file to create individual emails for each contact.
How do merges make your life easier?
The mail merging process automatically creates separate, personalized emails for each recipient. This way, you save tons of time as you’re not wasting hours manually creating a new customized document for each person.
Imagine manually composing 100 different emails for 100 different recipients!
You can use mail merges without having to individually select recipient data from your Outlook contacts or elsewhere to send different documents like:
- Bulk email
- Cold emails
- Email marketing messages (newsletters, promos, and more)
- A form letter
- Mailing labels
- Envelopes
- Return address labels
- Personalized brochures
- And more…
How to use mail merge for sending mass emails in Excel
Mail merging is the most commonly used method to send mass emails.
Here, the data file will be a mailing list, which is usually stored in a spreadsheet, like Google Sheets or Excel. Your mail merge template will be the email that you send to your list.
However, sending mass emails from Excel with Microsoft Word Mail Merge can be challenging due to formatting errors and other issues.
Find out the most common Word mail merge formatting errors you encounter when sending emails from Excel, as well as how GMass fixes these problems here.
Send mail merges easier with GMass
Unfortunately, an Excel mail merge is a time-consuming and often convoluted process to send bulk email with which many people struggle.
What if there was an easier way to send emails that were personalized to your entire mailing list? There is, and the solution is called GMass. You can use GMass to send email quickly and efficiently from Excel.
What Is GMass?
GMass is a powerful mail merge tool that makes it incredibly easy to draft and send mass emails from Gmail.
Our ease coupled with the most robust feature set of any Gmail-based email service provider have led to 400,000+ users (leaving 9,000+ reviews with a 4.8/5 star average).
What’s more —
Anyone can get started with GMass immediately — just download the Chrome extension and sign up with your email. There’s no credit card required… there’s not even a web form. It’s that simple!

If you have your contact data saved in an Excel file rather than keeping it as Google Contacts, GMass can easily use it to create a data merge that personalizes your emails to multiple recipients.
How to Send Mass Emails with Excel — The Easier Way
Here’s a detailed walk-through for how to send a mail merge in Excel using GMass.
I’ll be using the Excel spreadsheet, shown in the image below, to walk you through the process.
Step 1: Import Your Excel sheet into Google Sheets
The first step is to import your Excel spreadsheet into Google Sheets. (It just takes a few seconds.)
Google Sheets is free and available to anyone. All you need is a Google account!
Note – If your contact data is in a CSV file, you can also import it into Google Sheets. Here’s a LinkedIn Learning tutorial on how to import a CSV file into Google Sheets.
Here’s a step-by-step guide on how to import your Excel file into Google Sheets:
- Open Google Sheets.

- Click on the folder icon in the bottom-right to open the file picker.

- A new window showing the Google Sheets File Picker appears.
Click on the Upload tab to upload your Excel file.

- You can now select the file you want to upload from your computer.
To select your file, click on the Select a file from your device button.

- Select the Excel spreadsheet you want to upload from your computer and click on the Open button.
- Your file will be automatically uploaded and converted into a new Google spreadsheet.
Voila!

Step 2: Format your new Google spreadsheet
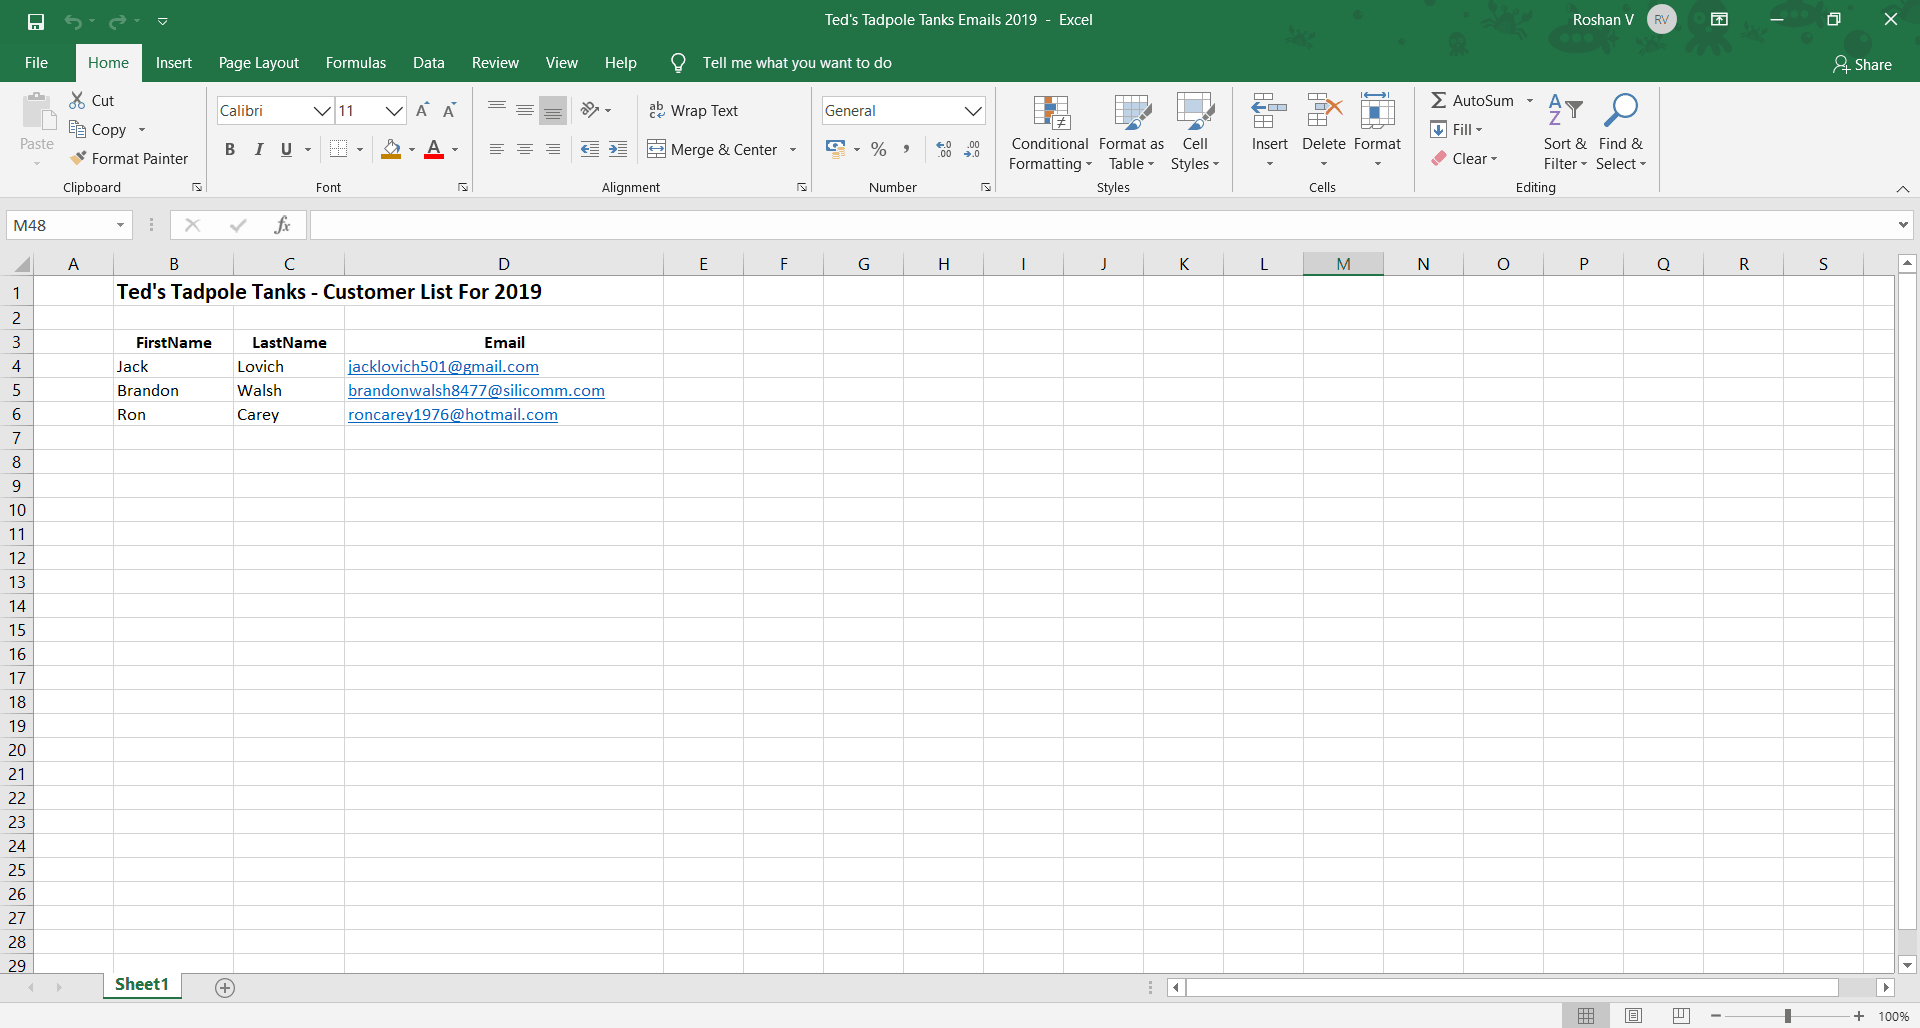
Notice how my Google Sheet has the text — Ted’s Tadpole Tanks — in the first row?
Remove text and blank rows from your spreadsheet for the mail merge (with GMass or, really, anything else).
Here, I’m deleting rows 1 and 2 from my sheet:

Once you’ve selected the rows to be removed, click on the Edit menu and click Delete selected rows.

After deletion, the sheet looks like this:

Your spreadsheet should also have the following. . .
- The first row of your Google Sheet should contain column names such as FirstName, LastName, Email, etc. Ideally, column names shouldn’t contain spaces, special characters, or codes. Instead, stick with alphanumeric characters for each name. GMass will automatically use these field names as the mail merge labels that will be placed in your email placeholders.
- The actual data should start in the second row.
- At least one column should contain your recipients’ email addresses. GMass will auto-detect this column during the data merge.
Step 3: Connect GMass to your Google spreadsheet
Here’s a step-by-step guide on how to connect GMass to your Google spreadsheet:
- Log in to your Gmail account.
- Click the GMass sheet button beside your Gmail search bar.

- A pop-up window appears:

- You can now select the spreadsheet you want to use for the mail merge from the Google Sheets drop-down list.

Note – If there’s only one sheet (Sheet1) in your Google spreadsheet, it’s selected by default. However, if your spreadsheet has multiple sheets, you can select the required sheet from the worksheet drop-down menu.
Once you’ve selected a spreadsheet, click on the Connect to Spreadsheet button.
- After clicking the connect button, GMass will automatically read each recipient’s address and other data from your spreadsheet. It will also insert their addresses into the To field of a new email when you send (though in the compose window, you’ll see an alias address representing your list.)

- Now you can compose your email using the advanced personalization features of GMass. To access these personalization settings, click on the settings arrow next to the red GMass button.

Click the Personalize drop-down list, and all the column names you added in your Google Sheets file will show up.
To personalize your email message, select the column names in your spreadsheet from the drop-down menu. You can insert these placeholders anywhere in your email subject and email body.
- Here’s how my personalized email looks:

Notice the {FirstName} label?
That’s a personalization tag corresponding to the FirstName column in my Sheet.
- Once you’ve finished composing your mail, hit the GMass button to send the email.
Note – GMass will automatically personalize the email for each prospect or contact based on the mail merge labels you’ve used in your email messages. For example, the second line of the spreadsheet, Brandon Walsh, will receive an email that starts with “Dear Brandon,” since the {FirstName} label was used in the email body.
Using your Outlook email address in Gmail
Even though you’re sending through Gmail you can still use your Outlook address for your email campaign. (You could also use a Yahoo mail address, AOL email address, and so on.)
And we even have a technique for sending mass email through Gmail with GMass where you can use your Outlook address — but still get the top-of-the-line deliverability by sending through Gmail’s servers. Here’s an explanation of how to set up that Gmail alias. (It only takes a few minutes.)
How to Send a Mass Email with Excel — The More Complicated Way
It’s easy to do your mass emailing from Excel through Gmail/GMass. But if you really want to keep everything within the Microsoft ecosystem, you can.
It’s just a little more complicated.
Send Personalized Mass Emails From Outlook with Excel
It’s common for organizations to send mass emails using Outlook and Excel Mail Merge. You can use mail merge in Microsoft Office to create a form letter with unique personalization elements like greetings or salutations for each contact.
However, the process can be challenging due to Word mail merge formatting errors and other issues.
Here’s a walk-through for how to create a mail merge in Word and Excel to create personalized mass letters:
Step 1: Format your Excel workbook
Before you start a mail merge in Word and Excel, you need to ensure that your Excel file is properly formatted.
However, unlike the GMass method, it can be a little more confusing.
Here are six things to keep in mind when formatting your Excel workbook for a data merge with your Word document:
- The column header of your Excel table must contain the field names you want to use in your mail merge template. For example, if the Excel column name for your contacts’ first names is “FirstName,” the Word mail merge function will use this as the corresponding placeholder in your template.
-
- Organize your Excel data to have one record per row.
- Your data must start in cell A1 in the Excel worksheet.
- All edits to your Excel document must be done before initiating the mail merge with your main document. (With GMass and Google Sheets you can update after connecting.)
- Your Excel workbook must be stored on your computer.
- Data entries with numerical values such as currencies, postal codes, percentages, dates, etc. must be in the proper number format. To do this, you need to:
- Select the column that contains the numerical value.
- Click on Home and go to the Number section.

- Click on the Number Format box and choose the required format from the drop-down menu that appears.

- Click on Home and go to the Number section.
- Select the column that contains the numerical value.

Note – If your contact data is a TXT or CSV file, you can import it to Excel by clicking on From Text/CSV in the Data section in the menu bar.
Step 2: Prepare the document template for your Word mail merge
The next step is to prepare a mail merge template for your form letter in Microsoft Word. Here’s a step-by-step guide on how to do this:
- Open a new document in Word.
- Select the Mailings tab and click on Start Mail Merge group. A drop-down list showing every different document type pops-up.
You can choose between an email, envelope, letter, directory, or label template. For example, to create mailing labels, you need to select the Label template as your document type.
As we are sending a letter (I mean, not really, but it actually works better to send email message templates), choose Letters as your main document from the drop-down list.

Note: You can also use the Step-by-Step Mail Merge Wizard to streamline the mail merge in Word process. For example, the wizard lets you select the starting document for your mail merge as shown here:

- Type in the “letter” you want to send to your mail merge recipients.
Step 3: Select Your Recipient List
After composing your letter, you need to choose the list of mail merge recipients for it. Here’s a step-by-step guide on how to select your recipients in MS Word:
- Click on the Select Recipients button.

- From the drop-down menu that appears, click on Use an Existing List.

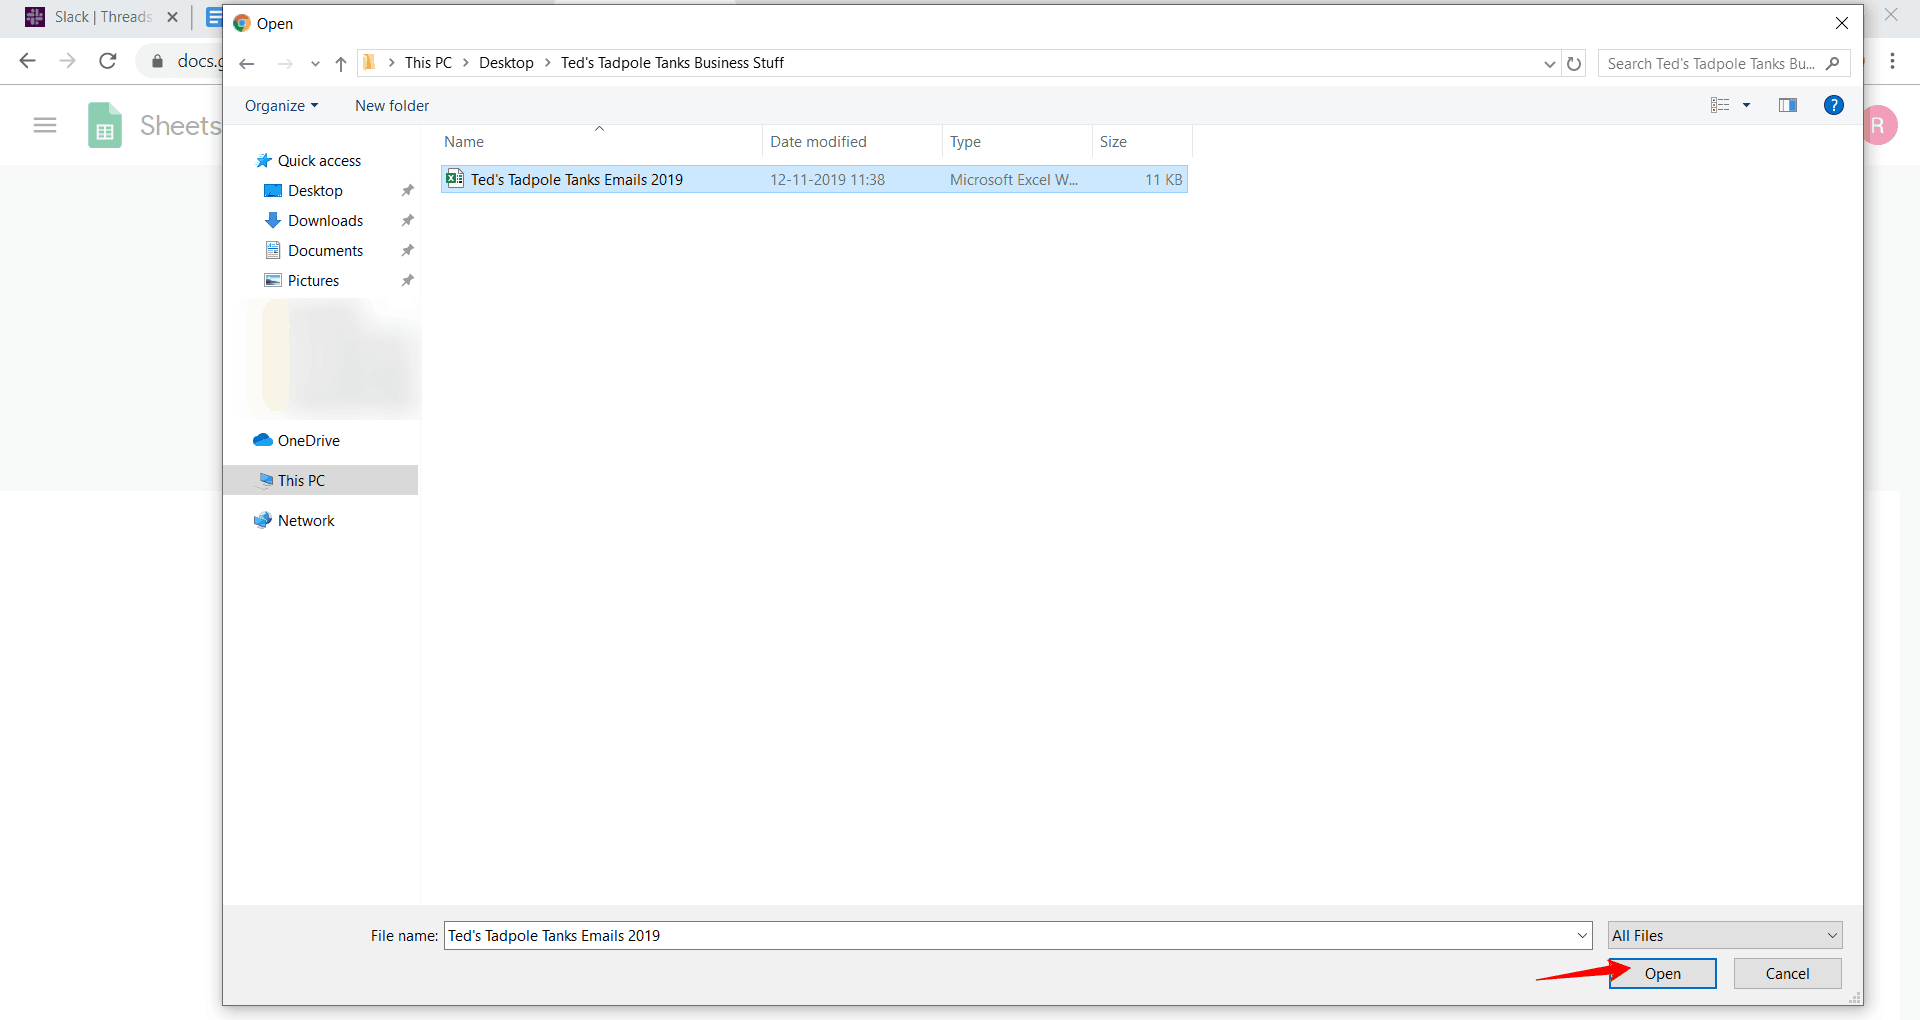
- A dialog box pops-up. Select the Excel file you want to use as the contact list for your letter and click Open.

- Choose the Excel worksheet you want to merge with the Word doc and click OK. If your Excel workbook has only one sheet, you’ll see only Sheet1.

- If you want to edit your mailing list, choose Edit Recipient List.
A Mail Merge Recipients pop-up window will be displayed. In the pop-up window, clear the checkbox next to the name of the person you don’t want to include.

Step 4: Add personalized content to your letter
Now you can add personalized content (like names and addresses) to your letter.
Word lets you add three personalization variables to your current document:
- Insert Address Block – you can insert a person’s address to your document.
- Insert Greetings/Salutations – add a personalized greeting to your letter.
- Insert Mail Merge Fields – add other mail merge labels from your Excel worksheet.
Insert Address Block
Go to the Mailings tab and click on Address Block.
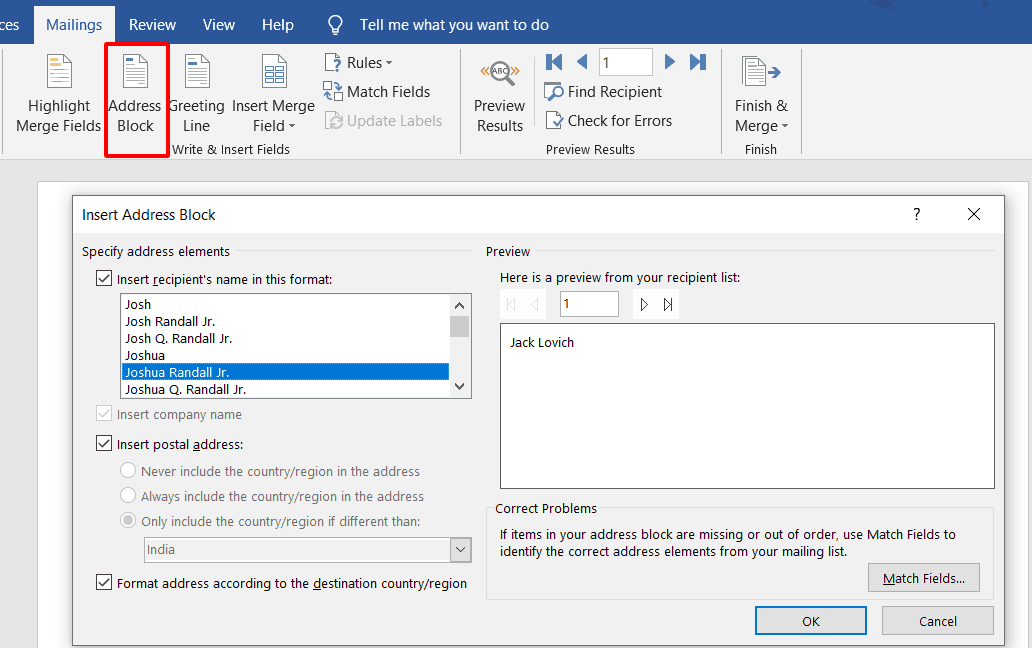
From the dialog box that appears, select the format for the recipient’s address block and click OK.
An address tag will be automatically added to your Word document, as shown in the picture below:

Insert Greeting Line
Click on Greeting Line from the menu bar, choose the format you want to use, and click OK.
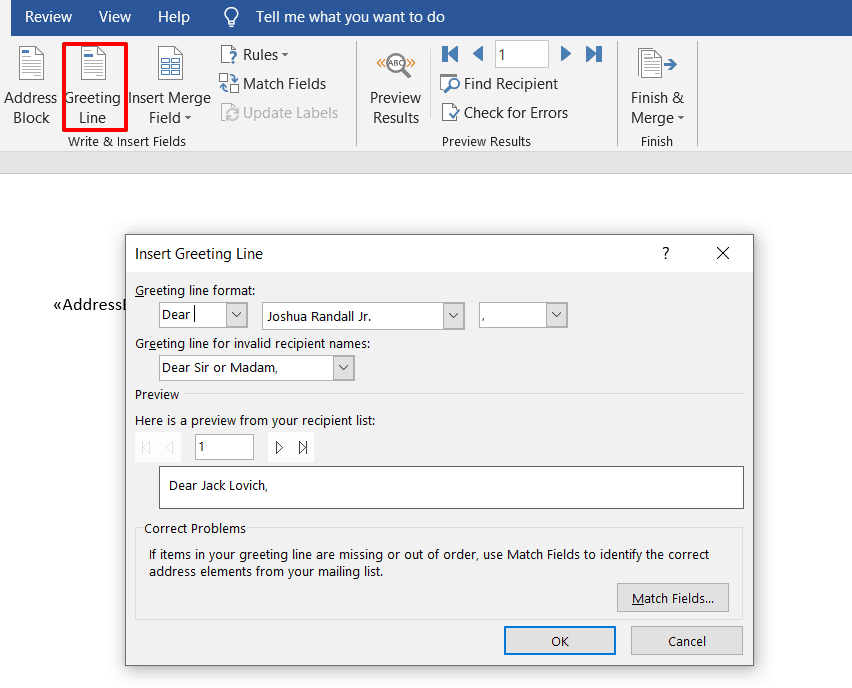
A greeting tag («GreetingLine») will be automatically inserted into your letter.
Insert Merge Field
You can also insert other mail merge labels in Word like the recipient’s first name, contact number, company name, etc. by clicking on the Insert Merge Field from the menu bar.
These fields are the column labels in your Excel sheet.

Quick Tip – You can also use the Match Fields dialog box to manually map your Excel column names with your template field names. While it’s more time-consuming, it gives you more control over the personalization process.

Step 5: Preview and finish the mail merge function
Once you’re done creating the letter, you can preview what it looks like with the data added from your Excel spreadsheet.
Here’s a step-by-step guide on how to preview your letters with Word’s mail merge function:
- Go to Mailings > Preview Results to preview your letter for each recipient.

- You can enter the recipient number (the corresponding row number in your Excel file) in the text box or click on the Next and Previous buttons to scroll through your recipients.

- After verifying the data, select Finish & Merge to complete the mail merge process between Word and Excel.

A drop-down menu appears. You can choose to:
- Edit Individual Documents – further edit individual letters.
- Print Documents – print labels, letters, or any other merged document type.
- Send Them as Email Messages – send the merged document as a bulk email.
Note – Sending letters as email messages requires you to set up Outlook or Gmail with Word manually. Using the GMass method for merges is a much simpler process.
Step 6: Save the letter
When you’re done working with your merged document, you can save it by going to File > Save or by pressing the Cmd/Ctrl + S keys.
To reuse your mail merge document, open it and click Yes when Word prompts you to keep the connection from Excel to Word.

Conclusion
Creating a mail merge in Excel to send emails doesn’t have to be so complicated.
While you can use MS Word to create mail merges for letters, it can be tricky to use when sending mass emails .
Instead, use a mail merge and email marketing tool like GMass.
Its powerful mail merge features let you draft, merge, and send emails faster and easier than any other solutions. So why not download the Chrome extension and try it out today?
Only GMass packs every email app into one tool — and brings it all into Gmail for you. Better emails. Tons of power. Easy to use.
TRY GMASS FOR FREE
Download Chrome extension - 30 second install!
No credit card required

Ajay is the founder of GMass and has been developing email sending software for 20 years.
Gmass used to add columns with stats on the spreadsheet after sending the campaign, like Opened, Clicked and marked with an X who took the action respectively.
Now it doesn’t. It was a great feature to have in order to see if someone is opening the email or not.
If still working, do I have to active it somewhere when setting up the campaign?
Thank you guys!!! I wasted so much time looking for something like this. <3