
A mail merge is a handy way to send personalized mass letters and bulk emails quickly (and if you’re looking for how to mail merge Word from Excel, you know the potential time-savings and power).
It works by automatically adding personalization data from a data file (for example, a spreadsheet) to a template file (like a letter or an email).
In this article, I’ll first cover what a mail merge is and explain how it works. Then, I’ll go over how to mail merge using an Excel spreadsheet and a Word document.
Later, I’ll mention two issues of using the traditional method for mail merges and running a mail merge from Excel to Word. I’ll also suggest a better and more powerful alternative to help you send mass emails.
Mail Merge Word from Excel: Table of Contents:
(Click on links to jump to specific sections)
- What Are Mail Merges?
- How Does Mail Merge Work?
- How to Use Mail Merge to Send Bulk Letters
- Two Problems of Using Microsoft Word to Send Mass Emails
- How to Use Mail Merge to Send Mass Emails
- 7 Mail Merge FAQs
Let’s jump right in.
What Are Mail Merges?
A mail merge lets you create personalized documents that are automatically customized on a recipient-by-recipient basis. This spares you the trouble of manually personalizing each document yourself!
You can use mail merges to create personalized messages automatically for:
- Marketing emails.
- Newsletters.
- Custom catalogs.
- Form letters, and more.
Note: A form letter is a template file used to create mass letters. Instead of typing a letter for each recipient, you can use a form letter to make quick, unique, personalized letters for each person.
Essentially, if there’s a document you need to personalize at scale, mail merges can take care of it for you!
Let’s now explore how a mail merge works.
How Does Mail Merge Work?
First, you need to understand the two essential components of every mail merge.
They are:
- Template File: the document (Microsoft Word, Google Docs, or an email) that holds the message you’ll be sending out (like a letter or an email). It specifies the places where the personalization data will go. And that data (names, addresses, etc.) is fetched from a data file.
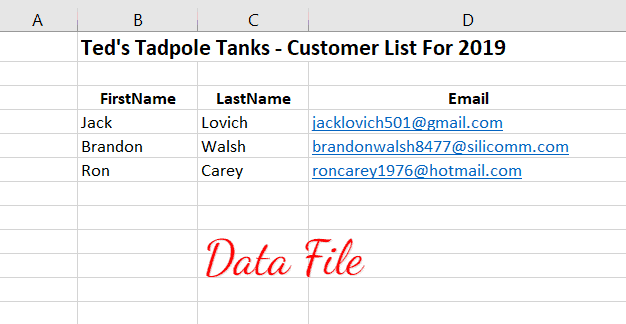
- Data File: a data source like a Microsoft Excel spreadsheet or a Google Sheets file. Each cell in the data file contains different information (first name, last name, email address, etc.) that will be placed in your template file in the corresponding space.
Essentially, a mail merge automatically adds the personalization data from your data file to your template file.
For example, let’s say you want to perform a mail merge to create mass letters.
Here, your letter is the template file — it has placeholders for your contacts’ names and addresses.
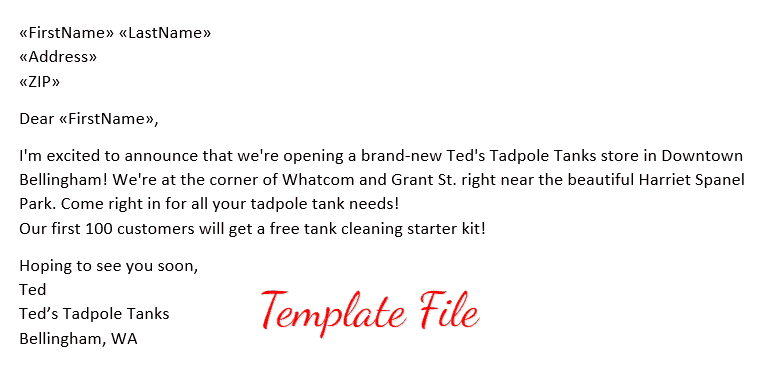
Notice the «FirstName», «Address» and other tags in the letter?
These are placeholders for your recipient’s details, also known as mail merge fields.
A mail merge field draws the personalization information from your data file (spreadsheet) to help you create your personalized letter.
But to make this work, the name of the mail merge field in your personalized letter template must match the name of the column header in your spreadsheet.
If the name of the merge fields and column headers match, the mail merge function would then merge your data file and your letter template to generate a personalized letter for each person.
Next, I’ll go over the steps involved in using mail merge to automatically personalize individual letters.
How to Use Mail Merge to Send Bulk Letters
You can use the mail merge feature in Word and Excel to create auto-personalized individual letters quickly.
Here:
- The mail merge template is a form letter in Microsoft Word.
- The data file is an Excel spreadsheet containing your recipients’ details.
Let’s now explore the steps involved in using the merge feature for bulk letters:
Step 1: Create and format your address list in Microsoft Excel
Here’s a step-by-step guide on how to set up an Excel data file:
Step A
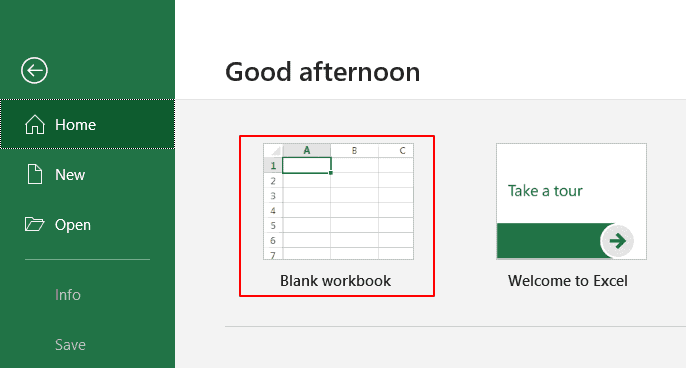
Open MS Excel and click on Blank workbook to open a blank Excel workbook (or document).
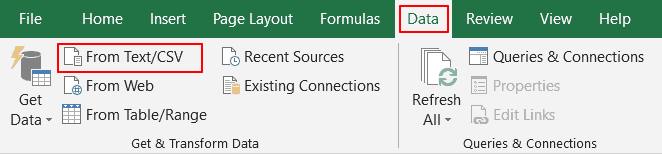
Note: If your contact data is readily available as an Excel spreadsheet, open the file and format it. If the data is present in a TXT or CSV file, go to Data → From Text/CSV to open the file in Excel.
Step B
Now you can start entering the details of your address list into the Excel workbook.
Only enter your column header names in the first row, starting in cell A1.
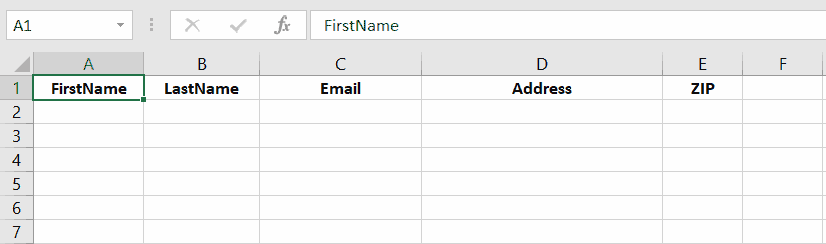
Check your header row to make sure the column headers in your Excel spreadsheet are exactly the same as the field names (or placeholder names) you want to use in your Word template document.
For example, if the column names in your Excel sheet are “FirstName”, “LastName”, and “Email”, the field names in your Microsoft Word document should also be “FirstName”, “LastName”, and “Email”.
Step C
Enter your contact information in your Excel database as one record per row, starting from cell A2.

Quick Tip
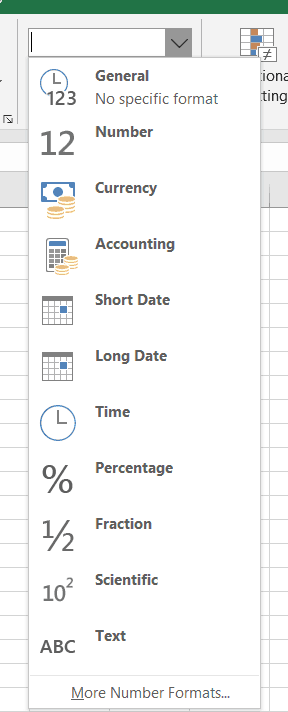
Data entries such as ZIP codes, percentages, currencies, etc., must be in the correct numeric format. To ensure this, you need to:
1. Select a column that has numeric data entries.
2. Go to the Home → Number section.

3. Click on the Number Format box and choose the correct format from the drop-down list that appears.
4. Repeat steps 1–3 for all columns containing numeric values.
Step D
Once you’ve created the contact sheet, you can save your Excel document by pressing Ctrl+S or going to File → Save or File → Save As.
Bonus Tip for Gmail Users
If you’re creating your first mail merge data file, you can export all your existing Gmail contacts (or “Google Contacts”) to get started quickly. Read my guide on how to export contacts from Gmail to learn how.
Note: Ensure that you finish all edits to the Excel spreadsheet before starting the mail merge process. Making edits to an Excel sheet once you’ve already begun a mail merge is a complicated additional step.
Step 2: Create the main mail merge document in MS Word
The next step is to create the form letter (or mail merge template — your main document) in your Microsoft Word document. You can create a different mail merge template for every bulk email campaign, and you can save the templates for future use.
A favorite time-saving technique of mass email managers is to choose an old email template that worked well, update the content where necessary, and give the mail merge template a new name.
As a result, when you create your mail merge document, try writing it in a way that will let you adapt and reuse it in future bulk mailings.
Here’s a step-by-step guide on how to create a mail merge template in Microsoft Office Word:
Step A
Open a new document (blank document) in Word.
This is the main document for your mail merge.
Step B
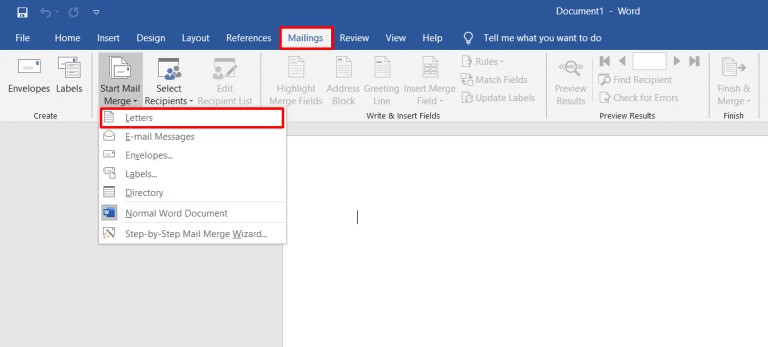
Click on the Mailings tab and select Start Mail Merge. A drop-down menu displaying every different mail merge document type will appear.
You can select the document type for letters, emails, envelopes, mailing labels, or a directory. Since we’re using the Word mail merge feature for sending letters, choose Letters as your merge document.
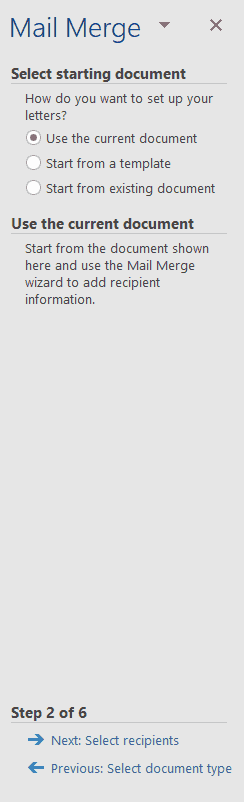
Step C (Optional)
You can also use the Step-by-Step Mail Merge Wizard (from the Start Mail Merge drop-down menu) to streamline the Word mail merge process.
The mail merge wizard lets you quickly select the starting mail merge document.
For example, it lets you use the current document, which is the mail merge letter you’re creating now. Or you could choose a starter template or another existing document as your mail merge template.
Step D
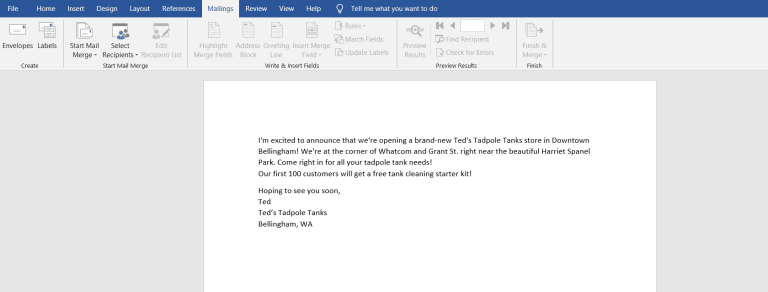
Write the body of the letter.
(Don’t worry about manually adding placeholders in your letter yet.)
Step 3: Select the recipient list
Now you can select the list of mail merge recipients (from your Excel file) who will receive your letter.
Here’s a step-by-step guide on how to do this:
Step A
Click on the Select Recipients option in the Mailings tab. A drop-down menu appears, showing different mail merge list sources.
As your contact information is already available as an Excel file, click on Use an Existing List.
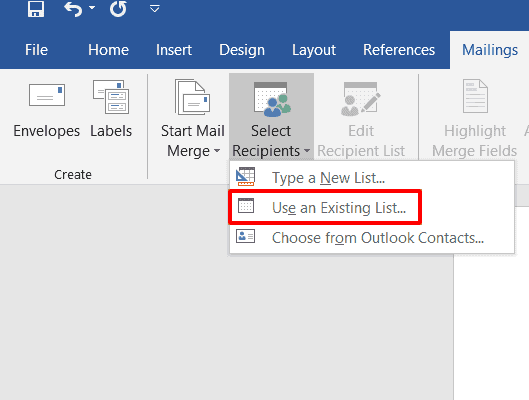
Note: You can also include your Outlook Contacts list if you have Outlook connected to Word.
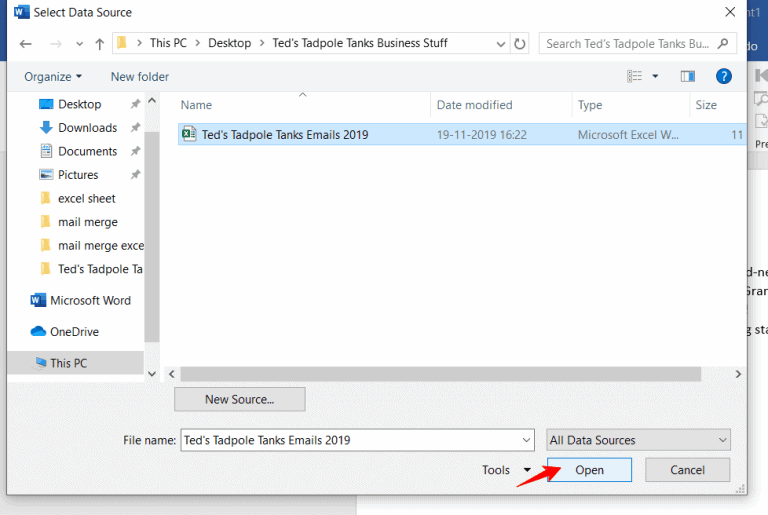
Step B
In the dialog box that pops up, select the Excel sheet you created earlier and click Open.
Step C
A Select Table window appears. Choose the Excel worksheet you want to merge with the Word template and click OK.
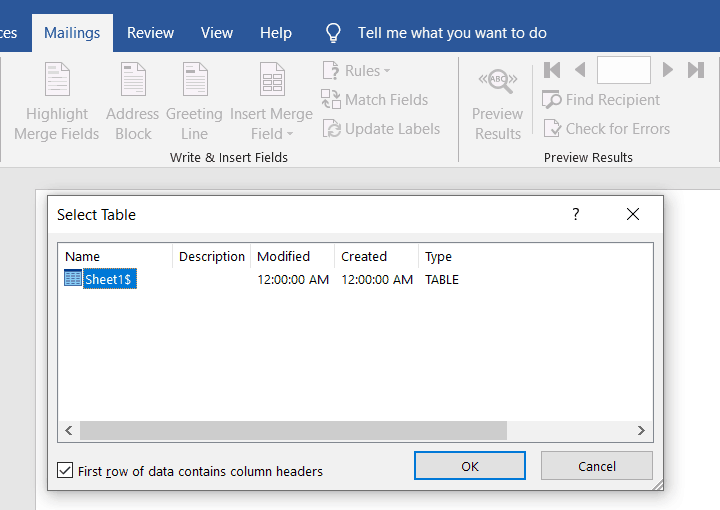
Note: If your Excel spreadsheet has only one worksheet, you’ll only see Sheet1 in the Select Table window.
Step D
If you want to edit your mail merge recipients list, click on the Edit Recipient List tab.
In the Mail Merge Recipients window that pops up, clear the checkbox of the person you don’t want in your mailing list.
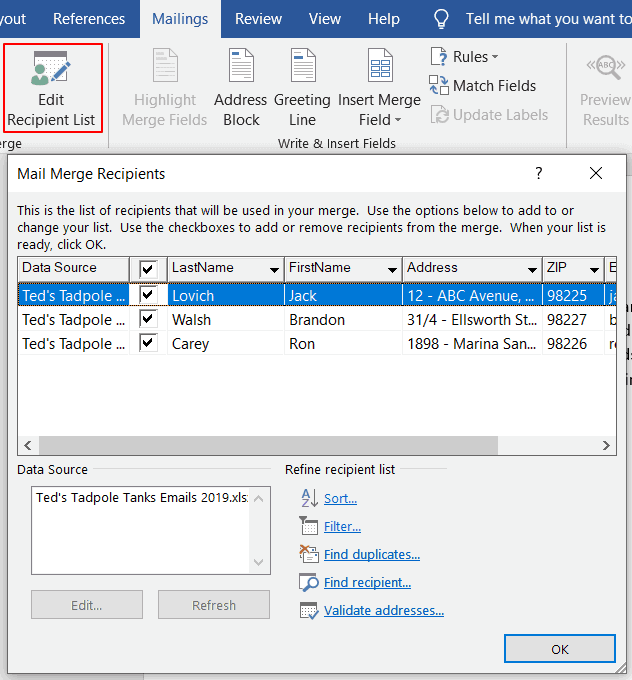
Anyone you remove from your recipient list in this step will be removed from any mail merge project that uses this data file in the future.
Step 4: Add personalized messages
The next step is to add personalized content (like contact names and addresses) to your form letter template (Word mail merge document).
In Word, you can insert three personalization variables into your document:
- Insert Address Block — add a recipient’s address to your document.
- Insert Greeting Line — include a personalized greeting or salutation in your letter.
- Insert Merge Field — insert other mail merge fields from your Excel file.
Here’s a walkthrough on how to add all three personalization variables to your merge document (form letter):
Note: You can add a personalization variable at an insertion point of your choice in the Word document. For example, to add a greeting line before the body of your letter, simply place the text cursor at the point you want to add it.
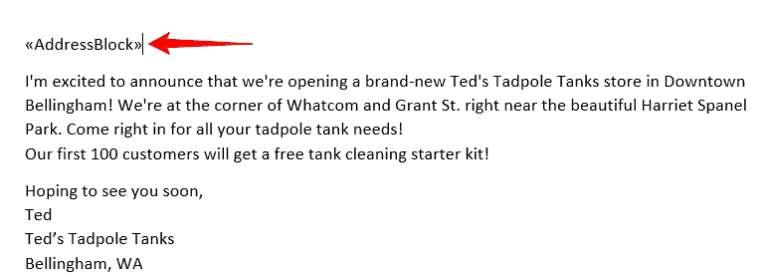
A. Insert an Address block
To insert a recipient’s address from your Excel worksheet, click on Address Block from the Write & Insert Fields section. In the window that appears, choose an address block format of your choice and click OK.
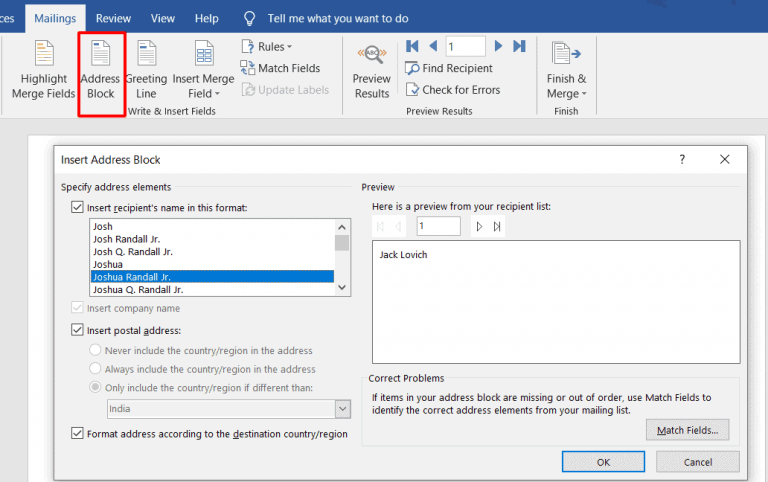
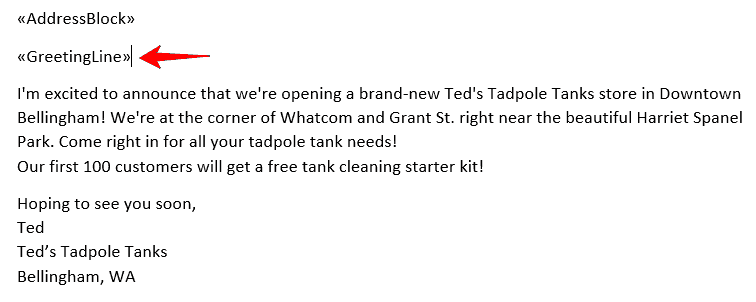
An address placeholder («AddressBlock») will be inserted automatically into your letter.
B. Insert a Greeting Line
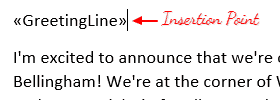
To insert a greeting line, click on Greeting Line from the Write & Insert fields section.
In the dialog box that pops up, select the format you want to use and click OK.
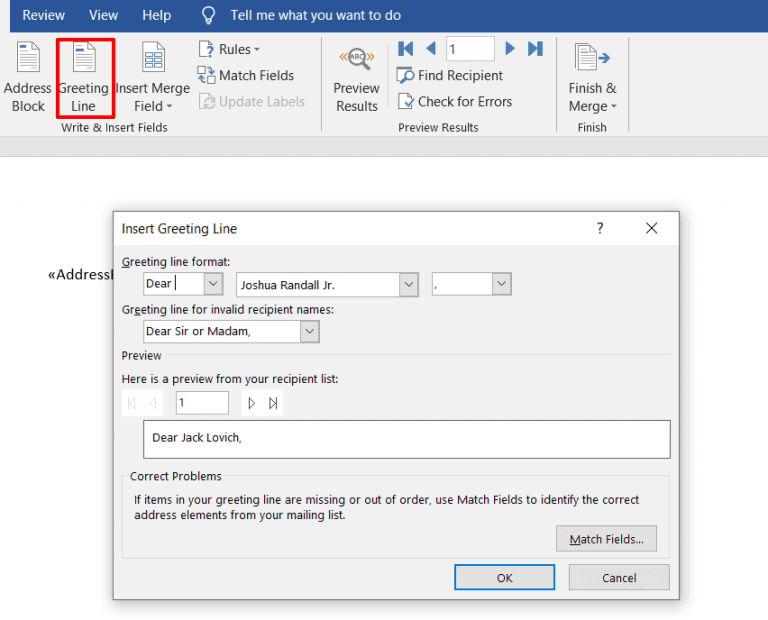
A greeting placeholder («GreetingLine») will be automatically added to your document.
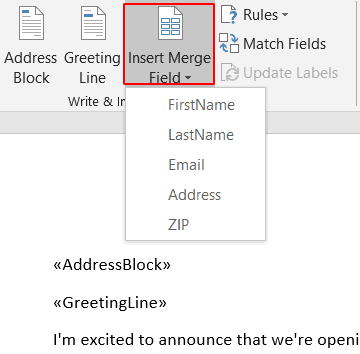
C. Insert Field
You can also add other mail merge fields, like your contact’s first name, company name, email id, etc., from your Excel worksheet to your Word template.
To do this, click on Insert Merge Field from the Write & Insert fields group.
You can see the insert field options there in the drop-down list of some mail merge labels. These labels are the column names in your Excel spreadsheet.
If you want to create a custom field, the easiest way is to add a column to your spreadsheet with the name of the custom field you want to make, like “birthday” or “pet name”. But you must do this before starting the mail merge process since you can’t edit your spreadsheet during mail merge.
Click on the mail merge fields you want to add to your letter. Here’s how my form letter looks after inserting the placeholders (mail merge fields) I needed:
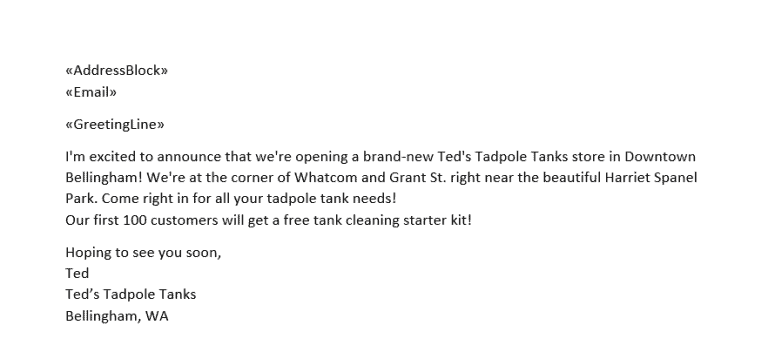
Note: You can also use the Match Fields feature to manually match your Excel column fields with the Word placeholders. This way, you can ensure that all the mail merge fields are accurately mapped to your Excel column names.
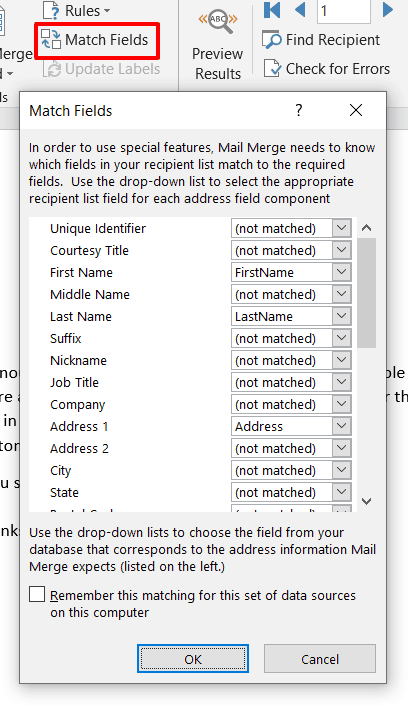
Step 5: Preview and finish the mail merge process
After personalizing the form letter for each recipient, you can preview the letters to see how they look with the data inserted from your Excel worksheet.
Here’s a step-by-step guide on how to do this:
Step A
Click on Preview Results under the Mailings tab.
Step B
To preview the result for each recipient, you can enter the recipient number (the corresponding row number in your Excel spreadsheet) in the text box.
For example, to preview the form letter for my second recipient — Brandon Walsh, I type “2” in the text box and click the Preview Results button.
Note: You can also click on the Next and Previous buttons to quickly scroll through your mailing list to preview the letter for each person.
If you realize someone who is scheduled to receive your bulk email should be removed from the recipient list, refer to Step 3 (D) for instructions.
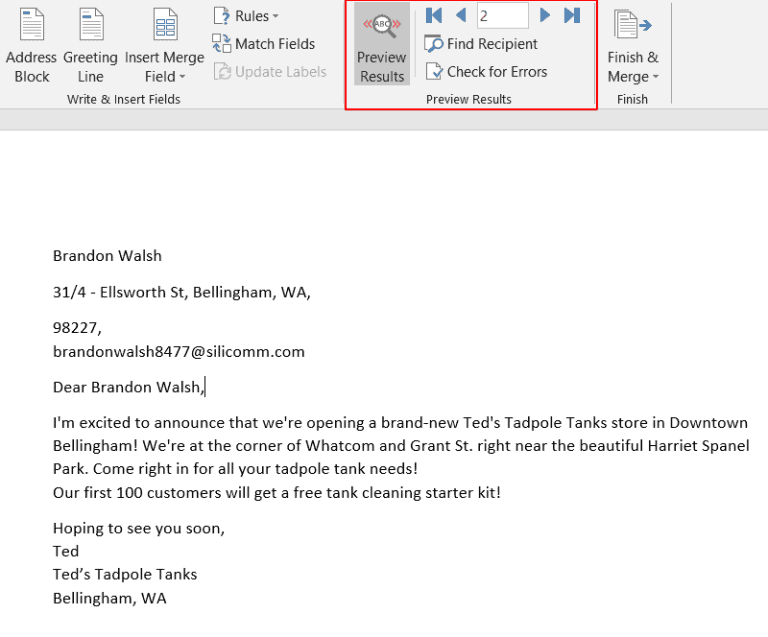
Step C
After previewing the form letter, click on Finish & Merge to finish the Word mail merge process.
From the drop-down list that appears, you can choose to:
- Edit Individual Documents — if you want to edit each letter further, separately.
- Print Documents — if you want to print documents (even as PDFs).
- Send Email Messages — if you want to send the letters as emails.
Note: If you want to send the letters as email messages to a Gmail or Outlook contact, you must manually set up Gmail/Outlook with Word.
Step 6: Save the form letter
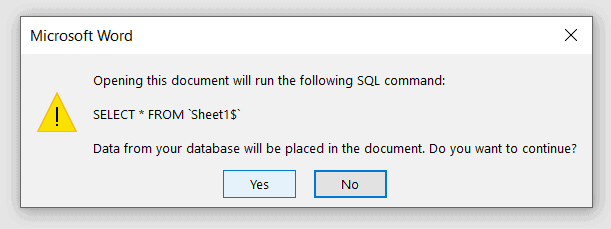
After you’ve finished working with the merged document, you can save it by pressing the Ctrl+S keys or by going to the File menu and clicking Save or Save As.
You can also reuse the merged document for sending additional letters — just open it and click Yes when Word prompts you with this alert:
How to Use Mail Merge to Send Mass Emails
You can use mail merge to quickly create personalized emails for newsletters, promos, and other email marketing messages.
Here, your mailing list is the data file, while the email is the mail merge template.
We’ve seen how to use Excel and Word to create personalized form letters.
Just follow the same steps to send merged emails to your mailing list.
However, I don’t recommend using Microsoft Word to send personalized emails at scale. Here’s why…
2 Problems of Using Microsoft Word to Send Mass Emails
While you can use a Microsoft Word document to create merged emails, there are two major drawbacks with this approach:
- To send the merged document as an email message, you must manually set up Microsoft Outlook or Gmail with Word. This can be time-consuming and confusing for most users.
- Microsoft Word isn’t well-equipped to handle mail merges. If your personalization tags are mismatched and there are hundreds of recipients or Outlook contacts (you can’t preview every email, can you?), you could end up sending something like this:
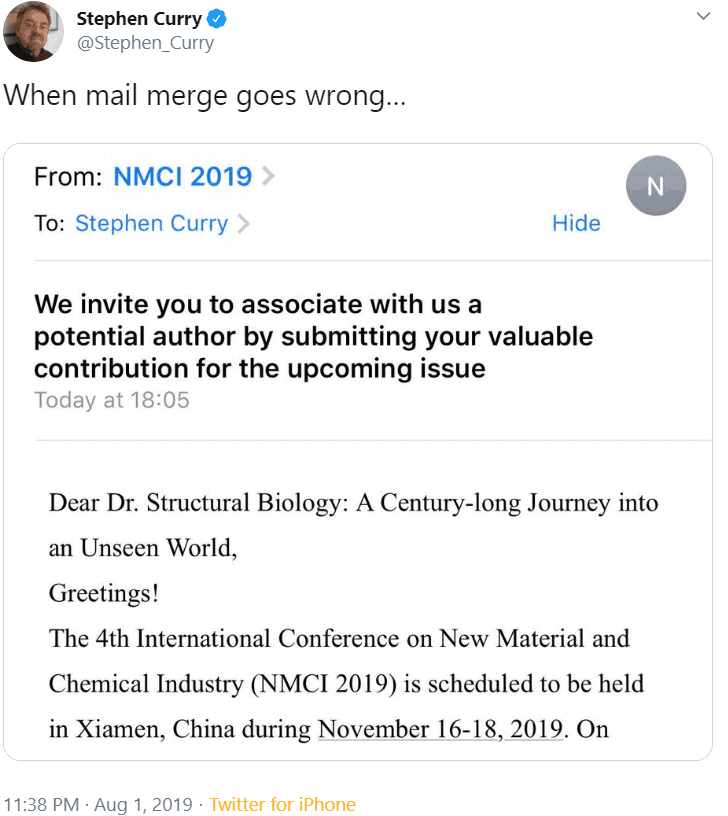
Image Source: Twitter
Now, imagine sending hundreds of such embarrassing emails!
That’s why it’s smarter to use a dedicated mail merge feature tool like GMass to send mass emails.
How to Use Mail Merge with GMass to Send Mass Emails
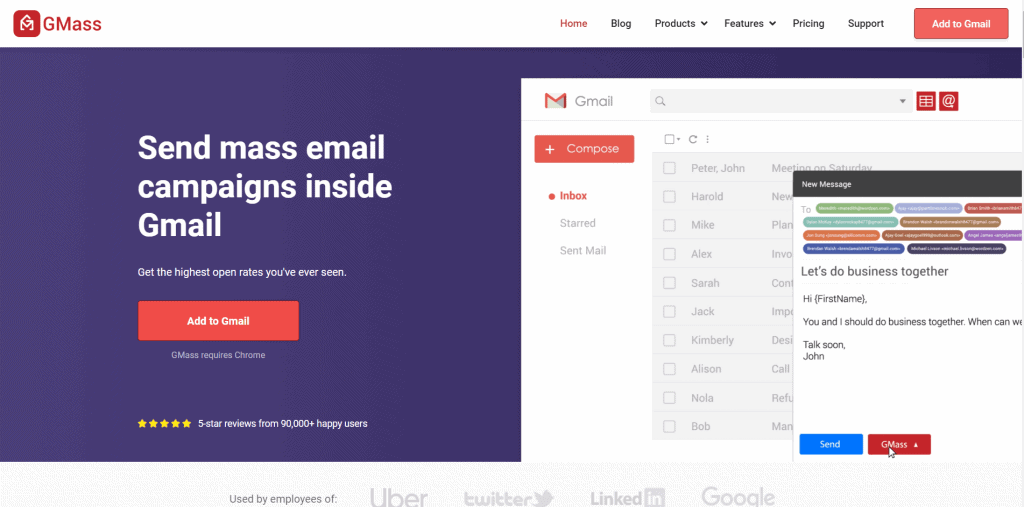
GMass is a powerful mail merge tool that lets you easily create and send tons of emails from your Gmail account.
Its advanced mail merge features have made it a popular tool used by employees from LinkedIn, Uber, Google, and Twitter. GMass is also perfect for individuals and groups like clubs, schools, churches, and other institutions to send emails to a target audience.
With GMass, you can easily create a mail merge with a data file stored as an Excel spreadsheet or a Google Sheet.
Here’s how:
Step 1: Import your Excel spreadsheet into Google Sheets
The first step is to import your Excel file into Sheets (this takes only a few seconds).
Why would you want to do this?
Because Google Sheets is far more powerful than Microsoft Excel for mail merging. Its automatic cloud-sync feature auto-saves your work with each edit made in the spreadsheet.
Plus, if you’re sending emails, it makes sense to have your spreadsheet online, right?
Additionally, Google Sheets is completely free and can be used by anyone with a Google (Gmail or Google Workspace) account. You won’t need a Microsoft Office subscription!
Note: If your data file is a CSV file, you can also import it into Google Sheets.
Here’s a step-by-step guide on how to import your Excel document into Google Sheets:
Note: I’ll be using the Excel sheet shown in the screenshot below for the walkthrough.
Step A
Open Google Sheets.

Step B
Select the folder icon to open the Google Sheets File Picker.
![]()
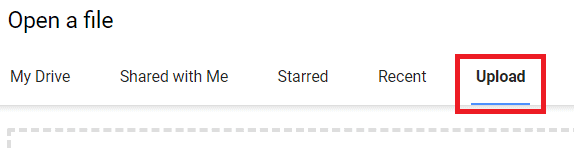
Step C
In the window that appears, click on the Upload tab to import your Excel sheet.
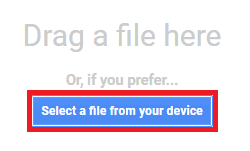
Step D
You can now choose the file you want to import from your computer. To select the file, click on the Select a file from your device button.
Step E
Choose the Excel file you want to import from your computer and click on the Open button.

Step F
Your file will be automatically imported as a new Google spreadsheet, which becomes your mail merge recipient list and data file.
Step 2: Format your Google Sheet
Your Google Sheet must be well-formatted before you use it with GMass. But don’t worry, it’s not as complicated as formatting your Excel spreadsheet.
Here are some guidelines to ensure it works well:
- Your column names must be in plain text — they shouldn’t contain spaces, codes, or special characters.
- Your column names must begin from cell A1. If there are any blank rows or additional text (like a sheet title) above the column names, you must delete them.
- The actual personalization data must begin from the second row onward.
- There must be at least one column that has your recipients’ email addresses.
GMass will auto-detect all column names during the mail merge process. It will automatically use the column labels in your Google Sheet as the placeholders in your email template.
Step 3: Install GMass and connect it to your Gmail account
If you haven’t installed the GMass Chrome extension yet, here’s a step-by-step guide on how to install and connect it to your Gmail account quickly:
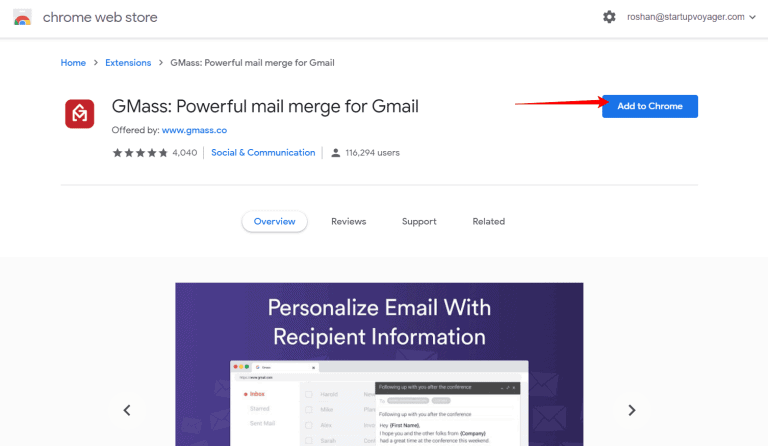
Step A
Head to the Chrome Web Store page for GMass.
Step B
Click on the Add to Chrome button.
Step C
A dialog box pops up:
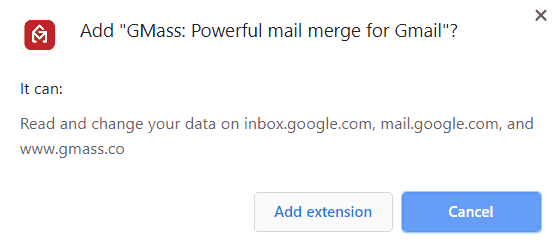
Click on the Add extension button to add GMass to Chrome.
Step D
Log in to the Gmail account you want to use with GMass.
After logging in, you can see three new GMass buttons next to your Gmail search box.
![]()
Click on one of these buttons, and you’ll be prompted to link your Gmail account to GMass:
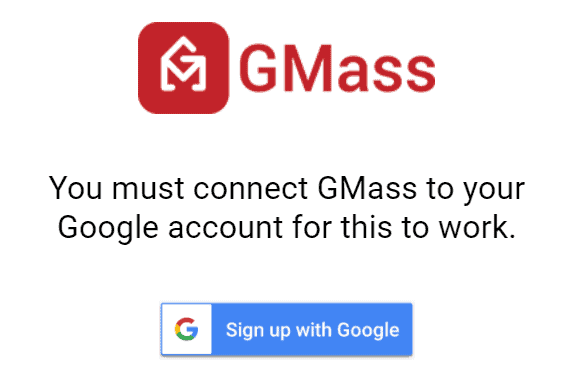
Click on the Connect GMass Now! button to connect your Gmail account with GMass.
Note: Simply installing the GMass extension doesn’t create a GMass account. It only makes the buttons appear in your Gmail account. You have to link it to your Gmail account (as above) to activate it.
Step 4: Connect your Google Sheet to GMass
Here’s a step-by-step guide on how to perform this last step:
Step A
Open your Gmail account and click on the GMass spreadsheet button near your Gmail search box.

Step B
A dialog window appears:
Step C
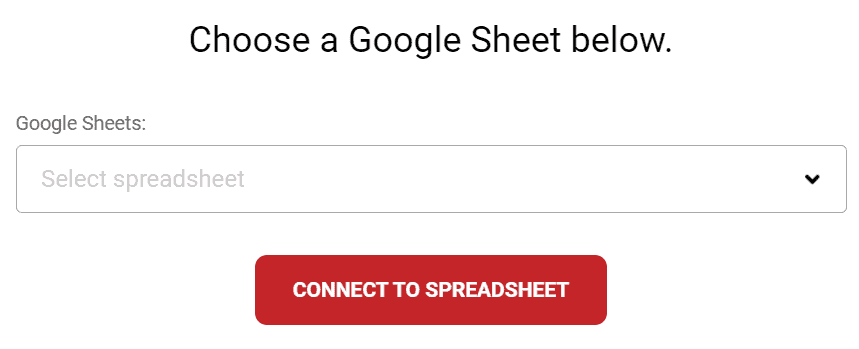
You can now use the drop-down menu to choose the Google sheet you want to use for the mail merge.
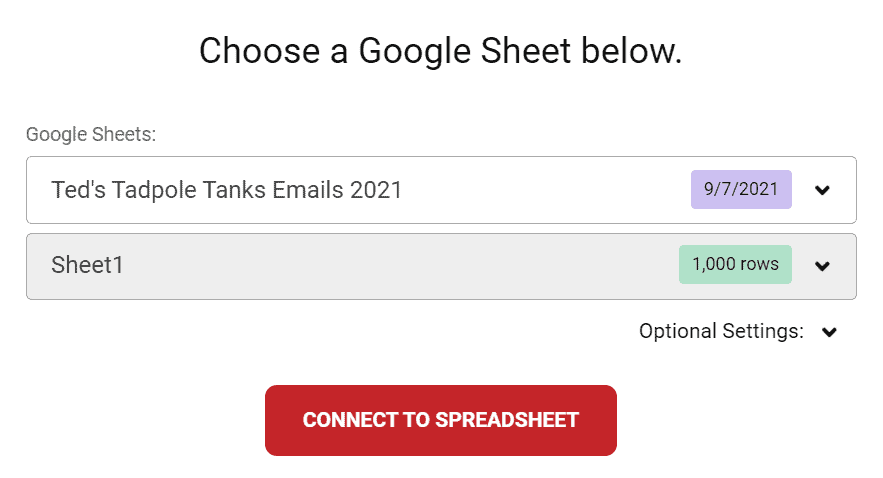
Note: If you have only one sheet (Sheet1) in your Google spreadsheet, that sheet gets chosen by default. However, if your spreadsheet has multiple sheets, you can select the sheet you want from the drop-down list.
Once you’ve chosen a spreadsheet, click on the CONNECT TO SPREADSHEET button.
Step D
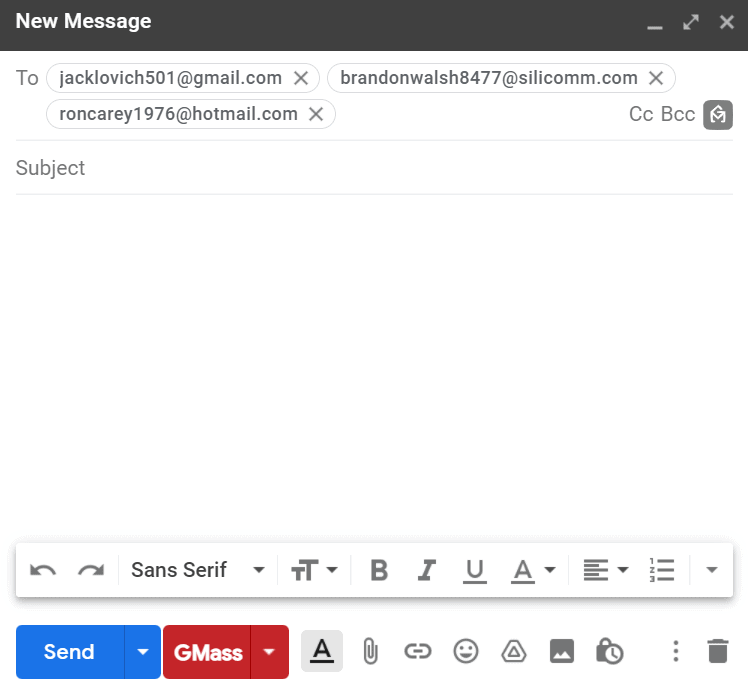
Now, GMass will auto-read all your recipients’ data from your Google sheet. It will also automatically insert their email addresses in the To field of a new email.
Note: GMass replaces the list of individual email addresses with a single alias address.
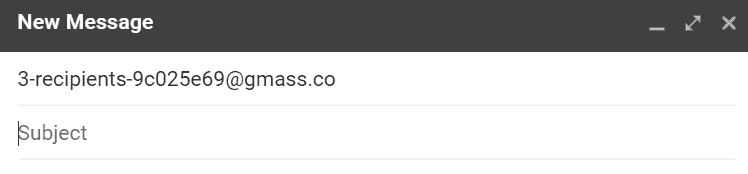
However, you can choose to display the email addresses individually. This way, you’ll be able to see the email IDs of everyone on your recipient list — but don’t worry, each select recipient will see only their email address (just like when you add recipients to the BCC field).
Step E
After a new email window appears, you can compose your email with GMass’ powerful personalization features. To use these personalization settings, click on the settings arrow near the GMass button.
![]()
Click on the Personalize drop-down list button to see all the column names present in your Google sheet.
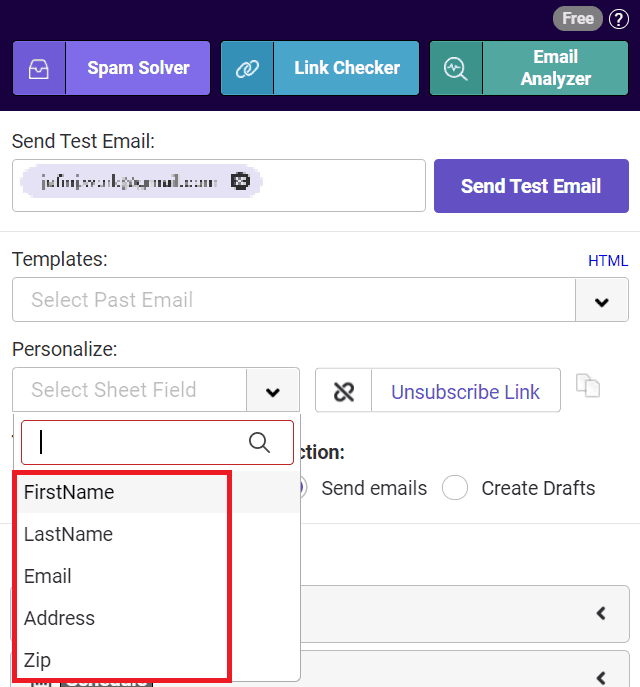
To personalize your email, select the column labels from the drop-down list. You can add these placeholders anywhere in your email message and subject line.
Here’s how my personalized email looks like with placeholders:
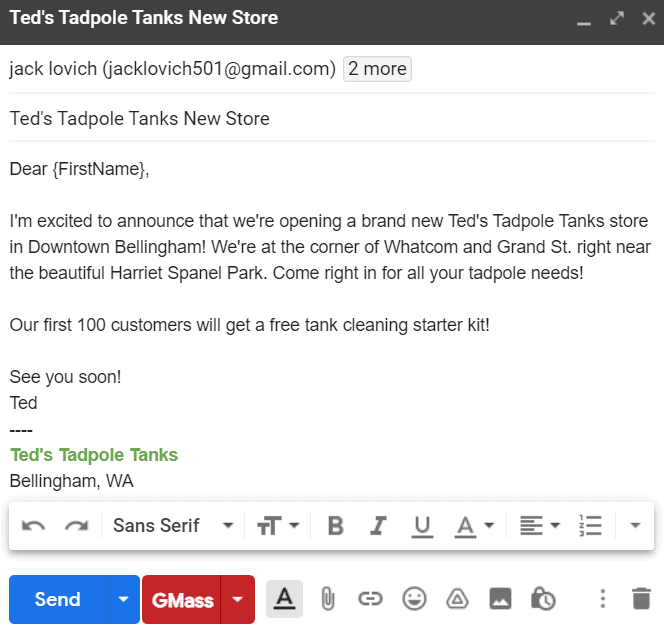
Notice the {FirstName} variable?
That’s a personalization label corresponding to the column header FirstName in my Google Sheet.
Step F
After composing your email, click on the GMass button to send it to all your recipients.
Note: GMass will auto-personalize the email for each person based on the mail merge labels you’ve used in your message.
For example, the third recipient of my email, Ron Carey, will receive an email that starts with “Dear Ron,” as the {FirstName} variable was used in the email message.
Mail Merge Word from Excel: Final Thoughts
Mail merging isn’t rocket science.
While you can use Microsoft Word to perform mail merges for letters, you need to follow a large number of steps correctly. Additionally, for sending mass emails, you have to set up a webmail client with Word manually.
Instead, why not use a powerful mail merge tool like GMass for sending mass emails?
Its advanced mass mailing features help you to perform mail merges and send out bulk emails effortlessly.
Why not try GMass today and simplify your mail merge experience?
GMass is the only tool for marketing emails, cold emails, and mail merge — all inside Gmail. Tons of power but easy to learn and use.
TRY GMASS FOR FREE
Download Chrome extension - 30 second install!
No credit card required

Ajay is the founder of GMass and has been developing email sending software for 20 years.
Hello, i read your blog from time to time and i own a similar one and i was just curious if you get a lot of spam feedback? If so how do you protect against it, any plugin or anything you can recommend? I get so much lately it’s driving me insane so any assistance is very much appreciated.