
Today, I have an example from GMass that’s an interesting way to stay in a critically important context–your email–while getting the work of job recruiting done effectively, courteously, thoroughly and searchably. Best of all, it’s very easy to implement and stay organized while doing it.
Overview
- Set up Gmail Labels to file the email response from your job ads under these Labels, immediately clearing them from your Inbox. Labels can be nested multiple levels, so you can have a very organized structure.
- Set up Gmail filters to send the candidates’ emails to the Labels–and remove them from your Inbox!
- Build the interview and rejection lists using GMass and the Gmail Labels.
- Send a personalized mass email to everyone, whether that’s for an invitation to interview or a courteous rejection, and sent such that the email goes out as a reply to each person’s original email to you.
First, Post Your Job Ad!
Before we begin, we will need a job advertisement that candidates could apply to. The nice thing about this approach in GMass is it is not dependent on which job placement site you use. Whether it’s Indeed.com, CareerBuilder, Glassdoor, Monster, Craigslist, or others, this approach will work. So, we’ll assume you’ve got your ad posted.
Create Gmail Filters and Labels to filter Job Posting Responses
Part of efficient recruiting management is keeping everything organized and not just overflowing your Gmail Inbox. To do that, we’re going to make use of Gmail Filters to keep the applicants’ emails out of your Inbox and where they belong: filed under the Label for the job they applied for.
- Start by setting up some Gmail Labels. It’s up to you how you structure them, but this tutorial will give you one possible format and you can adapt it to your needs. Mine, for the fictional “Ted’s Tadpole Tanks” business, looks like this:
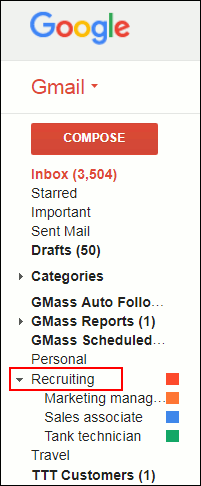
The Recruiting Label highlighted, and showing sub-labels. To create those Labels, scroll down to the bottom of the Gmail left sidebar (you may have to hover or drag to reveal the bottom section), and click on “Create new Label”.
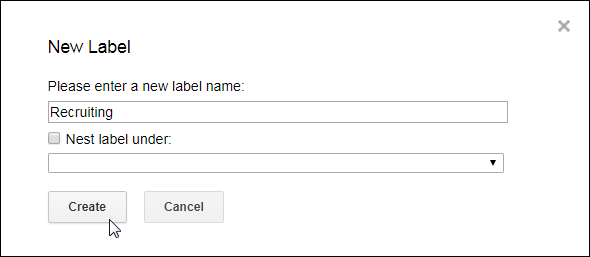
About to create a new Gmail Label - Then just give the Label a name in the popup window. In this case, I chose “Recruiting”.
Note: For now at least, Gmail’s Labels are organized alphabetically, so if you want your Label to appear higher on the screen–and avoid being hidden under the “fold”, giving it a name with a letter early in the alphabet will achieve that (Such as “Advertised jobs”). In this case for our tutorial, I don’t have enough other labels to have that matter.
I am also not going to nest this first Label, so that it will always be visible from my Gmail sidebar. Then click “Create”.
About to create this Label. - Now make one or more sub-Labels. These are just Labels that are “nested” under the main “Recruiting” label. To add one, first click on the small down arrow to the right of the “Recruiting” Label.

Click here to open options for this Label. - That brings up a new window.

Popup menu showing options for this Label. In this window, click on “Add sublabel”. That will bring up the same screen as shown above in Step 2. Make your new sublabel. Provide an informative name for this job title, one that matches to what was advertised in the job ad you posted. Make sure the “Nest label under:” checkbox is checked, and that “Recruiting” (or your equivalent) is shown in the choice dropdown below it.

Adding a sublabel to our “Recruiting” Label. Then click “Create”.
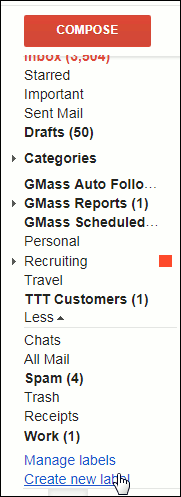
Note: It’s important to mention that you can repeat this process of adding sublabels under “Recruiting” as much as you want. In fact, you can re-organize and edit your Labels at any time. If you want to do that, click “Manage labels” found near the bottom of your Gmail sidebar.

The “Manage labels” option of Gmail sidebar. From there you can scroll down in the window and choose which Labels and their nesting you want to edit.
Tip: I later went back and clicked on the little arrow to the right of the Labels and chose “label color” just to bright these up and make them easy to find.
- Now that you have your Labels ready to “catch” your job applicant emails, you can now create your email filter for a job. Creating email filters in Gmail is possible in two ways: 1) if you have a message selected, the choice “Filter messages like these” is available under the “More” button’s dropdown menu or 2) you can do it from Settings. To keep things clearer, let’s do it from Settings. Start by clicking on the Settings “gear” icon on the right of your Gmail screen.

Gmail Settings button. - Select “Settings” from that dropdown list.

Gmail Settings menu. - Click on “Filters and Blocked Addresses”.

Filters options - Click on “Create a New Filter”.

Click here to create a new Gmail filter. - The filter you create is really up to your specific needs, but it is probably a good idea to create one that will filter emails that a) mention your advertised position and b) originate from an email from a job site.
To do that is to use, for example, the following filter, which will capture any job ad responses for your advertized “Tank technician” job coming in from Indeed.com or CareerBuilder.com:
Creating a filter for job ad responses. Note: if you don’t get your filter absolutely perfect, don’t worry: anything the filter doesn’t catch will just go to your Inbox as usual, and from there you can manually label it for the job. The point is, no emails can ever be lost if you don’t get the filter exactly right.
- The filter itself will now be created–in other words, what to do with emails that match your search specifications. In the window that pops up, click the checkbox for “Skip the Inbox (Archive it)” and “Apply the label”.

Getting ready to apply the label for this filter. - Then click on the “Choose Label” option, and in the list that drops down, click on “Recruiting/[your-advertised-job]”, or whatever the appropriate Label is. In my case, it is “Recruiting/Tank technician”.

Choosing the Label for this advertised job. …And you will have created your filter.Once you have your filter, you can now await emailed job ad responses from applicants. When they come in, Gmail will automatically filter them to your Labels. Remember, if it happens to miss any, you can always manually Label the email and archive it, and get the same effect as the filter.
- At this point, you can consider making additional sublabels for the process of sorting candidates. For example, you could have a set of sublabels of , “Interview”, “Maybe”, “Offer”, and “Rejected” for each job posting sublabel.

Showing a job role as a label, with hiring process sublabels.
Tip: The “(1)” shown next to the “Tank technician” Label does not refer to how many emails are labeled this way, but how many emails with this Label are unread.With the Labels organized this way, any time you wanted to look at candidates in a category, just click on that label to reveal all the emails. If you want to move a candidate’s email to another category, click the checkbox to the left of the email, then click the label’s icon. A dropdown will allow you to uncheck one checkbox and check a new one, which will relabel that email.

Relabeling a candidate’s email to “Maybe” within the Tank Technician job. - Now, to review your candidates, just click on the Label corresponding to this job (in my case, “Tank technician”) . That will bring you to a screen similar to the Inbox view, showing the candidates’ emails as a list.

The job applicants’ emails, selected via the label. - As you decide on the suitability of a candidate, you can relabel their email to “Interview” and other Label categories you set up. To do so, just click on the Label icon when reading an email. Be sure to check the Label for the category you assigned the person to, such as “Rejected”. Do not uncheck the job title Label–we are going to use later. And do not forget to click “Apply”.
Note: Gmail will separate the nested sublabels with slash marks, like this: “Recruiting/Tank technician/Rejected”.

Relabeling this inappropriate candidate to “Rejected”.
Use GMass to respond to groups of candidates simultaneously
When you are ready to offer the best applicants an interview, you can easily mass mail them now through GMass. Let’s assume you want to start by contacting those you’ve selected for an interview.
Note: The following assumes you have followed the labels structure I have used; if not, just adapt to your own structure.
- Click the Interview Label. This will bring all the emails from candidates you intend to interview.
- Click the GMass Build Email List button (magnifying glass button), and GMass will build a recipient list all of the email addresses labeled “Interview”.

About to build a list for a mass email. - Then write your email to those selected for interviews. Here’s our sample:

Email sent to potential interviewees. Tip: Notice I’ve personalized the email, too. That’s a nice touch in interview invites, and trivial to do in GMass.
- Let’s suppose I prefer the email inviting the applicant to an interview will arrive as a reply to their application email. To set that up, click the GMass settings button.
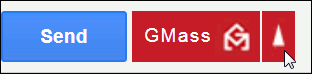
The GMass Settings button. - Then, In the settings dialogue, click the “Send as replies” radio button.

The “send as replies” option in the GMass Settings window. - Finally, click the GMass button to send out the mail. In our case, we just have four recipients, but for many jobs, there may be more recipients for the interviews and potentially hundreds for the “rejected category”. That many emails is fine–that’s just what GMass does best!

Ready to send out, just need to click GMass… - OK, let’s say you’ve hired someone. Now how do you inform everyone else they didn’t get the job? For those, you can do a time-saving trick with GMass. Just click on the job title Label (in my case, “Tank technician” and then the GMass Build Email List button (magnifying glass button). This will make a list of everyone who applied for this job. But don’t send it yet!

The email rejected candidates receive. Don’t send it just yet! - Now, click the Settings button (the up arrow) in Gmass, and in the Settings window, use the Suppression feature. Click in the field to the right of “Suppress” and a dropdown list will pop up. From there, select the emails that went out to the candidates offered interviews.
Note: in order to later find the interview offer email, it is a good idea to give it an informative subject when you compose it. Then you will be able to easily find it in the suppression list.
Selecting emails for the suppression list. - Finally, you can send this mass mailing via the GMass button. Each rejected candidate will receive a personalized email, as if it came directly from you.
- If you want, once you’re sure you are completely done with this hire, you can re-nest this job title under a different Label, such as “Recruiting/Former Searches/Tank technician”. This way, you can keep a record of all previous recruiting efforts while still keeping your Labels tidy.
That’s it! With the help of GMass, you’ve been able to manage an entire recruiting effort all through your Gmail account. That keeps context switching to zero, since everything–including discussions with other stakeholders at the job–is done within the Gmail interface. It’s a great way to stay focused and increase productivity.
GMass is the only tool for marketing emails, cold emails, and mail merge — all inside Gmail. Tons of power but easy to learn and use.
TRY GMASS FOR FREE
Download Chrome extension - 30 second install!
No credit card required

Ajay is the founder of GMass and has been developing email sending software for 20 years.
I cant pay via bitcoin
Hi Hudo,
Unfortunately, our payment processor Stripe has discontinued accepting Bitcoin. You can still use a credit card for your payment. See https://www.gmass.co/pricing ( https://www.gmass.co/pricing ) for details.