Let’s not bury the lede here: It’s very smart idea to set up a wedding email address — an email you use for your wedding and your wedding only.
Wedding require lots and lots (and lots and lots and lots) of correspondence. And your personal or work email inbox isn’t a great place for it.
In this guide, we’ll cover the benefits of setting up an email address just for your wedding. We’ll also share several dozen ideas for what that email should be and how to set it up. And finally, we’ll go over a few clever ways you can use that email address.
Wedding Email Address Table of Contents
- 6 Benefits of Creating a Specific Wedding Email Address
- 50+ Ideas for Your Wedding Email Address
- A Step-by-Step Guide to Set Up a Free Gmail Account for Your Wedding
- A Step-by-Step Guide to Set Up an Wedding Email Account Using Your Own Domain Name
- 3 Extra Things to Set Up with Your Wedding Email Address
- 3 Emails You Can Send with Your New Wedding Email Address
6 Benefits of Creating a Specific Wedding Email Address
If you’re reading this article but still sitting there skeptical, wondering if this push for a standalone wedding email account is all a conspiracy by Big Email — let’s ease your mind. Here are six of the biggest benefits of creating an email account just for your wedding.
You’ll keep all of your wedding correspondence contained in one place
When you have one email inbox for all wedding correspondence (invites, info emails, vendor emails, RSVPs, a long list of questions from your great aunt), it will make your life much easier and much more organized.
Especially when the other correspondence option is a patchwork of different email addresses, texts, voicemails, social media messages, mailed RSVP cards, and shouted questions across the hotel from that same great aunt again.
When everything is in one email account, your entire wedding paper trail is searchable, organized, and streamlined.
Plus, the standalone email account can also help with last minute questions — when you’re too busy to answer people’s basic questions on your wedding weekend, you can give a member of the wedding party access to the inbox to respond.
You won’t clog up your main inbox
Wedding emails can come in at a very high volume — especially if you’re asking for email RSVPs to any or all of your events.
Not only will wedding emails jam up your inbox, they also may get lost in the shuffle of your other emails — meaning you could miss ones that are actually important. (You don’t want to miss an email from your caterer canceling because of an emergency — then wind up with no food at your wedding.)
Using one inbox makes it easier for you to collaborate
I hope you and the person you’re marrying have the trust to allow each other unregulated access to your email accounts. But even so… it’s still a lot easier to have a separate email address you can both access for just wedding purposes.
Plus, if you want to give someone else access — like the scenario I described earlier where you have a member of the wedding party handle day-of-the-wedding email questions — a separate account is the way to go.
One more collaboration aspect: when you create a wedding email with Google, you’ll also be able to collaborate on your guest spreadsheet as a Google Sheet.
You can use it to correspond with vendors
You can keep all your vendor info organized — venue, food, transportation, photographer, and everything else — in your wedding email inbox. If you need any information, you can run a quick search in that account and you know you’ll find what you’re looking for.
You can use it to spread your email around in wedding contests
Planning to drop your info into every bridal fair contest you can find to try to get free stuff for your wedding? You’re going to wind up on a lot of mailing lists — and if any of those lists is run by someone unscrupulous, they could sell your email to a lot more mailing lists (and/or spammers).
By isolating all wedding correspondence to your wedding email… it doesn’t matter how bad you screw it up. For all you care it can become the world’s most spammed mailbox ever… as long as that happens after the wedding.
You can use it to create wedding accounts
You’ll need to create lots of website accounts for your wedding. From your wedding website to your gift registries to any wedding-specific social media accounts, every place will need an email address.
And once again, you won’t have to bother unsubscribing from their mailing lists after the wedding is over — you can just stop checking your wedding email.
50+ Ideas for Your Wedding Email Address
Of course, setting up an email address for your wedding means you’ll need to come up with an email address for your wedding.
Here’s a huge bank of ideas for your email address. We’ve divided these into two categories: Ideas if you’re planning to use a free @gmail.com address and ideas if you’re planning to set up an address for your own domain name (like @joeandkelly2023.com). We’ll go through our step-by-step setup guides for both later in this article.
Ideas for a Gmail wedding email address
A Gmail address needs to be 30 characters or less and use only letters, numbers, and periods.
But even more challenging: It needs to be an address no one has used before. That adds a degree of difficulty — and may require some creativity and/or compromising on your part.
Here are some ideas you can try for your wedding Gmail address. Just, you know, swap in your names for the generic “Kelly” and “Joe” I used over and over and over.
- kellyandjoewedding2023 / kellyandjoewedding23
- kellyjoe2023
- thekellyandjoewedding2023 / thekellyandjoewedding23
- kellyandjoearegettingmarried / kellyandjoearegettingmarried23
- kellyandjoegetmarried / kellyandjoegetmarried2023
- kellyandjoe6.30.23 / kellyandjoe06.30.2023
- kellyandjoeweddingtime / itskellyandjoeweddingtime
- kellyandjoe.june2023 / kellyandjoe.june23
- itskellyandjoeswedding
- kellyandjoesantabarbara23 (Note: Use your destination)
- kellyplusjoe2023
- kellyandjoeforever / kellyandjoe4ever
- thekellyandjoenuptials / thekellyjoenuptials / thekellyandjoenuptials23
- kellyandjoetietheknot
- kellyandjoesayido
- thekellyjoemerger / thekellyandjoemerger
- thekellyjoealliance / the kellyandjoealliance
- KMandJW2023 / KandJ2023
- michaelswilliams2023
- michaelswilliamswedding2023
- themichaelswedding / themichaelswedding2023
- michaelstietheknot2023 / themichaelstietheknow2023
- michaelswedding2023 / michaelswedding23
- using whatever your wedding hashtag is
A few tricks to try here if you’re having trouble finding an unclaimed address:
- Flip the order of your names (joeandkelly instead of kellyandjoe)
- Use last names
- Try 2023 or 23 for the year (or whatever the year may be)
- Try 06 or 6 for the month (if it’s a single digit month) and 04 or 4 for the day (if it’s single digit)
Ideas for a wedding email address with your own domain name
If you’re going to get your own domain name, you can choose:
- Your first names together (kellyandjoe.com, or if .com isn’t available, .org or something else).
- Your first names together and the year (kellyandjoe2023.com or something related).
- Your wedding hashtag.
- Your future shared last name (e.g., themichaelswedding.com).
- Any of the other ideas from above (like kellyandjoetietheknot.com).
Then you can pick a more basic first word for the email address
- info@yourweddingdomain.com
- details@yourweddingdomain.com
- us@yourweddingdomain.com
- kellyandjoe@yourweddingdomain.com
- hello@yourweddingdomain.com
- yo@yourweddingdomain.com
- hey@yourweddingdomain.com
- ouremail@yourweddingdomain.com
- email@yourweddingdomain.com
- wedding@yourweddingdomain.com
- letsgetmarried@yourweddingdomain.com
- weregettingmarried@yourweddingdomain.com
- getintouch@yourweddingdomain.com
- holla@yourweddingdomain.com
- ido@yourweddingdomain.com
- talktous@yourweddingdomain.com
- KandJ@yourweddingdomain.com
- 2023@yourweddingdomain.com
- itshappening@yourweddingdomain.com
- letsdoit@yourweddingdomain.com
A Step-by-Step Guide to Set Up a Free Gmail Account for Your Wedding
Up first, here’s your complete guide on how to set up a free Gmail account for your wedding.
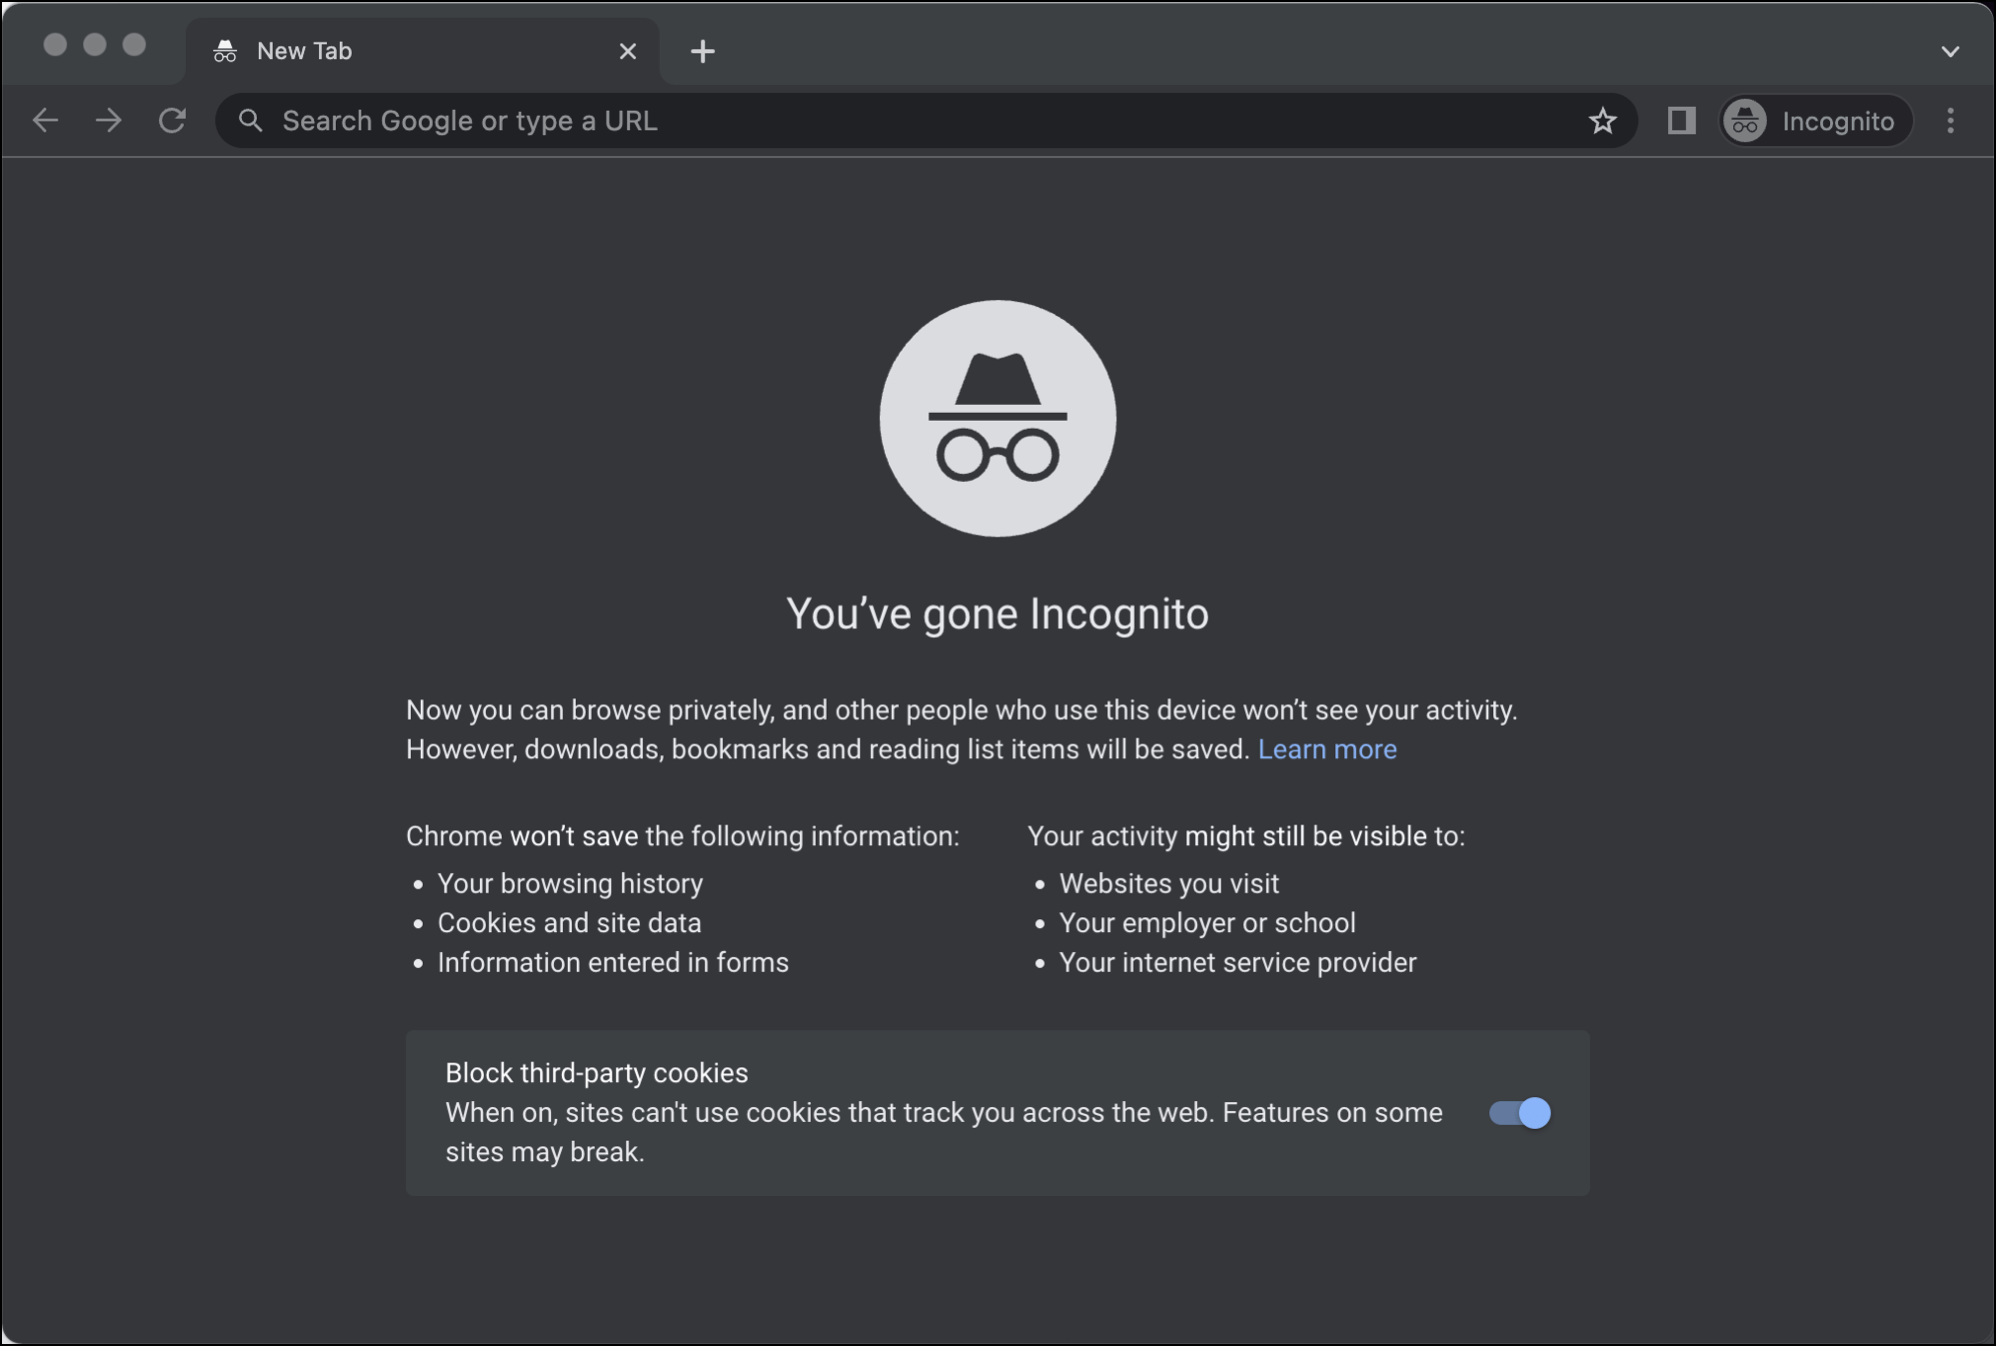
Step 1: Open up an incognito window
Open an incognito window; it’s always easiest to give yourself that clean slate when you already have a Gmail account (or multiple accounts) logged into your browser.
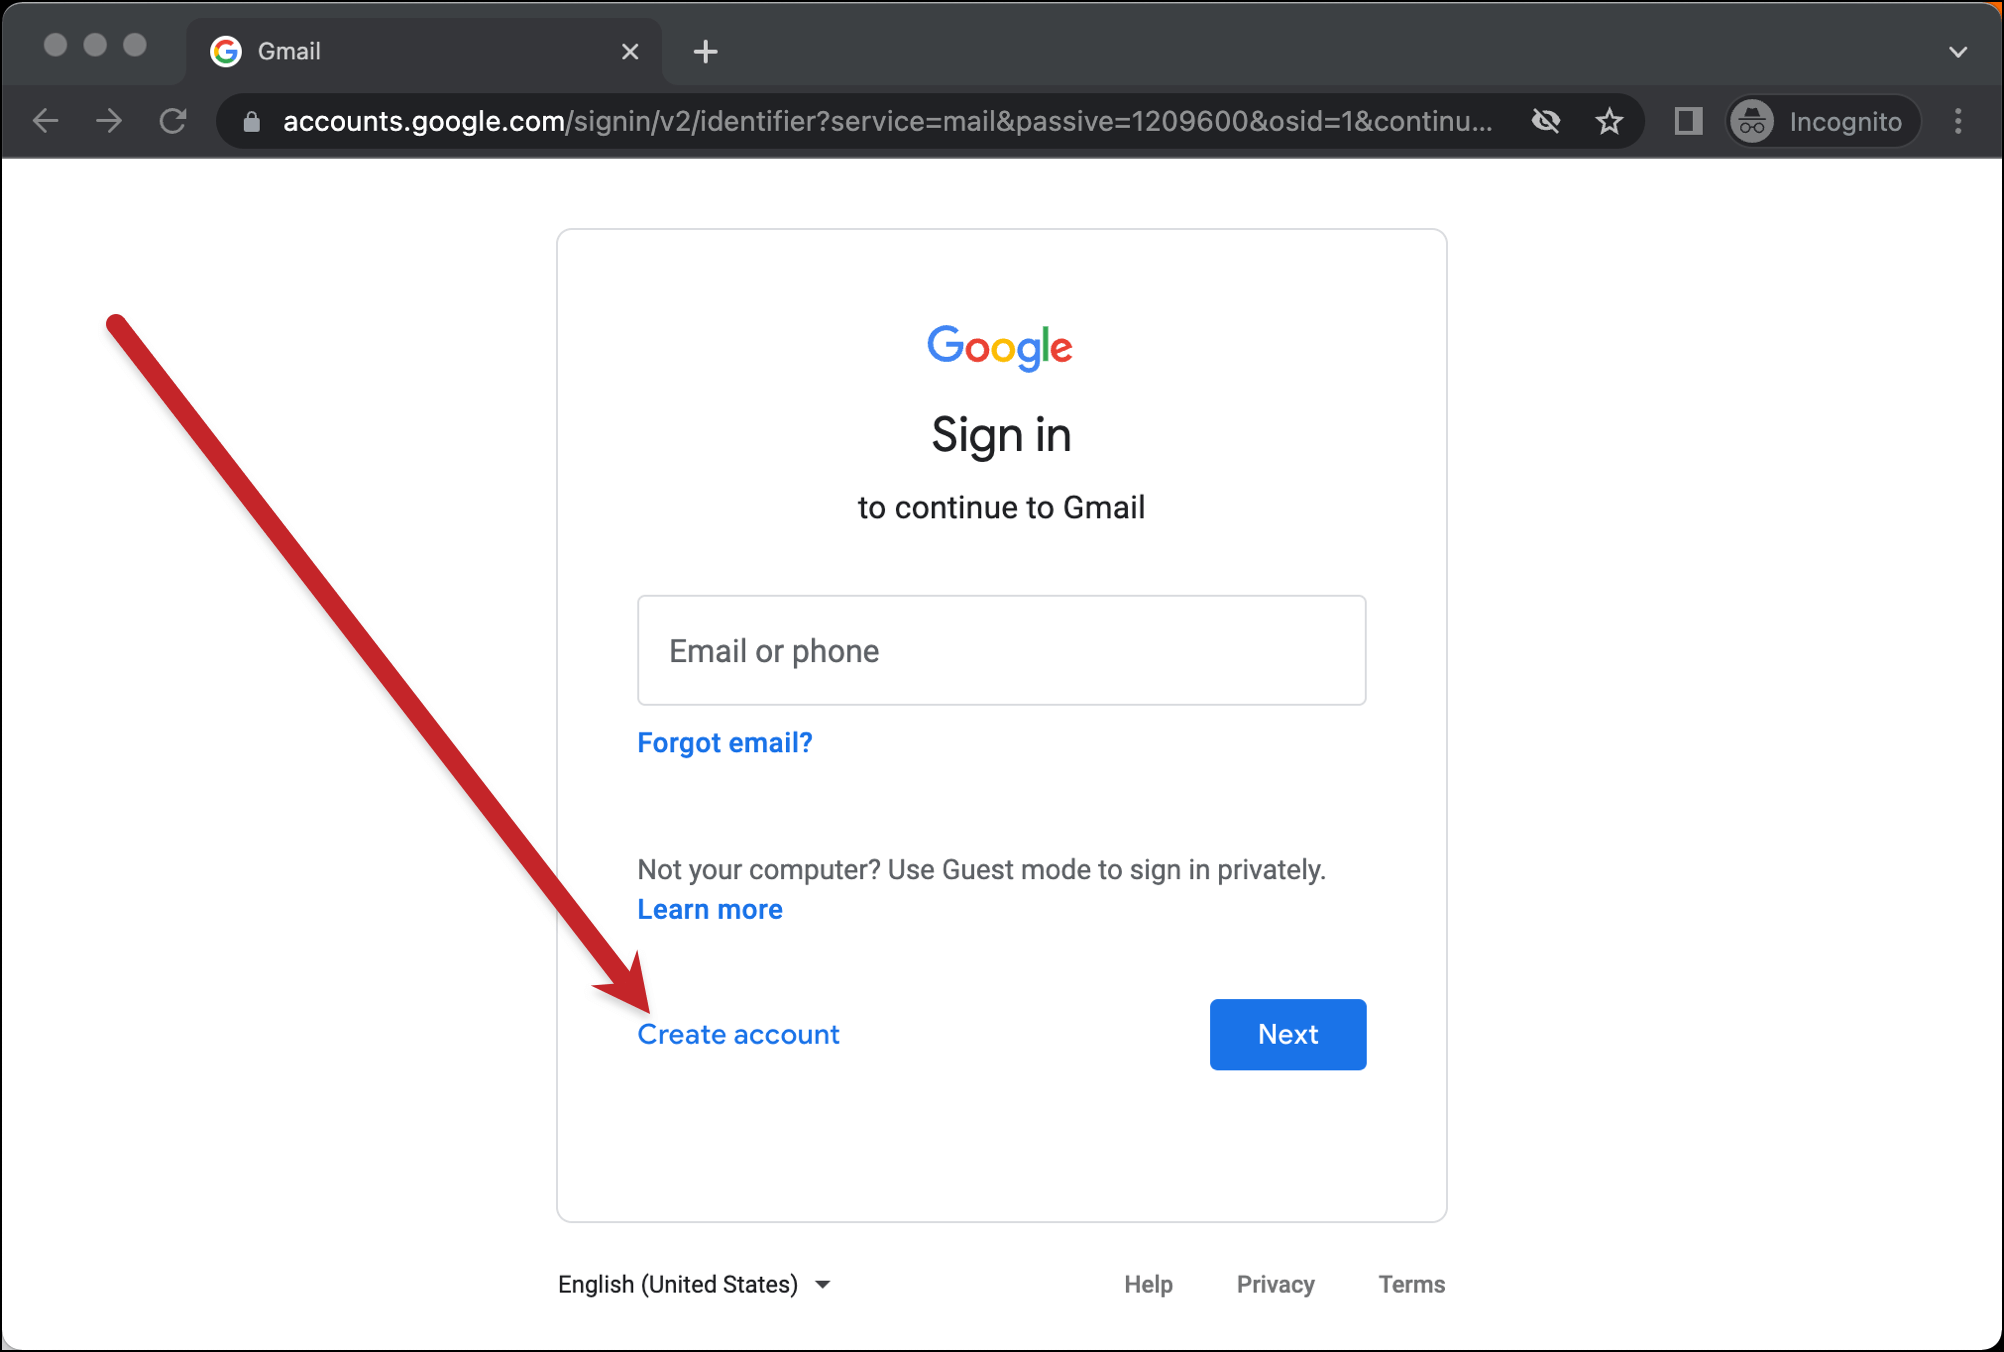
Step 2: Go to gmail.com
When you get to gmail.com, click on the link that says “Create account.” It will ask if you’re creating it “For myself”… “For my child”… or “To manage my business.” Click on “For myself.”
Step 3: Enter your email details
For the first name and last name, it’s best to put your first name in the first box (along with the word “and”) and your future spouse’s first name in the last name box. I’m not sure I could’ve phrased that any more confusing. The screenshot should really help make sense of it. (Basically, first name is “Kelly and” and the last name is “Joe.”)
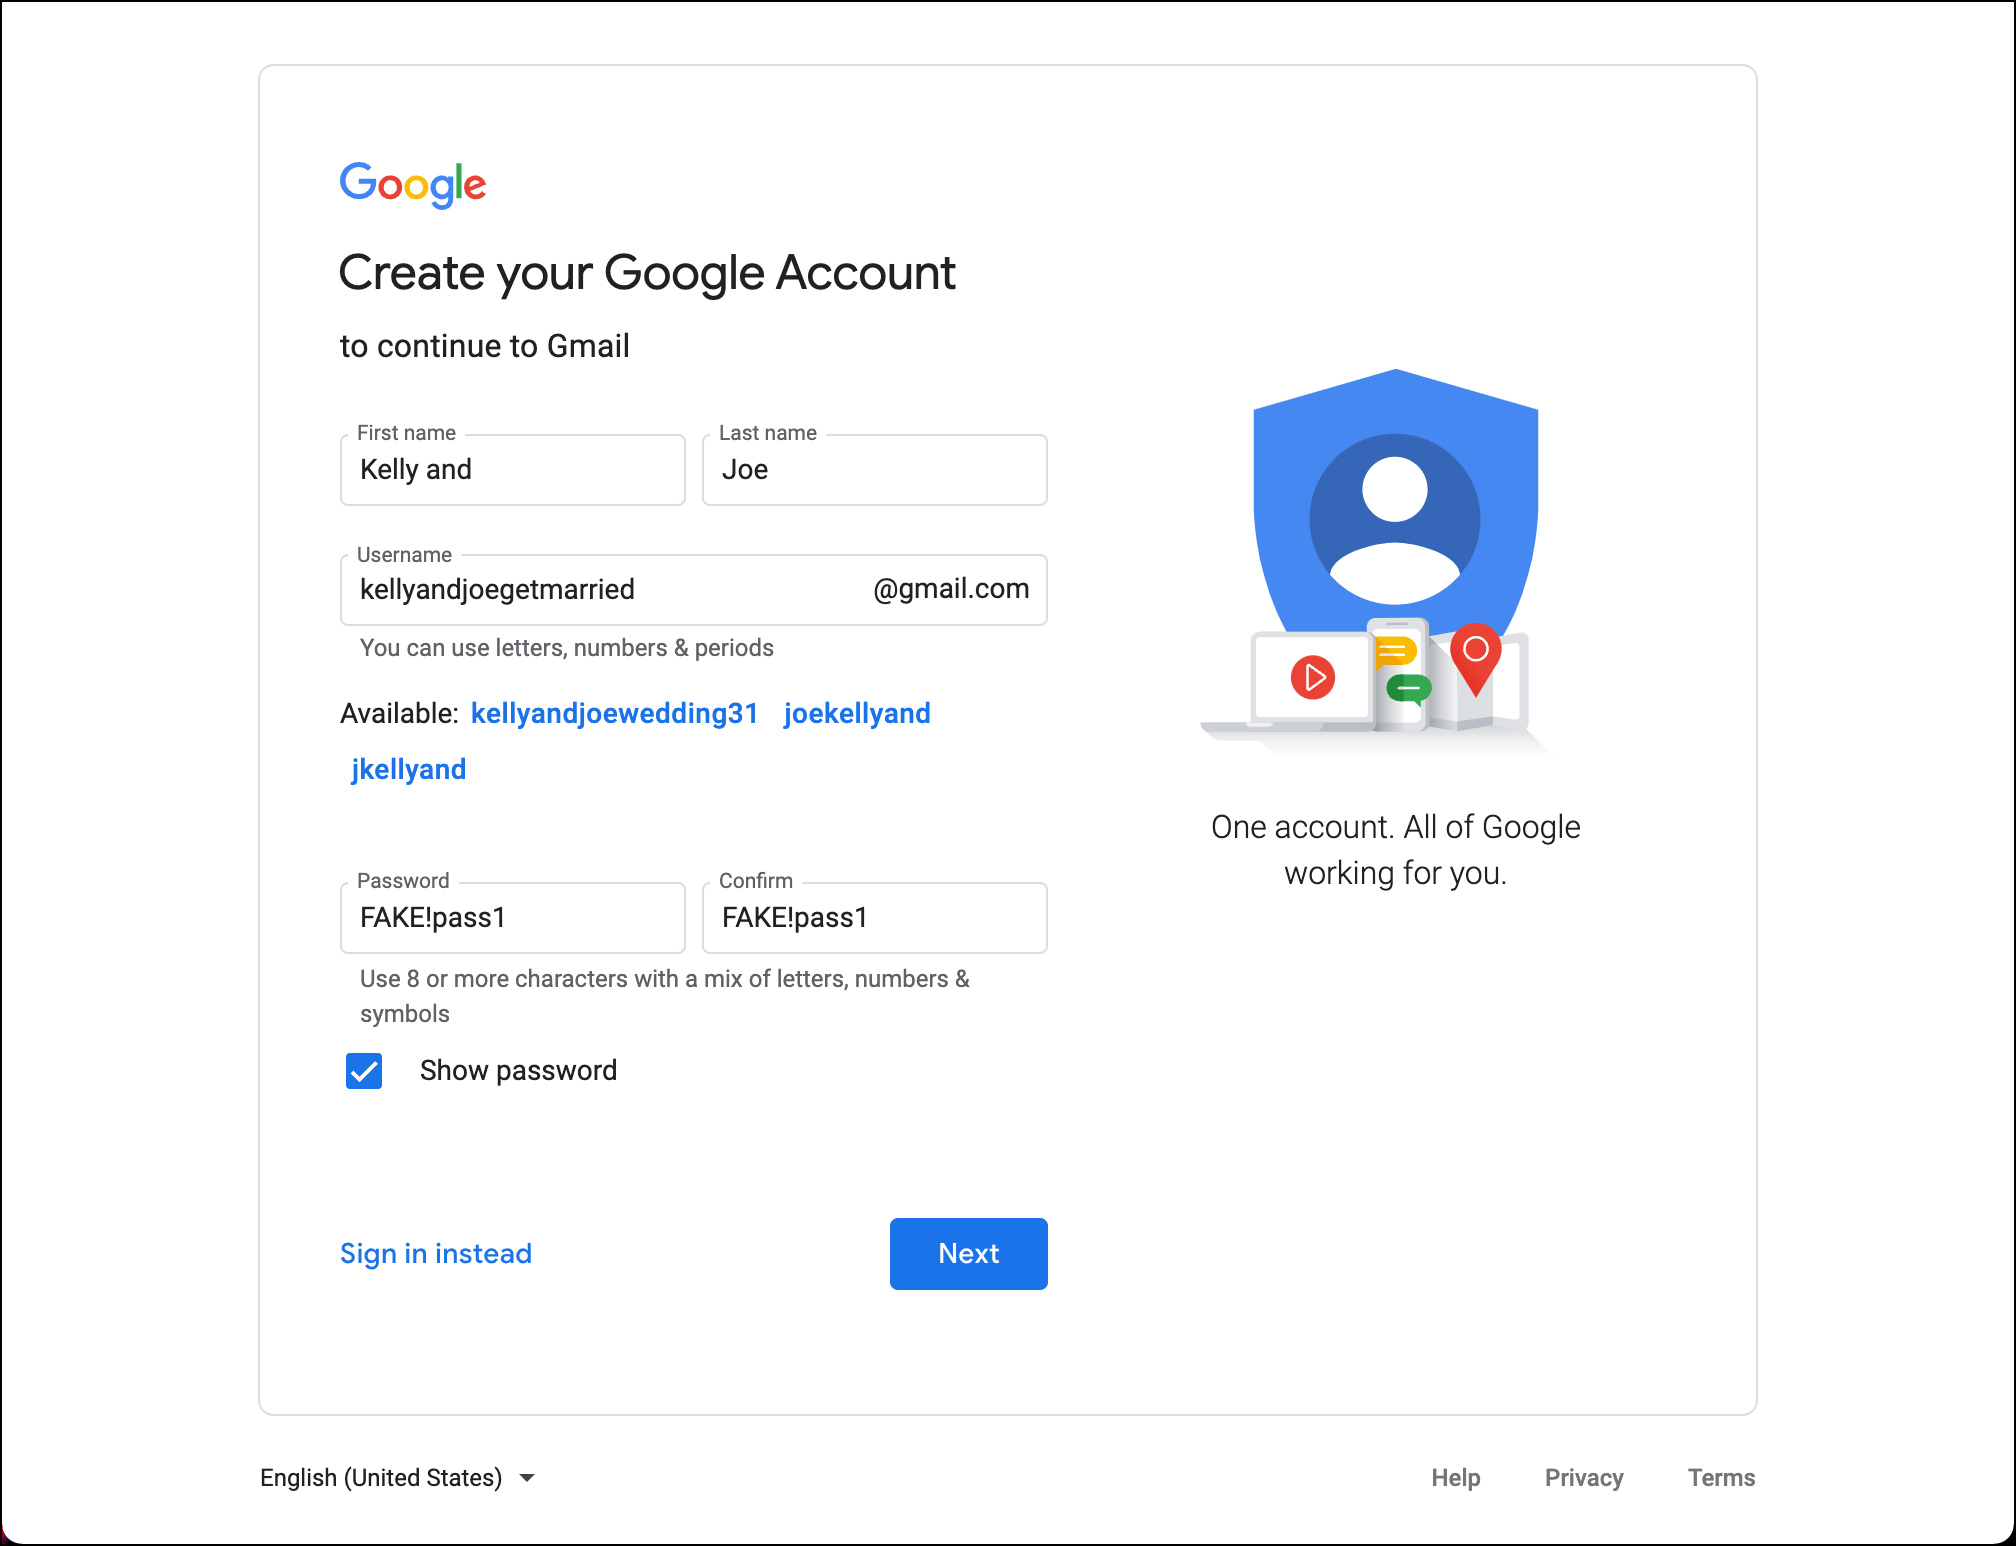
As for the username, try different options based on the address ideas you like. If the name is taken, Google will let you know and give you some (mediocre) suggestions for similar-ish alternatives.
And for the password, set something you and your future spouse can both remember. (Don’t make it that same password you use for all your other accounts, in case you decide to give the password to someone else to help manage this inbox.)
On the next screen, you can optionally enter your phone number and other email. Then fill in the rest of the details for security purposes (in case you somehow get locked out of your account, or North Korean hackers decide to break into your wedding email as part of a master espionage plan).
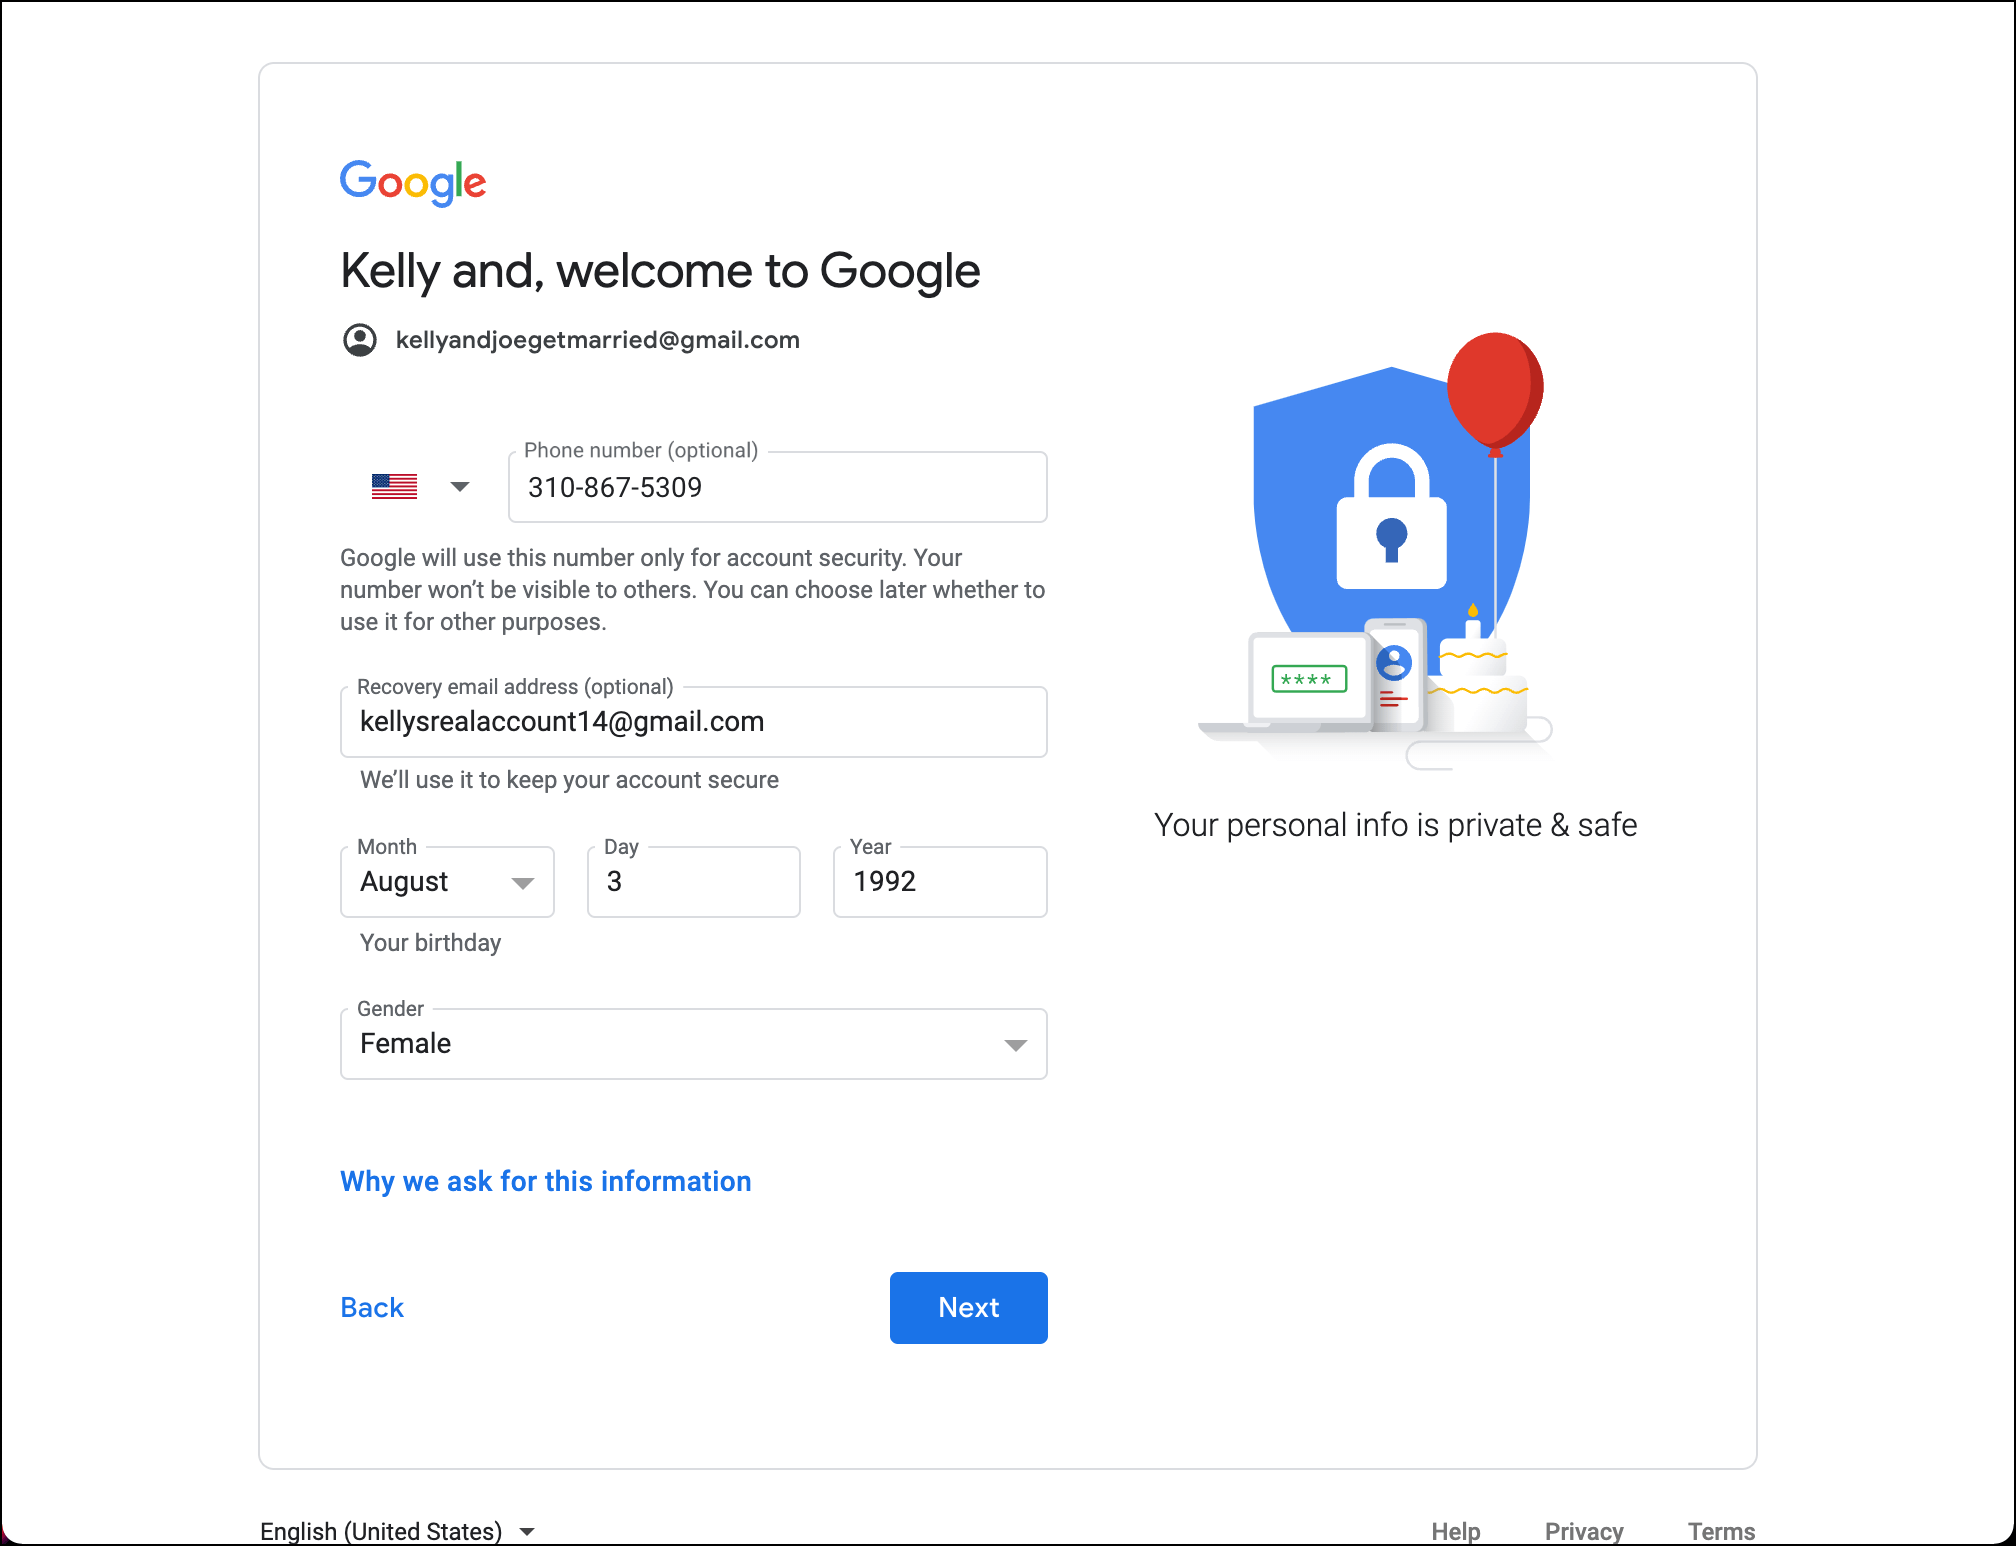
Then verify your phone number if you want and agree to their privacy terms.
Step 4: You’re all set!
Your wedding email is now set up. You can send yourself a test email to check out how it looks.
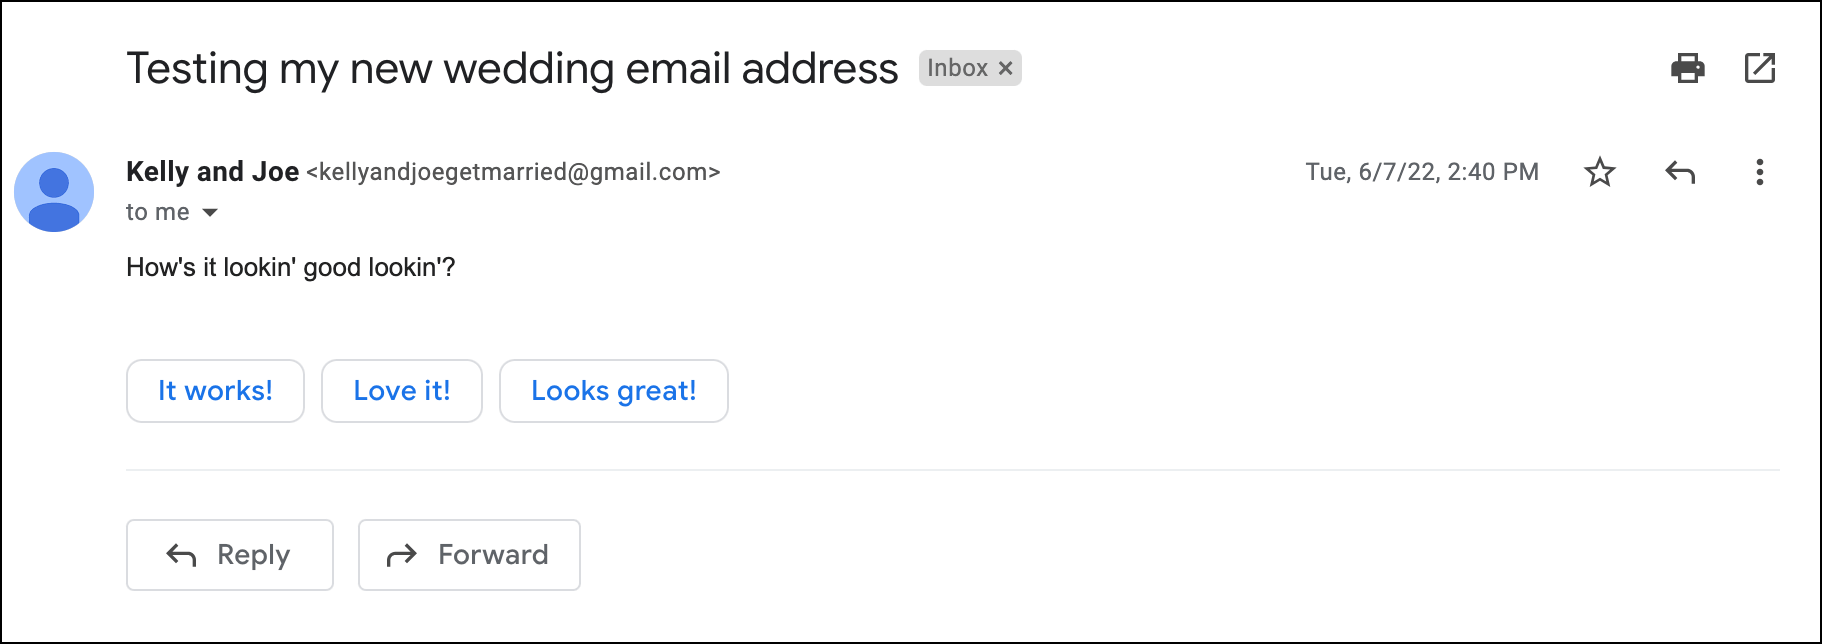
Now go ahead and jump down to our suggestions for three extra things to do with your email — we’ll go through things like adding a profile photo and setting up a signature.
A Step-by-Step Guide to Set Up an Wedding Email Account Using Your Own Domain Name
Now we’ll walk through setting up an email account with Google Workspace if you’ve picked your own domain name.
Note: This method isn’t free (it’s $6 per month, with the first month free, plus the cost of the domain). You may not want to take on that extra $50 or so as another wedding cost — but if you want your own domain name for this, the cost isn’t that significant.
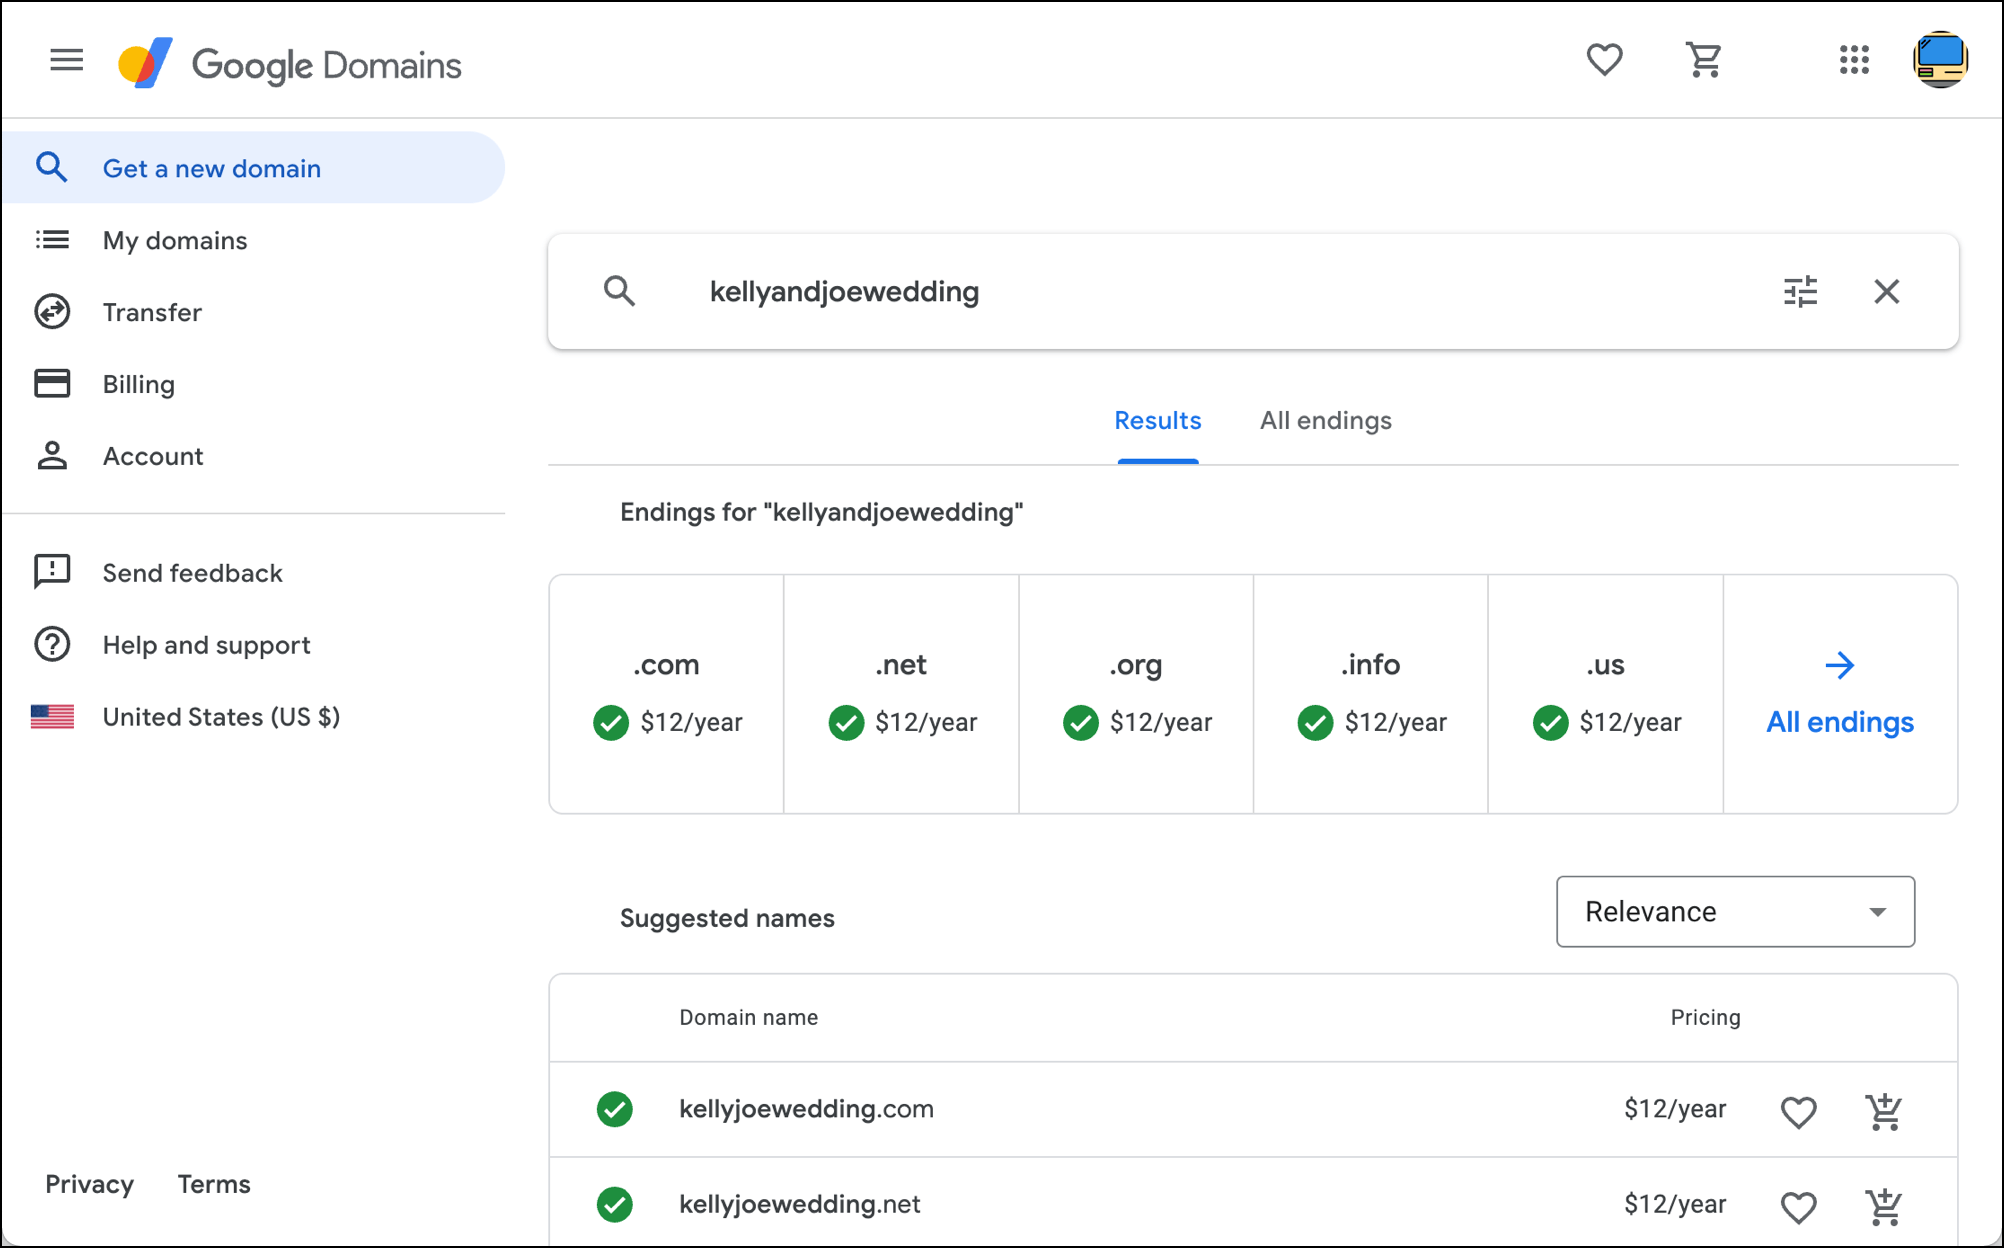
Step 1: Find your domain name at Google Domains — and set up your email in the process
You don’t have to use Google Domains to buy your domain name — your could use GoDaddy or anyone else. But we’ll use Google Domains in this example. It makes it much, much faster to set up the email address and you won’t have to edit any DNS records yourself this way.
I searched Google Domains and found kellyandjoewedding.com was available. Note: I just bought that website for the sake of this article. If you’re a couple named Kelly and Joe and you want that domain, I’ll happily transfer it to you.
Step 2: Buy the domain — and set up your email at the same time
I bought the domain — note that I turned off auto-renew. I’m fine letting this domain go a year from now, once the wedding is over.
By using Google Domains, I could set up my email address right here during checkout. I clicked the button to add “Custom email.” Switch the plan to “Business Starter” — it’s Google’s cheapest plan at $6/month which will more than meet your needs. Just make sure to remember to cancel the plan when you don’t need it anymore.
I entered “Kelly and” as the first name and “Joe” as the last name. Then, for username, I went with “hello” so our email will be “hello@kellyandjoewedding.com”.
I also checked the box to “Allow this account to manage domain settings” — to save time and to avoid having to do anything even remotely technical, I’ll just let Google handle all the configuration work.
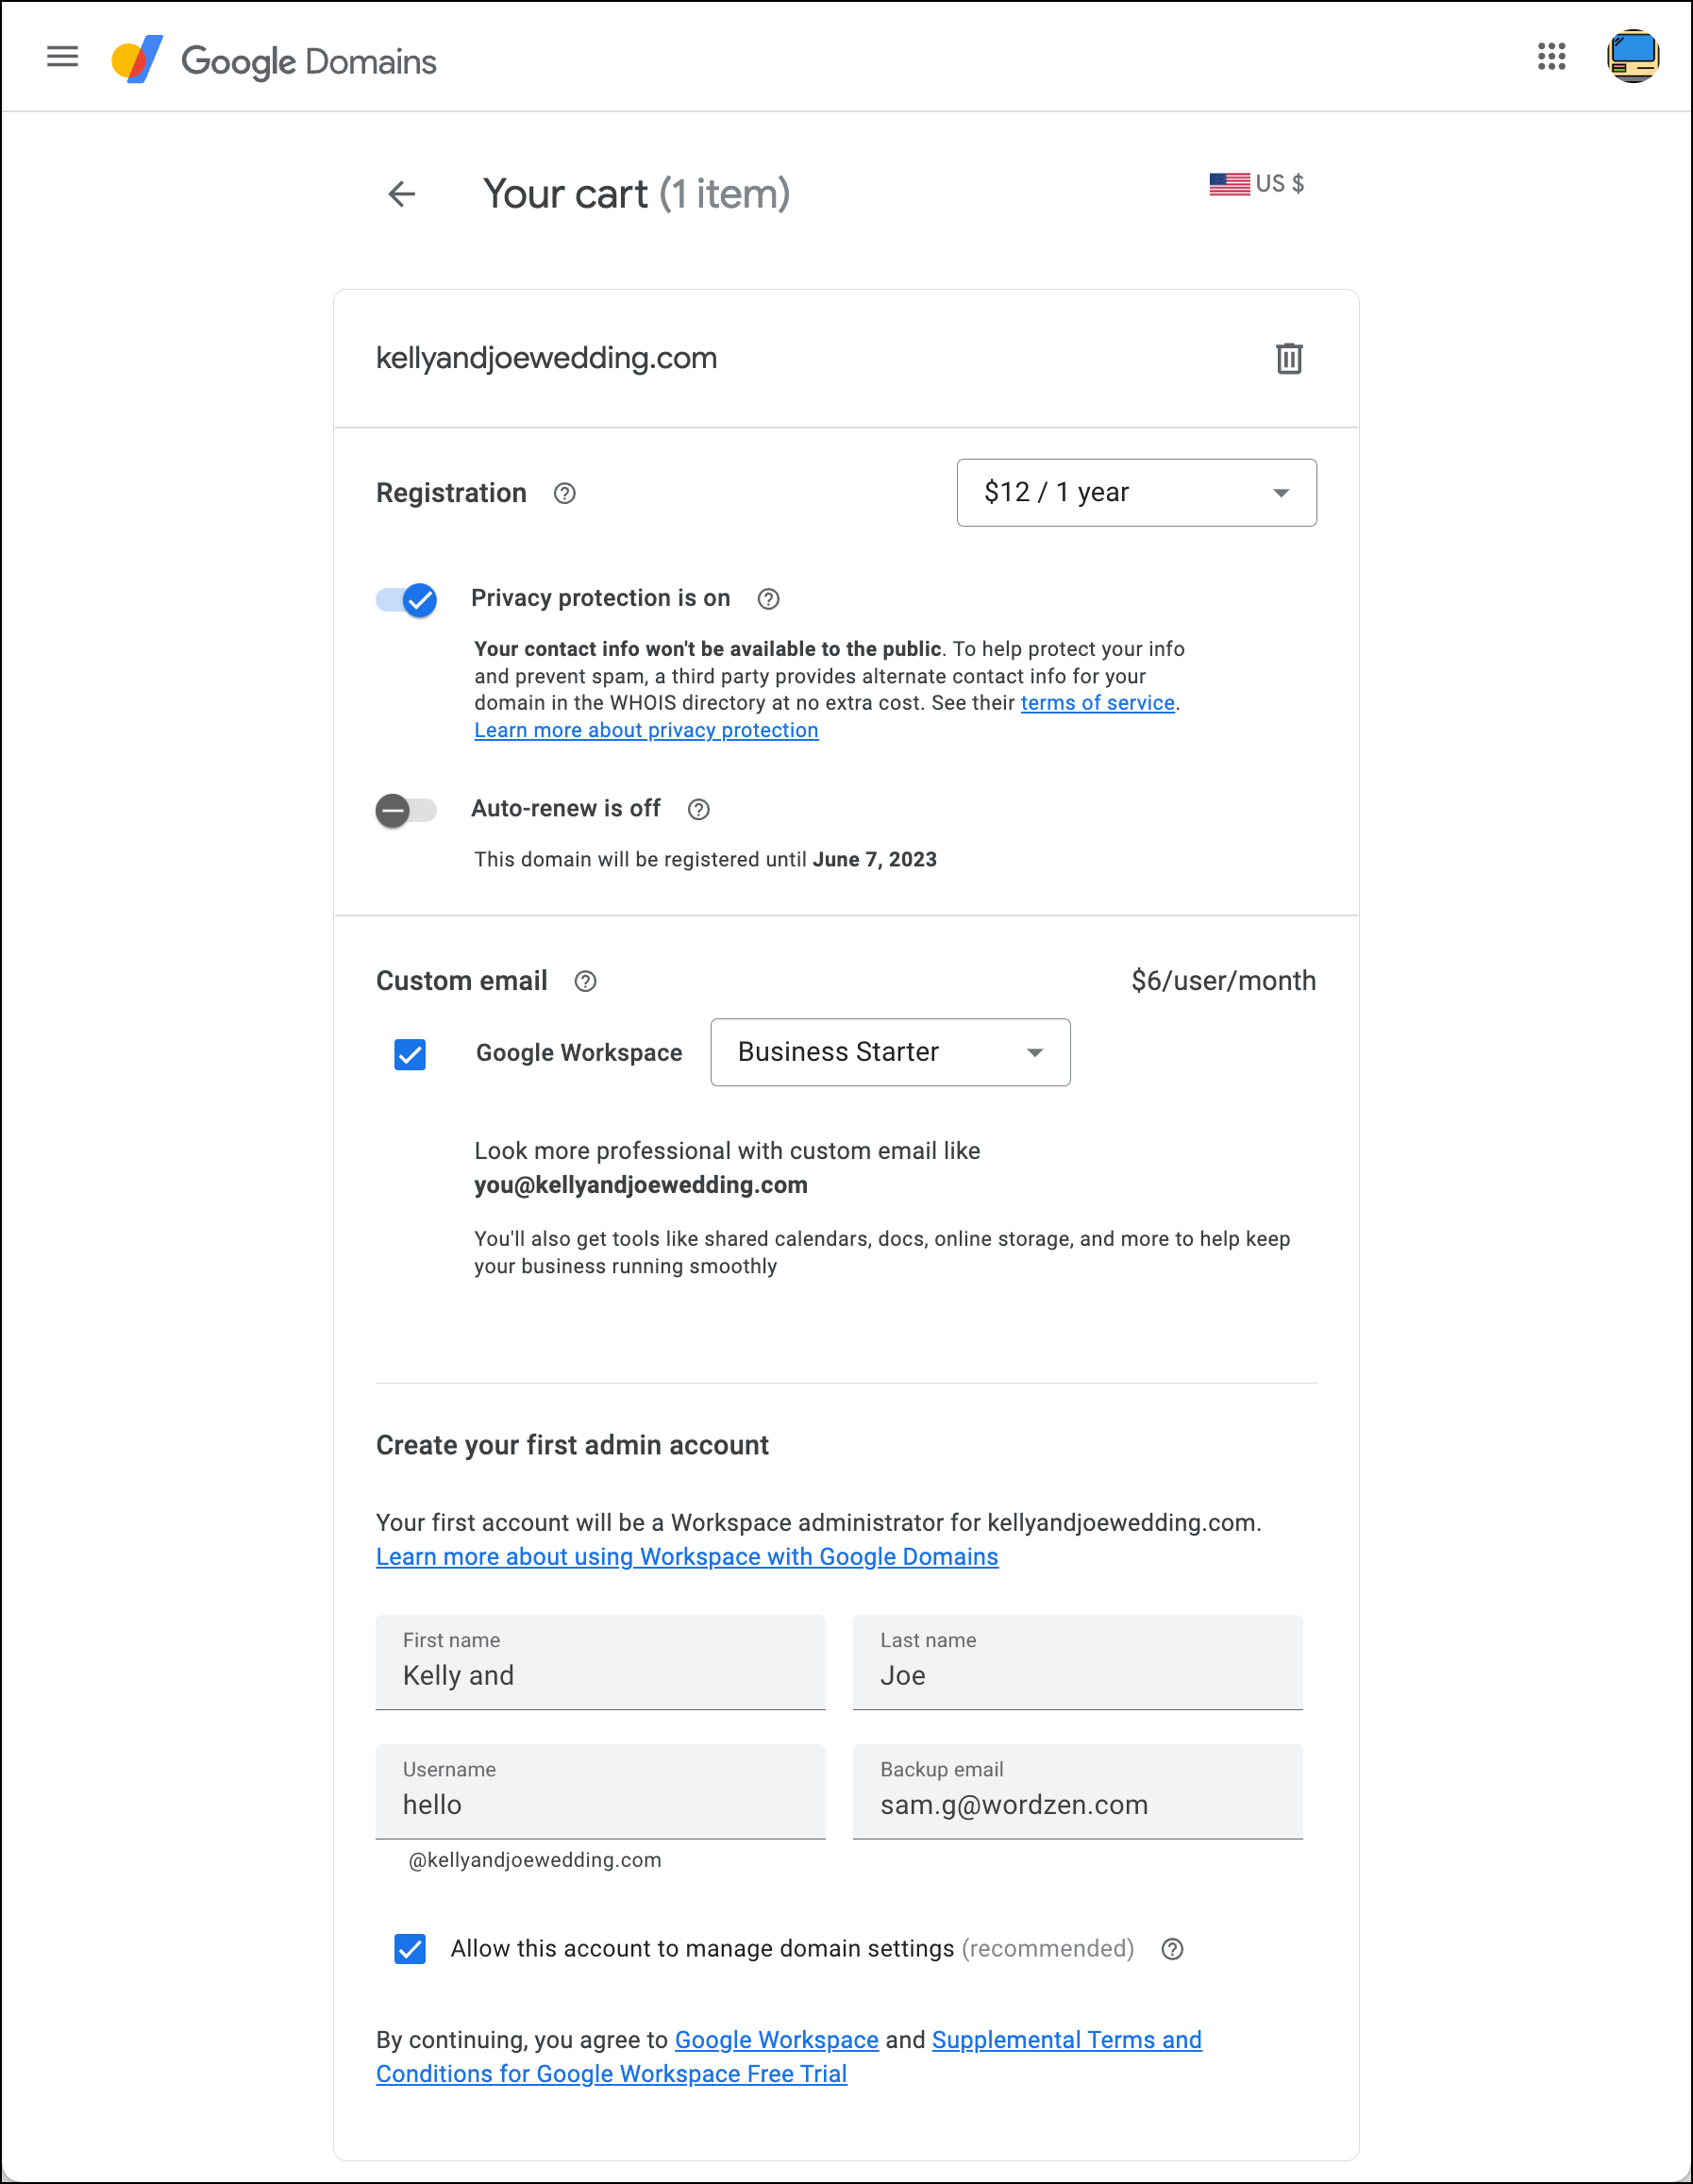
The last step here is to pay for the domain… and it’s all yours. You can then check out the Email tab to make sure your new email account is good to go.
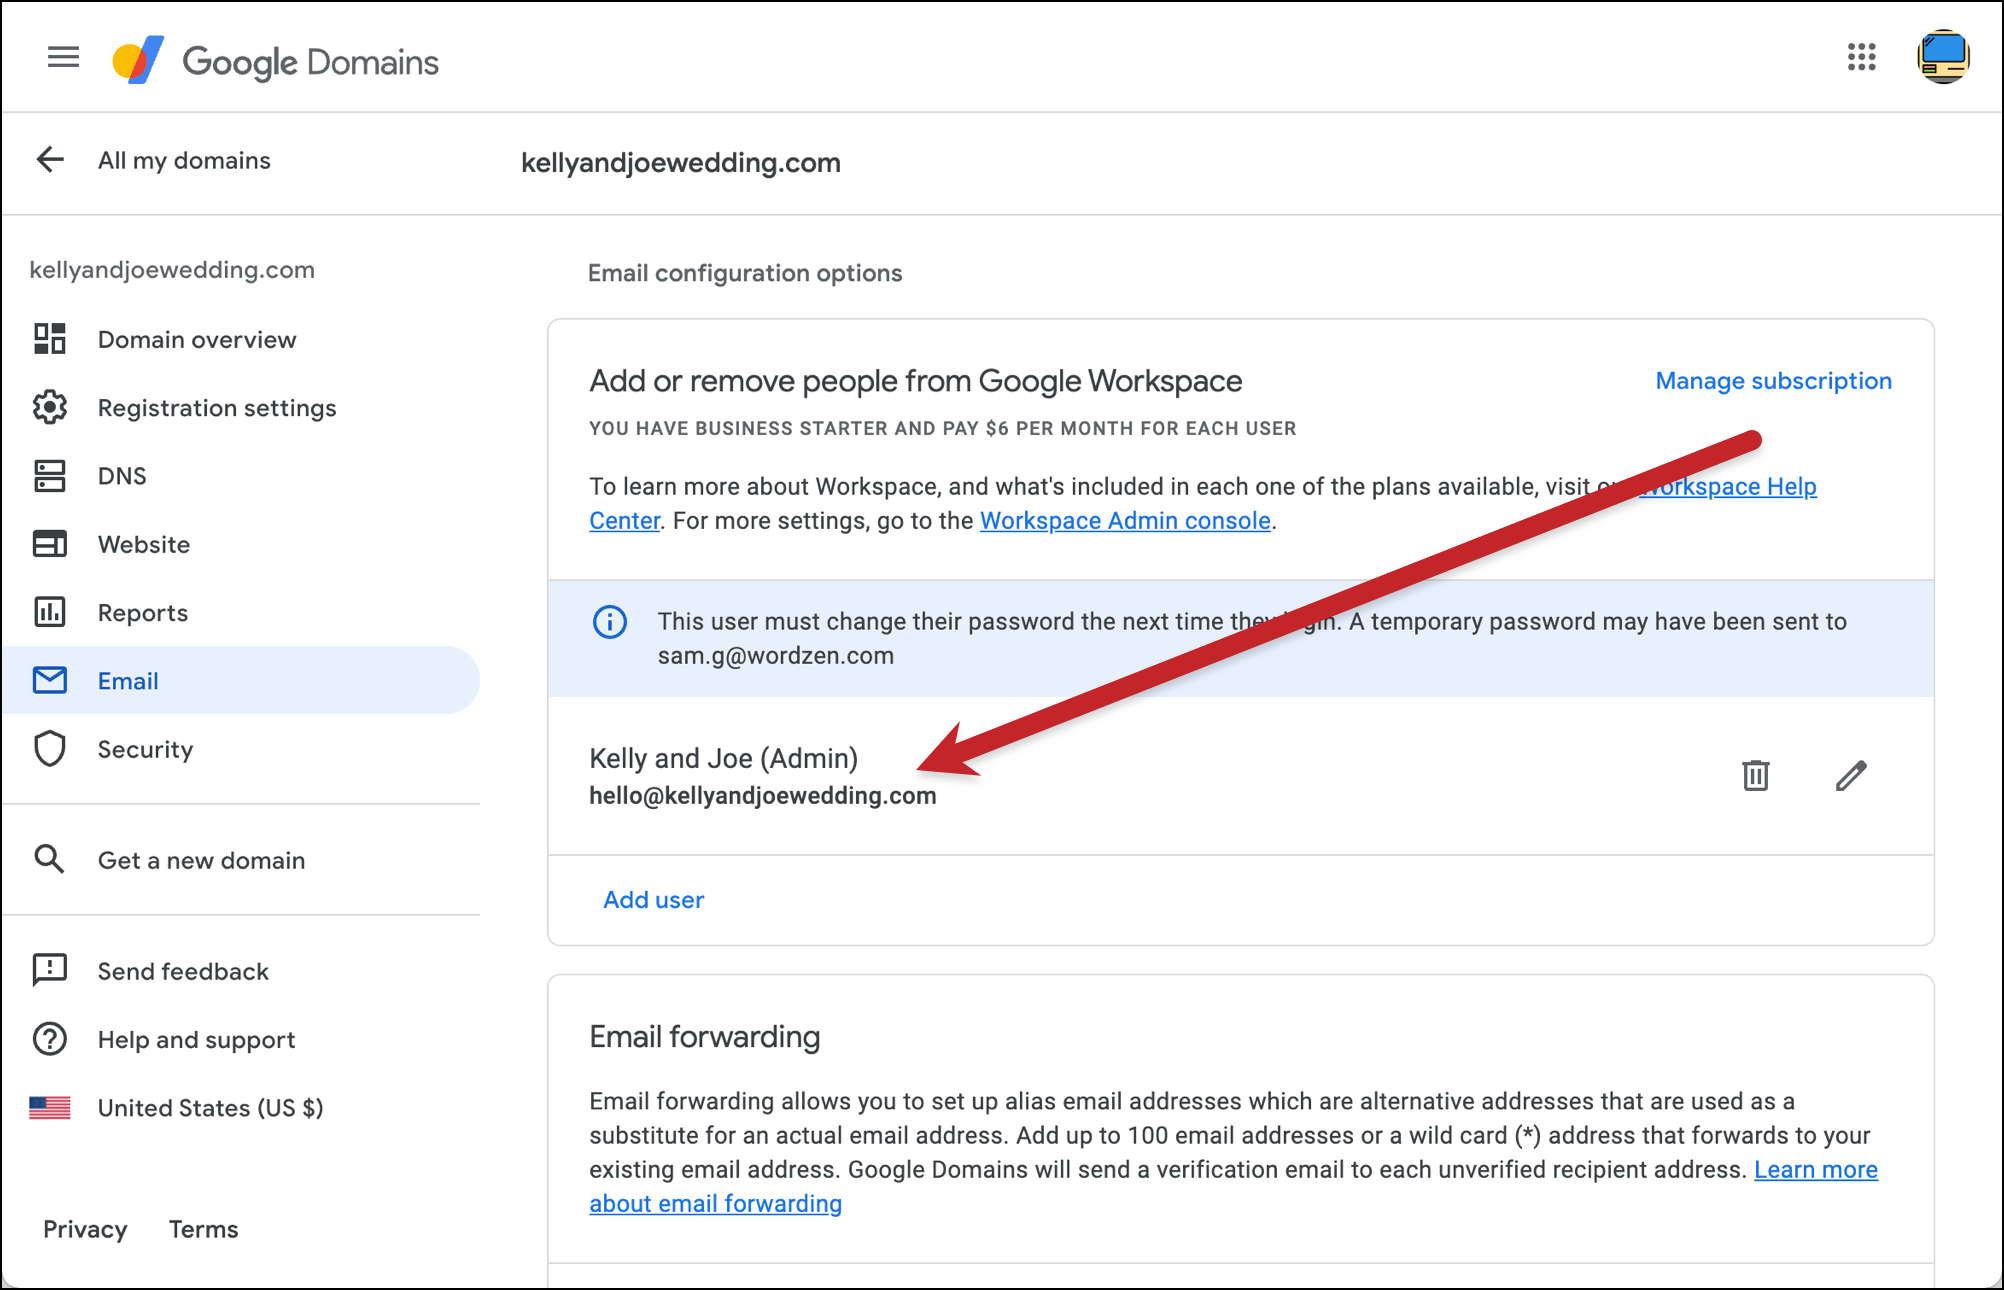
Step 3: Log into your new email address
Head over to your regular Gmail inbox (whatever email address you used during the domain setup). You’ll see an email with instructions to log into your new email.
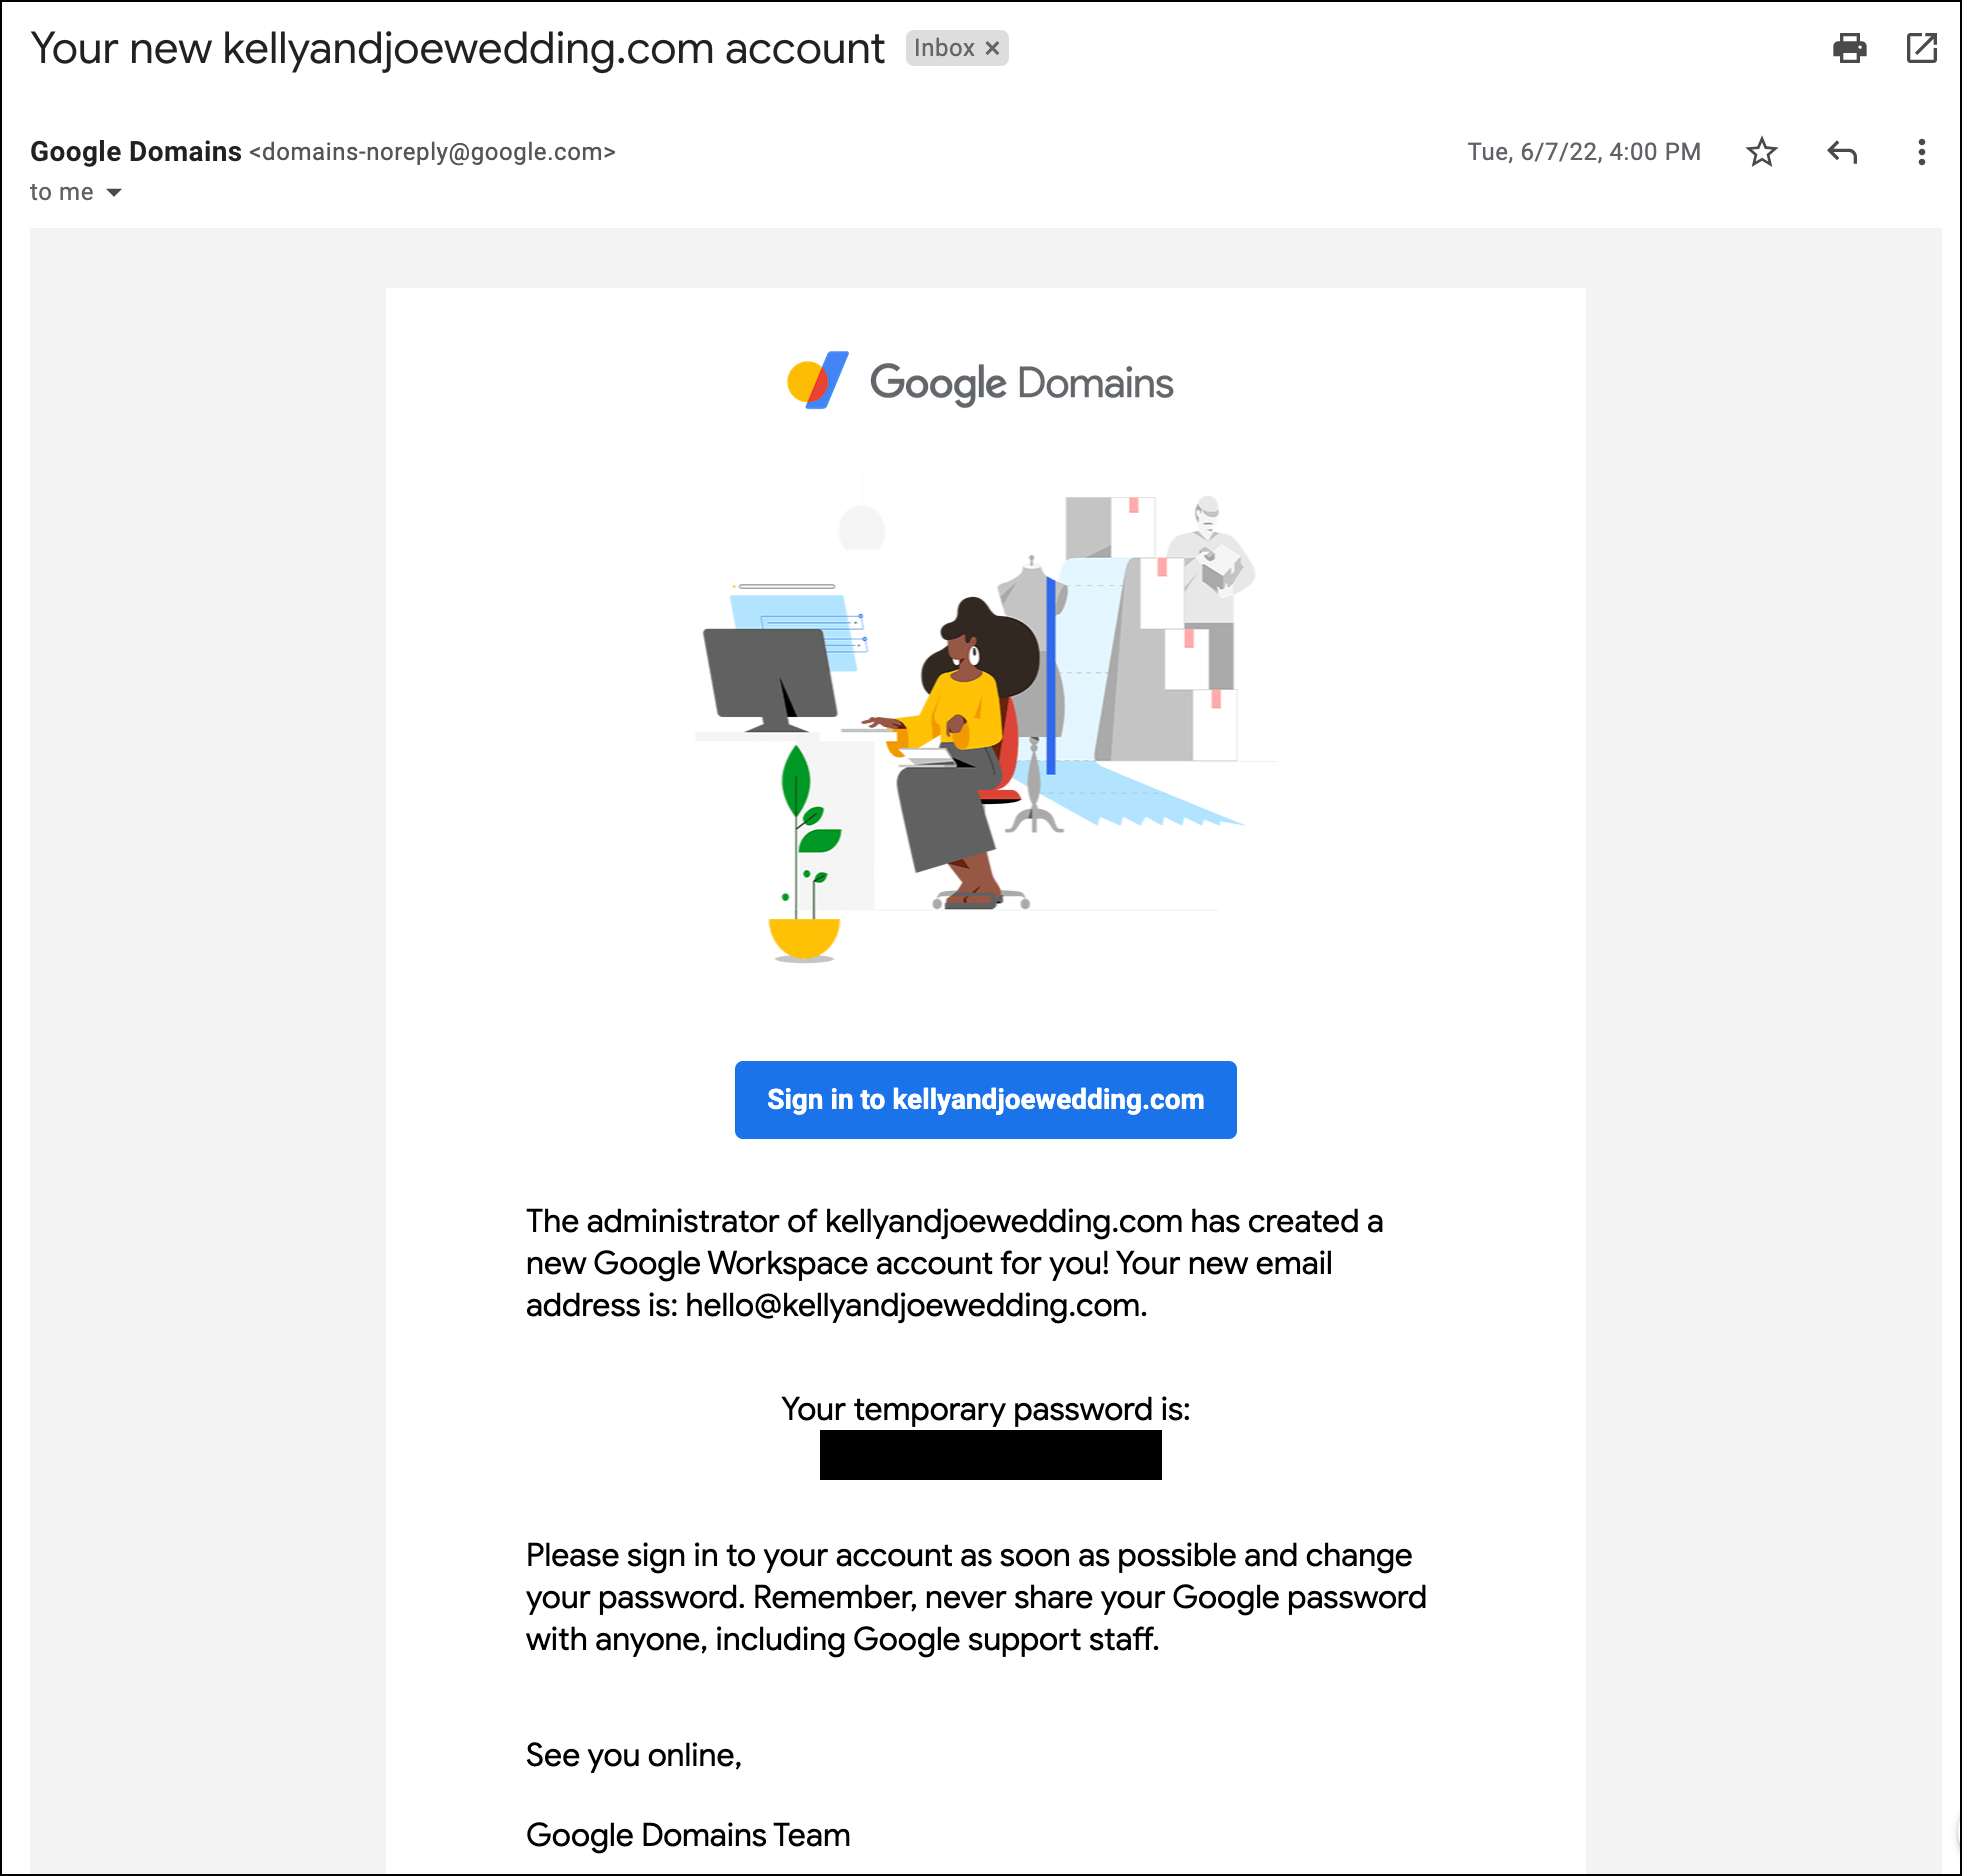
Click the link in that email to log into your new wedding email address with the temporary password Google provides.
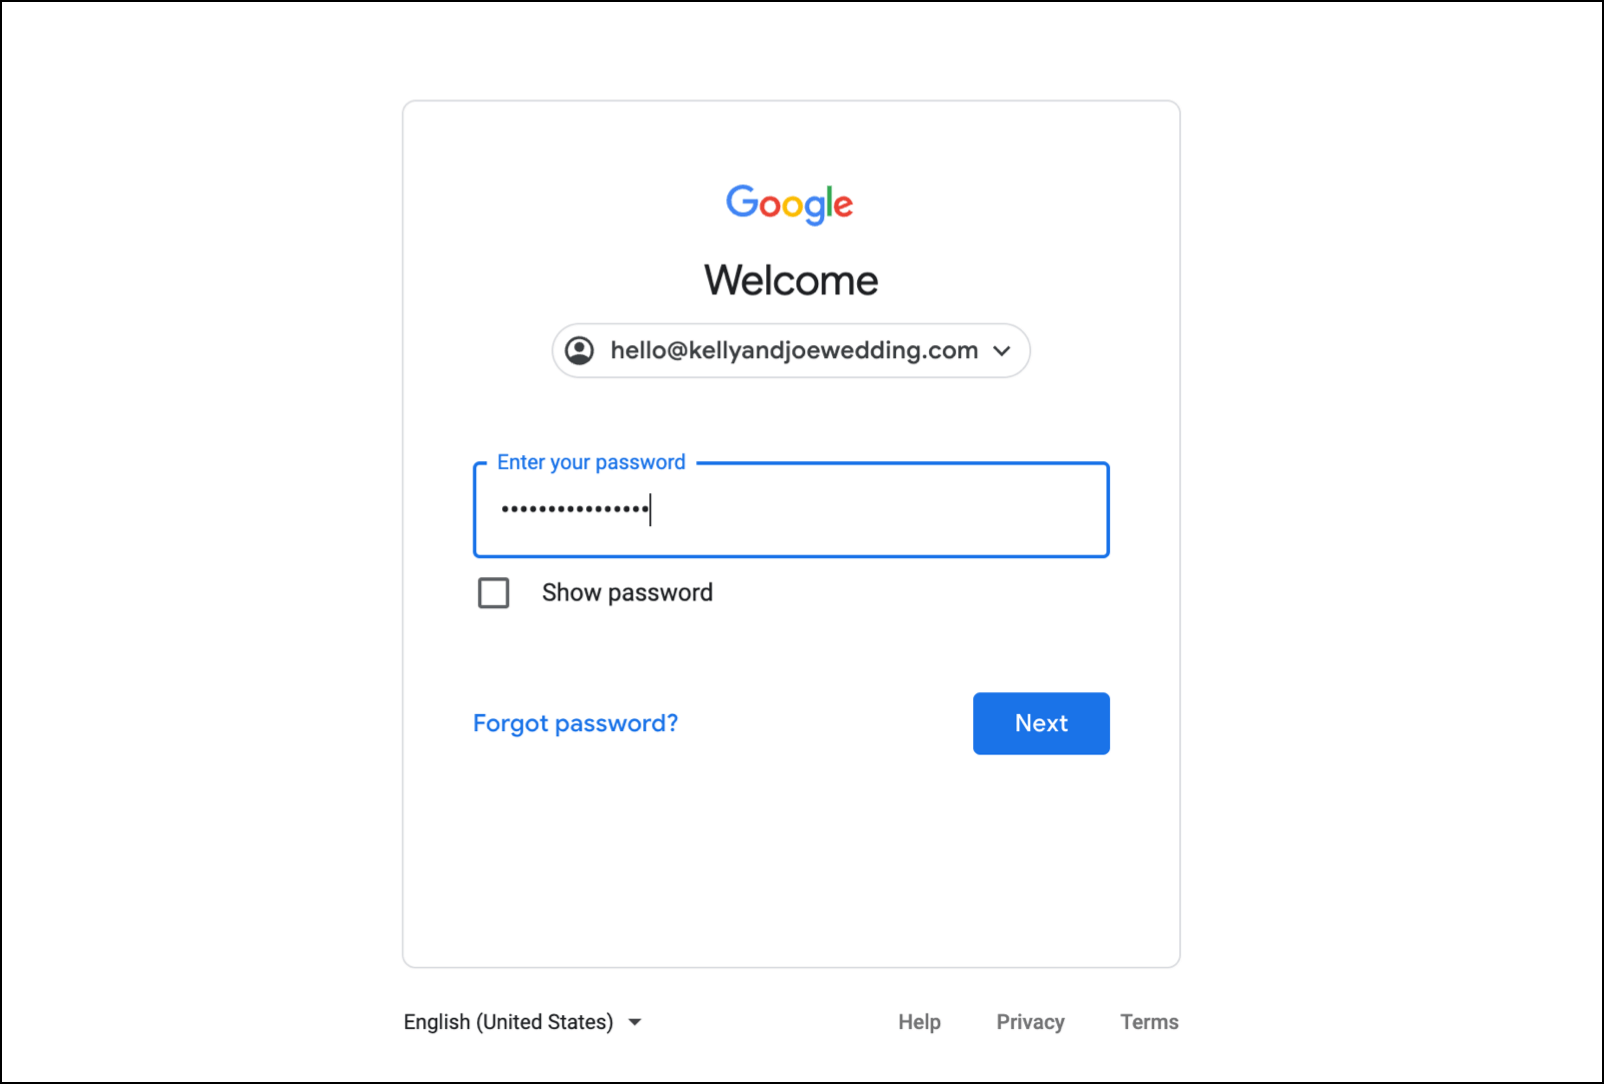
Accept the terms of service, then create a new password.
That will take you to your new inbox. You’ll also have the option to create a new Google Chrome profile for this account (if you’re using Chrome). Chrome profiles are a good way to keep Google accounts separate, so this is a good idea.
Step 4: You’re all set!
Your wedding email with a custom domain name is all set. You can send yourself a test email here to see how it looks. (Although you should give it a little while for the DNS settings to propagate; you don’t have to manually set up DNS settings but you do have to wait for them. In my experiment for this article, it took around 15 minutes before I could send emails from my new address.)
And you can also use this domain to set up your wedding website.
3 Extra Things to Set Up with Your Wedding Email Address
Whether you set up a gmail.com wedding email address or used a custom domain, there are a few things you should take care of now before you start sending emails. Or before you get so busy with other things you forget.
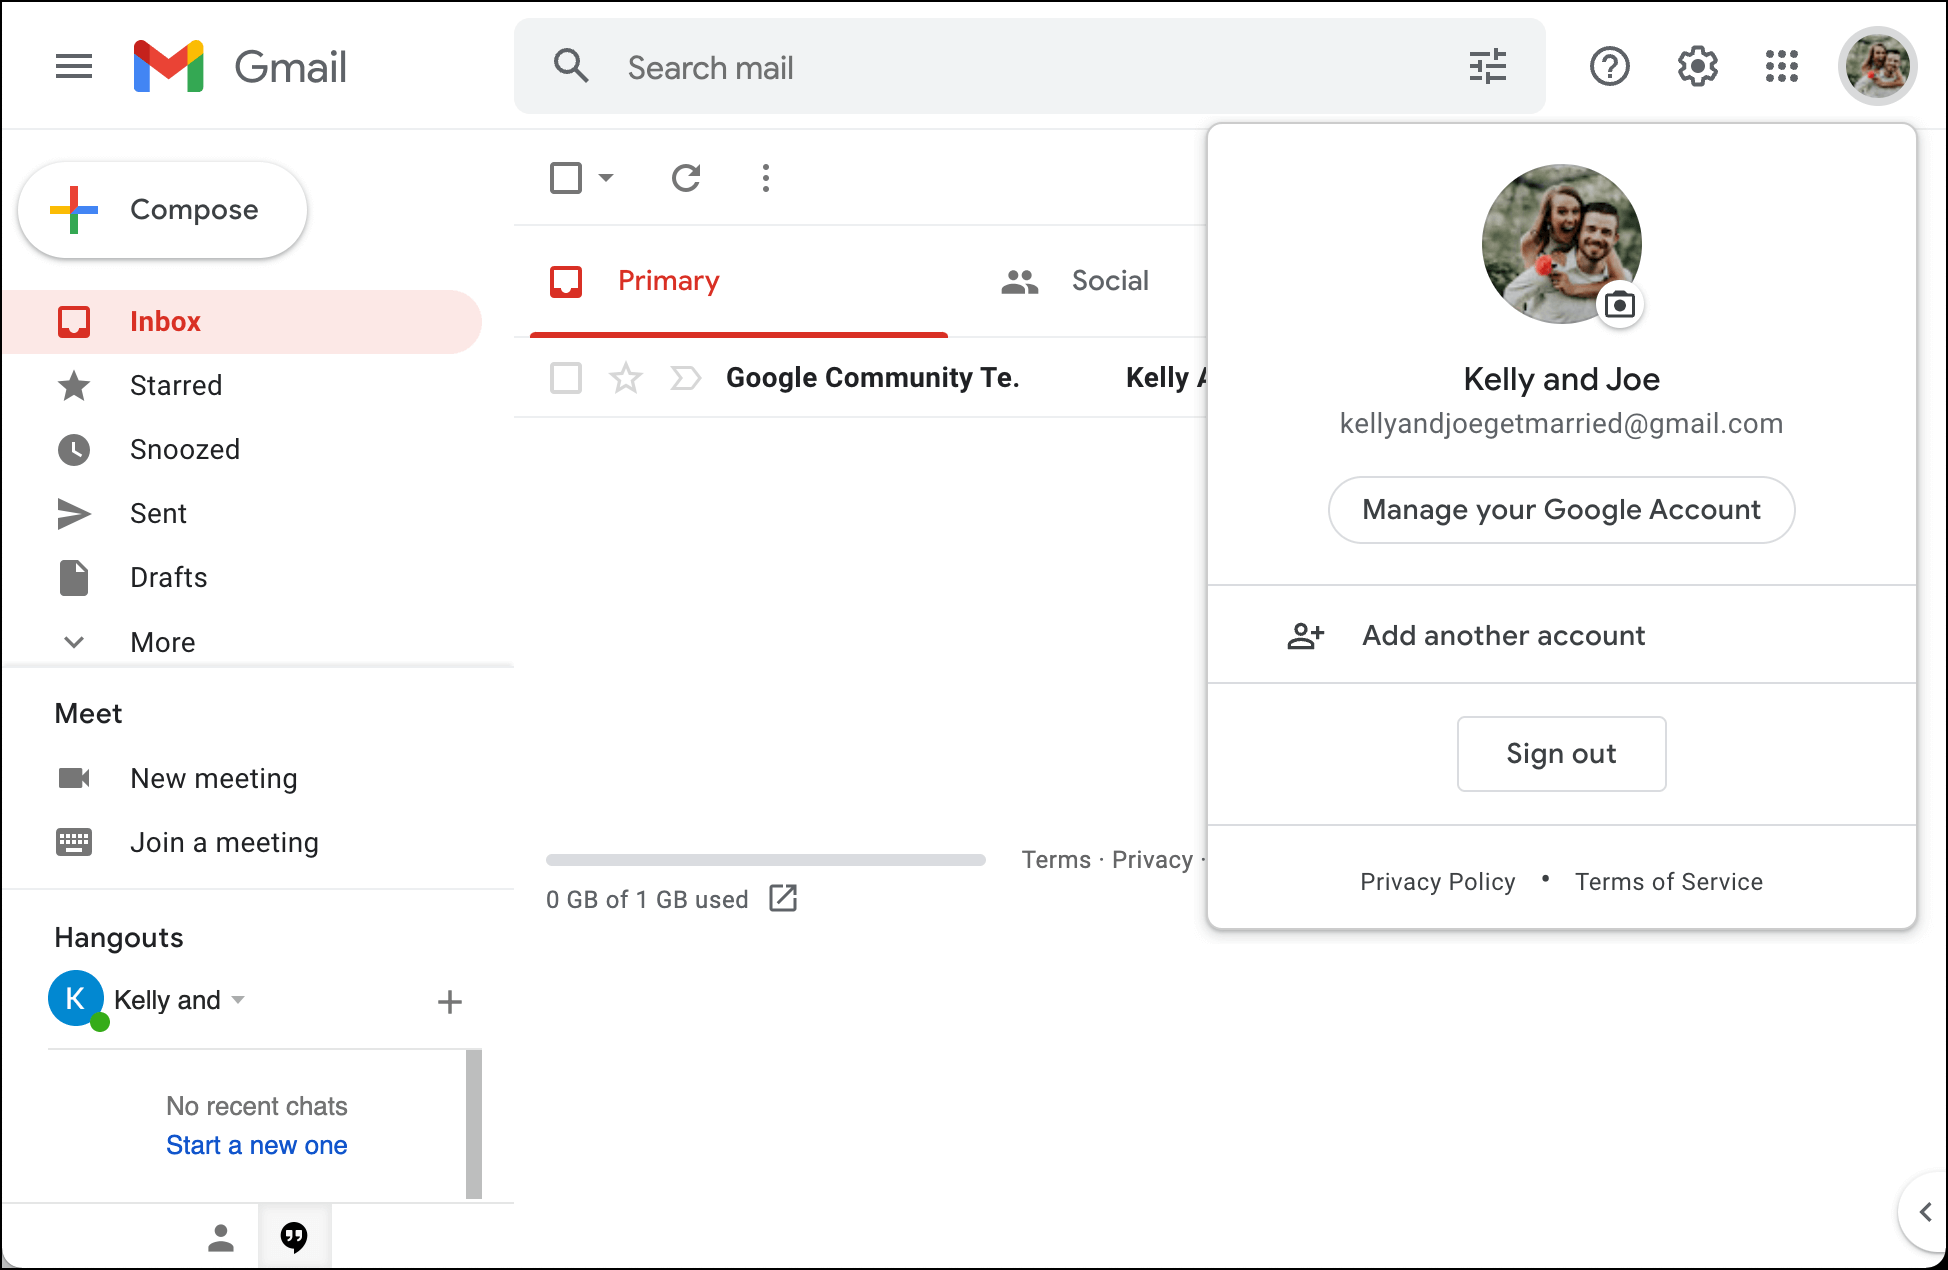
Add your photo to the profile
You can add a photo to the profile by clicking on the little letter circle in the top right, then on the camera icon.
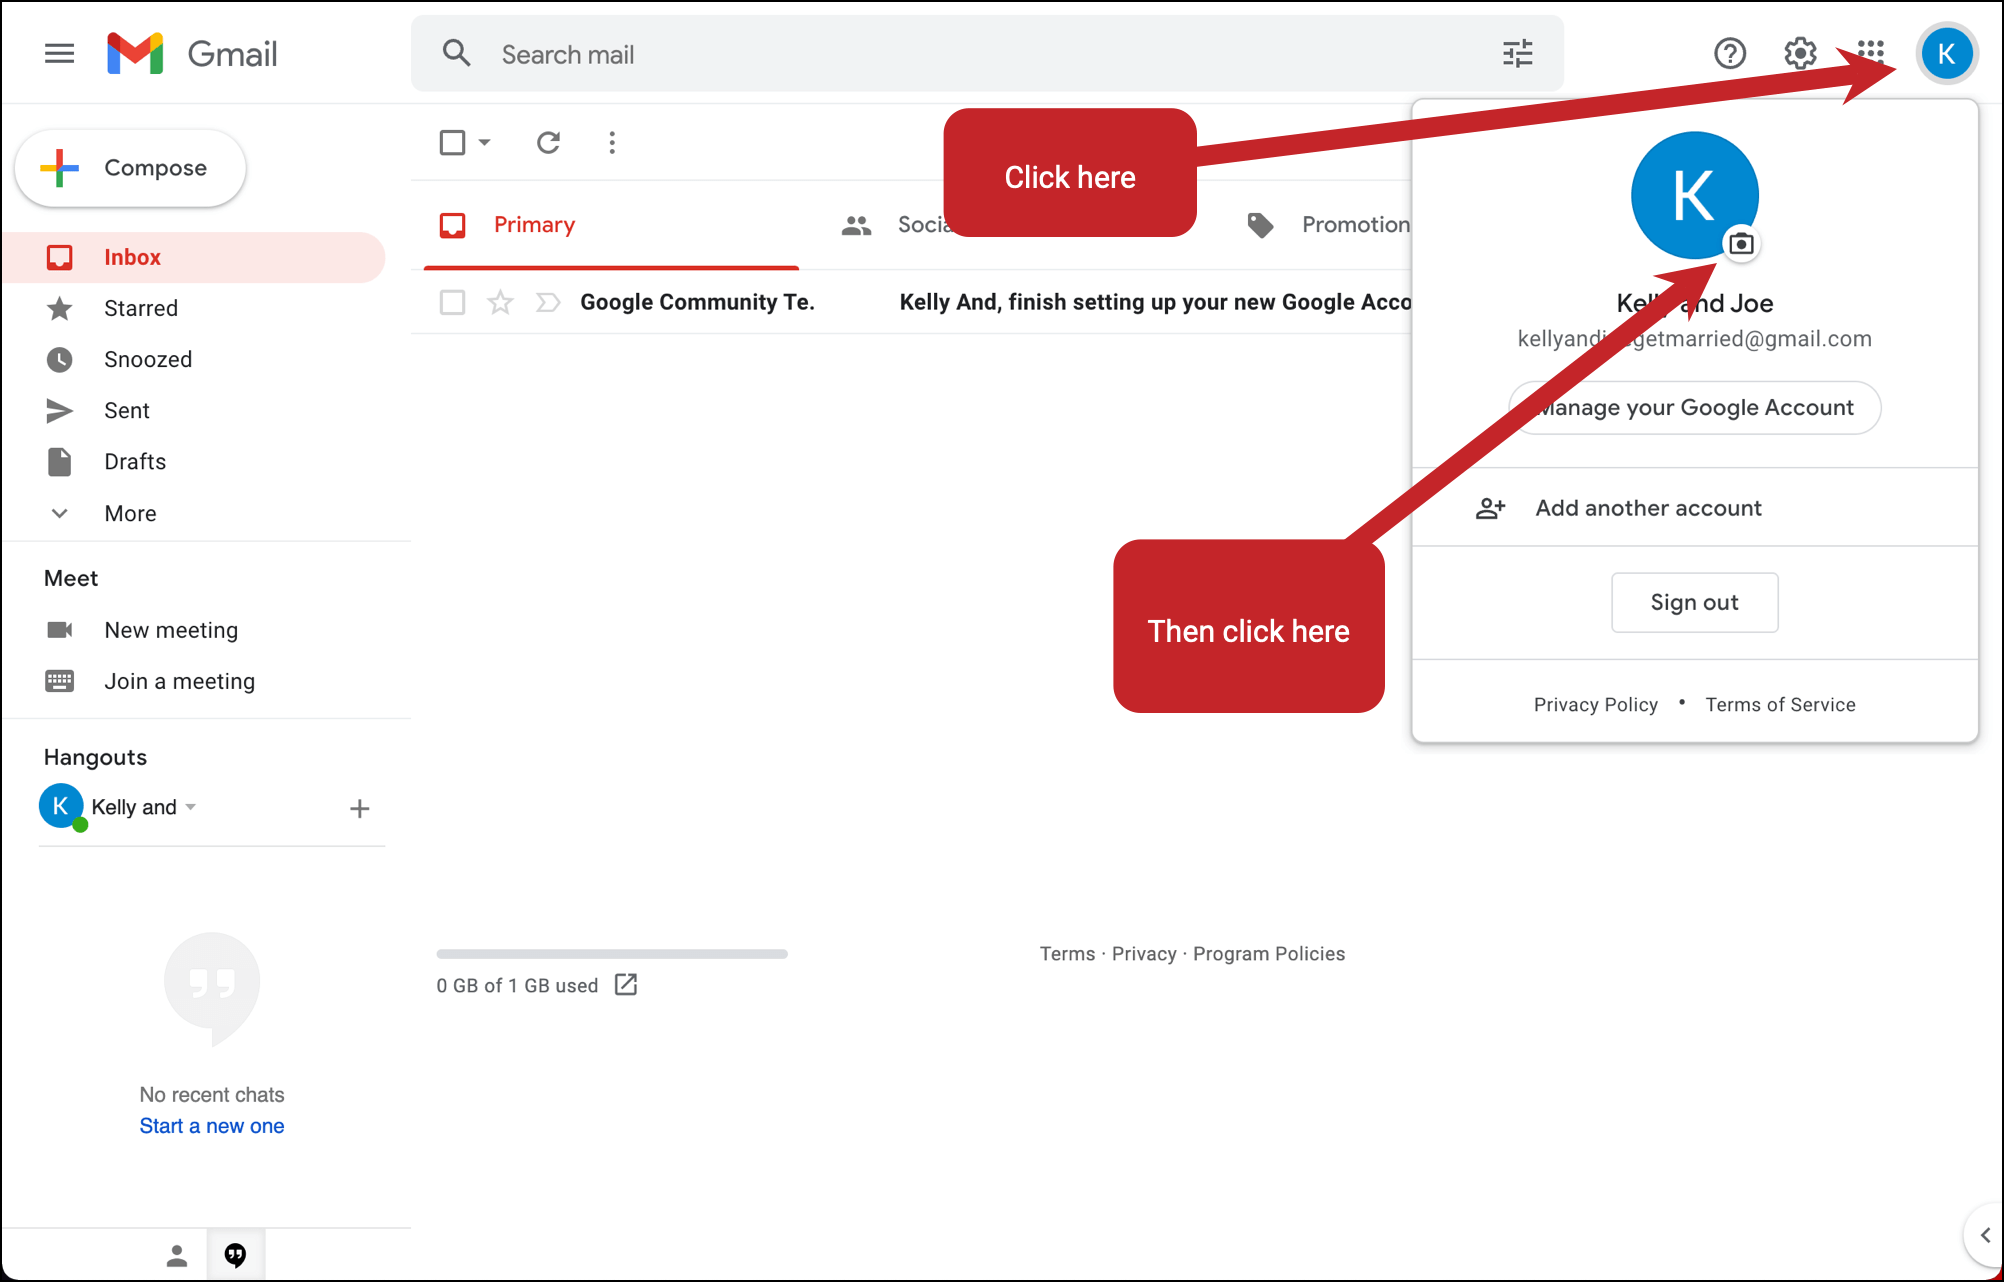
Then upload a picture from your computer. That picture will now appear next to your emails in people’s inboxes (it can take up to a day before it does; the picture needs to work its way through Google’s servers).
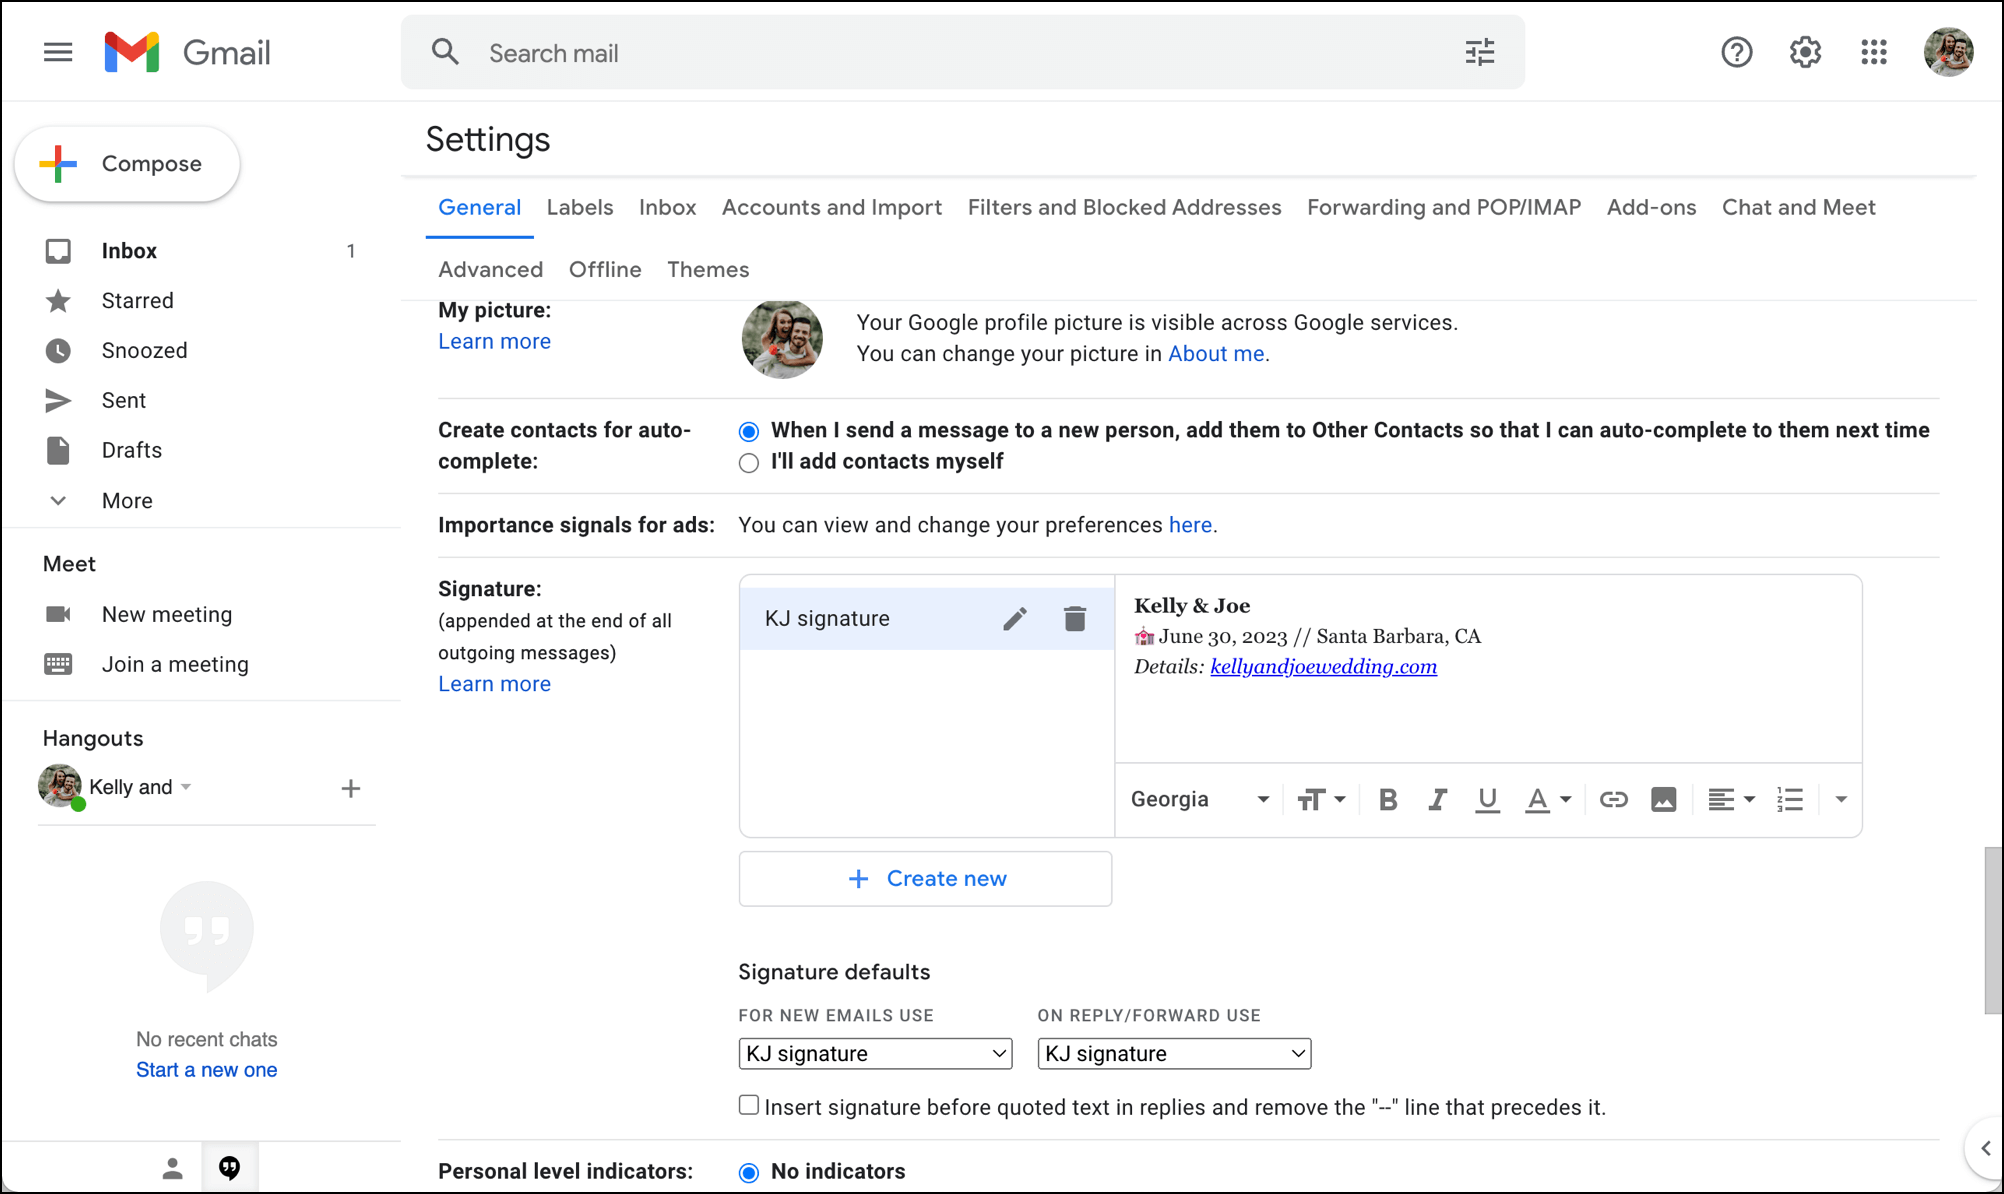
Add an email signature
If you want an email signature for this account, you can set it up now.
You should put your wedding website in the signature. Probably don’t put your phone numbers — one of the big reasons you have this email is so people aren’t endlessly texting questions your way.
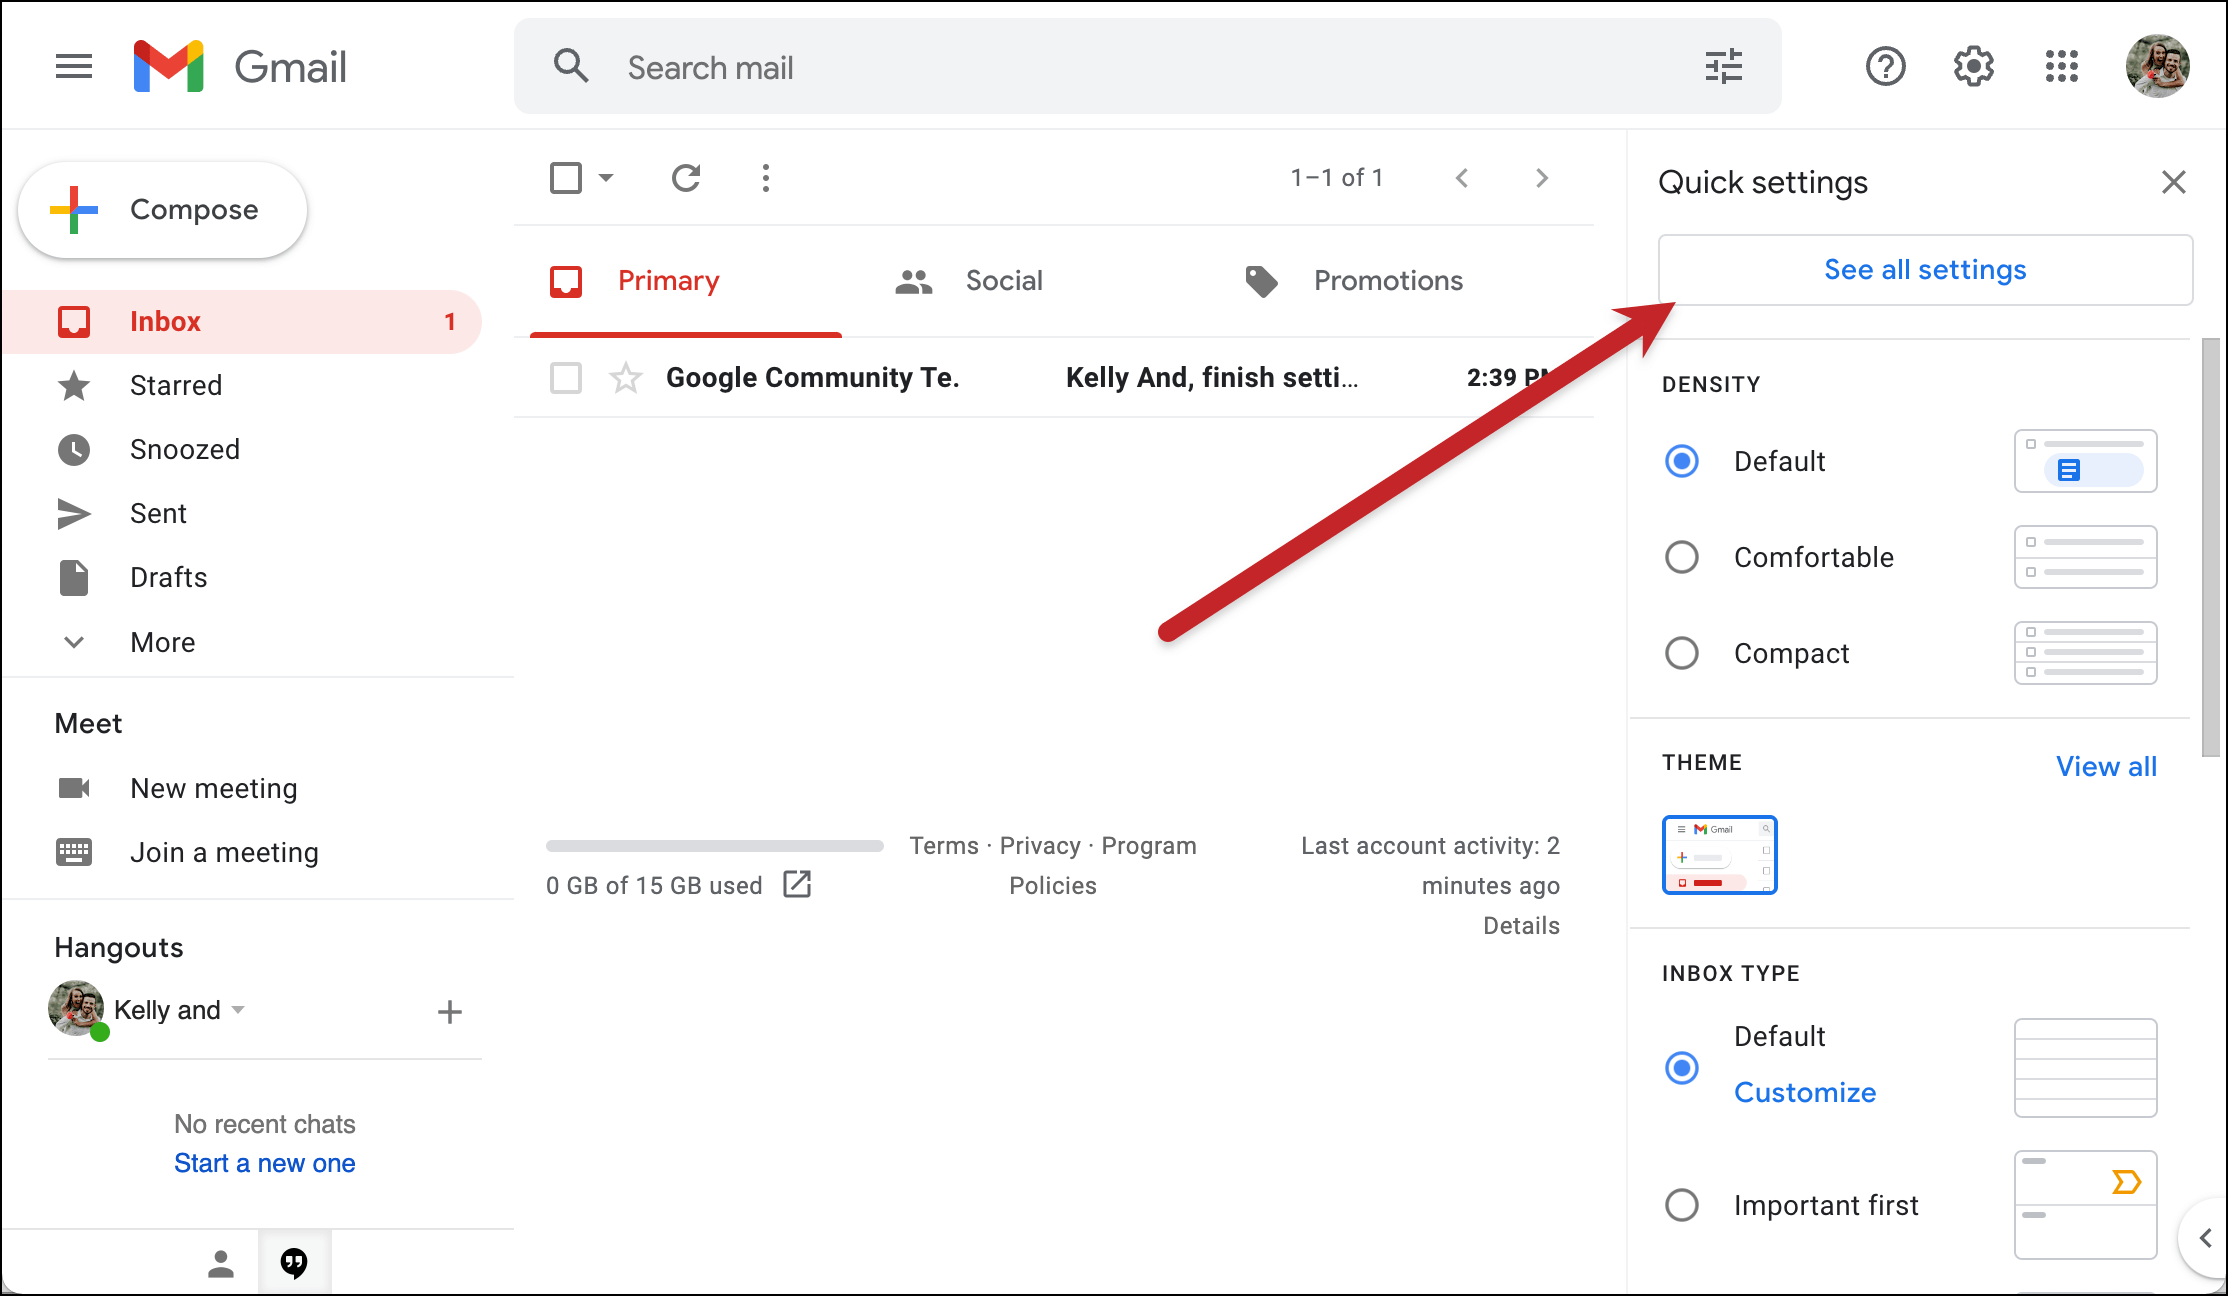
Head into the Gmail settings and click the top button to “See all settings.”
Scroll down to “Signature.” Then create a new signature.
Scroll to the bottom of the settings and click “Save Changes.”
Now your signature will appear by default in your emails.
Do *something* to make sure you check this email address
Congrats, you have a new email address for your wedding. That also means… you have a new email address you need to check.
How will you remember to do that? Make sure you do one of these things to help your future self out:
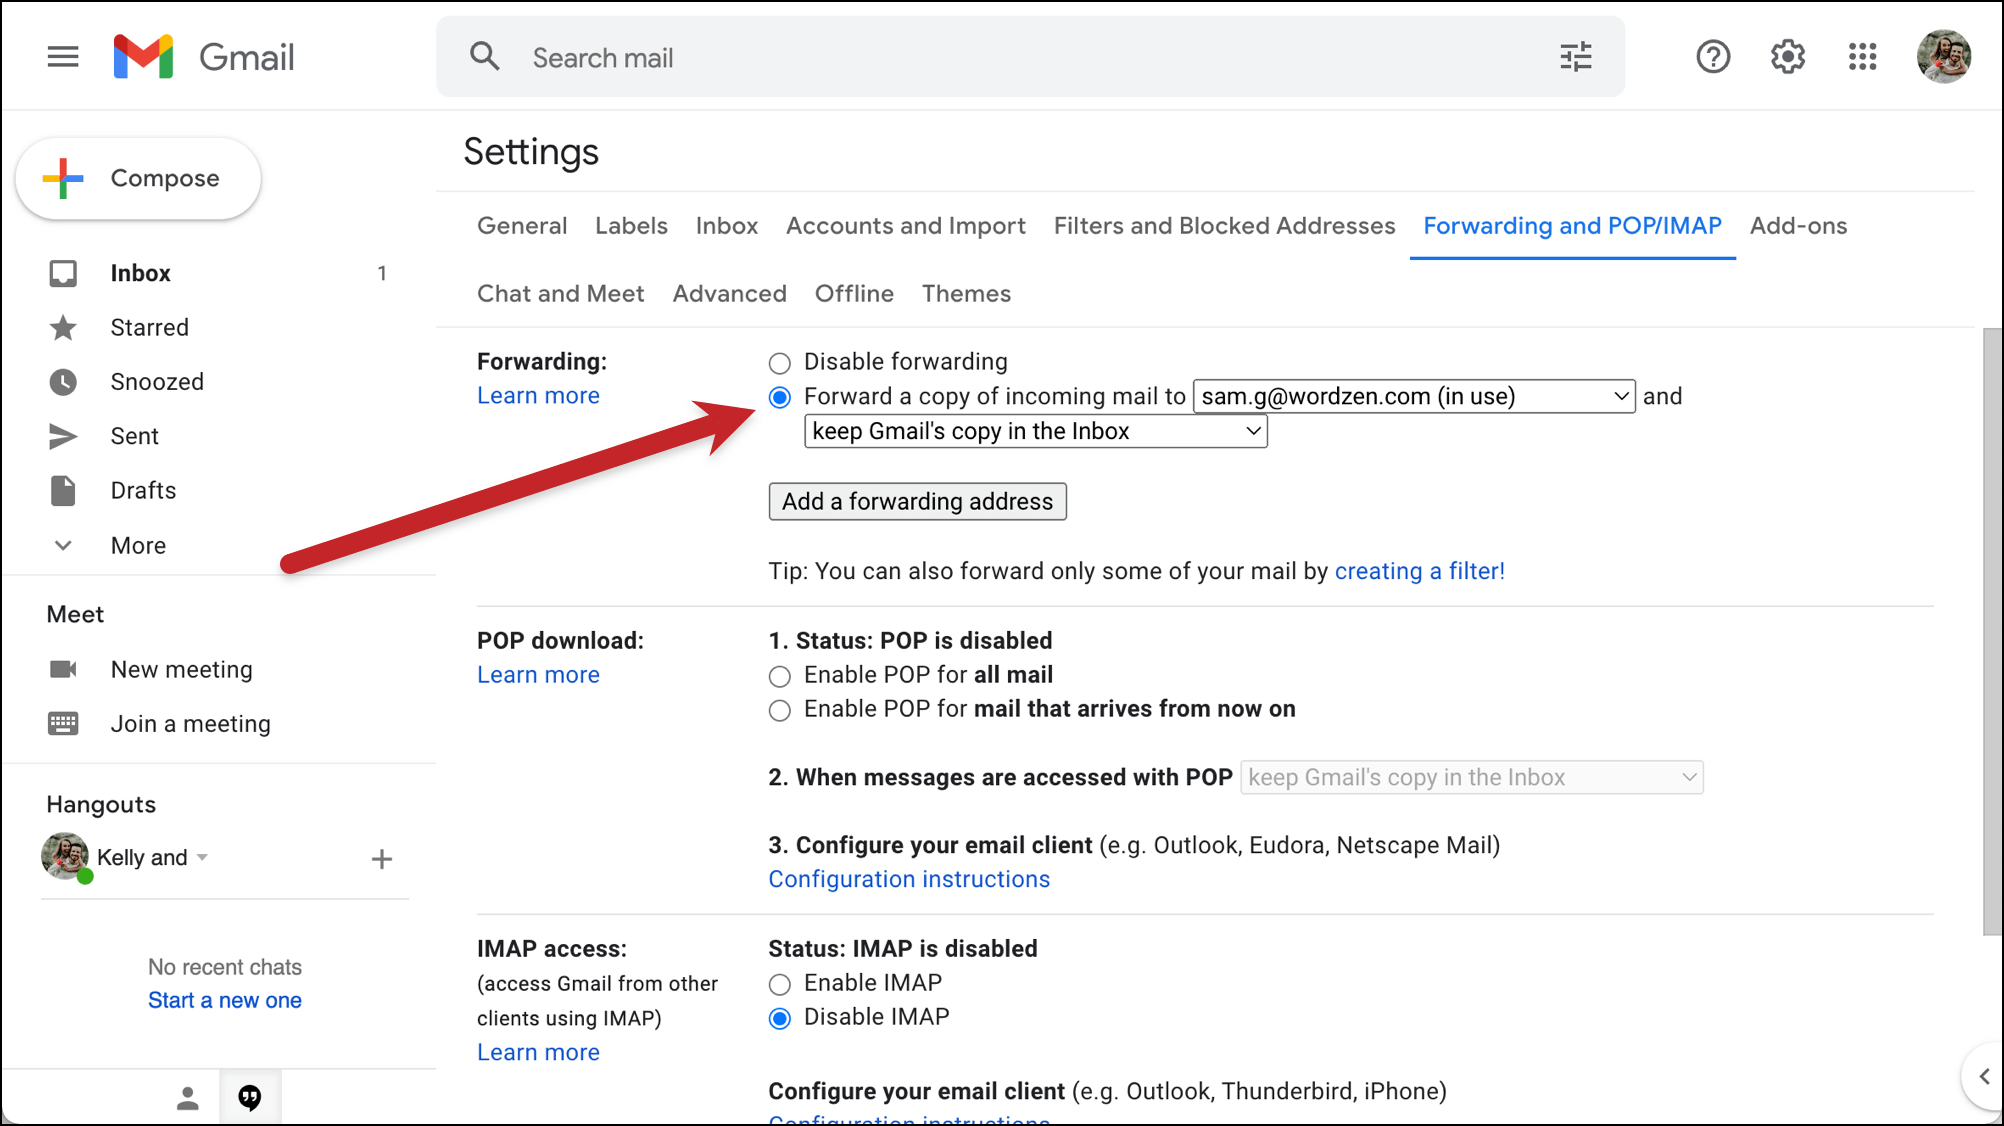
- Add the account to your phone so you check it there.
- Set up forwarding (as I did in the screenshot) so the emails from this account go to your main account. That ruins the whole “not cluttering up your inbox” benefit of this separate address, but at least you won’t forget it.
- Set a recurring calendar reminder to check this inbox every few days.
- Open the inbox in a new tab in your browser and don’t close it for several months.
3 Emails You Can Send with Your New Wedding Email Address
To wrap up this article, let’s cover some of the things you can do with your new wedding email address.
First up: You’ll need to install GMass, which will allow you to send personalized mass emails right from this Gmail account. GMass is a email Chrome extension that has become extraordinarily popular with people who are using email to manage some (or even all) of their wedding correspondence.
Install GMass with your new wedding email account by downloading the Chrome extension free to your new Google account.
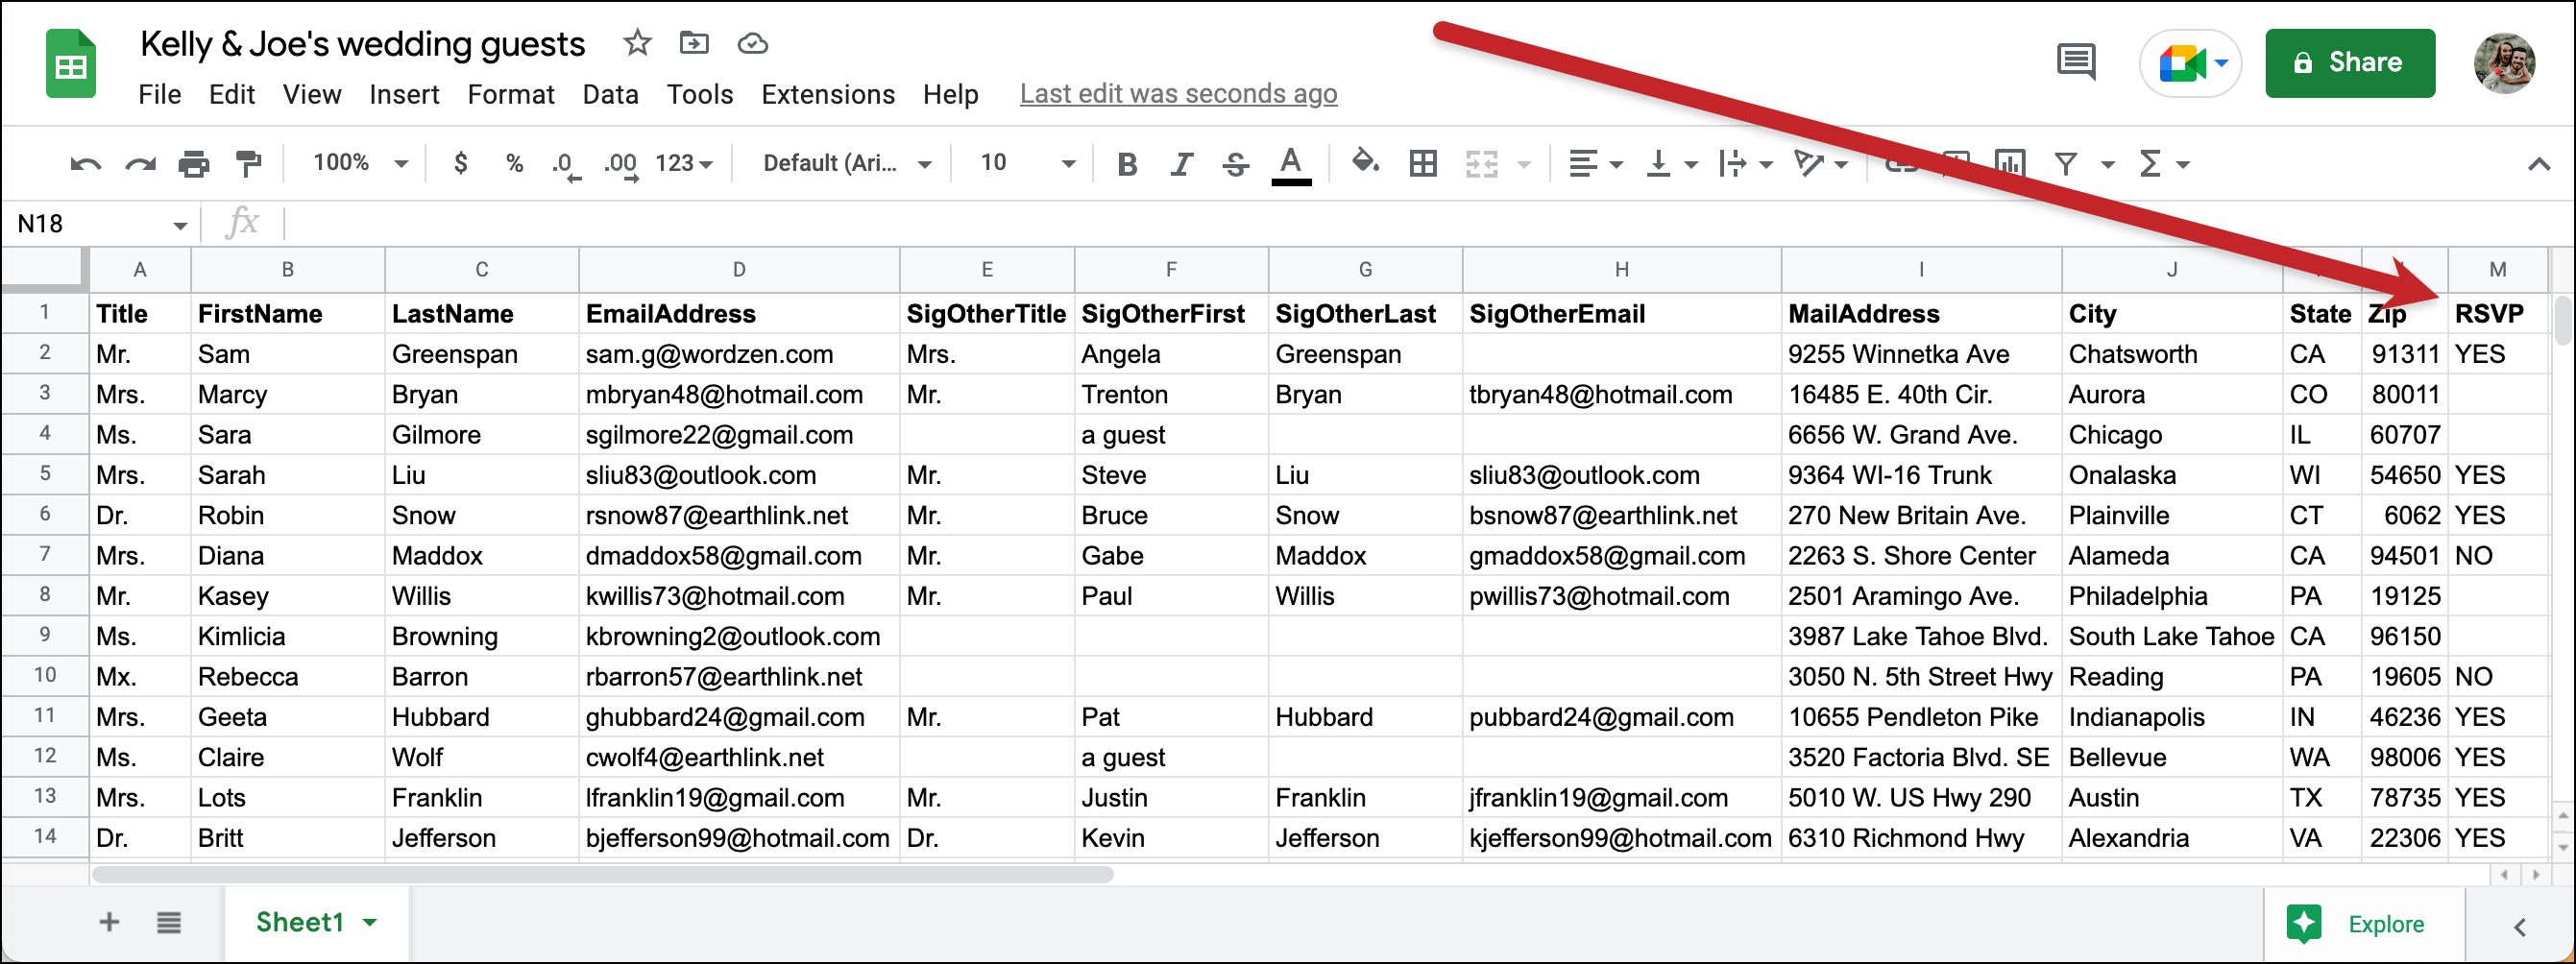
You should also make sure you set up your Google Sheet of your wedding guests in your new account. (Here’s my sample below.)

Here are three examples of emails you can send with your wedding emails.
Last-minute wedding details
You can send a personalized mass email to everyone with last-minute details right before your wedding weekend. The best part: You can set it up a few months in advance then schedule it to go out right on time.
Set up the email
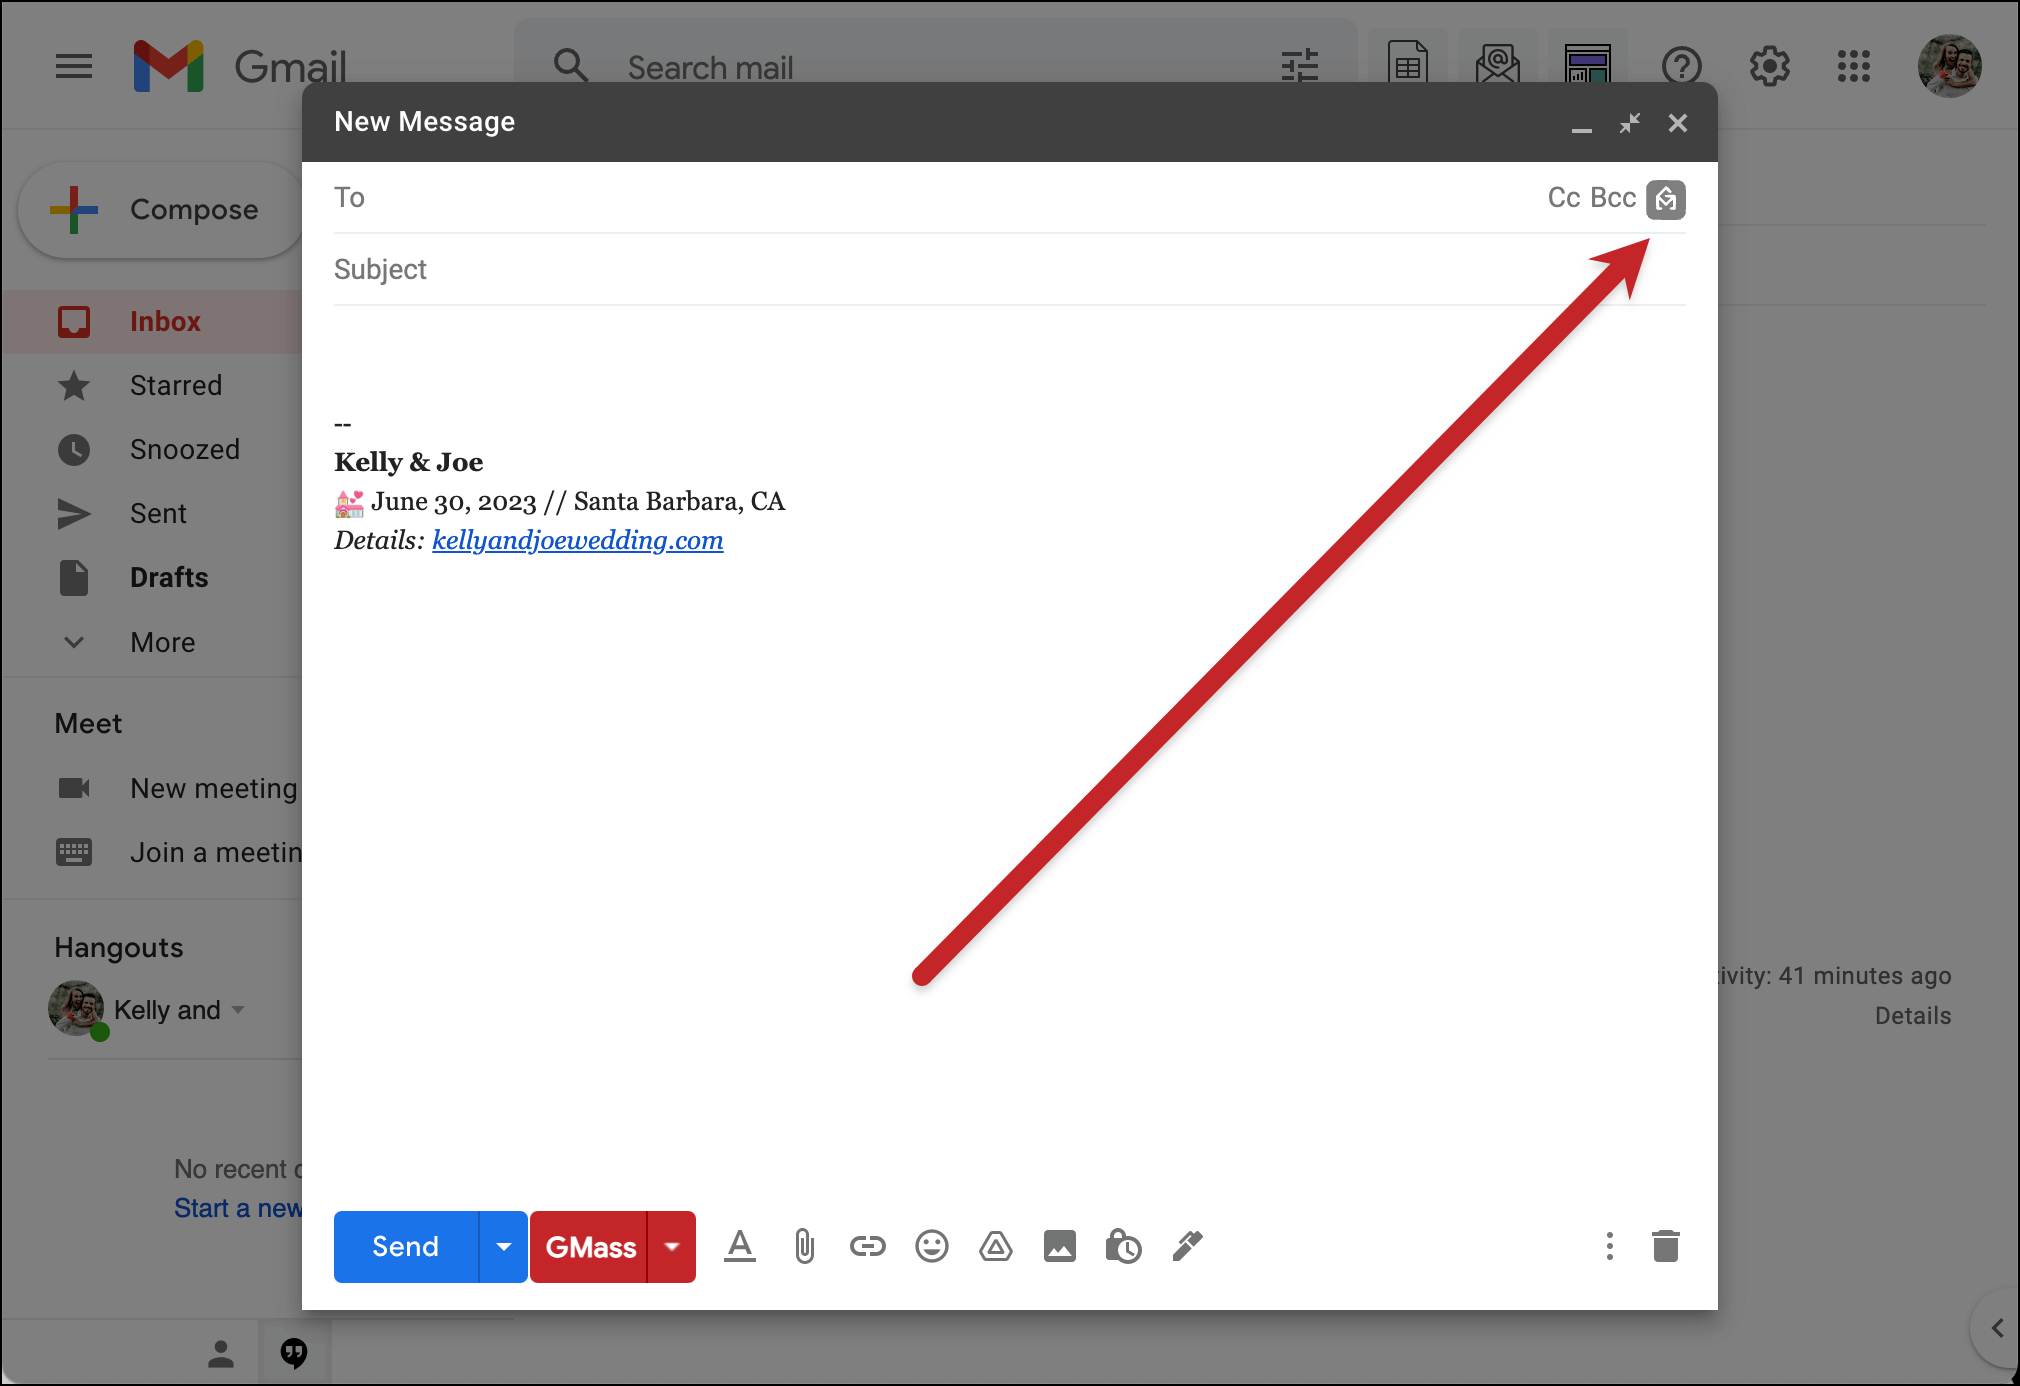
Open a new compose window in Gmail. Click into the To/Recipients field. Then click the little GMass icon that appears to connect to your spreadsheet of wedding guests.
Choose to add recipients “From a Google Sheet.” Then give GMass any necessary permissions to access your Google Sheets. 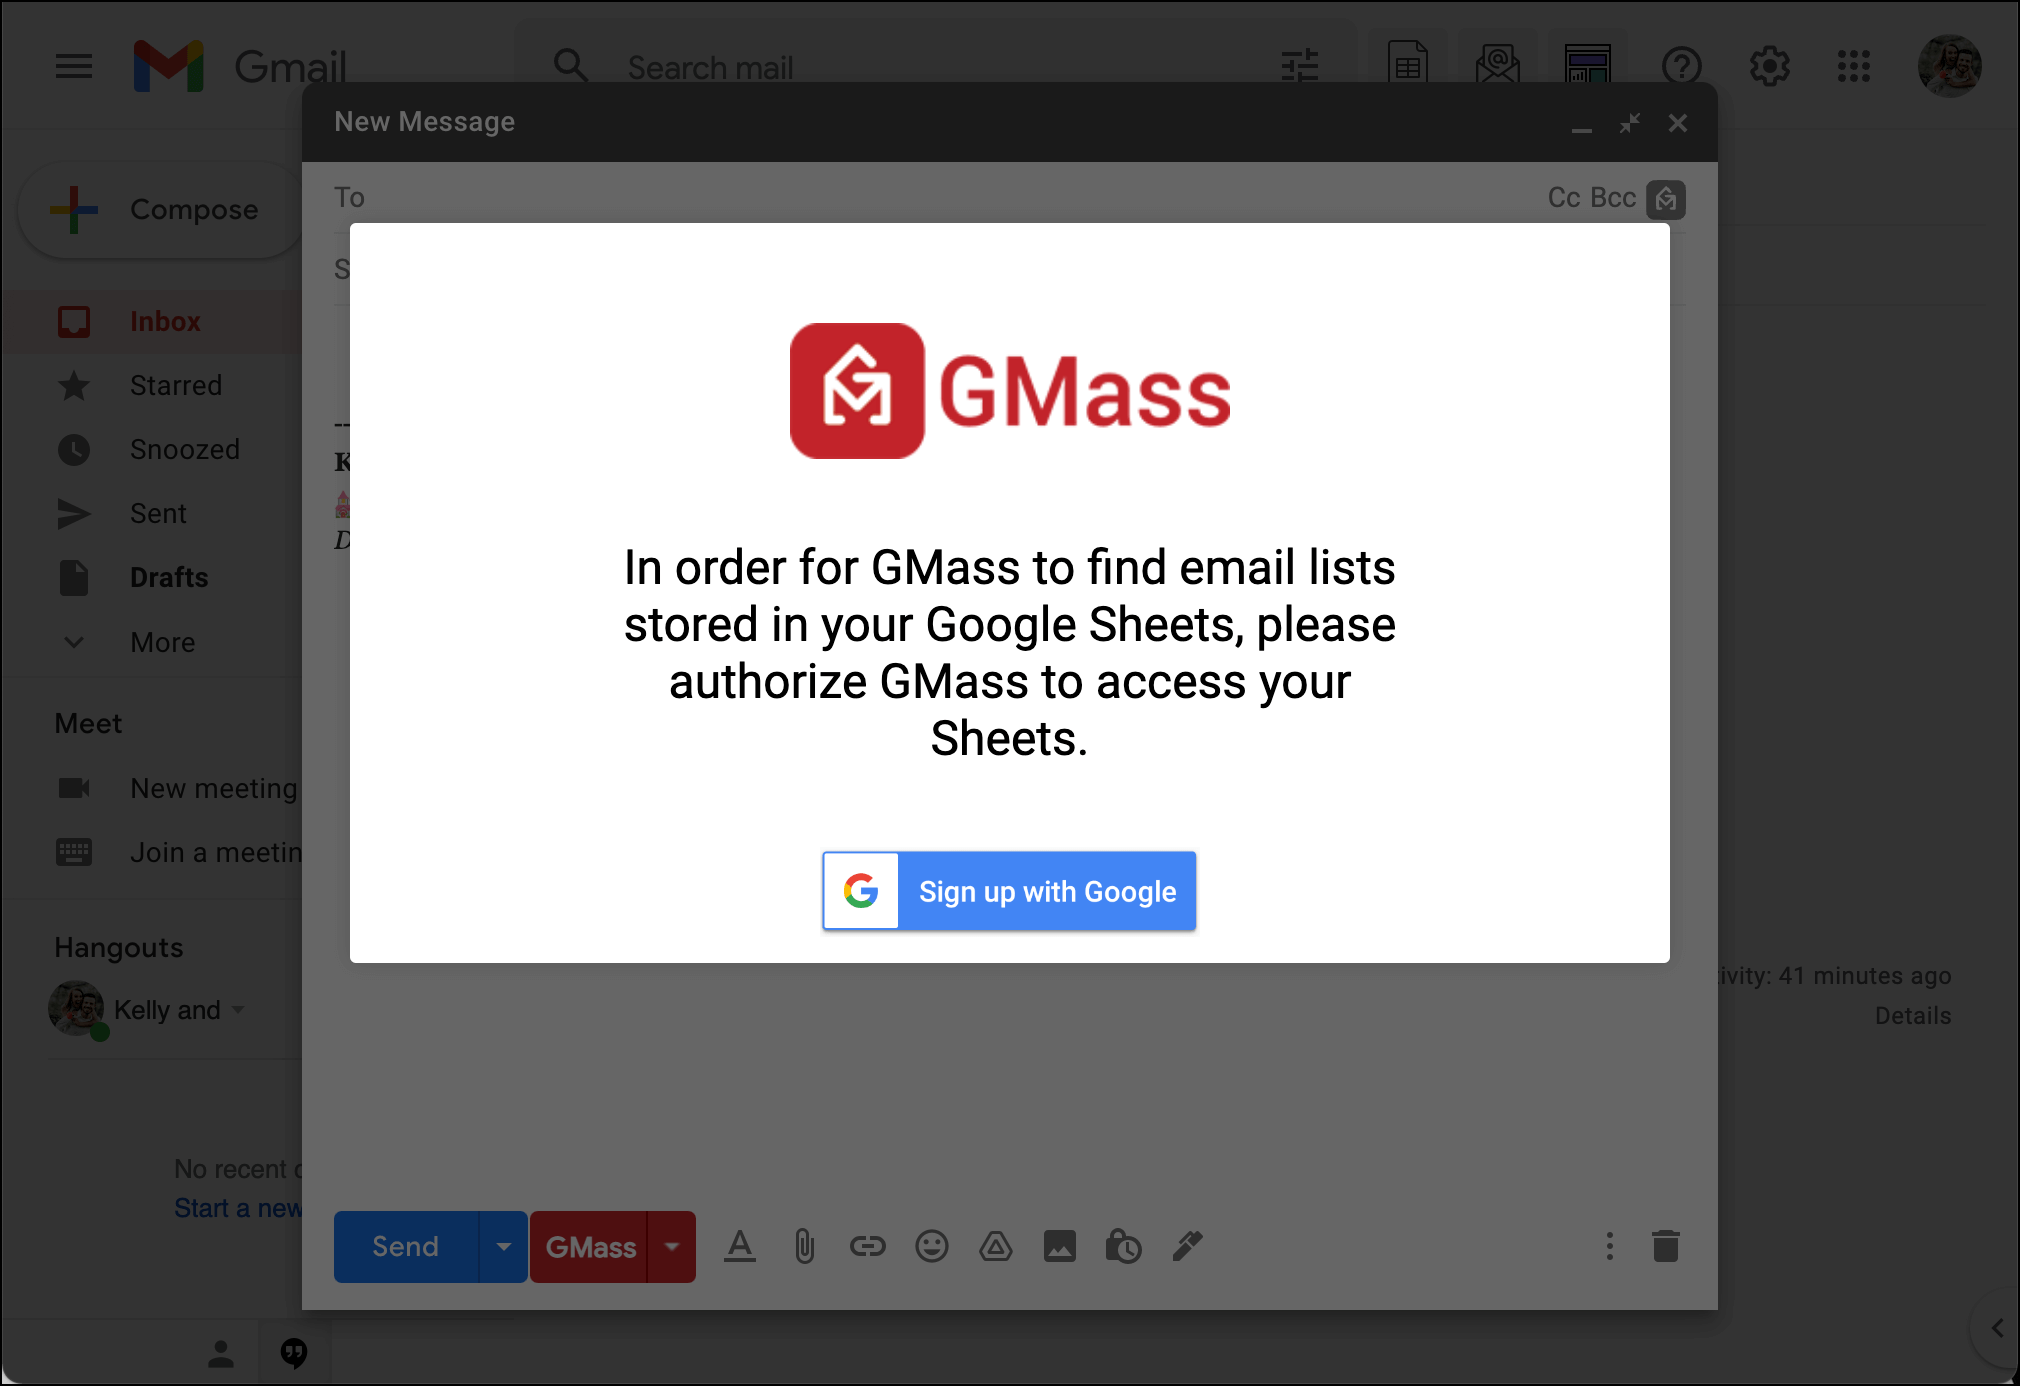
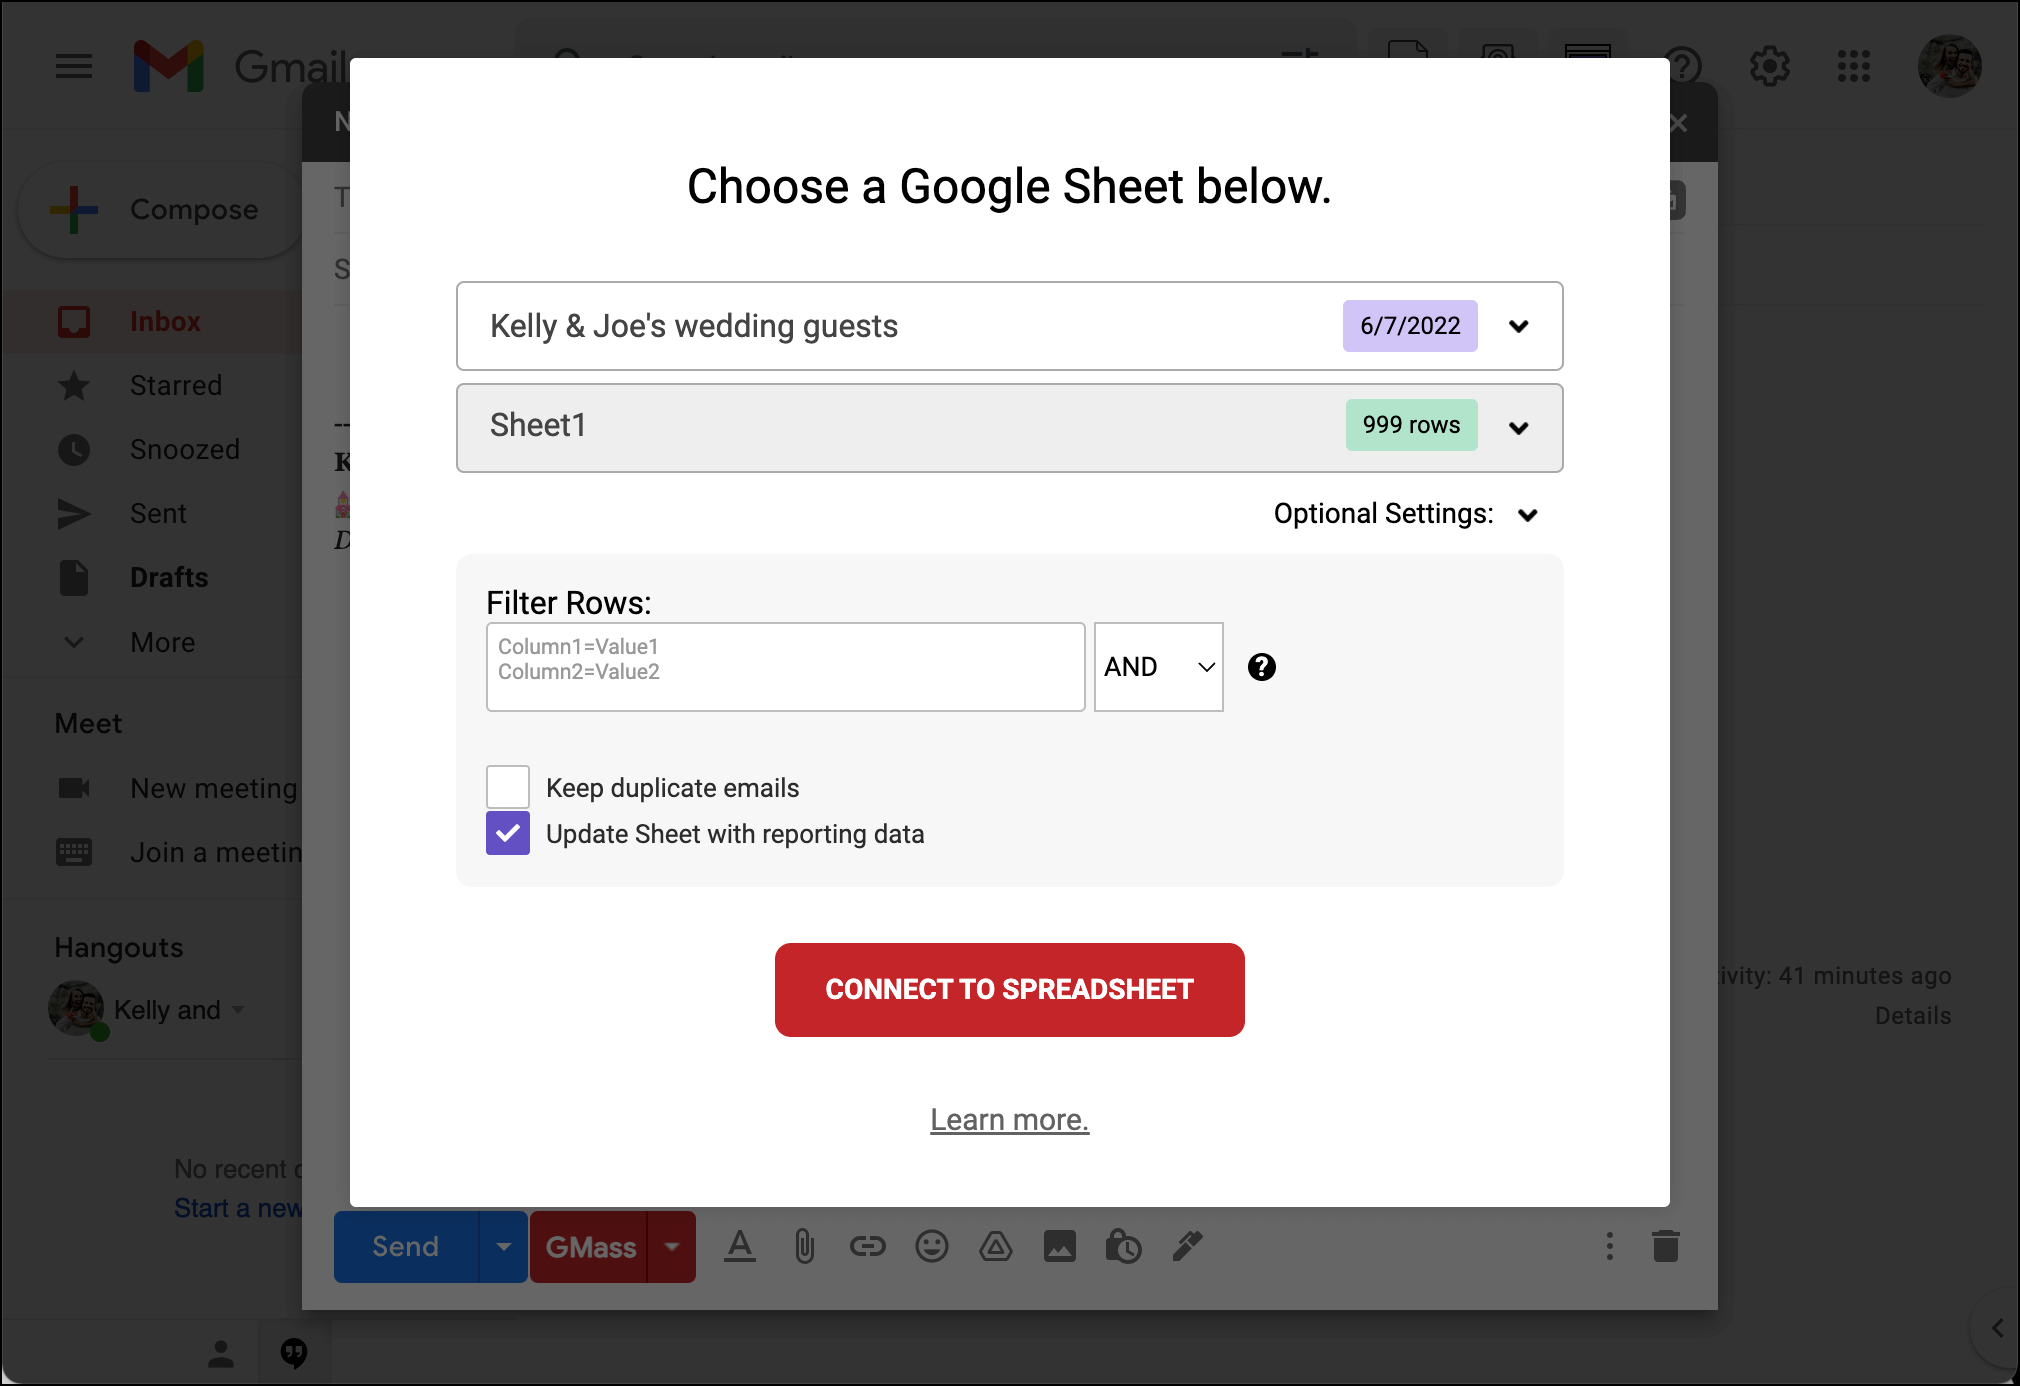
Choose your Google Sheet of wedding guests from the menu.
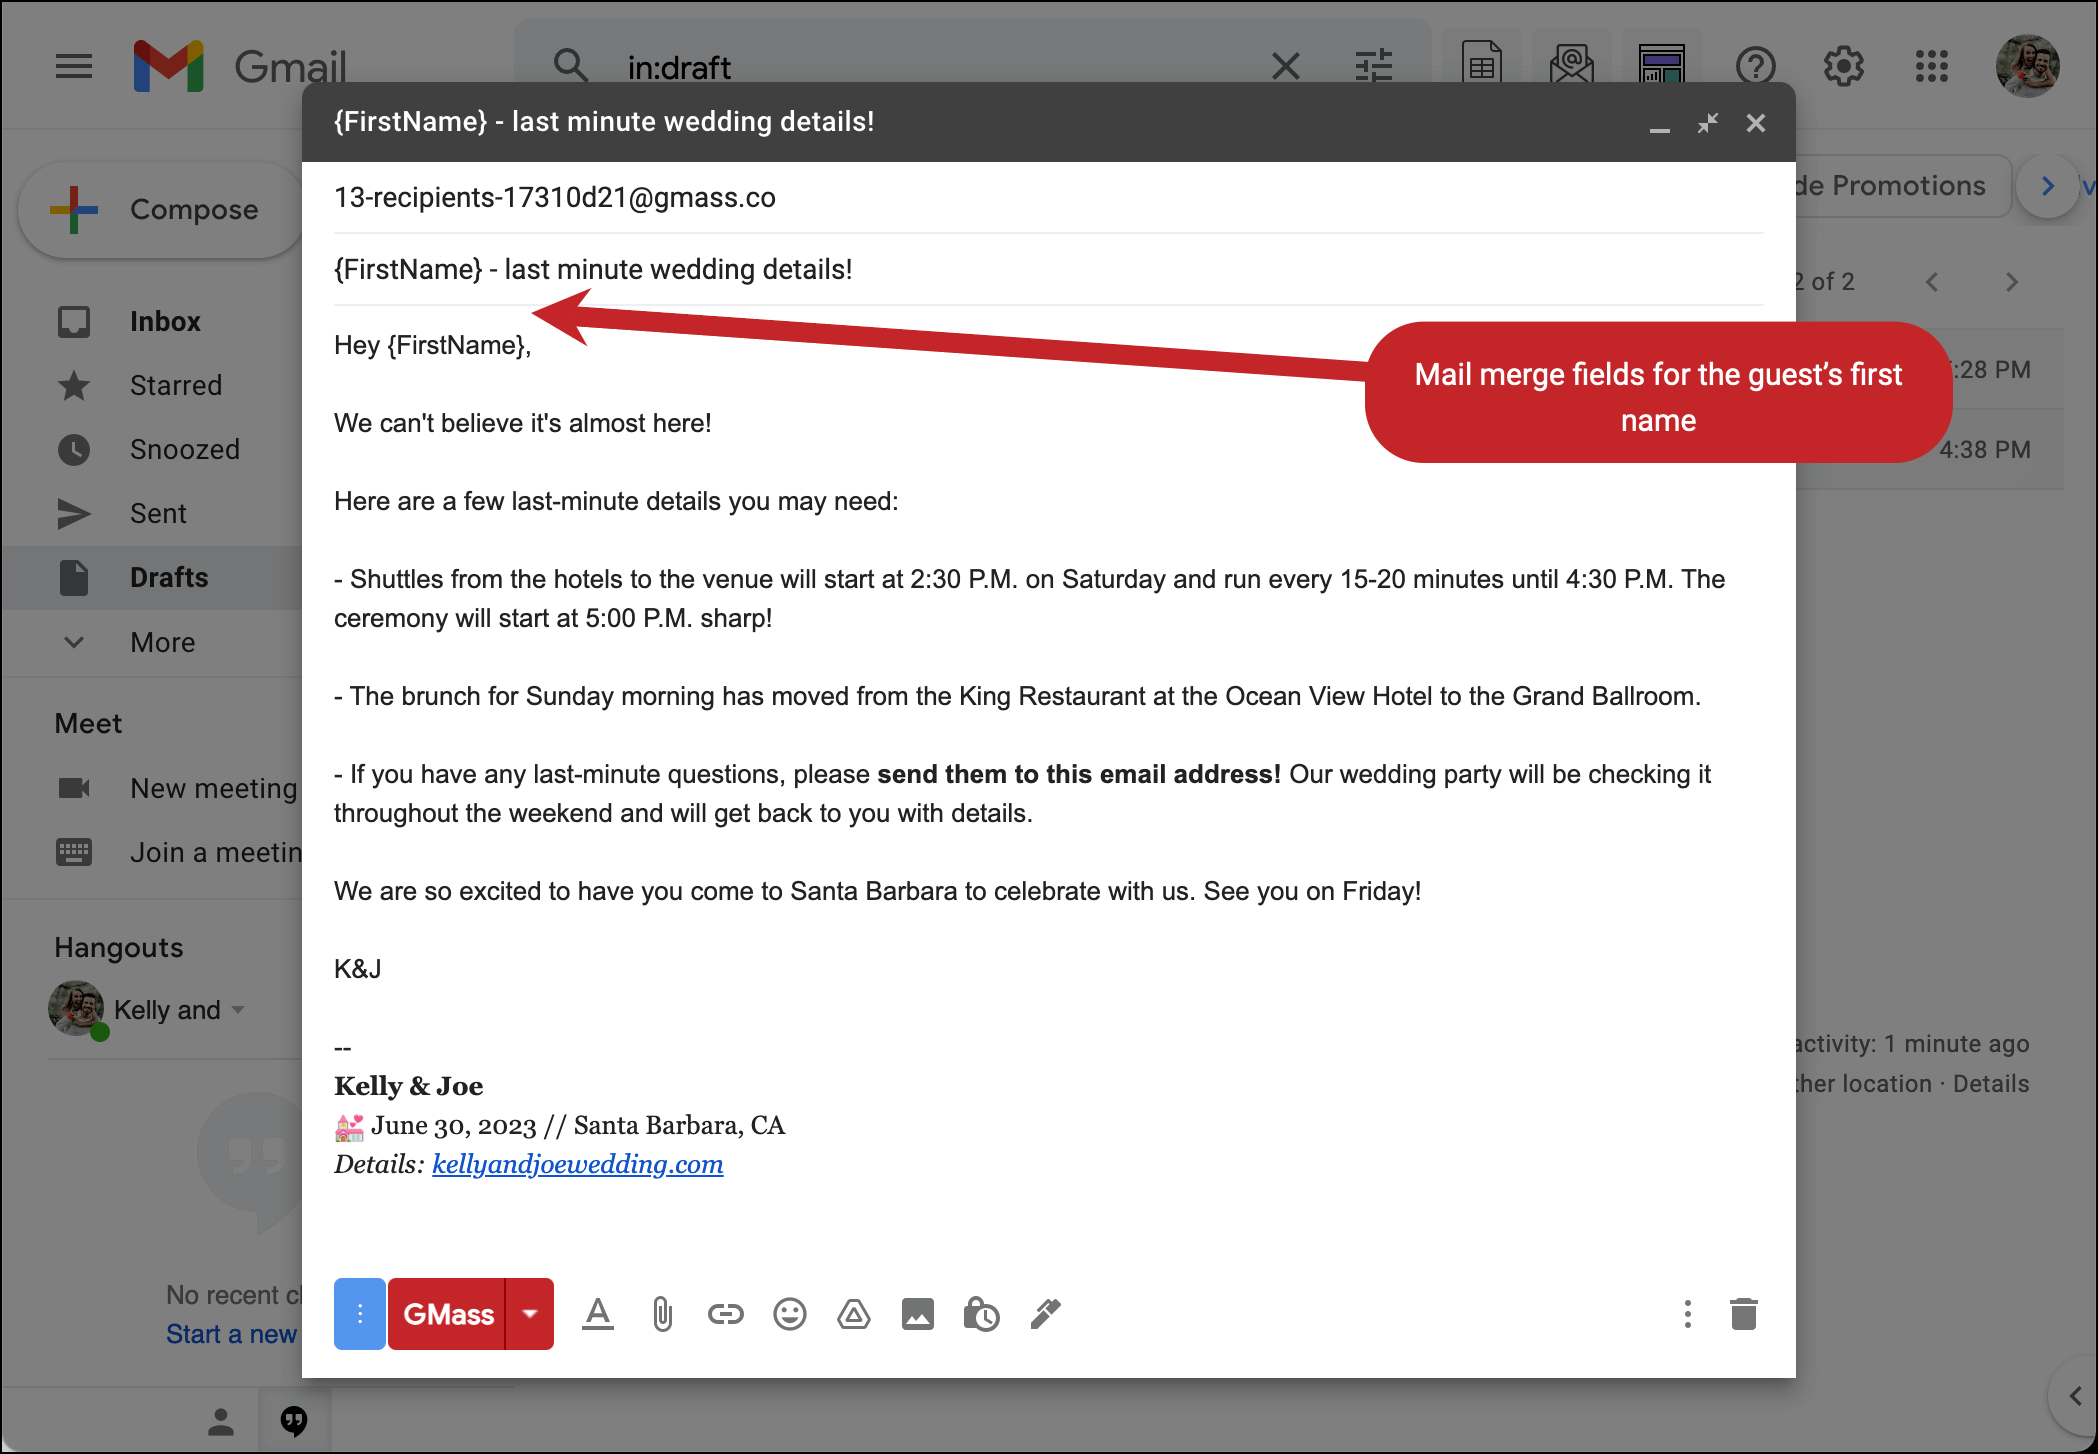
Compose the email
Now that you’re back in Gmail, you can type your message. I’m going to use merge fields to bring in people’s names for a little personalization, as you can see in the screenshot.
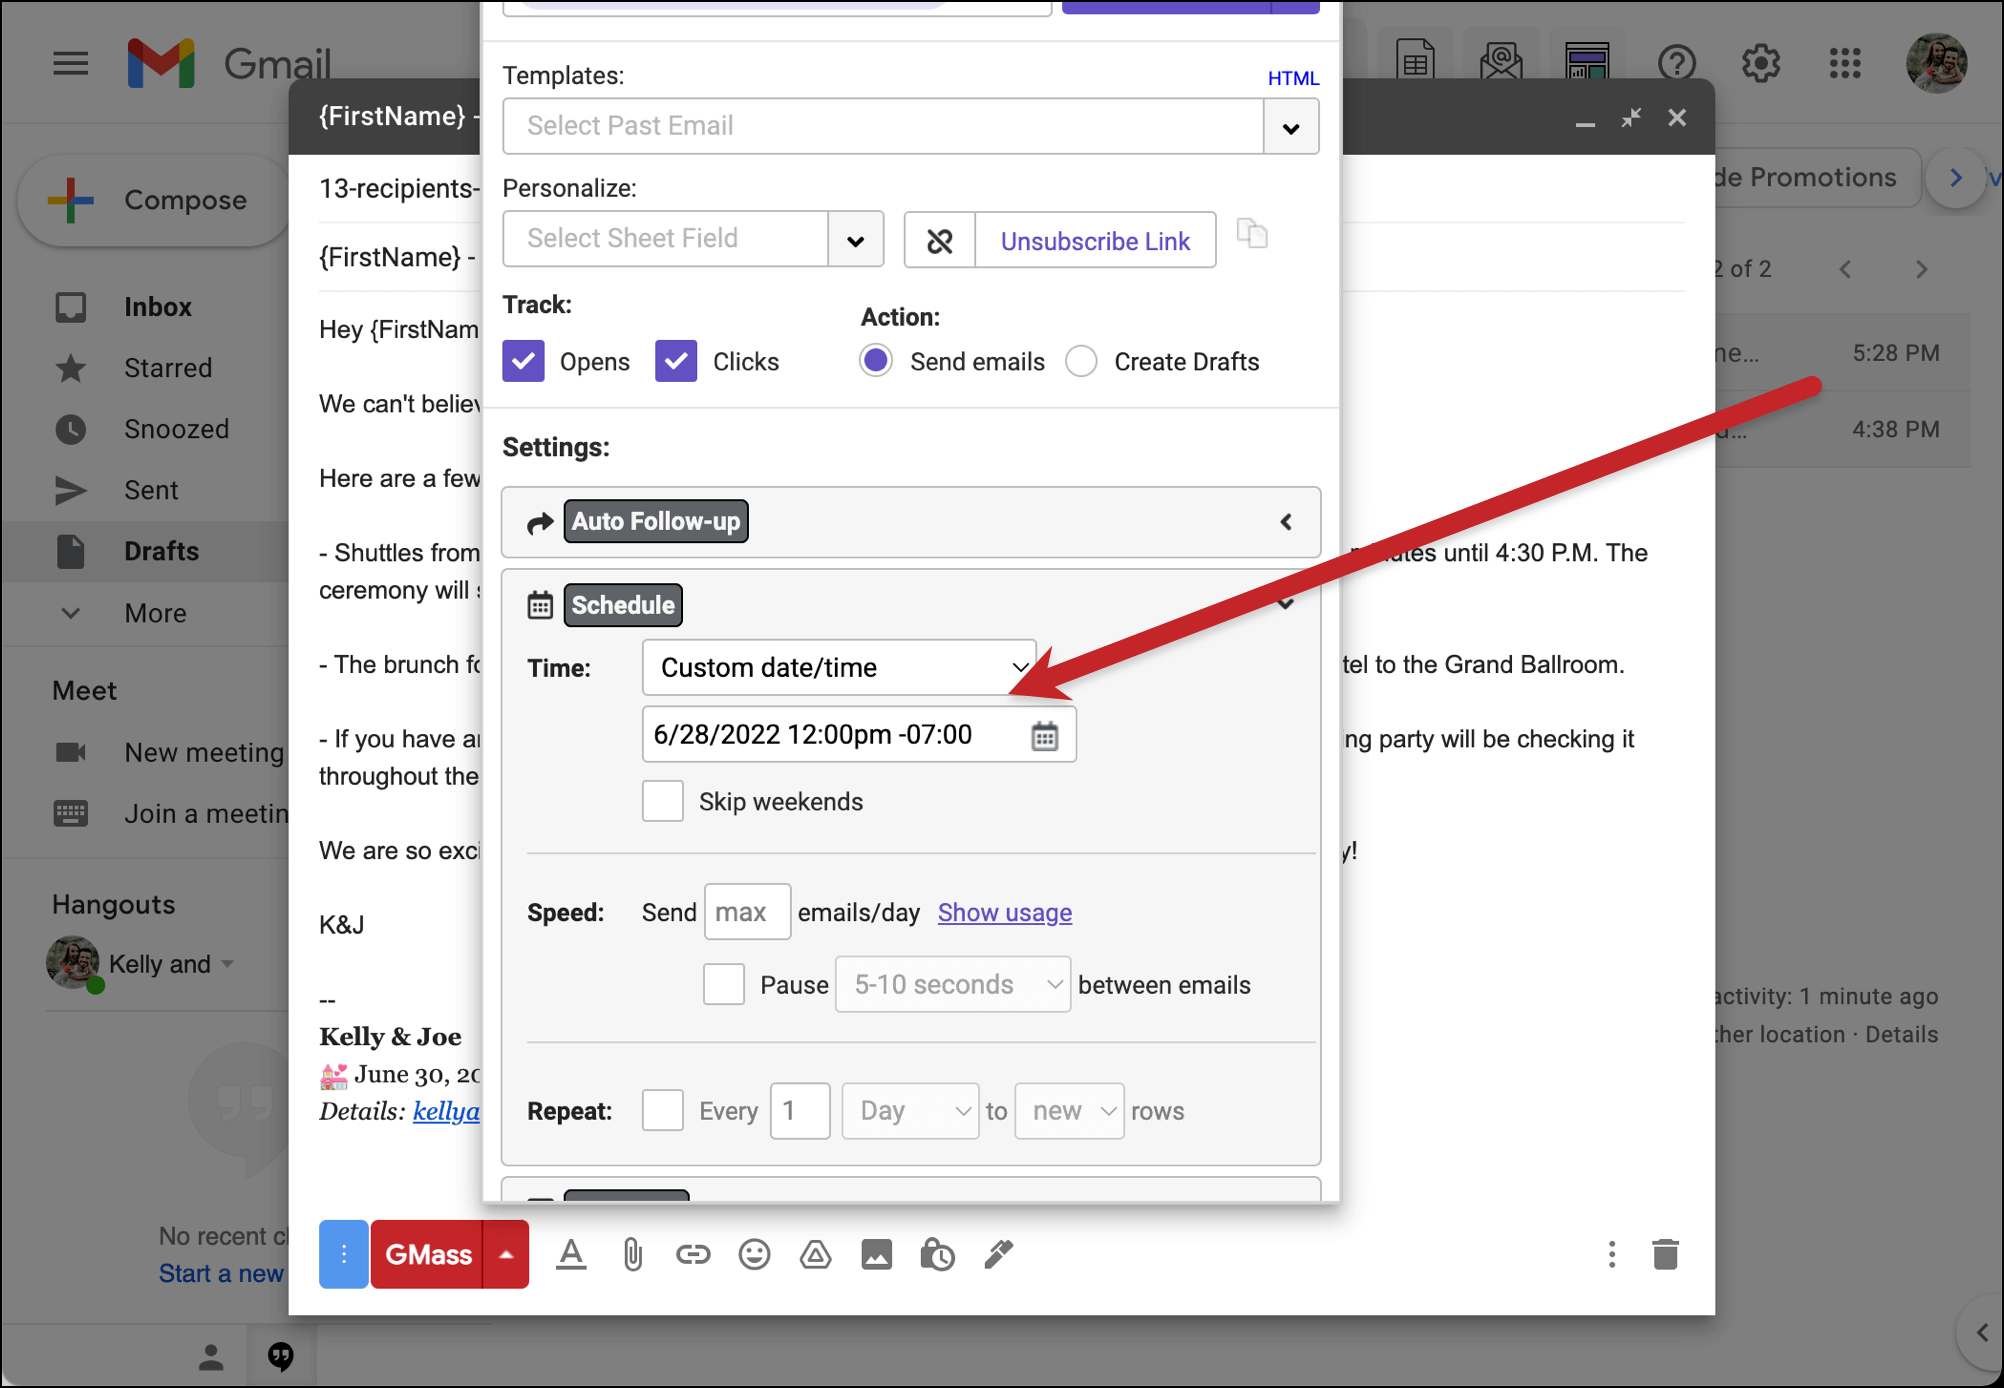
Schedule the email to go out Wednesday before the wedding
Go into the GMass settings by clicking the little down arrow next to the red GMass button. Then go into the Schedule section. Pick “Custom date/time” from the dropdown. Then set this email to go out on the proper date in advance of your wedding.
Send yourself a test, then schedule the email
You can send yourself a test by clicking the “Send Test” button in the top right of the settings.
And if all looks good, hit the red GMass button to schedule the email — it will go out at the time you planned.
You can always edit it more between now and then as well, by finding the draft of the email in your Gmail Drafts folder and making your changes.
Nudges to people who haven’t RSVPed
You’re going to have some RSVP stragglers. Everyone in the history of weddings has had RSVP stragglers.
You can use GMass to send a series of automated messages to people who haven’t RSVPed — and continue to send them messages until they reply.
Add an RSVP column to your Google Sheet
Add a column in your Google Sheet where you’ll mark whether guests have RSVPed yes, no… or not at all. Leave the people who haven’t responded blank.
Set up your nudge email
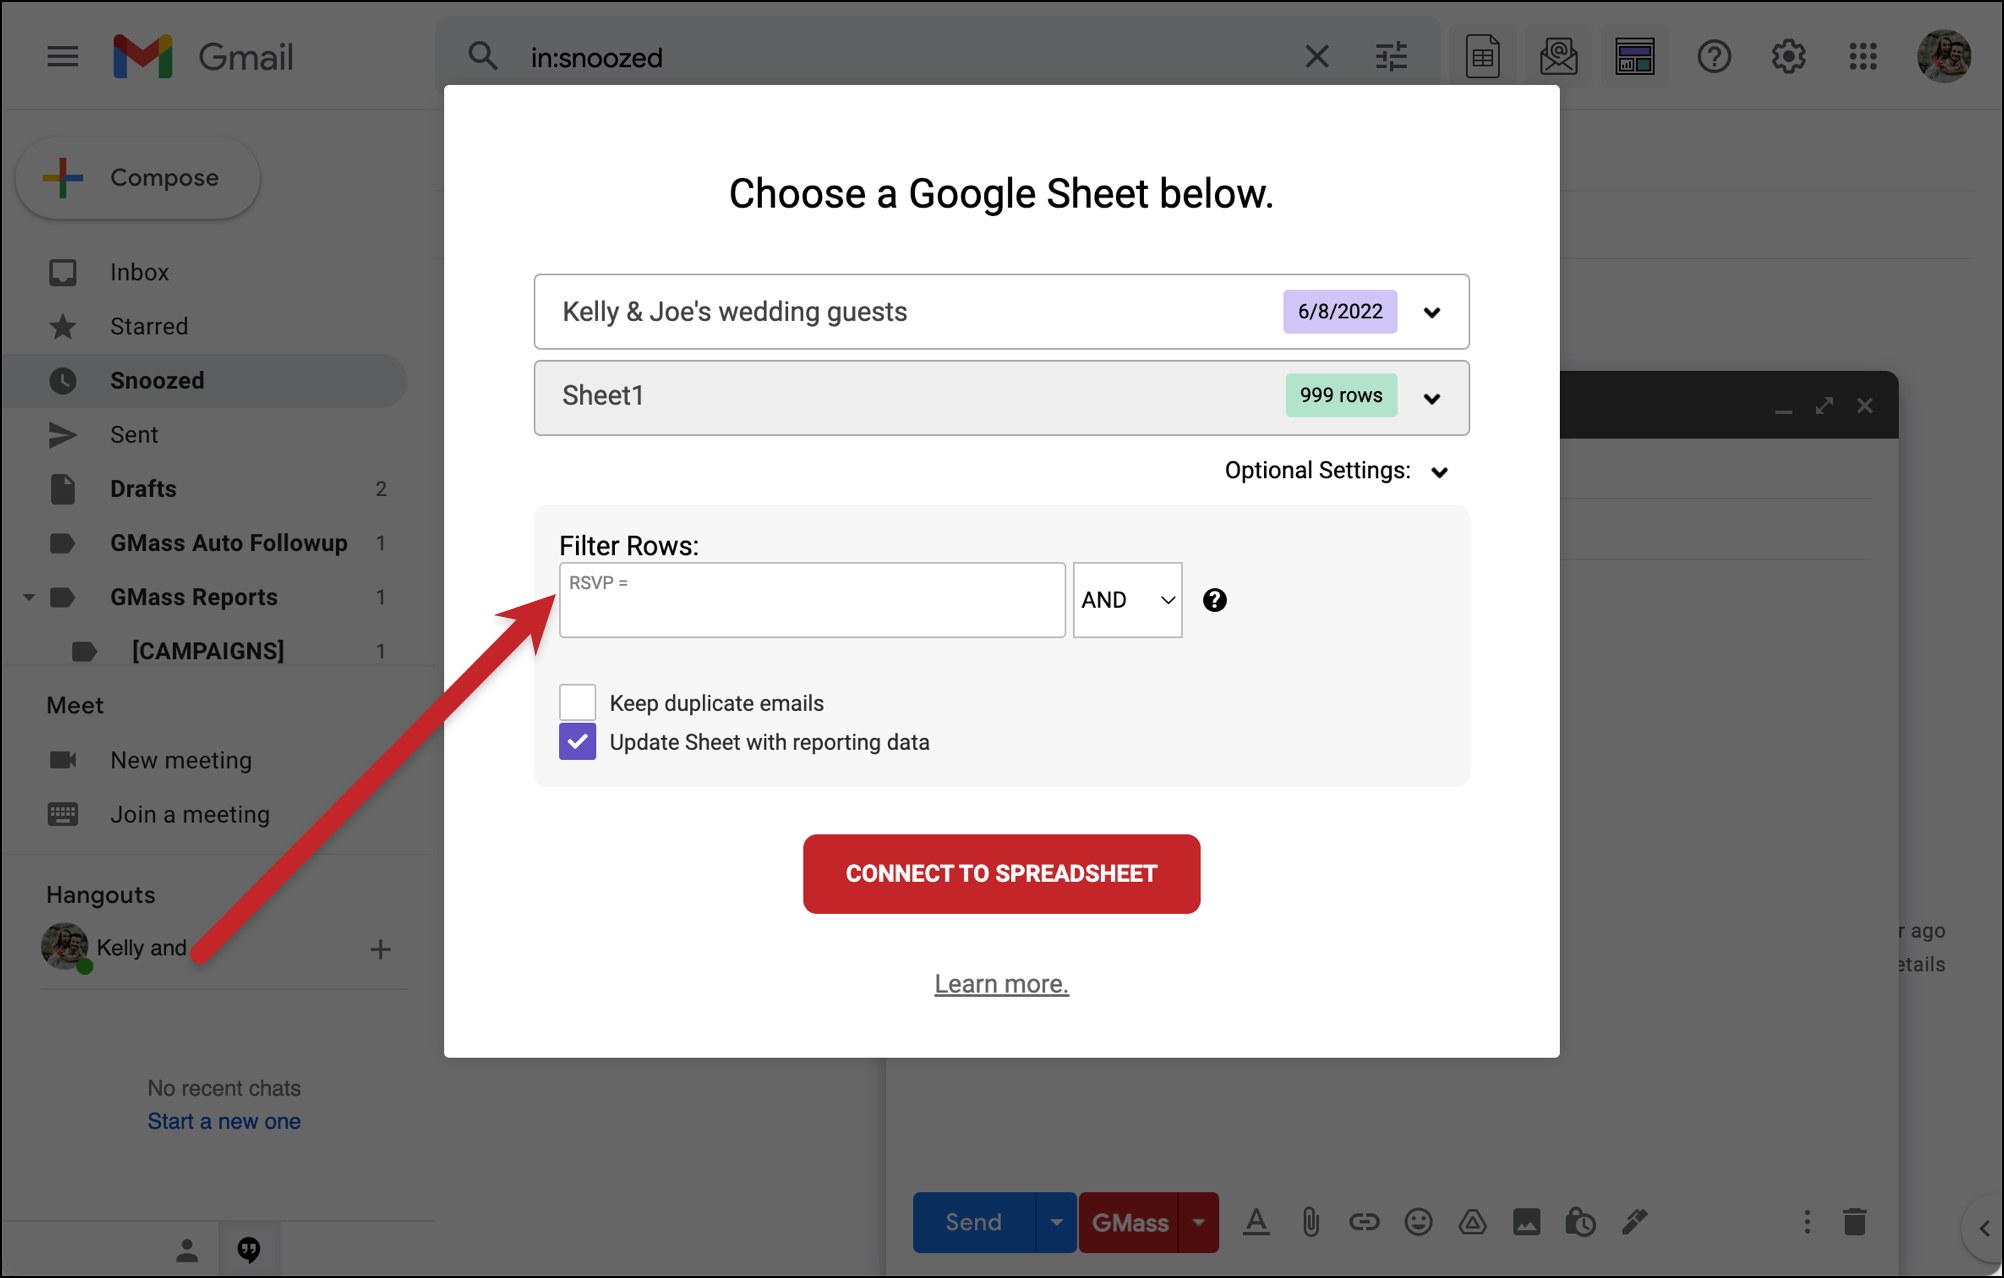
Open a new compose window in Gmail. Click into the To/Recipients field. Then click the GMass icon to connect to your spreadsheet.
This time, as we connect to the spreadsheet of guests, we’ll set up a filter so we only pull guests who have not RSVPed. As you can see in the screenshot, I added a filter: RSVP =. That means: We’ll only send this email to people for whom the RSVP column is blank.
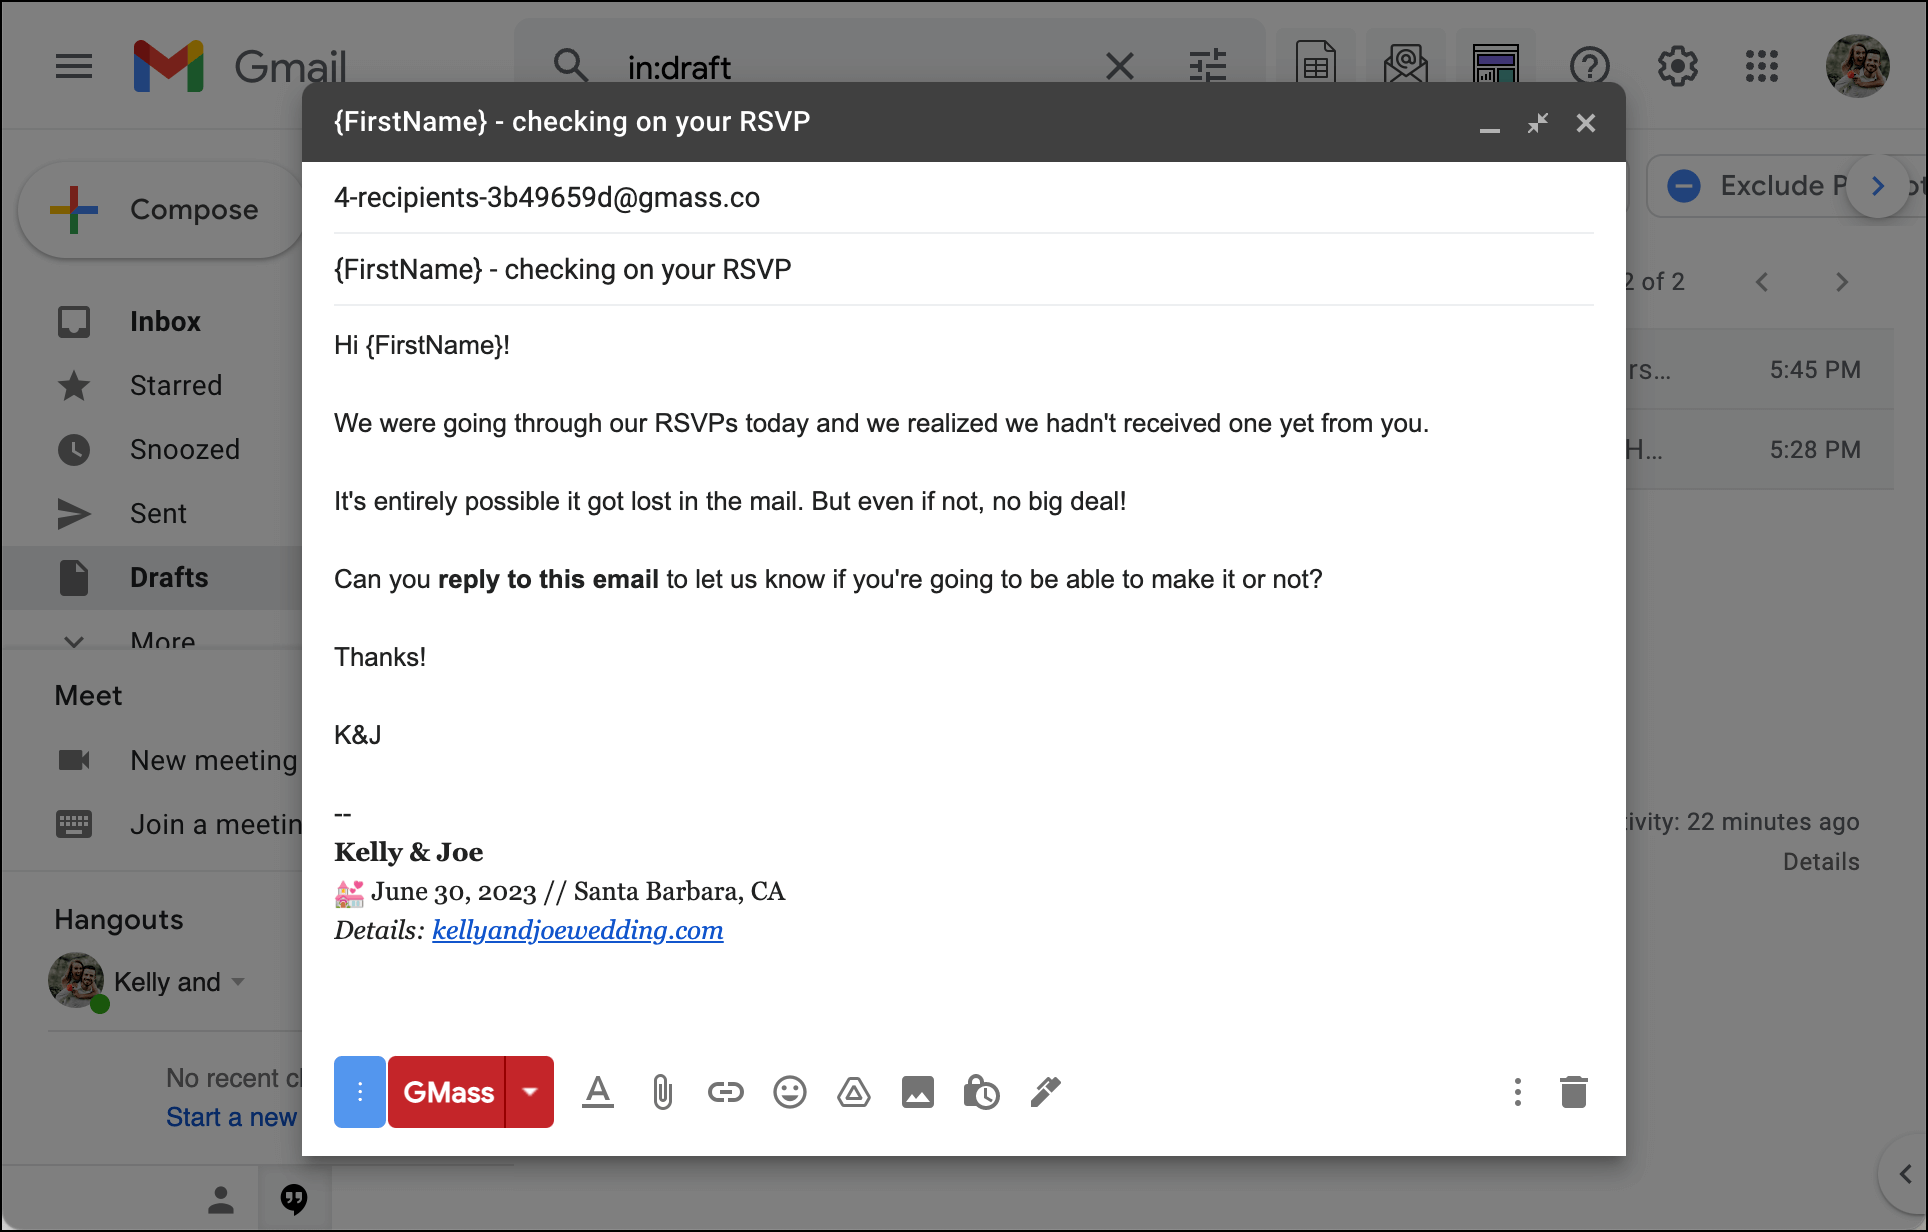
Compose your email
Word your email to be polite but insistent. And use the Gmail mail merge fields to make it personal, so it feels like a one-on-one email.
Set up automated follow-ups
That email should get the job done. But for those professional-level stragglers, you might need to nudge them even more.
You can use GMass’s auto follow-up feature for that.
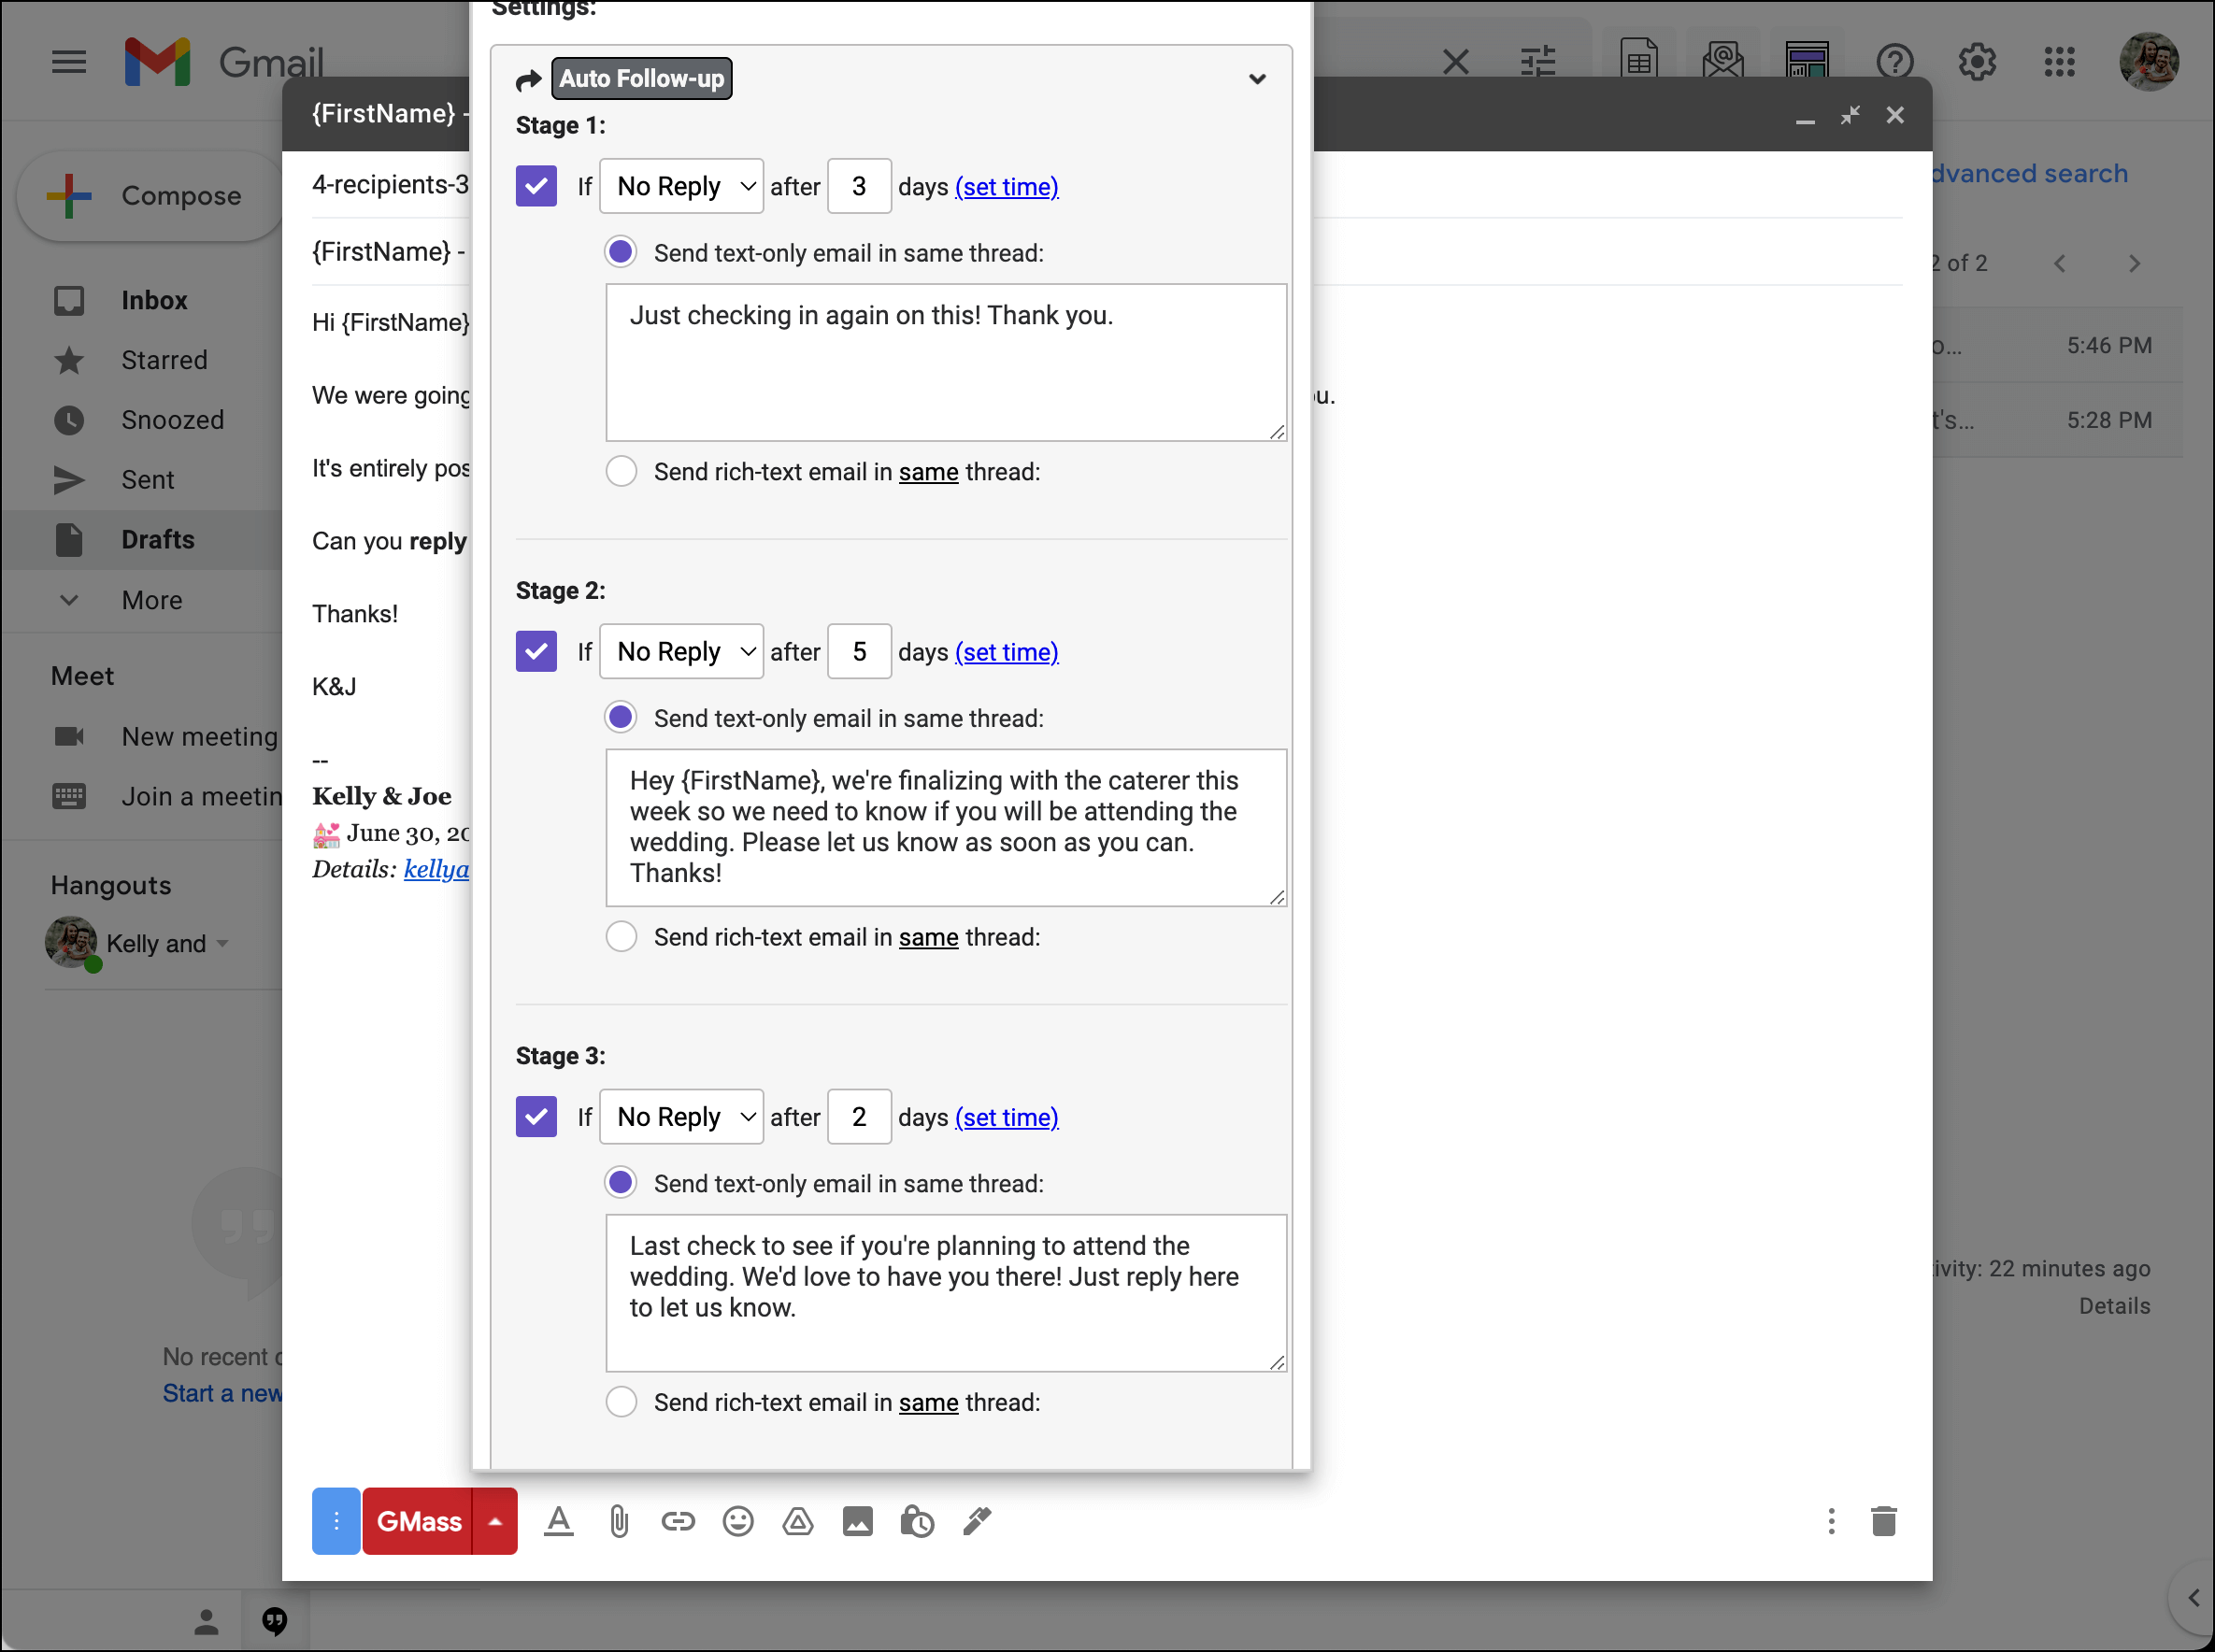
Go into the GMass settings by clicking the down arrow next to the GMass button. Then click “Auto Follow-up.”
Here, you can write a few more follow-ups that will automatically go out if the person doesn’t reply. These messages will stop as soon as they reply to one of your emails.
Test your entire sequence, then send the initial email
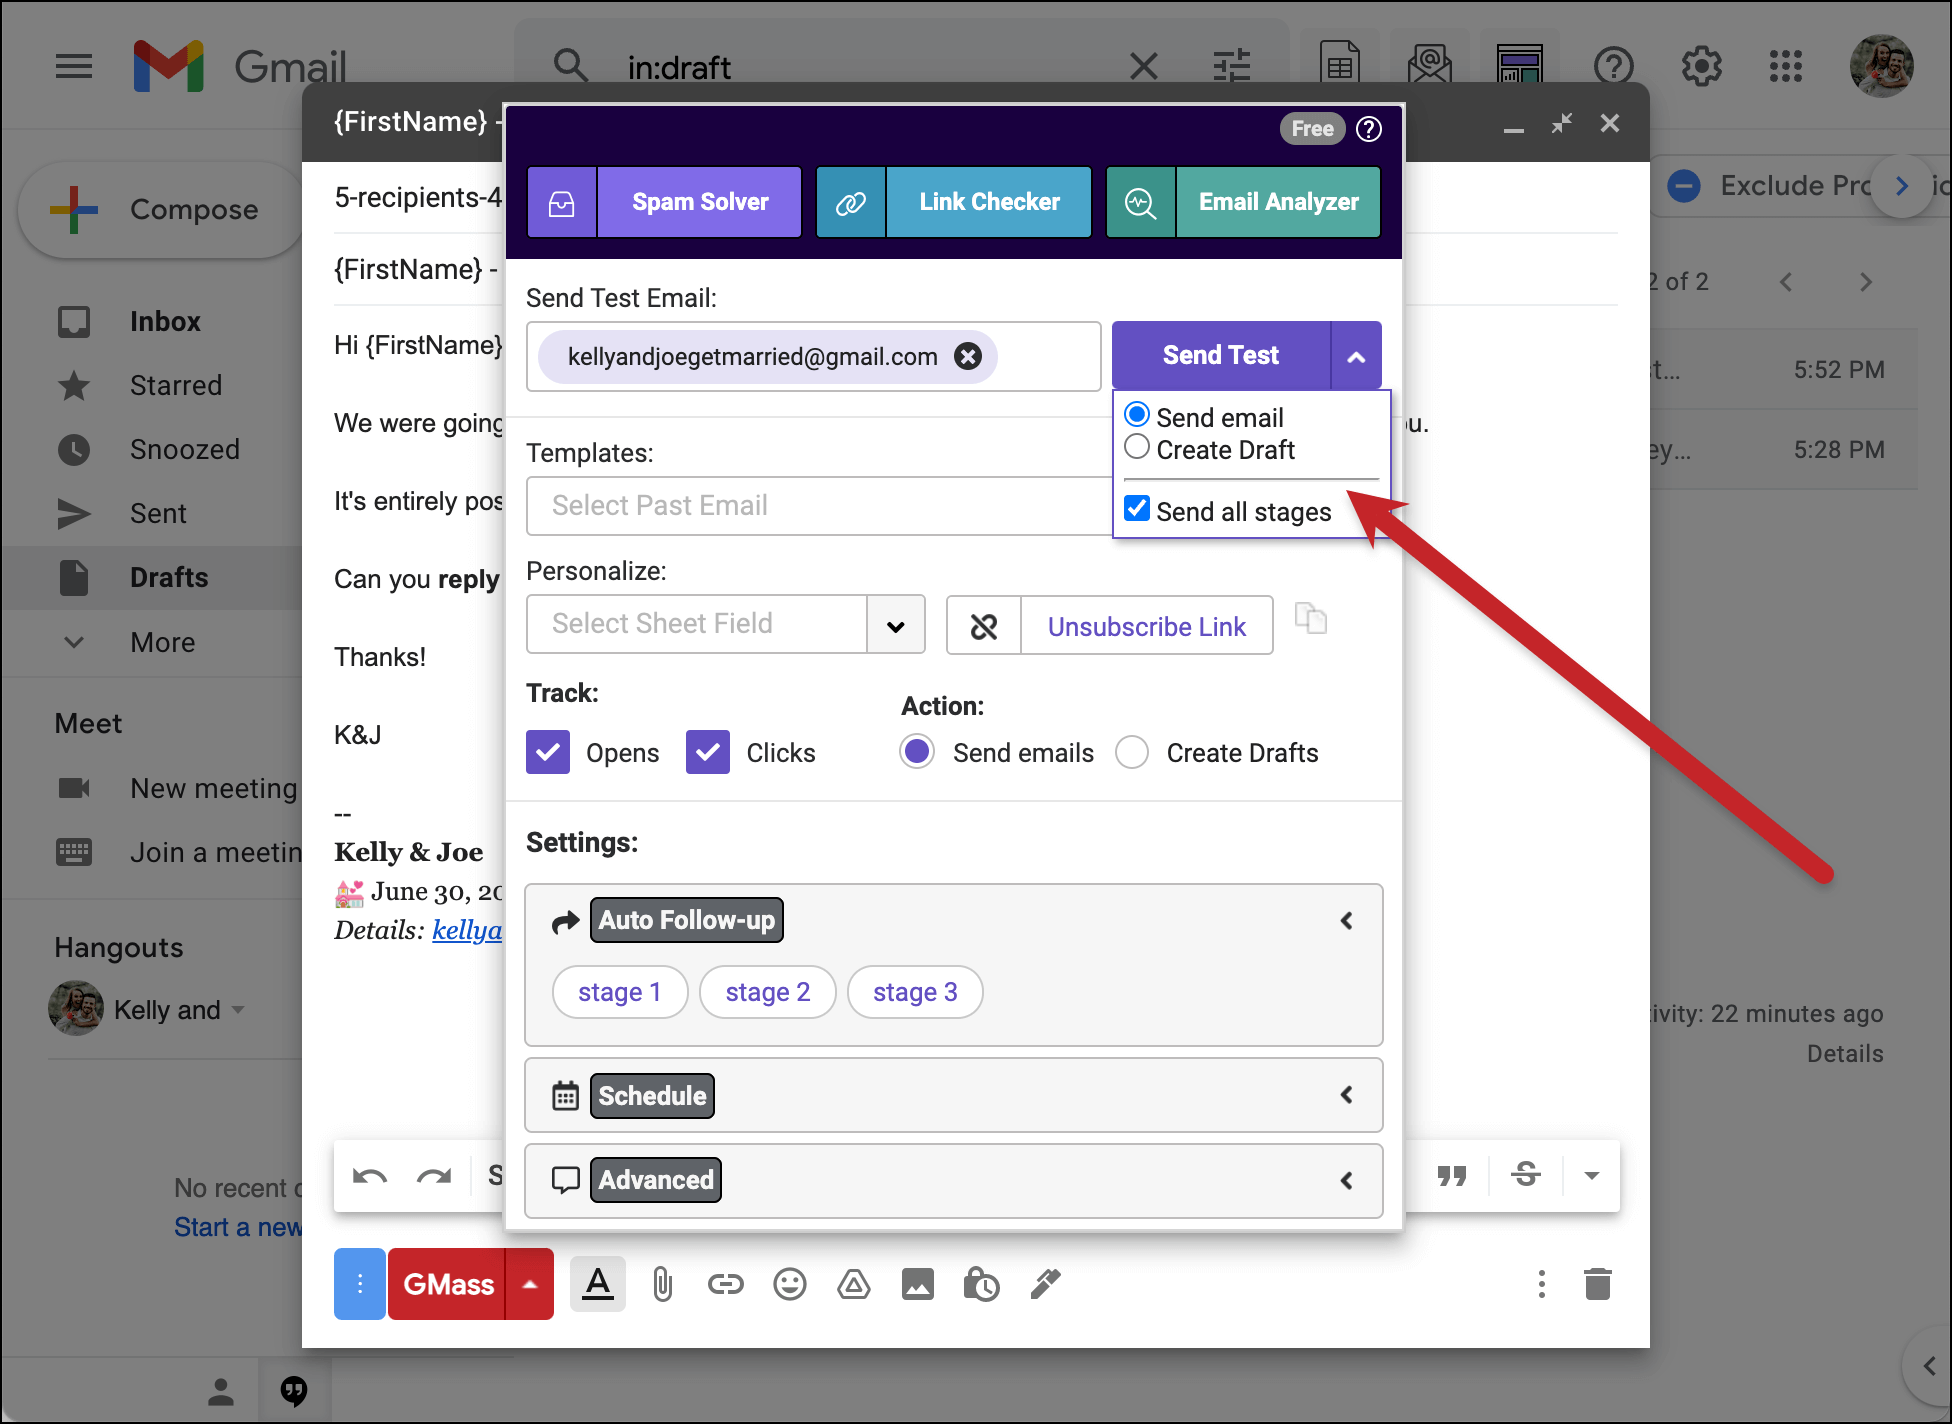
You can test out your entire sequence to see how it will look. Click the arrow next to “Send Test” in the GMass settings, then check the box to “Send all stages.” Once that’s done, click the Send Test button.
And here’s how the sequence will look for someone who just refuses to RSVP after every nudge. (Of course, for them, these emails would come more spaced out over several days.)

If all looks good, hit the red GMass button. That will send the initial email to everyone on your list who has not yet RSVPed.
Invitations, save the dates, bachelor and bachelorette party emails, and everything else
And these aren’t the only uses for GMass with your wedding. You can send emails coordinating every other detail, from arranging decorations at the shower to communicating with your vendors.
We’ve even written step-by-step guides to using GMass for other wedding emails (along with tons of templates):
To get started, download GMass from the Chrome Web Store. And congratulations! On finding GMass, which will be a real game changer for you. Oh, and also on your wedding.
Email marketing, cold email, and mail merge all in one tool — that works inside Gmail
TRY GMASS FOR FREE
Download Chrome extension - 30 second install!
No credit card required
¿Cuáles son las ventajas de tener una dirección de correo electrónico exclusiva para tu boda en términos de privacidad y organización de la información relacionada con el evento?