Gmail labels help you categorize emails, making it easier to find your emails later.
But to actually benefit from this handy feature, you’ll need to learn the ins and outs of using labels on both the Gmail web and mobile apps.
In this article, I’ll briefly cover what Gmail labels are and show you how to create and manage labels on the Gmail web app and mobile app. I’ll also share three no-nonsense tips to help you make the most of Gmail labels, including how to quickly build email lists using Gmail labels.
This Step-by-Step Guide Contains:
(Click on links to jump to specific sections)
- What Are Gmail Labels?
- How to Use Labels on the Gmail Web App
- How to Create a Label on the Gmail Web App
- How to Move an Email to a Label on the Gmail Web App
- How to Edit or Delete Labels on the Gmail Web App
- How to Show or Hide Labels on the Gmail Web App
- How to Create Nested Labels on the Gmail Web App
- How to Color-Code Labels on the Gmail Web App
- How to Automatically Label Incoming Emails on the Gmail Web App
Further Reading:
- Getting started with Gmail? Check out my step-by-step guide for everything you need to know about how to use Gmail.
- Want to make the most of your Gmail contact list? Read my comprehensive guide on accessing and managing your Gmail contacts.
What Are Gmail Labels?
Instead of a traditional folder system, Gmail uses a label system to help organize your inbox.
How is a Gmail label different from a folder?
While an email can belong to only one folder in an email service like Microsoft Outlook, an email can have multiple labels in Gmail.
In other words, your email can live in more than one place at the same time.
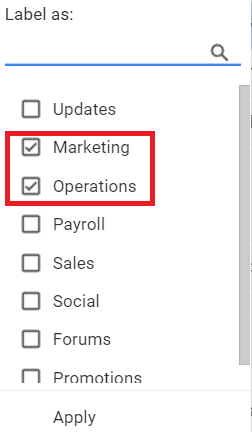
For example, as a Gmail user, you can assign an email to the labels “Marketing” and “Operations” without creating a copy of the email for each label.
Now that you know what Gmail labels are, let’s go over how to use and manage them on Gmail’s web app.
How to Use Labels on the Gmail Web App
To help you make the most of this handy Gmail feature, I’ll show you how to:
- Create a Label on the Gmail Web App
- Move an Email to a Label on the Gmail Web App
- Edit or Delete Labels on the Gmail Web App
- Show or Hide Labels on the Gmail Web App
- Create Nested Labels on the Gmail Web App
- Color-Code Labels on the Gmail Web App
- Automatically Label Incoming Emails on the Gmail Web App
I’ll cover how to use labels on Gmail’s mobile app later.
First, let’s learn how to create a label on the web app.
A. How to Create a Label on the Gmail Web App
There are several methods for creating labels in Gmail.
I’ll show you two easy ways here:
Method 1: Create the Label and Move Emails at the Same Time
You can use this method whether you’re looking to assign a new label to multiple emails or to add emails individually.
Step 1
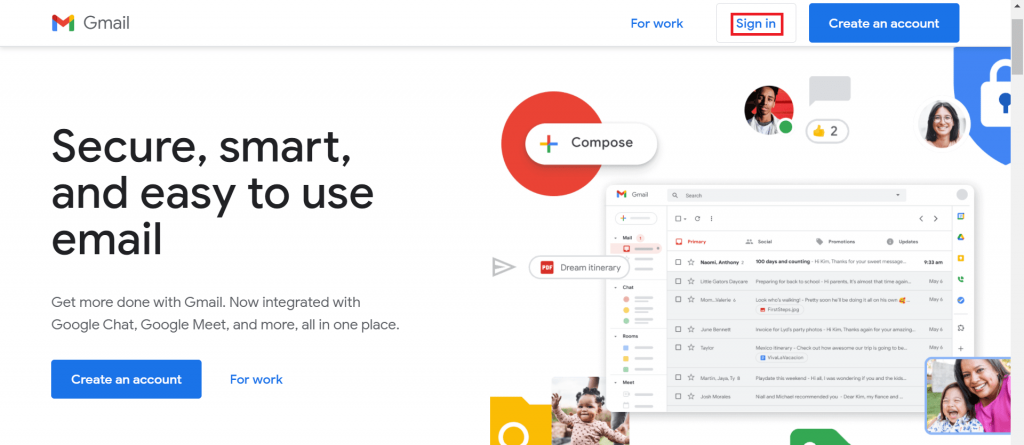
Sign in to your Gmail account.
Step 2
Select the email message or messages you want to label from your Gmail inbox and click the label button (or label icon) located below the Gmail search box.
![]()
Step 3
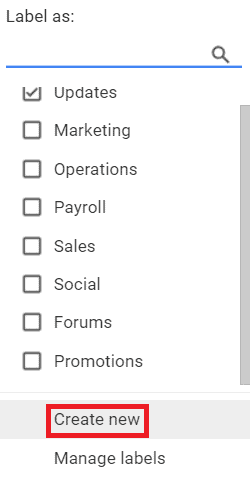
In the dialog box that appears, click Create new.
Step 4
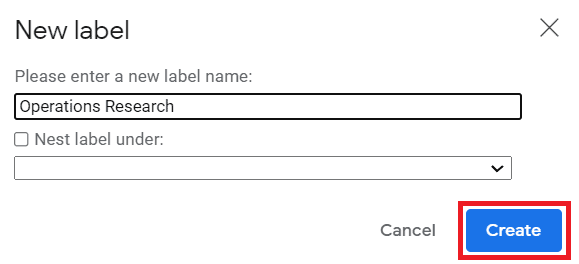
Provide a name for your label and hit Create.
Step 5
Alternatively, you can right-click on a message, hover your mouse over Label as, and click Create new.
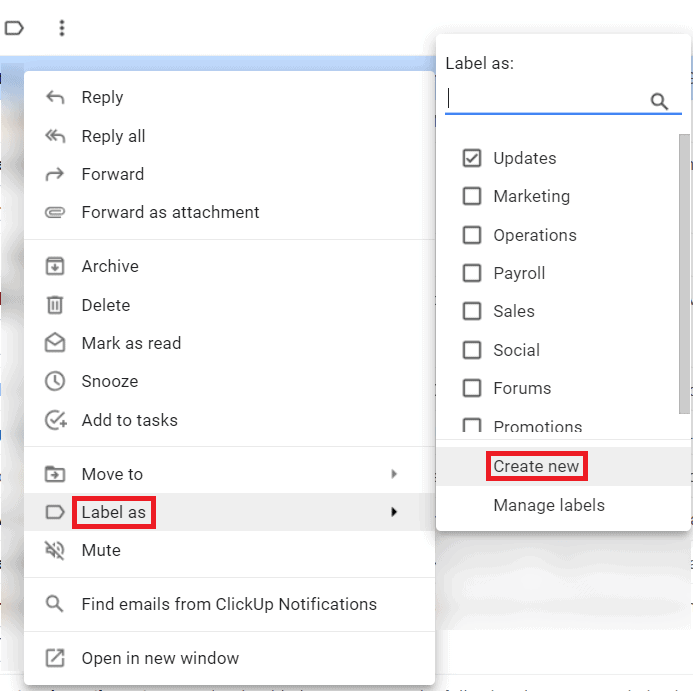
Then, enter a new label name, and you’re good to go.
Method 2: Create the Label and Move Emails Separately
This method is probably the quickest way to create a custom label.
However, unlike the earlier method, you can’t instantly add emails while creating a label this way.
Step 1
Open Gmail and scroll down the sidebar on the left side and click on More.

Step 2
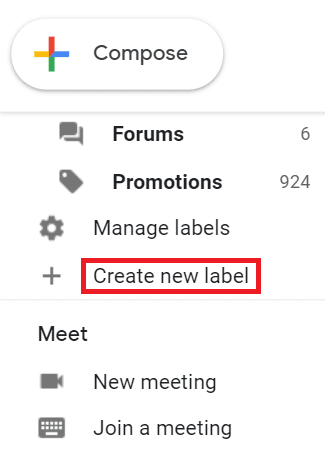
Scroll down to the bottom of the label-related options until you find the Create new label option.
Then, click on Create new label.
Step 3
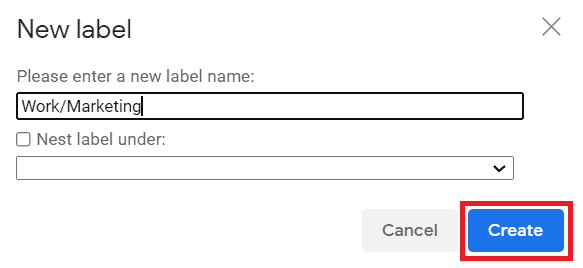
Type in a label name and hit Create to complete the process.
B. How to Move an Email to a Label on the Gmail Web App
Gmail offers several ways to move emails to a different label.
I’ll cover two methods here:
Method 1: Move One Email at a Time
Step 1
Sign in to your Gmail account and open the email message you want to move.
Step 2
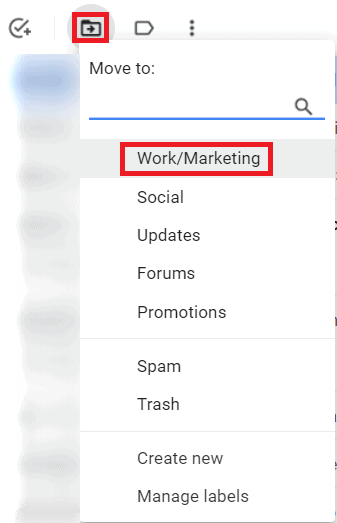
Click on the Move to icon (with a right-facing arrow) below the Gmail search box.
![]()
Step 3
In the drop-down menu that appears, select the label to which you want to move the email.
Method 2: Move a Batch of Emails
Step 1
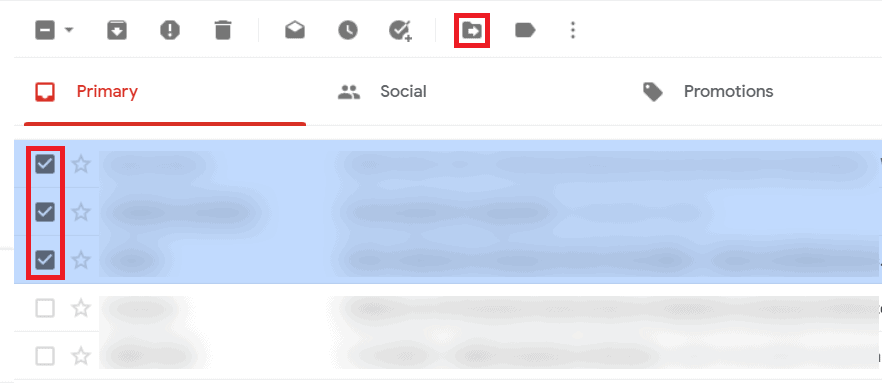
Go to your Gmail inbox and select the emails you want to move by ticking the checkboxes to the left of each email.
Step 2
Click on the Move to icon and select the Gmail folder (or label) into which you’d like to move the Gmail message.
C. How to Edit or Delete Labels on the Gmail Web App
Gmail lets you edit or delete labels quickly.
Here’s what you need to do:
Step 1
Sign in to your Gmail account, and find the label you want to edit or delete in the sidebar on the left.
Step 2
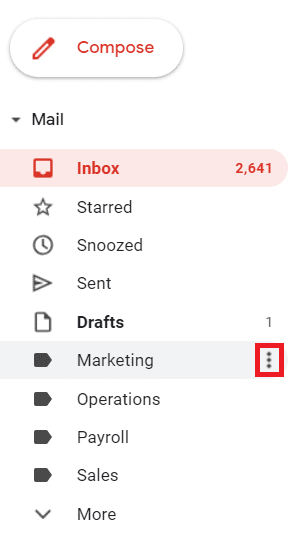
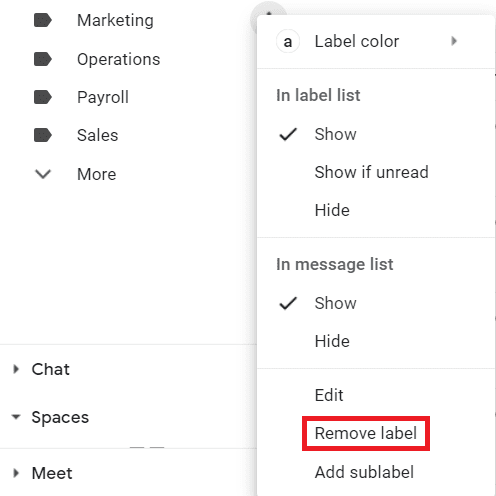
Hover your mouse over the label, and you should see a three vertical dots icon; click the icon.
Step 3
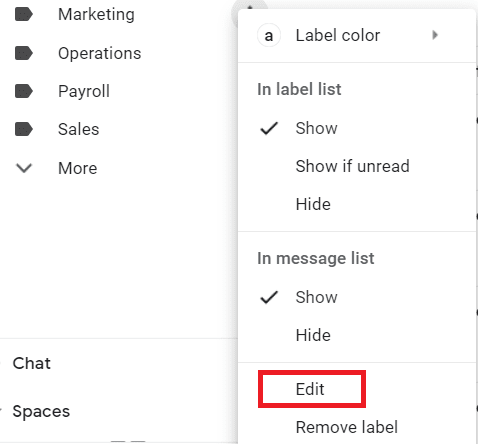
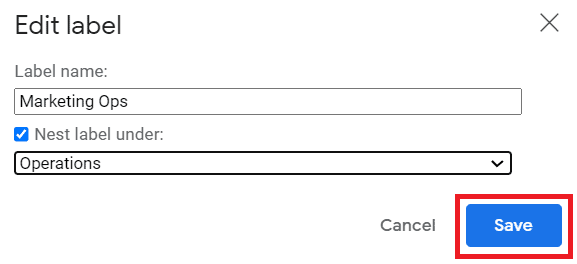
Click on the Edit option to edit the label.
Here, you can rename the label or click the checkbox next to “Nest label under:” to nest this label under another label.
Step 4
Once you’re done making edits, click Save.
Step 5
If you want to delete the selected label, click on Remove label.
D. How to Show or Hide Labels on the Gmail Web App
Gmail gives you the option to use hidden labels, which are hidden from the left sidebar.
Let’s explore how you can show or hide Gmail labels:
Step 1
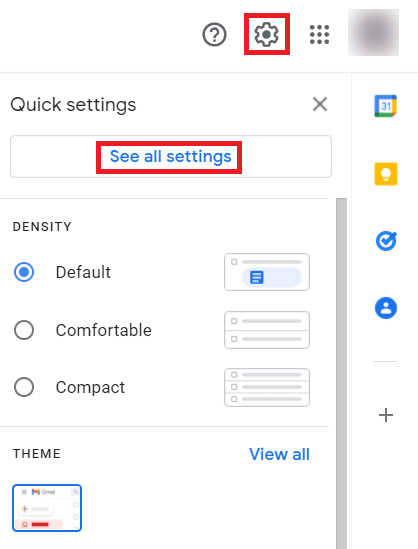
Sign in to your Gmail account, and click the gear icon in the top right-hand corner to open the Quick settings menu.
Step 2
To see the complete list of Gmail settings, click See all settings.
Step 3
Navigate to the Labels tab located under the search box.

Step 4
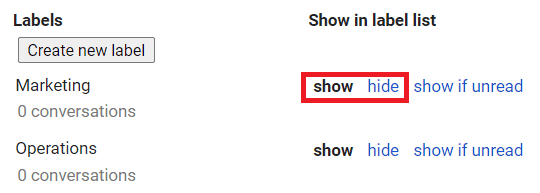
Under the Labels tab, scroll down till you find the label names.
Here, you can choose whether to show or hide different labels.
E. How to Create Nested Labels on the Gmail Web App
A nested label functions the same way that subfolders do: one parent folder can include multiple subfolders. Likewise, you can add multiple child labels within a parent label to declutter your label list.
Here’s how to go about creating nested labels in Gmail:
Step 1
Sign in to your Gmail account, and scroll through the left sidebar until you find the label to which you want to add a sublabel.
Step 2
Hover your mouse over the label, and click on the vertical three dots icon that appears.
Step 3
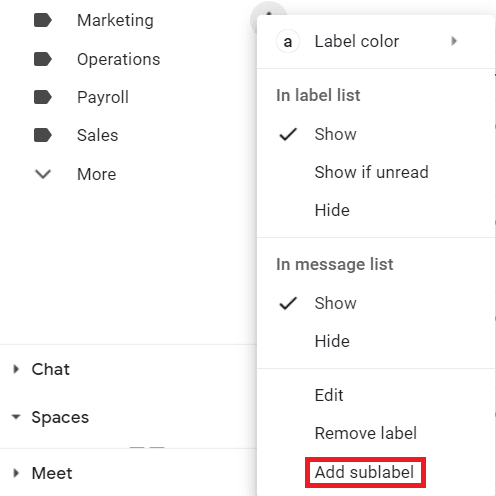
Click Add sublabel from the menu that pops up.
Step 4
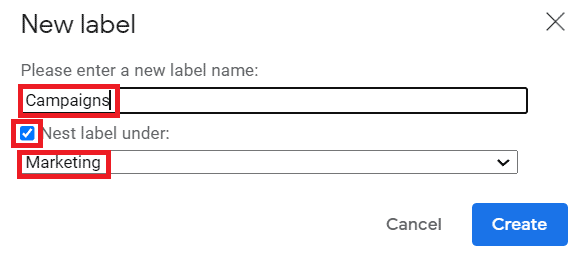
A dialog box asking you to provide details for the sublabel will appear.
Enter a name for your sublabel, click the checkbox next to Nest label under, and select the parent label from the drop-down list.
Step 5
Finally, click Create, and you’re good to go.
F. How to Color-Code Labels on the Gmail Web App
Color-coding your Gmail labels helps you quickly identify labels from the sidebar. This is handy if you use a lot of different labels to organize your mailbox.
Here’s how you can color-code labels in Gmail:
Step 1
Open Gmail and find the label you want to color-code from the sidebar on the left.
Step 2
Hover your cursor over the label, and click the three dots icon that appears.
Step 3
Click on Label color and pick a color you want to use for the label. You also have the option to add a custom color for your labels.
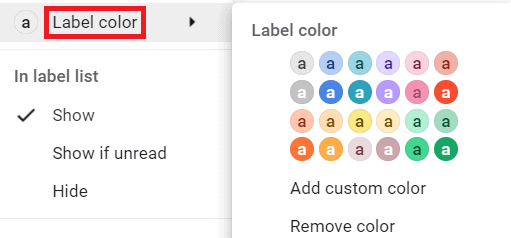
Later, if you want to remove a label’s color, just follow the same steps as above. Instead of picking a label color, click on Remove color.
G. How to Automatically Label Incoming Emails on the Gmail Web App
While Gmail’s labels help organize your inbox, manually adding labels to emails can be time-consuming.
Fortunately, Gmail offers an effective workaround — the functionality to automatically assign incoming emails to labels based on specific criteria.
Here’s how you can create Gmail filters to do that:
Step 1
Open Gmail and click on the Show search options button at the right end of the search box.

Step 2
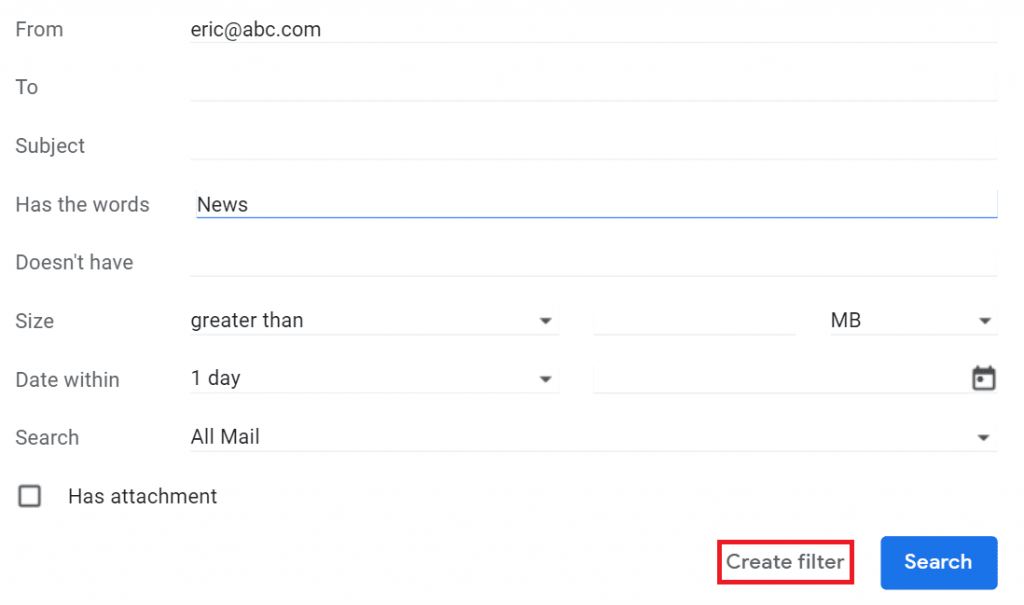
In the dialog box that appears, enter the parameters based on which you want to label emails.
For example, to filter future emails coming from a specific sender (Eric), I’ll enter their email address ([email protected]) in the From field.
Step 3
Once you’ve included all the relevant criteria for filtering, hit the Create filter button.
Step 4
The next screen will ask you what you want Gmail to do with the incoming messages.
Click the checkbox next to “Apply the label:”, select the label where you want to send the filtered emails, and hit Create filter.
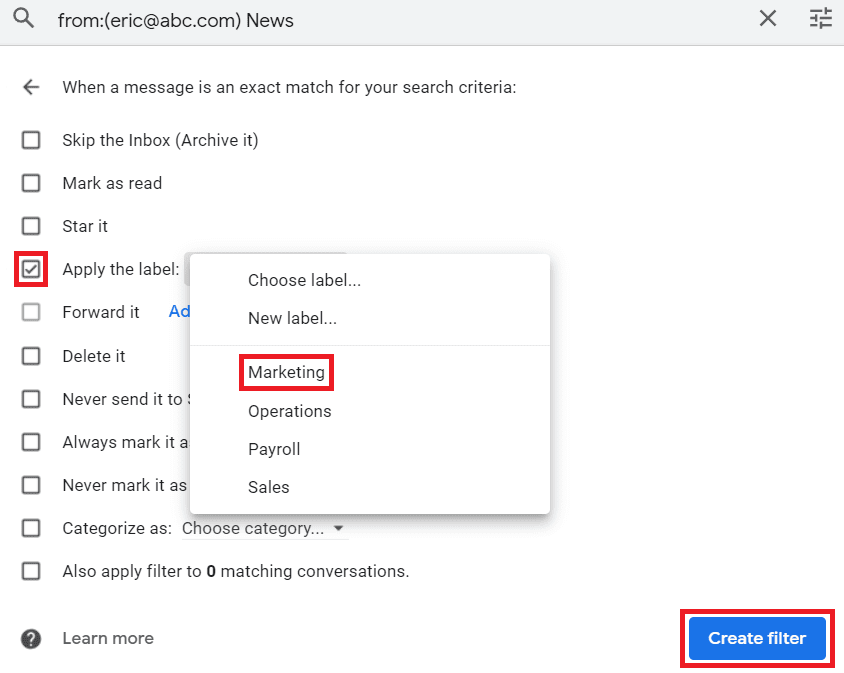
Gmail will now automatically send incoming emails matching the criteria you provided to a specific label.
Next, we’ll explore using labels on Gmail’s mobile apps.
How to Use Labels on the Gmail Mobile App
Gmail’s mobile app lacks much of the web app’s functionalities — you can’t create or edit labels, for instance.
However, you can:
I’ll first show you how to add a label to your emails with Gmail’s mobile app.
Note: The steps for adding labels to emails and moving emails to other labels are virtually the same for Android and iOS devices. However, the Gmail Android app doesn’t let you automatically label messages, while the Gmail iOS app does.
A. How to Add a Label to Emails on the Gmail Mobile App
On the Gmail mobile app, you can choose to assign a label to an email or assign a label to multiple emails at once.
I’ll go over both methods here.
Method 1: Assign a Label to a Single Email
Step 1
Open the Gmail app on your mobile device.
Step 2
Select an email and open it.
Step 3
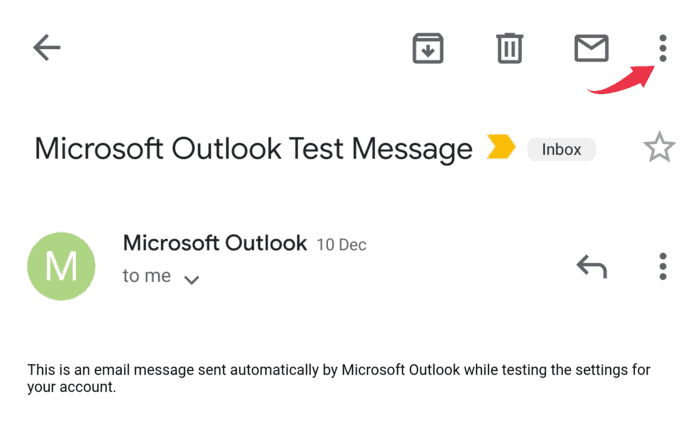
In the top right-hand corner of the screen, tap the More options button.
The button looks like three vertical dots on an Android phone. On an iPhone and other iOS devices, the button has three horizontal dots.
Step 4
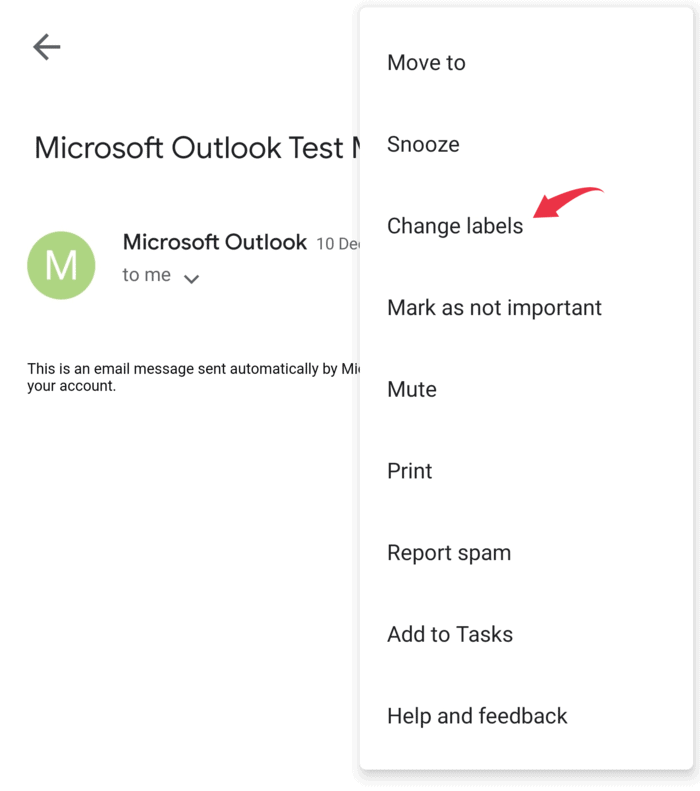
Tap Change labels.
Step 5
Select the multiple labels you want to add to the email and tap OK.
Method 2: Assign a Label to Multiple Emails
Step 1
Open the Gmail app on your mobile device.
Step 2
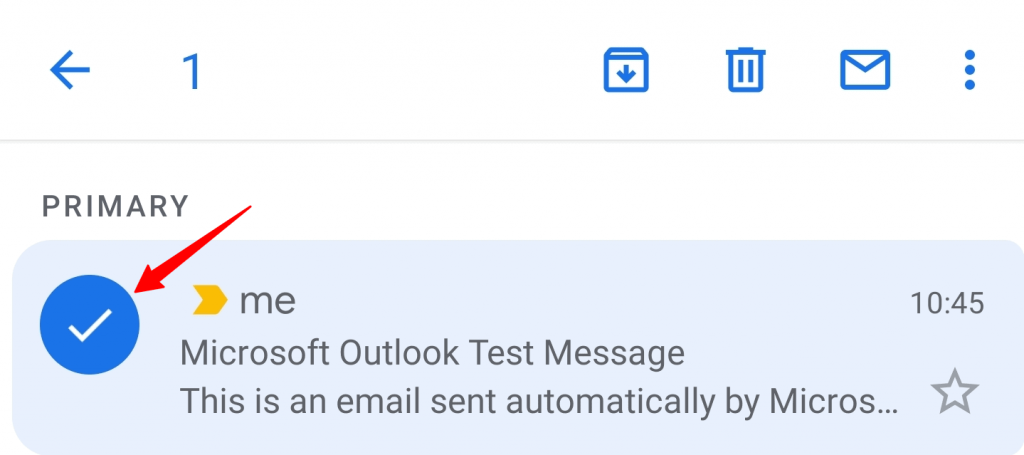
Select the email messages in your Gmail inbox you want to assign labels.
Step 3
Tap the three vertical dots (on Android devices) or three horizontal dots (on iOS devices) icon at the upper right corner.
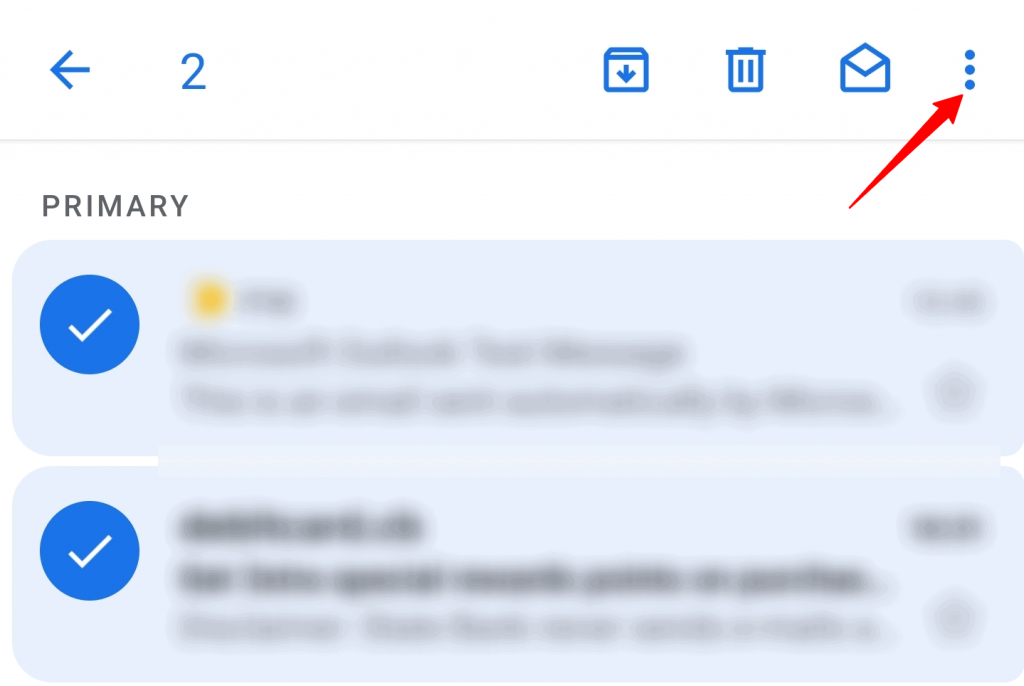
Step 4
Tap Move to.
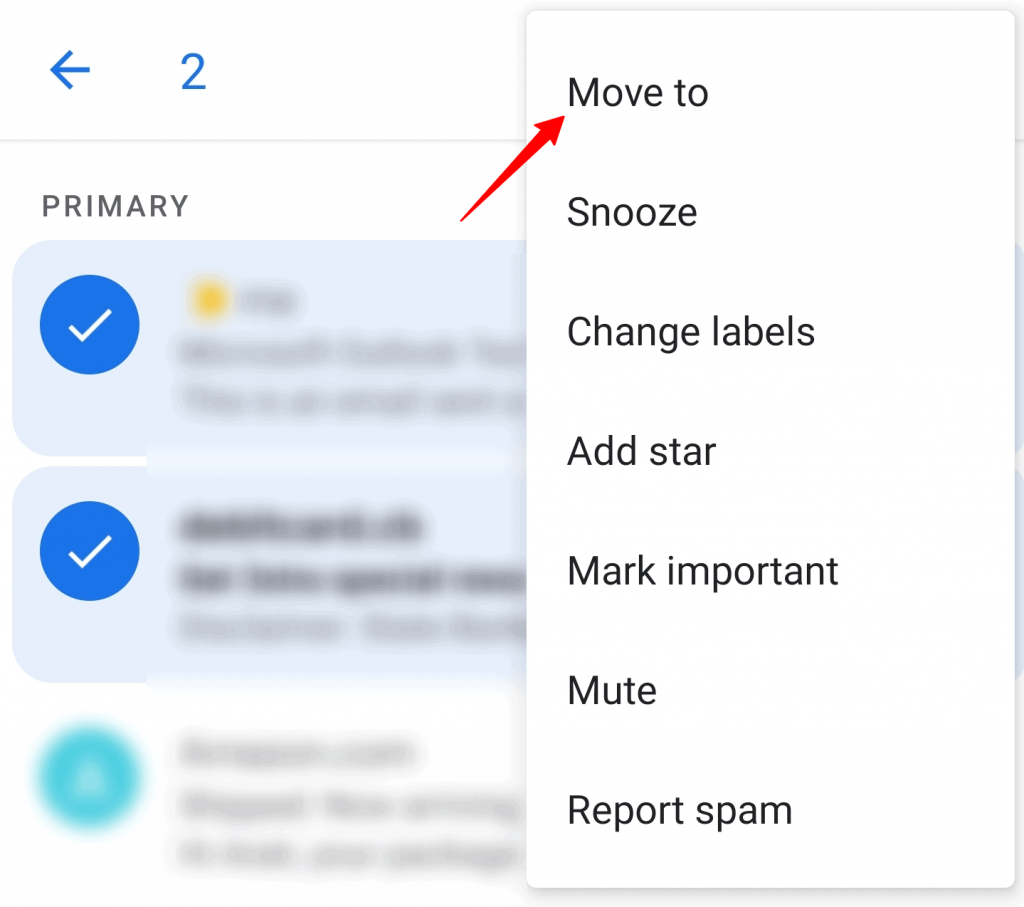
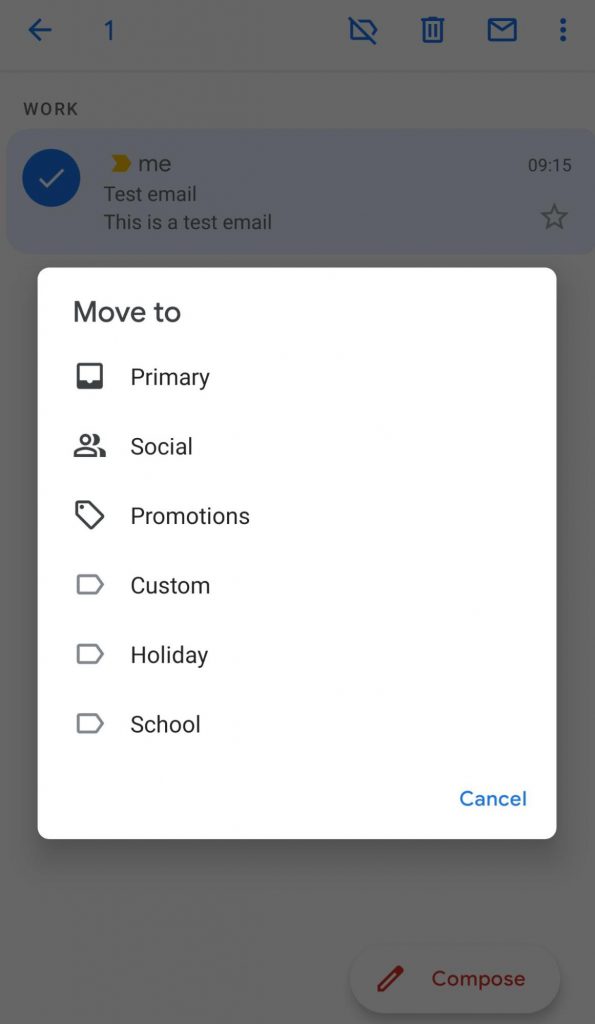
Here’s what the Move to (destination Gmail folder) window looks like:
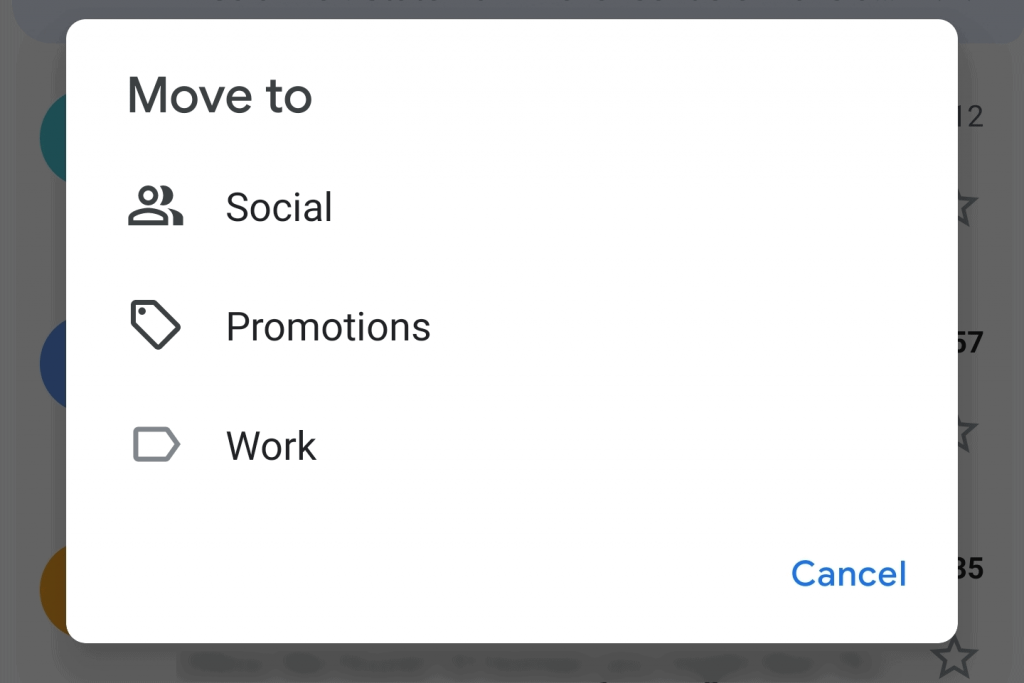
From here, select the multiple labels you want to assign to the selected emails.
B. How to Move Emails to Another Label on the Gmail Mobile App
You can quickly move emails from one label to another on the Gmail mobile app.
Here’s how to do it:
Step 1
Open the Gmail mobile app and click the Menu button on the top left.
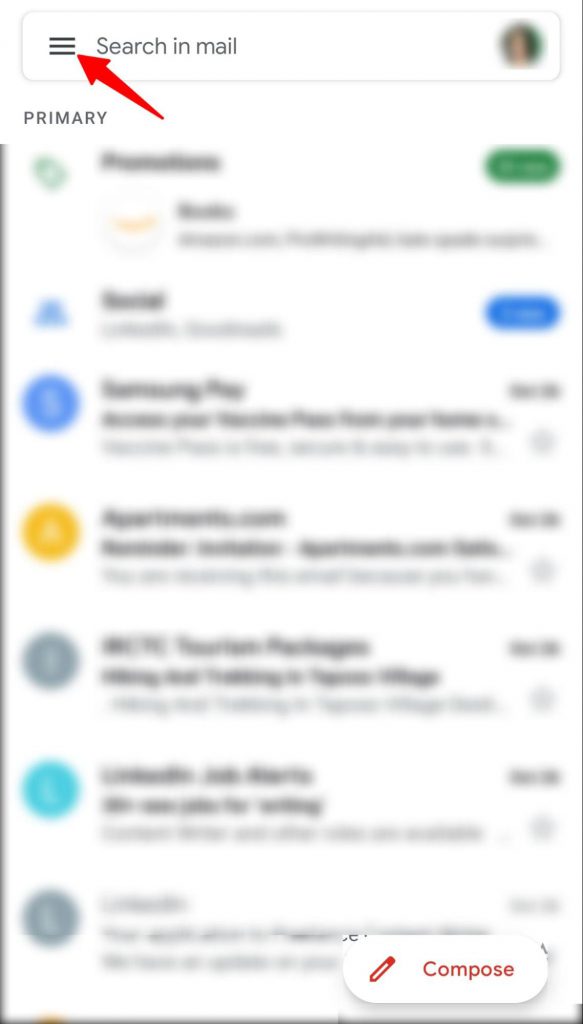
Step 2
Scroll down the menu bar until you find the label containing the emails you want to move.
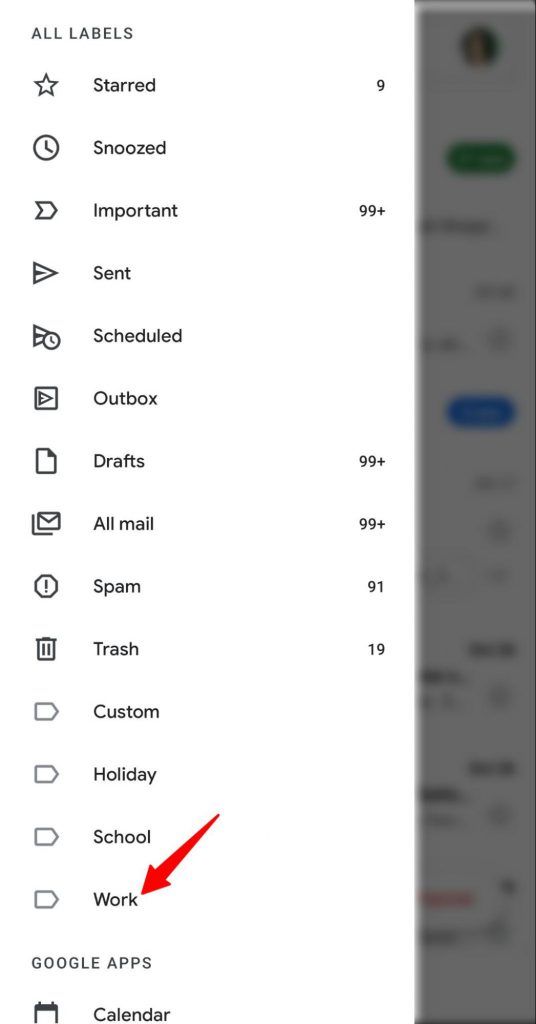
Step 3
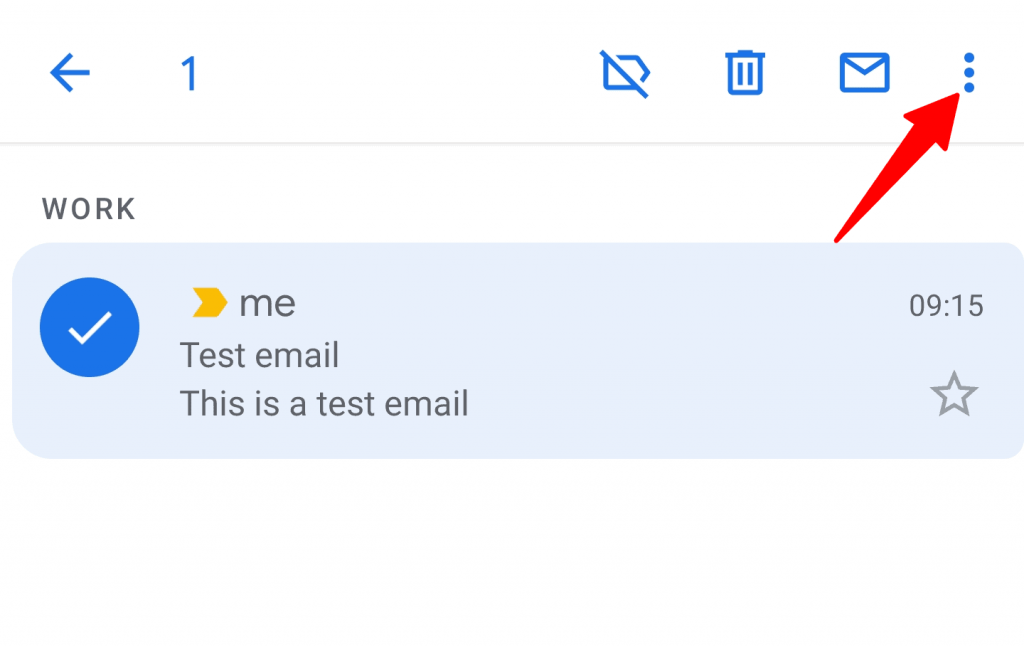
Select the emails you wish to move to another folder and click on the three dots icon on the upper right corner.
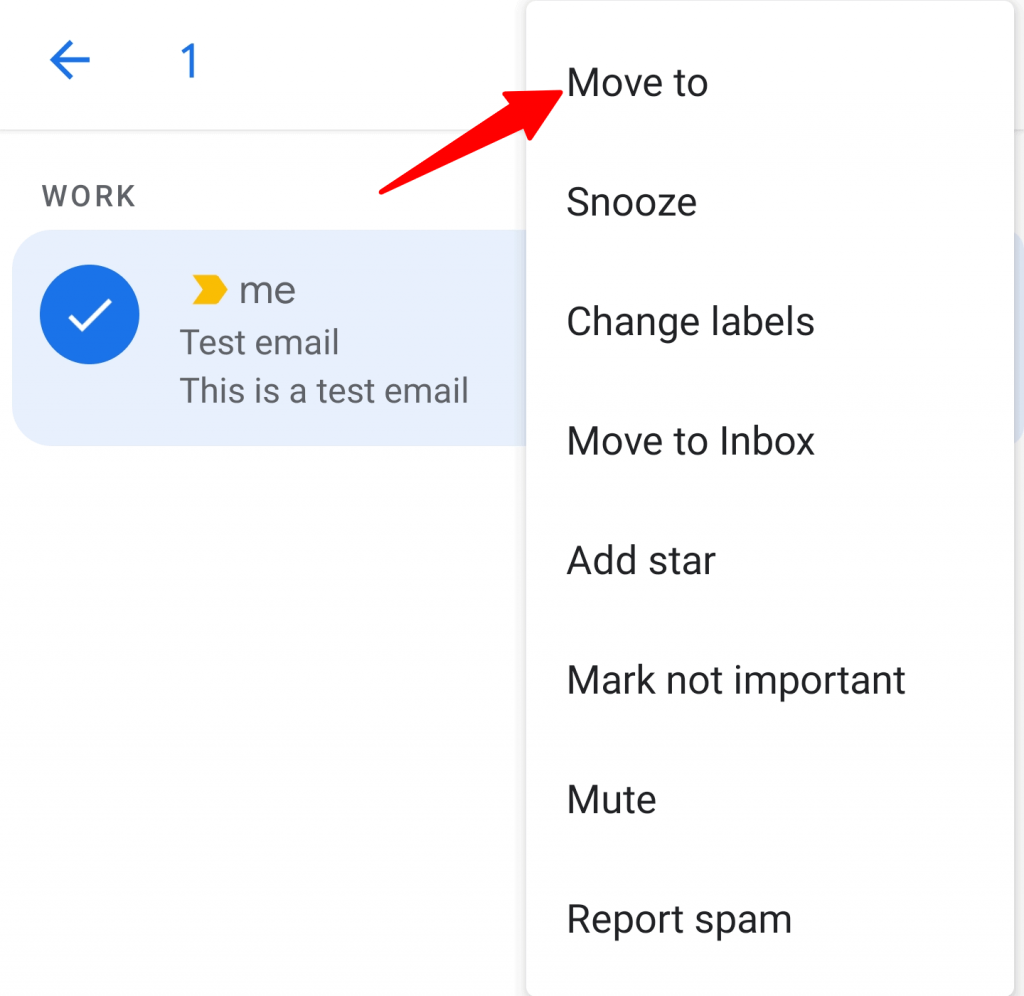
Step 4
In the dialog box that opens, tap on Move to.
Now, select the destination label to which you want to move the emails.
You can also automatically redirect emails to a specific label using the Gmail mobile app.
Wondering how?
Read on to find out.
C. How to Automatically Label Incoming Emails on the Gmail iOS App
Note: While you can automatically assign labels to emails on the Gmail mobile app for iOS devices, you can’t do so in Gmail’s Android mobile app.
Let’s go over the steps for assigning labels automatically to emails on Gmail’s iOS app:
Step 1
Open the Gmail app on your iOS device and click the Menu icon on the top right corner.
![]()
Step 2
Scroll down the menu bar and tap the Gmail Settings button.
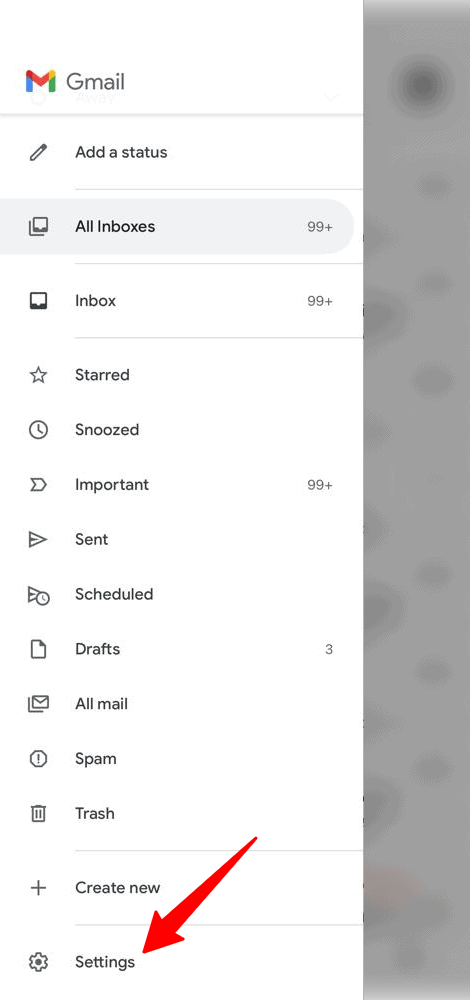
Step 3
Select your Gmail account.
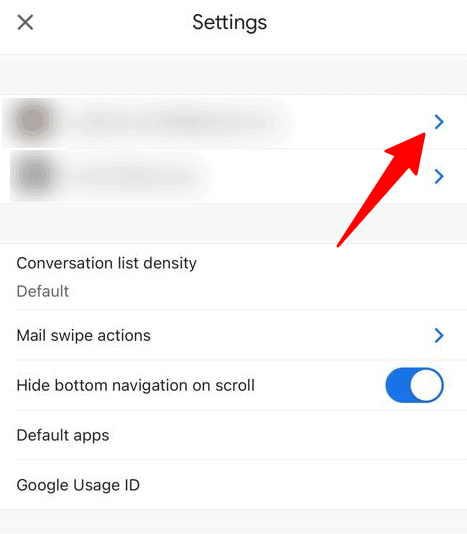
Step 4
Click on Label settings in the Settings Menu that opens.
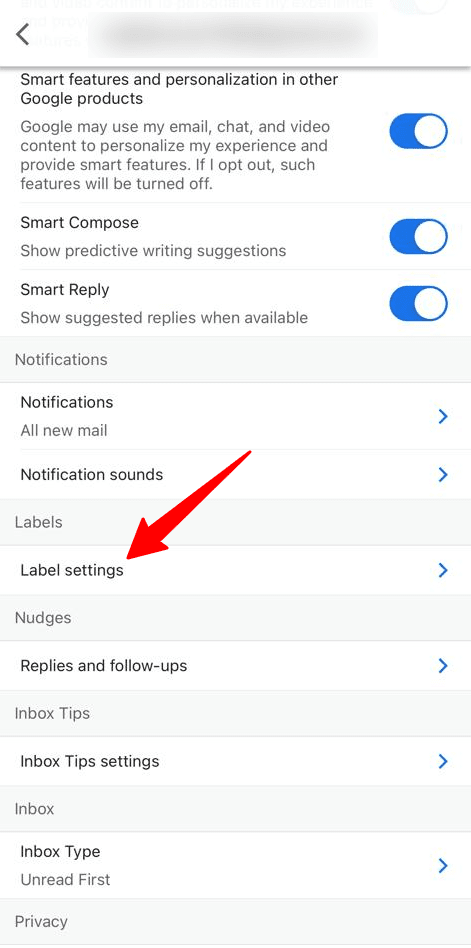
Step 5
Tap the label you want to assign to the emails.
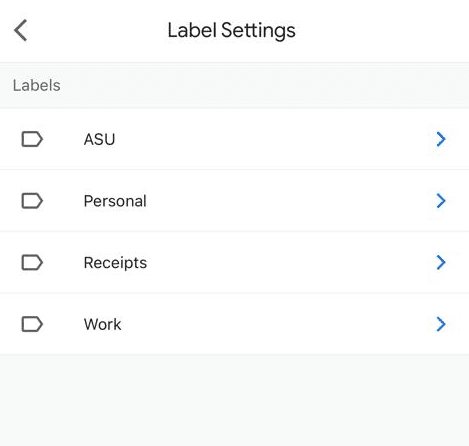
Step 6
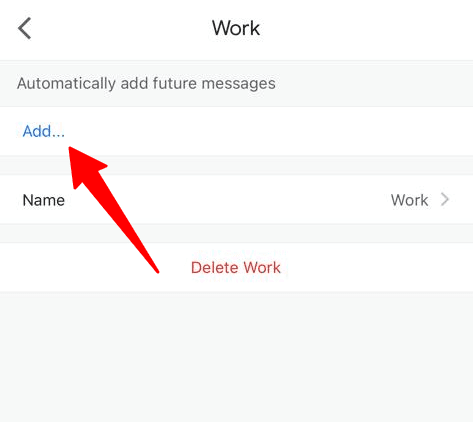
Click on Add….
Step 7
Enter a name or email address in the From field.
You can also add other criteria (for example, a keyword) for filtering emails. For this, click on And… and add any additional filtering criteria for the emails.
Then, click Save.
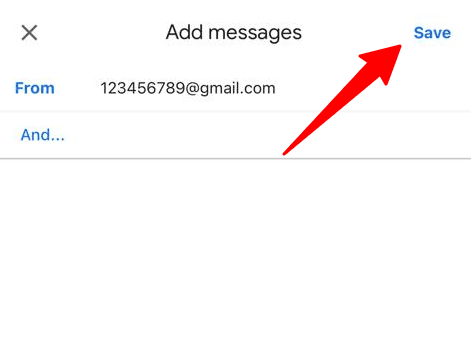
Later, any future emails coming in that match the given criteria will automatically be assigned labels.
Now that we have seen how to use and manage labels on Gmail’s web and mobile apps, I’ll share a few tips to help you make the most of this handy feature:
3 Actionable Tips to Help You Make the Most of Gmail Labels
Here are three practical tips to help you use Gmail’s label feature to its fullest potential:
Tip #1: Use Labels to Improve Your Search Results
You can use Gmail’s labels for more than just organizing your inbox.
Labels can also be used to filter out unwanted emails and narrow your search when you’re looking for important emails in your message list. Using labels to improve your search can be done on all platforms, and the steps remain the same whether you’re using mobile or desktop.
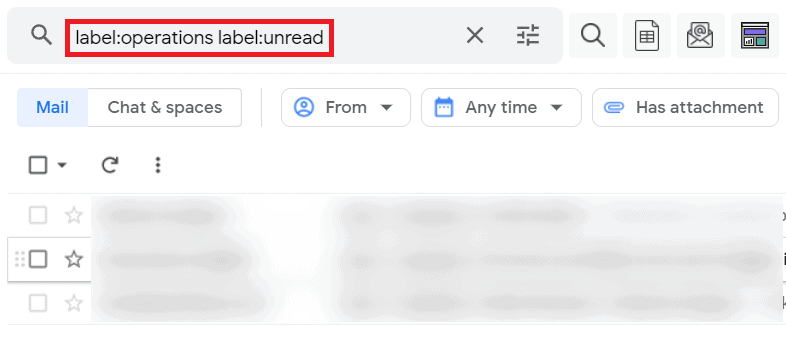
For example, if you want to quickly find unread messages in your message list with the “Operations” label, type label:operations label:unread into the search bar.
Hit search, and you’ll find only see unread messages marked with the “Operations” label.
Need to narrow your search even further?
Read my comprehensive article on how to use Gmail Search for some handy tips.
Tip #2: Add Labels When Composing Your Email Message
Gmail labels aren’t reserved only for your incoming emails.
You can also add them to those important emails you’re sending out. This way, you can organize your outgoing emails better.
Wondering how to add a label to your Gmail draft?
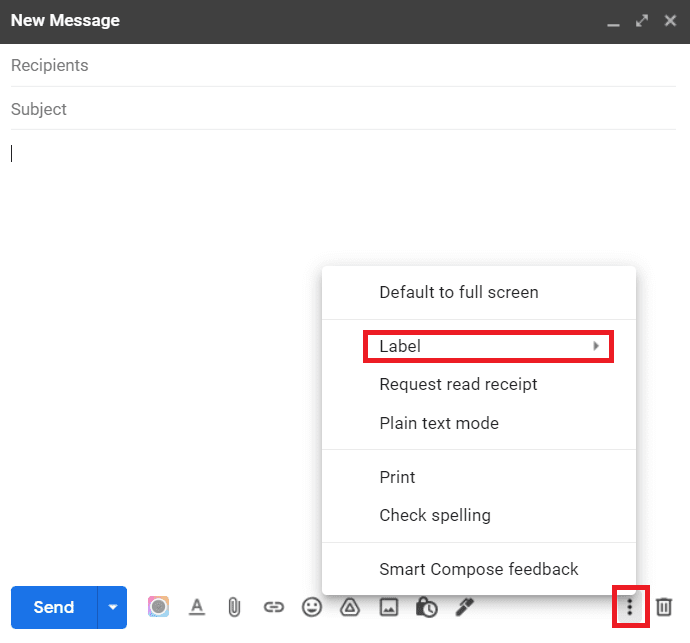
Just click the three dots icon at the bottom right of your new Gmail message window, select Label, and choose from your existing label list or create a new one — it’s that easy!
Tip #3: Build Mailing Lists Using Gmail Labels
It doesn’t matter if you’re a business owner, email marketer, or book club leader; we all need to maintain important mailing lists. However, manually creating a mailing list can be a time-consuming and tedious task.
Fortunately, you don’t have to do it manually anymore.
With powerful Gmail Chrome extensions like GMass, you can easily create massive mailing lists in seconds.
GMass works in tandem with the Gmail label feature to help you create email lists quickly.
To start using GMass, download the Chrome extension and sign up for free using your Gmail or Google Workspace (formerly G Suite) account.
Here’s how to use GMass to build an email distribution list using Gmail’s labels:
Step 1
Log in to Gmail and connect GMass to your Gmail account or Google Workspace account.
Step 2
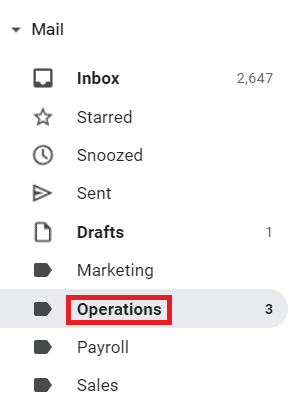
Select the label of your choice from the sidebar on the left.
Step 3
Click the “Build an email list from Gmail search results.” button (red magnifying glass icon).

Step 4
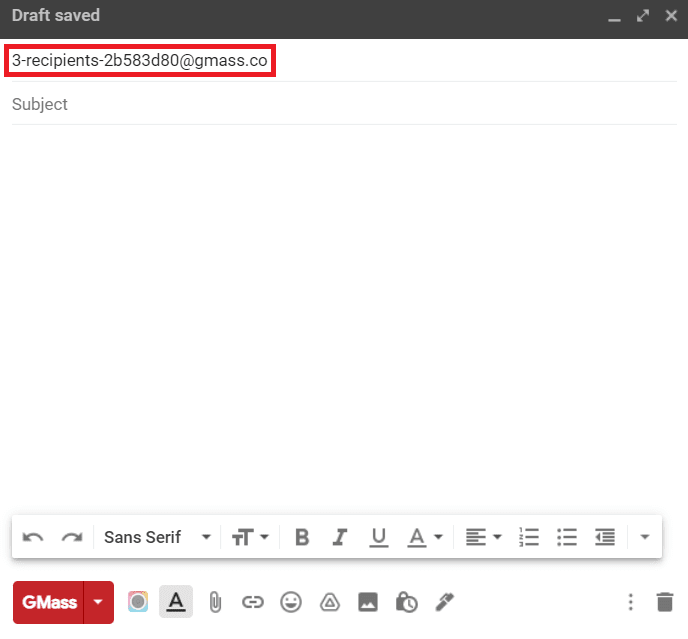
GMass will begin compiling a mailing list of every email address within that label. When complete, Gmail’s Compose window will appear where you can write your email.
Note: You can also create an email list in a Google Sheet and connect it with GMass to send out mail merge campaigns.
Step 5
Compose the subject and body of your email. When you’re ready to send, click the red GMass button.
However, that isn’t all GMass can do.
GMass also helps you:
- Automatically personalize the subject and body of the email.
- Schedule emails to be sent at a later time.
- Automatically send follow-up emails.
- Send behavior-based email campaigns.
- Analyze email performance with detailed reports.
- Check the sentiment scores on your email replies, and more.
Wrapping up
While Gmail’s label system may take some getting used to, labels are an easy way to organize your inbox quickly. They go beyond the traditional folder method — labels can be used to enhance your searches and automatically classify any incoming messages.
And with the right tools, they can even help you create email lists!
If you’re looking for hassle-free email management in Gmail, GMass is your best bet.
Download the Chrome extension today and sign up for free with your Gmail or Google Workspace account, and see the benefits for yourself!
Email marketing. Cold email. Mail merge. Avoid the spam folder. Easy to learn and use. All inside Gmail.
TRY GMASS FOR FREE
Download Chrome extension - 30 second install!
No credit card required


Hi I was trying to move the all mail folder to the top of the list to use easier and It disappeared. How do I get it back?
I appreciate you input.
thanks
The fact that in 2022, Google, who has used Gmail as one of its CORE PRODUCTS for like 15+ years, can’t even implement access to BASIC features in the mobile app like editing and creating labels, is absolutely incredible. I don’t get how a company with this much money manages to be so trash with its email UI on BOTH pc and mobile but my god, they have done it.
How. HOW.
I cannot do anything in Gmail that I’ve been able to do for years!! I cannot move an email to a folder. I have to use the Move icon at the top. No one has notified me of any such basic change. I cannot make a new folder using any of the above methods (of course, that makes sense because this article was written in 2021 and it is now 2023 and everything has changed but I cannot find anywhere that has the right directions for creating labels and sub-labels. I agree with the guy before me in a message on December 23, 2022. How can Google, of all companies, leave its loyal and faithful members – for YEARS – without these basic features? I cannot even imagine the horrors that await me if I change my email address but I will if something is not done. Change it back or send us all the directions we need. How hard can that be for an email company to send a bulk email????
Hey there, I think your website might be having browser compatibility issues. When I look at your website in Ie, it looks fine but when opening in Internet Explorer, it has some overlapping. I just wanted to give you a quick heads up! Other then that, wonderful blog!