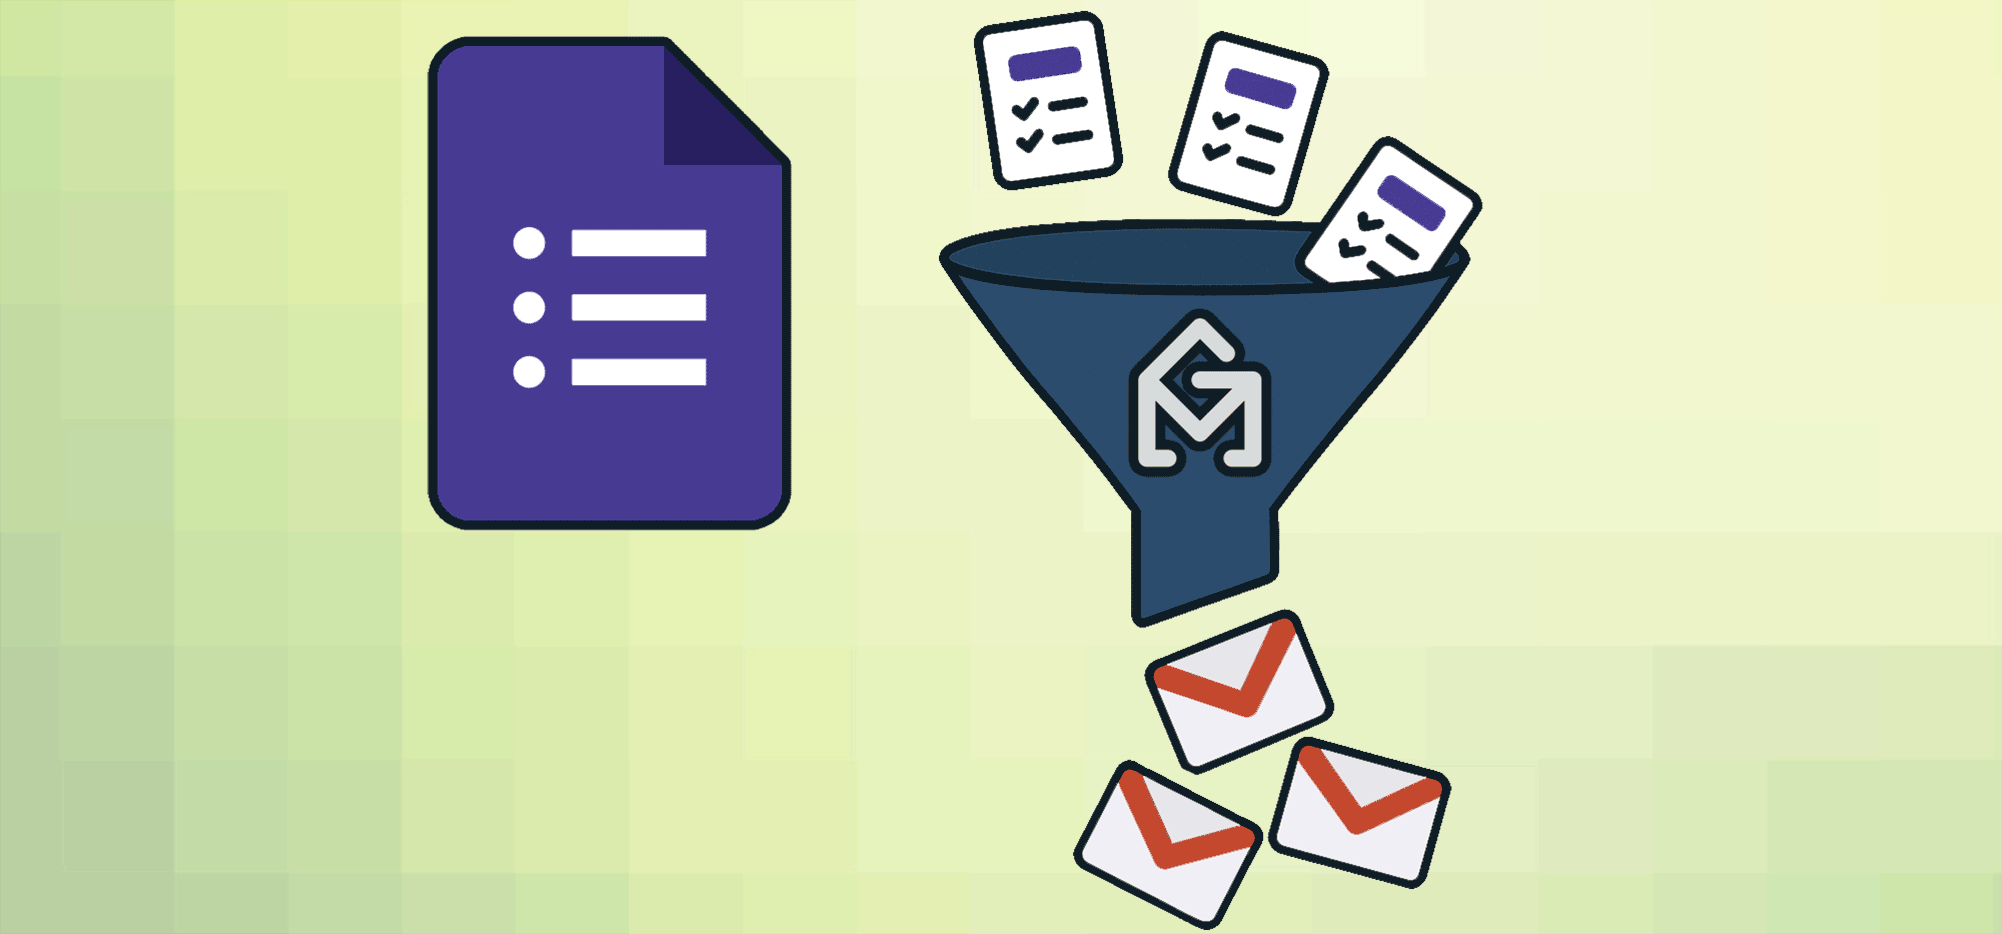
Want to run a Google Forms mail merge — where you automatically send an email to everyone who responds?
Good news: That’s not just doable… I’m gonna go ahead and say it’s easy.
Just not with the tools Google gives you natively.
In this article I’ll guide you step-by-step (with screenshots) through:
- Setting up a Google Form
- Feeding responses into a Google Sheet
- Then automatically sending an email (or even an entire sequence) to each respondent.
Let’s do it…
Google Forms Mail Merge: Table of Contents
- Step 1: Setting Up Your Google Form for Mail Merge Success
- Step 2: Connecting Your Form to Google Sheets
- Part 3: Creating Your Email Response Template in GMass
- Step 4: Set Up the Recurring Automation
- Step 5: Initiate the Campaign
- Ready to Run a Google Forms Mail Merge with GMass?
Step 1: Setting Up Your Google Form for Mail Merge Success
Before we dive into automation, let’s make sure your Google Form is structured for mail merge responses.
You have quite a bit of flexibility here but there are a few best practices.
Collect email addresses with your Google Form
This really should go without saying, but you need to collect email addresses in your Google Form if you’re going to, you know, send people emails.
You have two options for collecting email addresses: You can add an email address field to your Google Form, or you can require respondents to log into their Google account to fill out your form.
I prefer the second option for three reasons:
- When people’s email addresses are automatically collected, that leaves one less form field for them to fill out. (The more fields, the more people who quit filling out the form before they’re done.)
- Requiring log in makes sure people give you a real, valid email address.
- Requiring log in eliminates the risk of typos in email addresses.
However, if you have a lot of respondents who aren’t using Google accounts, then maybe this isn’t the best route.
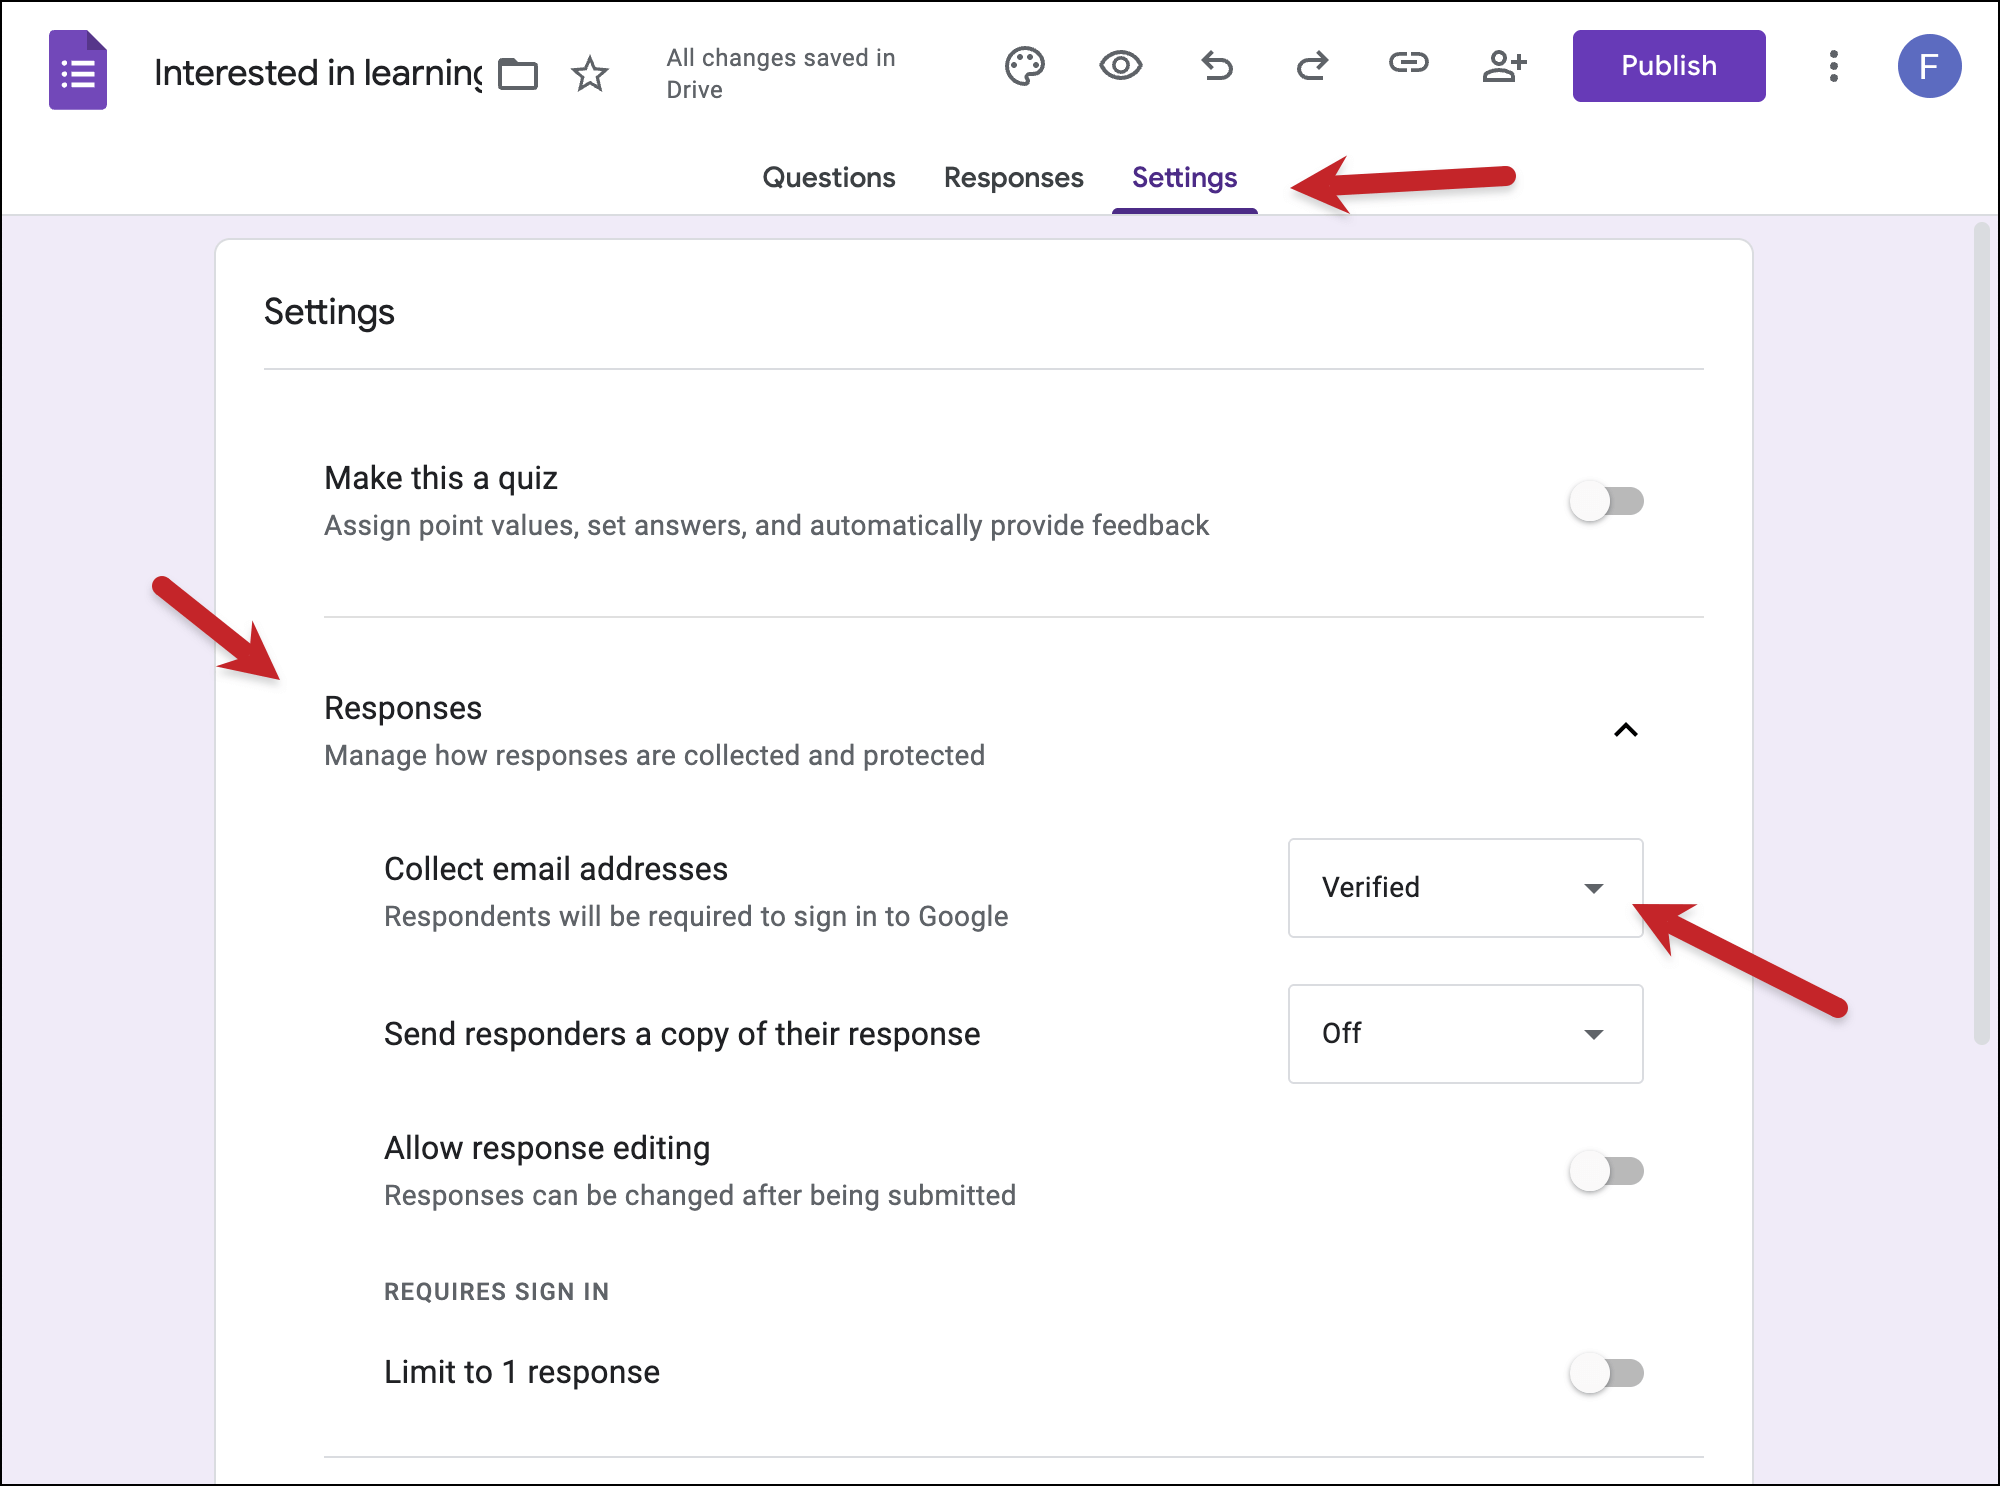
To automatically collect emails, in your Google Form, click on the Settings tab, then click on the Responses section. Then, in the Collect email addresses field, choose Verified.
Beyond email addresses, you can put pretty much anything you want to collect in your Google Form.
Test your Google Form with your own email (for two reasons)
After you publish your Google Form…
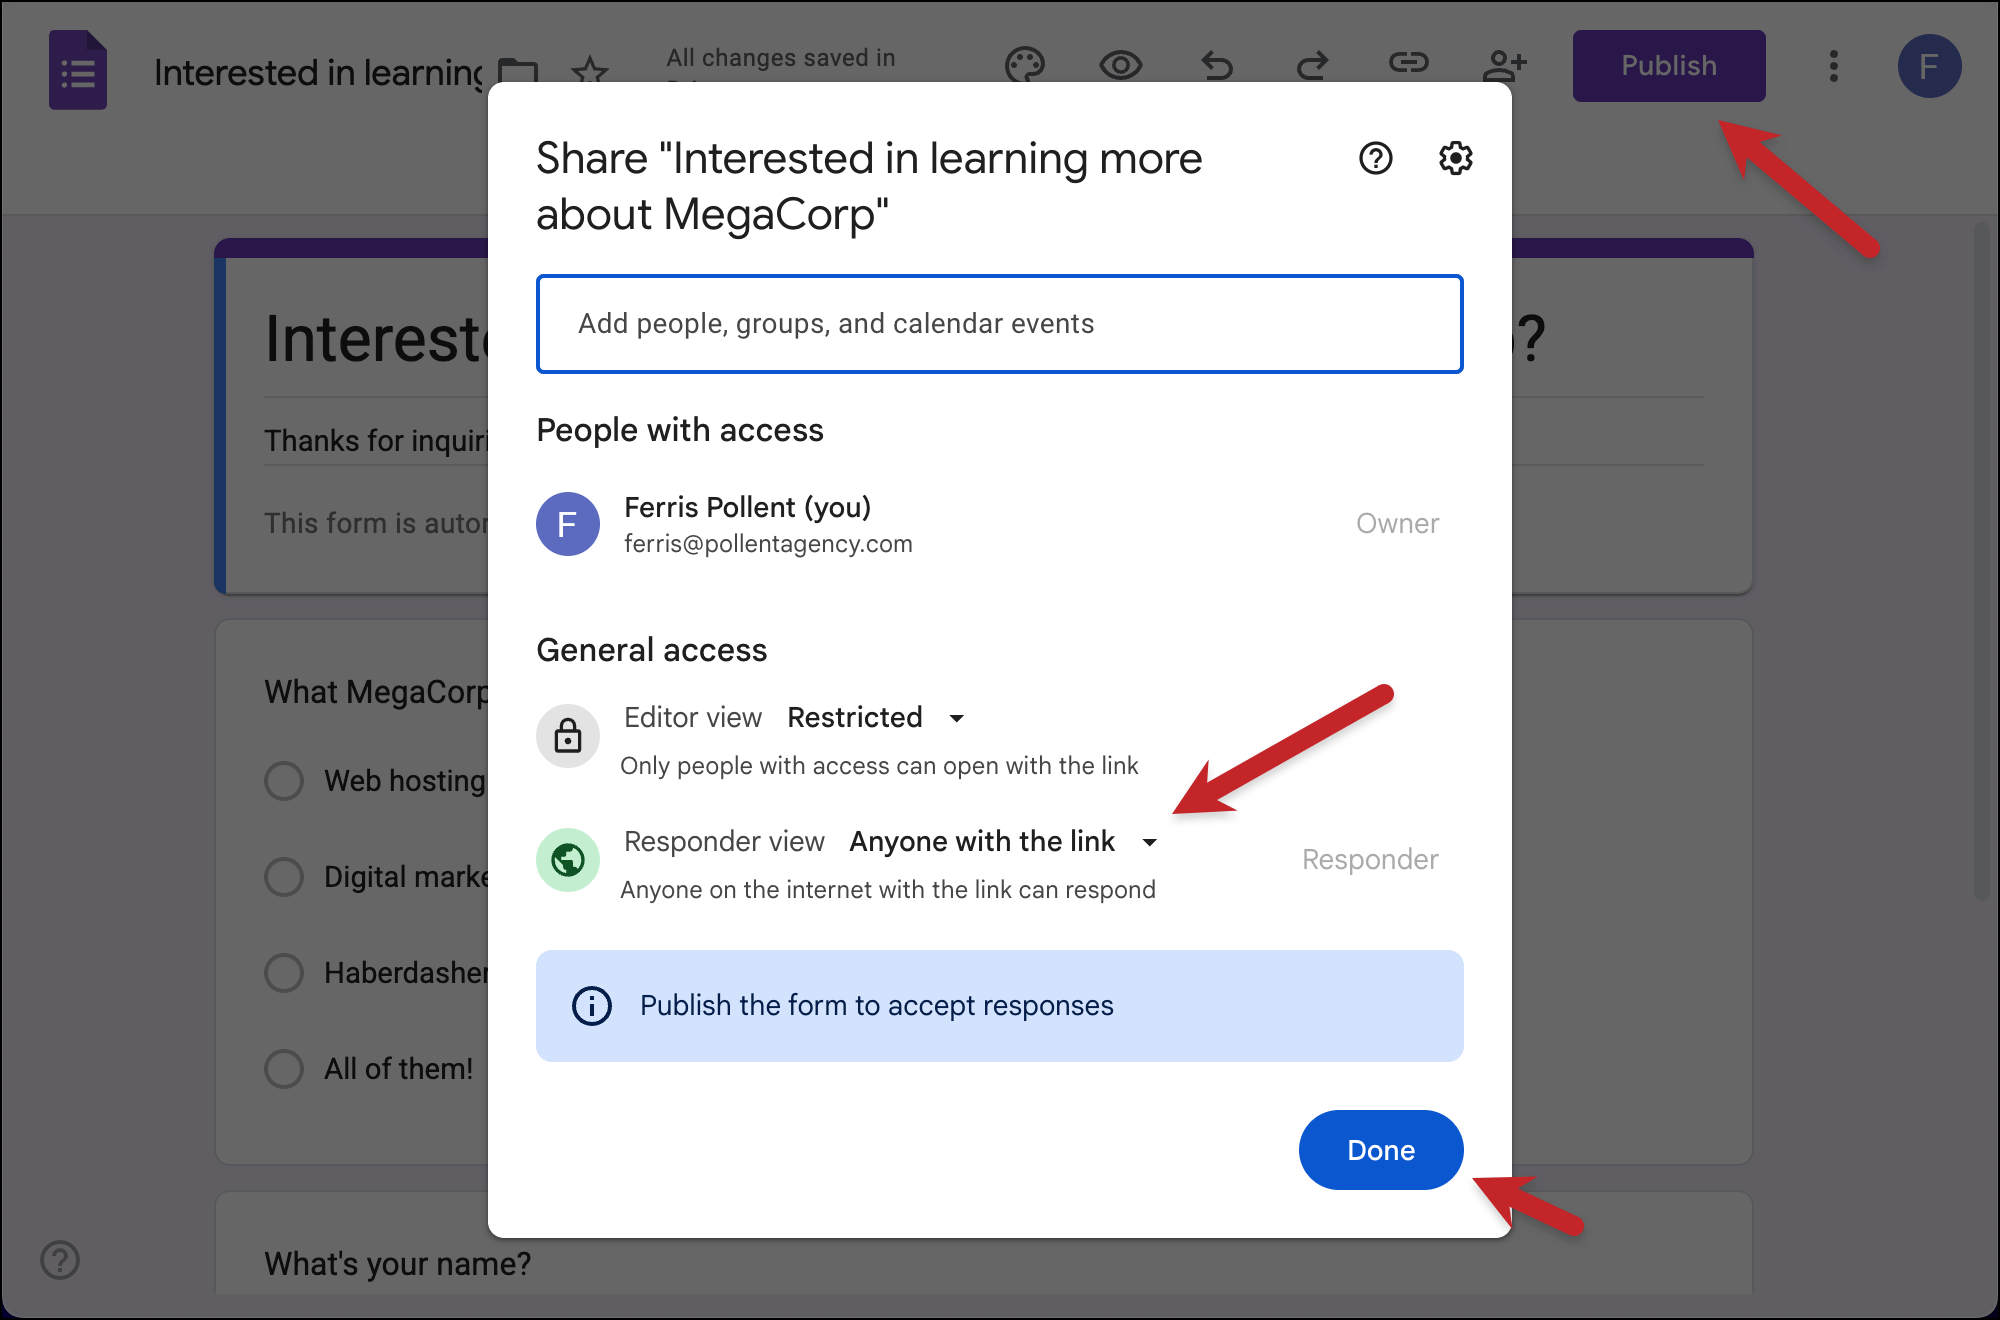
…you should always try it out before you share it with other people.
The first reason is, of course, you want to make sure the form flows smoothly and all your fields are showing up correctly.
But the second reason? We’re thinking ahead to the automated email campaign we’re going to build based off this form, and you need a “starter” respondent in order to set it up. You should be that first recipient.
Step 2: Connecting Your Form to Google Sheets
Now that your form is ready, let’s get all the responses feeding automatically into a Google Sheet.
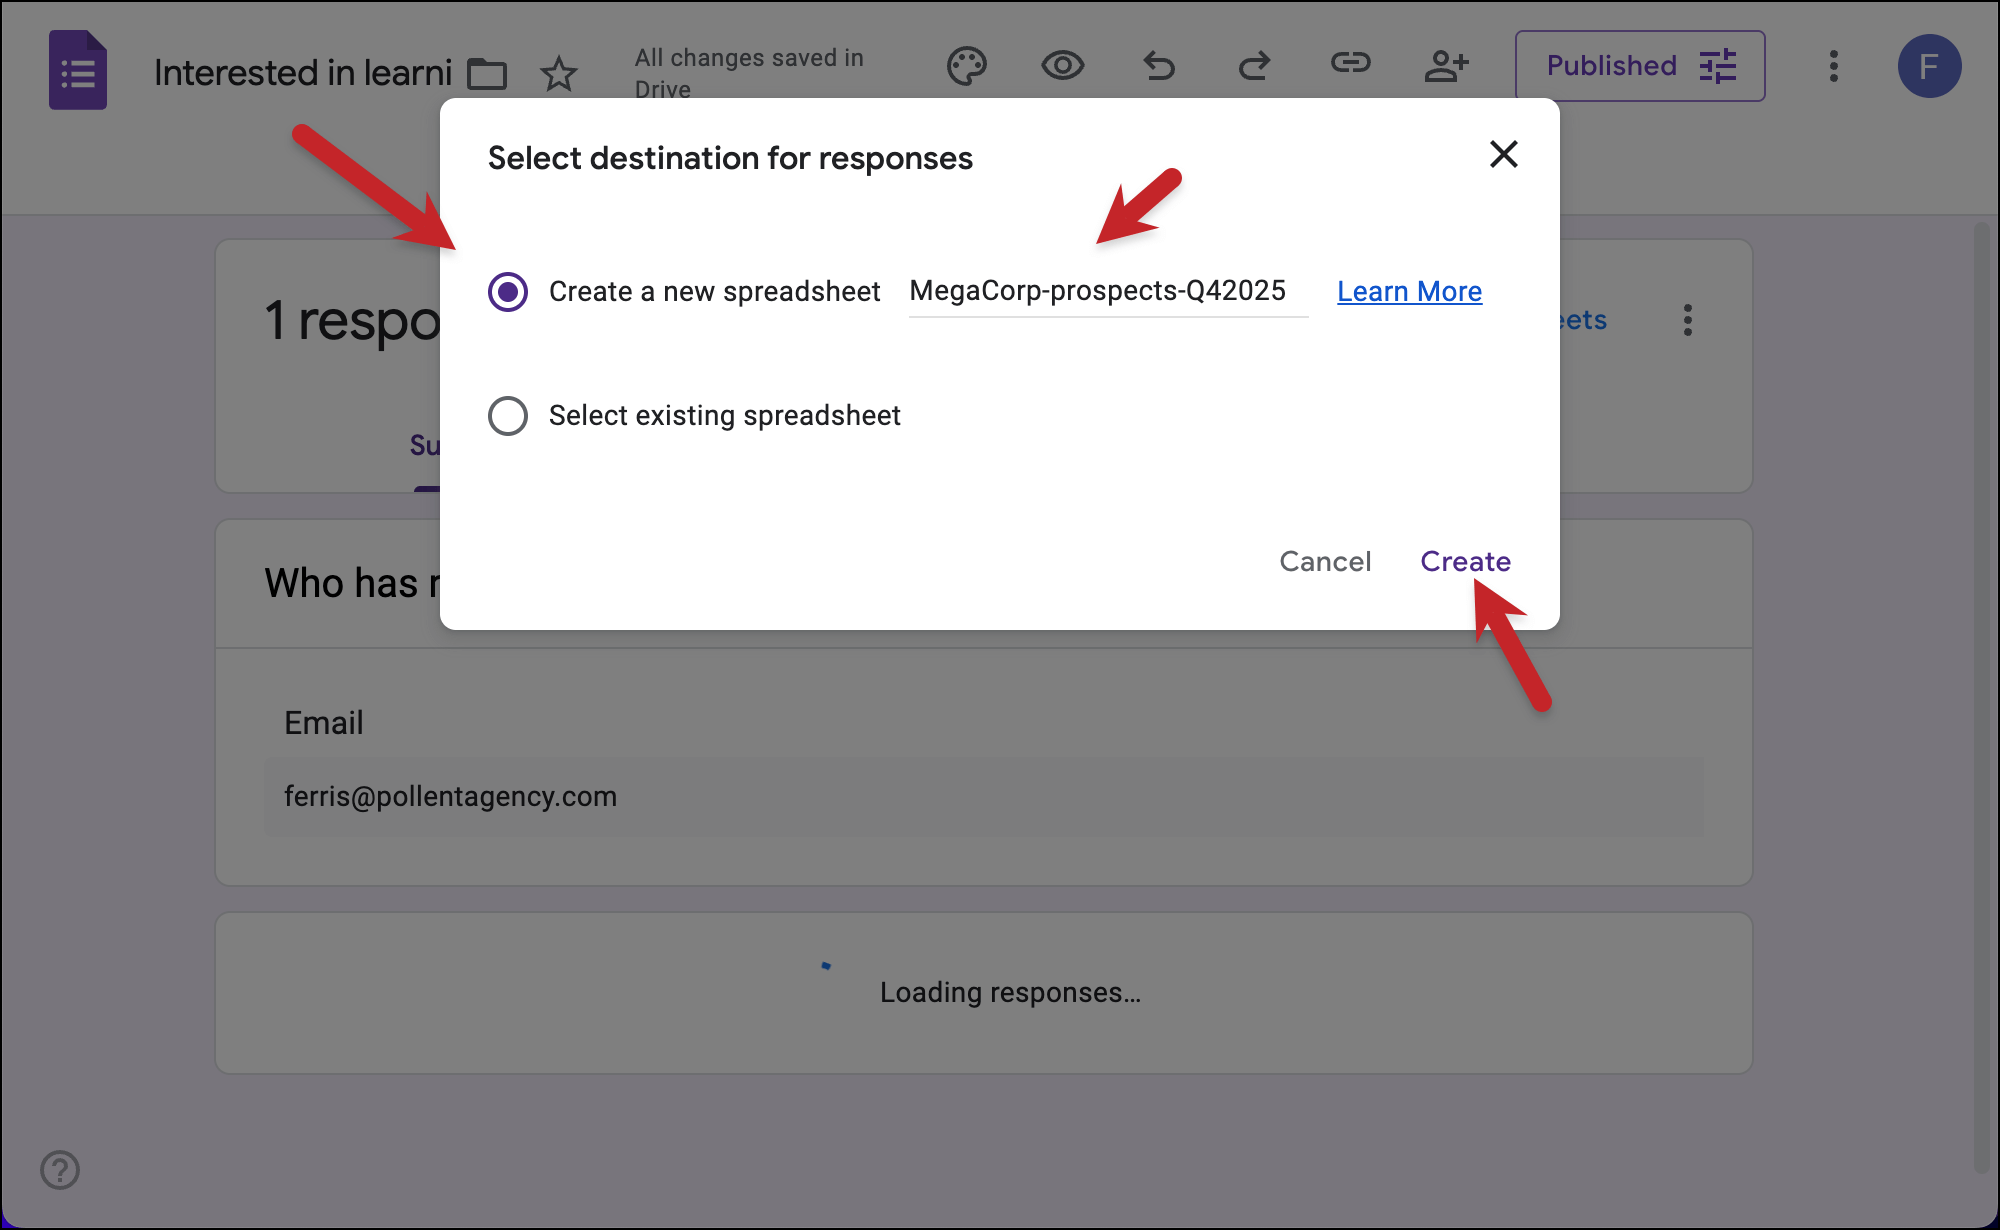
In Google Forms, go to the Responses tab. Then click the Link to Sheets link in the top right.
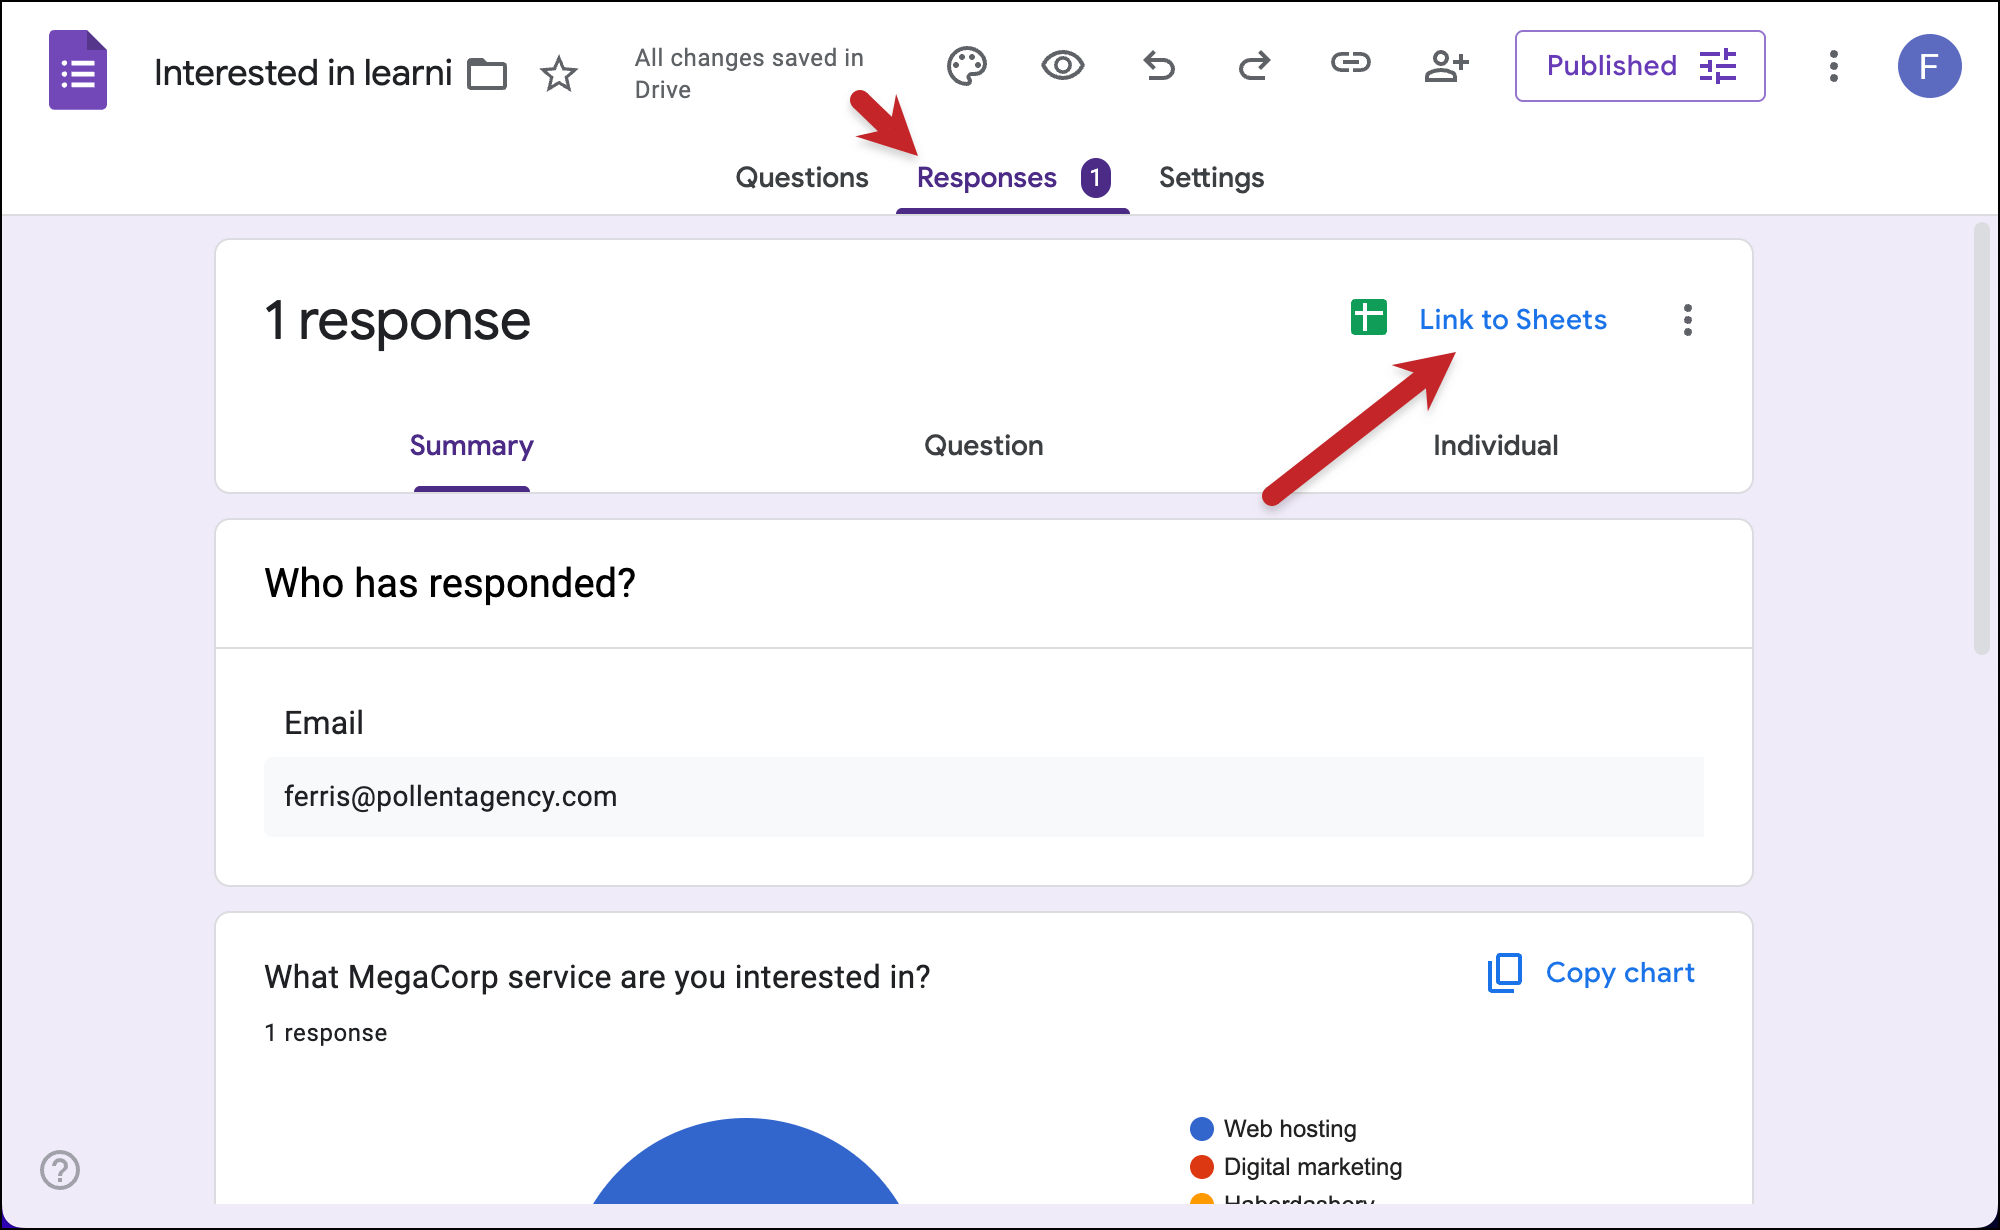
Choose Create a New Spreadsheet. You can use the default name (the title of your form) or give your Google Sheet a more concise name. (In my example, I’ve given it a better name.)
Rename the columns in your Google Sheet
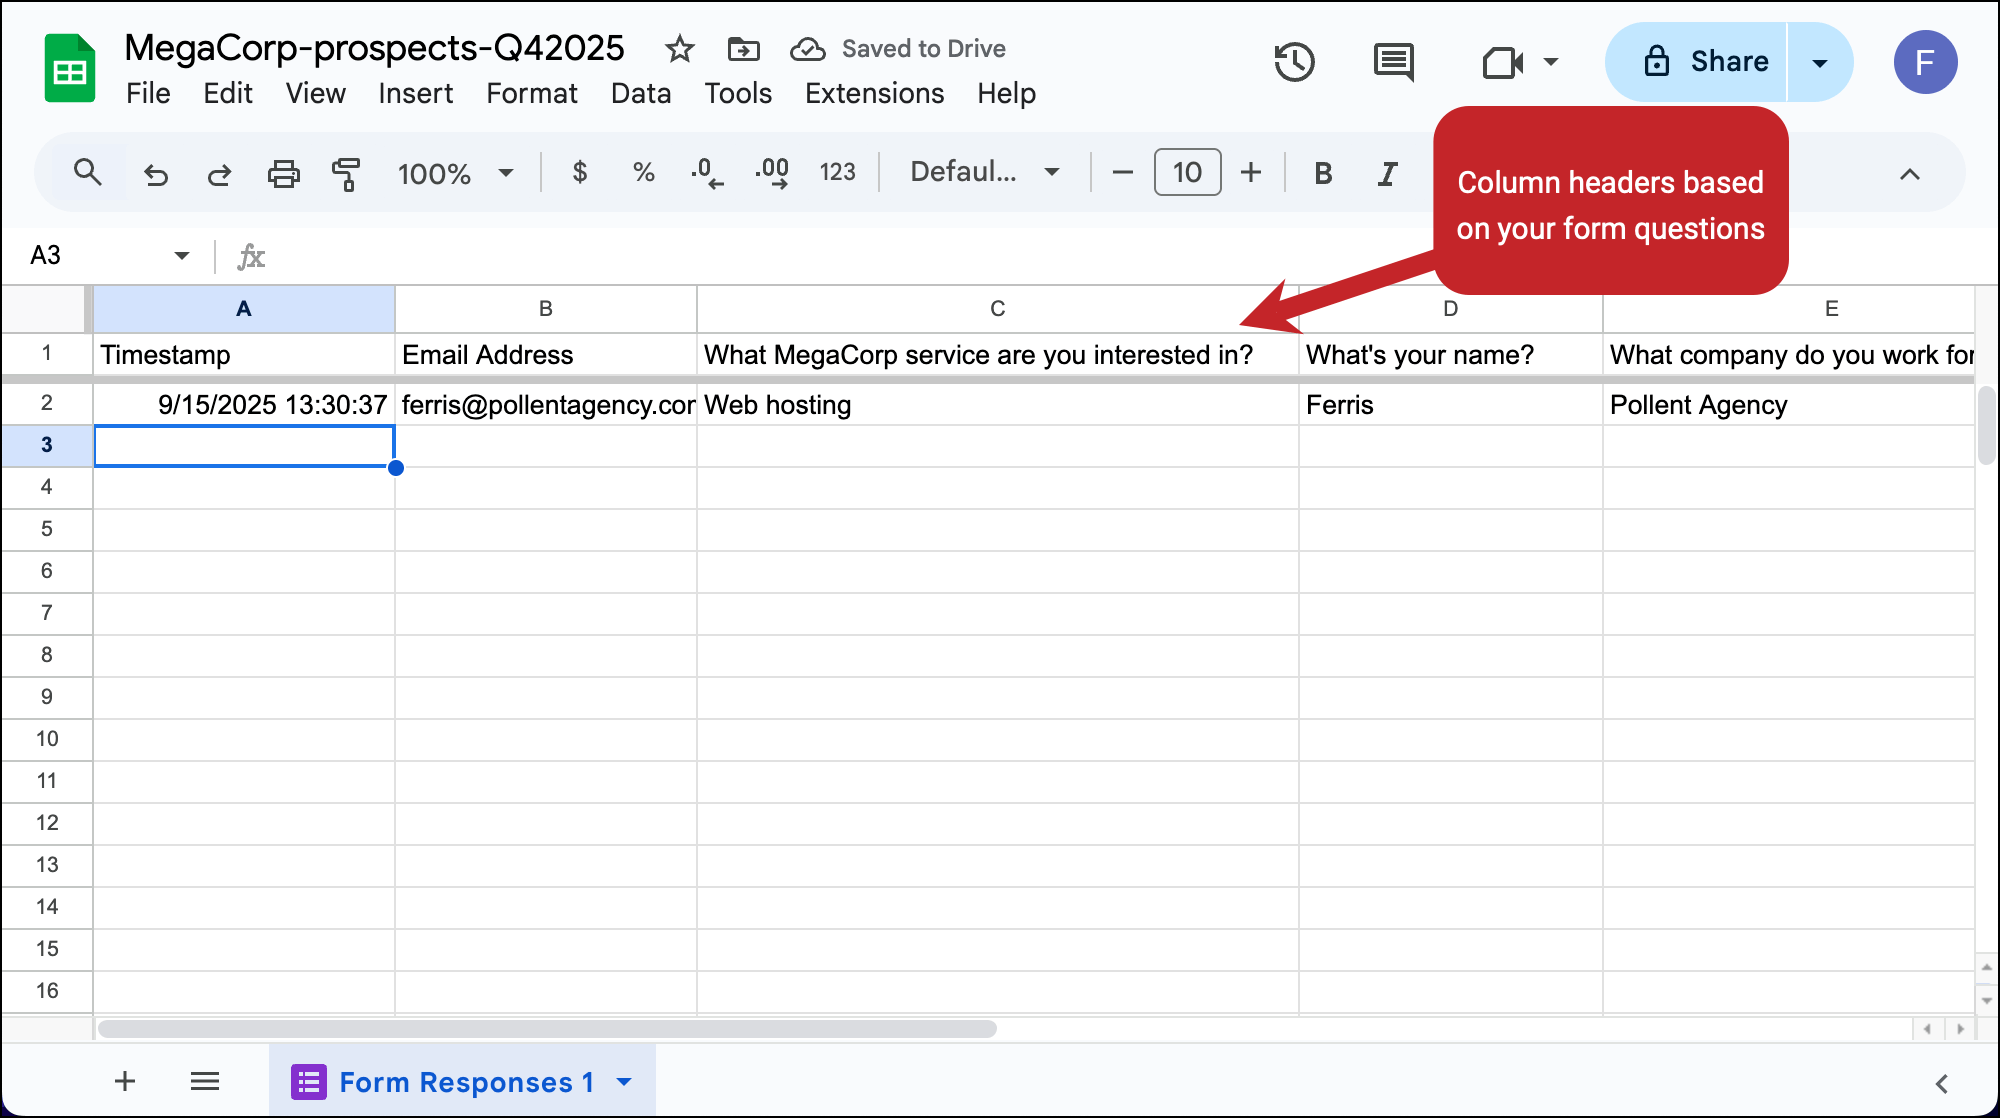
After you create the Google Sheet, it will open automatically in a new tab.
You’ll see one response in there (the one you did earlier as a test). You’ll also see column headers in row 1 based on the wording of your form questions.
In Gmail mail merge, your column headers in row 1 become your merge tags.
And as it stands, the column headers that Google Forms generated aren’t great for mail merge.
Mail merge best practices are to use column headers without spaces or special characters; your questions will probably have both.
But it’s ok. You can actually change the text of those column headers and it won’t affect how Google Forms feeds data into the Google Sheet. (However, avoid rearranging the order of the columns or deleting one.)
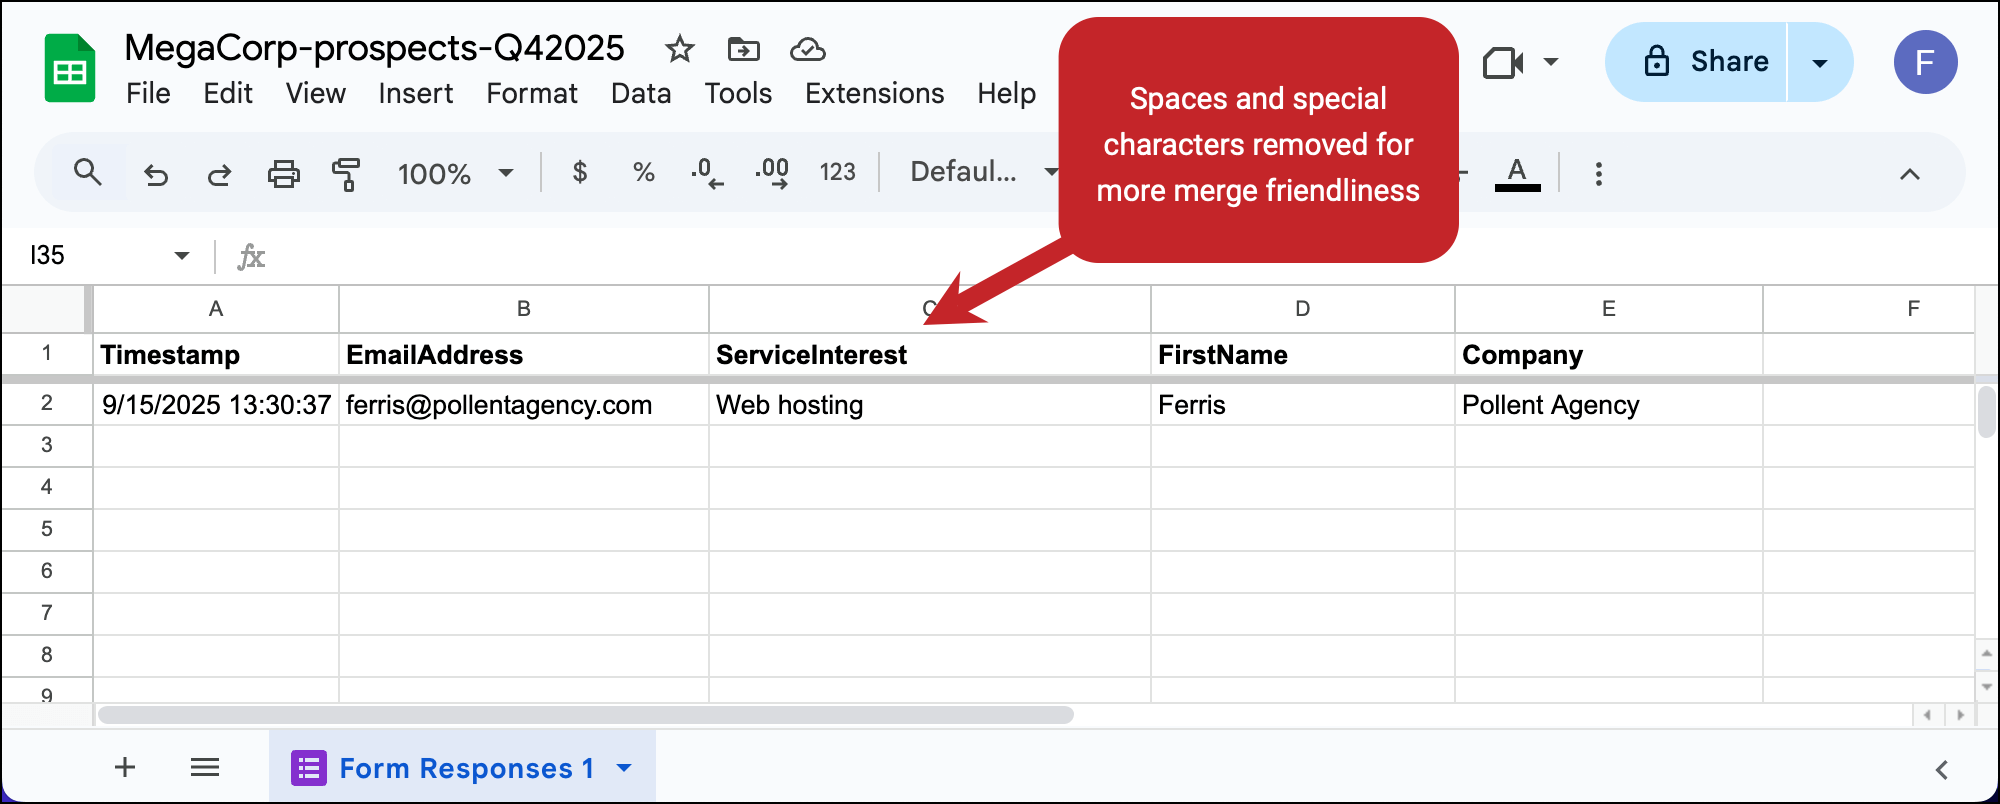
As you can see in my example, I renamed the column headers to be much more merge-friendly options.
And now, we’re already ready to set up your automated emails.
Part 3: Creating Your Email Response Template in GMass
We’re going to use GMass for Gmail mail merges here.
GMass is a mail merge and mass email tool that works inside Gmail. It’s also perfect for Google Forms mail merges.
Install the GMass Chrome extension
If you don’t have GMass, you can grab it from Google’s Chrome Web Store.
It’s free to try with no credit card required.
Just install it from the Chrome Web Store, give it the necessary permissions, and it’s good to go.
Connect your Google Sheet of form responses to a new GMass campaign
As you’ll see, GMass has added a few buttons to the Gmail interface.
Click the spreadsheet one next to the search bar.

Pick your Google Sheet from the dropdown menu. Then click Connect to Spreadsheet.
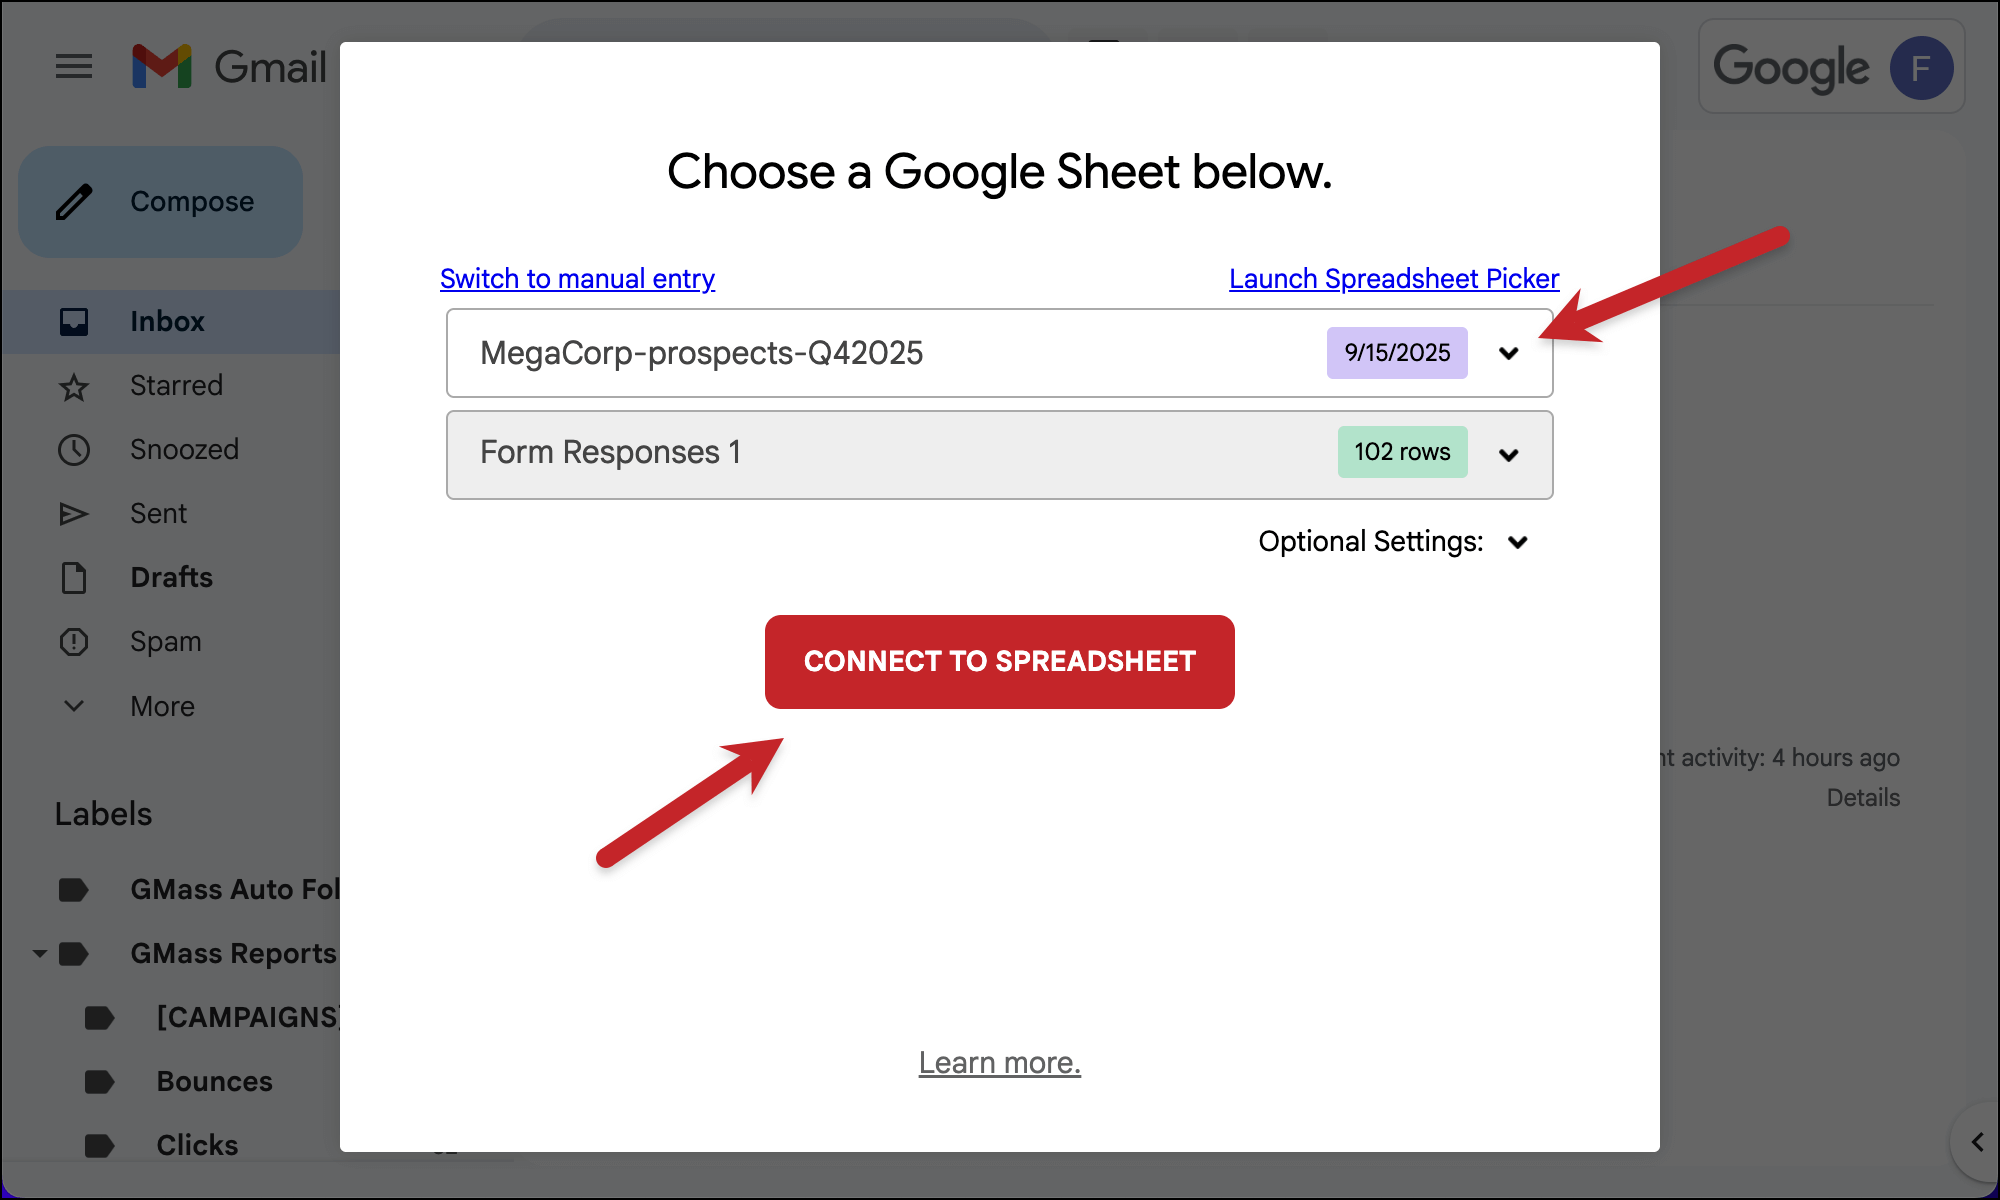
Your Google Sheet of responses is now connected to an email campaign.
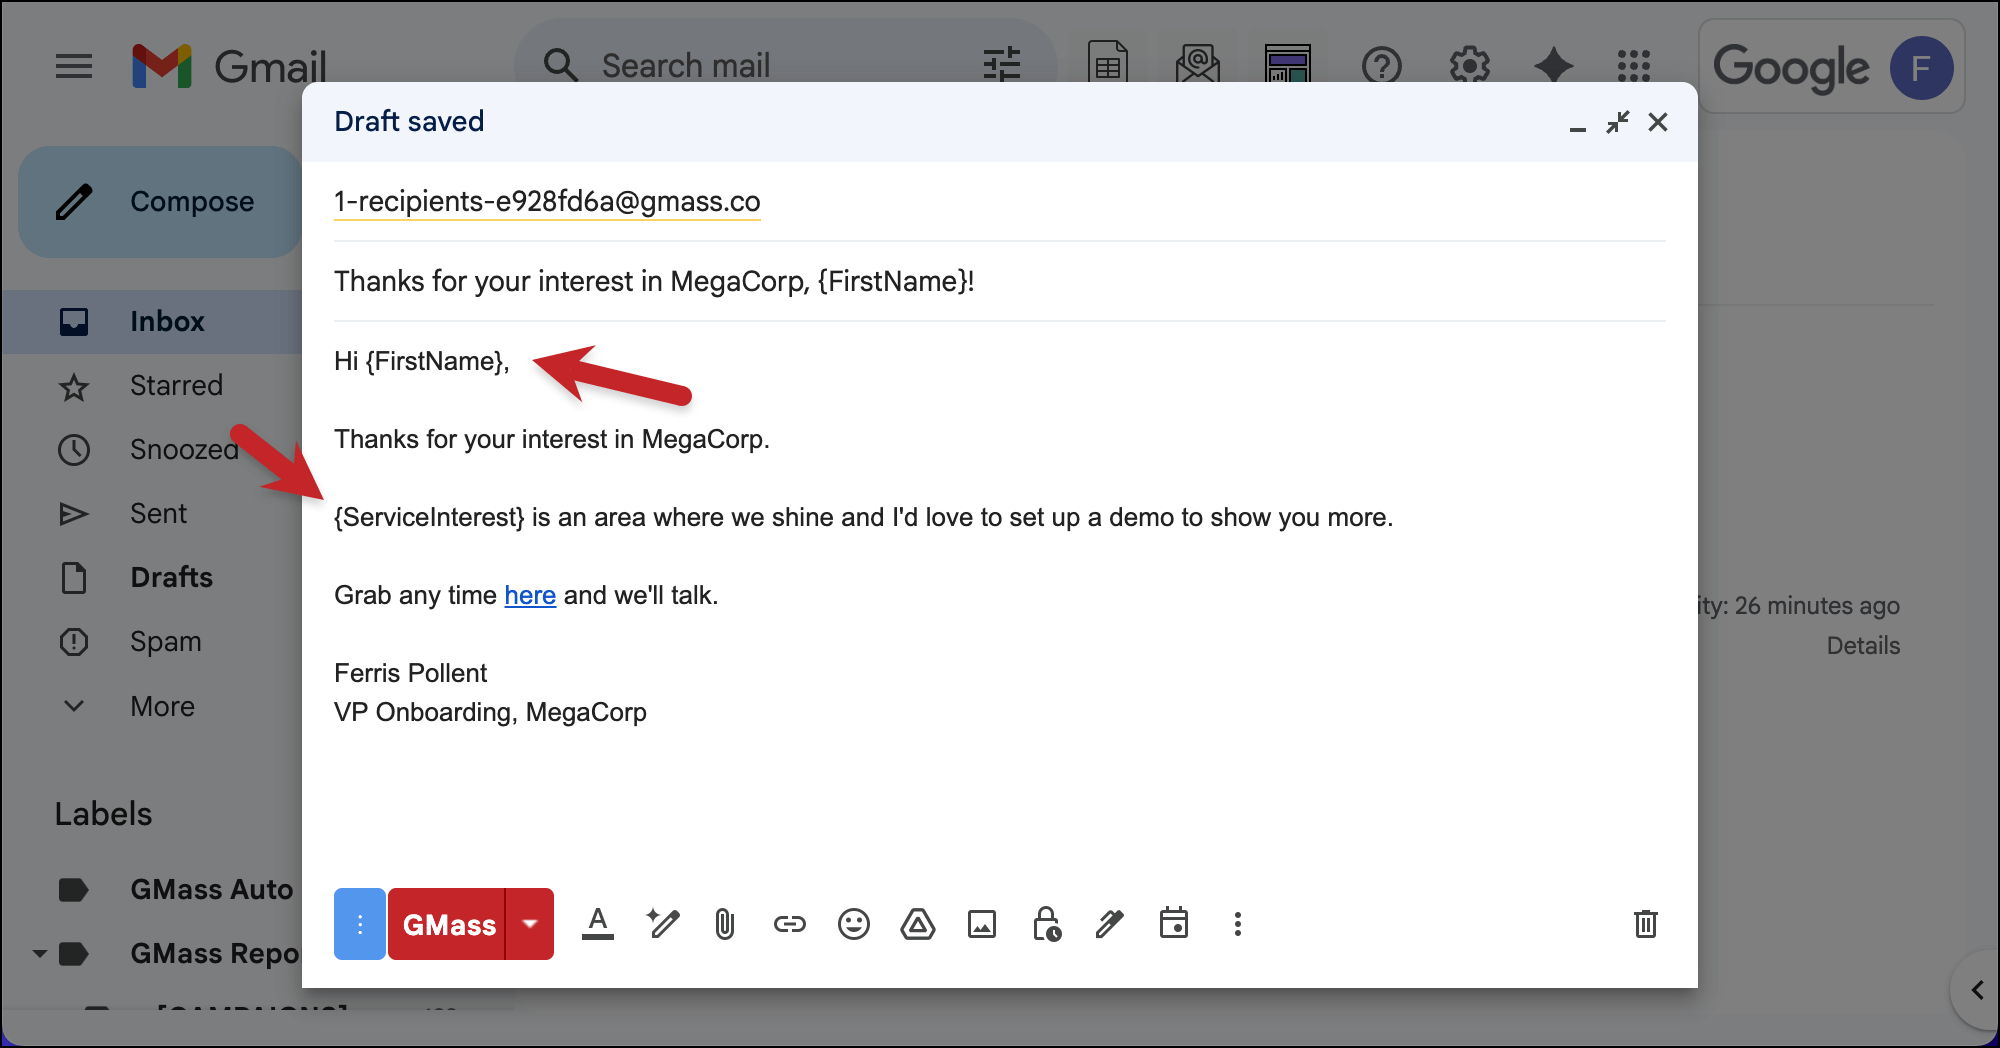
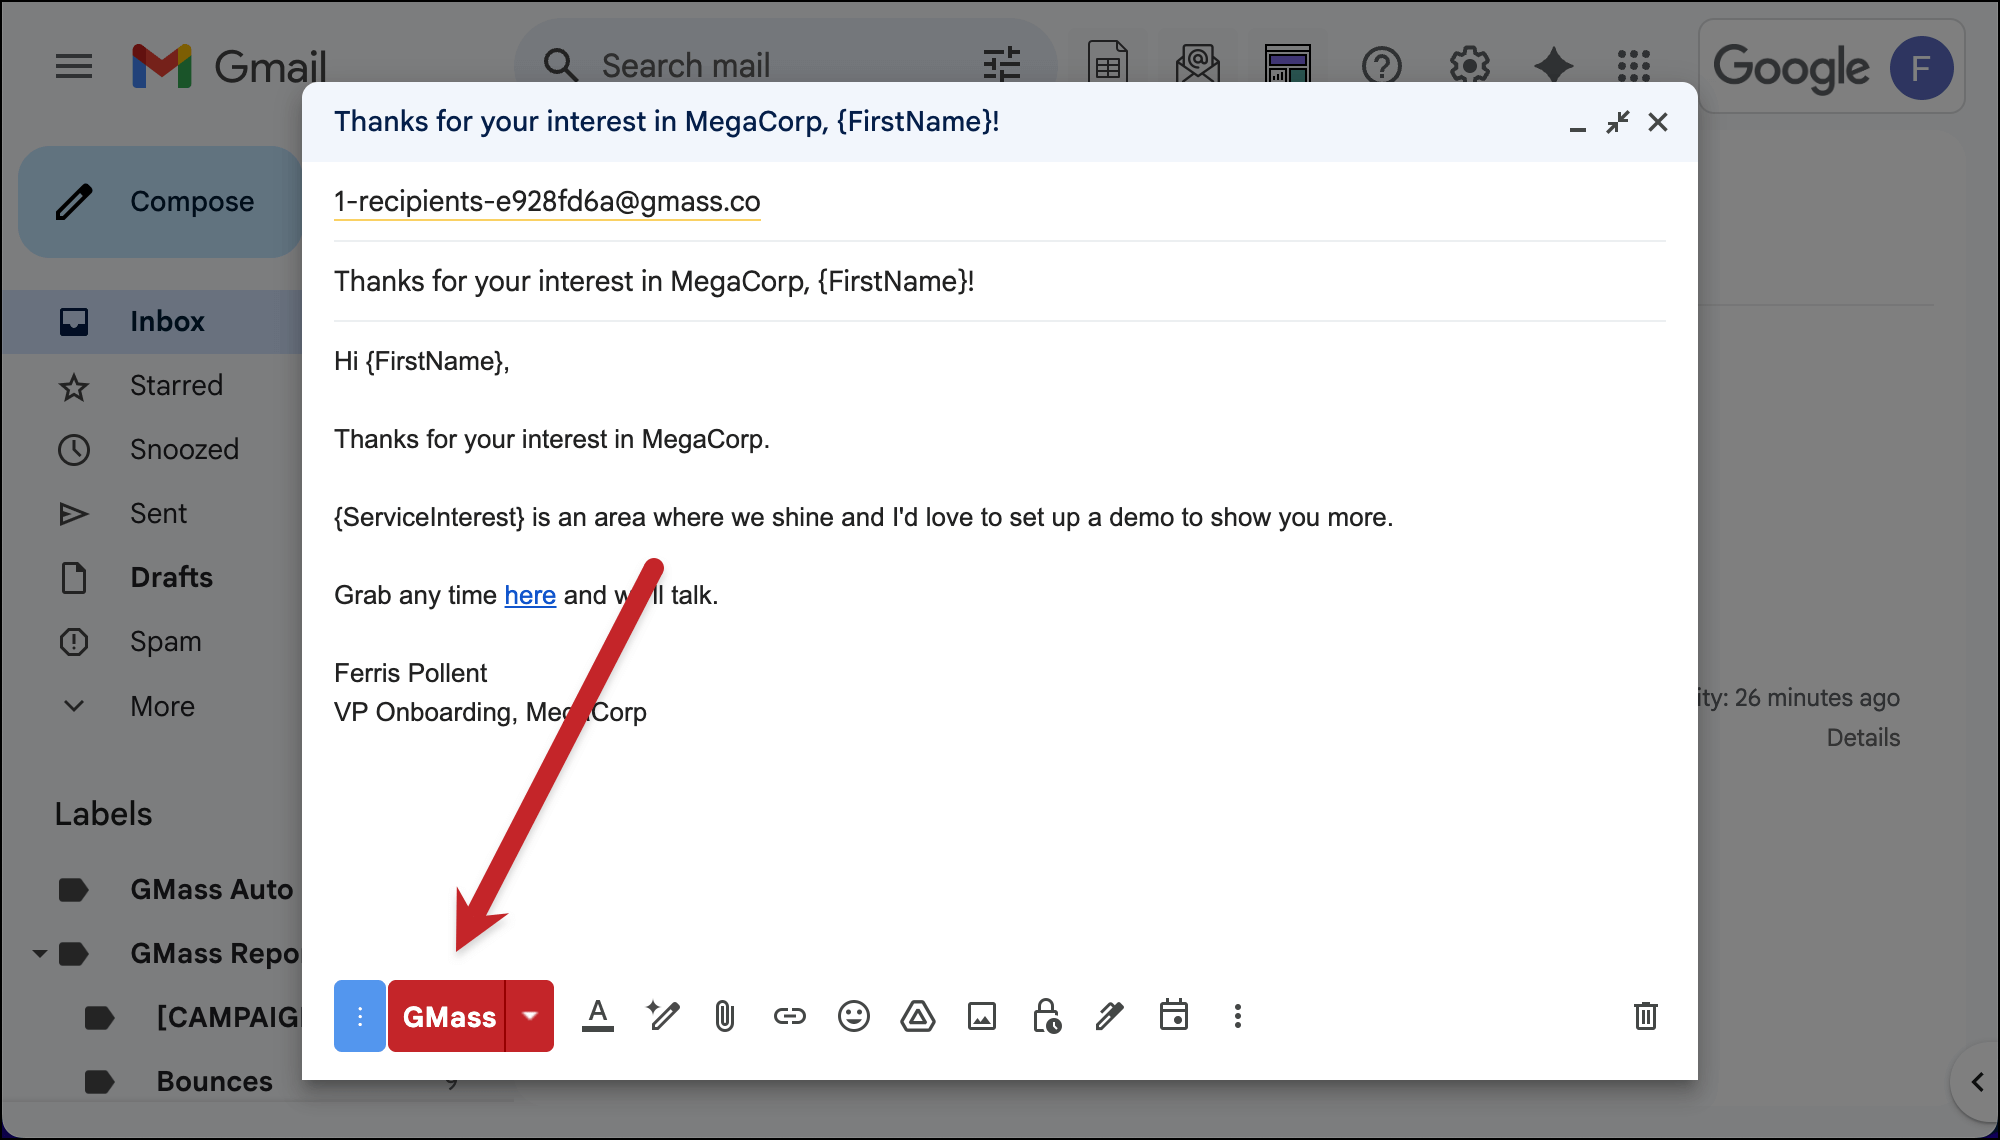
Compose your campaign
GMass launches a standard Gmail compose window. You can see that the address in the To field is a gmass.co alias; don’t change that, it’s all good.
Compose your campaign as you normally would.
When you want to include a mail merge tag, just type a left curly brace { — that will show you the list of the column headers from your Google Sheet.
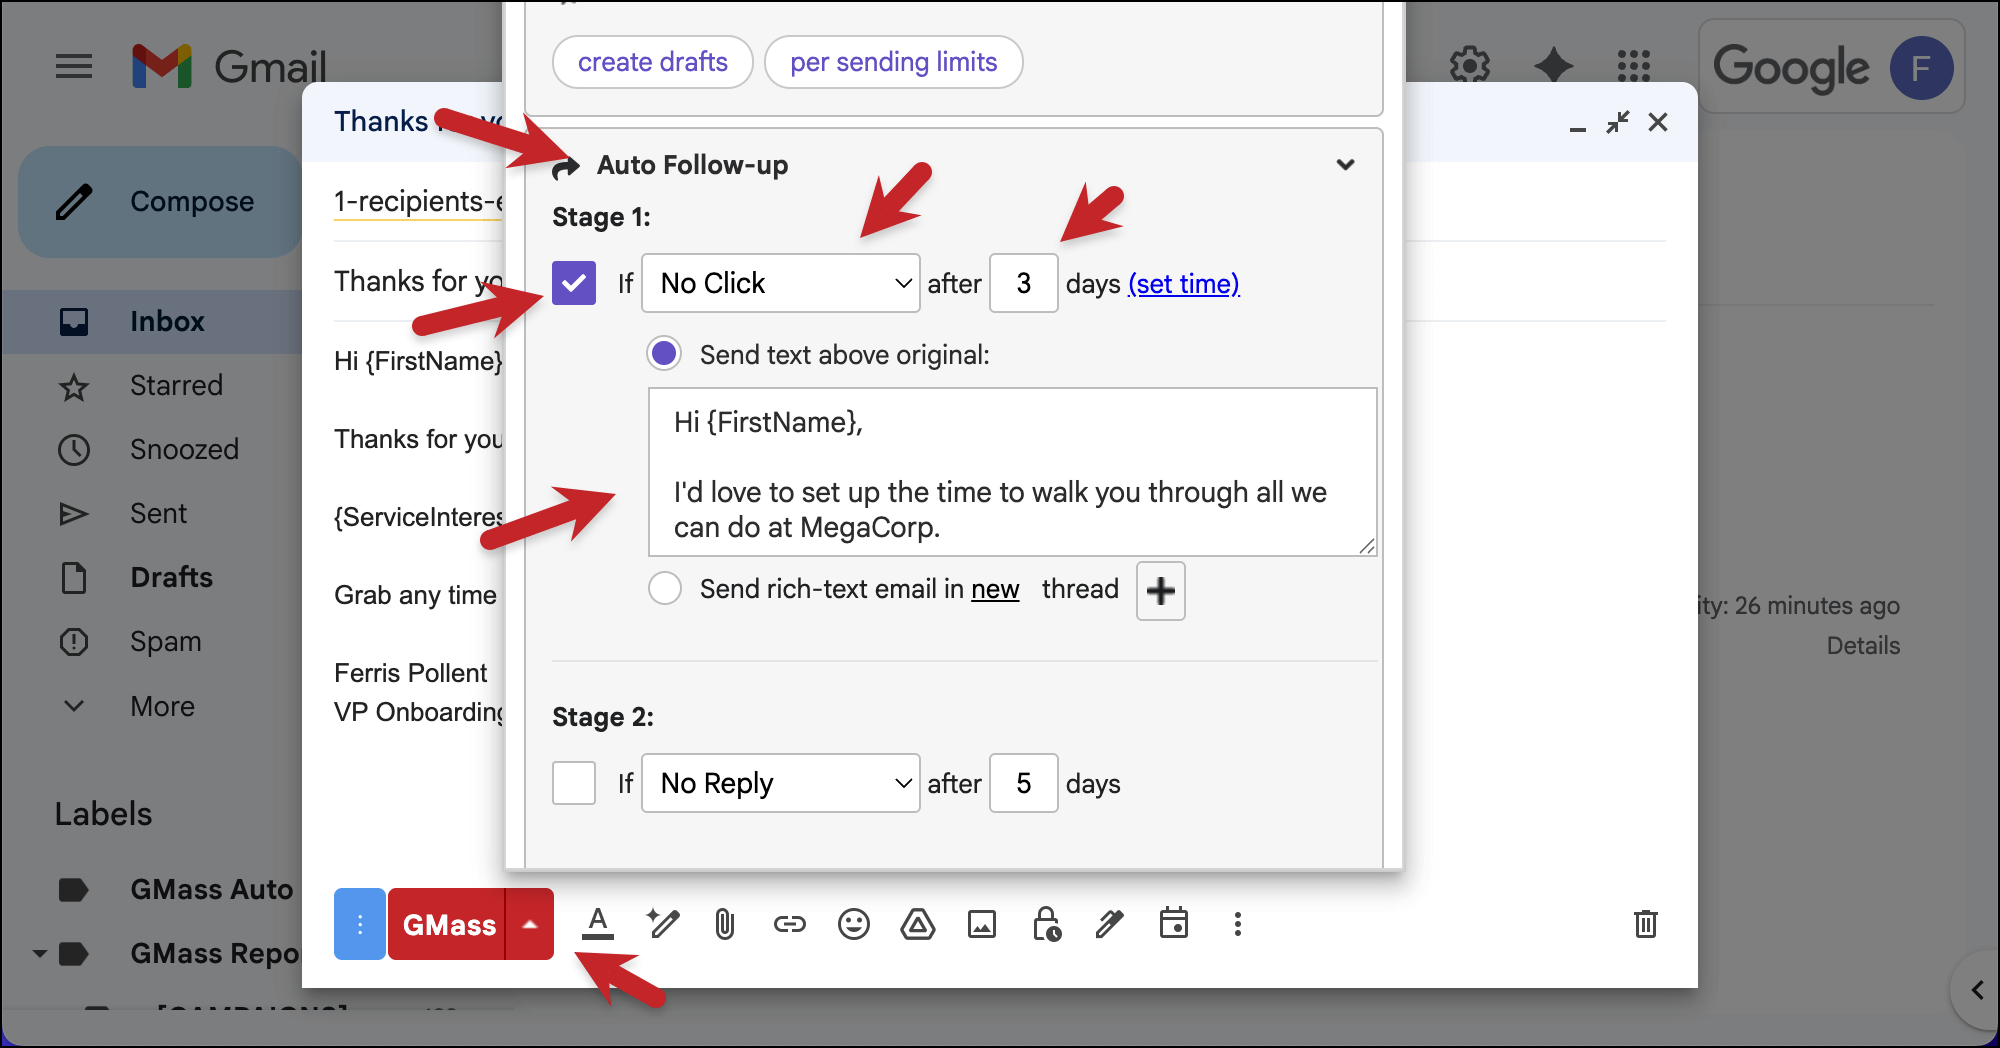
If you want to include automated follow-ups to make this a sequence, click the little arrow next to the red GMass button to bring up the GMass settings.
Then open the Auto Follow-up section and you can type in more messages in your sequence.
As you can see, I’ve set up a single auto follow-up to go out 3 days later if the respondent has not clicked.
Test your mail merge campaign
Now, if you want to see how the mail merge works in action, you can send yourself a test.
Scroll up to the top of the GMass settings box. Click the arrow next to the Send Test button and check the box to Send all stages.
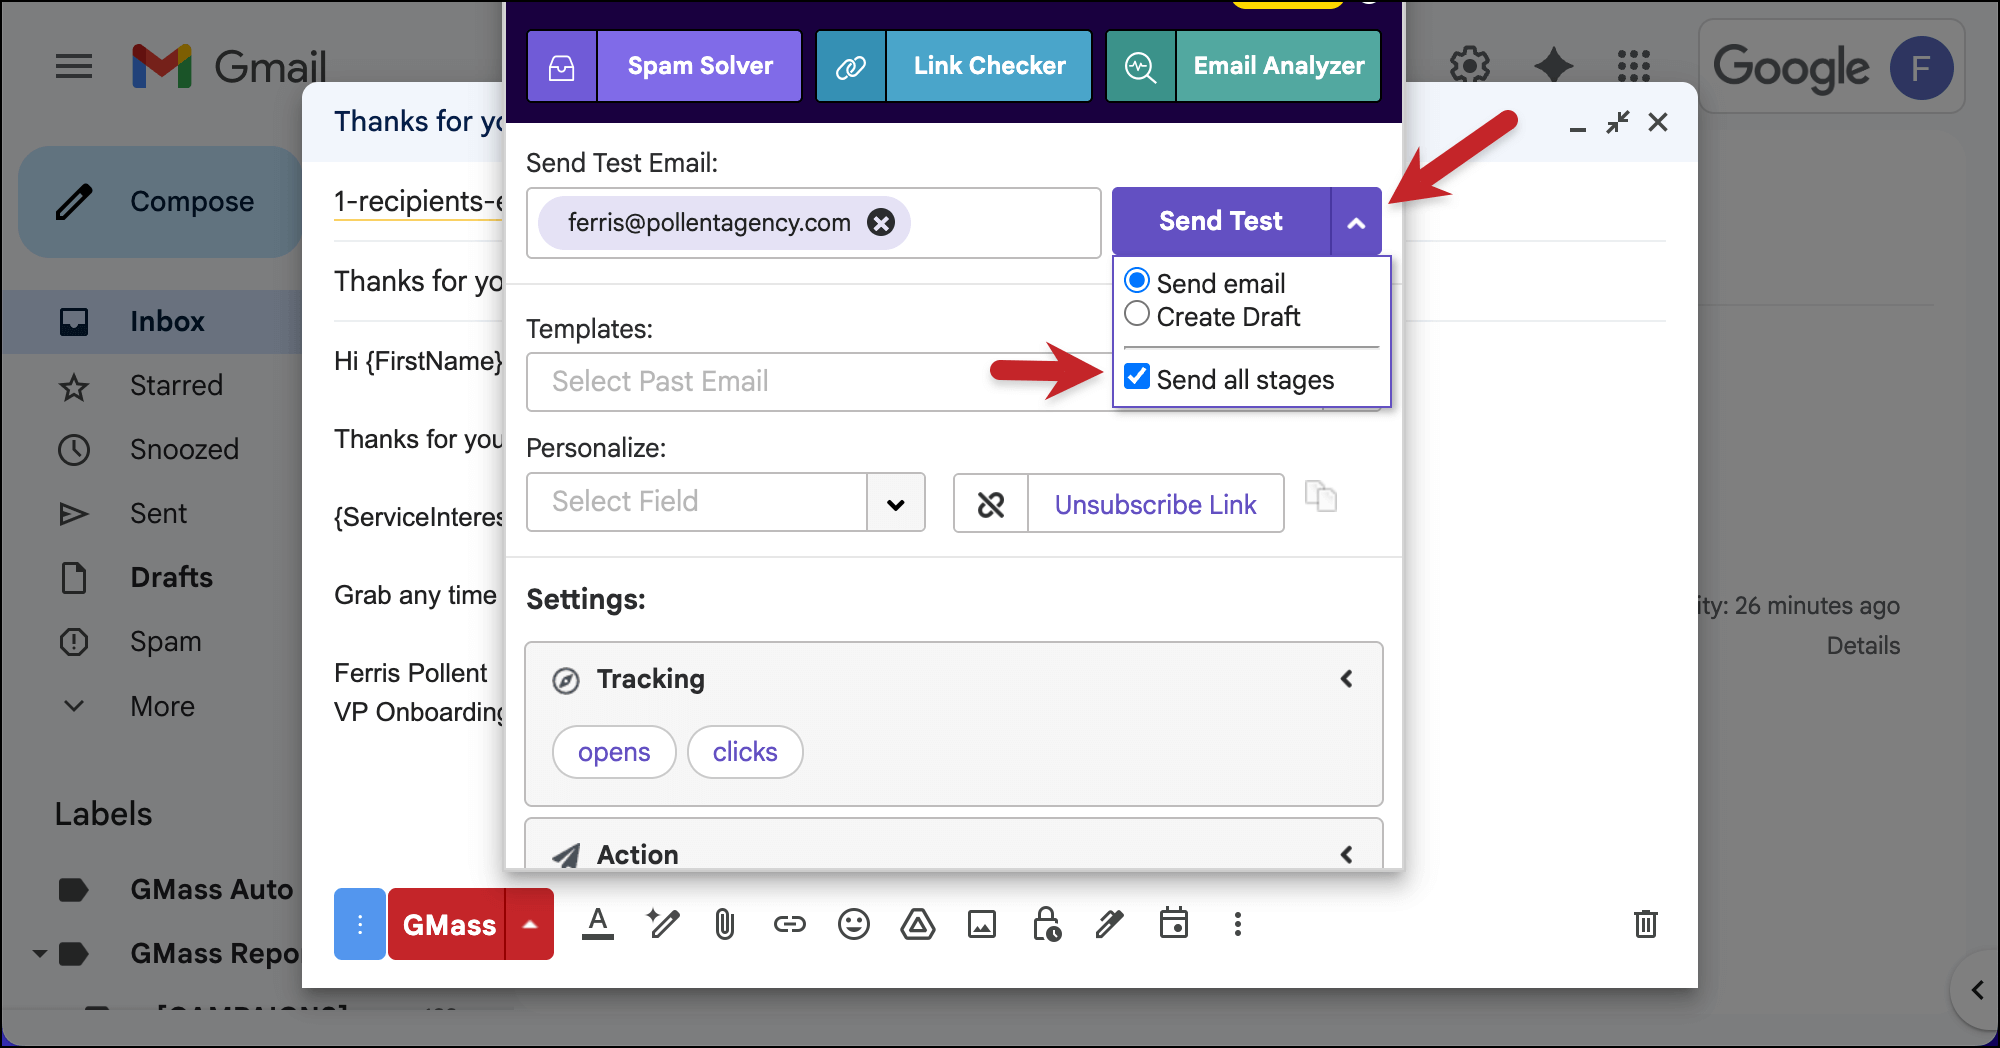
Then click Send Test.
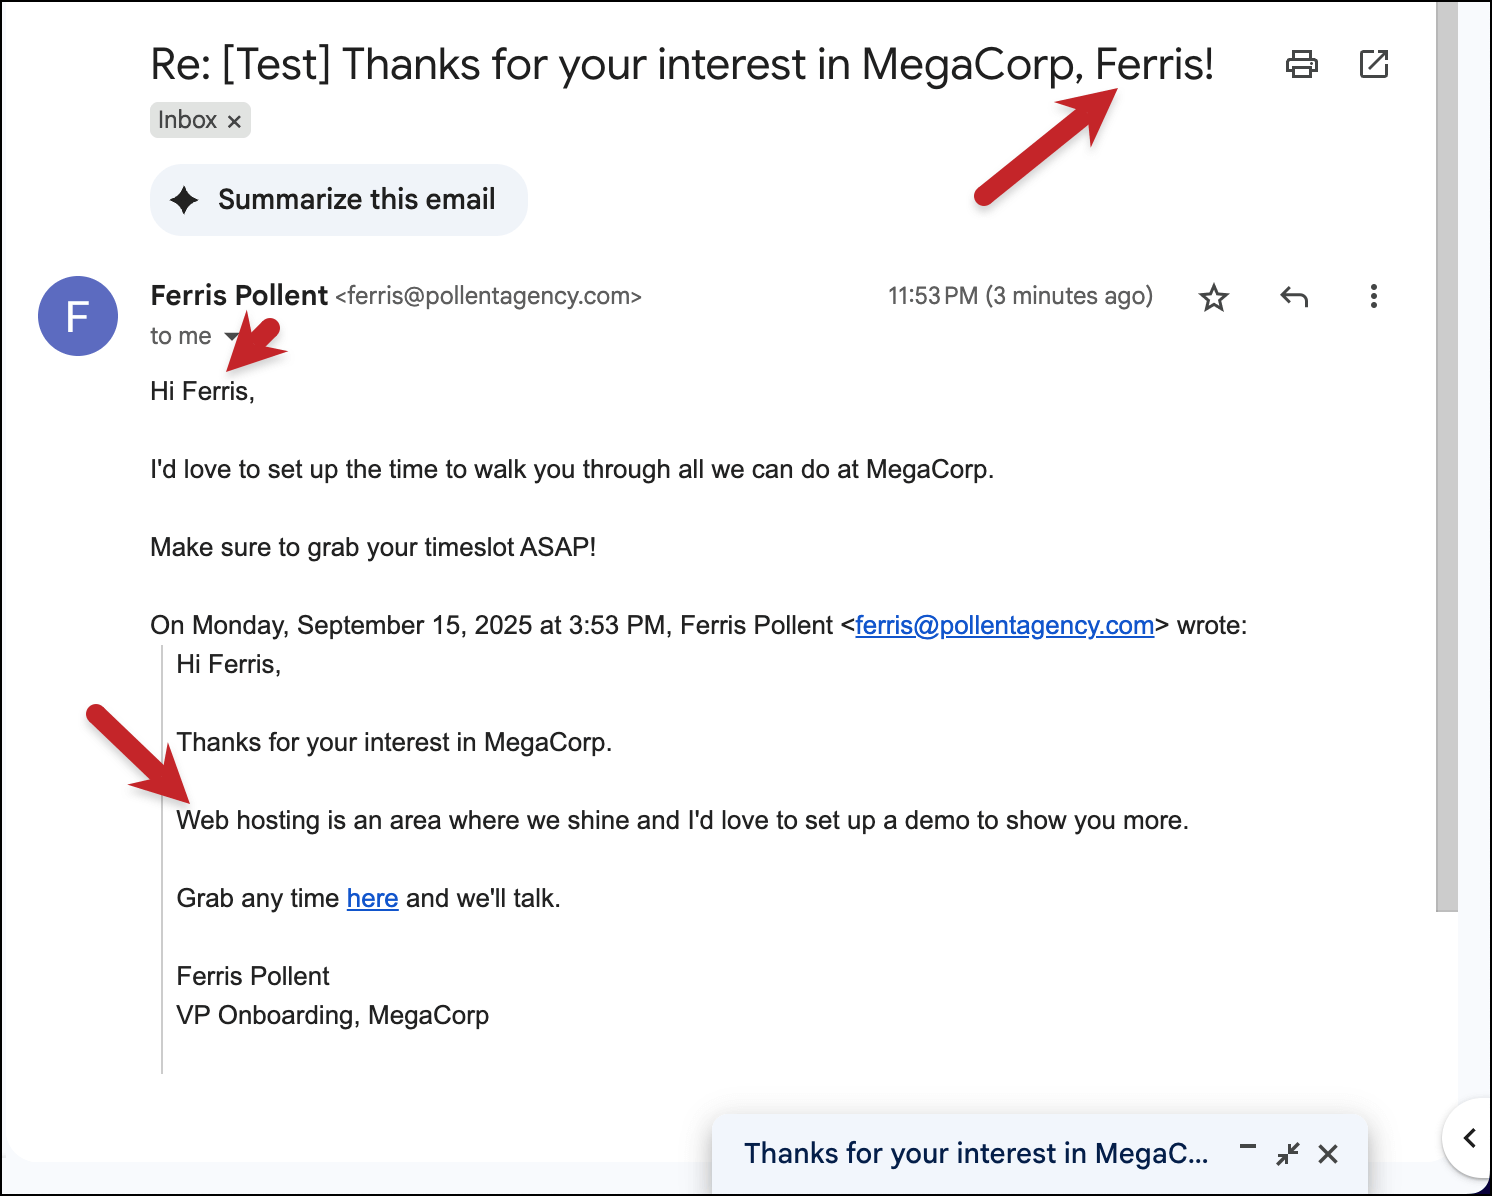
You’ll receive your entire sequence and you can see the mail merge in action.
Step 4: Set Up the Recurring Automation
In GMass, you can set up recurring campaigns that go out automatically at a designated interval. (It could be hourly, daily, every few days, weekly — or even instantly.)
For our Google Form respondents, we’re going to set up an email to go out to them within an hour of their submission.
(I’m choosing that option because sending instant emails requires an extra step. Since you’re new to GMass and automation, I wanted to keep this simpler. However, if you’re interested in automatically sending out instant emails to Google Form respondents, here’s a full walkthrough.)
Use the Repeat feature in the GMass settings box
In the GMass settings box for your campaign, go to the Schedule section.
Click the check box next to Repeat. Then choose to repeat every 1 Hour to new rows.
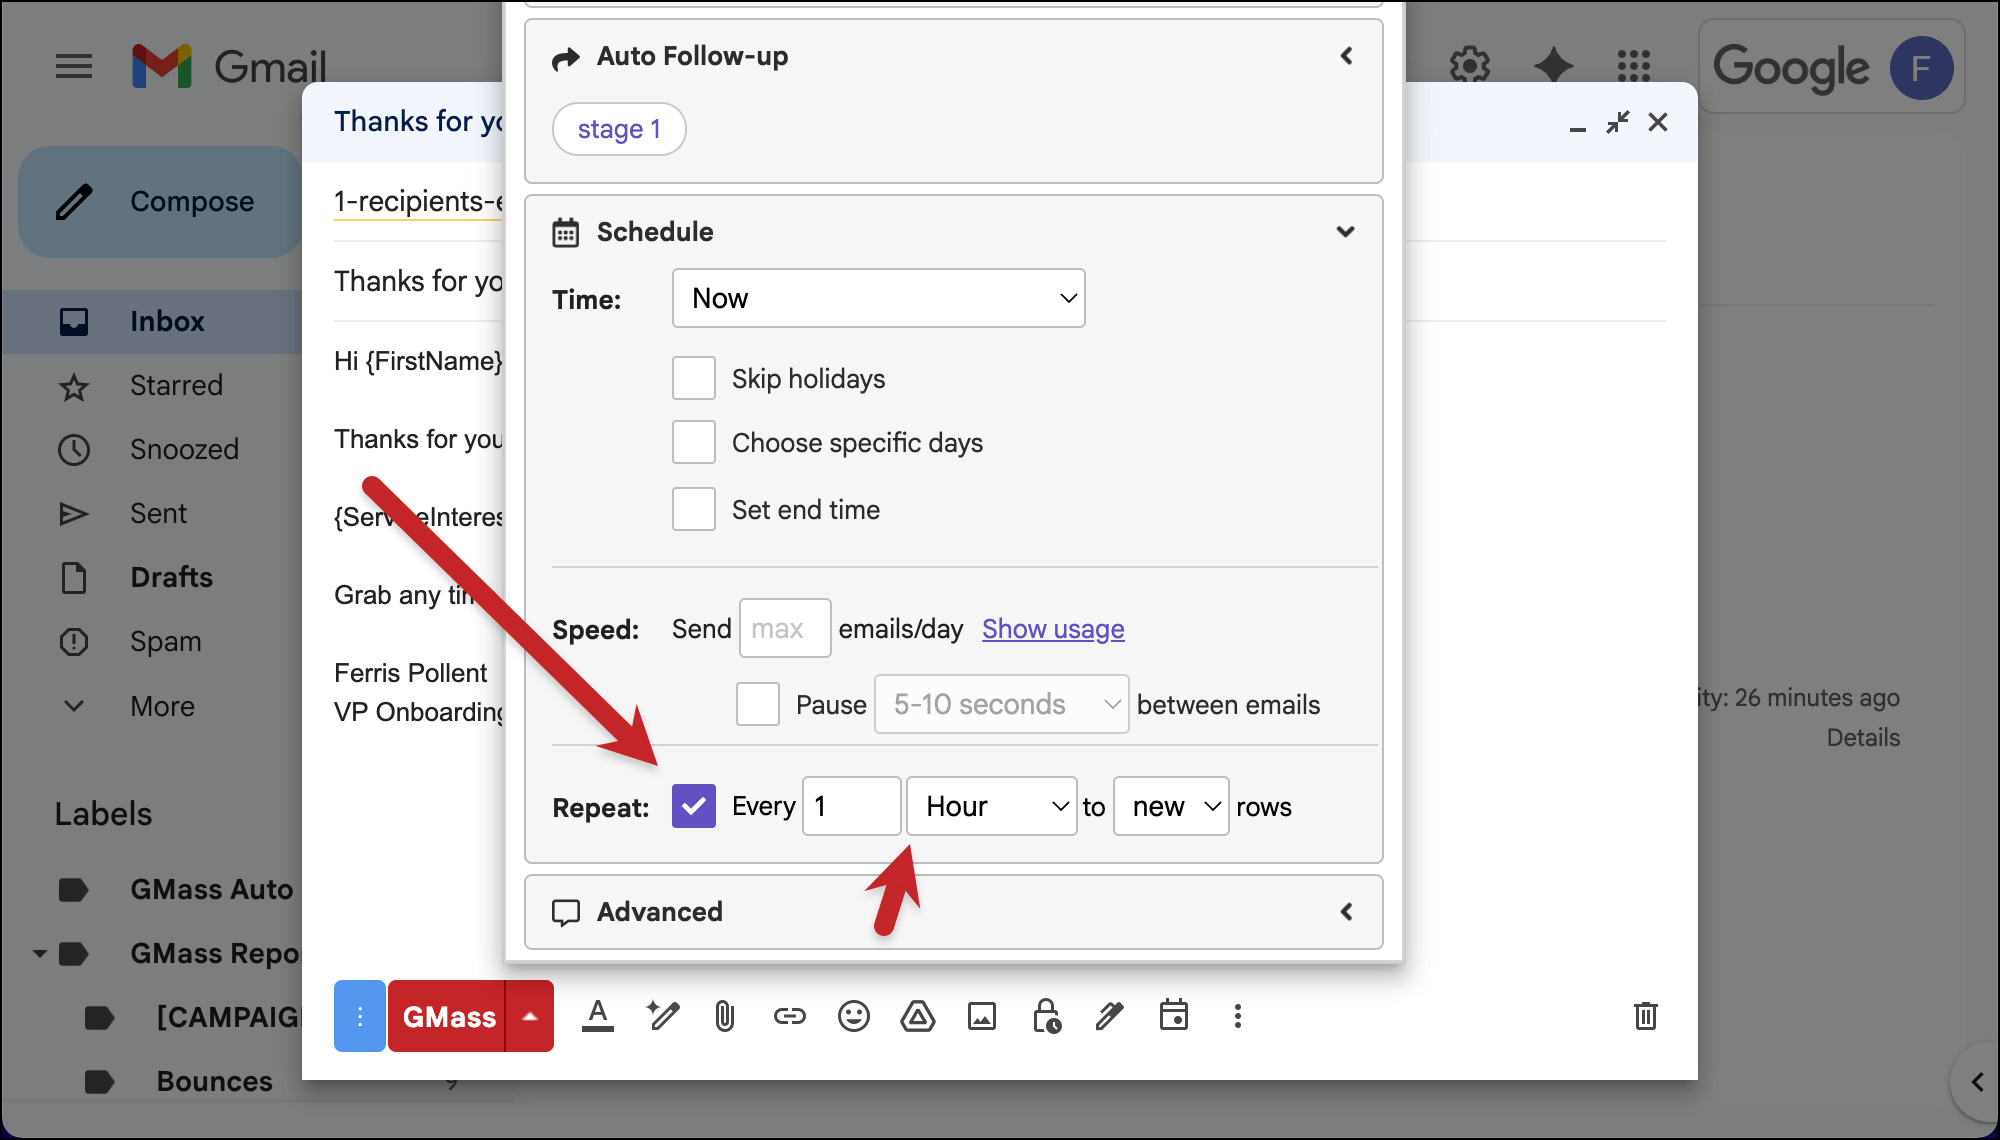
That means: Every hour, GMass will check your Google Sheet for new rows (in other words, new form respondents). And if it finds new rows, it will send your email to each of those contacts.
And that’s all it takes to set up this automation.
Step 5: Initiate the Campaign
Now we just need to set this campaign live.
Once your email, follow-ups, recurrence, and any other optional GMass settings are ready, click the red GMass button to set your campaign live.
The initial email will go out (that’s why we had YOU fill out the form first).
Now go ahead and publicize your Google Form. Whenever someone fills it out, they’ll now receive your email campaign.
Ready to Run a Google Forms Mail Merge with GMass?
In just these few steps, we’ve built something really powerful.
- Responds quickly to every form submission
- Personalizes every message with actual data
- Sends follow-up sequences automatically
- Scales infinitely without additional work
- Runs 24/7 without your intervention
That’s the power of combining Google Forms with GMass’s mail merge capabilities. You get the simplicity of Google’s tools with the sophistication of enterprise-level email automation — all inside the Gmail interface you already know.
And… this is just scratching the surface of what GMass can do with Google Sheets mail merge.
You can use these same capabilities for:
- Sending personalized campaigns to thousands of contacts (GMass can even help you break Gmail’s sending limits)
- Create evergreen drip campaigns for onboarding, education, and more
- Running A/B tests on your automated messages
- Send triggered emails that go out automatically when a recipient takes an action on another email
- Building entire customer journey workflows
Plus GMass has Spam Solver, which helps get your emails into the inbox and not the spam folder.
The foundation we’ve built today — connecting Google Sheets to GMass for automated mail merge — is the same foundation you can use on everything from small business newsletters to enterprise sales campaigns.
Time to put this into action
Just install the GMass Chrome extension to get rolling.
It’s free to try, with no credit card required, and you can set up and run this entire Google Form automation during that trial.
See why nearly 400,000 people rely on GMass to send everything from cold outreach messages to marketing campaigns to internal communications — and why GMass gets an average rating of 4.8 out of 5 stars across tens of thousands of reviews.
Email marketing, cold email, and mail merge all in one tool — that works inside Gmail
TRY GMASS FOR FREE
Download Chrome extension - 30 second install!
No credit card required
I love the emphasis on automating follow-ups. It’s such an easy way to ensure responses don’t slip through the cracks and boosts engagement.