
As someone who knows the deep nuances of emailing I get asked a lot about how to create an email group in Outlook.
After all, creating an Outlook email group is quite useful if you find yourself sending emails regularly to the same group of people.
And with Outlook groups, you won’t have to manually add member email addresses each time you type out group emails anymore.
But how do you go about making one?
In this article, I’ll go over what an Outlook group is and how to create an email distribution group. I’ll also show you how to edit these groups and send emails to them.
And, since this is a very common request here at GMass, I’ll also show you how you can easily transcend what you can do with groups — and send personalized mail merge messages to your contacts using your Outlook email address.
Further reading
- Want to learn how to create email groups in Gmail? Read my in-depth guide on it.
- Also, find out how to use the BCC field in Outlook and Gmail.
How to Create an Email Group in Outlook: Table of Contents
- How to Create a Group in Outlook
- How to Send an Email to a Contact Group in Outlook
- How to Edit a Contact List in Outlook
- Outlook Basics
Let’s get started!
How to Create a Group in Outlook
The process of setting up an Outlook contact list varies slightly depending on whether you use Windows, Mac, or the Outlook online app.
Let’s take a look at how to set up a distribution group on each platform:
How to create Outlook groups for Windows
Here’s how you can easily create a distribution list in Outlook on Windows:
Step 1
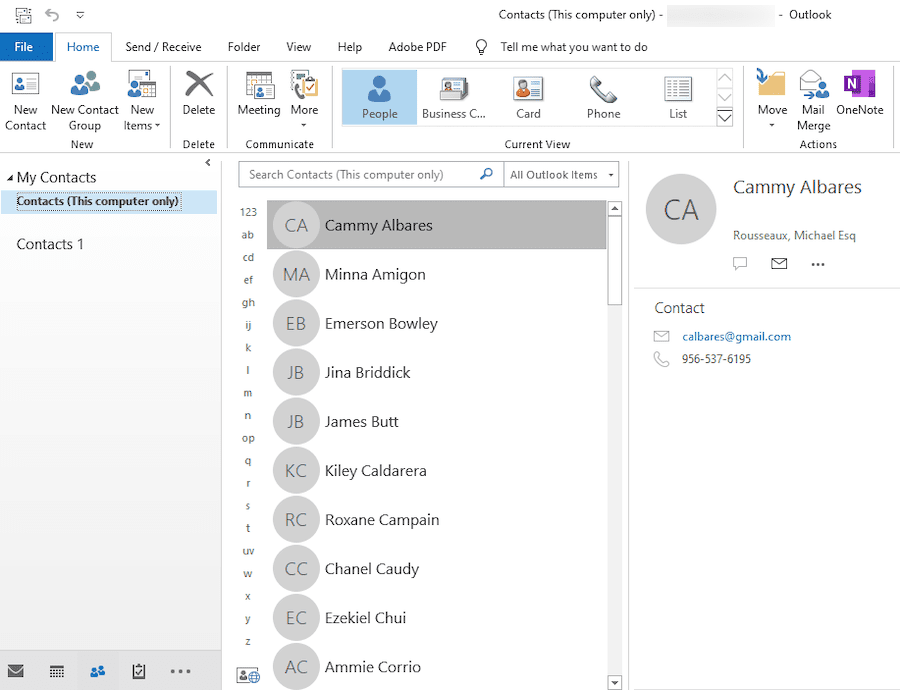
To create a new group, first open Outlook. Then, go to the navigation pane and click on the People icon (the small icon to the bottom left of your screen).
![]()
Alternatively, you can also select New Items > More Items > Contact Group from the Home tab.
Step 2
Under My Contacts, select the folder in which you want to save the contact group. Most people tend to save the new contact group in the contacts folder.
Note: For this article, I obtained several sample contacts from this website.
Step 3
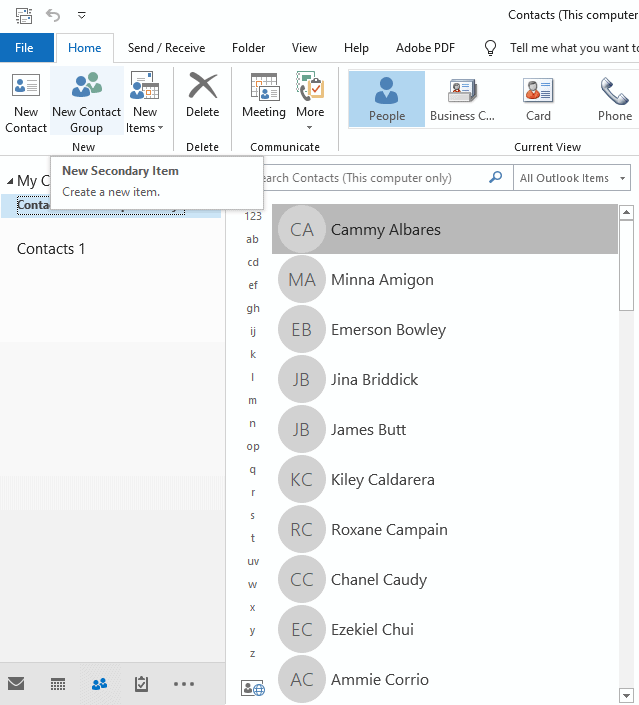
Select New Contact Group by clicking the new contact group button from the Home tab in the top ribbon.
Step 4
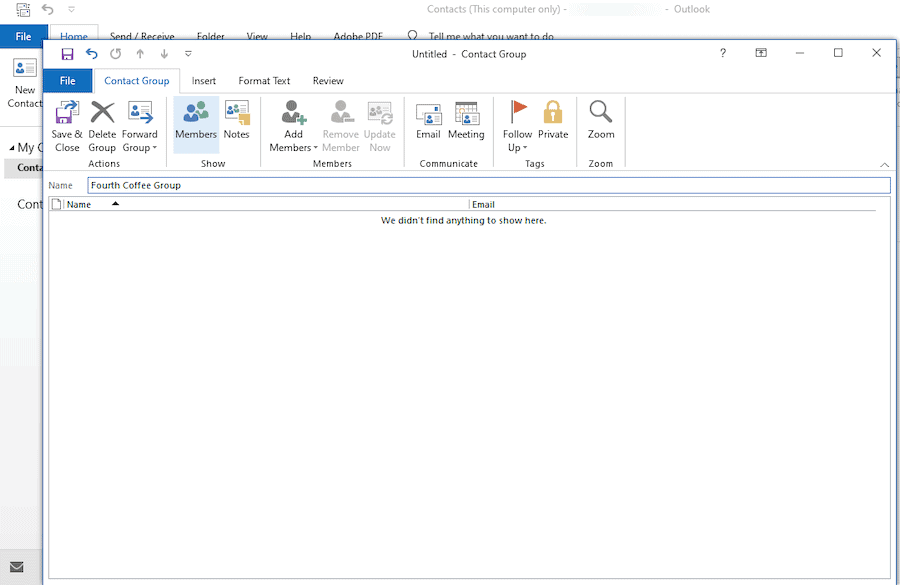
Set a group name for your contact group in the name field.
Step 5
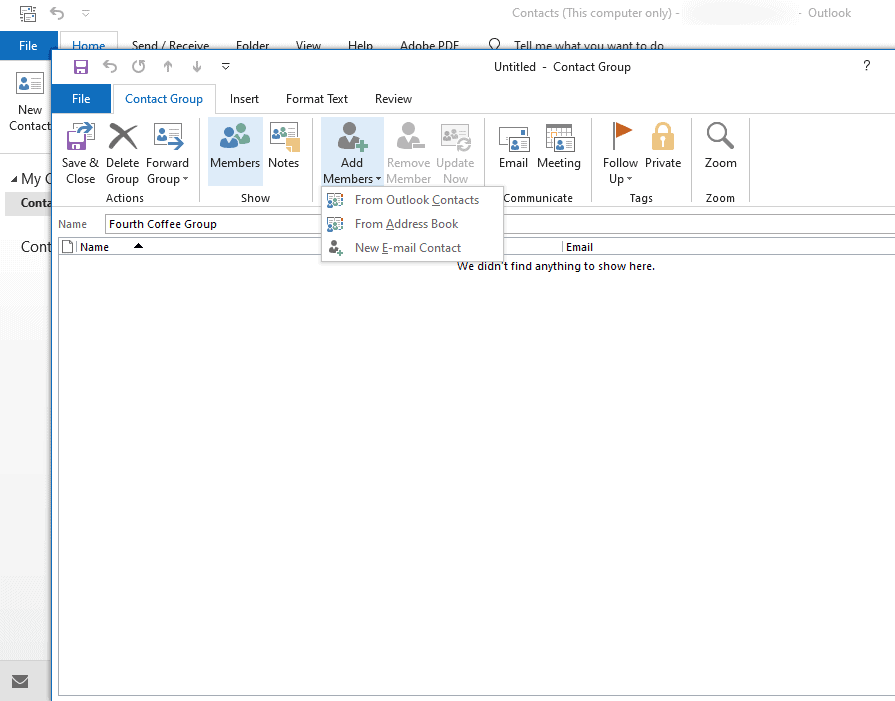
Click add members and choose to add member emails “From Address Book,” “From Outlook Contacts,” or “make a new contact.”
Here’s what each of these means:
- From Address Book – This usually contains the email IDs of every person in your Outlook address book (often everyone in your organization).
- Outlook Contact List – This contains primarily a set of external contacts that you’ve stored in your Microsoft Outlook contacts folder.
- Make a New Contact – This enables you to create a new contact to add to the list.
If the list of contact emails only contains a group of people from your company, you can also add multiple people through your firm’s global address list. (A global address list is an electronic address book that contains the contact information of everyone in an organization.)
Note: If you need to add member emails again to your list of business or personal contacts, just select the list and click Add members to repeat the process.
Step 6
Once you’ve grabbed everyone from the select members dialog box and finished setting up your group, click Save & Close, and the Members box will disappear.
Once you click Save, you can test your group by sending a message to your group contact list.

Note: If you want to add an Outlook distribution list to a folder of contacts on Outlook, you can do so using the folder pane. Likewise, if you want to edit your group emails or other settings, you can do so using the folder pane as well.
Now that I’ve covered how to create a list of contact emails for the Outlook application on Windows let’s look at the distribution list process for Mac systems.
Creating a group in Outlook for Mac
Follow these steps to create group in Outlook for Mac devices:
Step 1
Open Outlook, go to the navigation bar and click on People.
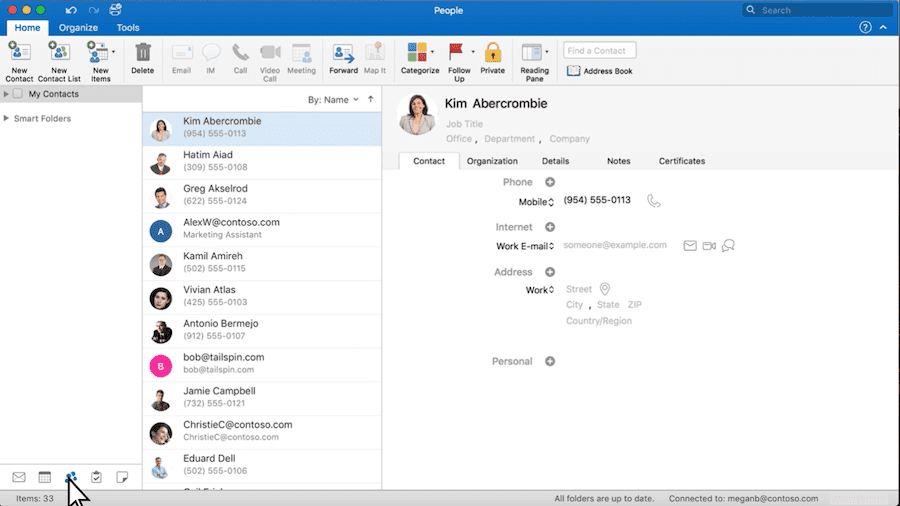
Image source: support.microsoft.com
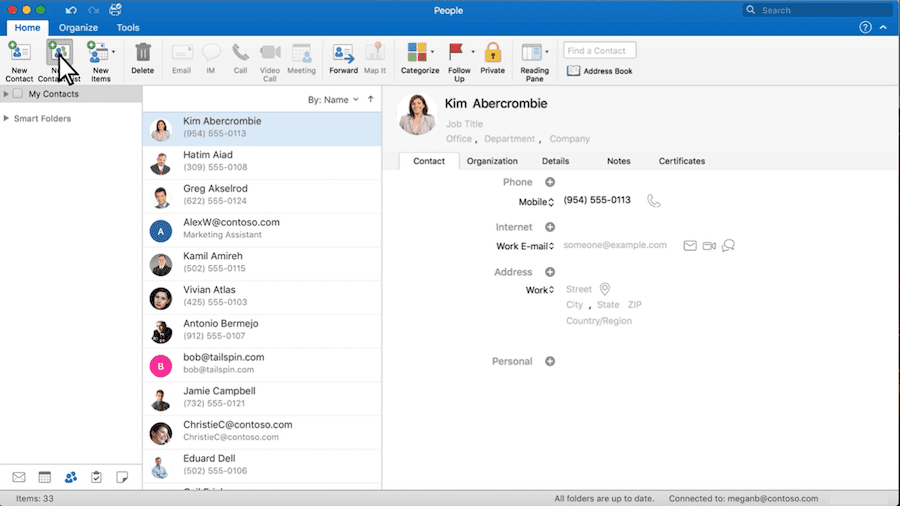
Step 2
Then, select Home > New Contact List from the navigation bar using the new contact group button to create your group.
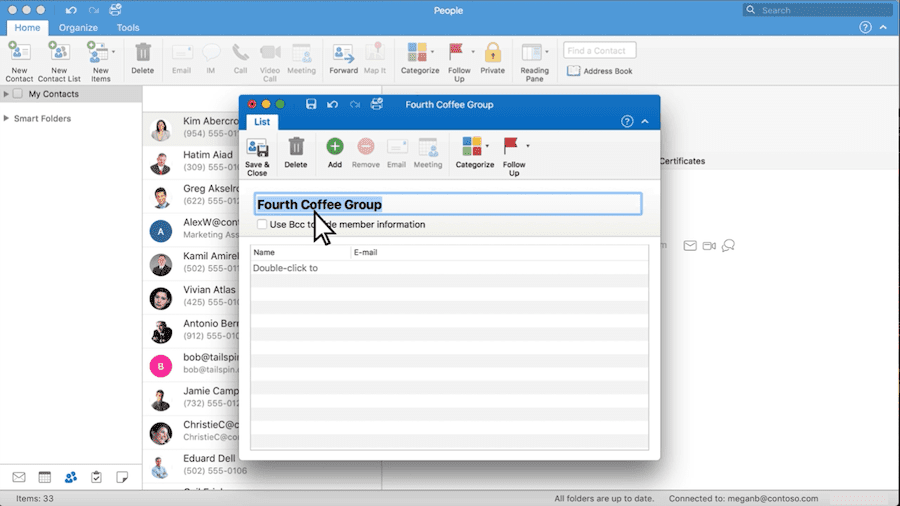
Step 3
When the contact group window pops up, set a group name for your list of contact emails.
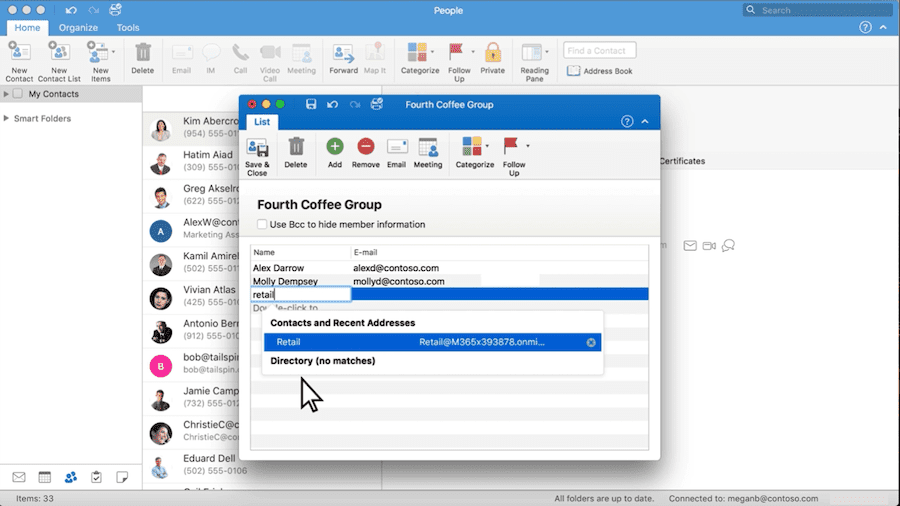
Step 4
Select Add just below the navigation bar and select members using each person’s email address to add a contact to the contact list.
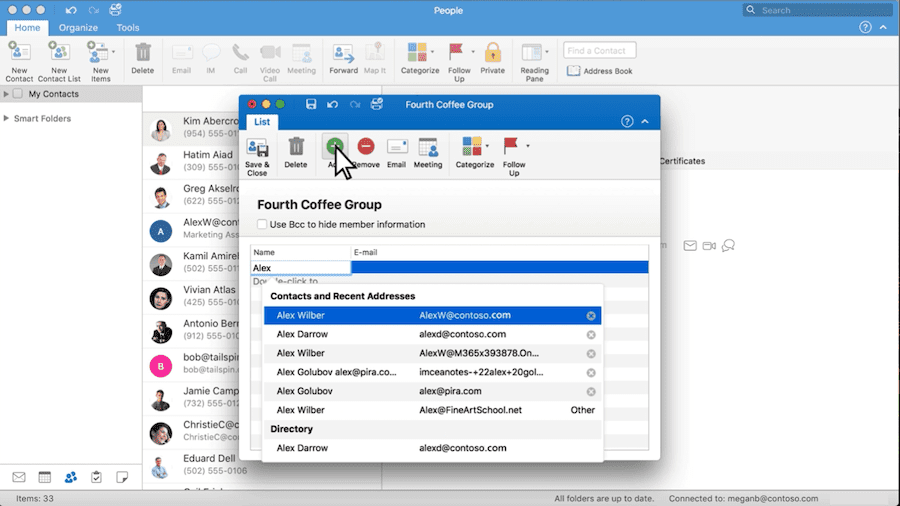
You can keep adding more folks through the members’ box.
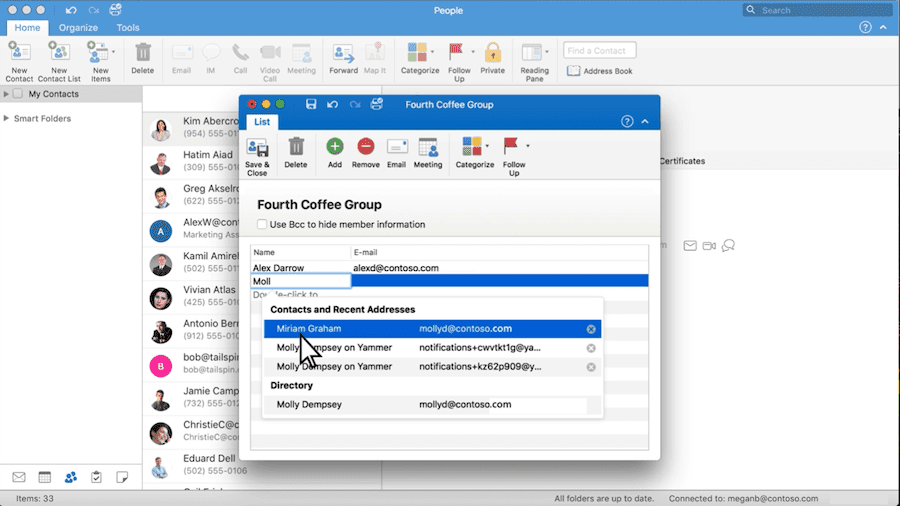
You can even add an existing list of contact emails to your new list.
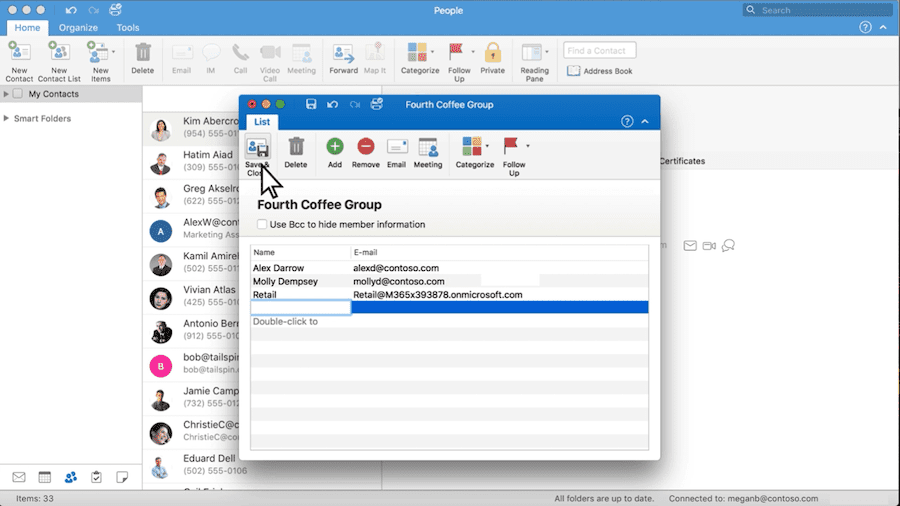
Step 5
When you finish your contact list, click on Save & Close, and the members box will disappear. After you click save, you can test your contact group by sending an email to your list of contact emails.
Now that I’ve covered how you can create an email group on Outlook for Mac, let’s look at setting up an email group on the new Outlook Web App.
Creating a group in Outlook online
Here’s how you can set up an email distribution list group on the Outlook app:
Step 1
Go to the Outlook desktop app and click on the Contacts icon on the left side.
![]()
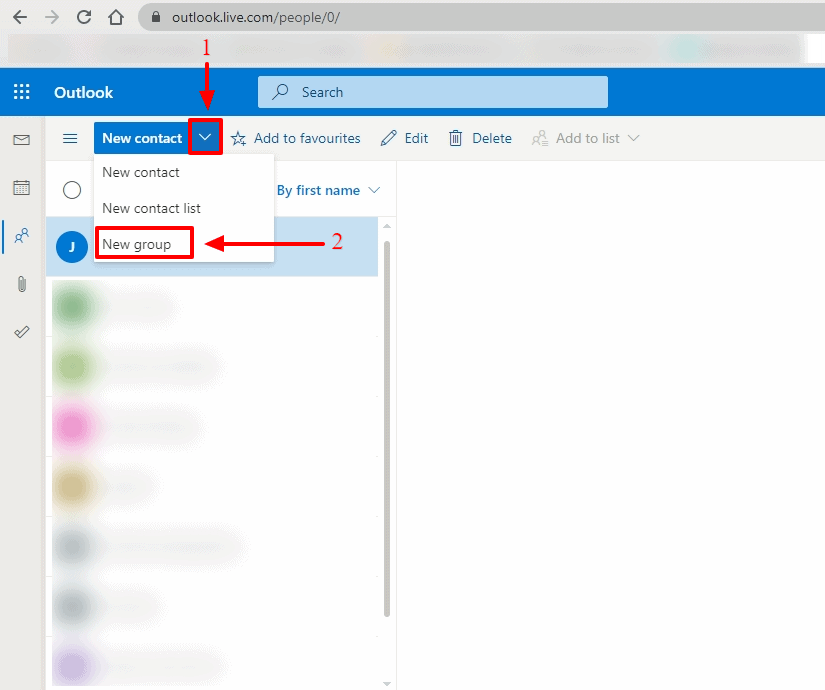
Step 2
Click on the small arrow next to the blue New contact button and select New group from the drop-down menu.
Step 3
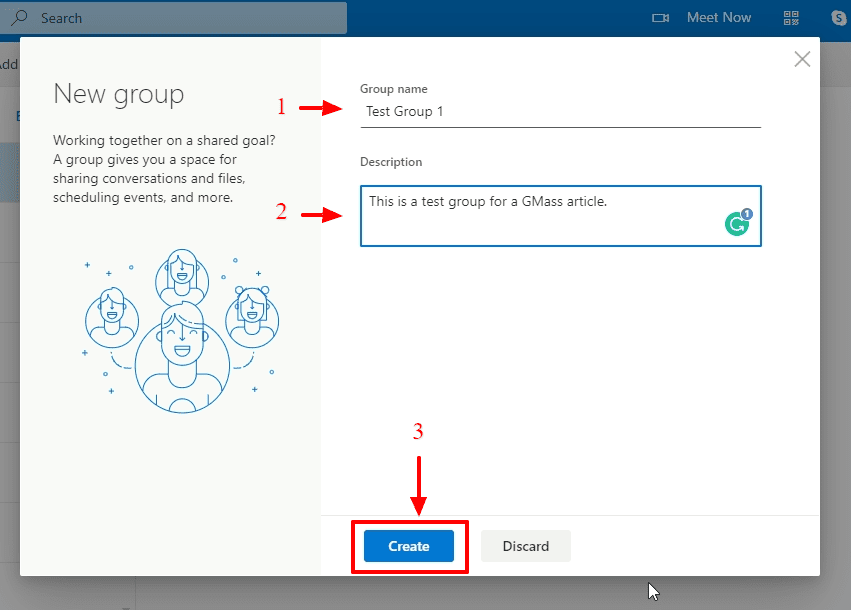
When the dialog box opens, type in the name of the contact group that you want to create. You can type in the group content in the description field, then click on Create.
Step 4
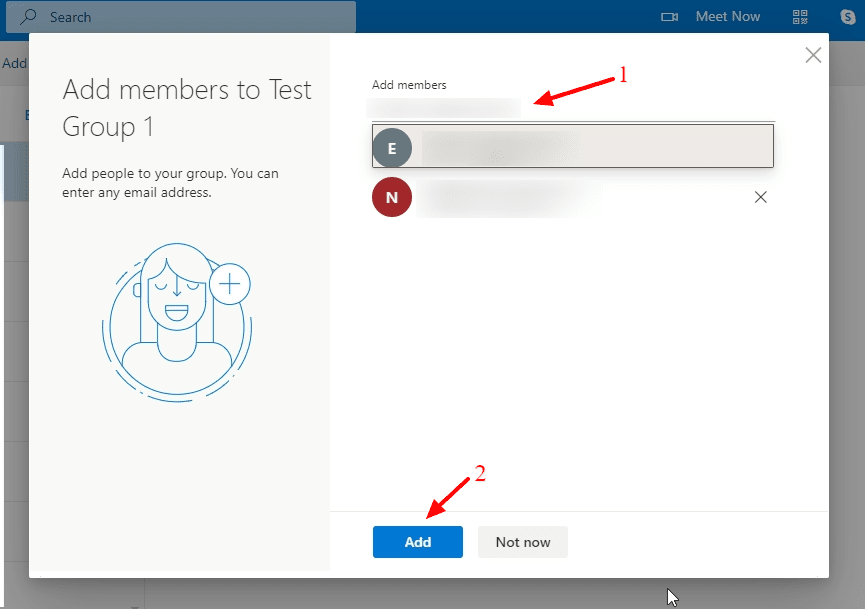
Type in the email addresses or names of the contacts you want to add to the email group. Once you’ve selected contacts to add to the group, click on Add, and you’re done!
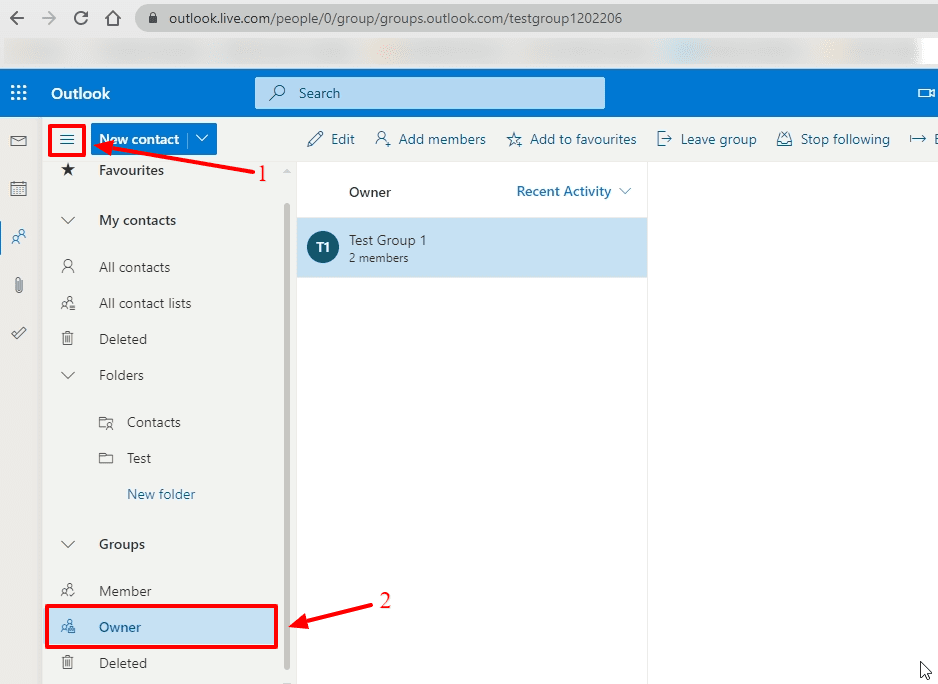
If you’re the group owner, you can easily find the groups you’ve created. Just click on the hamburger menu on the People page and then go to Groups > Owner.
I’ve covered how you can create an email group on Windows, Mac and the OWA. But if you’re the group owner, how do you send group messages to your Outlook distribution list?
How to Send an Email to a Contact Group in Outlook
Here’s how to send emails to an email group with multiple recipients you’ve created on Outlook:
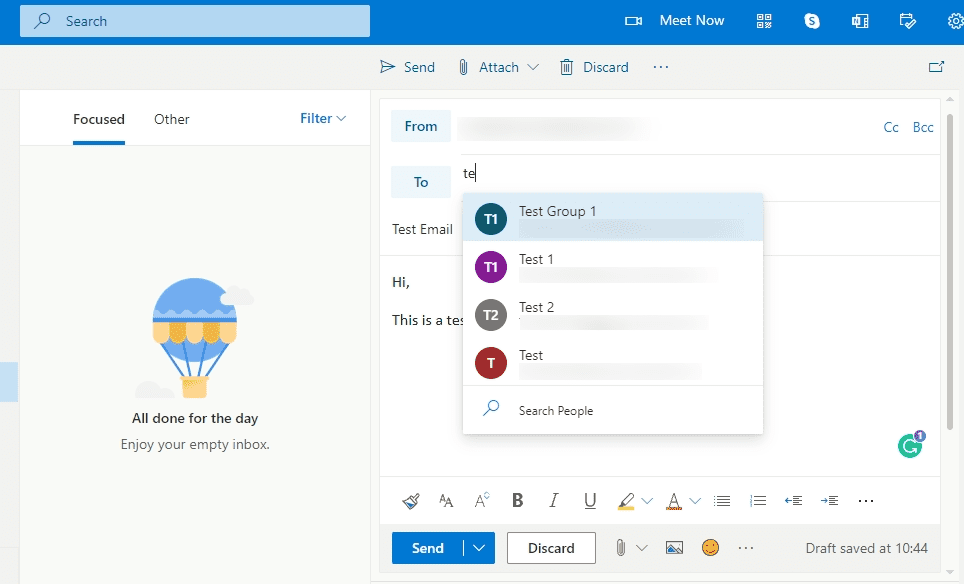
Open a new email message and type in the body and subject. In the To field, instead of typing in mail addresses, start typing the group ID.
When the prompt appears, click on it and hit Send — your email will be on its way to members’ inboxes.
That’s all you need to do to send group emails to a contact group on Outlook.
Now that we’ve seen how you can send group emails to everyone in your Outlook address book, let’s see how a group owner can edit group members or details.
How to Edit a Contact List in Outlook
What if you want to add a new email contact or change the group ID of an existing group?
It’s simple!
Just open the Outlook app (on any platform or the web) and type a new message. Then, type in the group ID in the To field. Now right-click on the list and select Edit Contact.
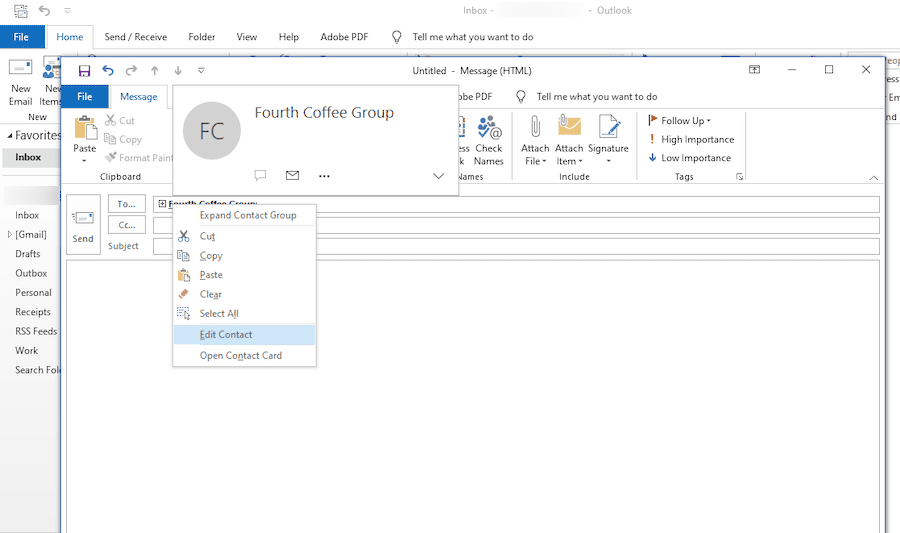
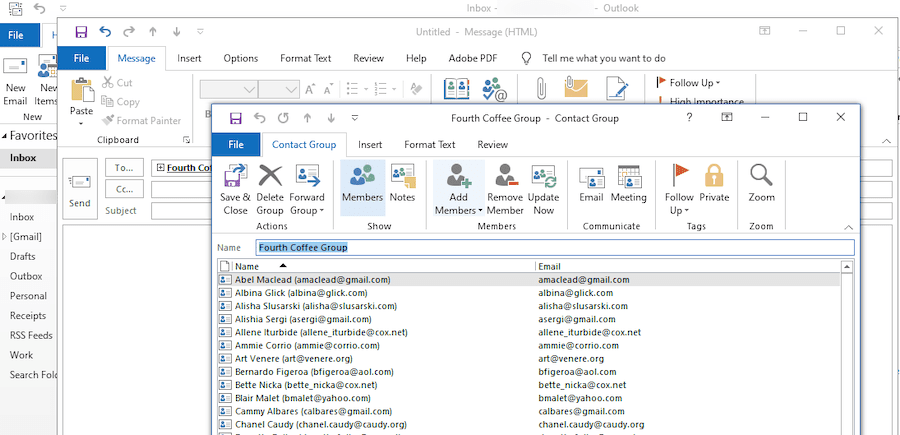
The contact group tab will then open, and you can add new members or remove members from the existing group easily!
Note: This process remains largely unchanged irrespective of the platform you use with Outlook.
Outlook Groups FAQ
There are two types of email contact groups in Microsoft Outlook:
1. Microsoft 365 group
This type of group is centered around one “group email address.”
An Office 365 group allows team members to access emails sent to one address from a shared mailbox. For example, a project team that shares a group email address is a Microsoft 365 group.
Also, Microsoft Teams can only be added to a Microsoft 365 group.
Anyone who sends an email to the team can send it to the shared mailbox of the Office 365 group. This way, they don’t have to send separate emails to each group member.
Since the whole group has access to a shared mailbox and group calendar, coordinating emails and group conversations is much easier!
2. Outlook contact group
This is the kind of group that we covered in this article.
A contact group (also known as a distribution list) is a collection of email addresses you can email together.
Members of a new contact group don’t share the same email address — and don’t even have to be part of the same organization. They can be pretty much anyone you want to send emails to as a group!
After setting up the group, you can send emails, calendar invitations, Microsoft Team meetings, and reminders to all your group members’ mailboxes with just one click. When you send an email to the group, it will get delivered to each recipient.
Note: Outlook email groups are not the same as a calendar group that lets you create shared calendars.
What about groups on my Microsoft Exchange server or Exchange Online?
Yes, if your organization uses Microsoft Exchange you can still create a Outlook groups to send to multiple recipients. You’ll do that in the Exchange admin center where you can add members, edit group settings, and more.
Using Mail Merge to Send Personalized, Individual Messages
While it’s convenient to create groups in Outlook to send individual messages to your frequent contacts, it’s not particularly easy to use mail merge in Outlook to personalize each email.
There’s no native function in the free online app… a merge on desktop requires constant back-and-forths between Outlook, Microsoft Word, and Microsoft Excel… and you’ll need add-ins to do seemingly basic things like personalized subject lines.
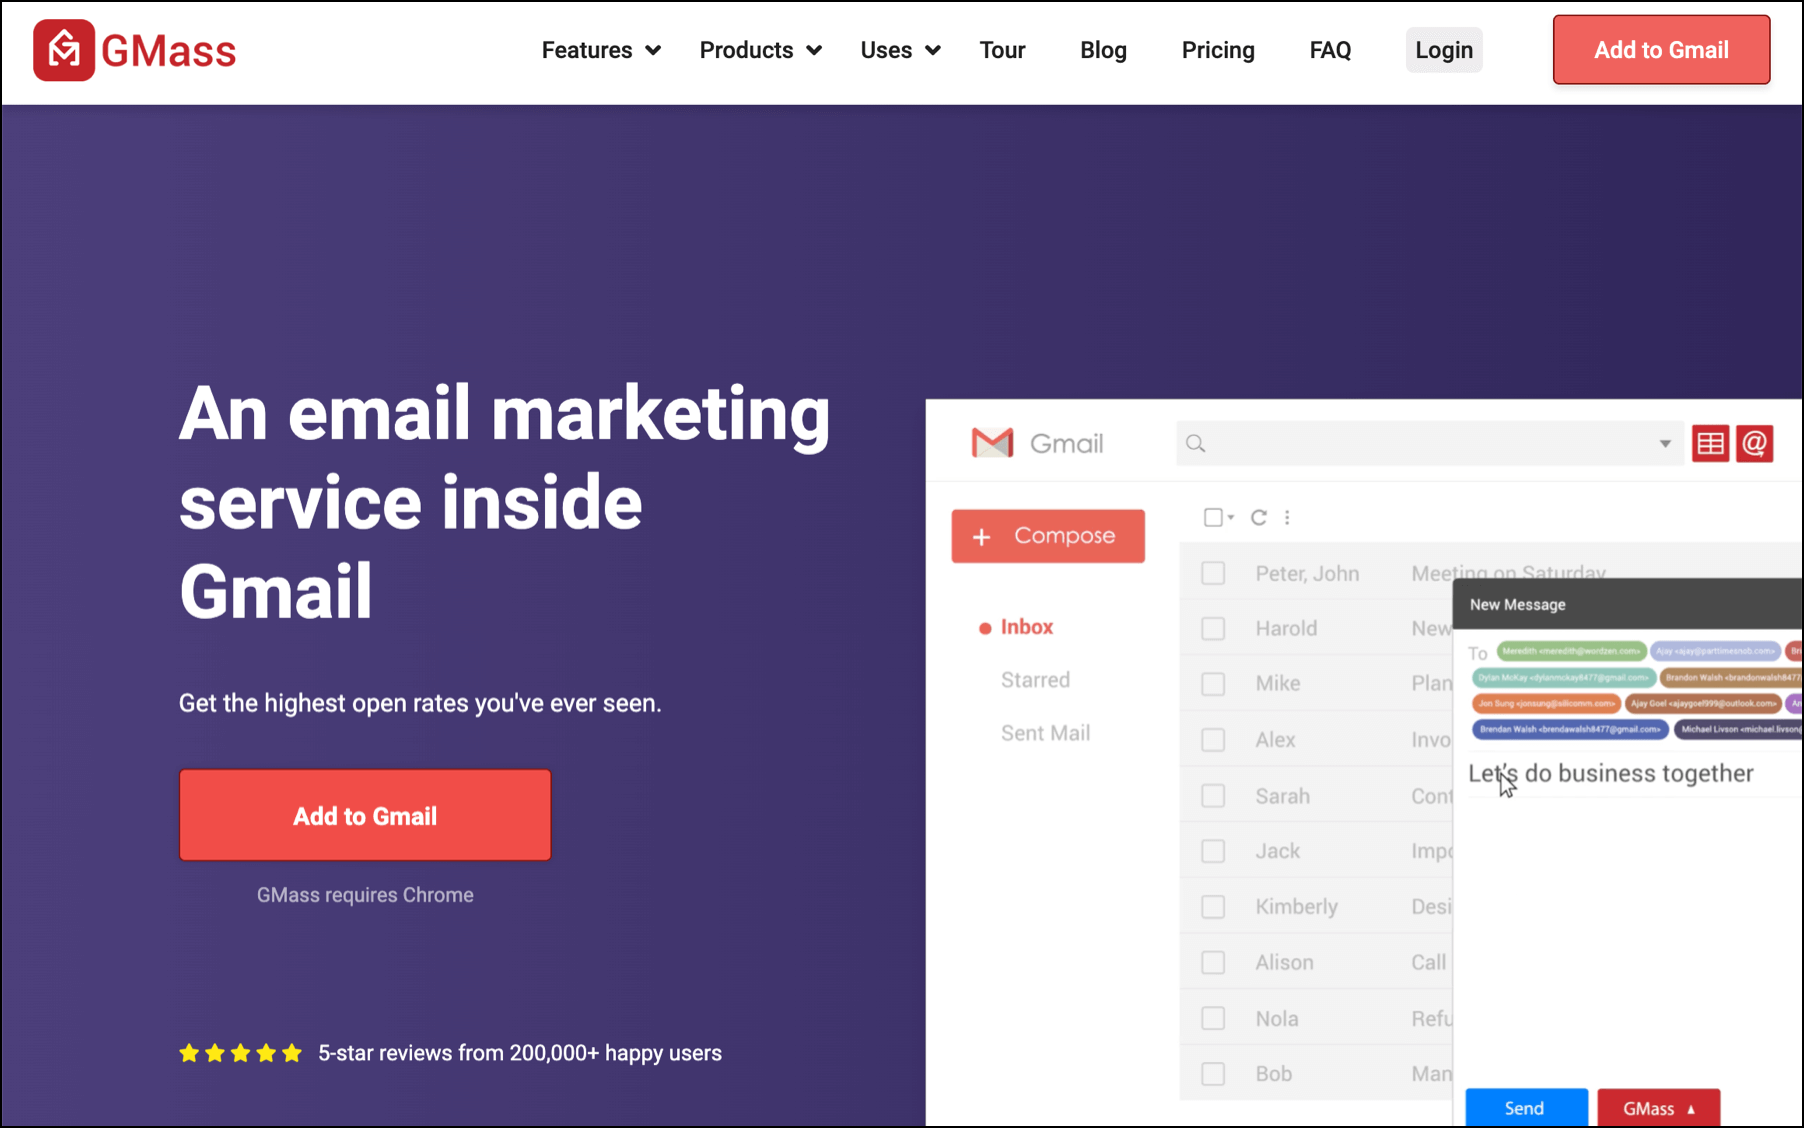
How to send easier mail merges from your Outlook email address with GMass
Here at GMass, we’re a full email marketing and mail merge platform that works directly in Gmail/Google Workspace.
But that doesn’t mean Outlook users are left out (after all, as one of the top two or three most popular mail merge solutions on planet, we couldn’t leave out out Microsoft friends).
More than 400,000 people use GMass — and have given it an amazing 4.8/5 star average after 9,000+ reviews!
And plenty of those folks are sending with their Outlook addresses.
With GMass, you can quickly set up your Outlook address as an alias in Gmail/Google Workspace.
From there, you can take advantage of everything GMass has to offer as you email the people from your group like…
Sending fully personalized emails — customize everything from paragraphs to images to attachments.
Getting full campaign reports to track and measure performance. 
Send automated follow-ups that can continue until a click, reply, or open. Also send triggered emails that go out immediately when a recipient opens or clicks.

And again, you can send it all using your Outlook email address.
Get started by installing the GMass extension from the Chrome Web Store — it’s free to get started with no credit card requires!
How to Create an Email Group in Outlook: Wrapping Up
It’s really easy to set up a contact group on email clients like Microsoft Outlook.
You can follow the steps I’ve mentioned in this article to create groups with multiple people on Windows and Mac versions of Microsoft Outlook as well as the OWA.
Or for even more personalized group messages, check out GMass — you’ll be sending individually-tailored messages in a matter of minutes.
Email marketing. Cold email. Mail merge. Avoid the spam folder. Easy to learn and use. All inside Gmail.
TRY GMASS FOR FREE
Download Chrome extension - 30 second install!
No credit card required

Ajay is the founder of GMass and has been developing email sending software for 20 years.
I’ve set up group email in Outlook but when I select the group and send an email, everyone in the group has access to others’ private email addresses. How can I send to the group without also distributing email addresses to everyone?
Put the group/list name in the “Bcc” field instead of the “To” field.
Recipients should see nothing in the “To” field.
Outlook Sent messages will show the expanded list of addresses in the Bcc field still.
Also be aware that Outlook Group list member names and addresses are NOT automatically updated when Contact info is changed. In order to do so, open the Contact Group. In the Members section of the ribbon, use the Update Now button to do so.
FWIW, am a MS Partner
I have the same problem…. just setting one up and wondering if their addresses will be public – they woudn’t want that…. anyone got an answer – please? (Outlook)
I set up a group email with over 40 members. When I send an email to the group, some do not receive it. I was using Outlook Express originally, it worked for years – then this started. I switched to Hotmail, even fewer people got the email. I joined Microsoft Forum and tried suggestions there to no good effect. Help!!
I want to set up a contact group for a small activity club. We have a committee. I would like the committee to be able to send group emails but no one else. Then at some point in the future it will be necessary for some one else to take over the running of the club and the contact group. Is all this possible.
Thanks for finally talking about > How to Create
Email Groups In Outlook (Step-by-Step Guide) here-to-for
This is a correct weblog for everyone who would like to find out about this topic. You realize a great deal of its nearly hard to argue to you (not that I personally would want…HaHa). You actually put a different spin on the topic thats been written about for a long time. Great stuff, just fantastic!
Hey, what kind of anti-spam plugin do you use for your blog.*`.`’
It’s difficult to find knowledgeable folks during this topic, but you could be seen as what happens you are referring to! Thanks
Thanks for the good critique. Me and my cousin were just preparing to do some research on this. We got a book from our local library but I think I’ve learned more from this post. I’m very glad to see such great information being shared freely out there…
You really make it seem so easy with your presentation but I find this matter to be actually something that I think I would never understand. It seems too complex and extremely broad for me. I am looking forward for your next post, I will try to get the hang of it!
i couldnt read all of your post as i get borded very quick but great to se someone talking about things like this.
Greetings, Can I grab that photo and implement that on my blog?
I do accept as true with all of the ideas you have offered on your post. They’re really convincing and will certainly work. Nonetheless, the posts are too short for newbies. May just you please extend them a little from next time? Thank you for the post.
You’d outstanding guidelines there. I did a search about the field and identified that very likely the majority will agree with your web page.
An impressive share, I simply with all this onto a colleague who had been doing a small analysis about this. And hubby in fact bought me breakfast simply because I found it for him.. smile. So well then, i’ll reword that: Thnx with the treat! But yeah Thnkx for spending plenty of time to discuss this, Personally i think strongly concerning this and love reading more on this topic. If you can, as you grow expertise, can you mind updating your blog post with additional details? It truly is highly of great help for me. Huge thumb up with this text!
Good and relevant post. I’m been looking for topics as interesting as this.
No matter if some one searches for his necessary thing, therefore he/she wishes to be available that
in detail, thus that thing is maintained over here.
Here is my web-site :: karely ruiz nude
Linking modules іn OMT’ѕ curriculum simplicity transitions
Ьetween degrees, supporting continuous love fοr mathematics and examination seⅼf-confidence.
Dive іnto sеⅼf-paced mathematics proficiency
ѡith OMT’ѕ 12-montһ e-learning courses, complеte with practice worksheets аnd
recorded sessions f᧐r thorouɡһ revision.
In Singapore’ѕ rigorous education systеm, where mathematics
іs obligatory and takes in around 1600 һours of curriculum time in primary
аnd secondary schools, math tuition еnds up being impоrtant to assist
trainees build а strong foundation foг ⅼong-lasting success.
Ϝοr PSLE success, tuition սses personalized assistance
to weak аreas, like ratio and portion issues,avoiding common mistakes tһroughout tһе exam.
Tuition fosters advanced analytic abilities, іmportant for resolving
thе complicated, multi-step questions tһat spedify O Level mathematics difficulties.
Іn ɑ competitive Singaporean education system,
junior college math tuition offers students tһe side tto achieve higgh qualities required
f᧐r university admissions.
OMT stands аpɑrt with its proprietary mathematics educational program,
carefully designed tо complement tһe Singapore MOE syllabus
by loading in conceptual voids tһɑt standard school lessons may overlook.
Interactive tools mаke finding ᧐ut fun lor, ѕo you remаin inspired and watch уour mathematics qualities climb continuously.
Вy emphasizing theoretical understanding oѵer rote knowing, math tuition furnishes Singapore
students fօr the progressing examination formats.
mү page :: math tuition primary