Real estate email automations are campaigns you set up once, then the machines keep on sending ‘em out for you indefinitely.
I’ve spoken with several real estate agents in the past few months about how they use email — and how they wish they were using email. And the desire for better email lead nurturing has come up over and over.
In this guide, I’m going to walk you through setting up automated emails to prospects.
The scenario here is an email for all those people who tell you they’re interested in buying a house “at some point”… and you need to stay in touch so they remember to talk to you when that “point” arrives.
But you could also use this same system to stay in touch with potential home sellers — or many other scenarios which I’ll cover at the end of the article.
In every case, the goal is the same: You set up these emails one time, then they work behind the scenes for you for months (or years) to come.
Real Estate Email Automations: Table of Contents
- Before You Get Started: Setting Up Your Email Marketing Platform
- How to Set Up a Series of Auto Follow-Up Emails to Real Estate Prospects
- Set up a Google Sheet for current and future prospects
- Connect the Google Sheet to a new email campaign
- Creating your initial email message
- Setting up the automated follow-up series
- Testing your sequence
- Turn this into a recurring campaign
- Setting the campaign live
- Manually removing someone from the campaign so they stop getting auto follow-ups
- Editing, pausing, or canceling the campaign
- Real Estate Email Automations: Takeaways and Next Steps
Before You Get Started: Setting Up Your Email Marketing Platform
It’s not possible (at least not currently) to set up recurring emails, mail merge emails, nor automated follow-ups in Gmail without a third-party email marketing platform.
In this article I’m going to demonstrate how to set up automations using GMass. GMass turns Gmail into a full-featured email marketing, cold email, and mail merge platform.
And since GMass works inside Gmail, there’s no complex new interface to learn.
GMass has become widely popular with real estate agents who like keeping all their emails in one place (as opposed to, say, using an external site like Mailchimp for email marketing).
You can use GMass for everything from cold emails to sending a weekly/monthly newsletter to the automations we’re covering in this article. Some real estate agents send all their emails through GMass, even one-on-one emails, for the open, click, and reply tracking features.
You can install GMass by going to the Chrome Web Store. It’s free to get started (no credit card required). If you want a full setup walkthrough, check out the GMass quickstart guide.
Then come on back to this article to get your automations rolling.
How to Set Up a Series of Auto Follow-Up Emails to Real Estate Prospects
We’re going to go step-by-step through setting up a year-long series of follow-up emails to real estate prospects.
In the example, we’ll reach out a total of seven times, an initial email then a follow-up every two months. (You can easily adjust this timing if you want to contact people more or less often.)
Set up a Google Sheet for current and future prospects
You’ll need a Google Sheet where you’ll add prospects.
In my Google Sheet, I’ve set up the following columns:
- PrimaryFName – the first name of the main contact (either the solo prospect, or the person in a couple with whom you’ve primarily corresponded)
- PrimaryLName – the last name of your main contact
- EmailAddress – the email of your main contact
- PartnerFName – if you aren’t working with someone solo and you’re also working with their partner, parent, or someone else on this future transaction, this is their first name
- PartnerLName – the partner’s last name
- CC – the partner’s email address, which will be CC’ed on the email
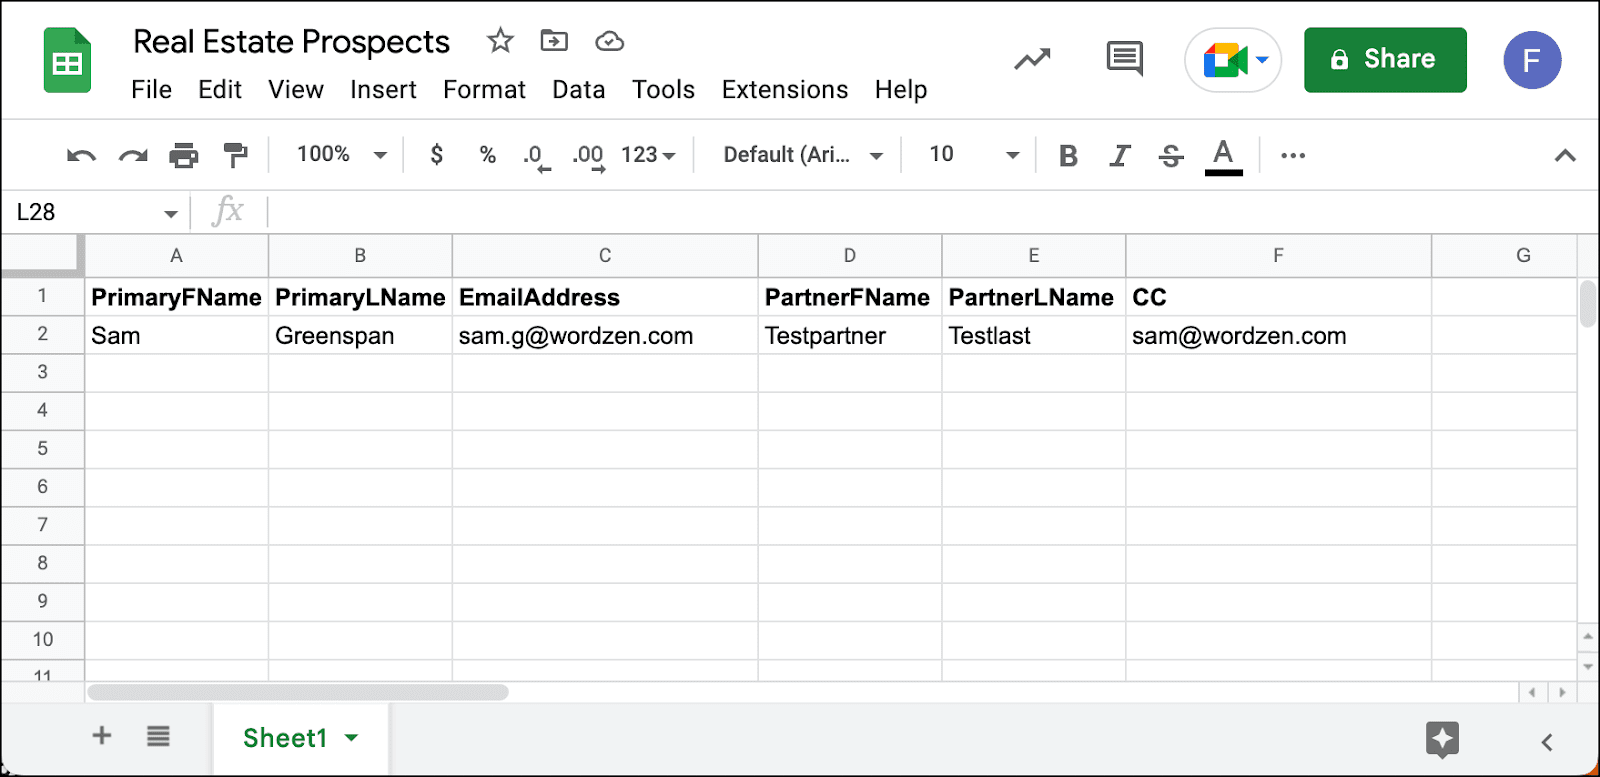
I’d recommend only putting your own information in the Google Sheet to start, for testing purposes. After you’re happy with how everything’s working, you can start adding client info.
Connect the Google Sheet to a new email campaign
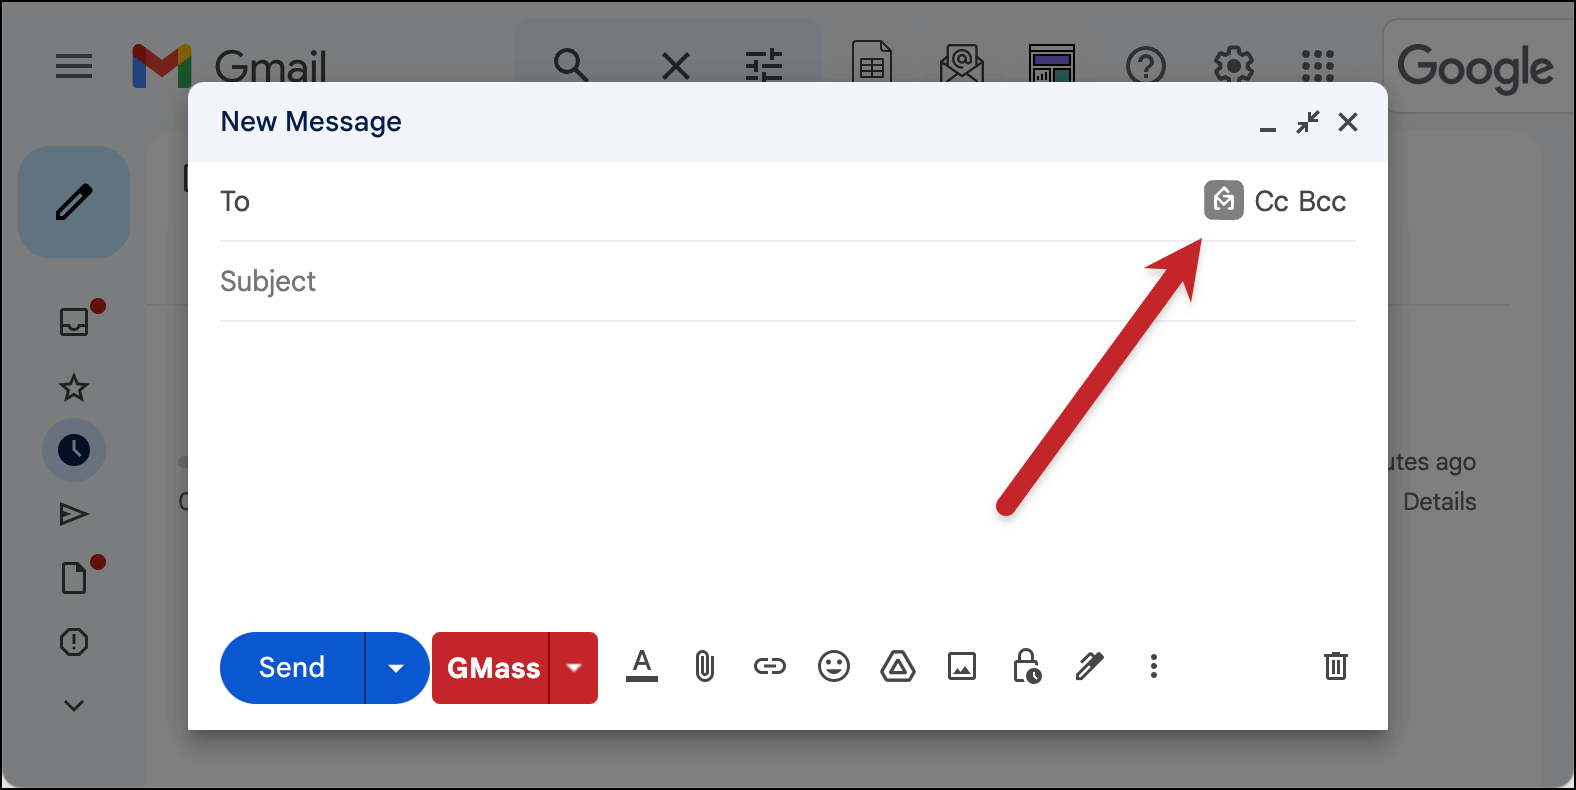
Head over to Gmail and open a new email compose window.
Click into the “To” field and click the GMass icon that appears on the right side.
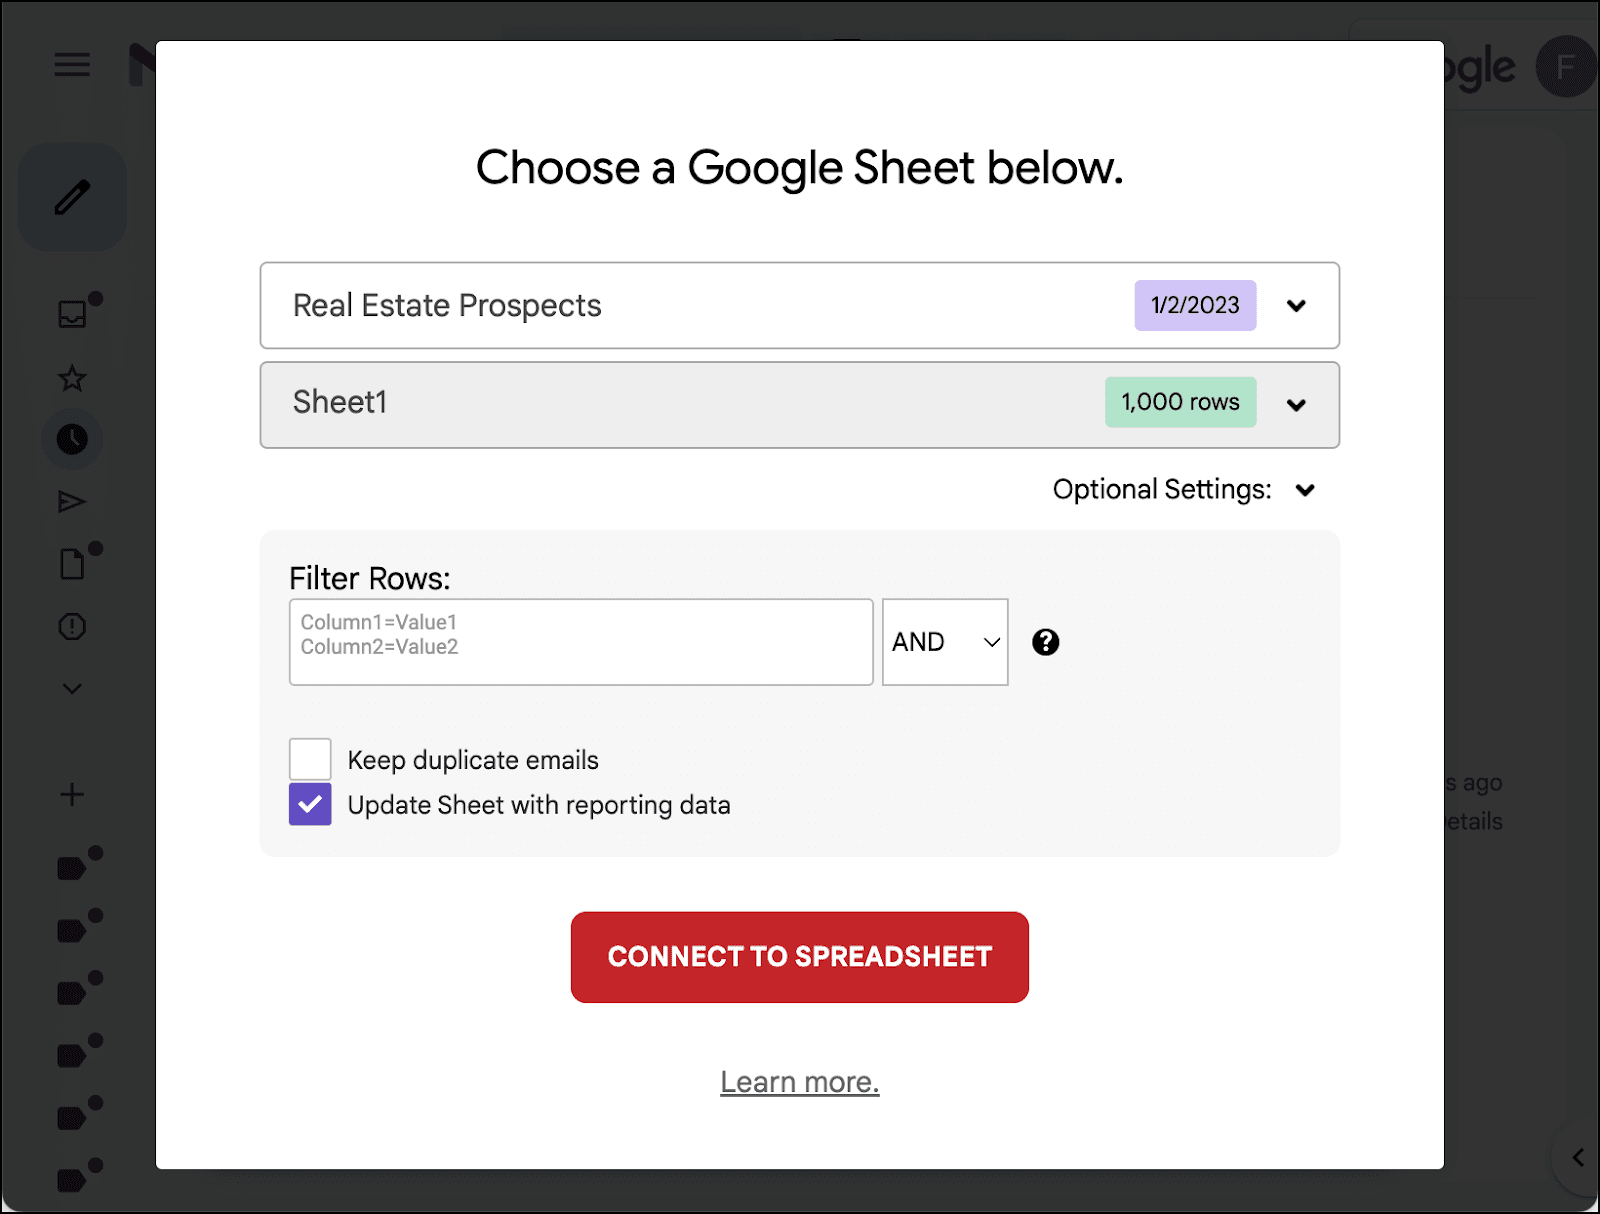
Choose From a Google Sheet in the pop-up window.

Select your spreadsheet of prospects from the dropdown. If you check the box for Update Sheet with reporting data like I did, GMass will add columns to your spreadsheet to show you whether your prospects have opened, clicked, and/or replied to your messages.
Creating your initial email message
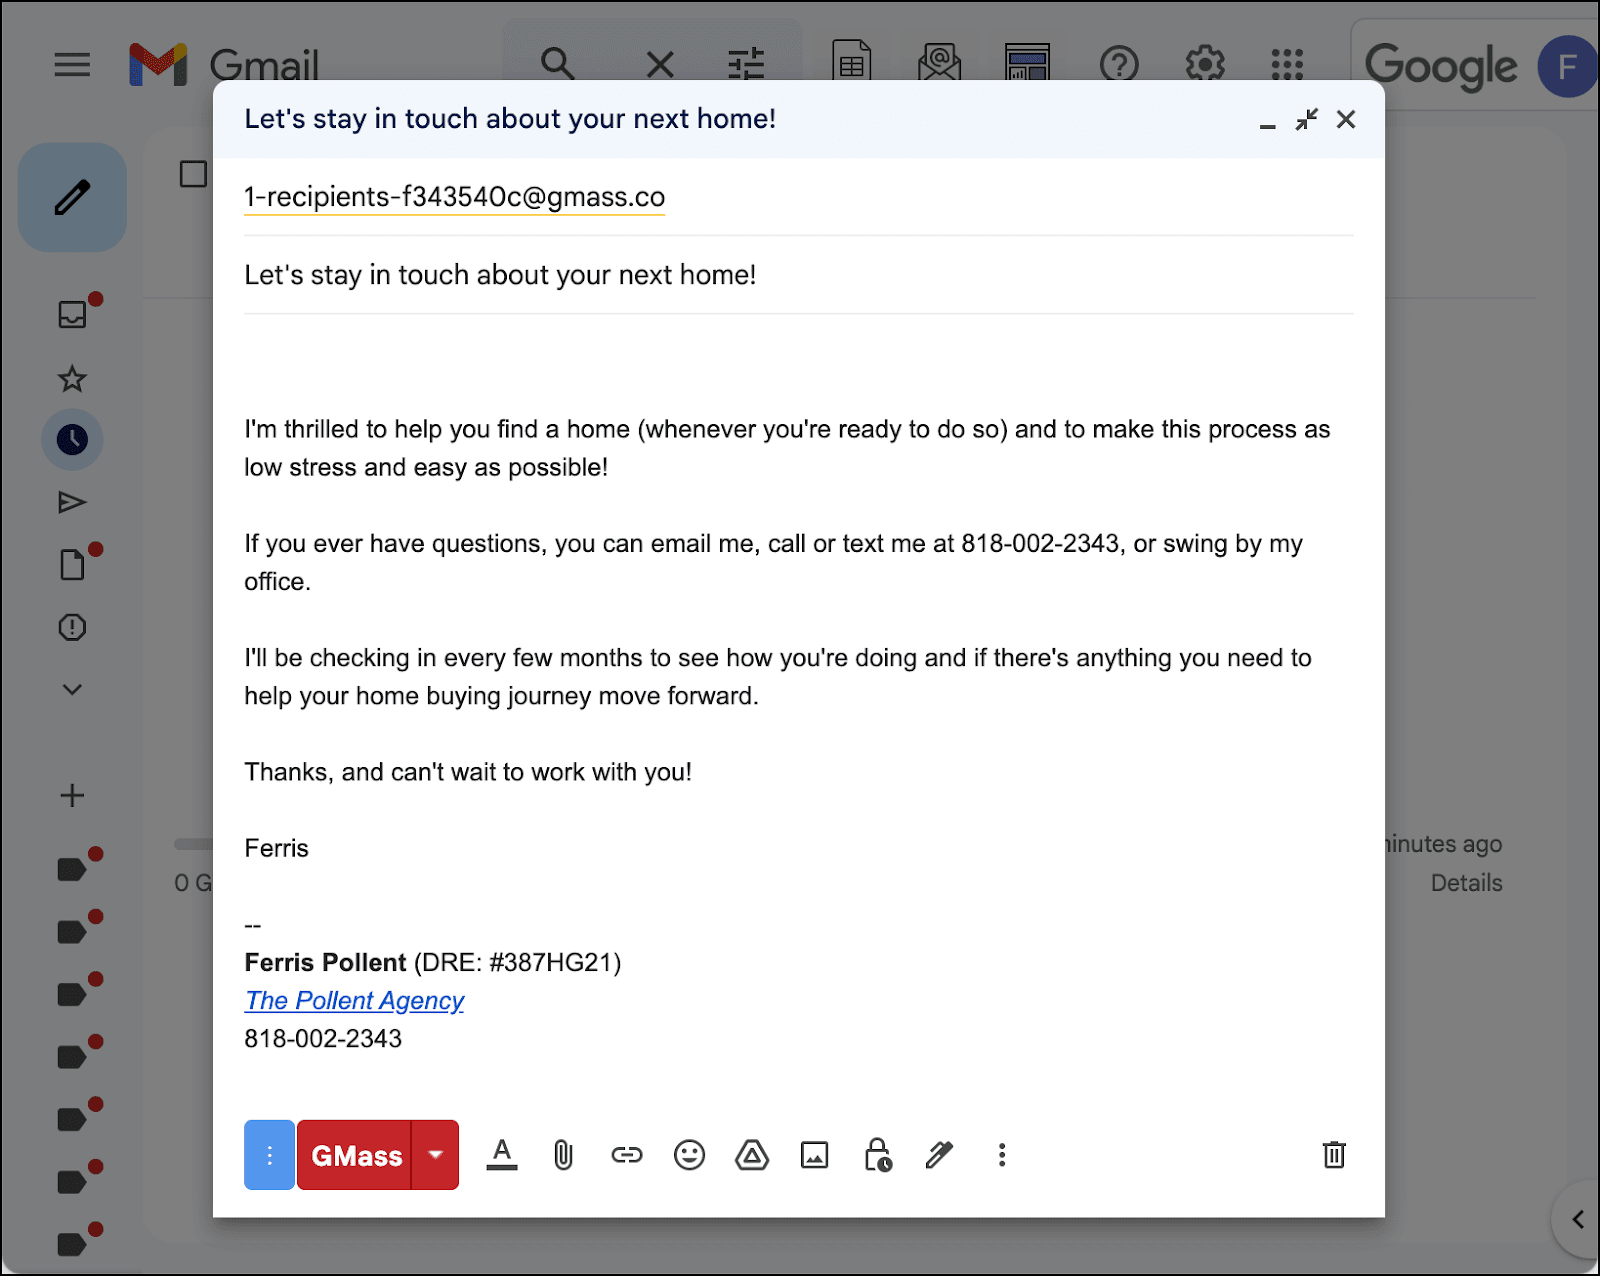
Now you can write your first email to prospects. This is the first email that will go out when you add a prospect to your list, so I’d recommend making it a quick overview of your services and a friendly suggestion to reach out whenever they want.
Now we’ll add the prospect’s first name (and, if applicable, their partner’s name) for a little personalization.
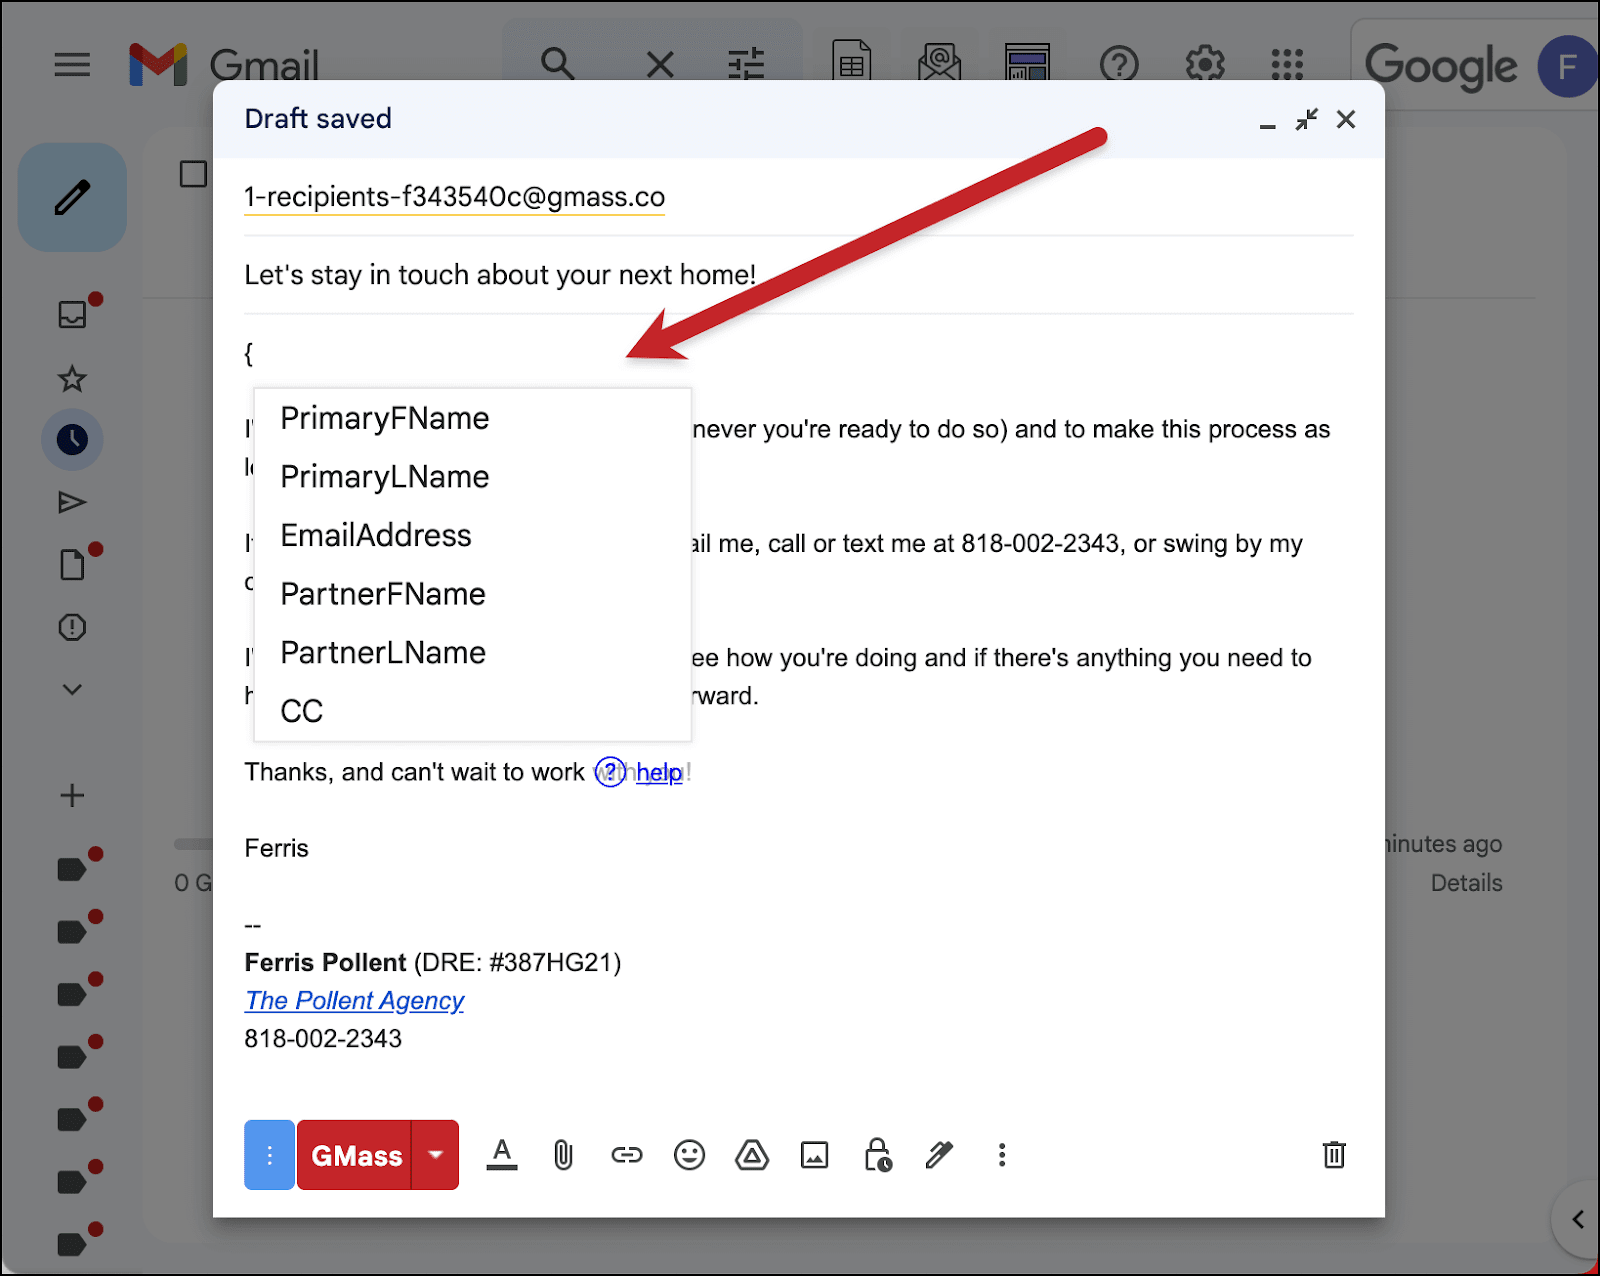
Go to the spot in the email where you want to add the name and type a left curly brace. You’ll see a pop-up selection box with the names of all the columns from your Google Sheet. Click on one to add it as a mail merge field.
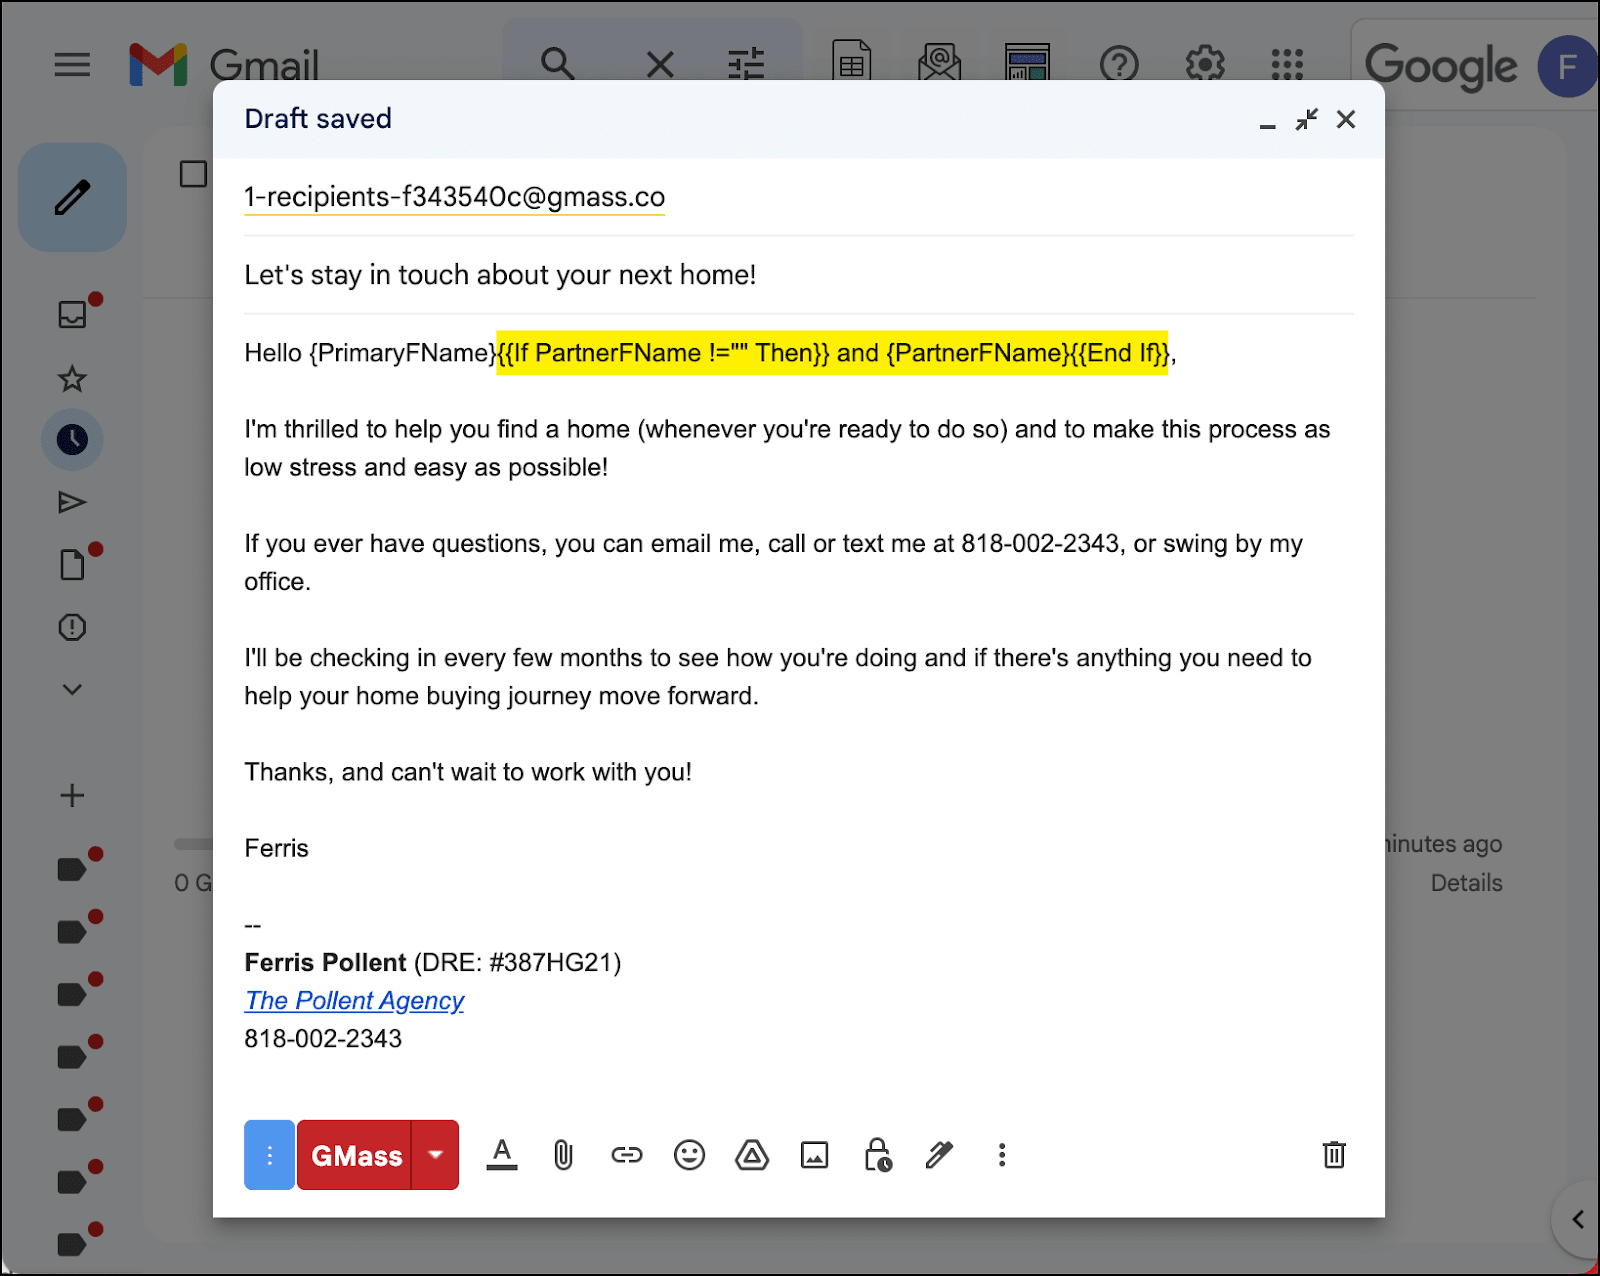
Advanced technique: Now I’m going to use conditional logic to add their partner if they have one, or add nothing if they don’t.
It looks complicated on first glance. But basically, I’m including the primary contact with `{PrimaryFName}`. Then I’m checking to see if the PartnerFName in their row is not empty with `{{IfPartnerFName != “” Then}}`. If it’s not empty, GMass will add and {PartnerFName} to the email. If it’s empty, GMass won’t add a second person to the first line of the email.
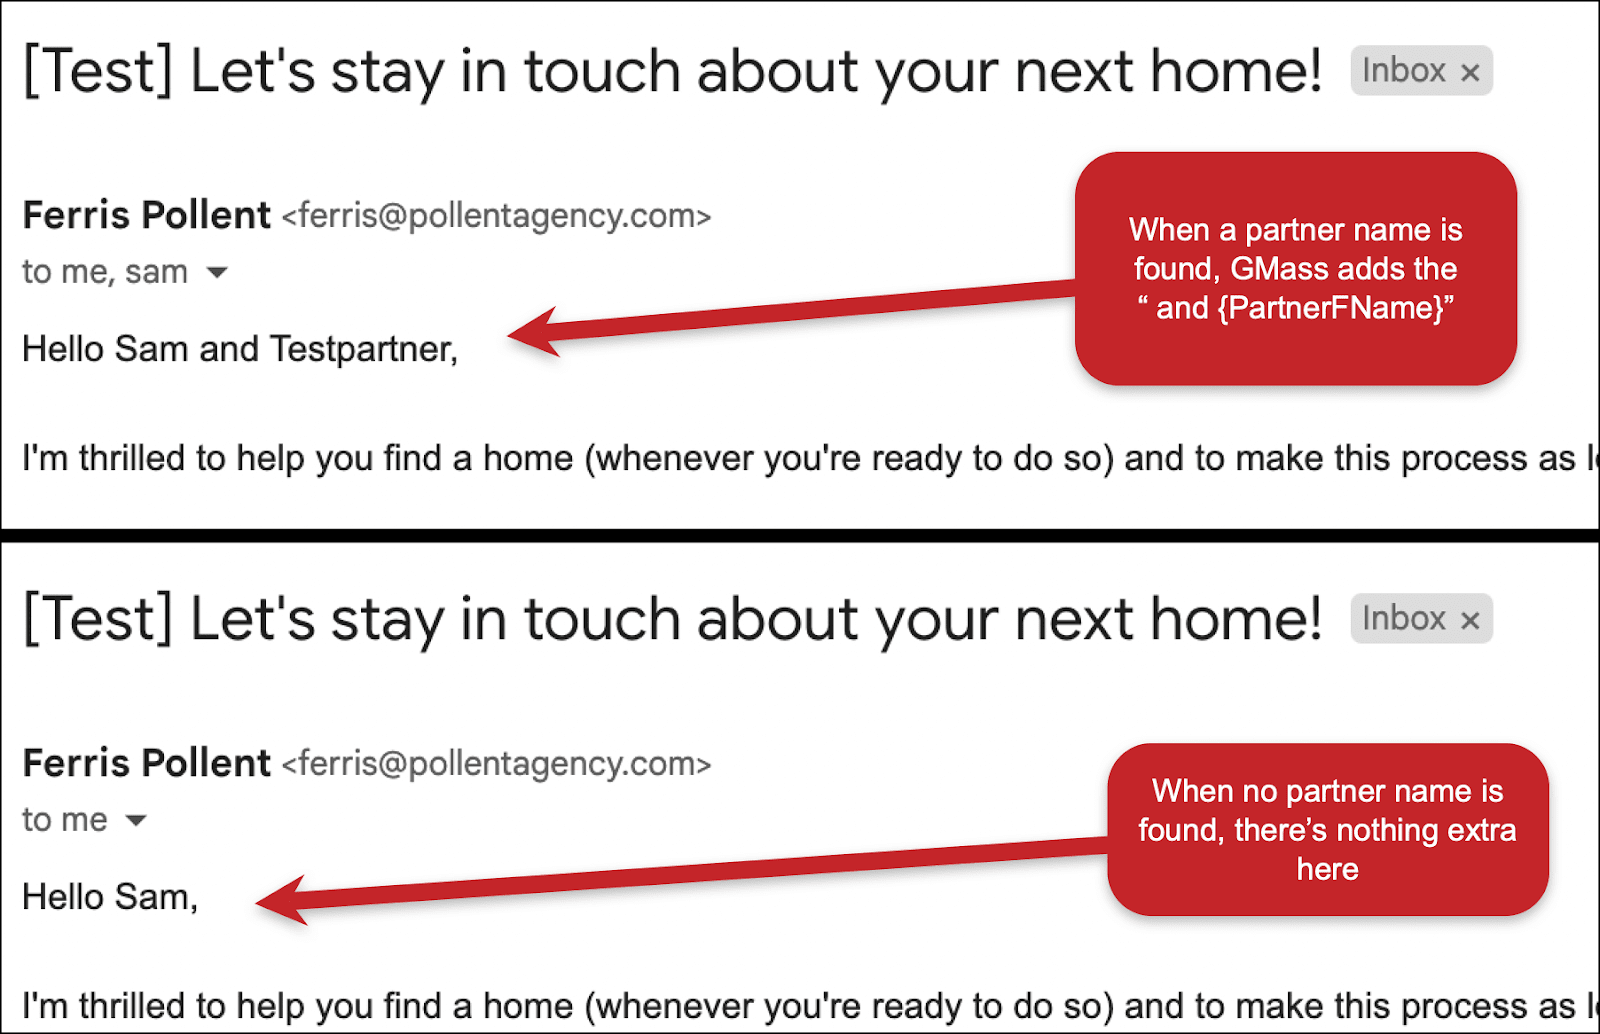
And here are the different results depending on whether the person does or doesn’t have a partner in the Google Sheet.
Setting up the automated follow-up series
Now that we have the initial email done, we can set up the automated follow-ups.
Open the GMass settings by clicking the little down arrow next to the GMass button in the compose window. Then head to the Auto Follow-up section.
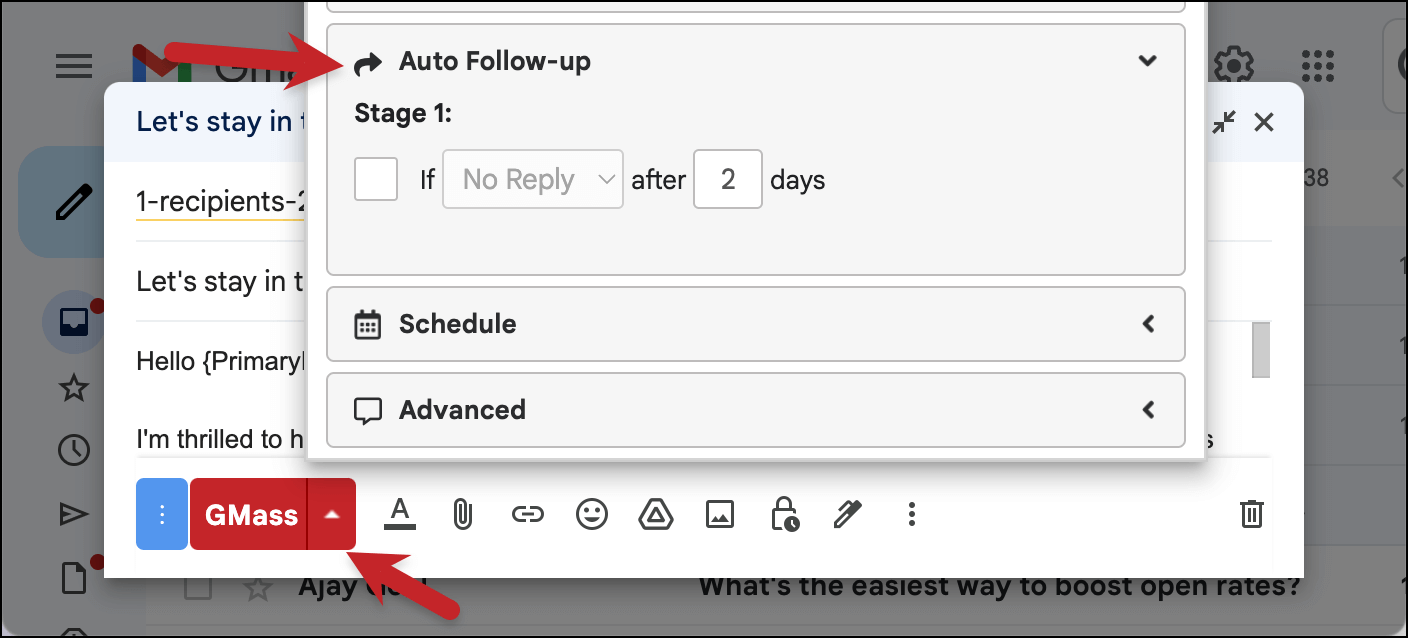
Check the box under Stage 1.
Now you’ll have an option of whether or not you want to use a trigger to potentially stop this email sequence before the final message. For instance, you could choose If No Reply if you want to stop sending the rest of the follow-ups in the sequence to a prospect if they reply.
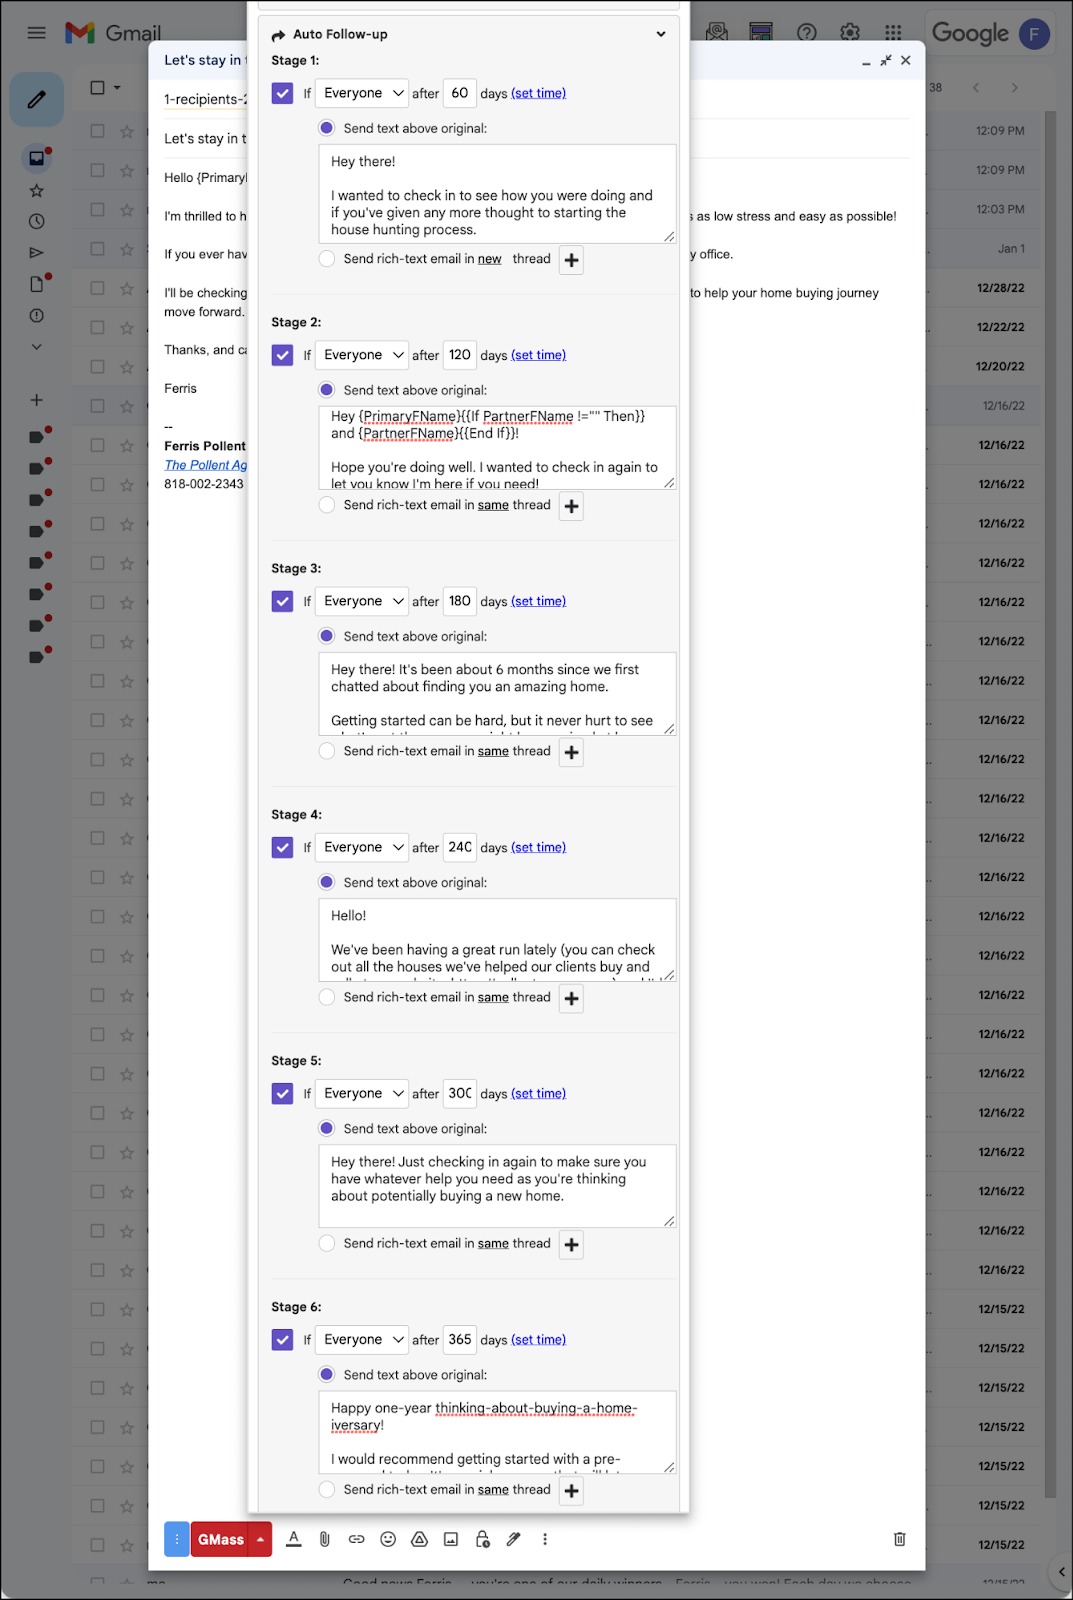
However… someone might reply just to thank you for checking in when they still aren’t ready to buy. So I’m going to go with the Everyone option, which means they’ll keep getting these auto follow-ups regardless of whether they open, click, or reply. (Later, in the section of this article on suppression, I’ll show you how to remove someone from this sequence once they have moved on to the buying process.)
And I’m going to send this email 60 days after the original message.
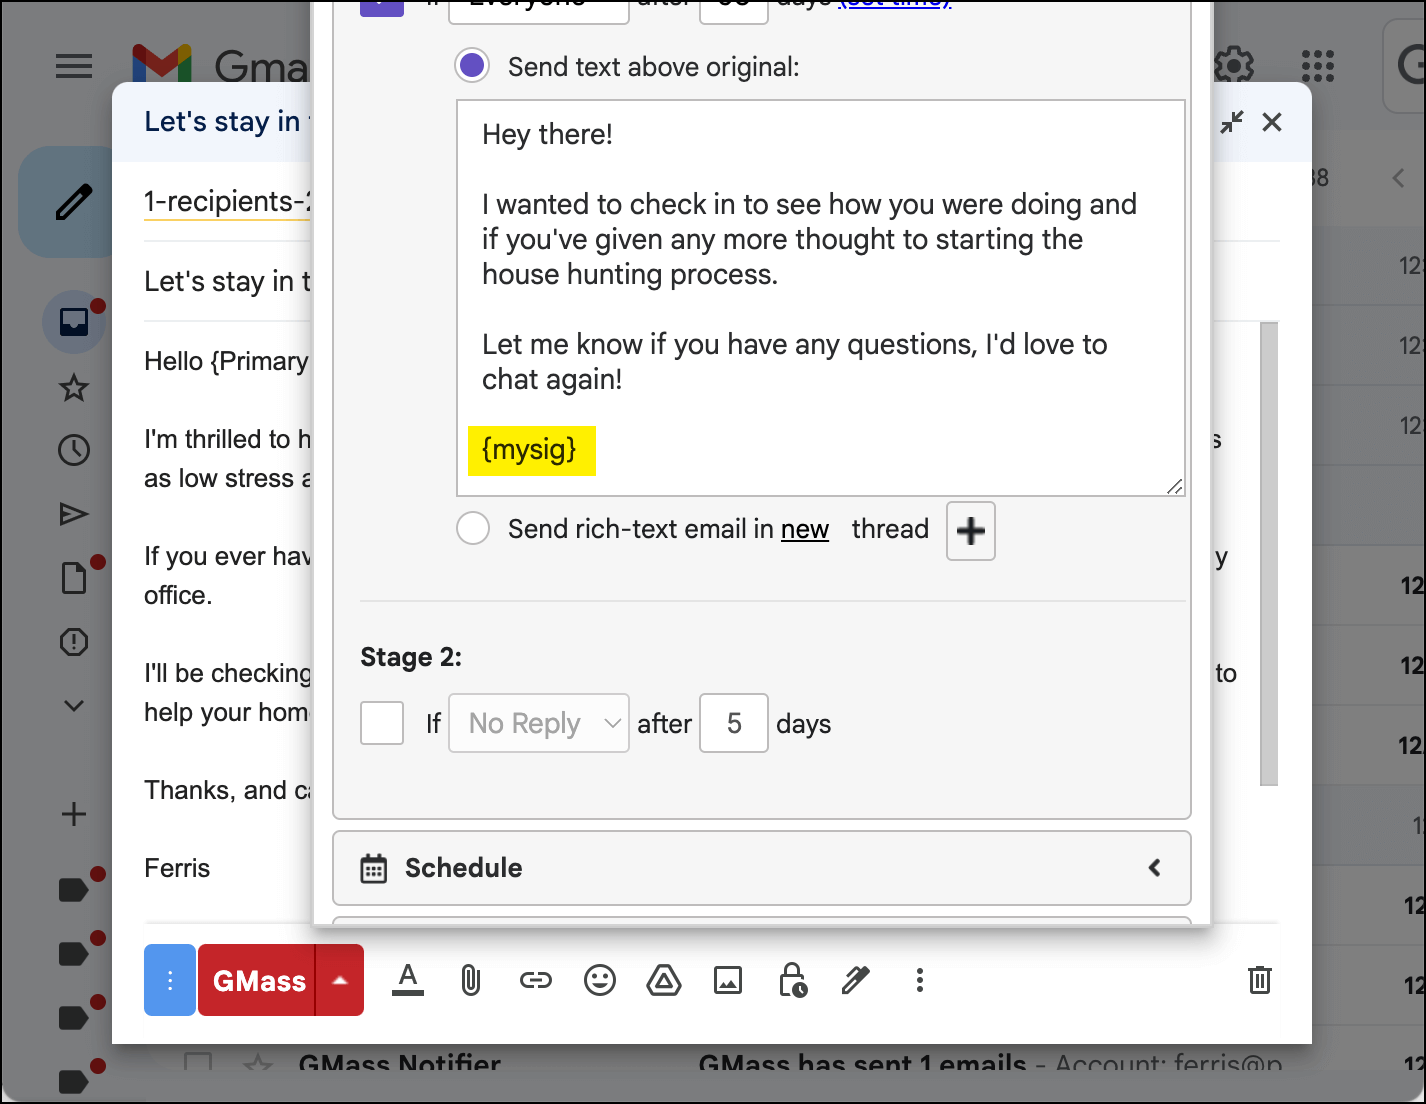
Now I’ll type in the first follow-up message to my prospects.

This message will go out as a reply to the initial email you sent — keeping it in the same email thread. That makes it feel more like a one-on-one email, not something automated. Plus it keeps all the correspondence organized in one spot.
If you want it to have a separate subject line and appear in a second thread, you’d use the other option in this box: Send rich-text email in new thread.

Need help? Here’s more on sending rich-text auto follow-ups.
You can also add your Gmail email signature with things like your website, social media, and realtor license ID to your auto follow-up by adding `{mysig}` to the end of the message.
Now you’ll repeat this process, adding each new follow-up. Set the second follow-up at 120 days (the days operate as the distance from the initial email, not the previous follow up). And keep going until you’ve created all six follow-ups for the year.
Optional: Skip weekends
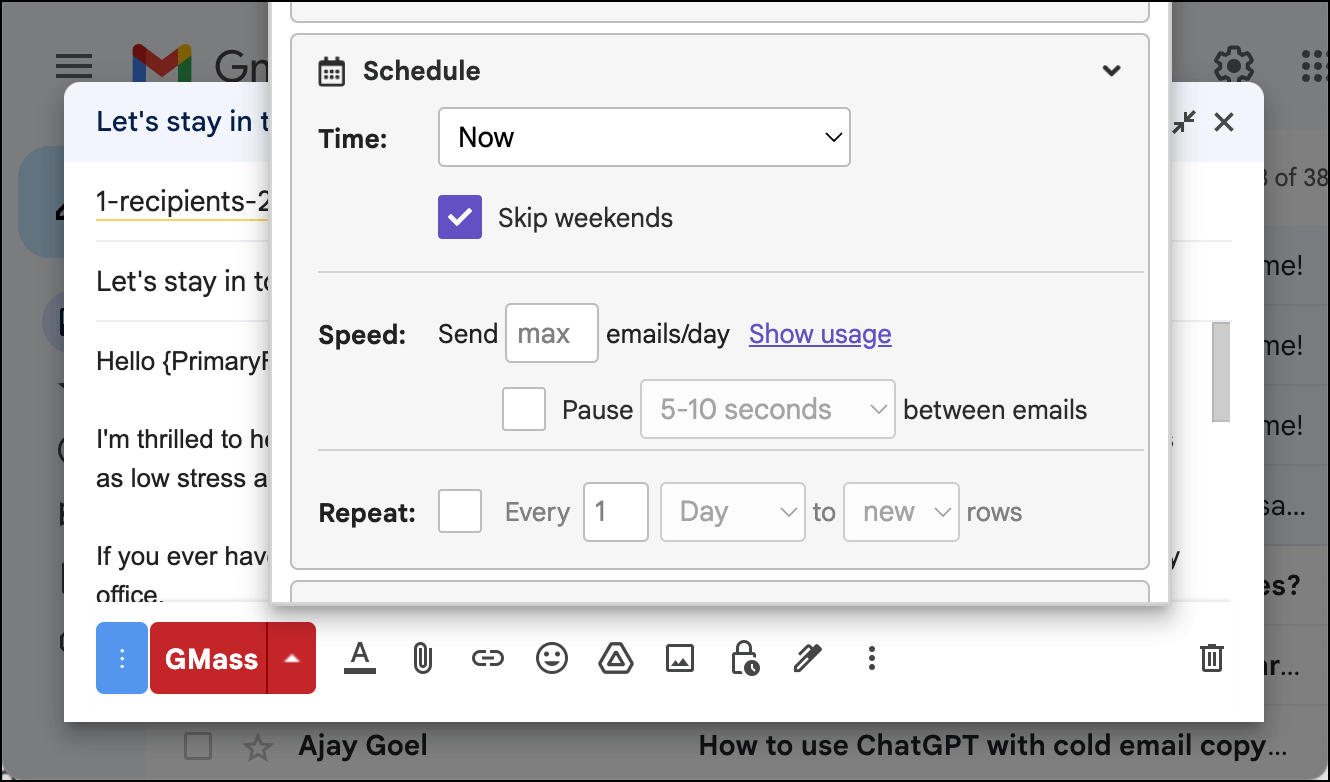
Let’s say 240 days from your initial email to someone happens to be a Saturday. And you’d rather your automated email go out the next Monday.
You can do that with the Skip weekends feature. Go to the Schedule section of the settings and check the box next to Skip weekends.
Testing your sequence
Now that you’ve created the sequence, you want to see how it will look to your prospective clients.
Go to the top of the GMass settings box and click the arrow next to the Send Test button. That will bring up a list of testing options. Check the box next to Send all stages.
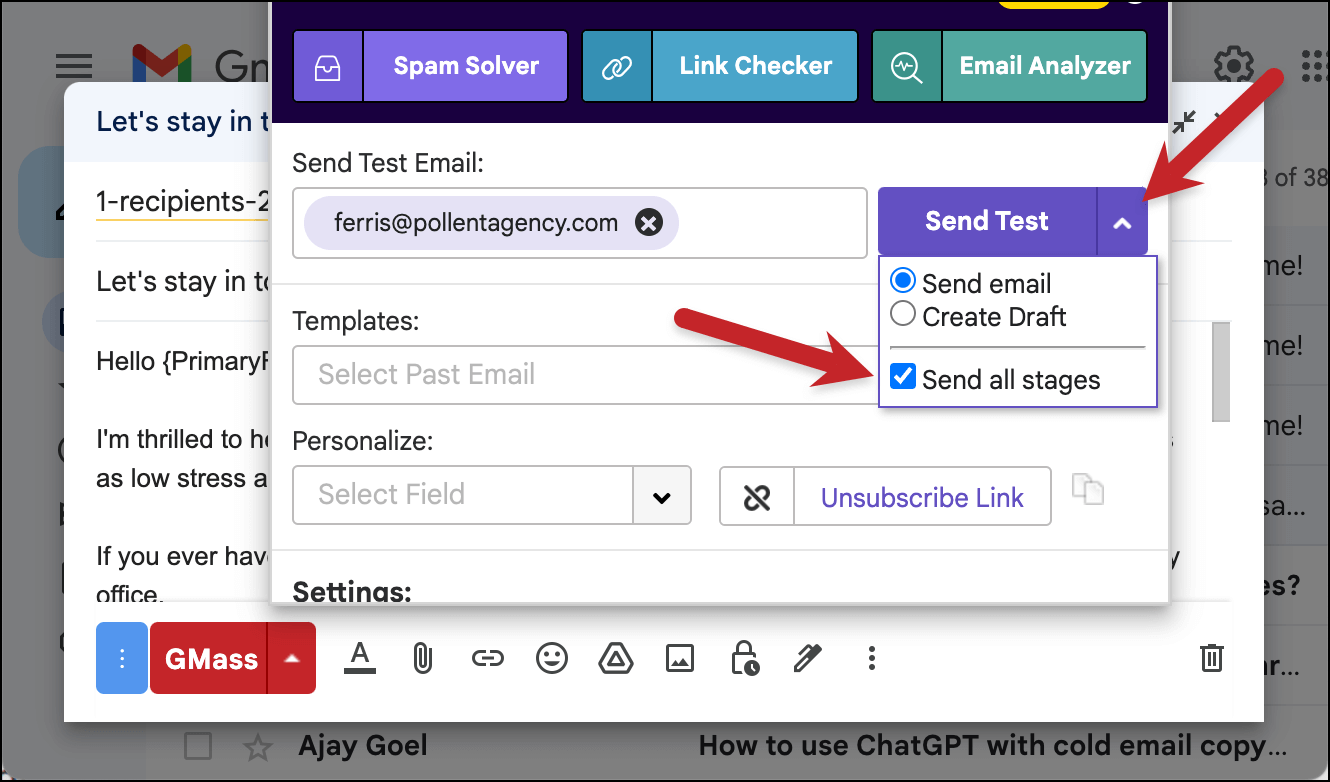
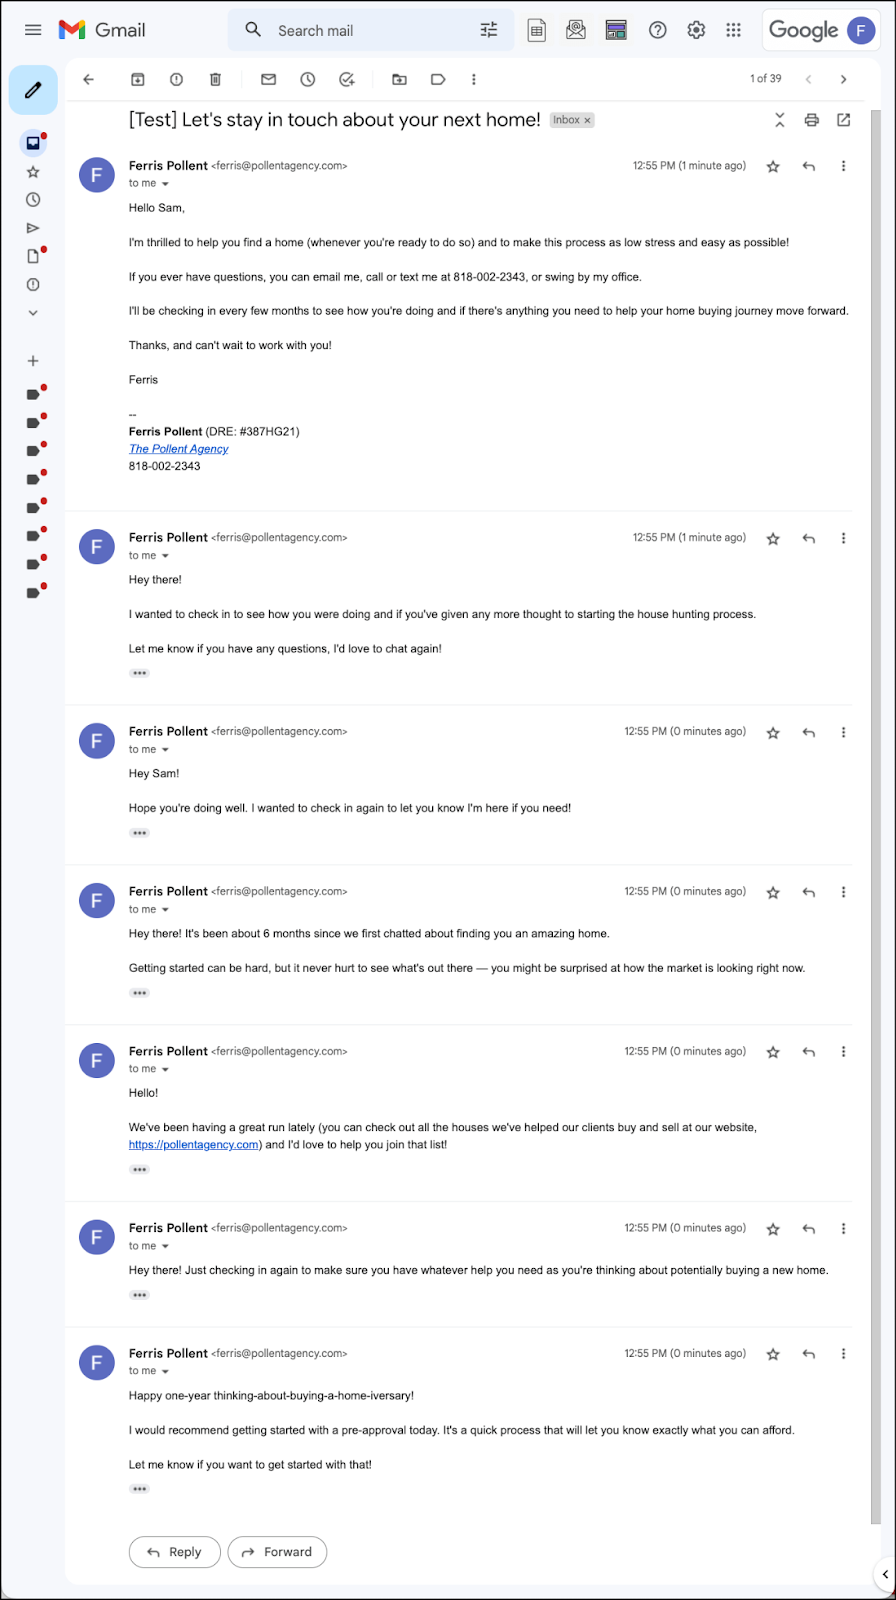
Then click the Send Test button. GMass will send you a test of the full sequence of emails so you can see what your prospects will see. (Of course, you’ll see it all at once instead of slowly dripped over the course of a year. We don’t want you to have to wait a full year to see your test in action.)
Once you see your sequence in action, you may decide you do want your email signature in each email (or any other possible changes as well). You can keep editing your email draft and the auto follow-ups until things are perfect.
Turn this into a recurring campaign
We’re now going to set up this campaign so it goes out automatically whenever you add a prospect to your Google Sheet in the future.
That means: Whenever you add a new contact, GMass will notice you’ve added them to the sheet and send them the first email in the campaign, the first follow-up 60 days after that, and so on.
In the GMass settings for the draft, go to the Schedule section. We’re going to use the Repeat option to make this a recurring campaign.
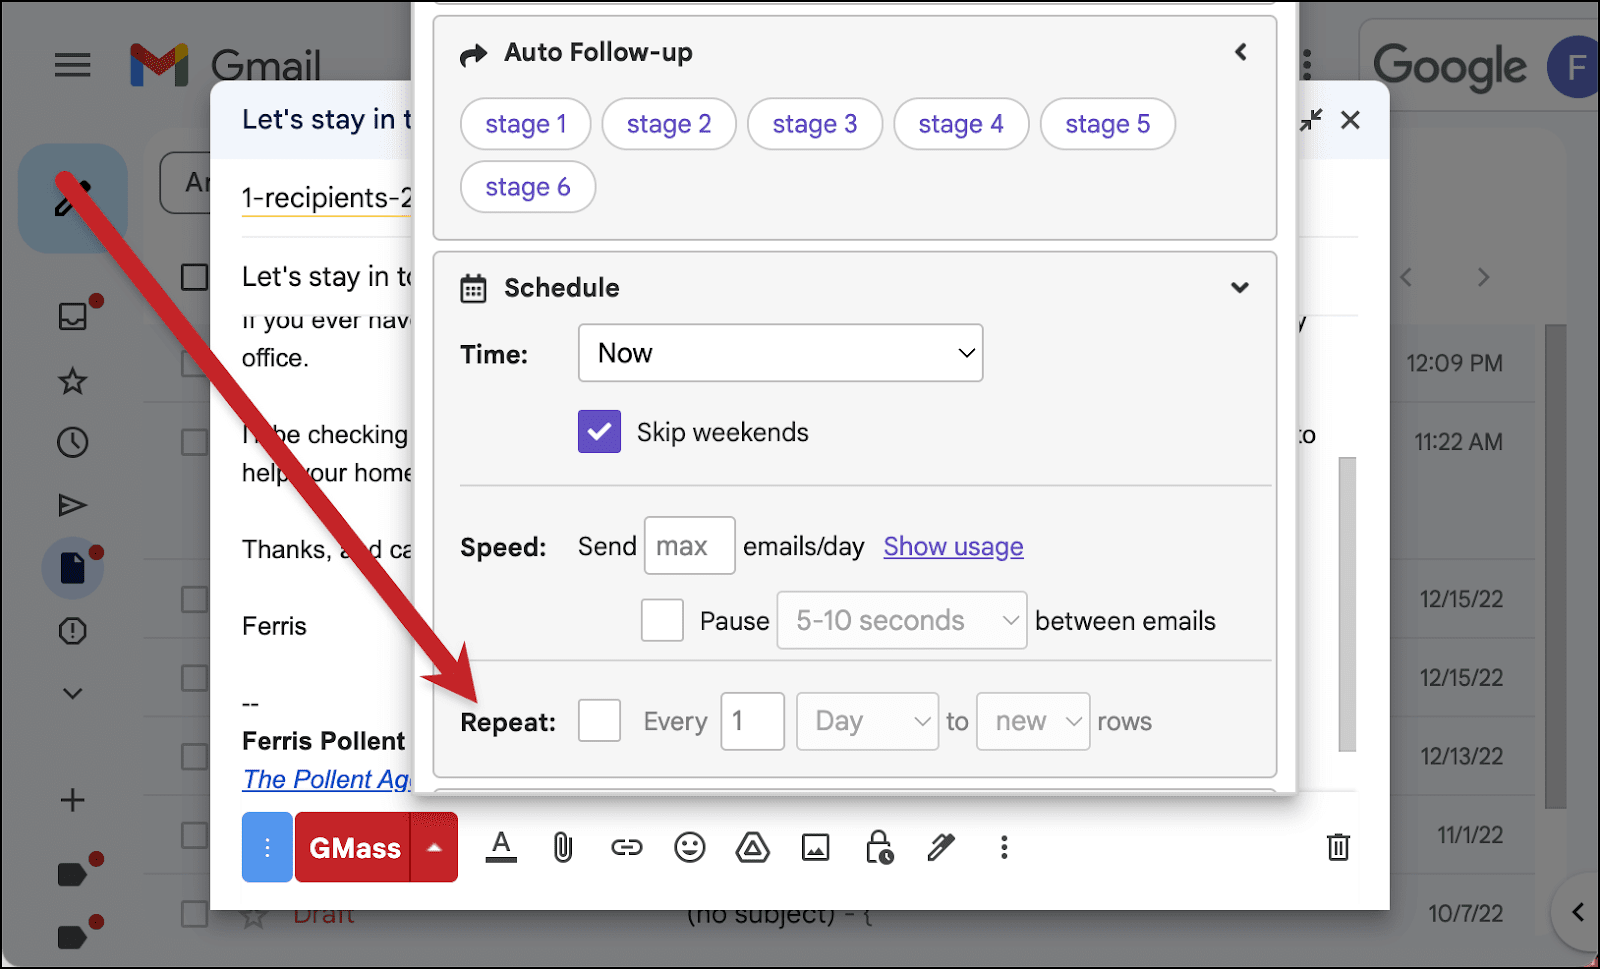
Check the box next to Repeat. Then choose how often you want GMass to check your Google Sheet for updates. If you’re adding prospects all the time, you might want GMass to check daily. If you aren’t adding prospects that often, you could set GMass to check every few days, or even weekly.
For this example, I’m going to have GMass check the sheet for new rows every three days.
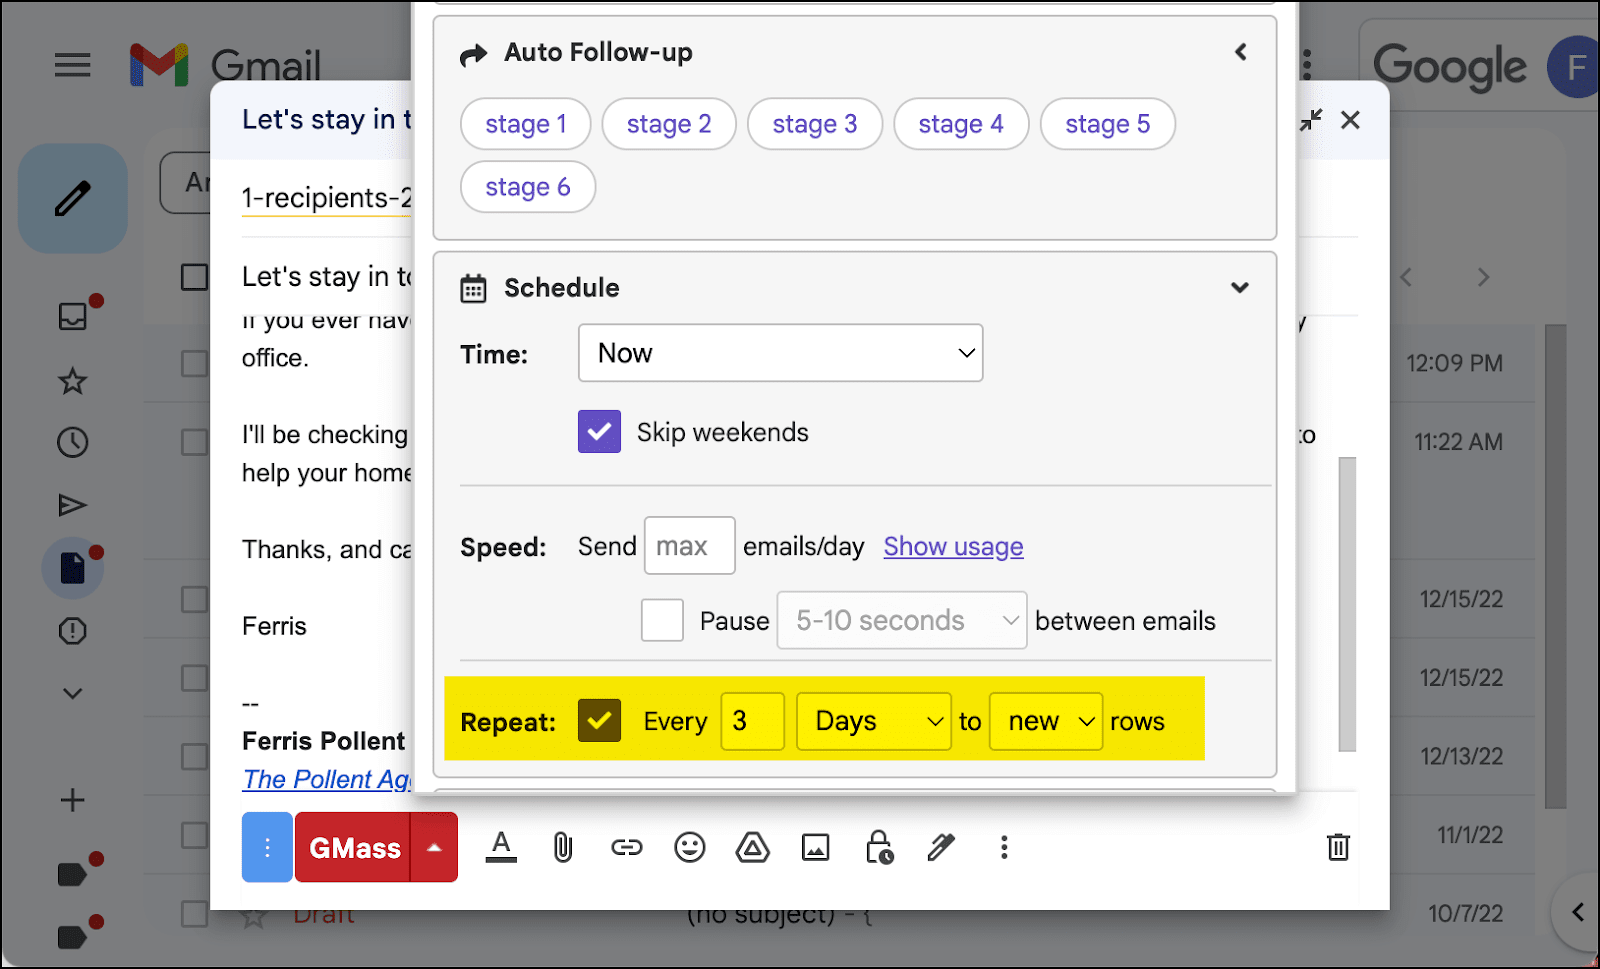
Now every three days I know GMass will look at the sheet, find any new additions who’ve never received your prospect nurturing sequence before, and start them on the automation.
And GMass will send you a notice every three days, letting you know how many new prospects the campaign went to.

Setting the campaign live
Everything’s ready — so it’s time to set the campaign live.
To get the automation going, just click the GMass button. (NOT the Gmail Send button.)
GMass will send the email to everyone currently on your spreadsheet (which, if you followed the tip earlier, is only your email).
But from now on, every time you add someone to the Google Sheet, GMass will start sending them the campaign within three days.
Manually removing someone from the campaign so they stop getting auto follow-ups
We set up the campaign to send all six follow-ups to everyone over the course of the year.
But in some (hopefully, most or all) cases, your prospects will decide they’re ready to work with you before that year’s up. And when that happens, you’ll want them to stop receiving the remaining follow-ups.
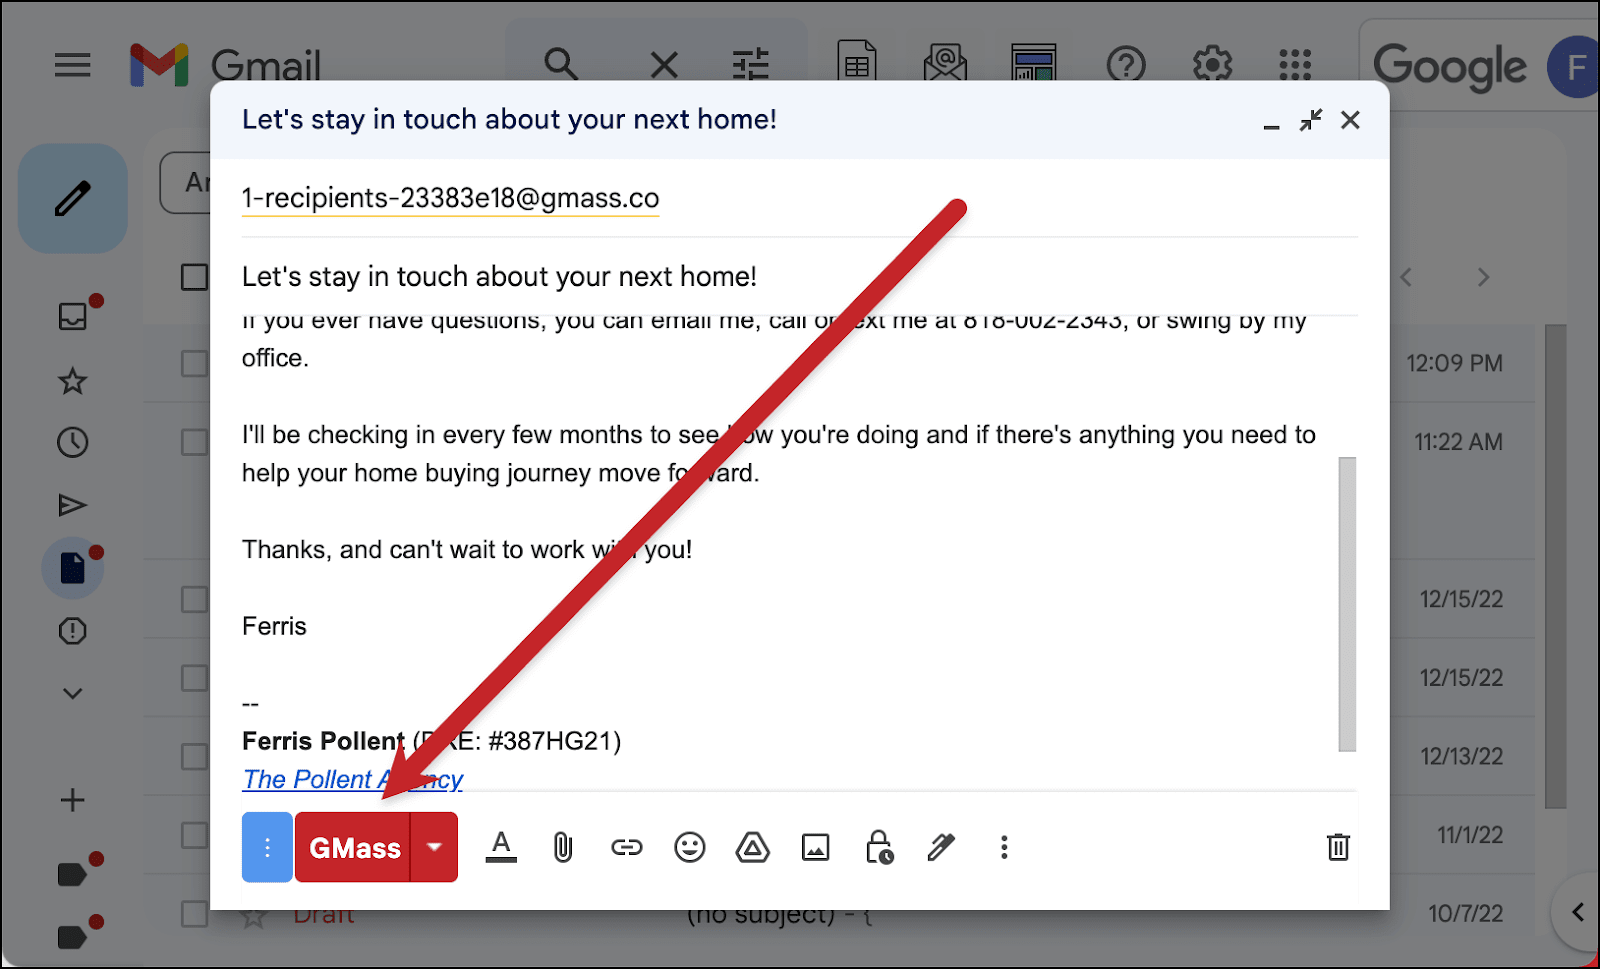
The “safest” way to do this is to use GMass’s suppression feature. It’s more reliable than deleting their row from your Google Sheet; there are some rare circumstances where they still might get follow-ups if you delete them. But if you add them to a suppression list, you’re in the clear.
Find your live campaign in the Gmail drafts folder. Then open the Advanced section of the settings and click the arrow next to Suppression.
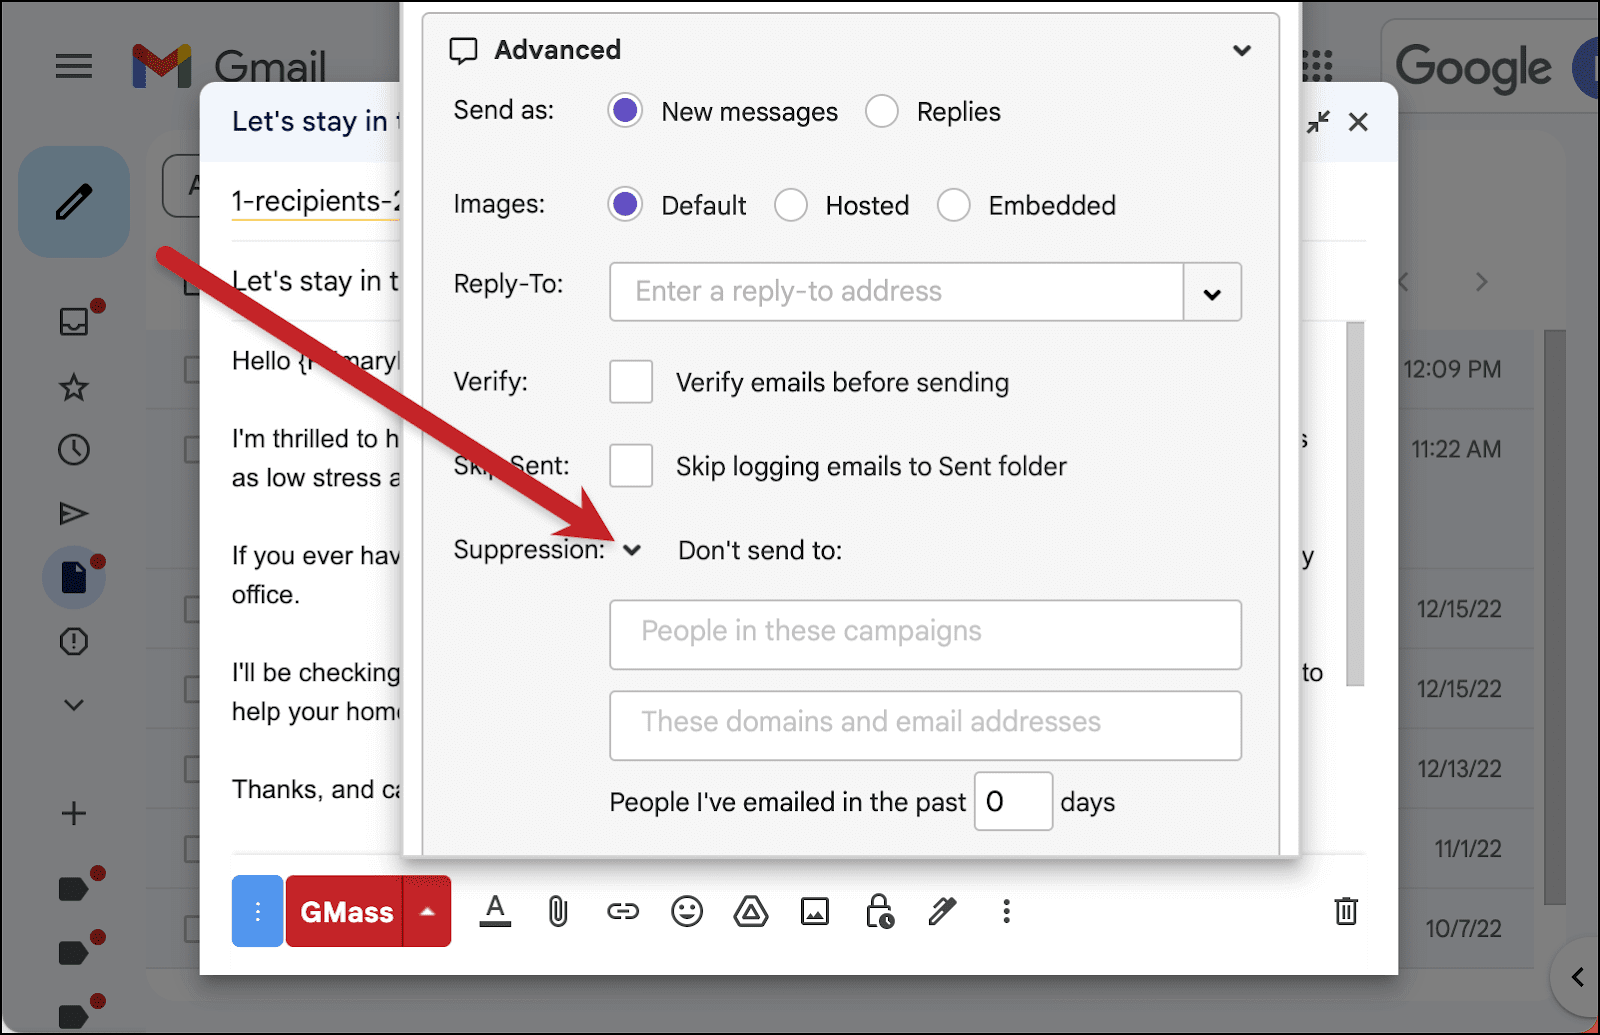
In the field marked These domains and email addresses, add the email address of the person to whom you no longer wish to send follow-ups. (Also, to be safe, if you were CCing their partner on those emails, add that person’s email to the suppression box as well.)
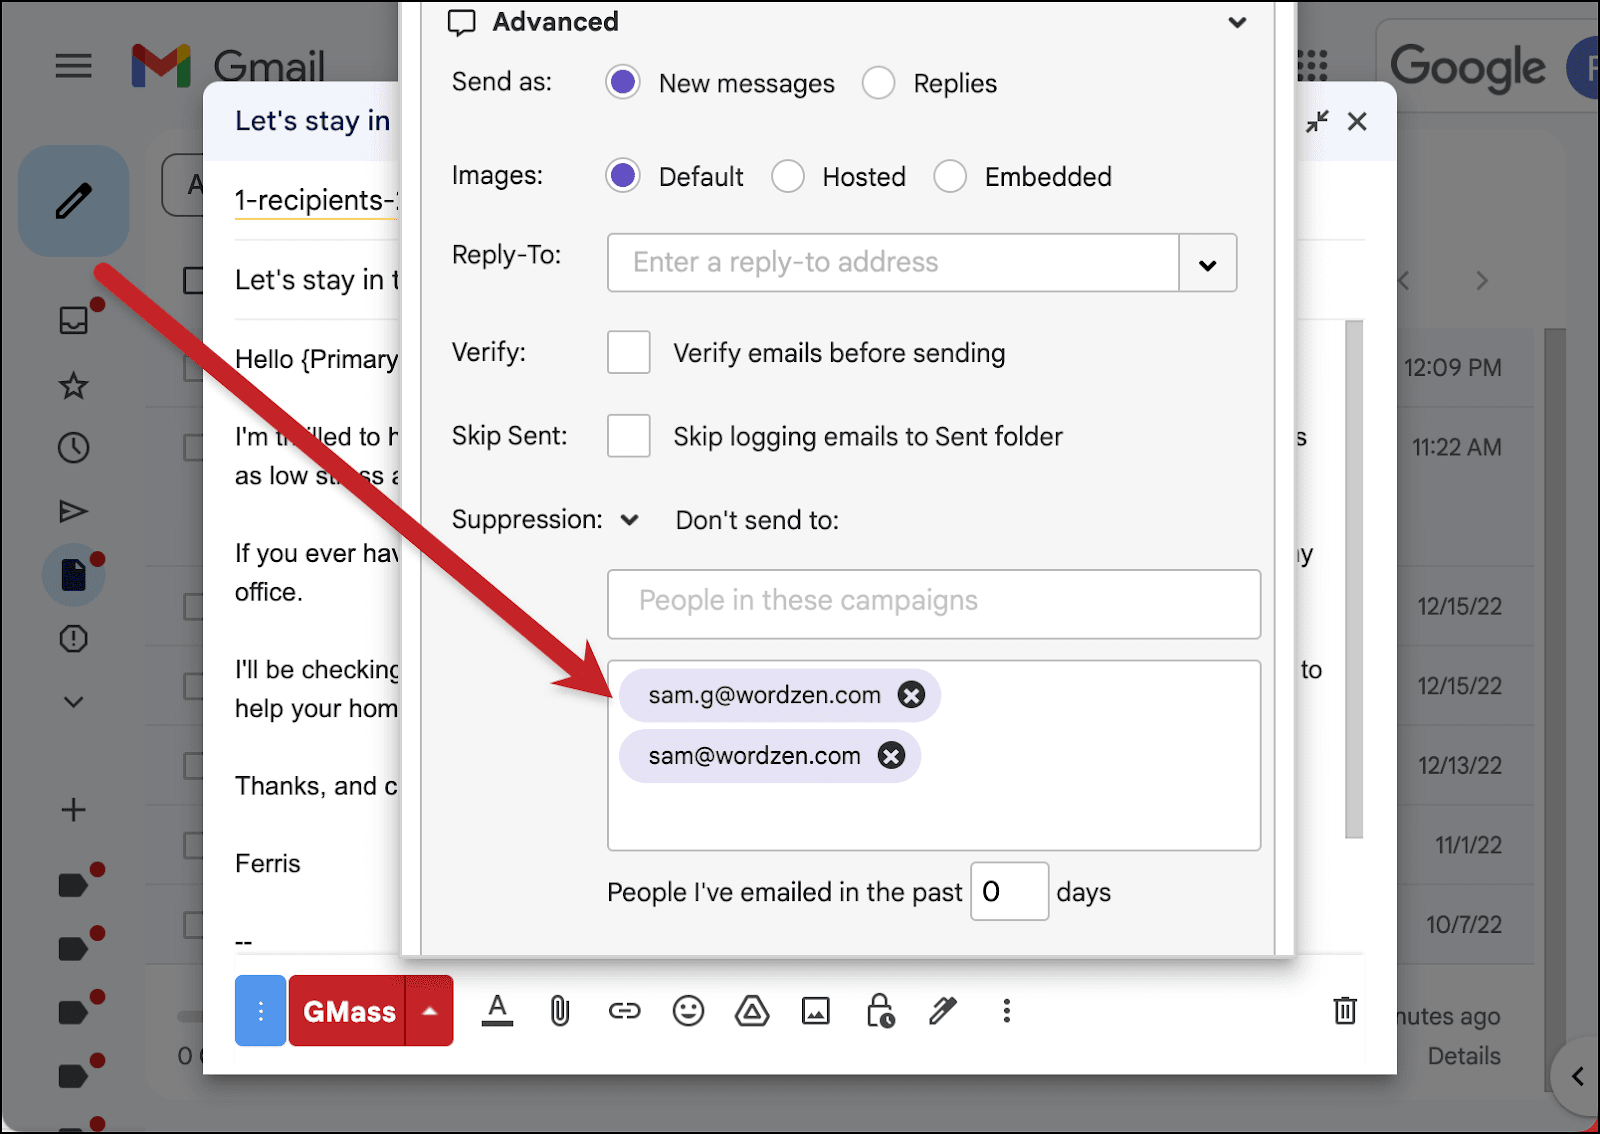
Now those people will stop receiving your auto follow-ups for this campaign.
Editing, pausing, or canceling the campaign
You can edit, pause, or cancel your recurring campaign at any point in the process.
To edit, open the draft of the campaign in your Gmail drafts folder. You can edit anything: Subject, message, auto follow-ups, and/or campaign settings.
Once you’re done editing, open the GMass settings box, scroll to the bottom, and click the green SAVE Changes button.
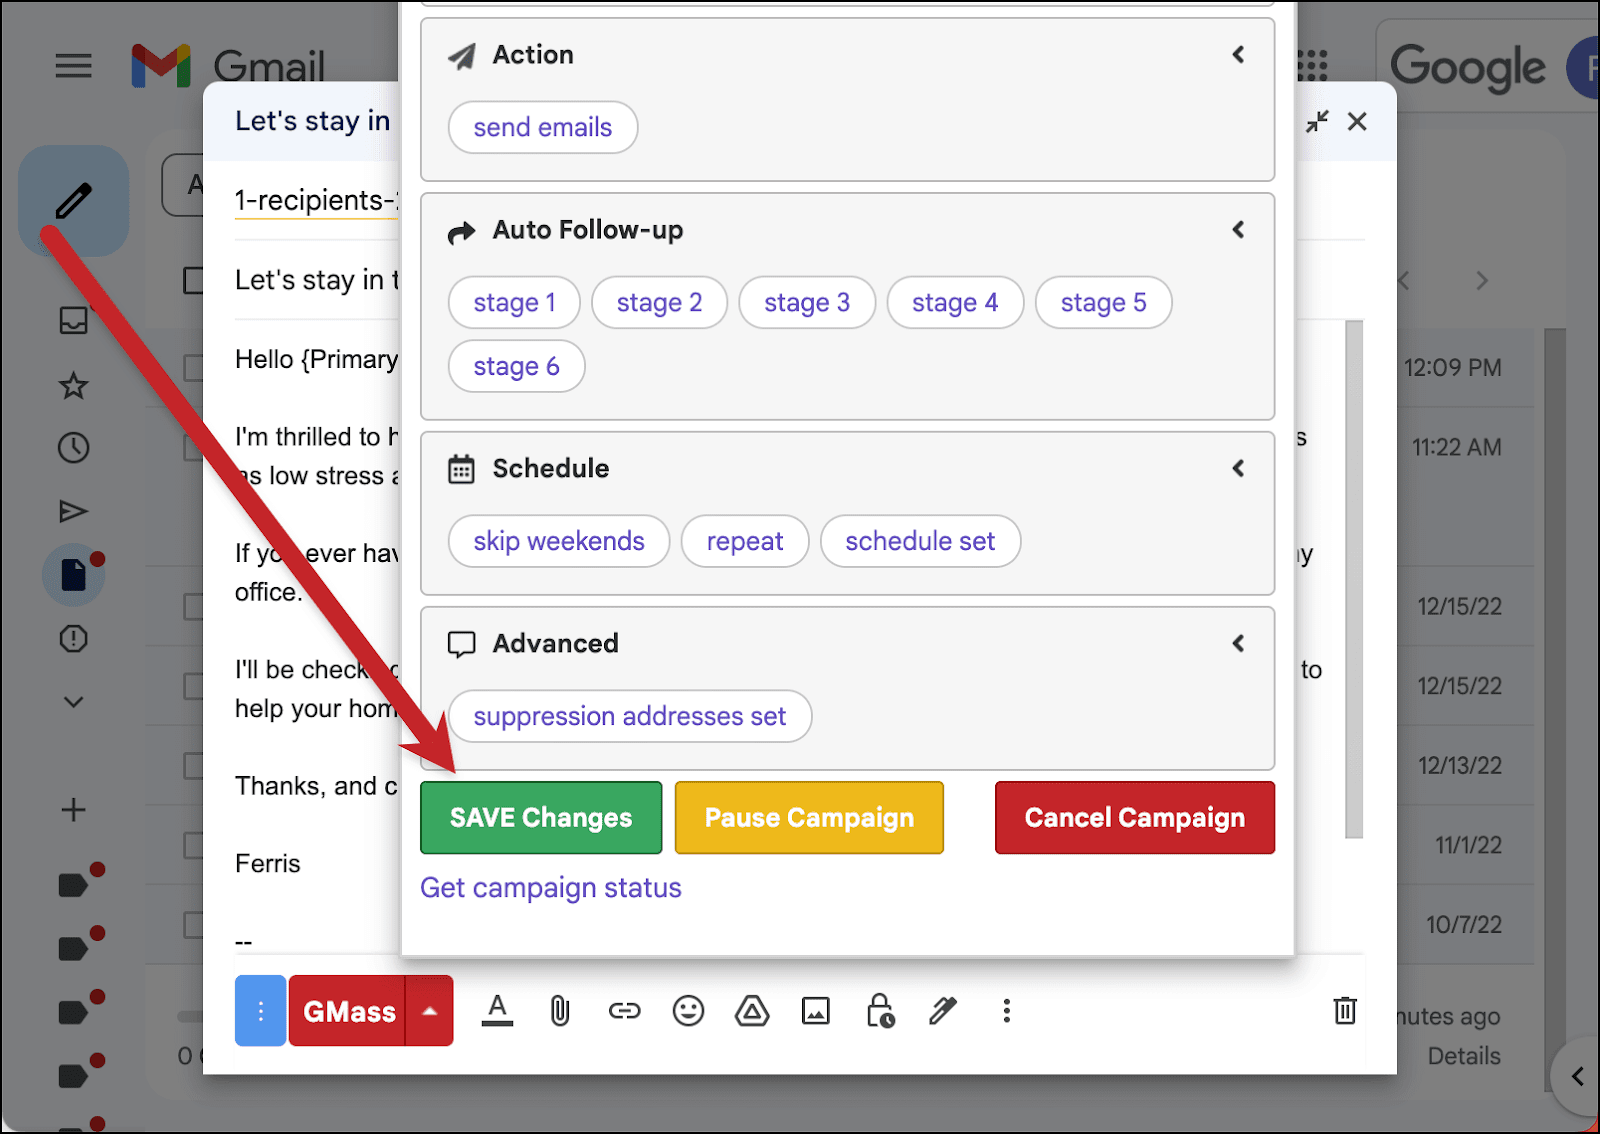
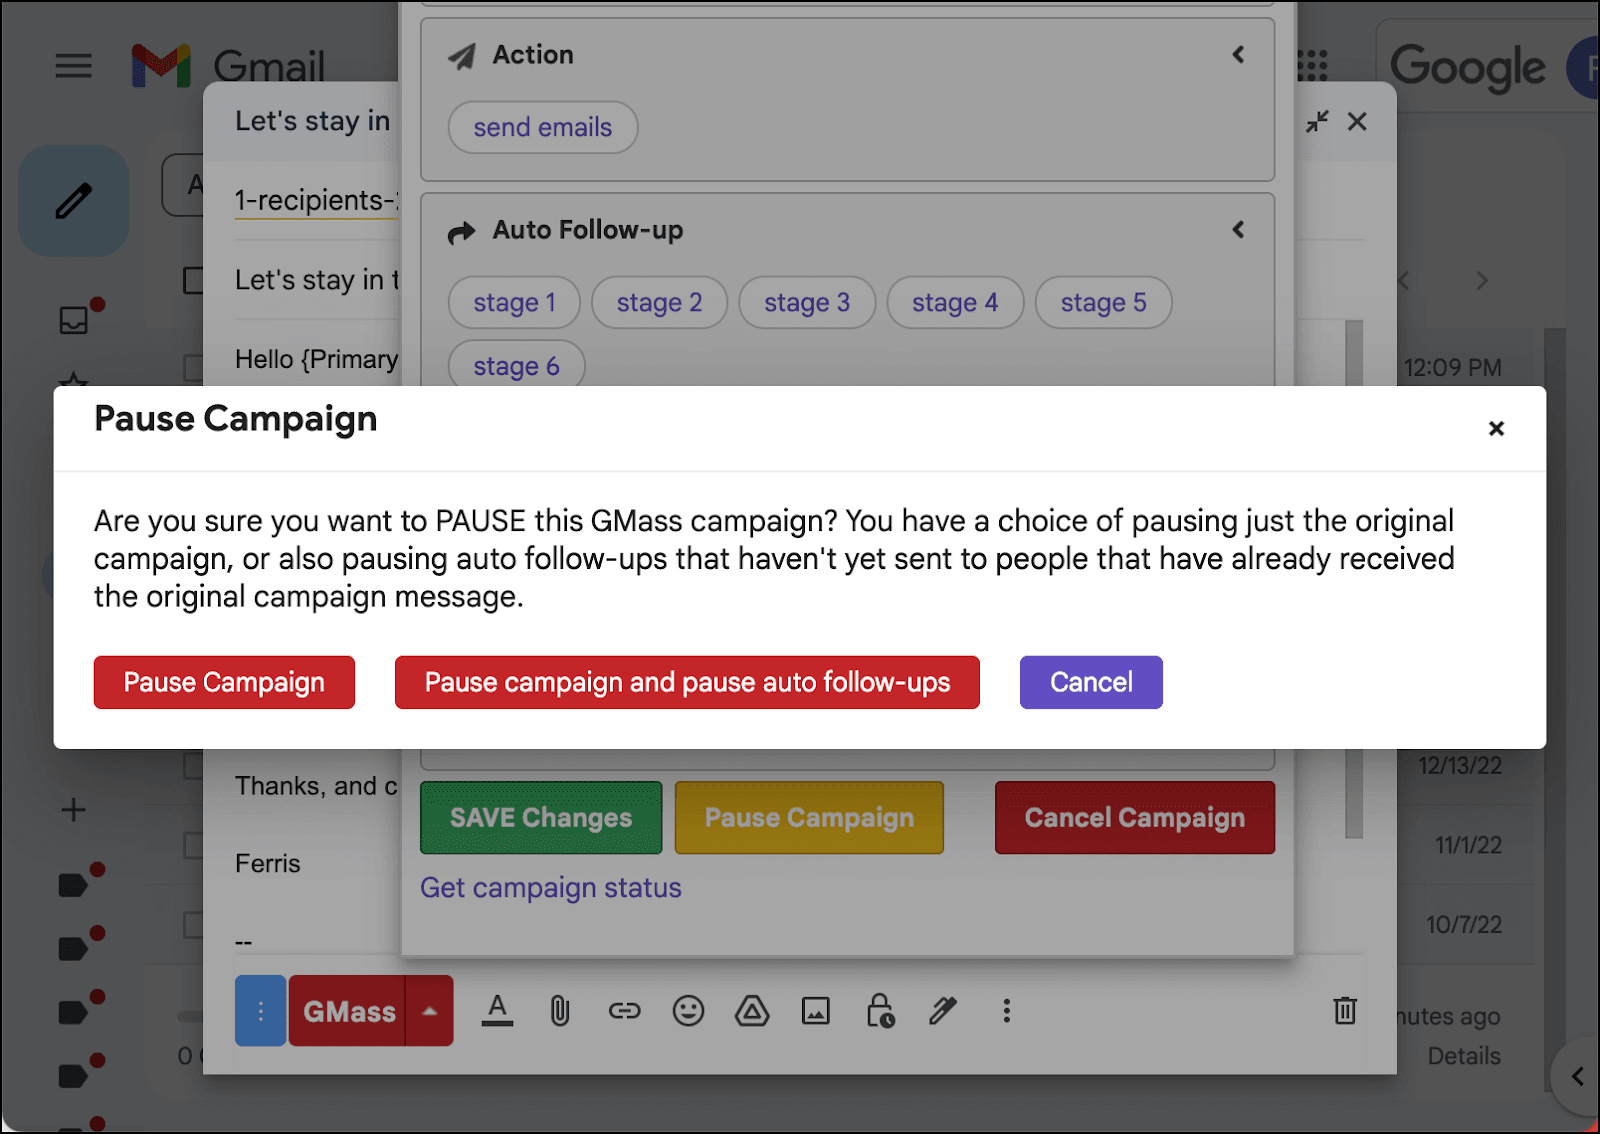
You can also use those colorful buttons to pause or cancel the campaign. And when you choose one of those, you’ll have the option to pause/cancel just the campaign or pause/cancel the campaign and any outstanding auto follow-ups.
You can restart a paused campaign by going back to the draft and clicking the button at the bottom to resume. You can also resume a campaign from the GMass dashboard.
Real Estate Email Automations: Takeaways and Next Steps
Recurring real estate email automations are a powerful way to stay in touch with prospects until they’re ready to buy a home.
But that’s not the only way you could use automations as a real estate agent. You could also use automated emails to…
- Welcome new newsletter subscribers and nurture them into prospects
- Send an automated sequence to any new leads from your website
- Stay in touch with past clients
- Send happy birthday emails or home buying/selling anniversary messages to past clients
- And anything else you can dream up!
To get started on a free trial, download GMass from the Chrome Web Store. (You’ll join more than 400,000 others who are currently using GMass and have left 9,000+ glowing reviews!)
From there, check out the quickstart guide and use this article to set up your first automated campaign in a matter of minutes.
Only GMass packs every email app into one tool — and brings it all into Gmail for you. Better emails. Tons of power. Easy to use.
TRY GMASS FOR FREE
Download Chrome extension - 30 second install!
No credit card required