If you’re sending cold email or doing any kind of email outreach for prospecting purposes, you need to ensure your cold email tool can offer you more than just standard email marketing “batch and blast” features.
Features like open tracking, click tracking, and personalization are essential — but they’re more or less standard across every email platform.
If you’re specifically sending cold email, and you’re serious about getting results, then you also need the ability to use some important cold email tactics:
- (Though it’s on the way out…) Warm-up your email address
- Add a pause between each email to simulate individual sending
- Send auto follow-up email sequences to non-responders (obviously)
- Personalize emails to the max, including personalized images and attachments
- Embed images to reduce image blocking
- Open tracking on with click tracking off
- Stop sending emails to certain people or companies
- Have tight control over scheduling (including skipping weekends)
- Include the prior conversation below the message
- Run quick A/B tests
- Get around Gmail’s daily sending limits
And you need the ability to configure those settings in the best possible way for your target customers and to hit your goals. After all, there’s plenty of advice on how to write cold emails — but not much on how to configure cold emails to send.
In this article, we’ll dig into each one of these features: Why each is important and worth your consideration, the optimal settings for each feature, and how to configure those settings for your campaigns.
Warming up your email address: A (former) cold email tactic for improving deliverability
If you use your email account for normal, day-to-day emailing and then, one day, you try to send 2,000 nearly-identical emails to a bunch of brand new contacts — that’s a big time red flag.
The result? Lots of your emails miss your prospects’ inboxes and wind up in their spam folders instead.
Optimal settings for email warm-up before sending cold email campaigns
You may consider warming up your inbox before you start sending, ramping up naturally, and keep warming up until you’re hitting your sending limits with perfect or near-perfect deliverability.
Unfortunately, automated email warmup tools are on the way out. At GMass, we used to offer one — then Google cracked down, as was inevitable. The days of automated warmup are numbered.
Instead, it’s best to manually warm up a new account. Start by sending a few emails on the first day. Then a few more on the next day. Keep increasing gradually over six to 12 weeks to warm up your address.
Adding a few seconds of delay between each email to simulate a real sending cadence
If your prospect list has 100 people on it, lots of cold emailers like to insert a pause of a few seconds between each email that goes out. (So sending out those 100 emails will actually take 500 seconds, or a little more than eight minutes, if you add a five-second pause between each email.)
Why add a pause? Because if you were sending personal messages one-by-one, there’d be a little pause before you sent each one. Adding a delay closely simulates the sending cadence Google would see from a real person, not a machine.
And it’s been long thought that doing so results in better open rates because of strong inbox placement.
That argument still hasn’t been definitively settled, but using our Deliverability Wizard, you can see the response rates of both cold email campaigns sent with a pause and cold email campaigns sent without a pause. Here in April 2022, running for the past 30 days, we see these results:
- No delay between messages: 17.2% open rate
- 5-10 second delay: 20.3% open rate
- 10-60 second delay: 17.6% open rate
- 1-5 minute delay: 19.9% open rate
Of course, there are lots of other uncontrollable factors at play (like the content of those emails, deliverability factors like email warm-up and tracking domains, and more) — but as you can see, there’s no glaring difference between sending with a short delay, a medium delay, a long delay or no delay.
Optimal settings for pauses between cold emails
While we can’t say definitively that a pause is better than a pause, cold emailers love a pause — and it probably can’t hurt to add in a little one. If you do want to throttle your cold emails, give the 5-10 second delay a try and see how it works.
You’ll probably want to compare your numbers with a delay versus your numbers without a delay after you’ve run a few campaigns both ways.
How to add a delay between your cold emails
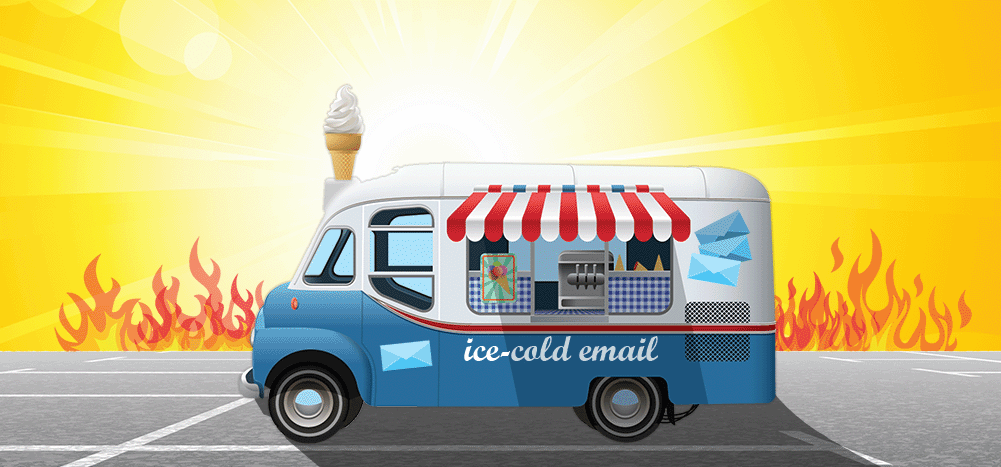
With GMass, you can choose to send your emails with any of the four delay speeds we mentioned above (no delay, 5-10 seconds, 10-60 seconds, 1-5 minutes).
You can set your delay for a campaign by going to the GMass settings and choosing your pause length in the Schedule section.
Sending follow-ups to people who don’t reply to get more responses
Automated follow-ups are a cornerstone of cold email campaigns. In most cases, you won’t get a reply after the first email, but have a higher chance after the second or third… or eighth or ninth.
In GMass, we call each follow-up a “stage.” In a cold email campaign on GMass, you have the original message plus unlimited stages of auto follow-ups, so there are as many messages as you need in a campaign.
But not all auto follow-ups are equal. You want to make sure your auto follow-ups arrive at the right frequency and with the right timing; finding that balance between staying top-of-mind or being too persistent.
You want to make sure your auto follow-ups to a prospect stop once they take a desired action.
And you want your mass auto follow-ups to appear indistinguishable from personal, one-on-one emails.
Optimal settings for automated follow-ups to a cold email campaign
For the number of emails in a campaign, send as many emails as you feel you’ll need. That could be three, five, eight… or 300. Only you know what’s worked for you in the past and what works with your target customers.
We recommend sending auto follow-ups as quick, plain-text replies to your prior emails — that’s the most realistic proxy for individual sending.
Most cold emailers will continue the auto follow-up series until a prospect replies. Your desired action will depend on your campaign, but that’s generally the default.
How to set up the best cold email follow-up series
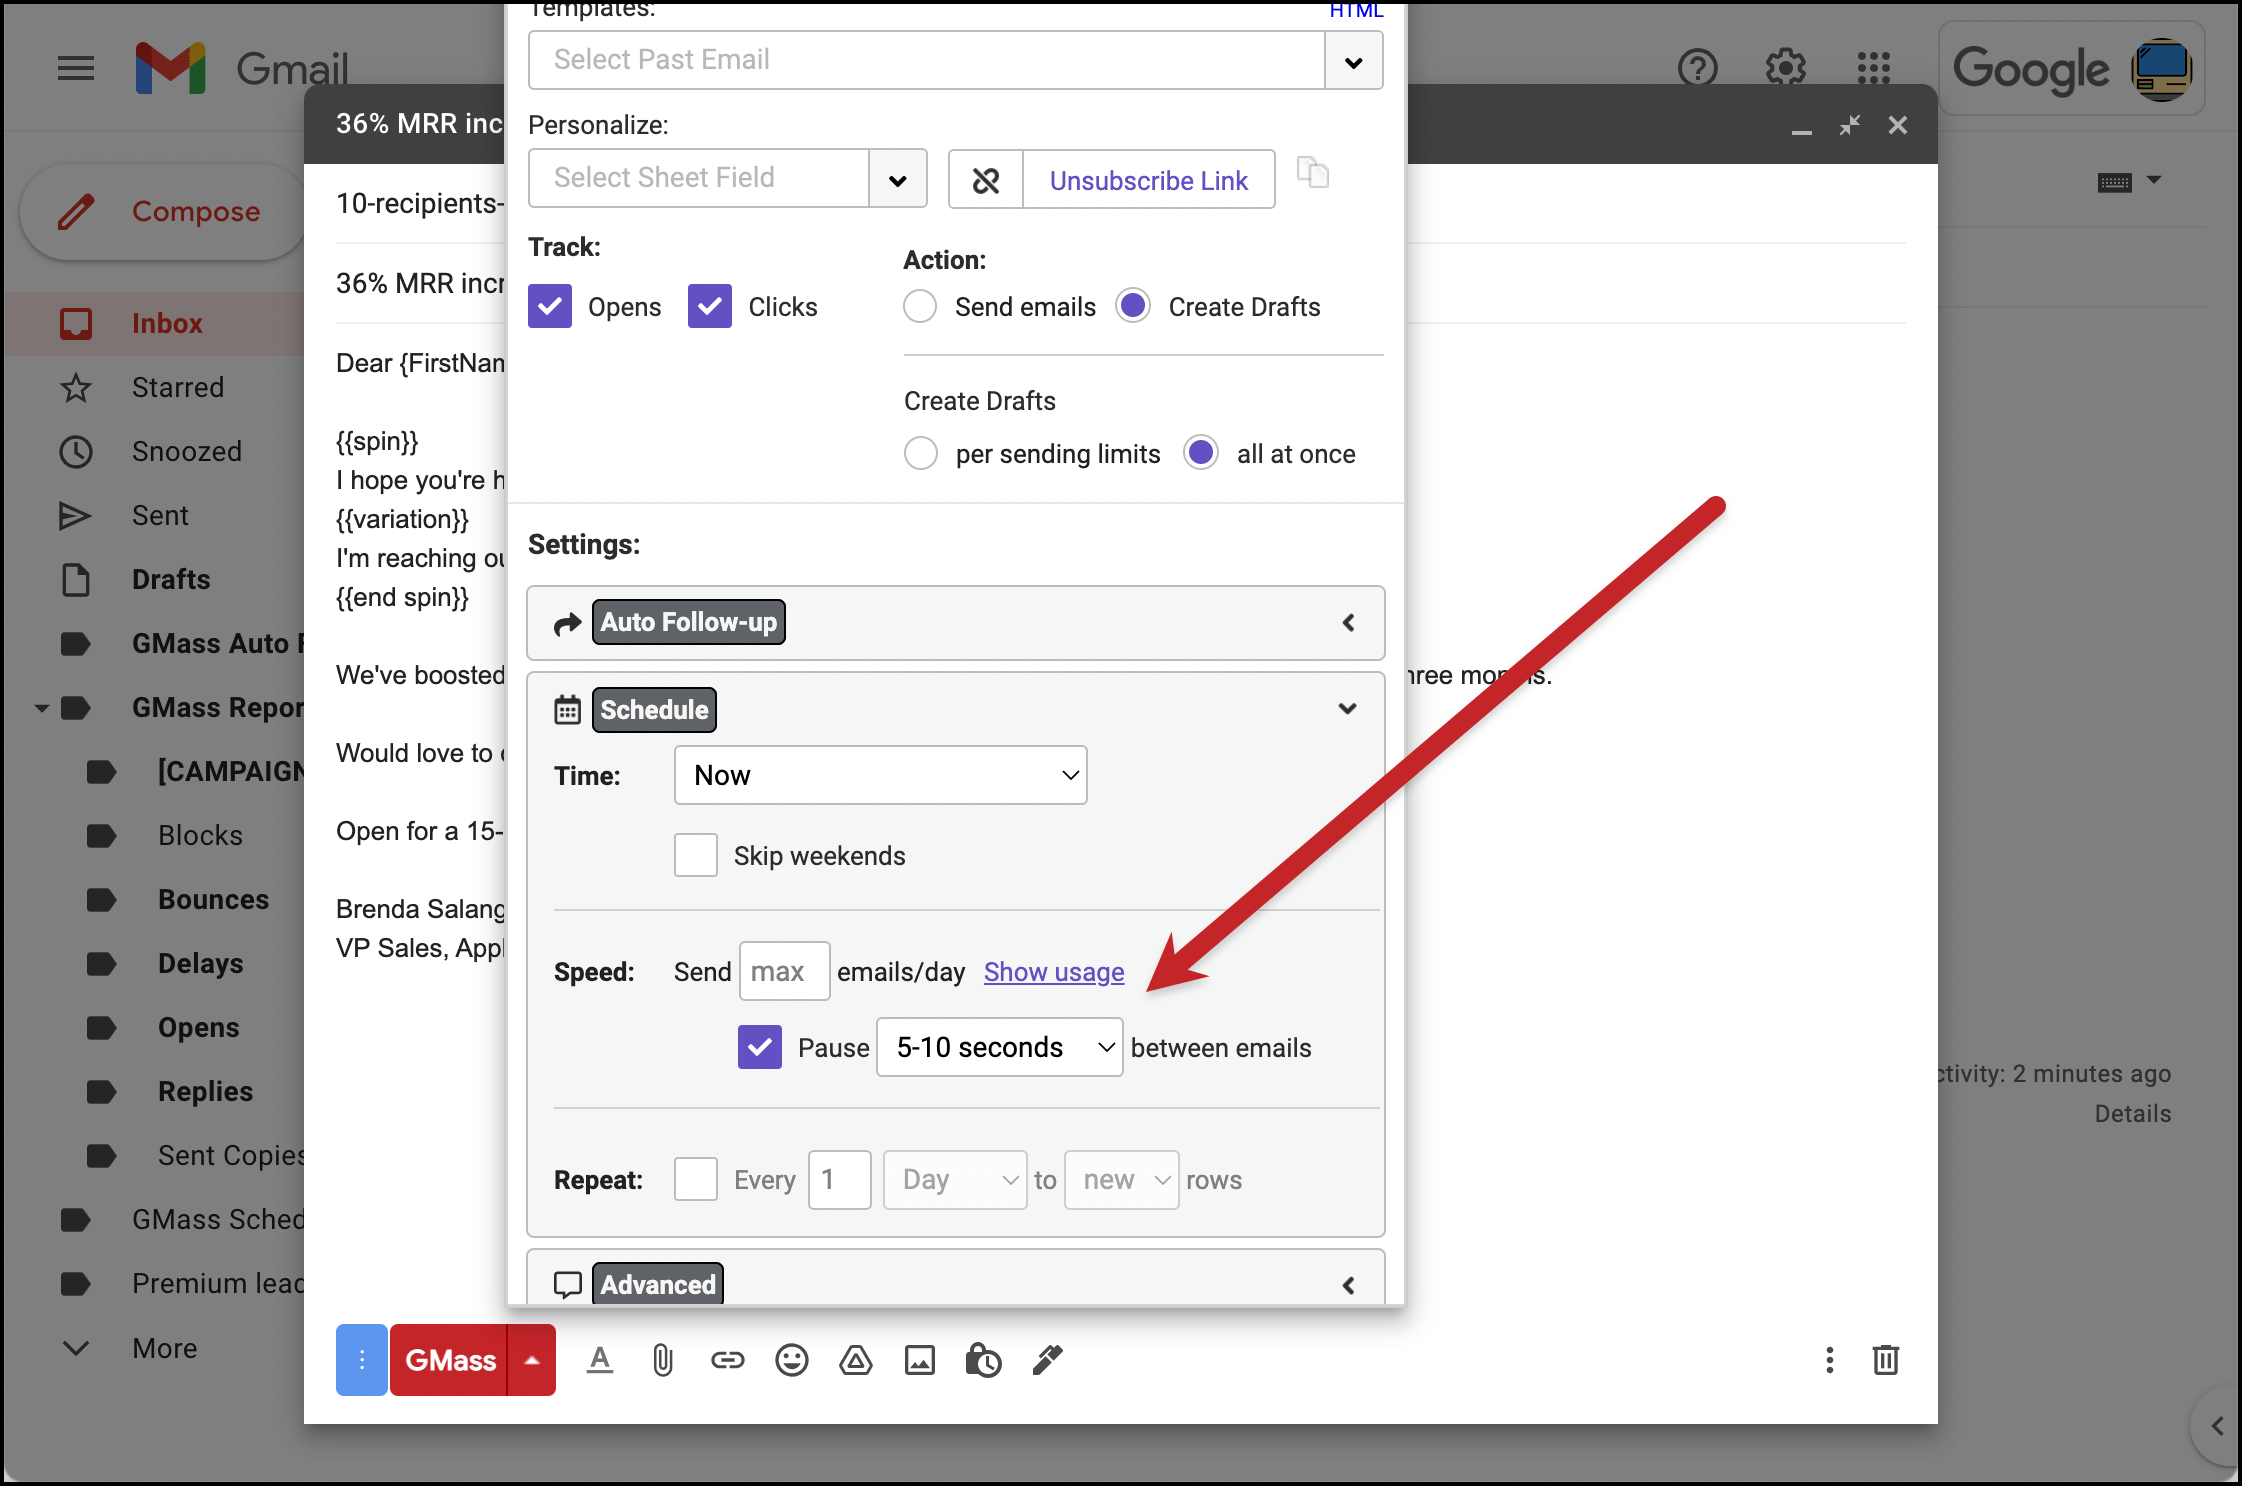
You can set up an auto follow-up series in the GMass settings for a campaign, in the Auto Follow-up section.
We’re pretty sure there’s no email platform that lets you set up your auto follow-up sequence faster. You can quickly write your follow-ups in text boxes for each stage. (You won’t be able to add rich formatting to them, but most cold emailers don’t want any rich formatting because that makes it look like a “campaign” rather than a natural email message.)
You can use any mail merge personalization you want in any of your follow-up messages. Just type a left curly bracket, and you’ll get a dropdown of your variables from your spreadsheet.
Plain-text replies automatically go out as responses to your previous emails. That’s to directly simulate how you’d naturally email someone.
If you do want rich formatting, or attachments, or images, as part of your follow-ups, then create the follow-up separately as explained here. Rich-text replies can have their own subject lines (to start their own threads) or go out as replies. Even when they have their own subject lines, you’ll still have the option to include your message history in that email (we’ll cover that later in this article).
The follow-up sequence can continue until a recipient takes an action. It can go out until a person replies (again, most popular for cold email), opens or clicks. If you choose to keep sending the sequence regardless of whether or not a prospect takes any action, it really isn’t a follow-up anymore, it’s more like a drip campaign.
You have full control over the timing between follow-up emails, as well as the time of day those emails will go out. (Later in this article, we’ll also cover the “skip weekends” option.)
Personalizing emails to the max — go beyond just adding someone’s first name
Personalization can make a big difference in how your cold emails perform. (It’s not guaranteed to, but it can.)
However, there’s basic personalization you can find on any platform — like using a mail merge to include a recipient’s first name — and then there’s higher-level personalization.
That’s the kind of personalization that shows you’ve put care and individual effort into each email — and the kind of personalization people aren’t used to seeing in the cold emails that normally pass through their inboxes.
Optimal settings for cold email personalization
It’s usually good to personalize using a name (often putting that name in the subject line) — but that’s cold email table stakes.
We also recommend personalizing more of the message — like adding an individual paragraph that shows you’ve researched the prospect individually.
If it applies in your case, personalizing links, images, and/or attachments are touches that can make your email even more appealing.
And make sure you use fallback values or conditional logic to avoid mail merge disasters, like saying “Hi ,” because there was no merge field for their first name.
How to set up high-level cold email personalization features
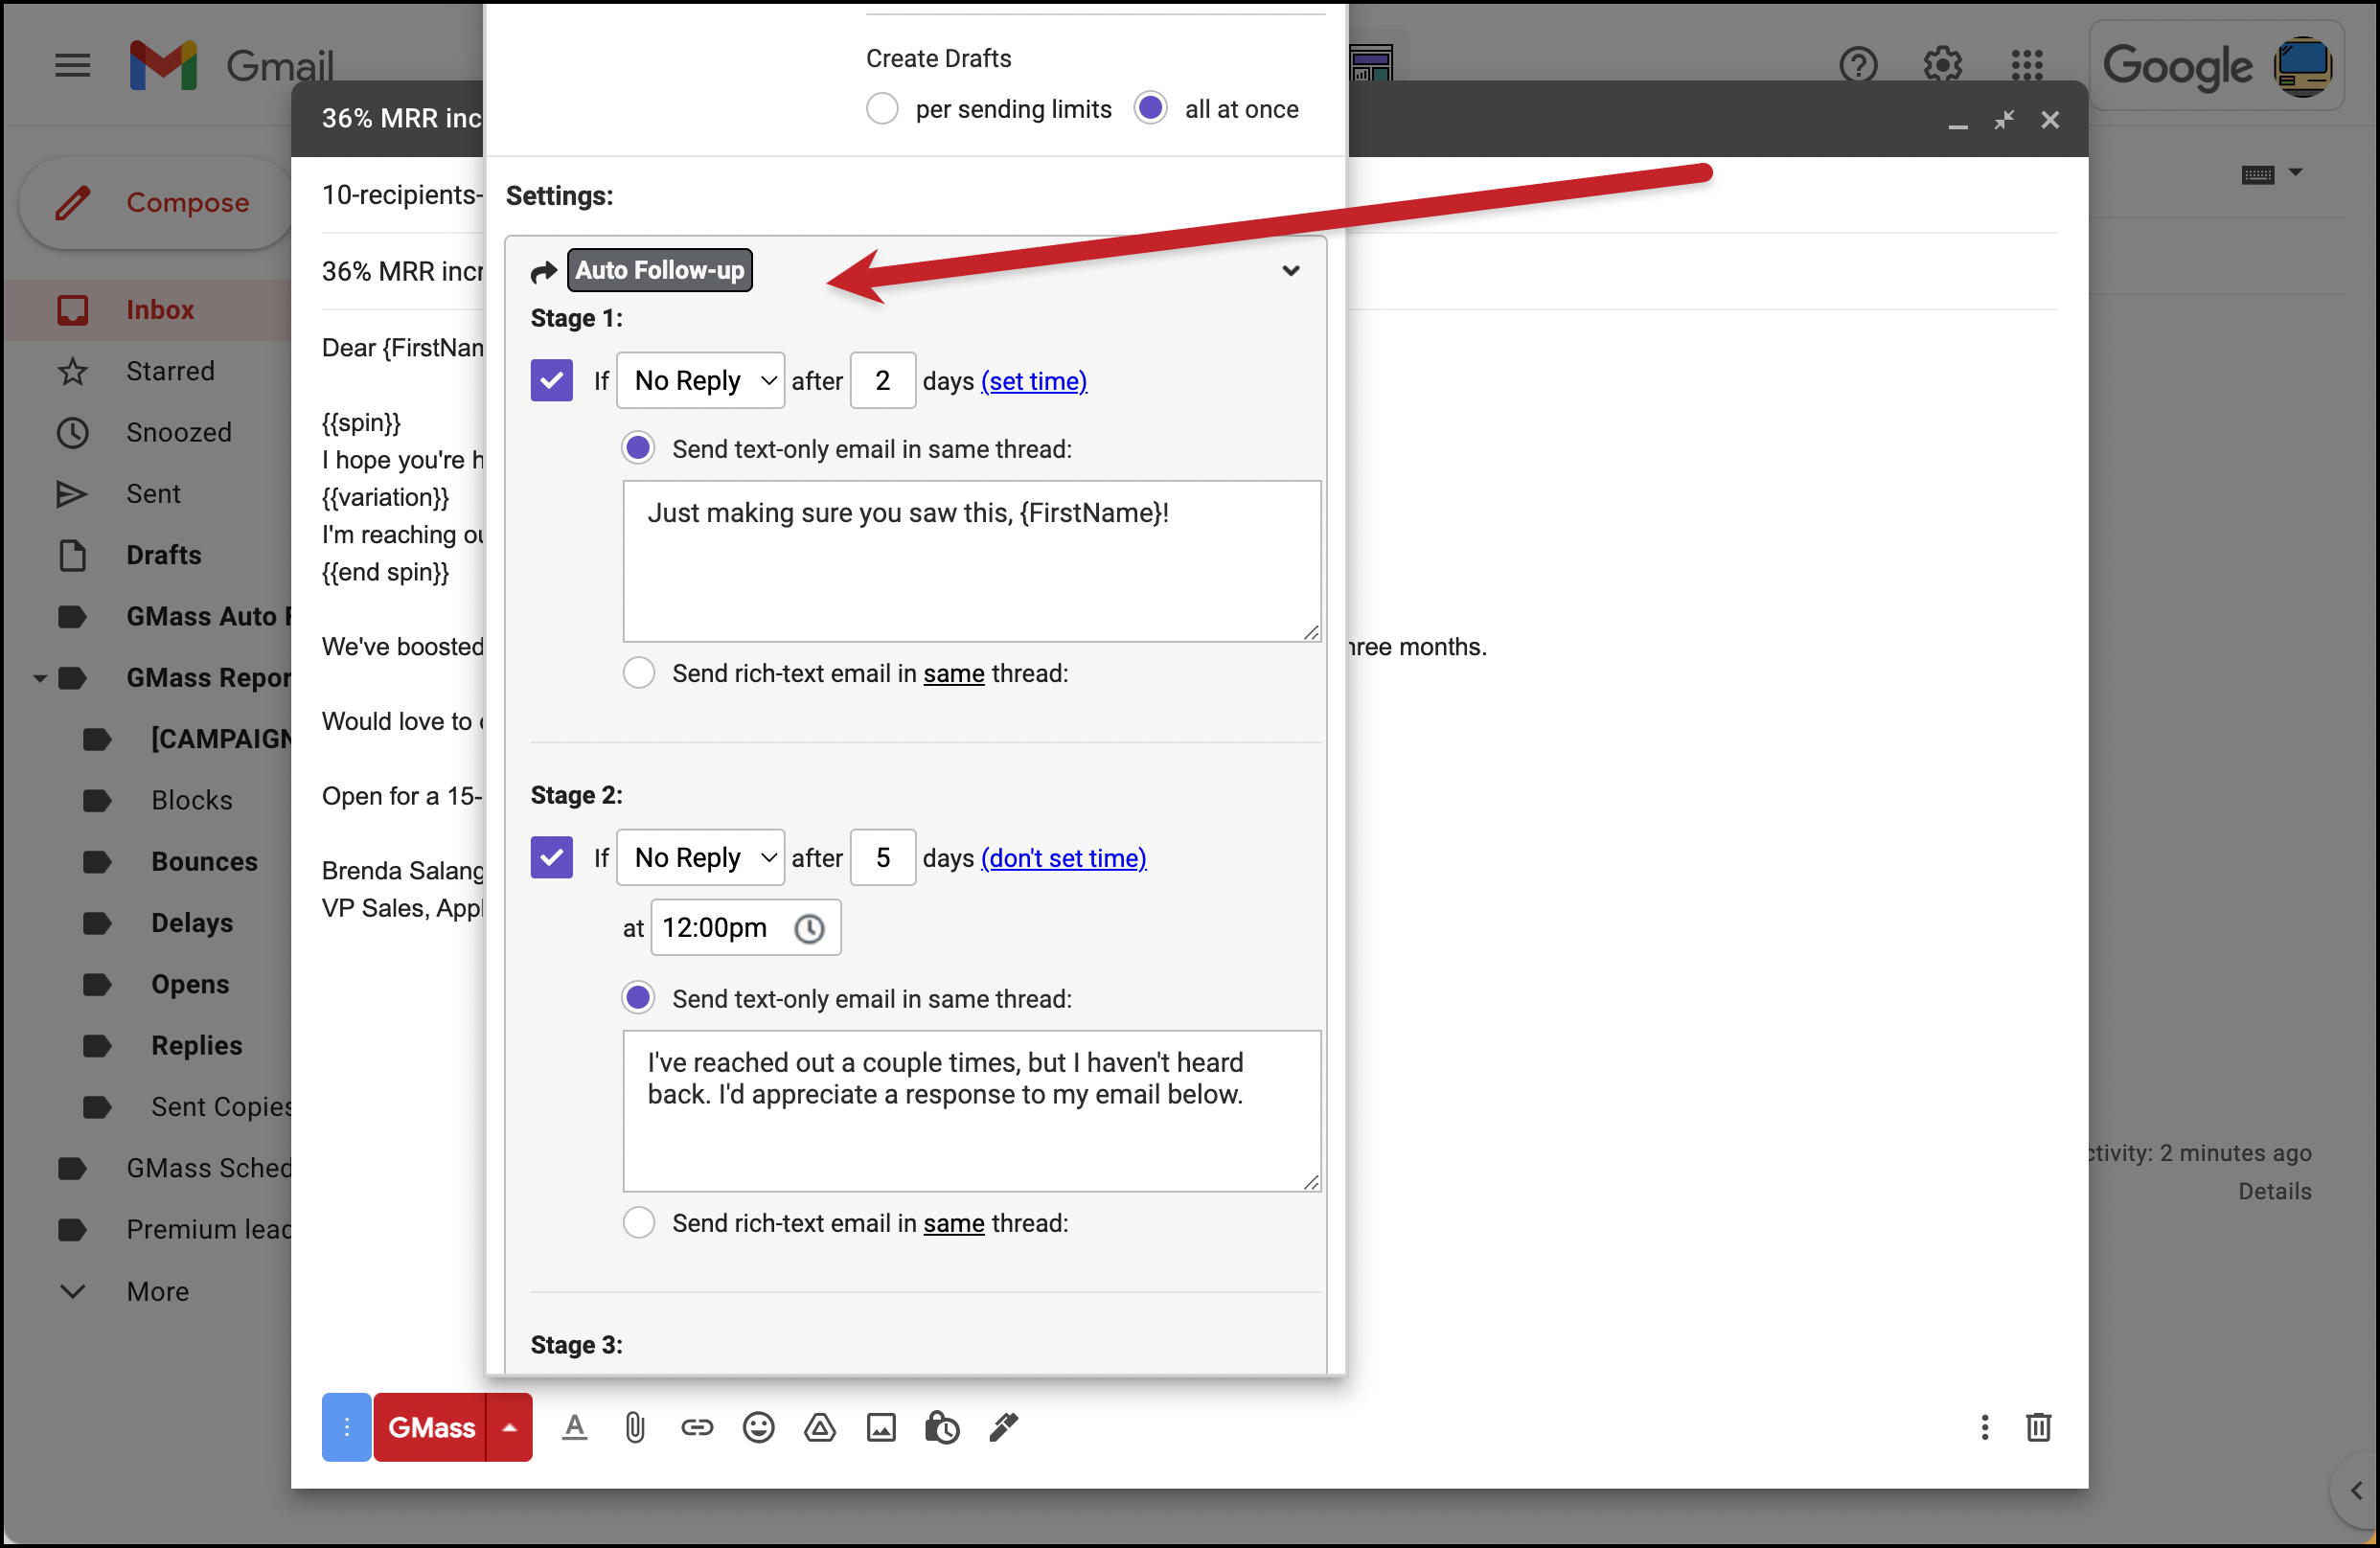
With GMass, you can (of course) use any mail merge personalization variable — as long as it’s a column in your Google Sheet, you can use it in your email.
But personalization with GMass goes several steps deeper as well (the links below take you to the instructions):
- Personalize entire paragraphs to eradicate the feeling that you’re sending a mass email. Just type the paragraph into the Google Sheet connected to your campaign.
- Use fallback values and if/then logic to personalize based on different conditions. (For instance, use different language if your cold email campaign is going to a marketing agency versus a direct-to-consumer brand.)
- Automatically detect your prospects’ first names based on just their email addresses.
- Personalize links to each recipient.
- Personalize the To: header, From name, From address, Reply-To address, and Cc and Bcc fields.
- Send personalized images and/or personalized attachments to your prospects. Using file attachments in cold email sequences is rare, but it’s necessary for certain business situations.
Embedding images to better mimic individual emails and reduce image blocking
Embedded images are the images you directly insert into an email in Gmail, by uploading your picture (or pasting it in). Hosted images live on an external server. (For more on the differences and a deeper dive, check out our article on embedded vs. hosted images.)
The key difference is with embedded images, the full image content is included within the email — no call to an external server required.
That means the image is way less likely to be blocked, is still viewable when the user is offline, and better mimics the “natural” way you’d include images in an individual email — because if you were typing a regular email and including an image, this is how you’d do it.
Optimal settings for images in cold email campaigns
Embedded images are a superior choice for cold email campaigns, for all of the reasons enumerated above.
GMass is one of the only cold email platforms that can embed image content into emails. Most others, like Mailchimp or essentially any email platform where you’re not working in the Gmail compose window, only use hosted images.
How to embed images in your cold emails
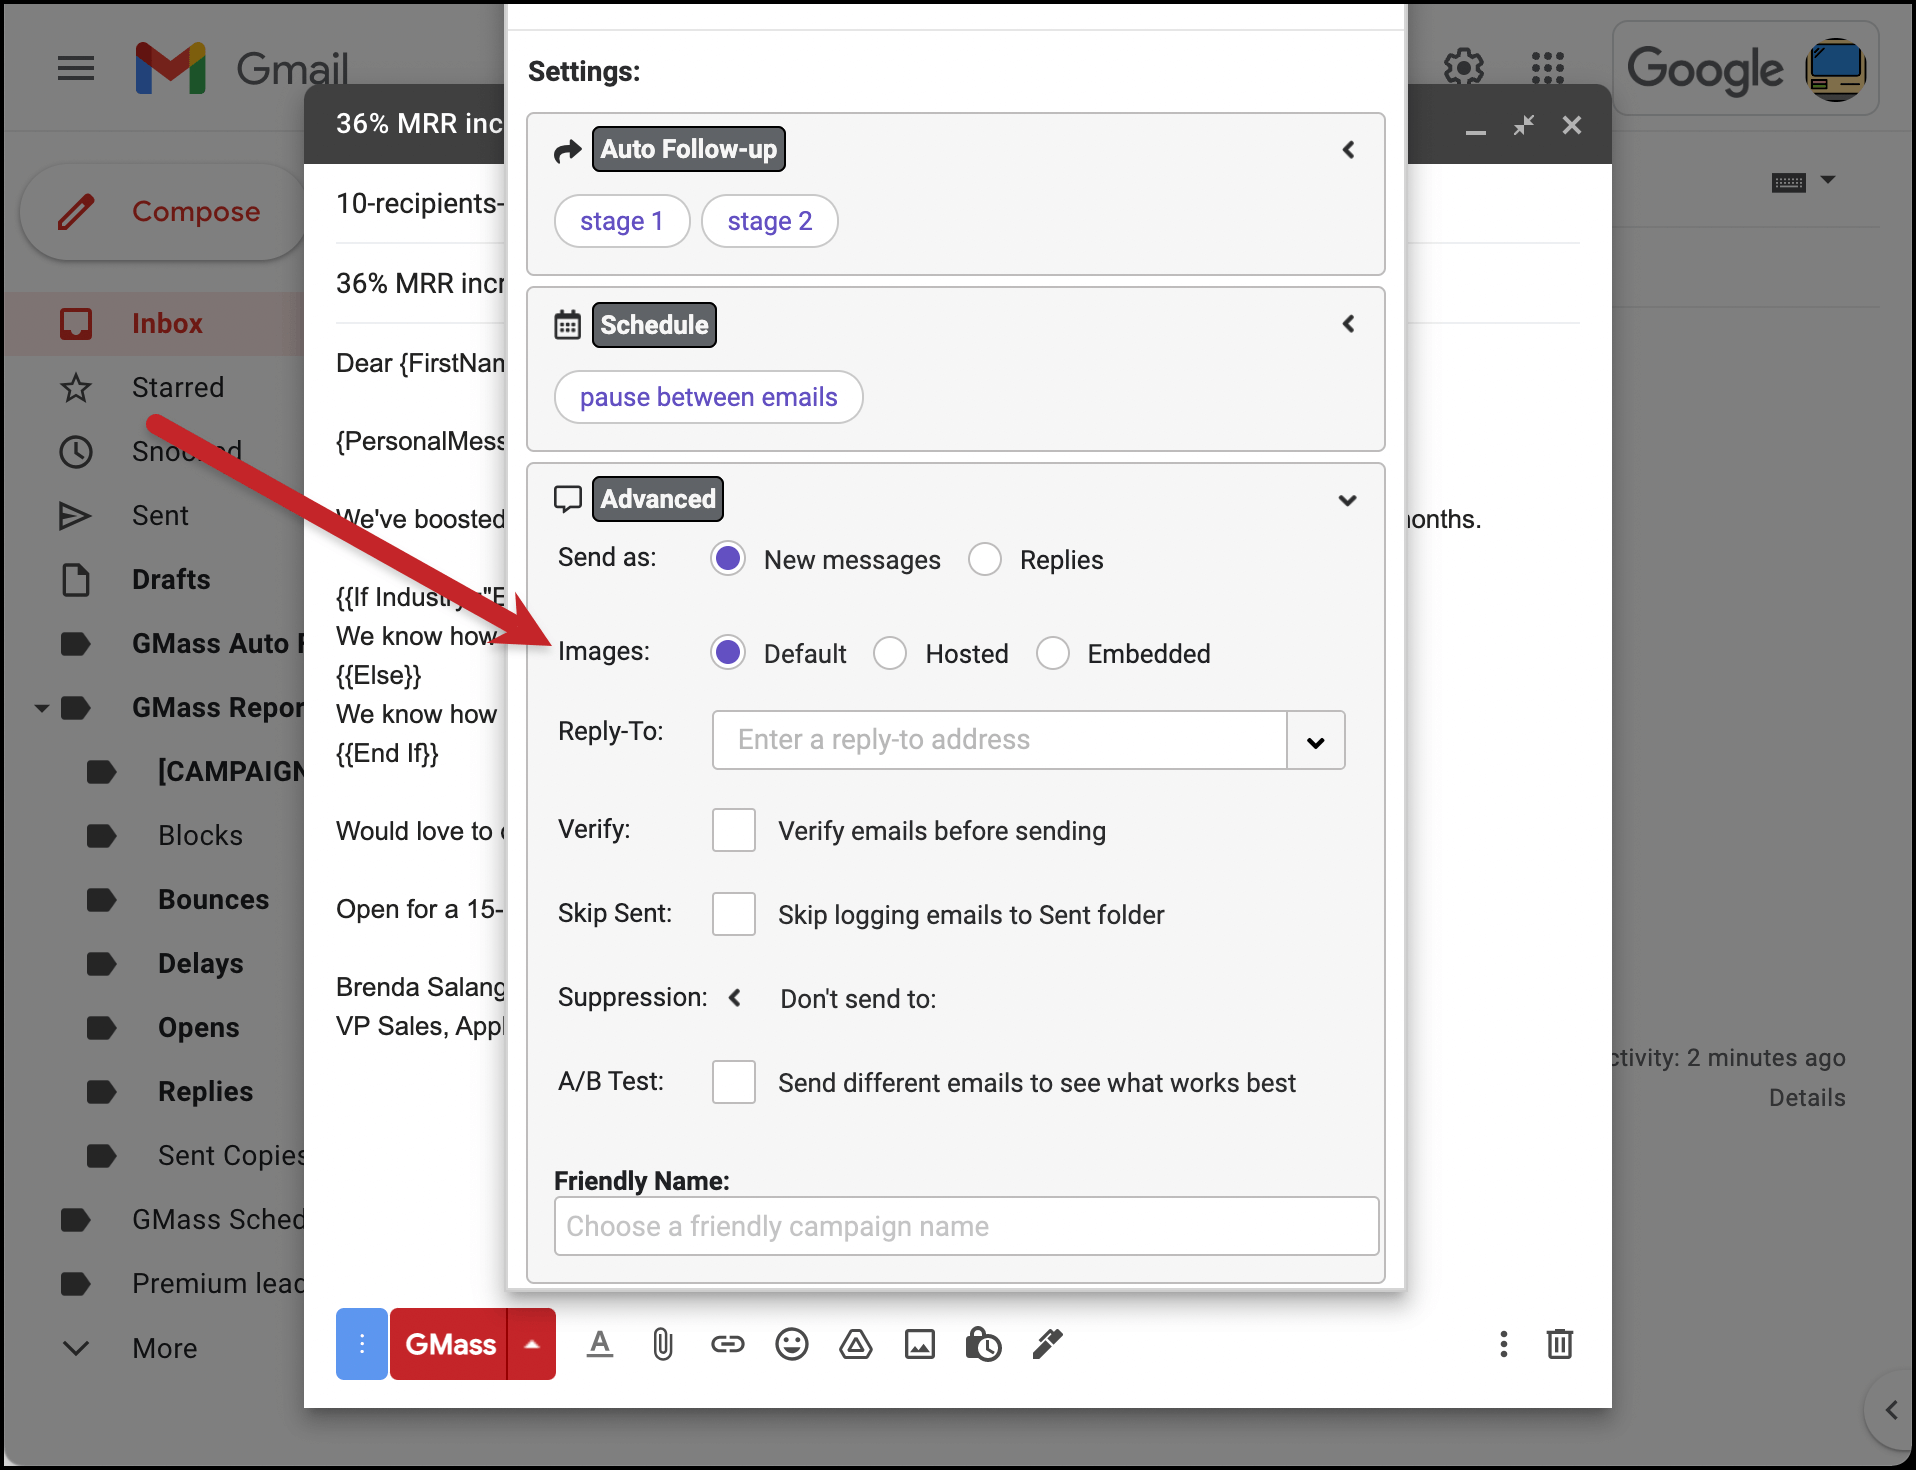
By default, GMass will use embedded images — they’re undeniably better for your campaigns. To embed an image, just put the image in your email as you normally would (insert it in Gmail or just paste it in).
However, if for whatever reason you prefer hosted images, in the Advanced section of the GMass settings for your campaign, you can choose between embedded and hosted images.
Keeping open tracking on while turning click tracking off
Not every cold emailer wants to track every stat for every campaign. In fact, it’s popular to keep open tracking on, but turn click tracking off. (Some of the most hardcore cold emailers may even turn off open tracking as well.)
Why? Maybe you think adding click tracking to your links will make them seem spammy when someone sees them in plain text or mouses over them in rich text (after all, if they mouseover your website and see https://yoursite.com it’s a different vibe than seeing https://ec2-52-26-194-35.us-west-2.compute.amazonaws.com/x/d?c=sa12w3s&l=ccedb989-b898-4897-b7c6-70fdb92bec9a&r=b5da9659-69d1-4707-beb0-a9147dfasd413bf341).
Maybe you don’t want to set up a custom tracking domain, and you’re worried using a shared tracking domain will increase your odds of ending up in spam.
Maybe you’re including a link to a YouTube video and, when click tracking is added, a clickable preview of that video won’t show up in the email.
Regardless of your reason, it’s good to be able to handpick which stats you do and don’t track.
Optimal settings for open tracking and click tracking in emails
Open tracking can be valuable — and many cold emailers like to keep it on. Open tracking is a good gauge of the effectiveness of your subject lines and can help you diagnose issues with an email. (Getting a good open rate but few replies? Your copy and/or call-to-action need work.)
You may, however, want to turn off click tracking. If your goal for your email campaign is to get clicks then, no, you shouldn’t turn off click tracking — you need it to measure your campaign’s effectiveness.
But if you’re optimizing for replies, you’re sending plain text emails, or any other case where click tracking might cause you a problem — it’s okay to turn it off.
How to keep open tracking on and turning click tracking off
![]()
By default, GMass has open tracking and click tracking switched on for every campaign.
To change that, it’s as simple as going into the GMass settings box and un-checking the Clicks box in the Track section.
Stopping follow-ups from going to certain people during a campaign
Most cold email auto follow-up sequences only stop once someone replies. GMass (and most other cold email platforms) automatically handle that process for you.
But, what if somebody calls you in response to your campaign and never replies to your email?
What if a contact sends you a fresh email instead of a reply?
What if they’re so blown away by your cold offer they respond by sending you a fruit basket instead of an email? I mean sure, that’s never happened in the history of cold email, but you could be the first.
What if you’re using paid ads with your cold outreach, which takes the conversation away from your email thread?
Or what if you cold email 700 people at a company hoping one of ‘em will reply — and you get that one reply (so now the other 699 people don’t need your follow-ups anymore)?
You need to remove them from the auto follow-up sequence.
Optimal settings for removing targeted prospects from a cold email follow-up sequence
This is obvious, but the ideal move is to remove a prospect from a cold email series after you hear from them — even if you hear from them in a different medium.
Some of the process has to be manual — for instance, if you get a call from a prospect, you’ll want to manually remove them. (Or set up a very advanced Zapier action connecting your CRM with your cold email platform.)
But, as much as possible, you should try to automate the process of removing leads from your sequences after they respond.
Also — you can add an unsubscribe link to your emails if you think that’s appropriate. An unsubscribe link can affect deliverability, though (as sometimes it triggers email filters or banishes your email to the Promotions tab).
If you don’t use an unsubscribe link, you should manually add contacts to your unsubscribe list if they write you back saying things like “unsubscribe,” “remove me,” or “stop.” Unless the “stop” is followed by “Hammer time,” but approach that on a case-by-case basis.
How to stop follow-ups from going to prospects who shouldn’t remain in the sequence
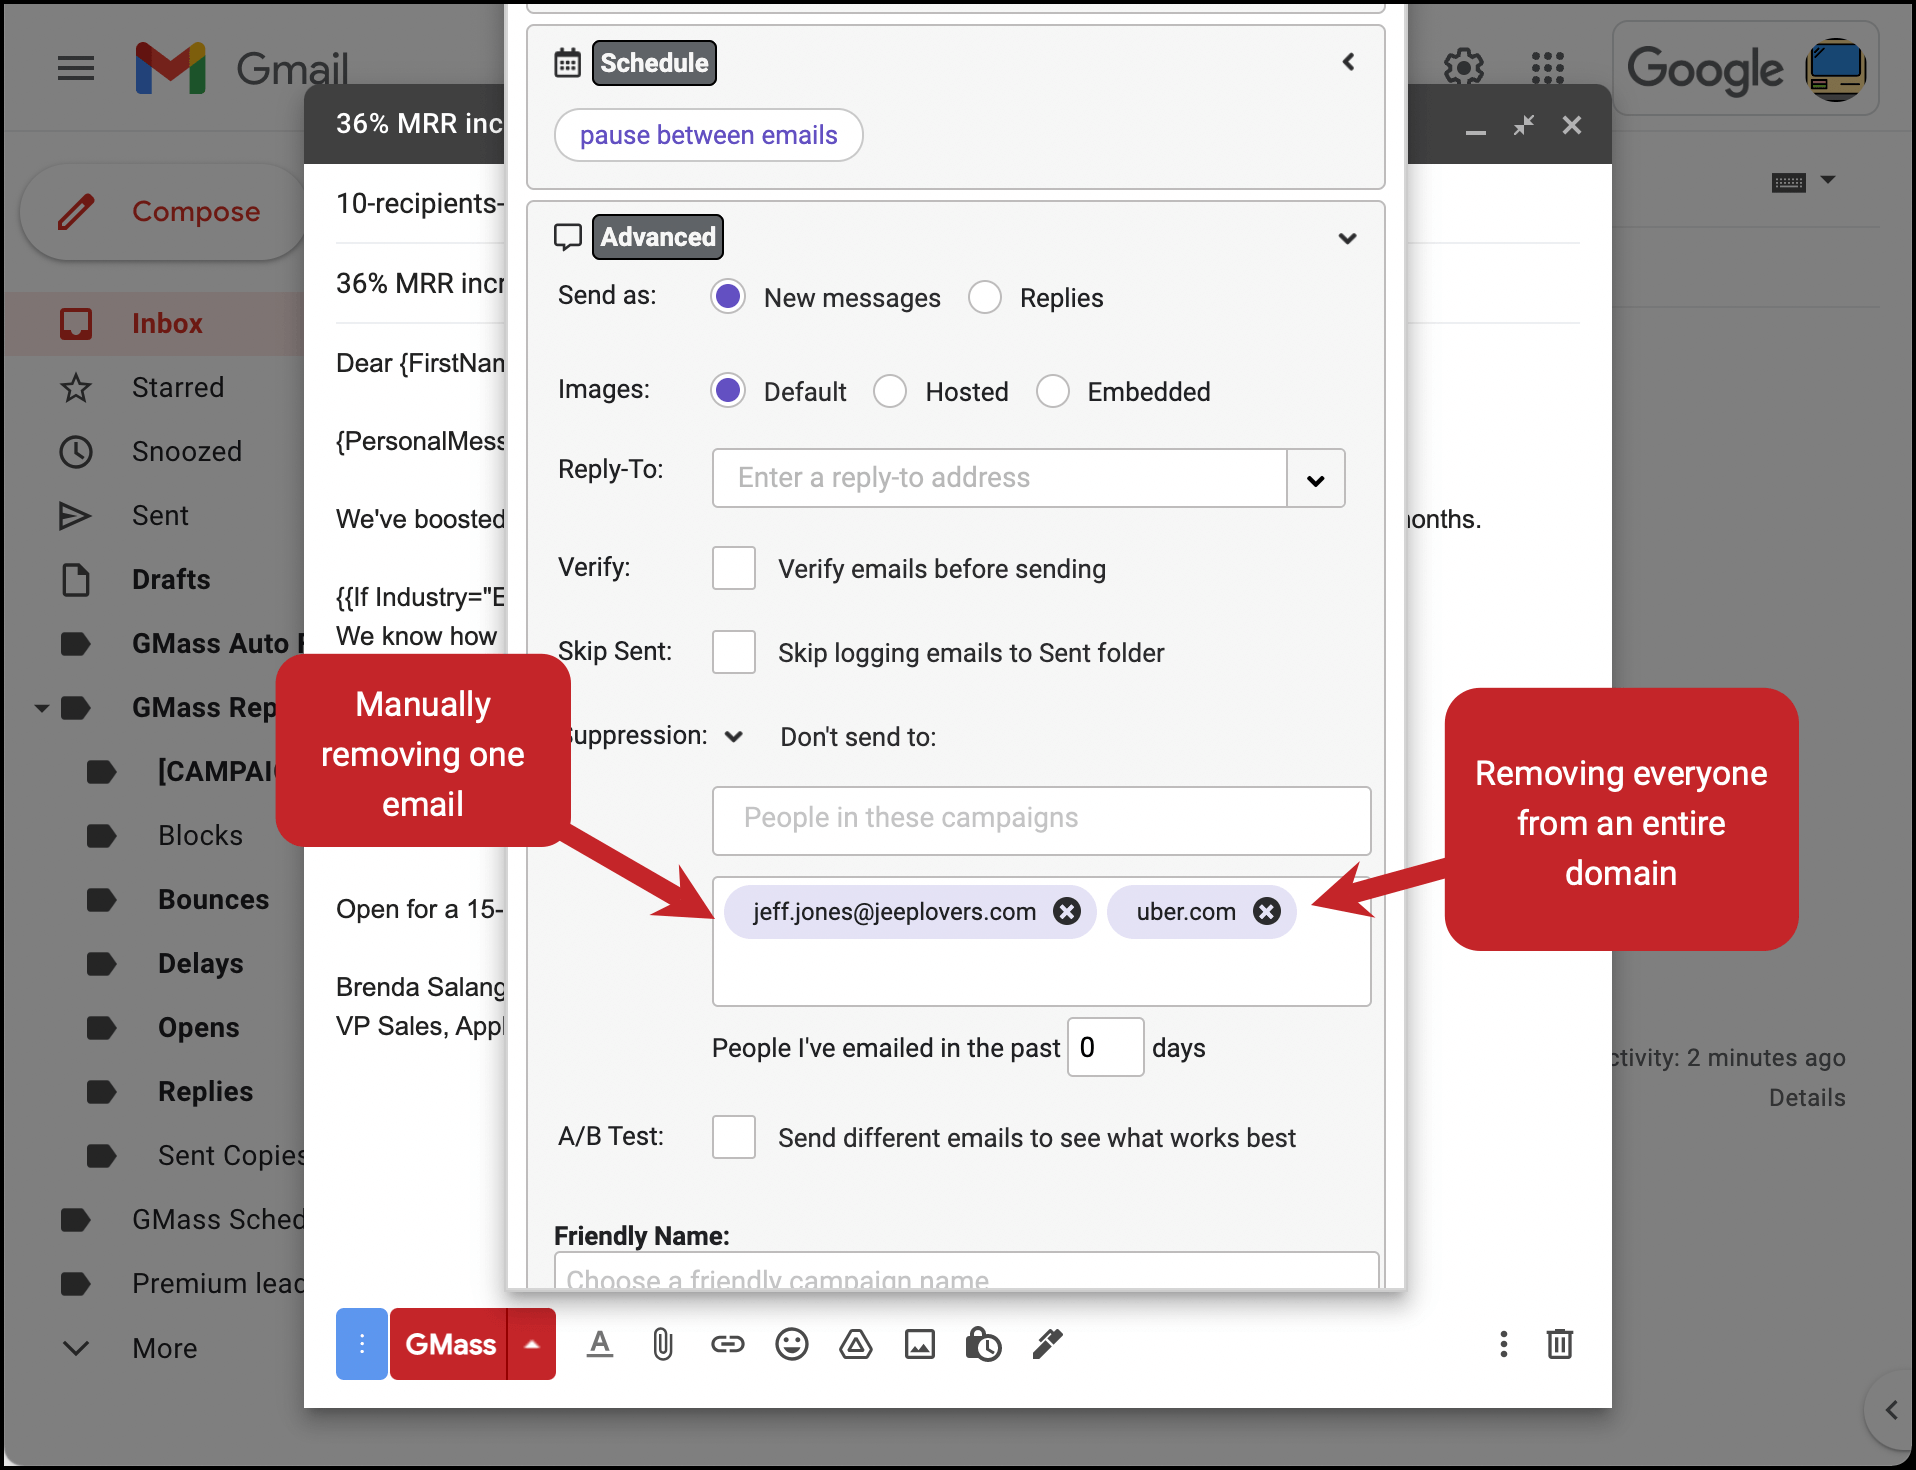
It’s simple to remove prospects from an auto follow-up sequence, even if they haven’t taken your pre-designated “stop the sequence” action.
To remove individual addresses or an entire domain name from a campaign in GMass, head into your Gmail Drafts, find the draft for the campaign, open it, and go into the GMass settings box. In the Advanced section, under the Suppression settings, you can enter email addresses or a domain.
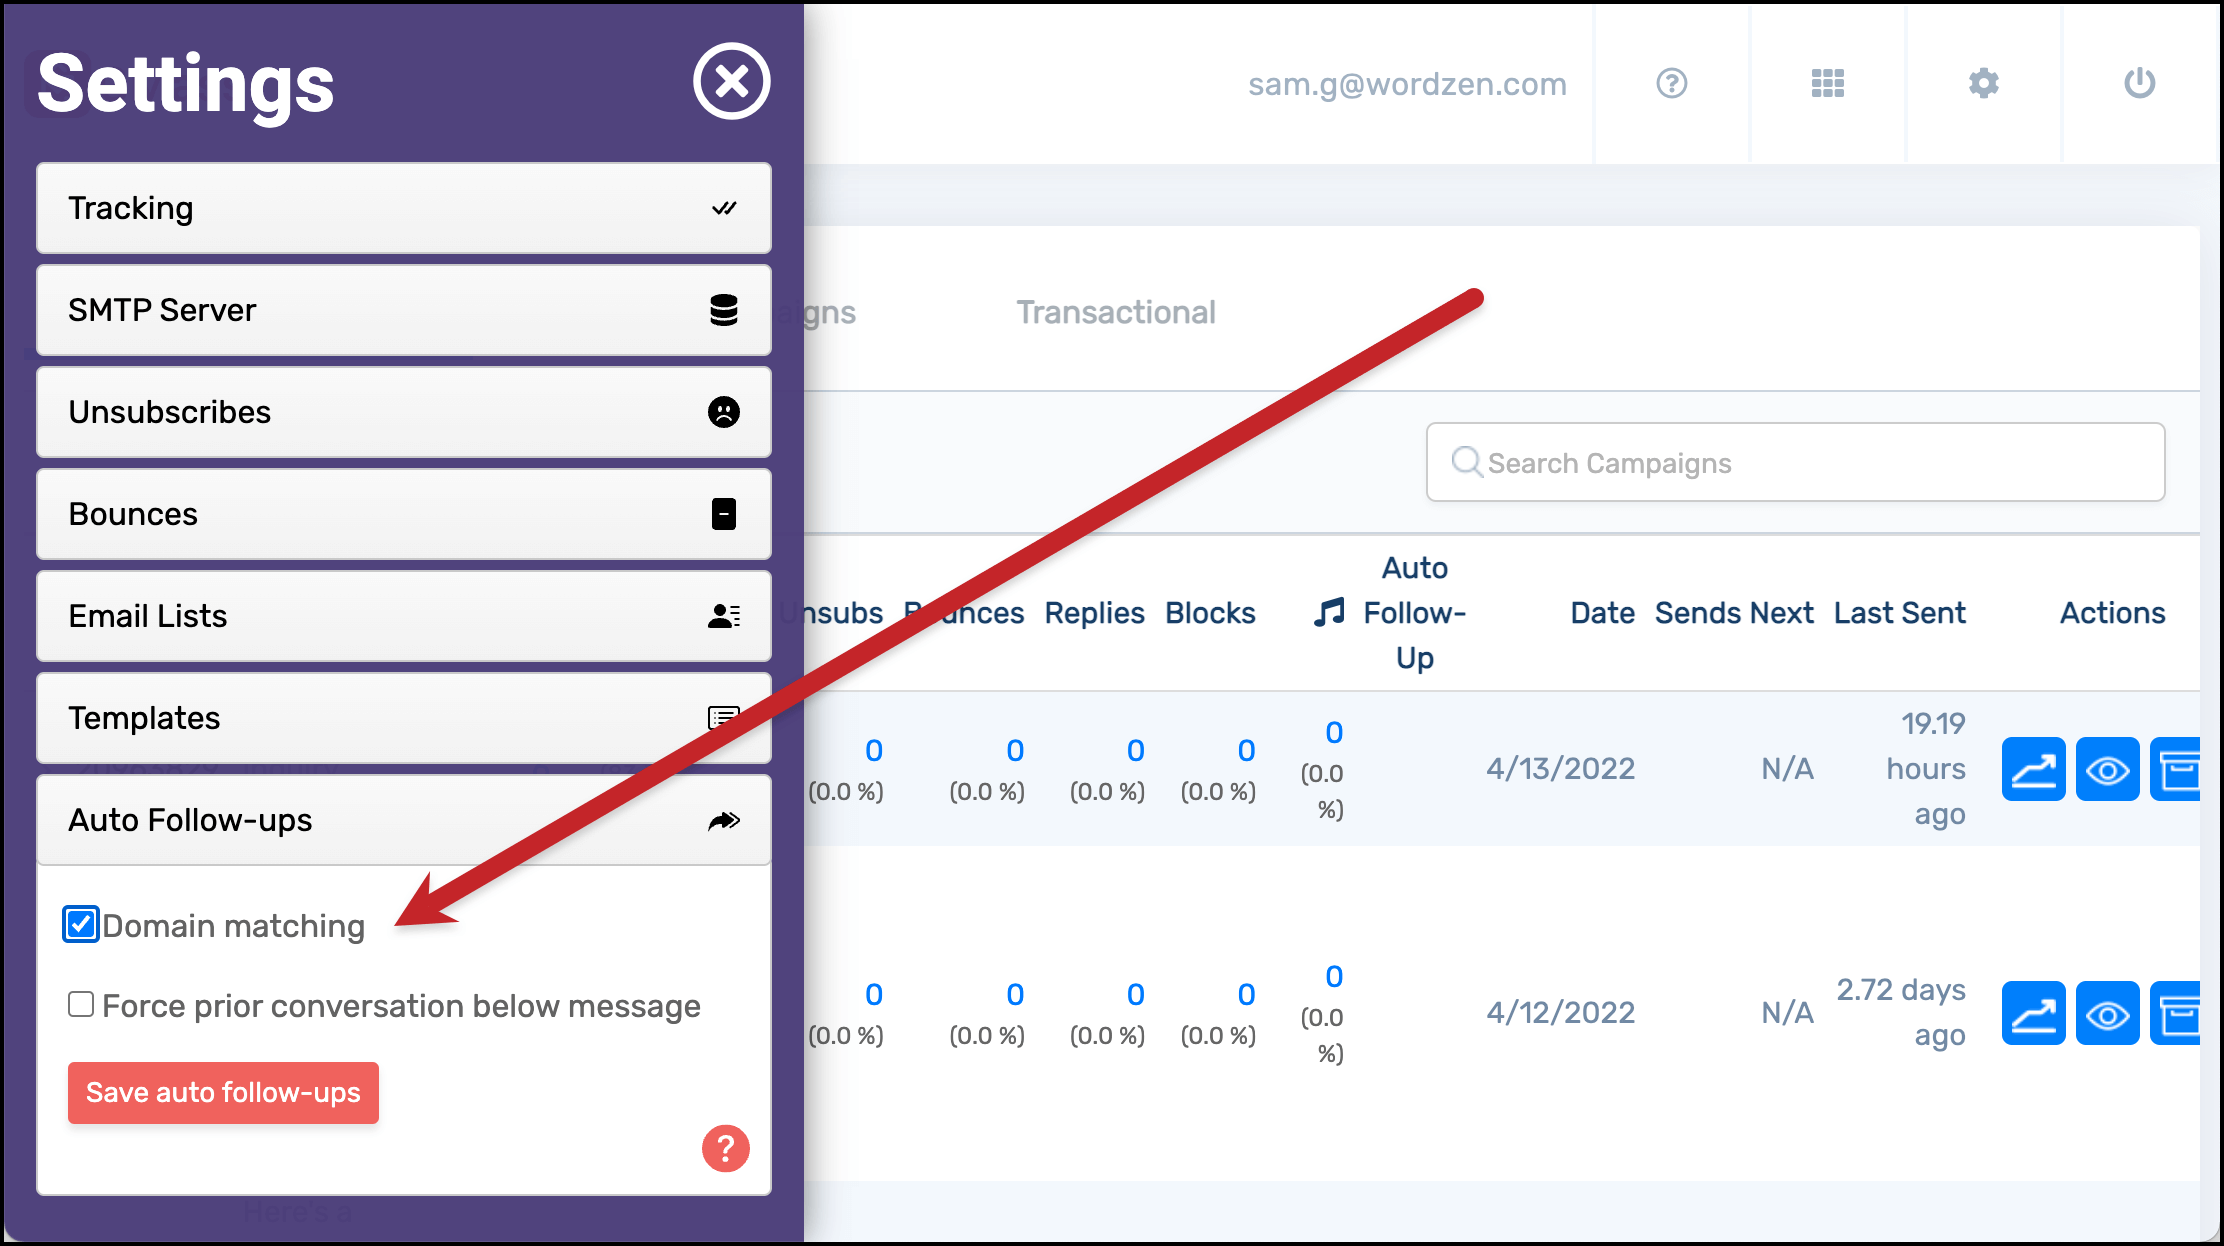
You can also set up GMass to automatically stop follow-ups to an entire domain once any person with an email address at that domain responds to a campaign. In the GMass dashboard, go to Settings and head to Auto Follow-ups, then check the box next to “Domain matching.”
To skip weekends or not to skip weekends — the choice is yours
It’s long been thought that you’ll get the best results if you send emails to people at the time of normal business hours for their individual time zones.
In fact, many email platforms include a feature such that they’ll optimize this for you and send emails to people only during their working hours.
But is that really still necessary in the 2020s? In GMass, you can set the times and dates when you send your campaigns and each of your follow-ups — but we don’t automatically optimize to try to send to each person during the 9-to-5, Monday-to-Friday window.
We simply don’t believe it’s important anymore. The world has changed a lot in the two decades since sending email campaigns became trendy.
Now, people travel more frequently, work at all hours of the night and check email on their handheld devices every day of the week.
Optimal settings for sending emails on weekdays only (or not)
This is a serious “your mileage may vary” situation. You may want to send only on weekdays and set all of your follow-ups to go out at 9:01 A.M. You may figure that’s not important anymore and emails can go out any time of day, any day of the week.
You might even find better results by sending your emails at non-traditional times, when people aren’t at work and dealing with a bunch of other cold emails from other people.
Our recommendation is to test different send timing to find what works best for your target audience.
How to schedule cold emails and follow-ups (with the option to skip weekends)
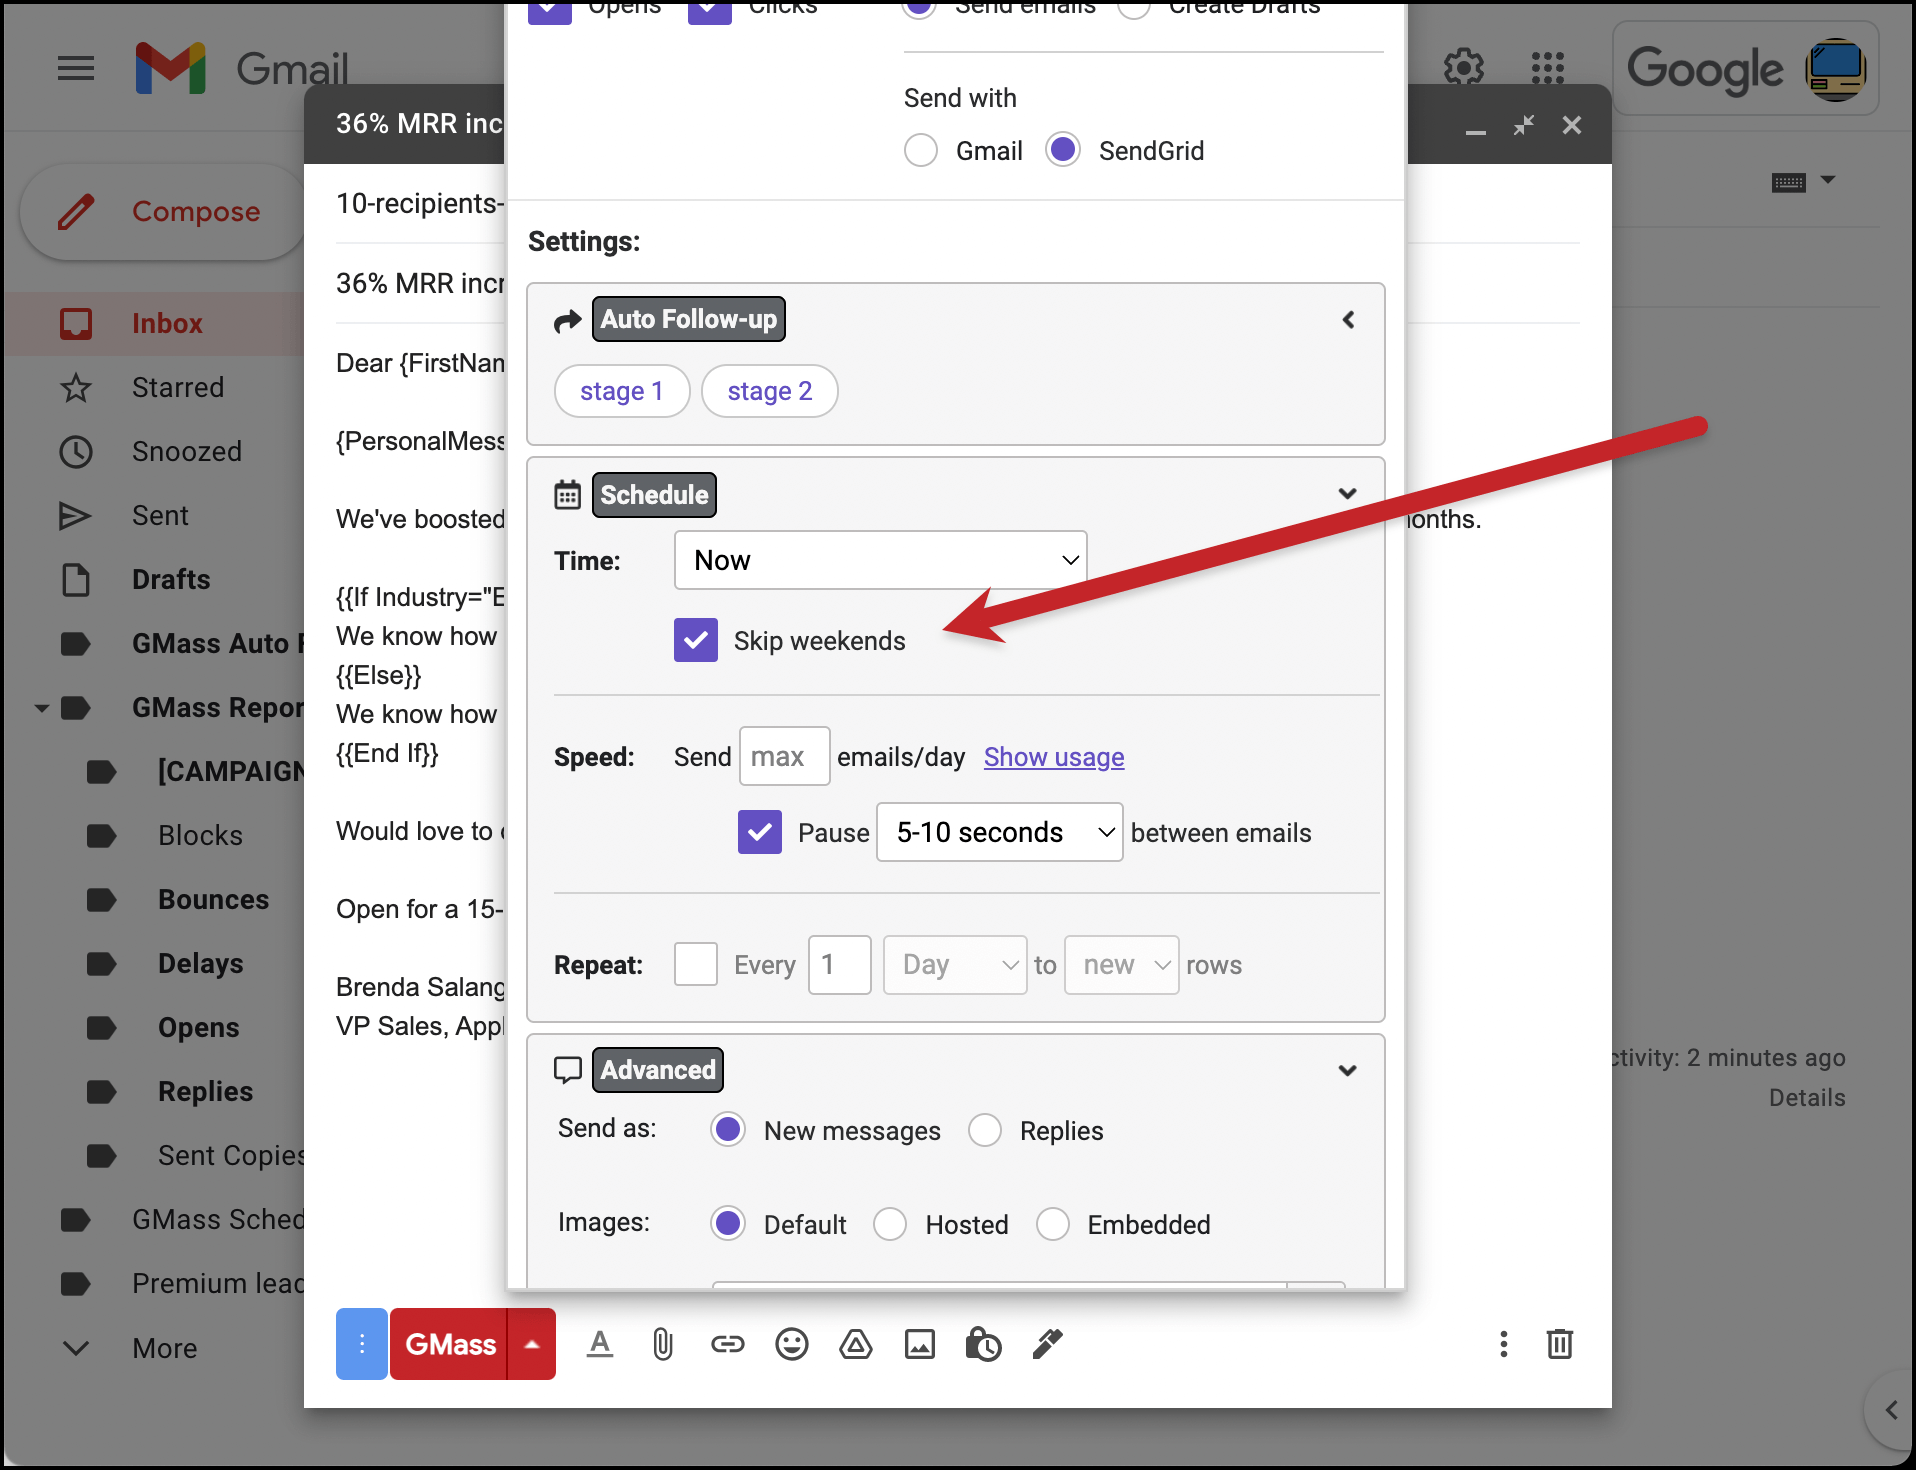
You can set the timing for your first email in a campaign and for every auto follow-up in the GMass settings box for the campaign.
To skip weekends, just check the box for “Skip weekends” in the Schedule section of the settings.
Adding the prior message below the conversation, even in a new thread
Cold emailers traditionally send auto follow-ups as replies to the previous message.
But there may be situations where you want to send follow-ups as new messages; say, to try a different subject line to see if it better grabs your prospects’ attention.
In those cases, even though you’re starting a new thread, you may still want your previous message history to appear in the email.
After all, having the message history there probably simulates what you’d do in a one-on-one email situation as opposed to this mass email situation. If you were individually emailing someone but wanted to change the subject line, you’d open the conversation in Gmail, hit reply, then edit the subject line. That would preserve the message history in the new email.
And since cold emailing at scale is all about making it look like you’re not cold emailing at scale — including message history even in new threads is a good thing.
Optimal settings for making sure prior message history appears in every cold email conversation
If you’re sending traditional cold email replies, you won’t have to worry about this — the message history will be there, no problem.
But if you’re sending new threads with new subject lines, make sure you’re using a cold email platform (yeah, like GMass) that allows you to include prior message history.
You may even want to send a new campaign as a reply to your last message with each recipient, whenever that may be — keeping not just the message history from your new campaign, but your total message history.
How to make sure prior message history appears in your cold email threads (even those with new subject lines)
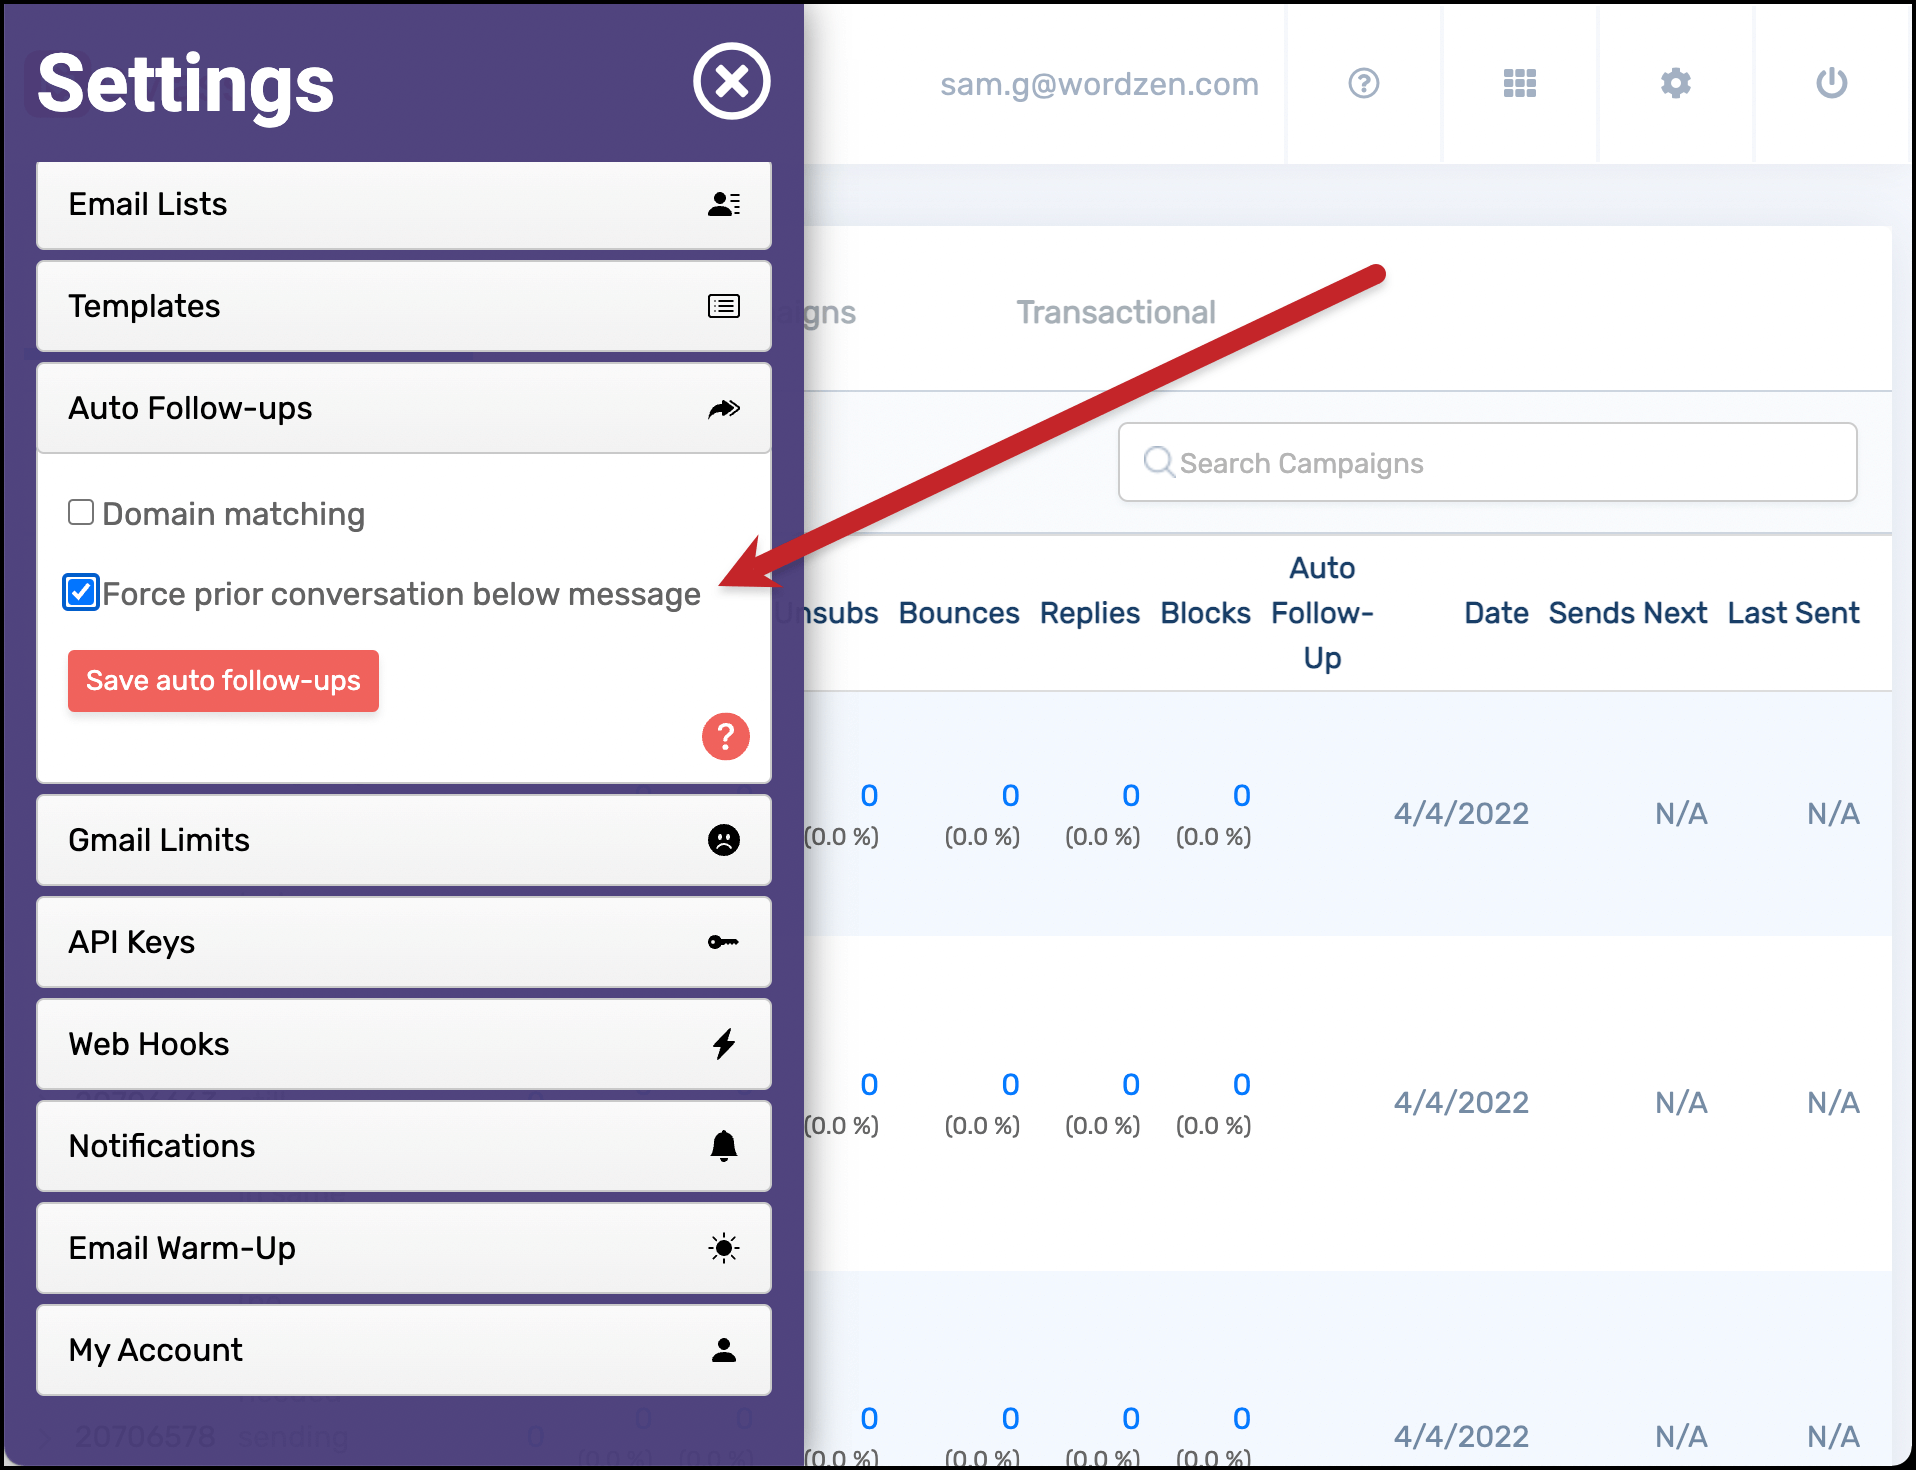
GMass offers a setting in the dashboard to force prior messages from an auto follow-up campaign underneath your conversation, even if it’s in a new thread with a new subject line. This is in the dashboard because the setting applies to your entire account, not just on a campaign-by-campaign basis.
Head to your GMass dashboard, click Settings, go to the Auto Follow-Up settings, and check “Force prior conversation below message.”
If you want to send a new campaign as a reply to your prior conversation with each contact, you can set that up in the GMass settings for the campaign. Go to the Advanced section of the settings and for “Send as,” choose “Replies.” (If you don’t have any prior messaging history with that contact, the email will just go out as a new thread.)
Running quick A/B tests than instantly implementing the results
We’ve mentioned running tests multiple times throughout this article — and that’s because testing is a huge tool for people who are serious about improving and maximizing the effectiveness of their cold email campaigns.
With A/B testing, you can see which version of a subject line gets more opens. You can try out different calls-to-action to see what yields more clicks or replies. You can test personalization versus non-personalization, humorous versus straightforward copy, Comic Sans versus any other font — pretty much anything you can think of in your email subject line or message.
Well, maybe don’t test Comic Sans. The rest of the ideas are all good though.
Optimal settings for A/B testing in cold email campaigns
In theory, it’d be great to test something during every campaign. Send one variation to a group, send another variation to another group — then send the more effective variation to the rest of your list.
That sounds… complicated and time-consuming. We’ll try to un-complicate and… um… un-time-consume it.
How to set up quick A/B tests for cold email campaigns
GMass runs A/B testing a bit different than a lot of the other cold email platforms — with GMass, our goal is to bring A/B testing directly into your workflow to save you a ton of time and effort.
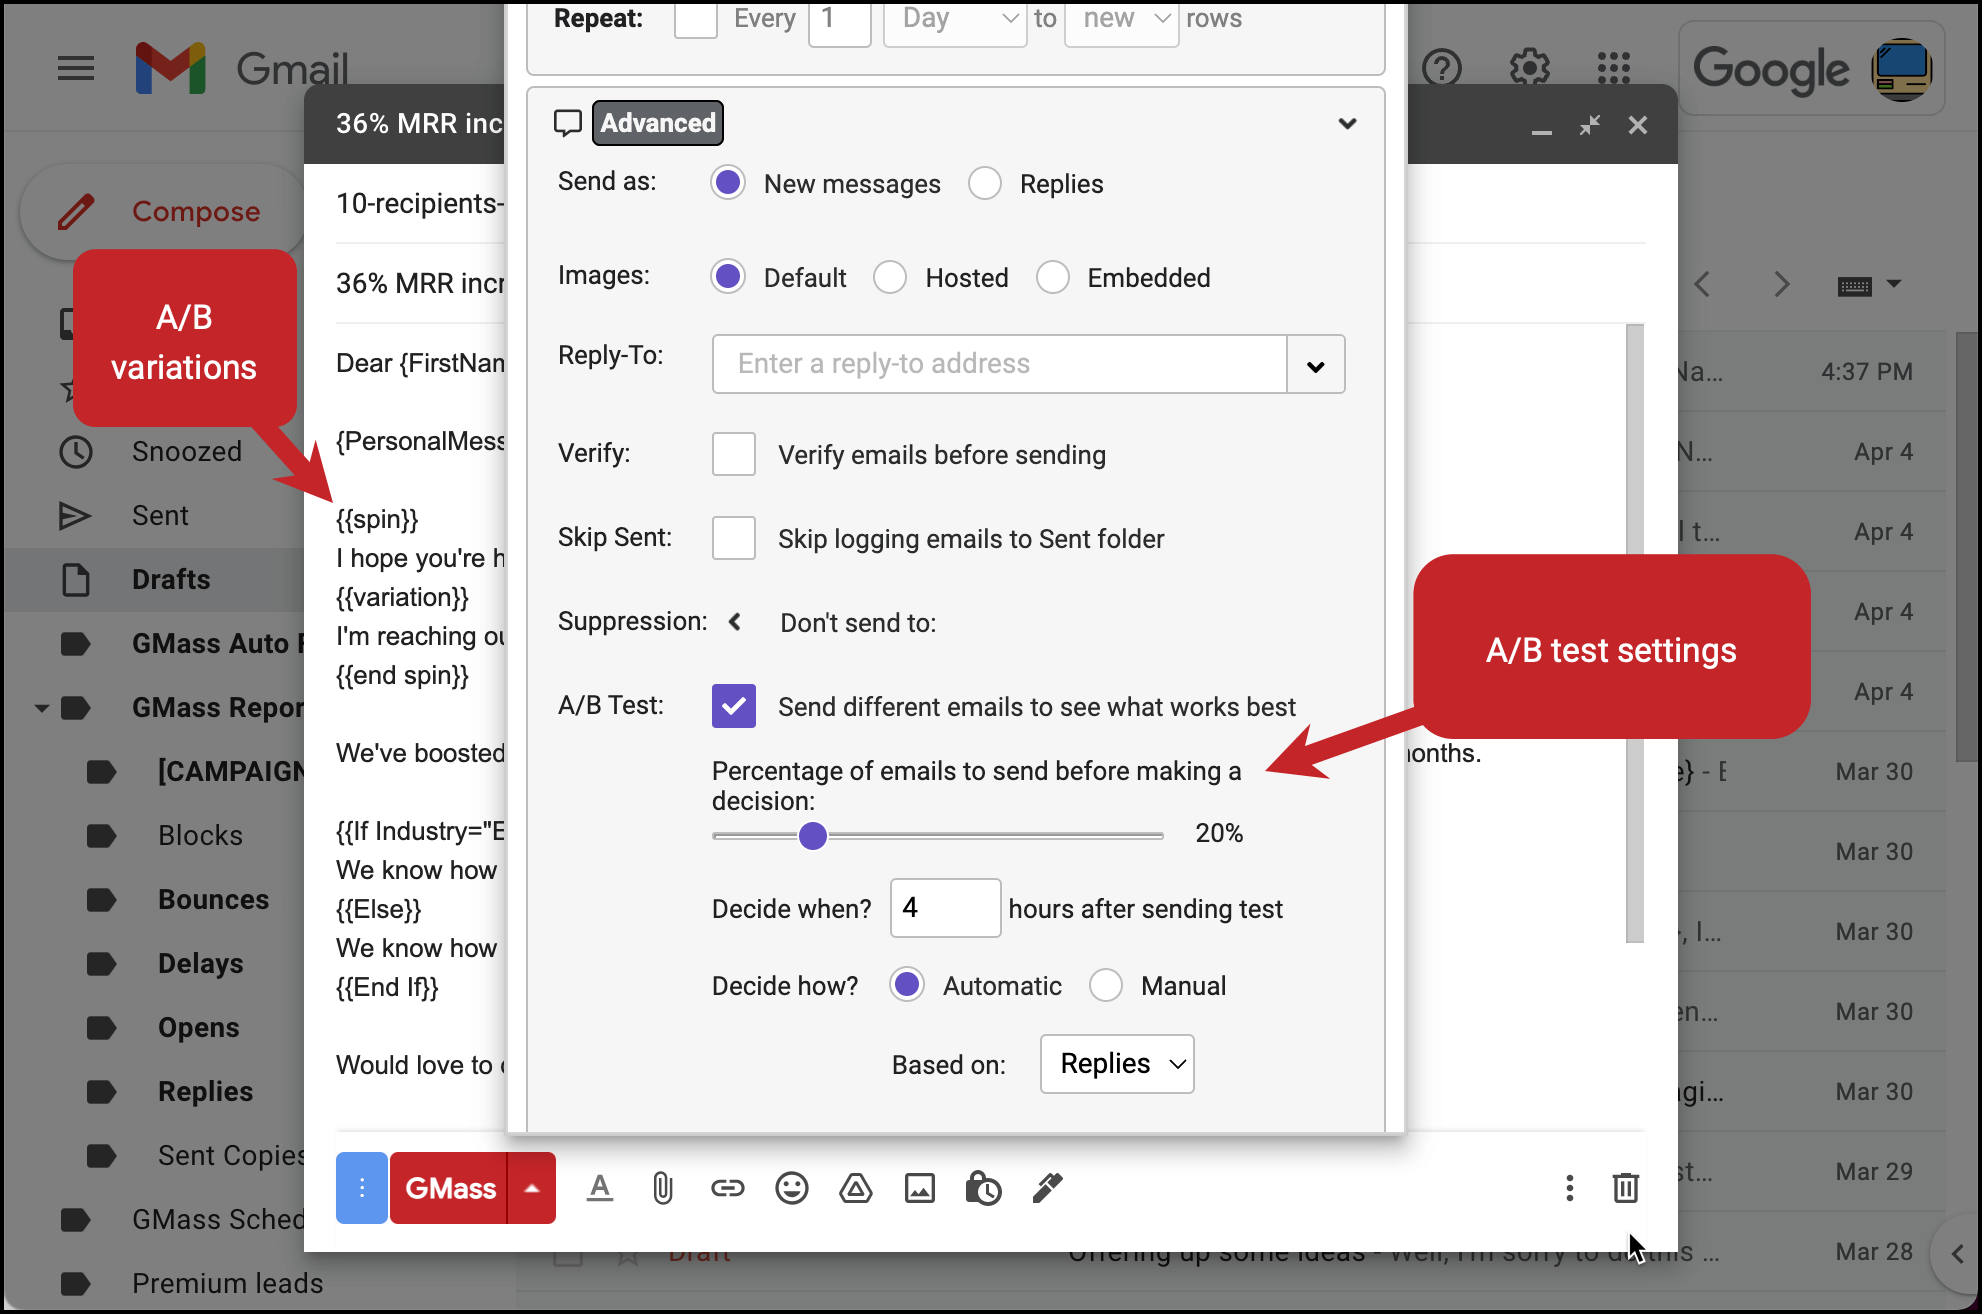
In GMass, you can set up an A/B test by putting our special spintax commands in one email — so you can test variations without composing multiple emails. Then you can designate how many people you want to send each variant to (say, each goes to 25% of your list for a campaign).
Once those test emails are done, GMass can automatically send the “winning” variation of the email to the rest of the list, or you can make that choice manually.
One of the biggest reasons why cold emailers don’t run A/B tests is the mountainous hassle of it all (normally, it requires creating multiple emails, sending them to specific groups, then monitoring the results and making a decision). At GMass, we’re taking the hassle out of A/B testing — find what variation gets you the best results in as few steps as possible.
Breaking Gmail’s daily sending limits to get your campaigns out on time
Gmail is a fantastic platform for cold email (well, not natively because they don’t offer native cold email features, but when you pair Gmail with a tool like GMass). Gmail is a platform you’re already comfortable with which means you don’t have to learn a whole new email app (and that app’s quirks). Plus, the deliverability is through the roof — once your email address is warm, you should be in great shape because no email clients are blocking Google’s IPs.
But if there’s something that could work against Gmail as a cold email platform, it’s the sending limits. For a regular gmail.com account, you’re limited to 500 emails per day; for a Google Workspace account, you’re limited to 2,000 emails per day.
And when you’re sending large cold email campaigns, or running multiple campaigns with follow-ups simultaneously, it’s really easy to hit those limits. After all, if you’re using advanced tricks to find emails or
Optimal settings for working around Gmail’s sending limits
The real optimal setting? Not worrying about Gmail’s sending limits.
With GMass, you can use a third-party SMTP server to send virtually unlimited cold emails through your Gmail account.
Worried that might affect deliverability? With our Deliverability Wizard, you can gauge for yourself how emails sent through Gmail directly compare with emails sent through Gmail via a third-party SMTP.
For the past 30 days as of this writing, campaigns sent direct through Gmail only had a 16.6% open rate; campaigns that used a SMTP service had a 18.6% open rate. So no significant difference — and the SMTP campaigns even performed better.
How to break Gmail’s limits on cold email campaigns
GMass has several methods for breaking Gmail’s limits to send virtually unlimited daily emails.
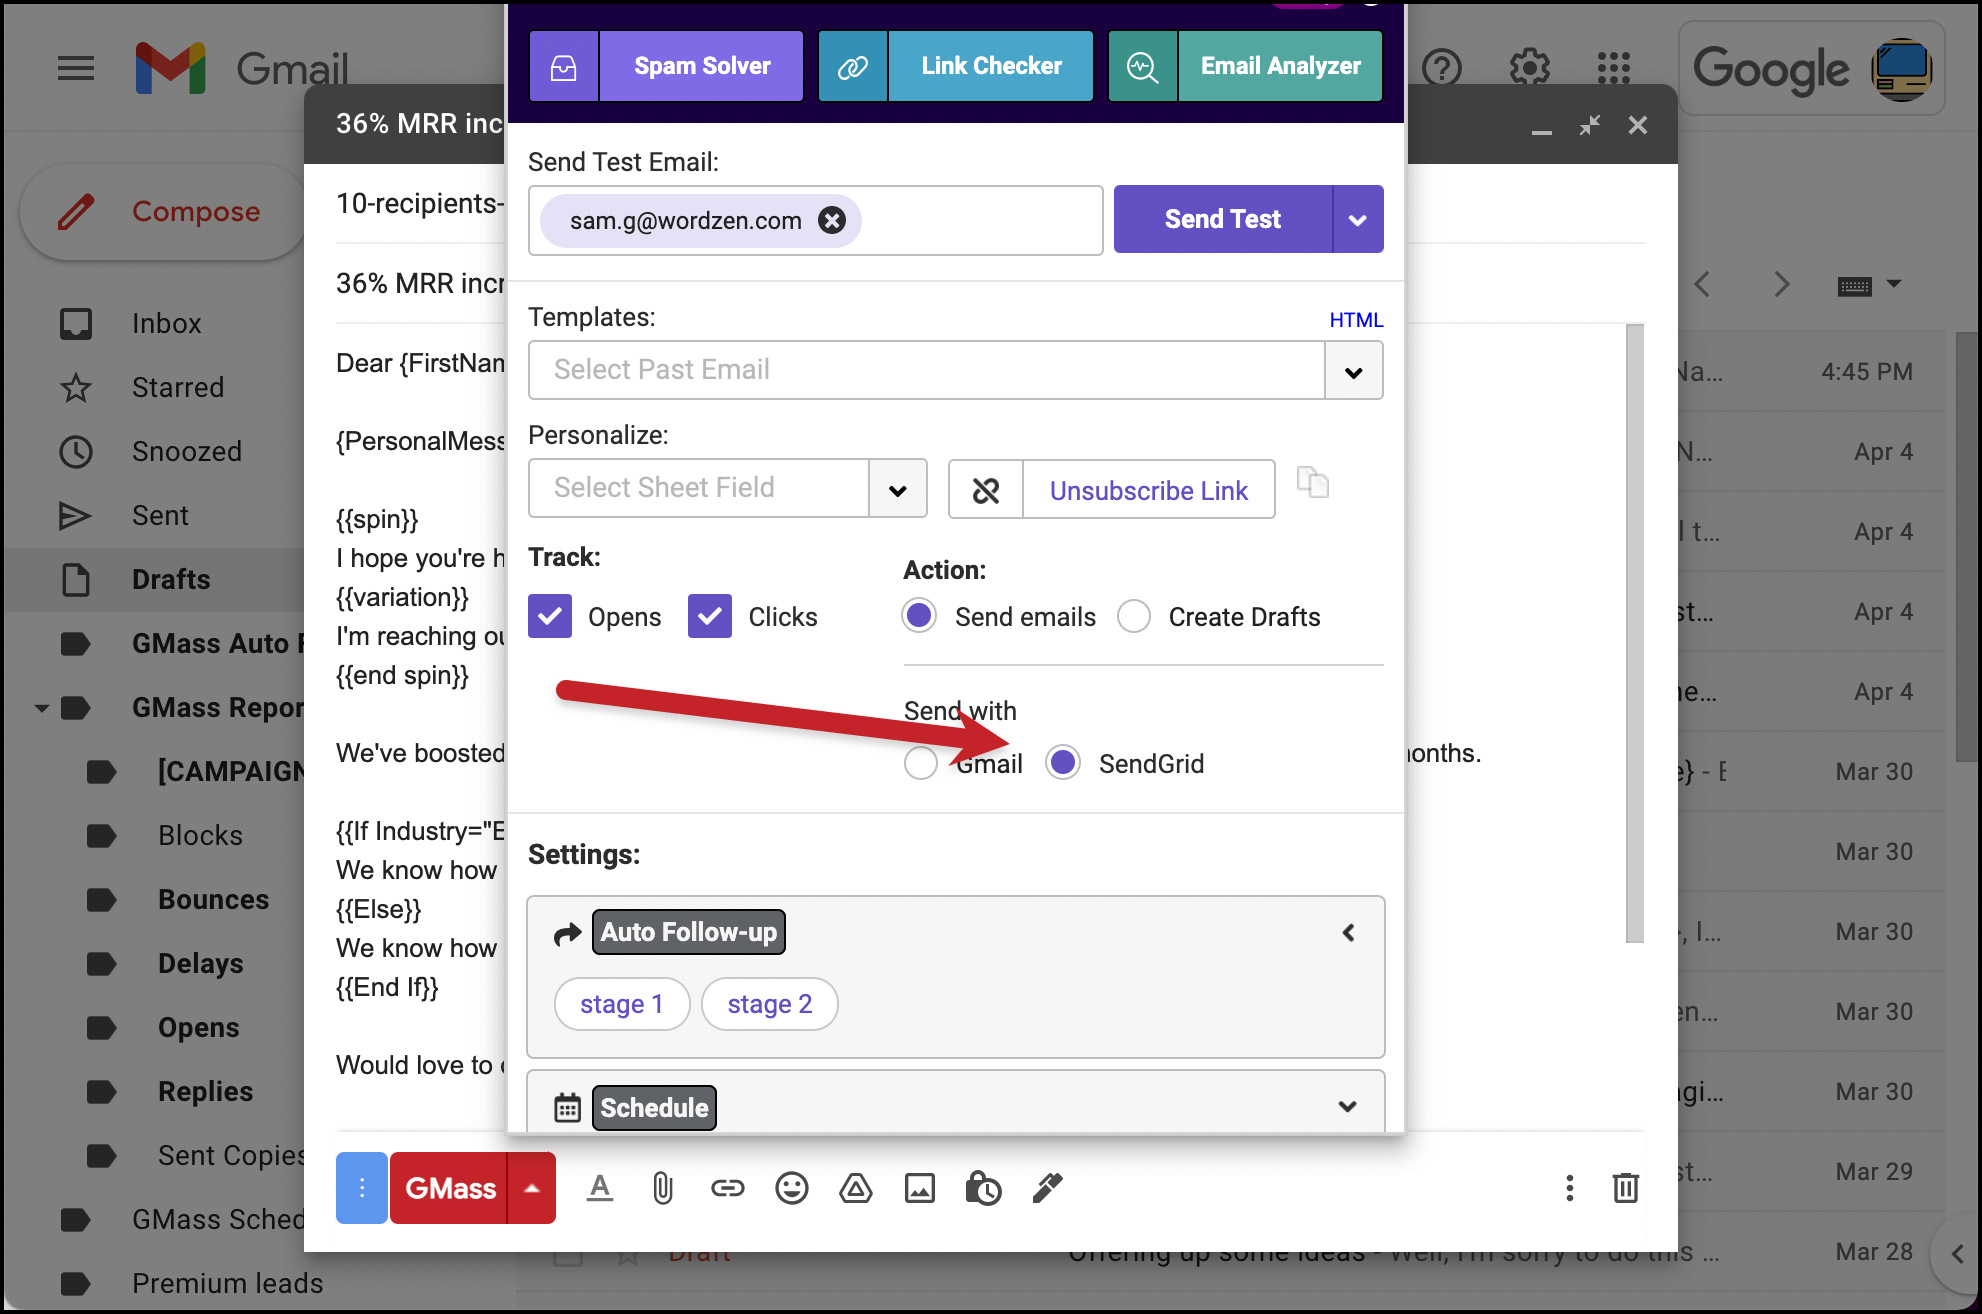
Your best bet for large cold email campaigns: Use a third-party SMTP server like SendGrid with GMass to send 10,000 or more cold emails in a day.
Cold email tactics: Final thoughts on the best cold email settings and features for optimized, effective campaigns
Serious cold emailers know there’s more to an effective cold email campaign than setting up a few emails, maybe tossing in one or two mail merge tags, hitting Send, and just sitting back and waiting for millions of dollars to roll in.
There are lots of other important cold email tactics, settings, and features you need to get the most out of your cold email campaigns. Those include:
- Adding a pause between emails. While there’s no definitive answer on the deliverability effect of adding a pause between cold emails, throwing a few seconds in between each send probably can’t hurt.
- Sending auto follow-up sequences. Auto follow-ups an indispensable part of cold email campaigns — but there are lots of little settings within your auto follow-ups that can make a big difference on your results.
- Personalizing emails to the max. There’s a lot more to personalization than just adding in a contact’s name with a mail merge.
- Embedding images. Embedded images in Gmail are less likely to be blocked and are a big step toward making mass emails seem like personal emails.
- Turning off click tracking. Open tracking is almost always valuable, but in some situations, click tracking is not — and in those situations, you should turn it off.
- Removing people from sequences as necessary. You need to make sure prospects stop receiving auto follow-up emails after they’ve replied — even if they don’t reply via email (or someone else at their company replies for them).
- Scheduling emails for the right times. Do you really need to send your emails during normal business hours on weekdays — or are off-hours and weekends fair game? Test and find out.
- Including the prior conversation below your message. No matter how you send campaigns and follow-ups, it’s always good to include your conversation history in the message.
- Running fast A/B tests. Bring A/B testing into your campaign workflow to squeeze a little extra optimization out of every campaign.
- Getting around Gmail’s sending limits. Gmail limits how many emails you can send on a given day. Get around those limits with GMass by incorporating a third-party SMTP server.
Ready to optimize the settings for your cold email campaigns to get the best possible results? GMass makes it easy to do virtually everything we’ve discussed in this article.
Join the 400,000+ other cold emailers (plus everyone from churches to job recruiters to DJs) using GMass to send their campaigns.
Download the GMass Chrome extension from the Chrome web store to get started for free — and to send your first ultra-optimized campaign in a matter of minutes.
Only GMass packs every email app into one tool — and brings it all into Gmail for you. Better emails. Tons of power. Easy to use.
TRY GMASS FOR FREE
Download Chrome extension - 30 second install!
No credit card required

Ajay is the founder of GMass and has been developing email sending software for 20 years.
Email preview text complements subject lines.
Sounds great! Optimizing cold email campaigns can be tricky, but GMass seems to make it super easy. Definitely worth checking out!