Ajay is the founder of GMass and has been developing email sending software for 20 years.
Here’s an SEO win that I never thought I’d experience. For a particular Gmail search term, we now outrank Google, on Google.
One of my articles about a Gmail bounce codeoutranks Google’s own page on that same bounce code.
If you’ve sent any sizable email marketing campaigns from your Gmail account, you’ve likely encountered the dreaded 69585 bounce. It looks like this:
The code “69585” is unique to Gmail and is not a standard SMTP code. A while back I wrote a detailed explanation of what this bounce means and how to handle it. And now, if you Google “69585” or some derivative of that search phrase, look what happens:
Can you believe GMass is #1 and Google is #3?
Amazing! The GMass article is #1, and the official Google article is #3, with a support forum article sneaking its way into the #2 spot. If there was ever any suspicion as to whether Google favored itself, you can let that suspicion go.
Now, about Facebook listening to us through our phones and targeting ads to us that way…
Email marketing, cold email, and mail merge inside Gmail
Send incredible emails & automations and avoid the spam folder — all in one powerful but easy-to-learn tool
Love what you're reading? Get the latest email strategy and tips & stay in touch.
If you’re the developer of a Chrome extension, after a user installs your extension from the Chrome Web Store, you may want to redirect the user to a particular website. For example, if you make a Gmail extension, you may want to redirect the user to Gmail immediately after they install the extension so they can begin using it.
Why is this necessary?
Recently, Google disabled inline installations of Chrome extensions. When inline installation was allowed, developers of Chrome extensions like myself had more control over what happens when a user installed an extension from our website. From the GMass website, you could install the Chrome extension without going to the Chrome Web Store, and then right after installation, I could redirect the user to gmail.com. It was an easy, seamlessess experience.
Now, however, since inline installation has been deprecated, some creativity is required to create that same seamless experience. Now, all Chrome extensions have to be installed from the Chrome Web Store, and by default, when the extension is installed, nothing happens. The user remains on the Chrome Web Store. The user isn’t taken to the website that the extension applies to, in my case, Gmail, automatically.
The developer has a couple of choices of how to redirect the user to the desired website, and in this article, I’ll discuss those options.
The super simple option to load Gmail after an extension install
If you’re developing a Chrome extension for Gmail, after the user installs the extension from the Chrome Web Store, you probably want the redirect the user to gmail.com. The easiest way to do this is to use the chrome.runtime.oninstall event in a background.js file, and this is also how I do it for GMass.
Designate a background script in your manifest.json file, and this code will do the trick:
chrome.runtime.onInstalled.addListener(function() {
  alert('You just made the best decision of today, by installing GMass!\n\nWe will now redirect you to your Gmail account so you can get started sending email campaigns inside Gmail.');

  chrome.tabs.create({
    url: 'https://mail.google.com',
    active: true
  });

  return false;
});
You can even throw in that JavaScript alert, but that could also get annoying, so consider carefully before you do that.
Notice that I’m using the chrome.tabs API to create a new tab which will load Gmail and now the be the focused tab in the browser. I could have also used:
window.open("https://mail.google.com");
…but doing so has a couple of disadvantages:
window.open could be stopped by a popup blocker
Depending on a user’s individual browser settings, this may open up a new window rather than a new tab in the existing window, which wouldn’t be as nice of a user experience
Note that you don’t need to add any additional “permissions” to your manifest to do this. I’m always wary of adding “permissions” because doing so forces a new warning message to pop up when a user’s browser updates your extension with the latest version.
A smarter option that detects what tabs are already open
The super simple option works for most cases, but if you want to give your users a really slick experience, it has a couple of flaws:
If the user already has Gmail opened in a browser tab, it might annoy the user to now open up a second tab with Gmail in it. And you want happy users, not annoyed users.
Many people have multiple Gmail accounts and are logged into them at the same time. Gmail “numbers” the logged-in Gmail accounts and creates URLs to those accounts in the format of https://mail.google.com/mail/u/0, https://mail.google.com/mail/u/1 and so on and so forth. If a user has an existing tab open to https://mail.google.com/u/1, and that’s the account he wishes to use with your extension, the super simple method will launch https://mail.google.com which will always redirect to https://mail.google.com/u/0, so now the user is on a different Gmail account than the one on which they want to use your extension.
It would be ideal to be able to detect if the user already has a Gmail browser tab open, and reload just that tab and bring the focus to it, or, if the user does not already have a Gmail browser tab open, then open one for them, and just assume it’s the 0-numbered user they want to open. Of course the user can obviously navigate to any Gmail account he wishes.
Note that regardless of how the webpage is reloaded, reloading is necessary after the installation of a Chrome extension in order for it to run and appear as part of that webpage, whether it’s for Gmail or something else.
One of my least favorite Chrome extensions is Mixmax. Perhaps I’ll dive into why I dislike it so much in a future article, but I do bestow praise upon their developer for doing something smart. He wrote a routine in background.js that detects if any Gmail tabs are already open, and if so, the focus is brought to that tab, and the tab is reloaded. If not, a new tab is opened. This kind of seamless experience, however, comes at a cost.
chrome.runtime.onInstalled.addListener(function(details) {
  if ((details.reason === 'install') || (details.reason === 'update'))
  {
    refreshBrowser('gmail-inbox', true);
  }
});

function refreshBrowser(target, bringToForeground) {
  if (target !== 'gmail-inbox') return;
  chrome.windows.getAll({ populate: true }, function(windows)
  {
    var foundExisting = false;
    windows.forEach(function(win)
    {
      win.tabs.forEach(function(tab)
      {
        // Ignore tabs not matching the target.
        if (target === 'gmail-inbox') {
          if (!/https:\/\/(mail|inbox)\.google\.com/.test(tab.url)) return;
        }
        else
        {
          return; // Unknown target.
        }
        // Reload the matching tab.
        chrome.tabs.reload(tab.id); // If this is the first one found, activate it.
        if (bringToForeground && !foundExisting)
        {
          chrome.tabs.update(tab.id, { active: true }); }
          foundExisting = true;
        });
      });
      // If no gmail tab found, just open a new one.
      if (bringToForeground && !foundExisting)
      {
        chrome.tabs.create({ url: (target === 'gmail-inbox') ? 'https://mail.google.com' : 'https://www.mixmax.com', active: true
      });
    }
  });
}
Analyzing the code
Looking at the code, it loops through each tab in the window checking if its URL is either mail.google.com or inbox.google.com. If so, then that tab is reloaded. If no tab is found with Gmail, then a tab is created and its focus is set.
What is the cost that it comes with? You must add the “tabs” permission to your manifest.json, and doing so triggers a warning that will scare off some users:
Ouch. In today’s age of privacy and security, that warning is enough to scare off most would-be new users. And in fact, that could be why their user installs have been dropping, according to Chrome Compete. Technically if you only had the “tabs” permission declared in manifest.json, the warning would say: “Read your browsing history”, but in the case of Mixmax, they request a bunch of other permissions as well, and “Read and change all your data…” supersedes the “Read your browsing history” statement so that warning is used instead.
The reason you have to add the “tabs” permission to manifest.json to begin with in this scenario but not the super simple scenario I’m using with GMass above is that is explained by Google:
The majority of the chrome.tabs API can be used without declaring any permission. However, the "tabs"permission is required in order to populate the url, title, and favIconUrl properties of Tab.
Meaning, if you want to read the URL of the tab, in order to detect that the user is already on a certain webpage, as the Mixmax example does, then you need to request the “tabs” permission. But if you just want to create a tab, as I do in the super simple example, then you don’t need the “tabs” permission.
To compare this is the warning you get when you install the GMass Chrome extension:
See the difference? Hopefully this warning is a lot less scarier than the prior one.
One day I hope GMass ranks among the most popular Chrome extensions for Gmail, but for now, I have the utmost respect for the currently most popular Gmail Chrome extensions, including Streak, Boomerang, Yesware, Gmelius, and Sortd. I often examine how these other Chrome extensions handle an issue when I’m trying to solve an issue of my own. In researching these other extensions for this article, I was curious how each of them handles the post-install experience for the user. Here are the results:
Boomerang: Creates a new tab that loads up a “welcome” page on their website, boomeranggmail.com, which then quickly redirects to gmail.com.
Yesware: doesn’t redirect the user at all after install
Gmelius: launches a new tab that loads gmail.com, regardless of what other tabs are open
Sortd: detects what tabs already have Gmail loaded and reloads just those, and therefore requires a stricter warning upon install, similar to Mixmax
Streak: doesn’t redirect the user at all after install
Summary
So to summarize, even though Google has deprecated inline installation for Chrome extensions, you can still control the experience of the user after they install an extension by redirecting them to the website of your choice. How sophisticated you want to get with that redirect, meaning whether you want to launch a new tab regardless of what tabs are already open, or whether you want to detect whether the website is already open, dictates which approach you take and what warnings the user sees when installing.
Ready to transform Gmail into an email marketing/cold email/mail merge tool?
Only GMass packs every email app into one tool — and brings it all into Gmail for you. Better emails. Tons of power. Easy to use.
Love what you're reading? Get the latest email strategy and tips & stay in touch.
I have a problem.
I coded a bunch of landing pages as ASP.NET MVC Views as part of the GMass website, and now I want to convert those landing pages to WordPress so that they can be more easily managed, and so I can easily create more of them.
but I also have MVC pages at the same root level like https://www.gmass.co/pricing that I do NOT want to convert to WordPress that should remain functional as .NET pages.
So I want to convert the existing MVC landing pages to WordPress and keep the URLs the same for SEO purposes.
Here is how I accomplished that.
Step 1: Copy WordPress files to root folder of IIS site
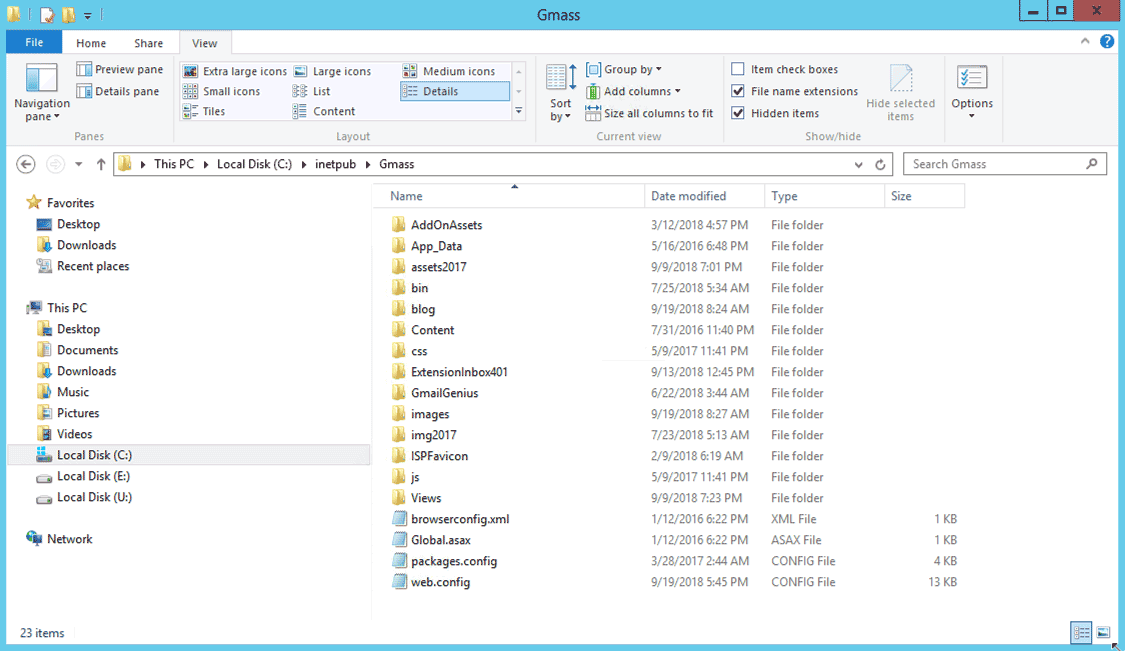
The root folder of my IIS website looks as you would expect:
The root GMass folder on my IIS web server
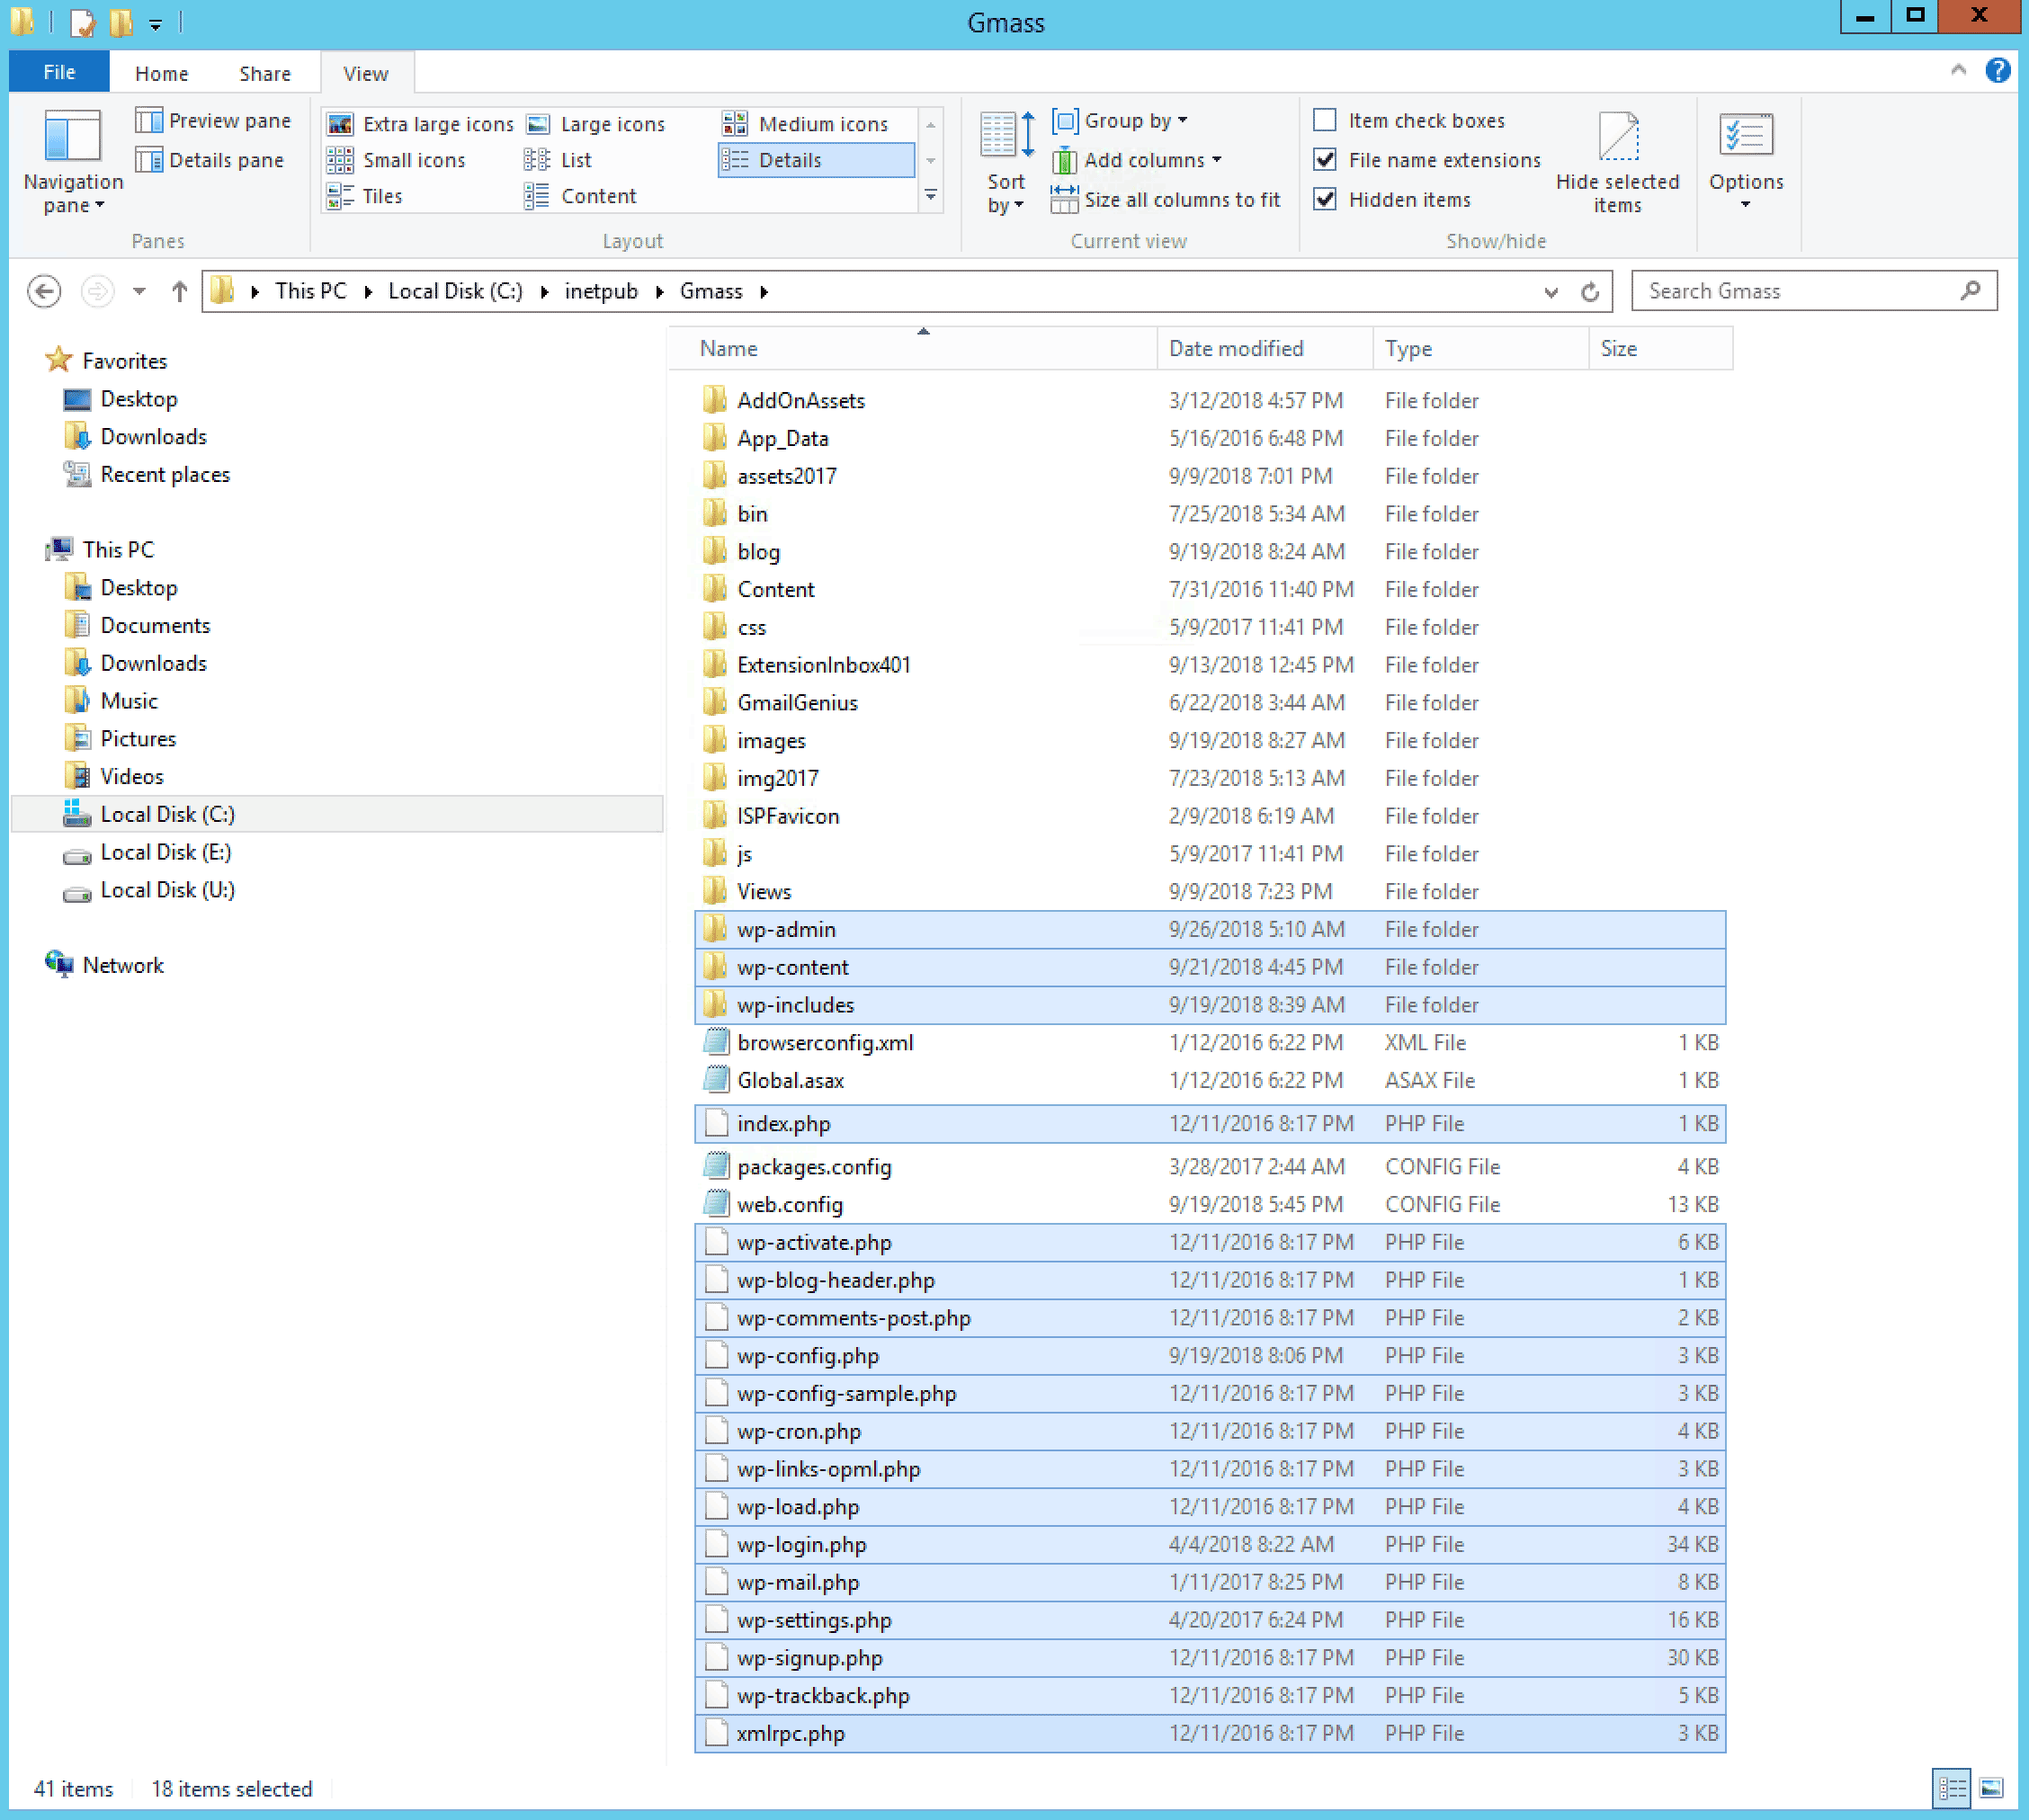
I installed WordPress at the same root level, which crowds the files and folders, but otherwise doesn’t do any harm. I’m assuming that PHP is already installed on your IIS server. If not, here’s how to install PHP on IIS.
The root GMass folder on my IIS web server, after I install WordPress
Note that I also have WordPress installed in the /blog folder, and the GMass blog is driven entirely by WordPress, but in the /blog folder, everything is served by WordPress, so there aren’t the complexities of the setup here, which involves serving some pages with .NET and some pages with WordPress.
So, I have two installations of WordPress connected to two different MySQL databases—one in the root GMass folder and one in the gmass.co/blog folder.
Step 2: Create a new MySQL database just for the landing pages
Create the new database to store the landing pages in MySQL using MySQL Workbench.
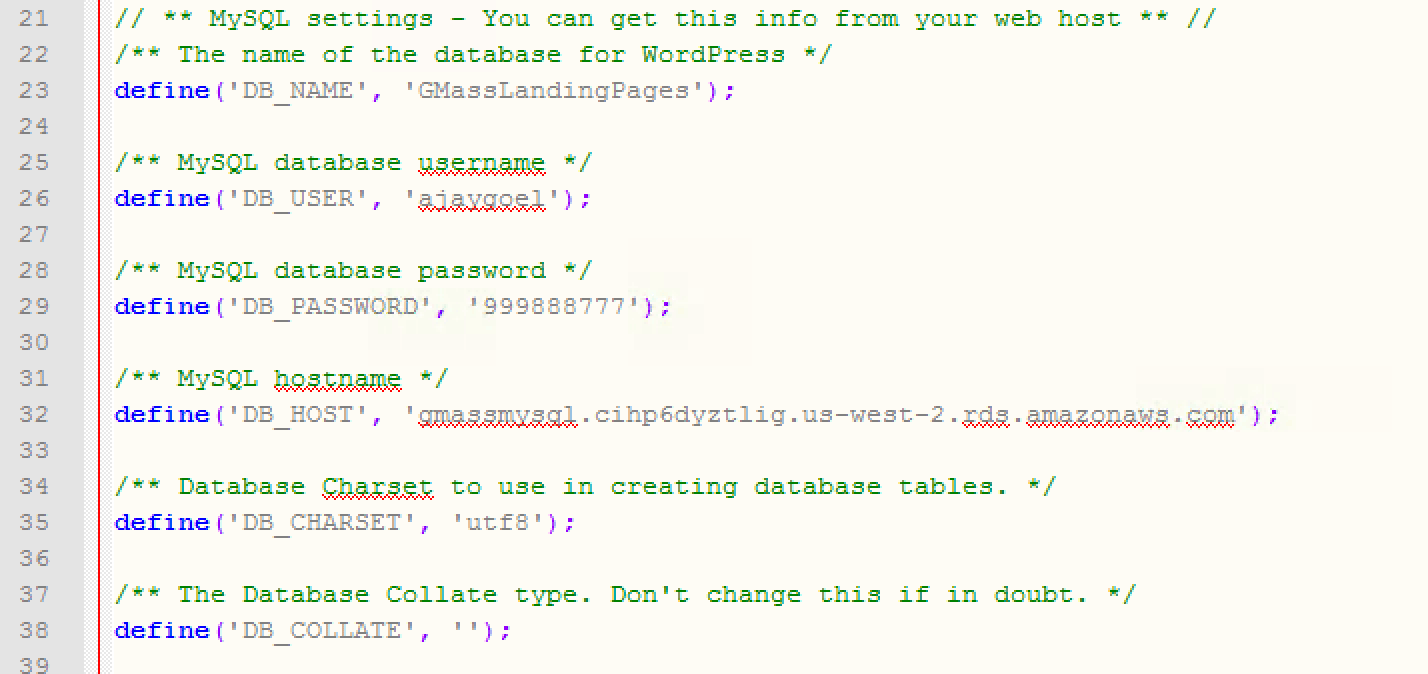
Open up wp_config.php, and replace the sample information with the actual database credentials. I will call my new MySQL database “GMassLandingPages“. Of course, you could use an existing MySQL database, like the one for your WordPress blog that already has the WordPress table definitions, but I like to keep things clean and organized, so I’m creating a separate database just for my landing pages.
My wp-config.php file, which uses my new “GMassLandingPages” database.
Next, I have to go to https://www.gmass.co/wp-admin to complete the setup of my new WordPress installation. The setup will have me create my WordPress Administrator login, and it will set up the GMassLandingPages database that I just created. Meaning, it will create the necessary tables and other MySQL metadata needed for the database to function as my WordPress database.
Step 3: Create a WordPress page
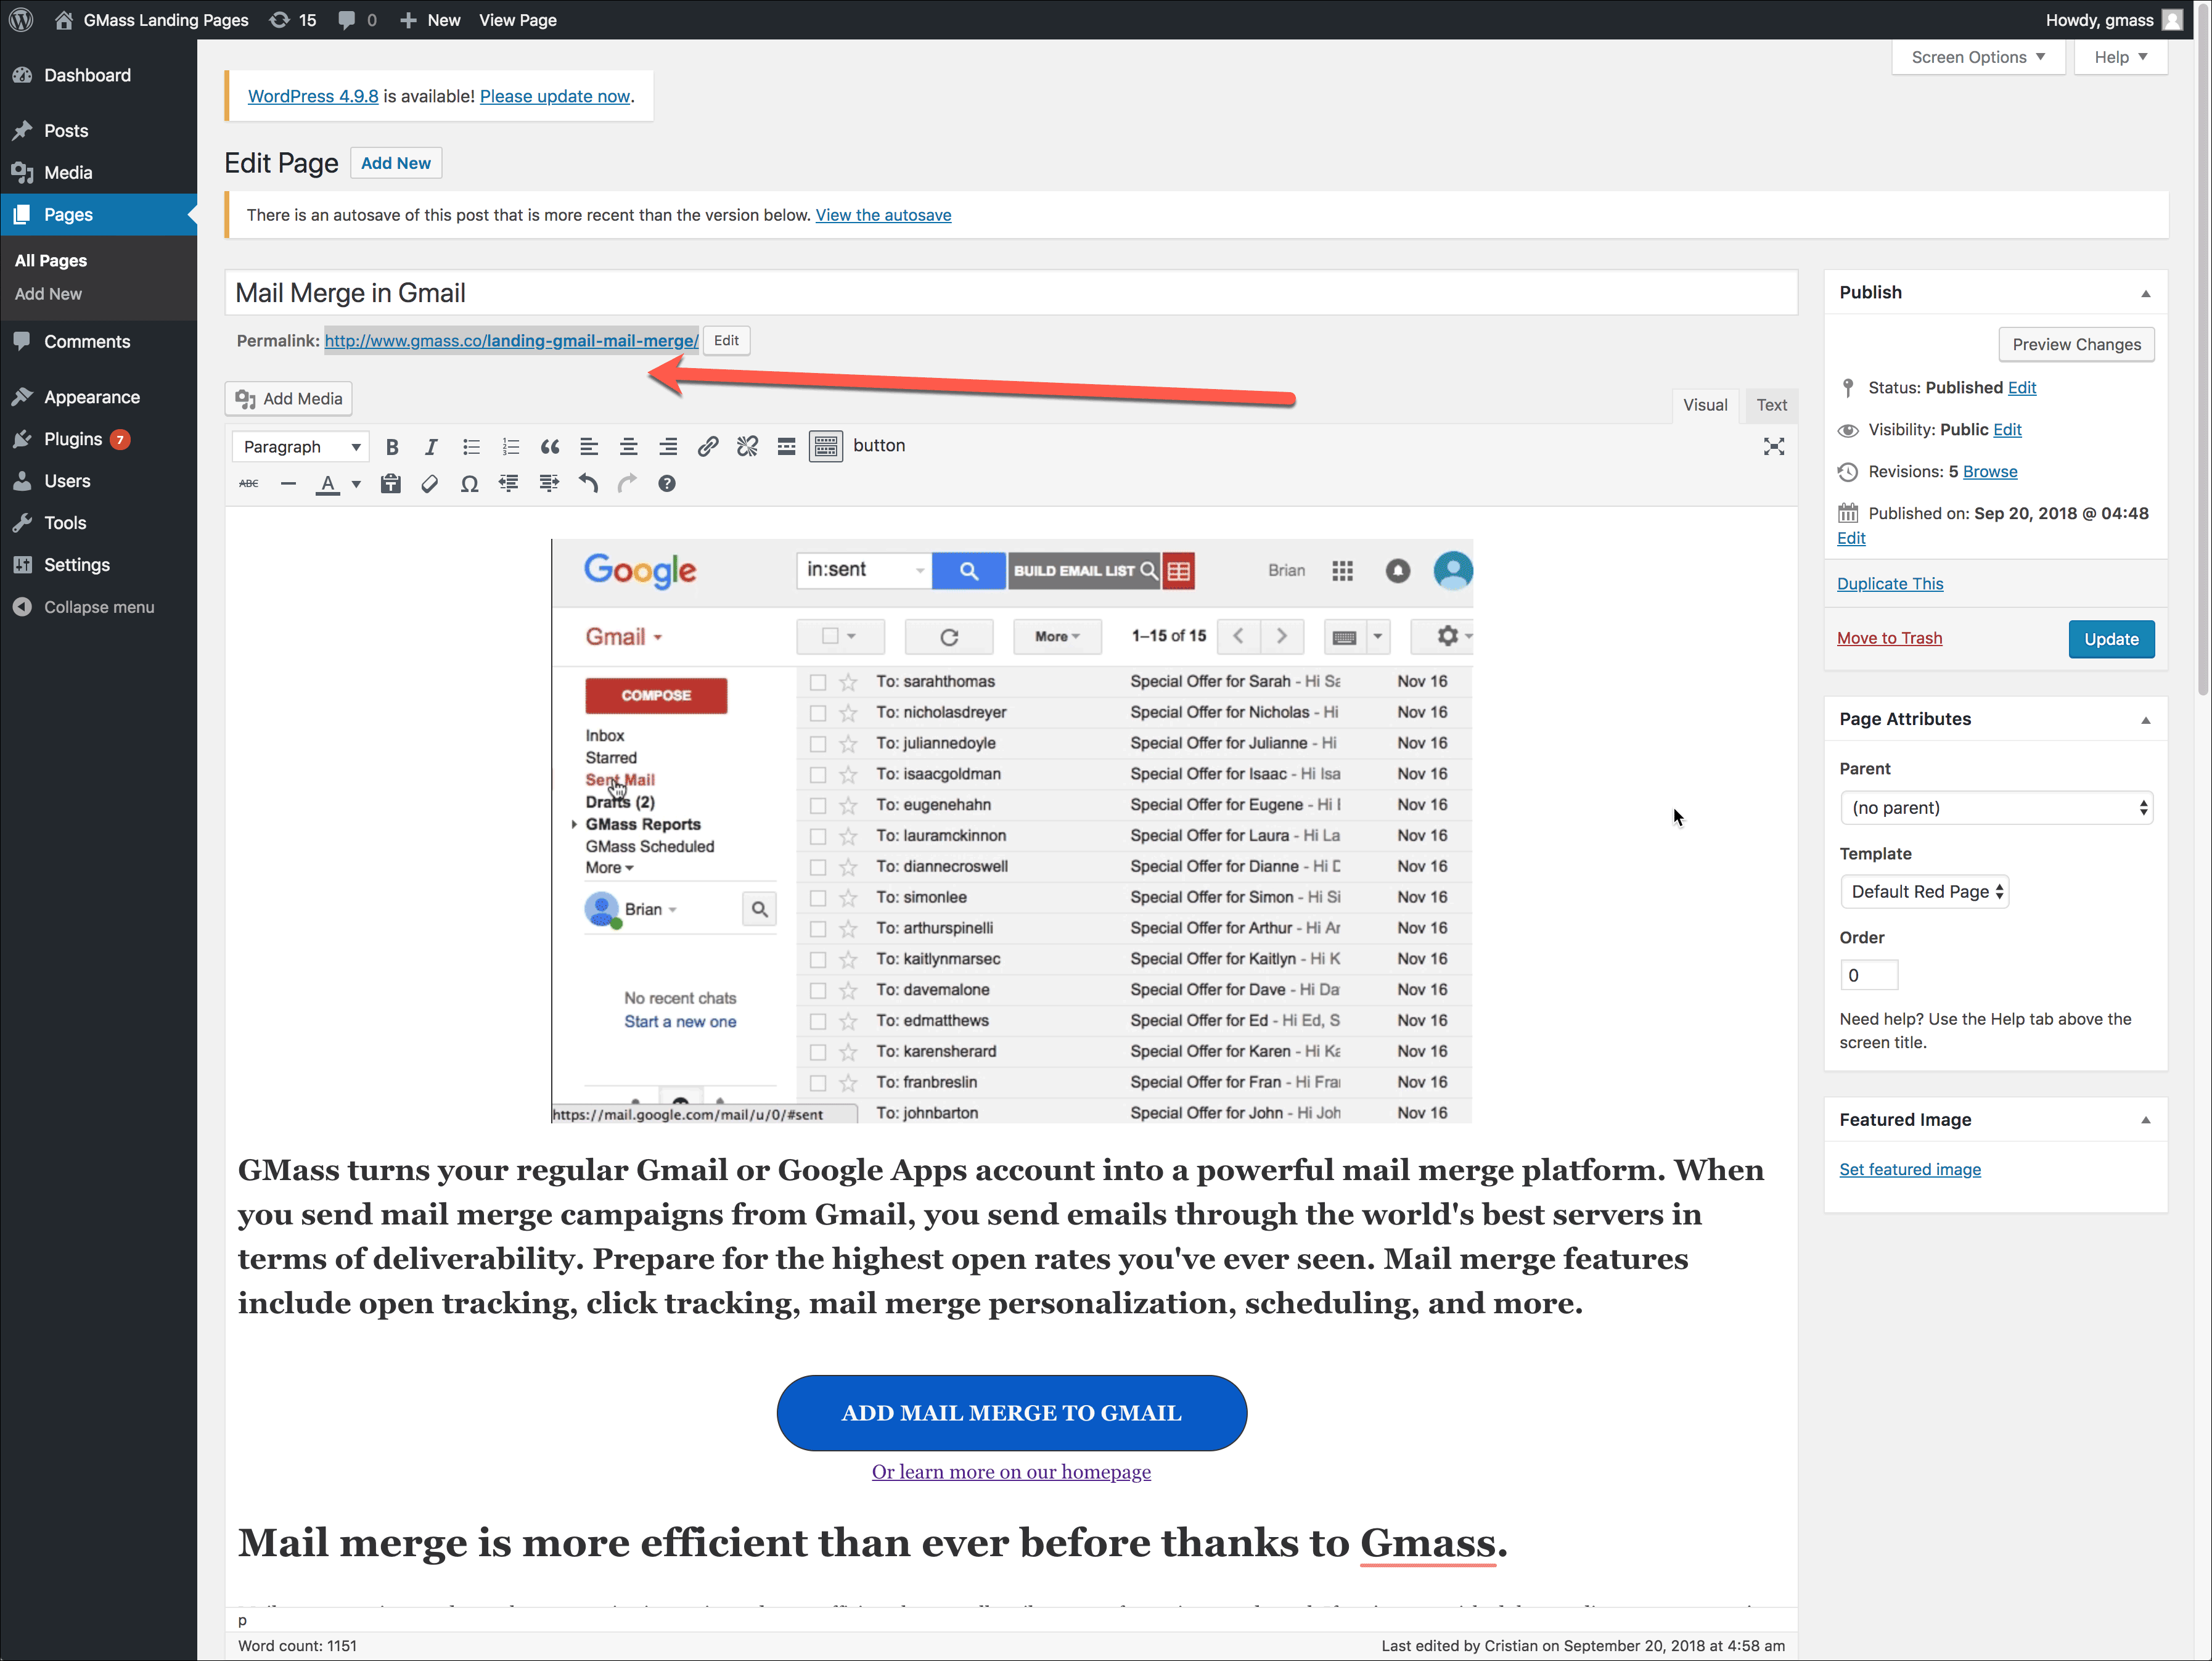
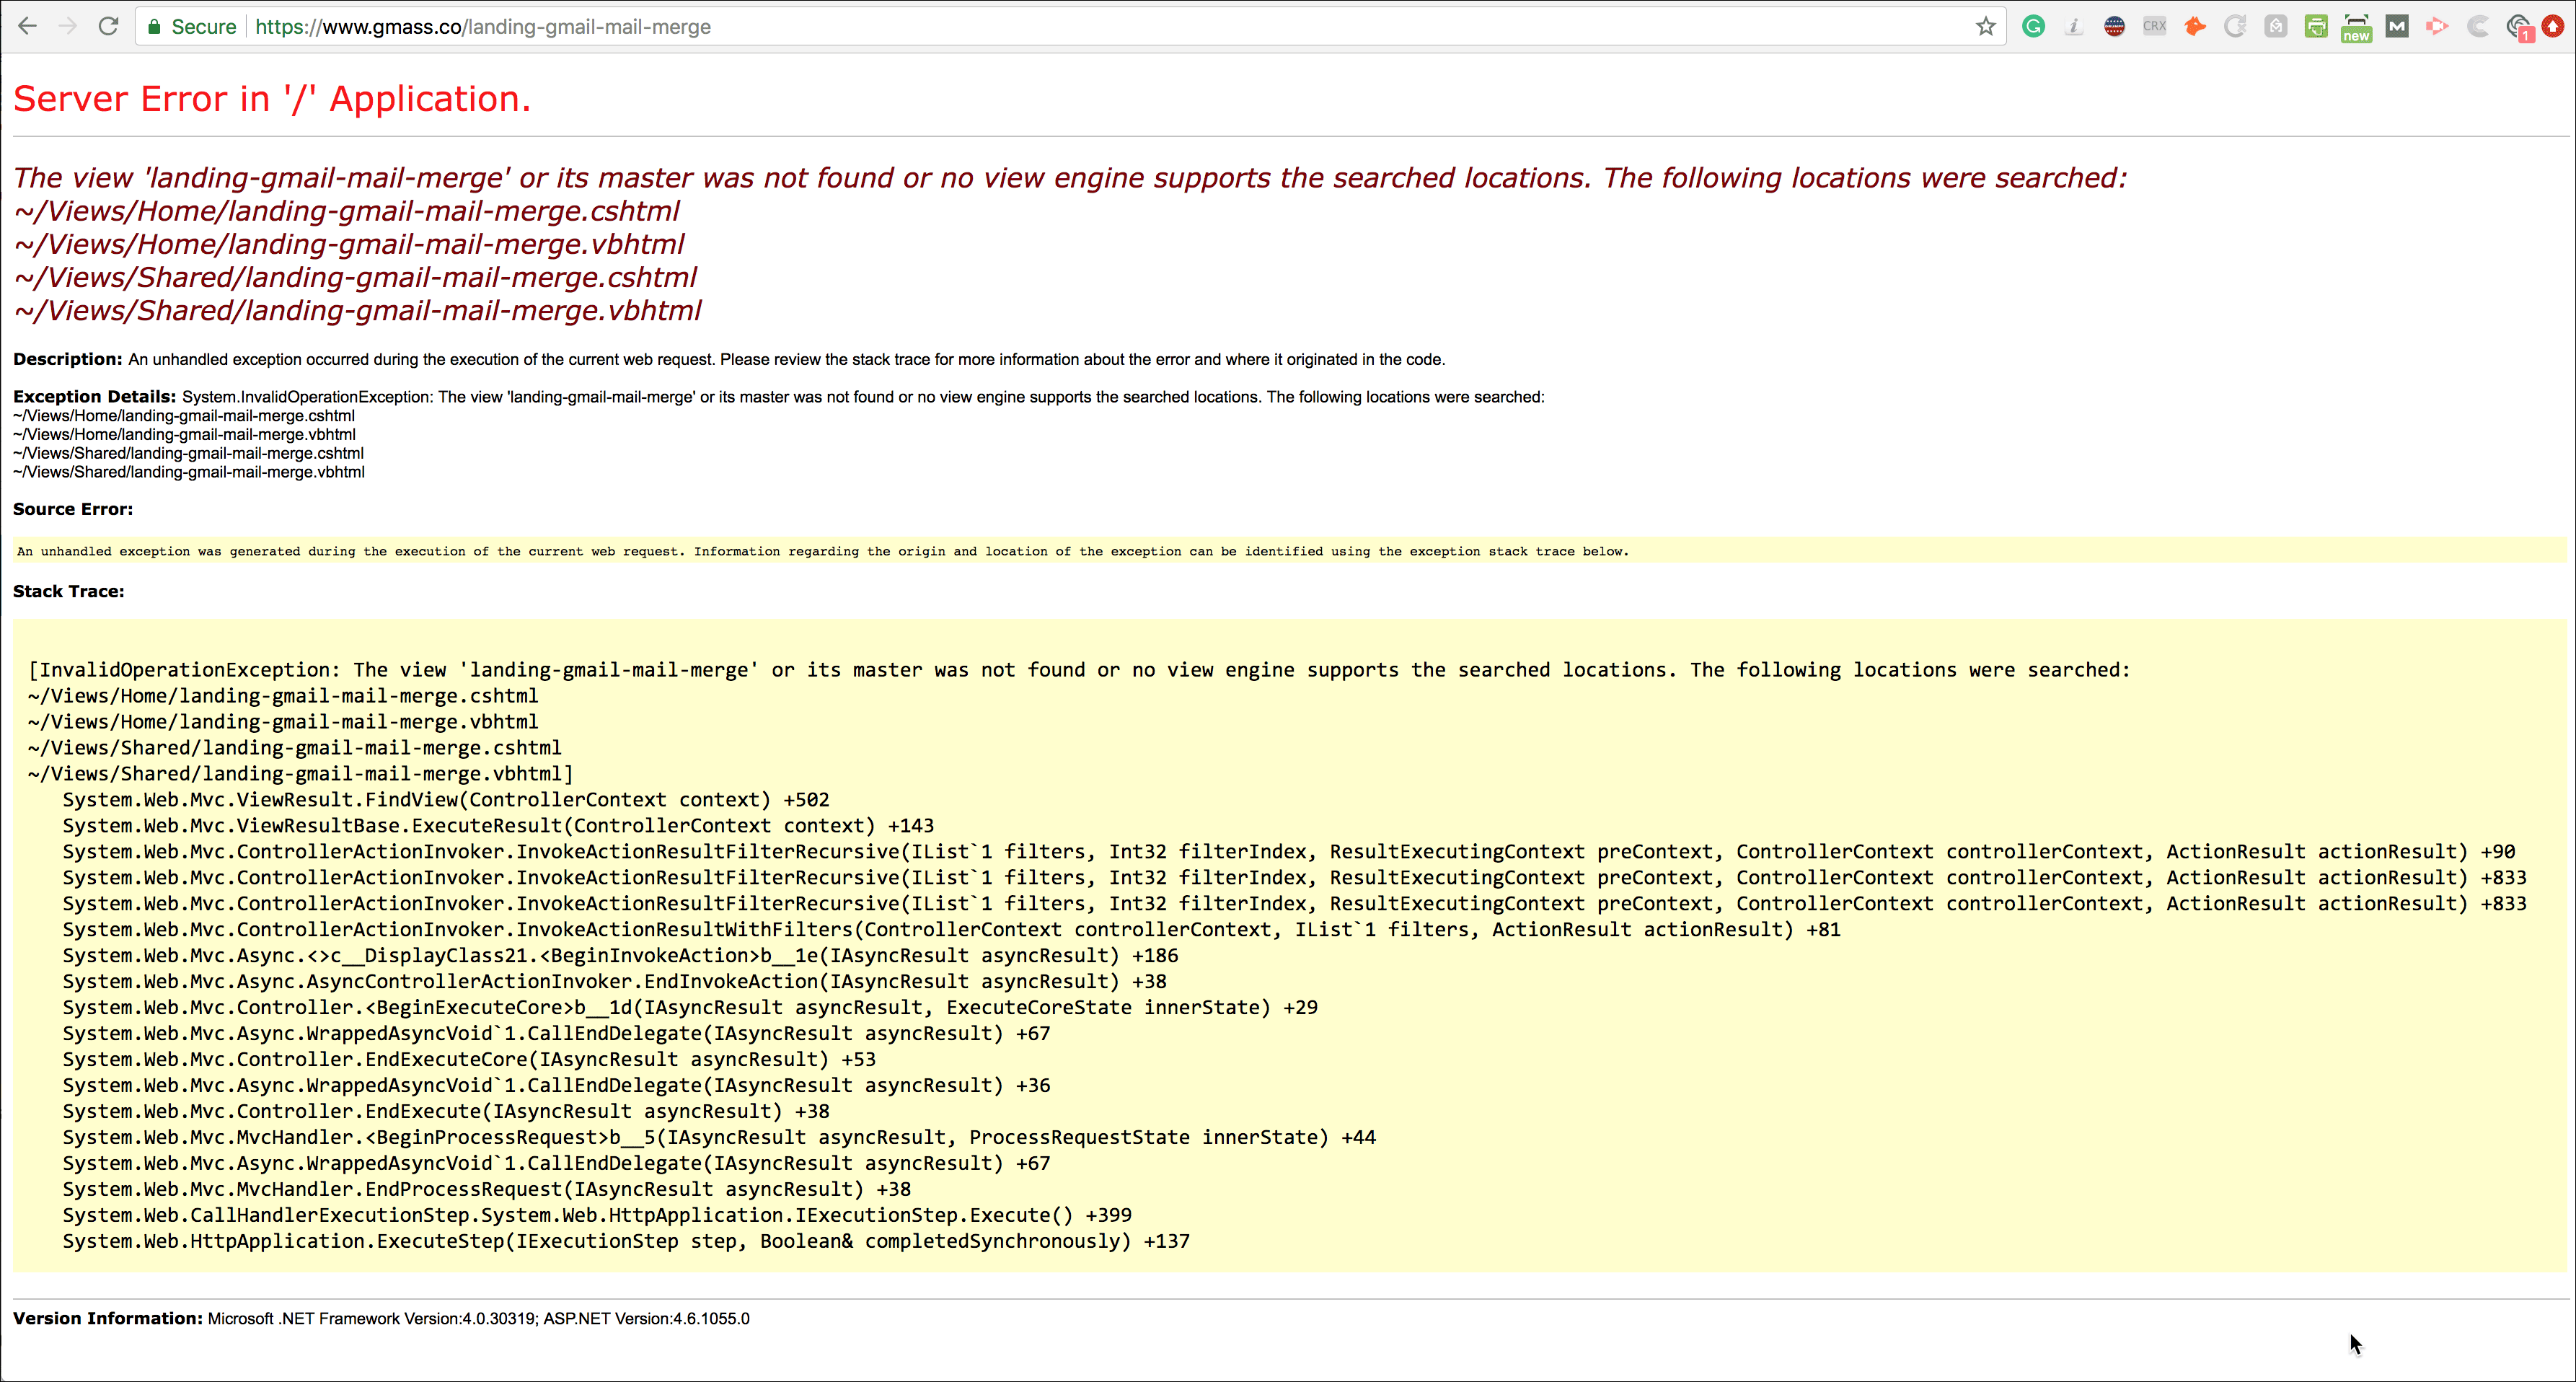
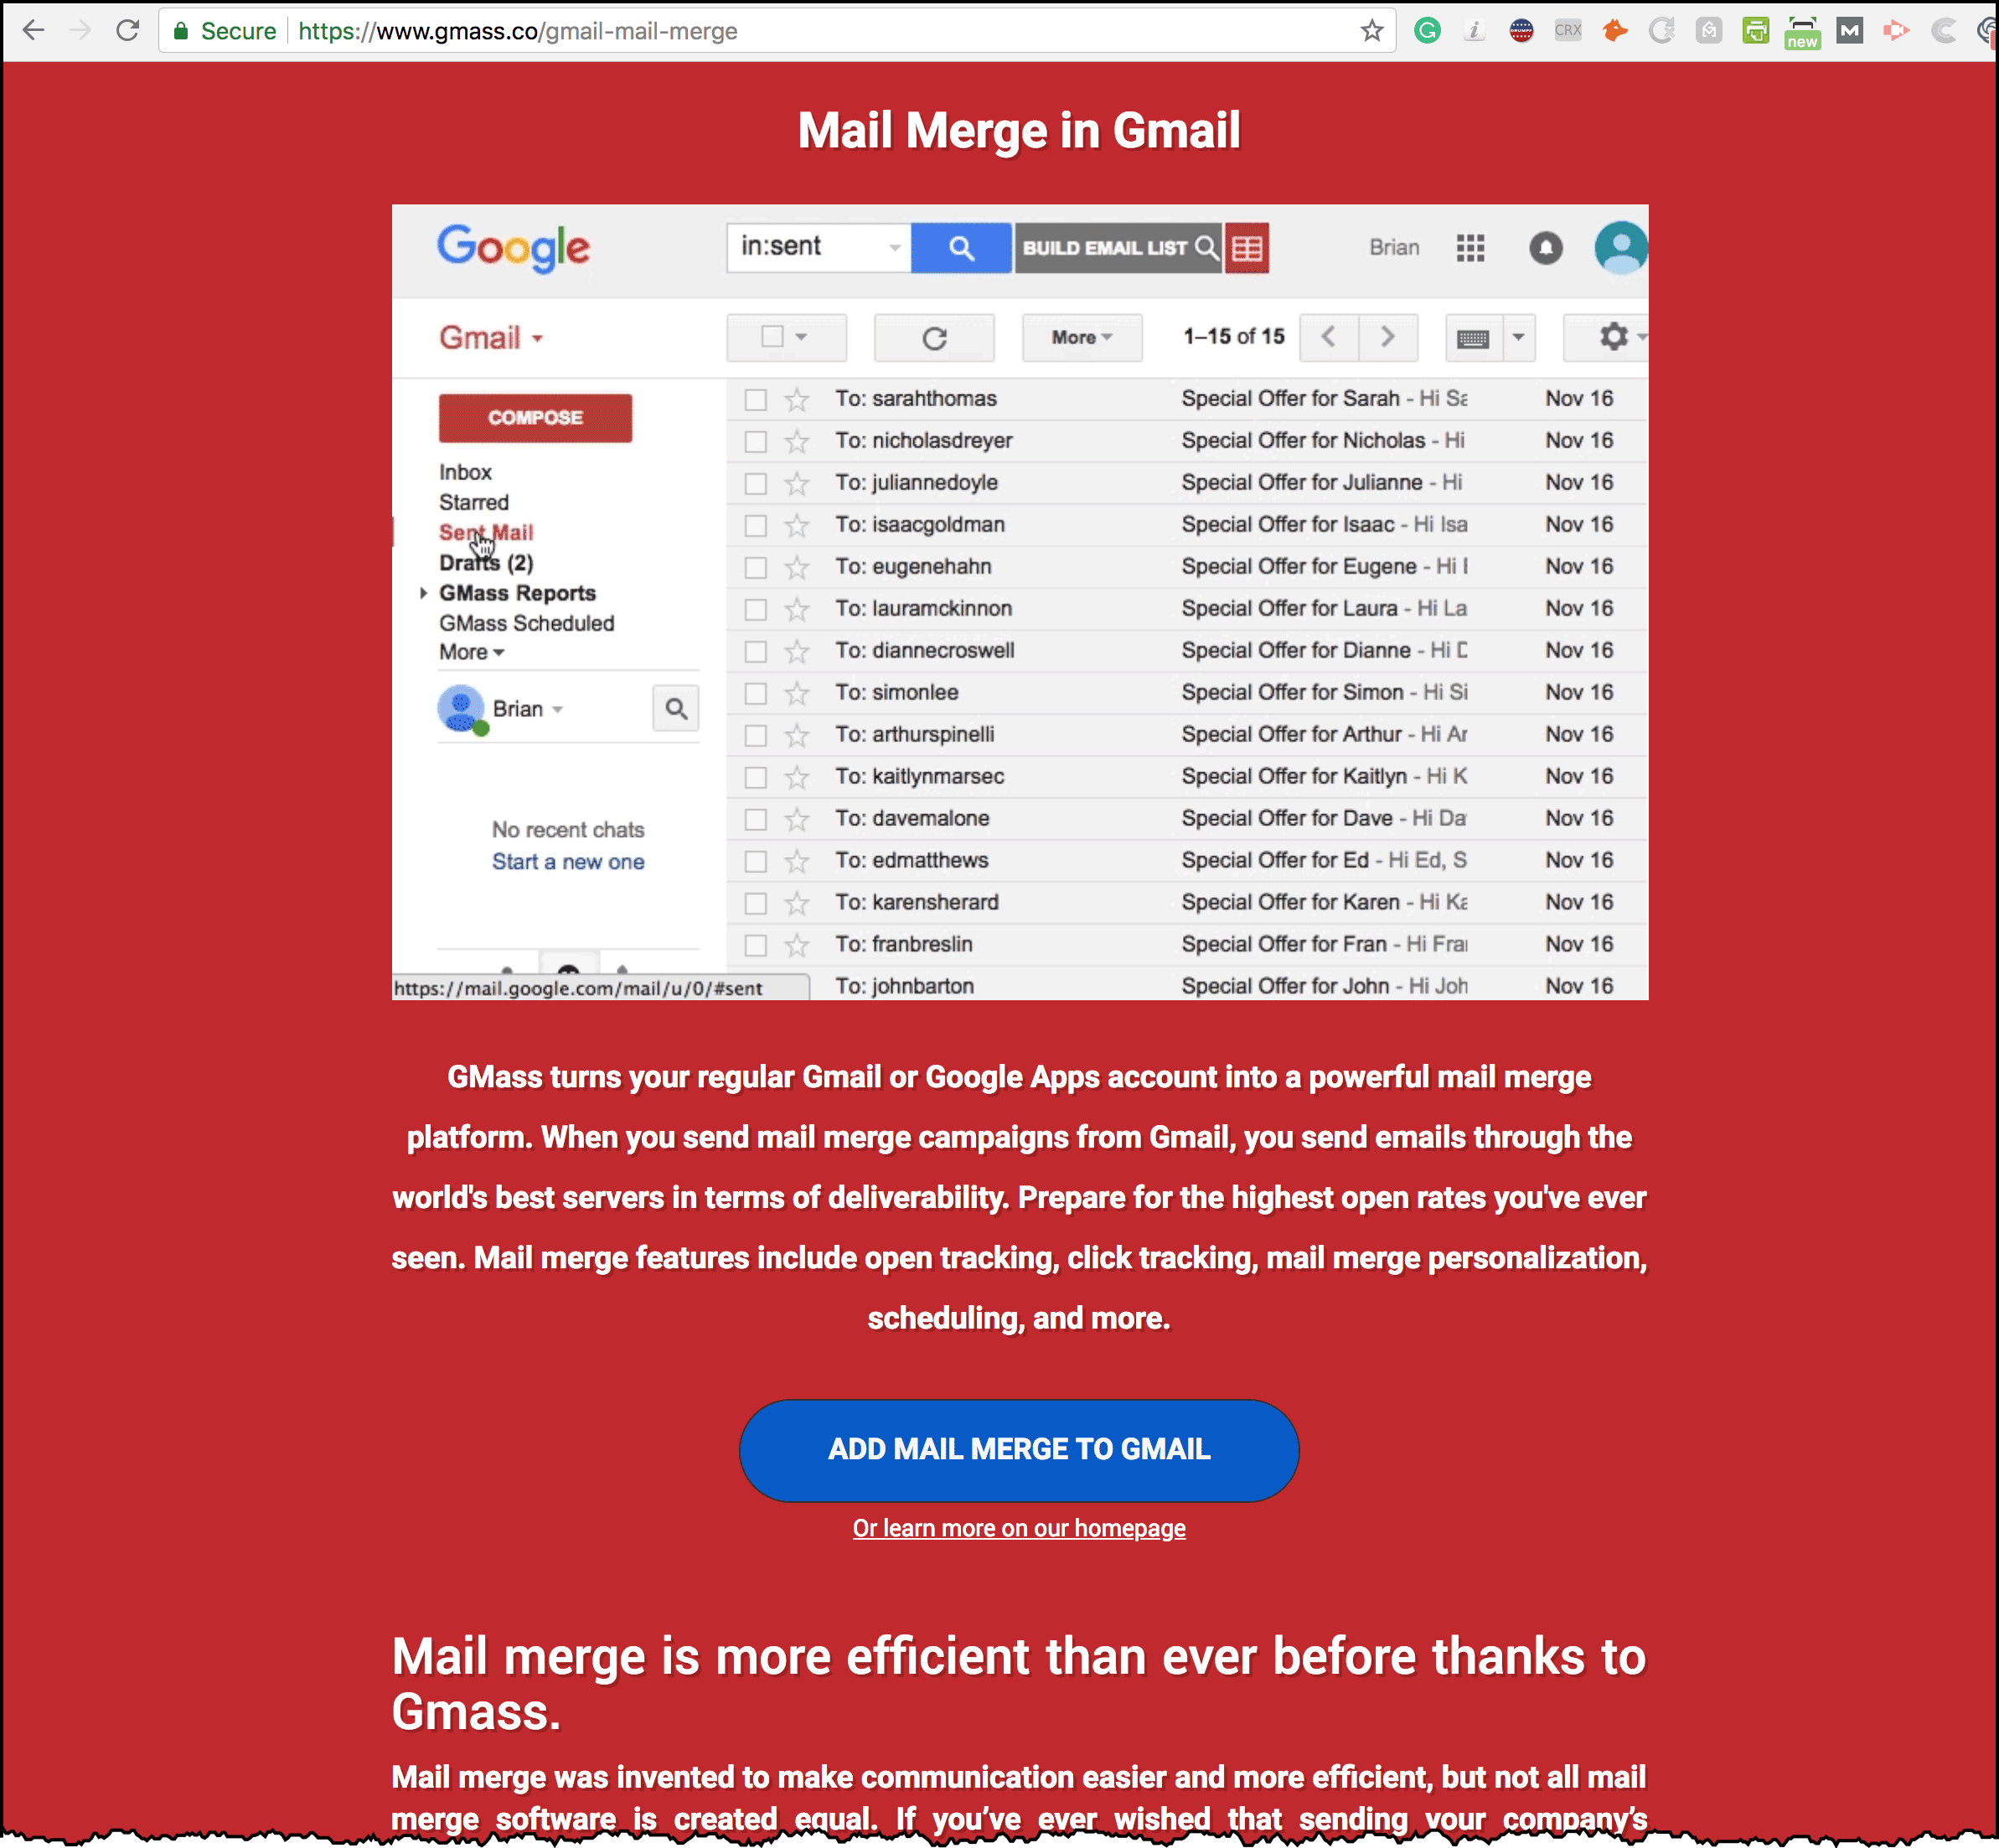
Now, we’re ready to create a test page in WordPress that should be accessible at the URL https://www.gmass.co/landing-gmail-mail-merge
I copy the contents of my MVC landing page into my WordPress page.
Note that this URL is different from the original URL because I want to get it working first — then I’ll change it to the actual URL, without the word “landing” in it.
Navigating to the URL of the WordPress page doesn’t work, as I would expect
Nope, doesn’t work, but that’s what I would expect. How does IIS know whether PHP or .NET should serve this URL?
The MVC Router is looking for a matching controller to route the request to but doesn’t find one. I need to get PHP to process this request, not MVC.
I’ll do that by adding an IIS URL Rewrite Rule. If you don’t have the IIS Rewrite module installed yet, that’s your first step. I won’t explain how to do it here, but it’s pretty easy if you Google it. Hint: Use the Web Platform Installer.
Once the module is installed, there are two ways to manage your IIS URL Rewrite Rules: do it through the interface in IIS, or just edit the web.config file manually.
I prefer editing the web.config file manually because it’s faster for me.
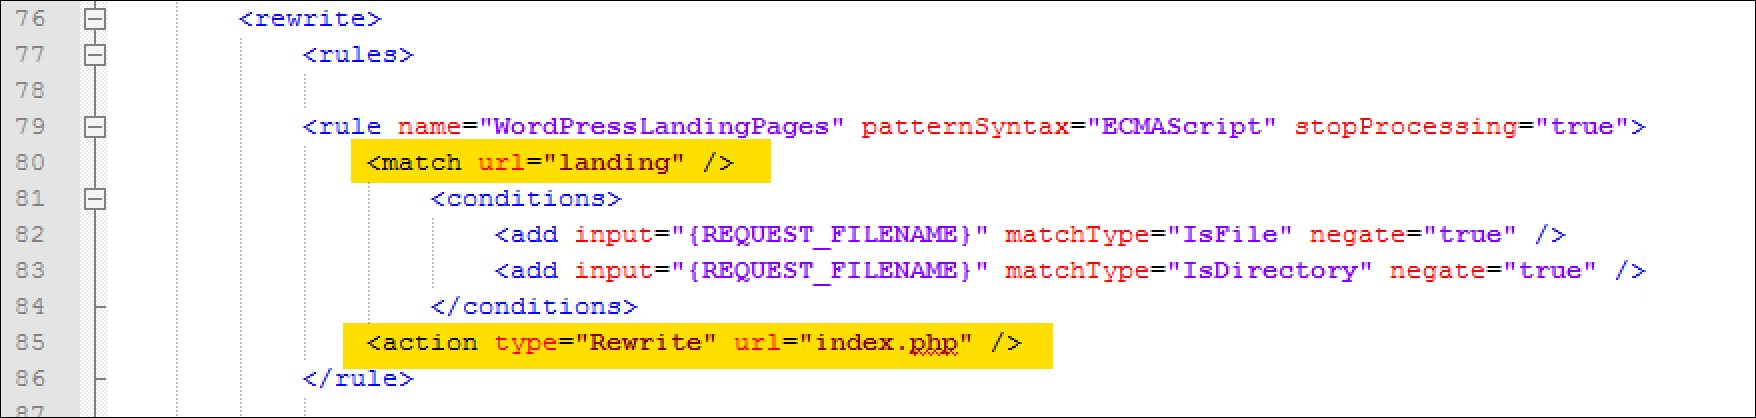
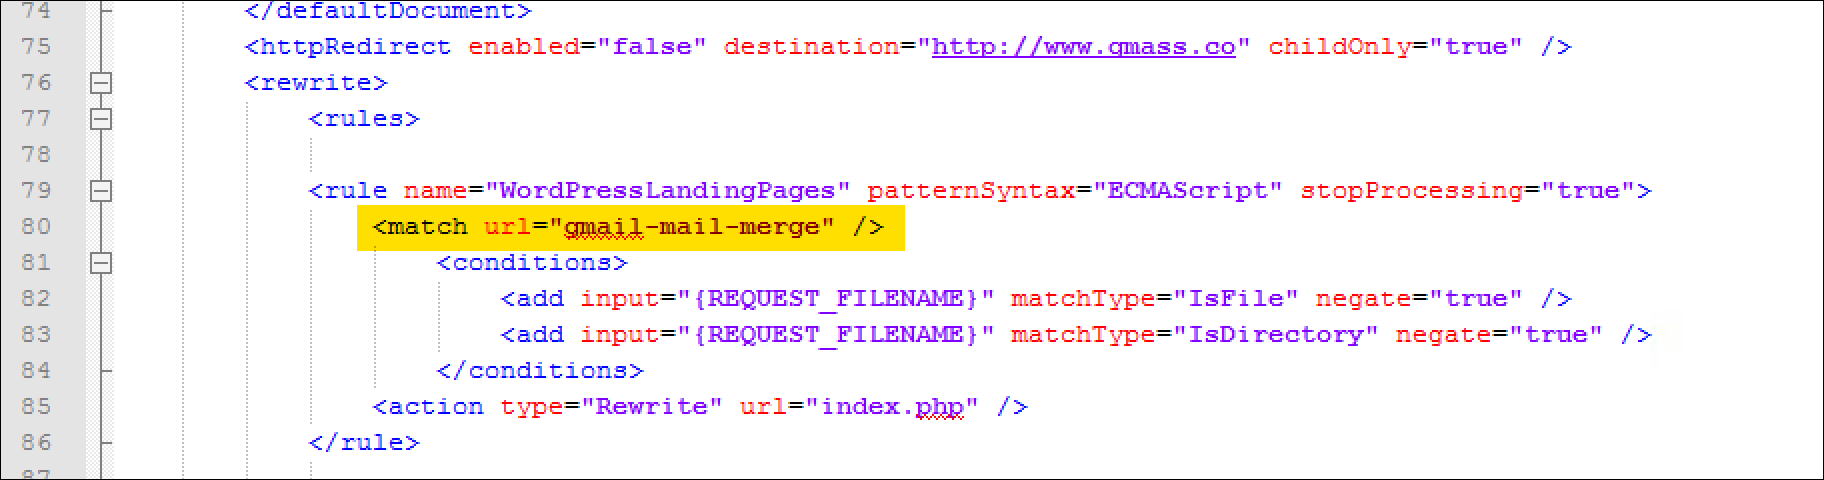
Here’s what I need to add to web.config so that the https://www.gmass.co/landing-gmail-mail-merge page works:
Setting a URL Rewrite rule in web.config is necessary for the WordPress pages to be served.
In English, this URL Rewrite rule says that if the URL contains the string “landing”, route the request to index.php instead of MVC. The “rewrite” to index.php is at the core of how WordPress works on IIS. Meaning, if you have your entire blog running on WordPress on IIS in a separate /blog folder, you’ll see a similar entry in the web.config under the /blog folder.
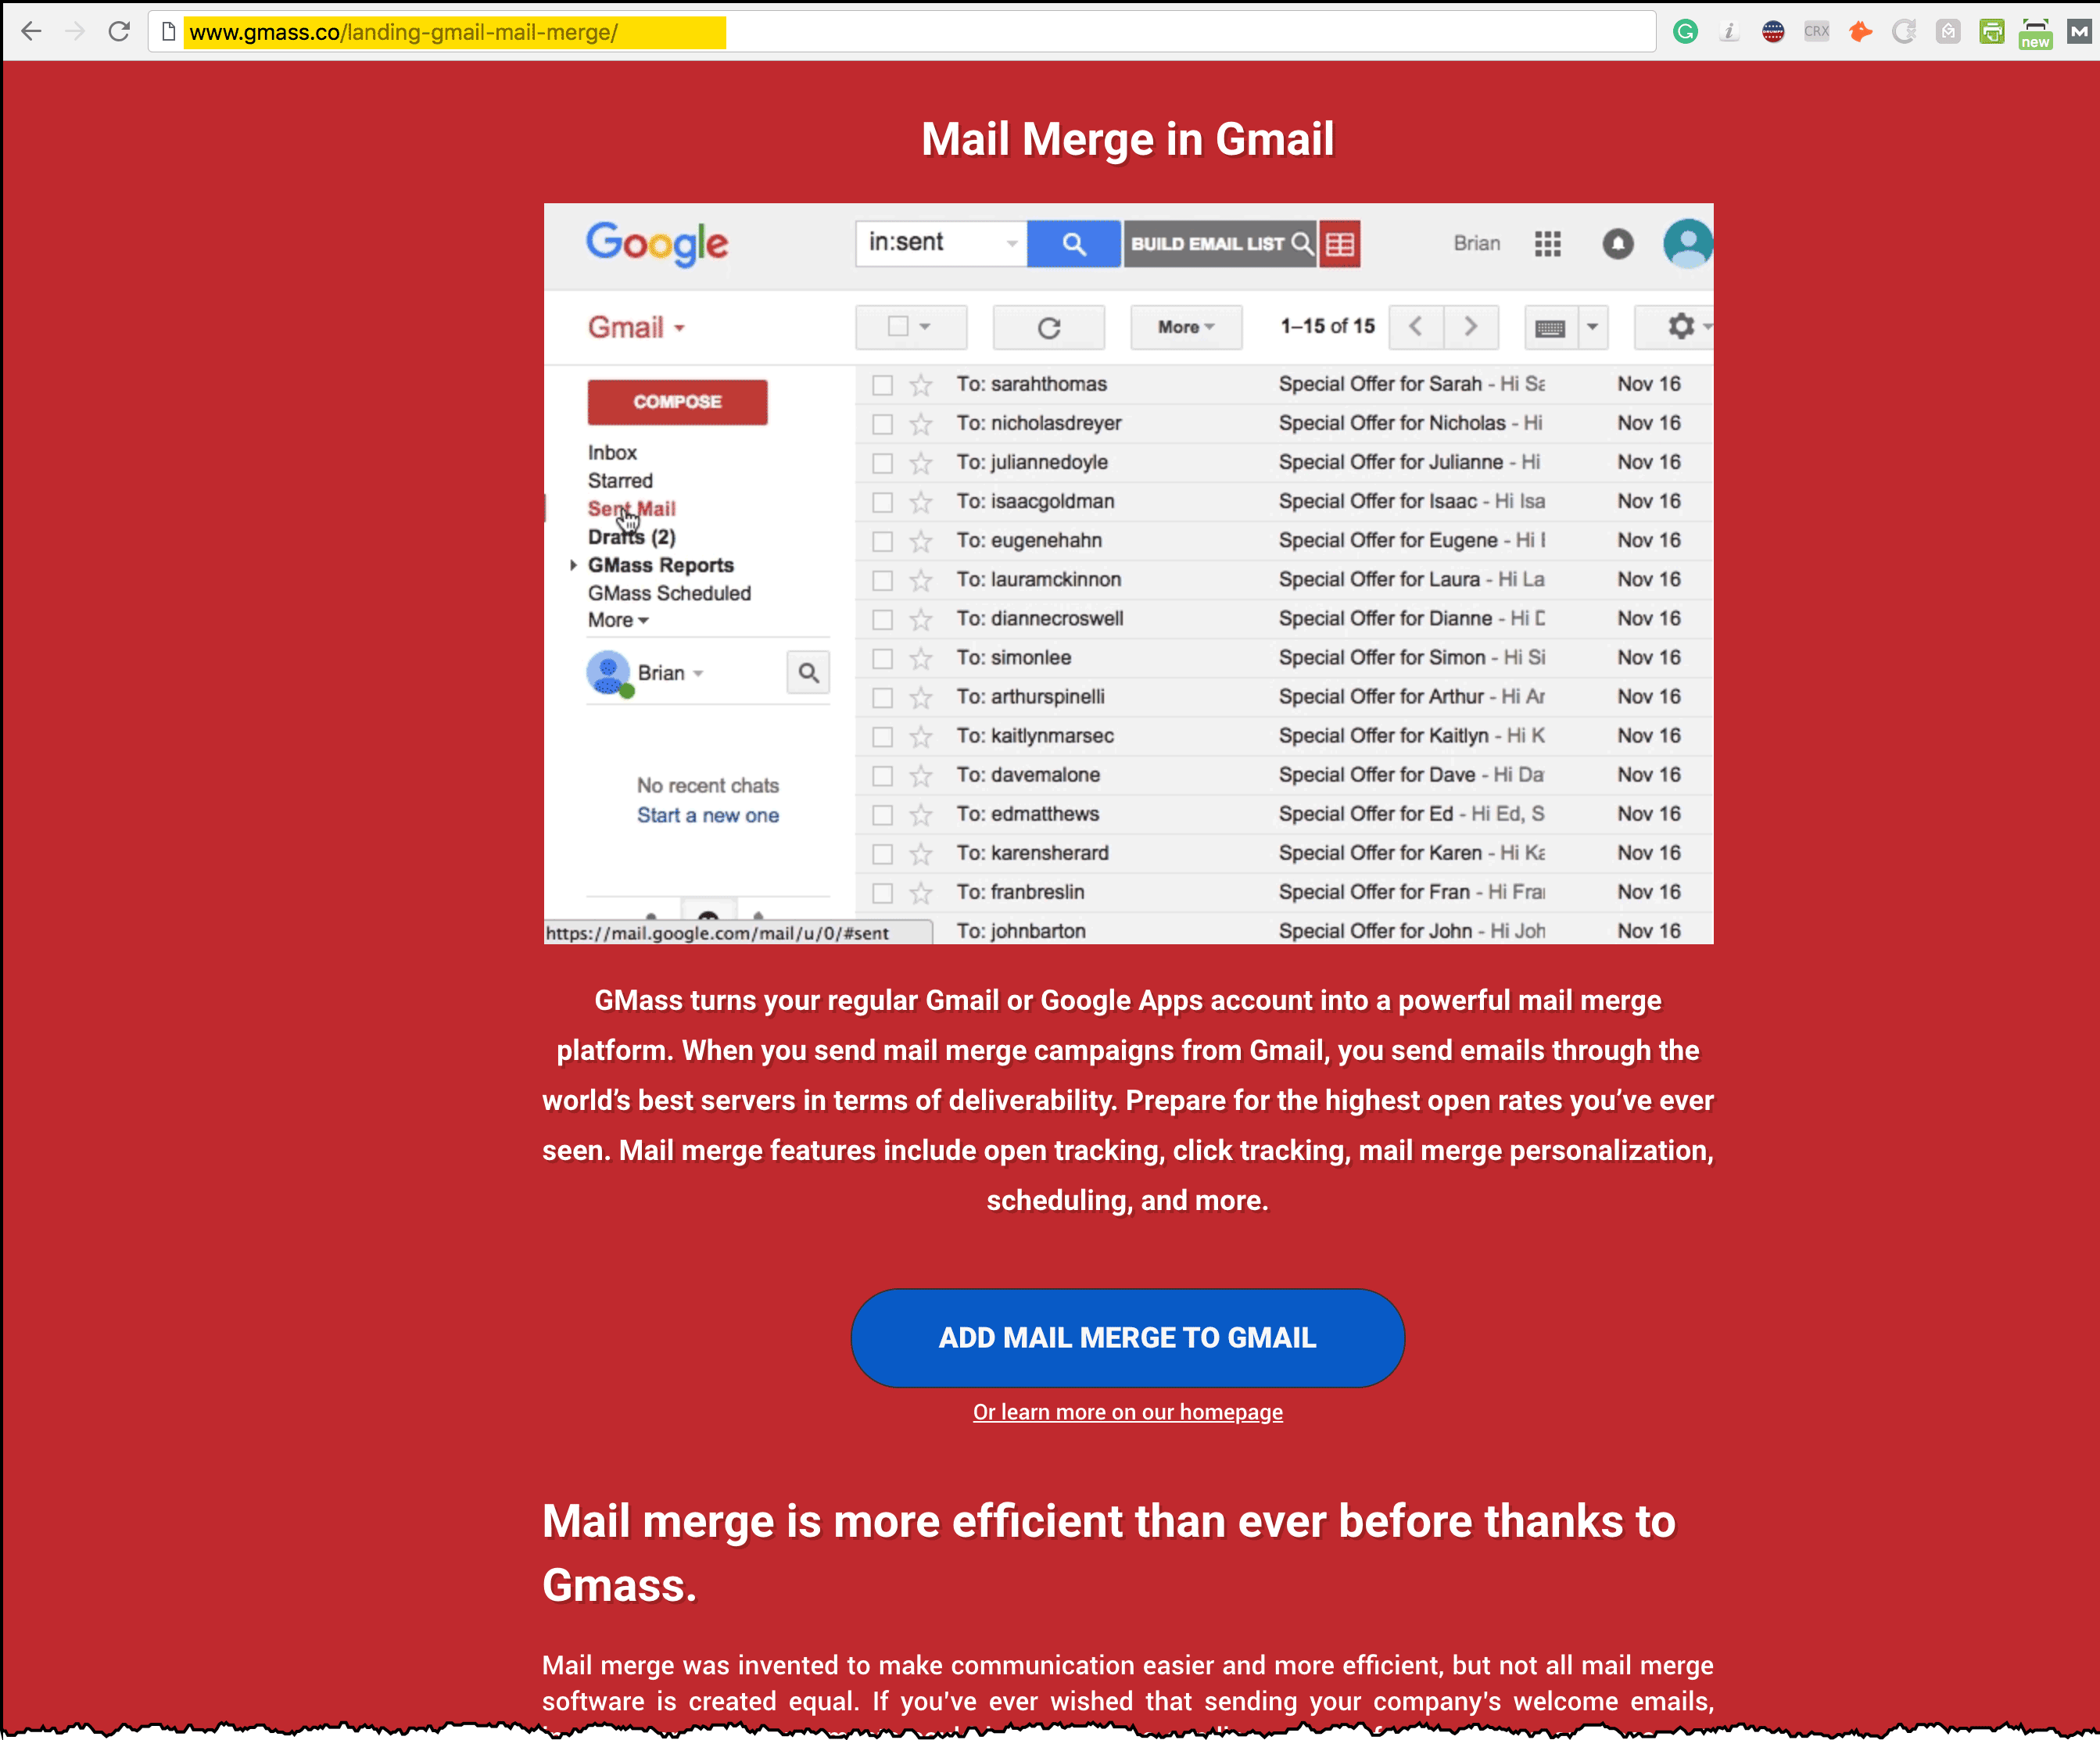
Now, the setup works, but my landing pages look ugly. It doesn’t match the red background and text styles of my existing MVC page. This is where I hand-off the project to a WordPress expert who can appropriately style my landing pages to match the look of the .NET versions of the landing pages. A WordPress expert created a custom theme for my landing pages that matches the look and feel of the existing MVC landing pages.
Great, now my test landing page is working. I can also create as many “Pages” as I want in WordPress, and as long as they contain the word “landing” in the URL, they will work.
Now the WordPress landing page is working.
But remember, I want to migrate my landing pages to WordPress and keep the URLs the same, so I don’t lose any SEO juice.
I could make things easier on myself if I decided that changing the URLs is acceptible that all my WordPress pages will have URLs containing the word “landing”. Then I can use the one rule I added to web.config. But for now, I don’t want to do that.
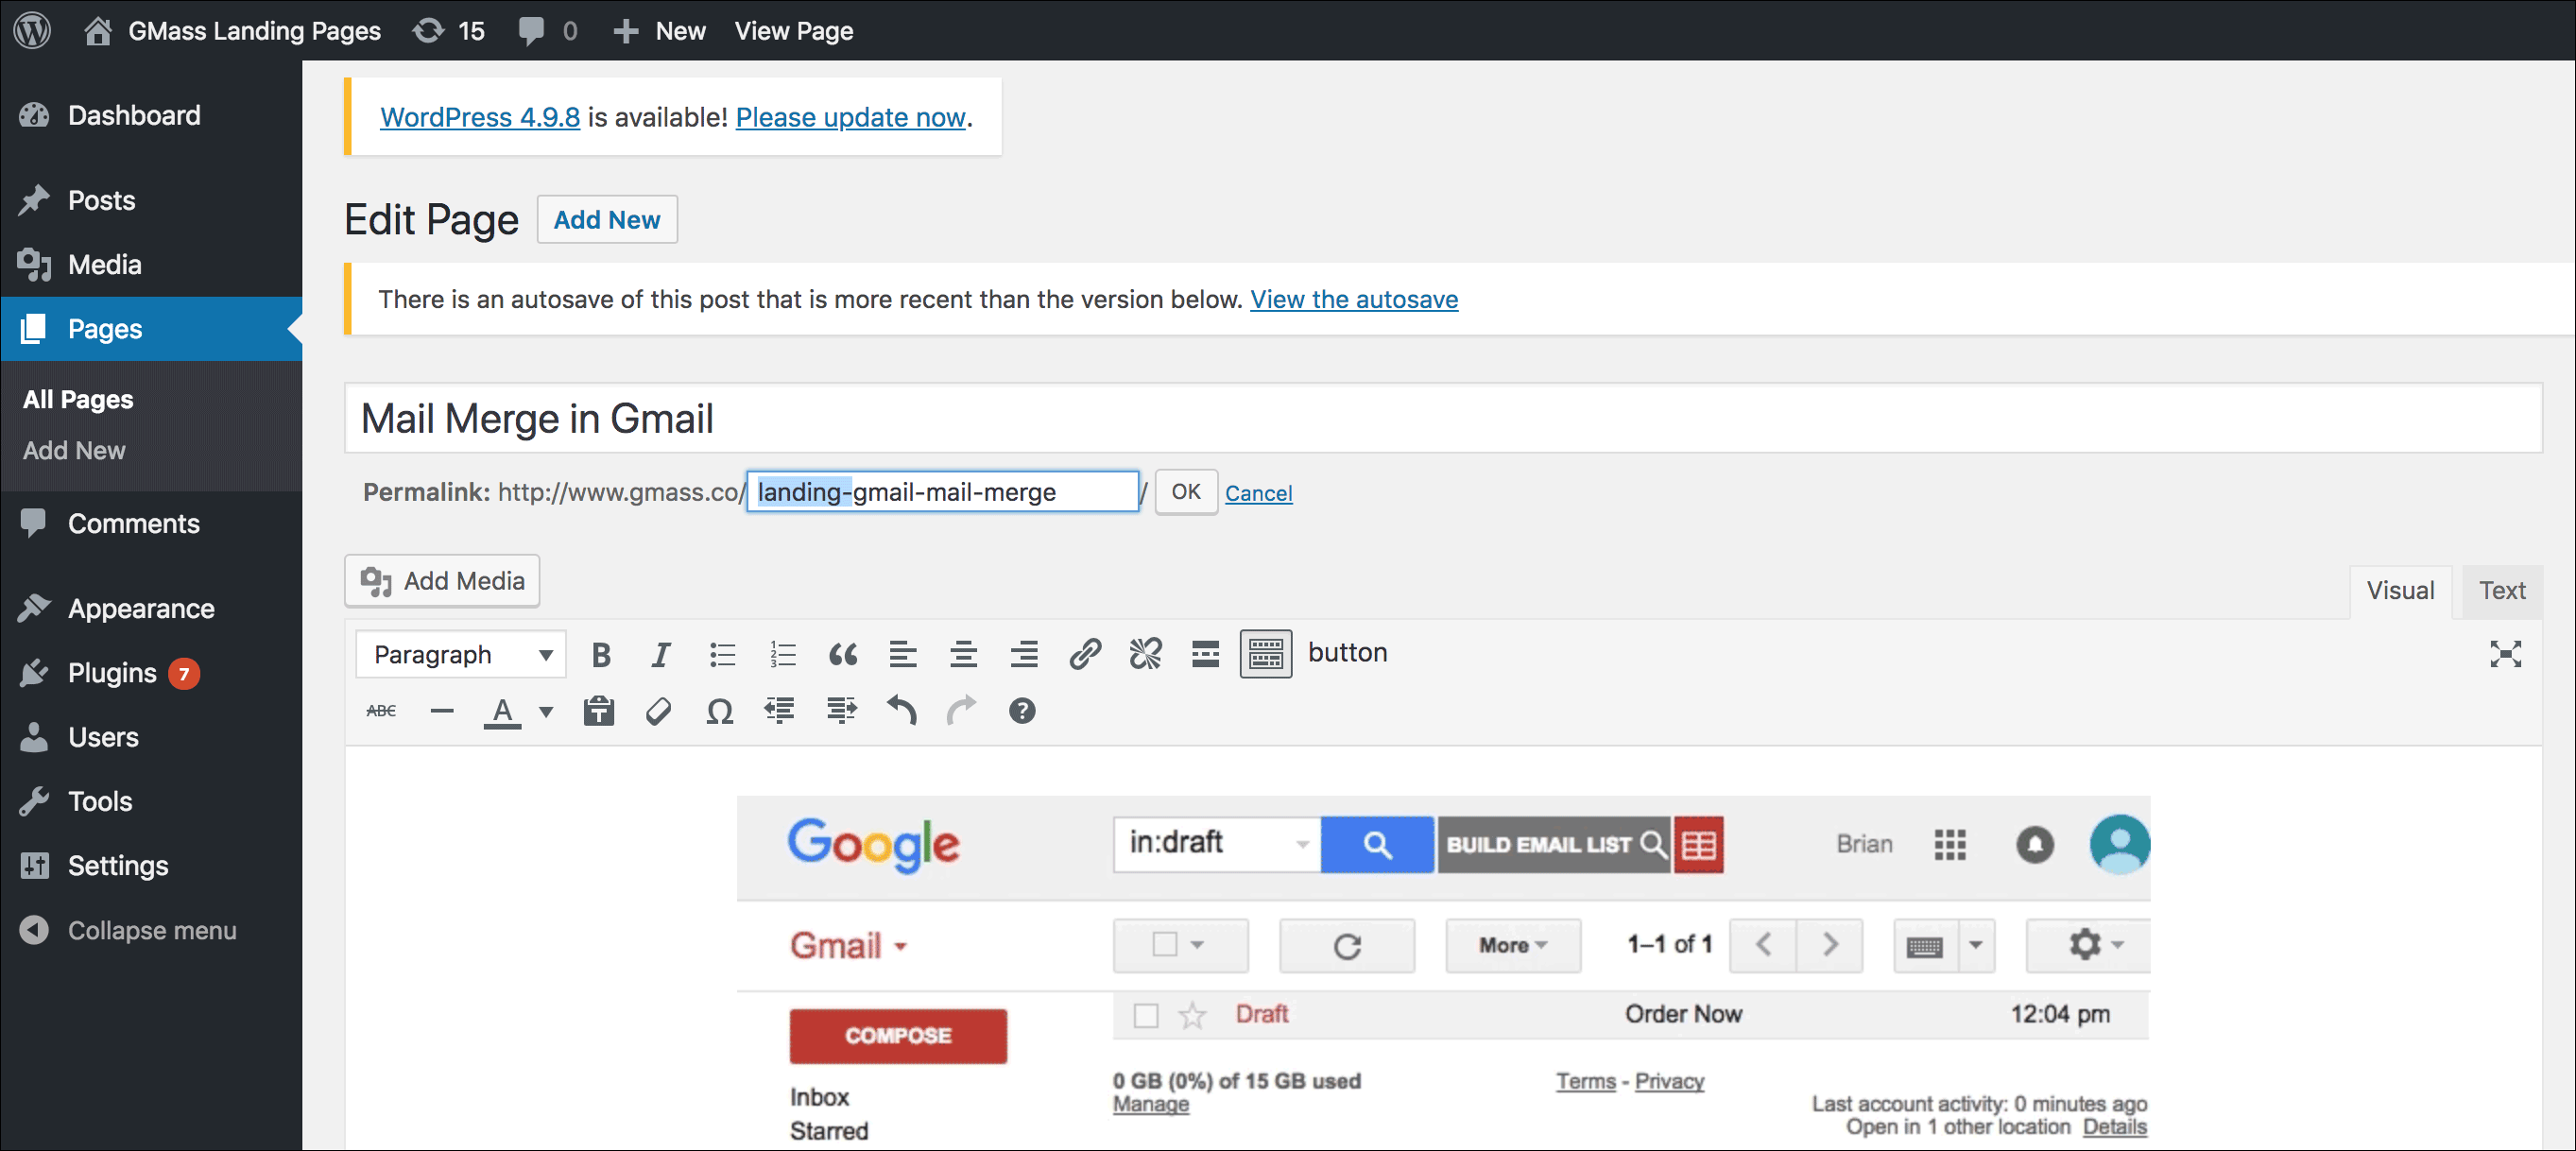
First, I’m going to edit the URL in WordPress and remove the “landing” portion of the URL.
I’m removing the “landing-” portion from the Permalink in WordPress.
Now all I have to do is add an entry in web.config for this specific page, so that it’s served by WordPress and not .NET. I’m going to remove the first rule I put in that was based on the string “landing” and replace it with this rule, that will handle this one specific landing page.
Since I want to keep the URLs of the landing pages the same in the move from MVC to WordPress, I will create a separate rule for each landing page.
And voila! The final page, using the same URL, is now being served by WordPress and not ASP.NET.
And that’s it! This page is now being served from WordPress instead of .NET MVC.
If my landing page URLs don’t follow any specific pattern or have a string in common, then I’ll have to create a Rewrite rule for each landing page, but that’s a simple task, and the benefit of manaing my landing pages in WordPress far outweighs the inconvenience of having to add Rewrite rules to my web.config file.
Step 4: Celebrate!
Check it out! So now, my WordPress pages work and are served by WordPress:
and both are in the same root level folder of my IIS installation.
Bonus: how do you know whether MVC or WordPress is serving a particular page?
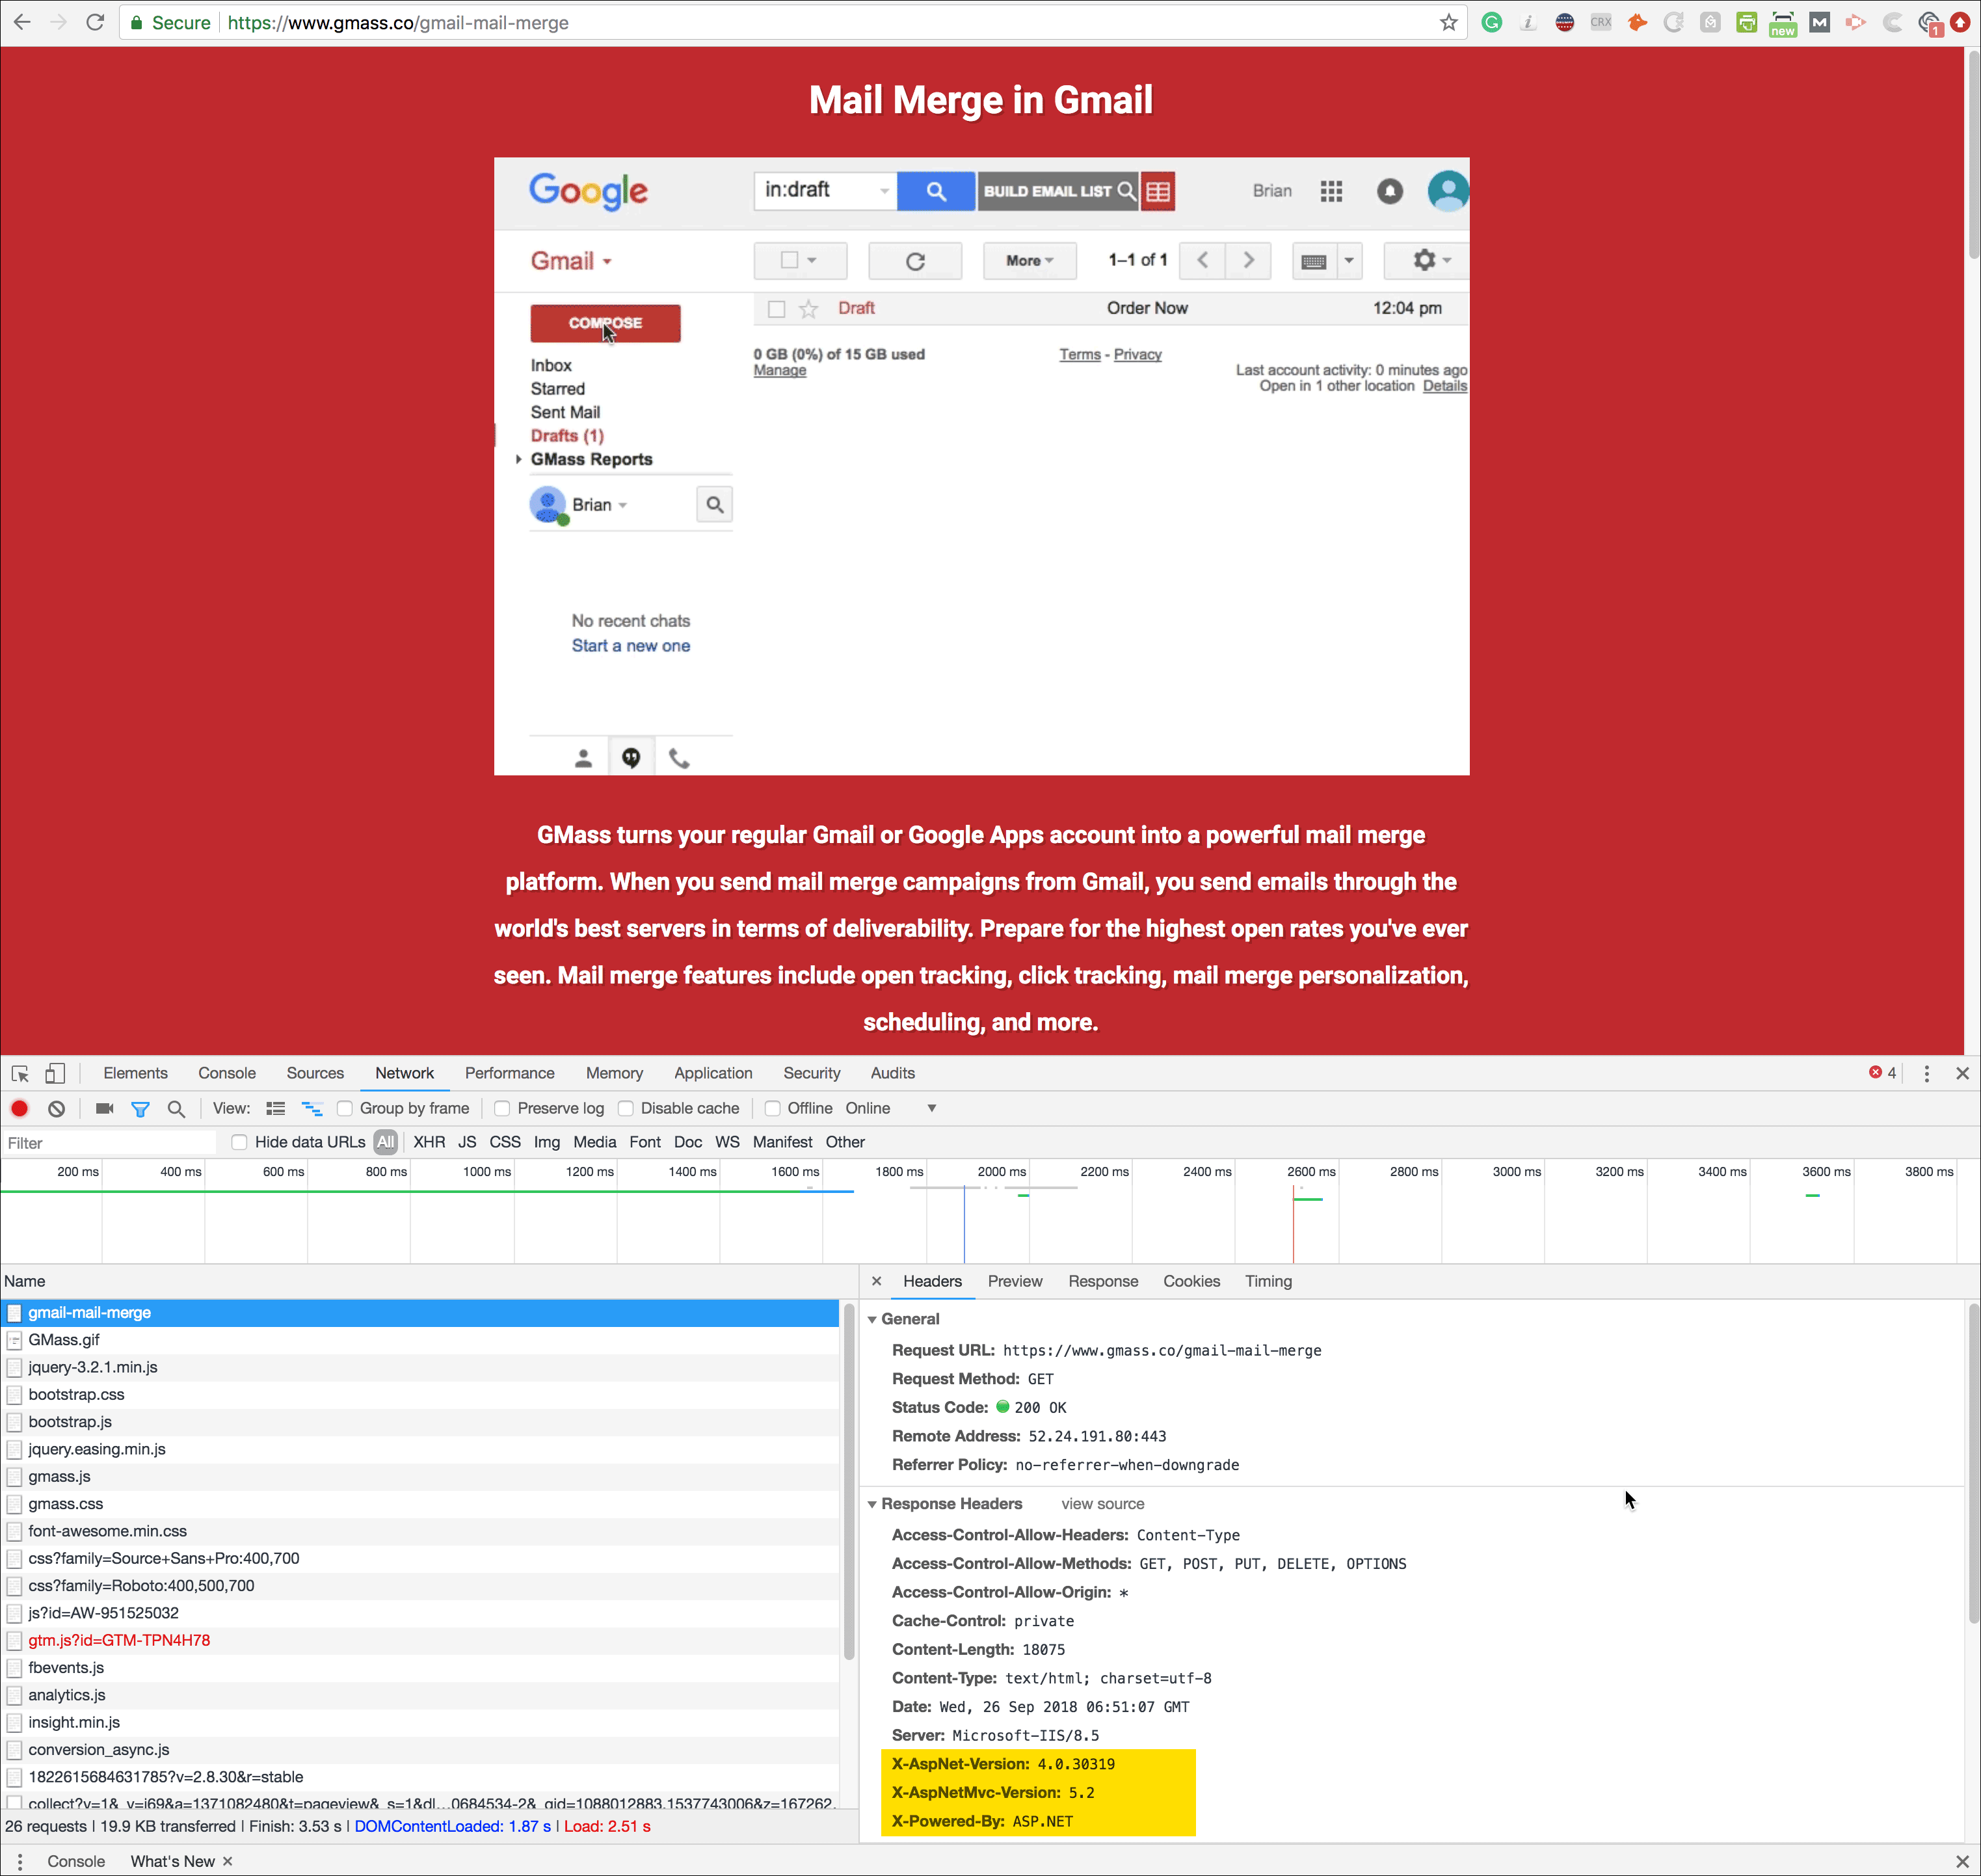
Everything might be working, but you might want to be certain that WordPress is serving a page and not MVC. Of course, you could make a simple edit to the page in WordPress and then just reload it in the browser, but it’s easy to tell using Chrome’s Developer Tools. Just right click the page, choose Inspect, and then navigate to the Network tab, and look at the Response Headers.
The original landing page, served by ASP.NET MVC.
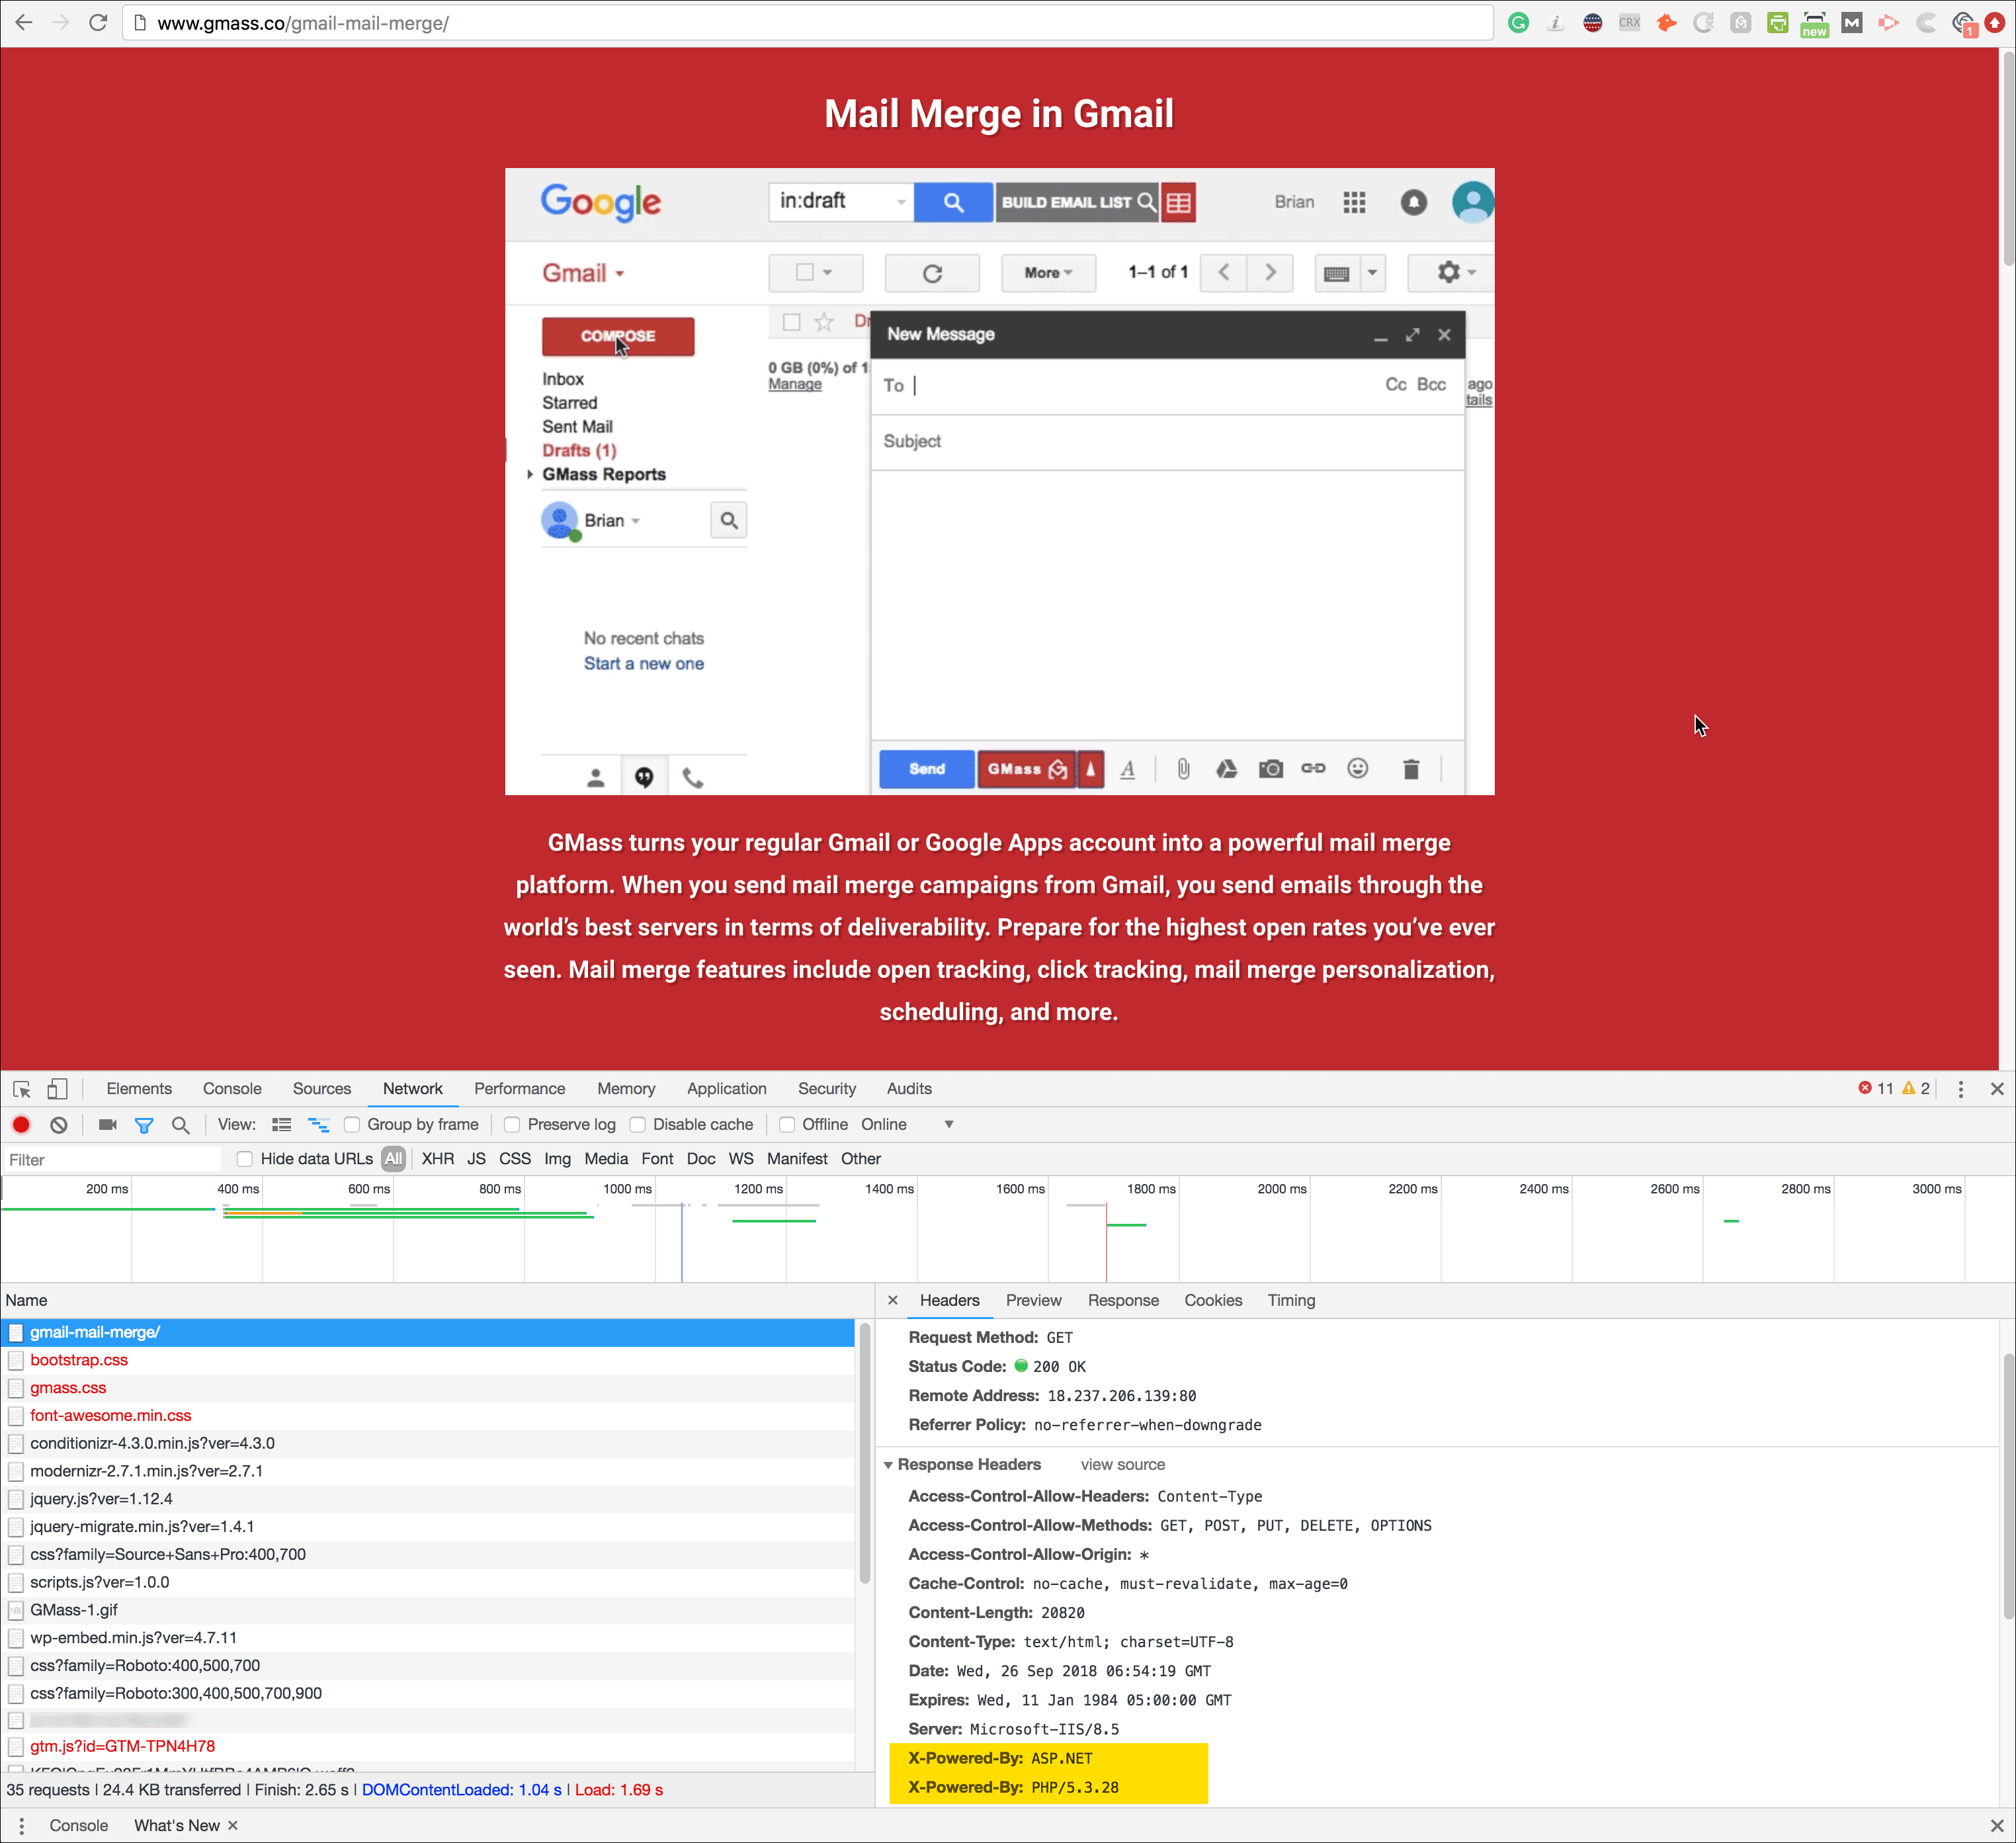
And here’s the new version of the page, served by WordPress:
The same landing page served by WordPress (PHP).
Notice the difference in the X-Powered-By response header. This headers tells you whether the page was served by PHP (meaning WordPress) or by MVC.
Email marketing, cold email, and mail merge inside Gmail
Send incredible emails & automations and avoid the spam folder — all in one powerful but easy-to-learn tool
Love what you're reading? Get the latest email strategy and tips & stay in touch.
When you start sending mass emails from your Gmail account, you’ll have many more emails filed in your Sent Mail folder than you’re used to. For users who are inexperienced with narrowing Gmail’s search results, having many additional emails in the Sent Mail folder can feel overwhelming. Google has published an extensive guide to all of Gmail’s search features, but this guide teaches you how to search specifically when you’re sending campaigns with GMass.
So today I’m going to show you how to search your Gmail account for sent messages like a boss, neatly sidestepping the great mass of GMass-generated emails and zeroing in on just what you want. The Sent Mail folder really shouldn’t be something one “browses” anyway, but should be seen merely as a record of what you have sent. So, I hope this post is helpful on your way to being both a Gmail and GMass search expert.
Example 1: Filtering out a GMass campaign from the Sent Mail folder
Let’s imagine you’ve recently sent out amail merge campaign with an email that has a Subject line of “Sale this weekend”–and you’ve sent it to 10,000 people. Due to this, you’re now going to have a copy of each of those 10,000 emails in your Sent Mail folder. But if you want to see everything you’ve sent except for your campaign, you can filter all of them out of your results with this simple line in the Gmail Search bar:
in:sent -subject:"Sale this weekend"
Like this:
That line is part of the syntax of Gmail’s filtering, and it tells Gmail to search for everything in your Sent Mail folder that has a Subject line that is not “Sale this weekend”. The key to this is that minus sign right before the word “subject”. Minus signs in Gmail (and in Google searches, as well) tell the search engine to leave out that search term.
Example 2: Did that person get my email?
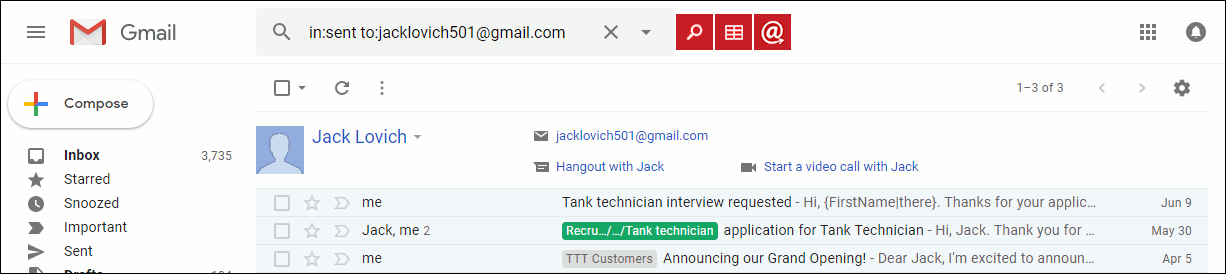
If you want proof that a campaign was sent to a particular person, you would use this search:
in:sent to:email@domain.com
For example, this search, followed by clicking the magnifying glass to the left of the search field, produced these three emails sent to Jack Lovich:
A search for emails sent to a particular recipient.
Example 3: Did that person open or click my email?
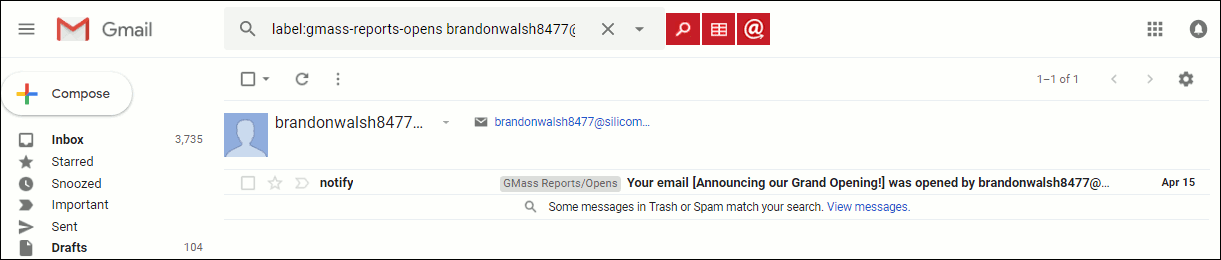
Because GMass writes all open/click events to the GMass Reports–>Opens and GMass Reports–>Clicks Labels folder, if you quickly want to see if somebody opened or clicked an email campaign, you can use this sort of search criteria:
label:gmass-reports-opens email@domain.com
Like so, using a person’s actual email address:
A search for occasions when a particular user opened a GMass email campaign.
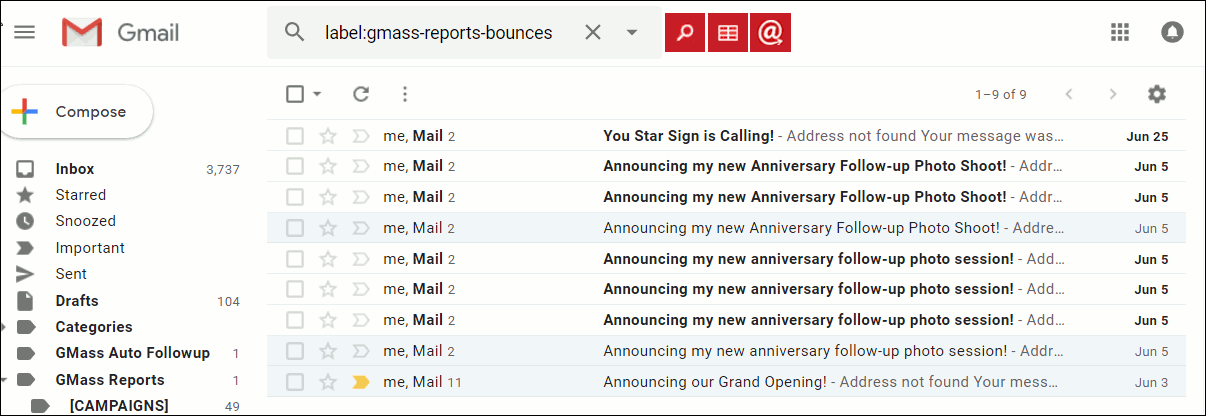
Example 4: Did my email to that person bounce?
With GMass, it is useful to occasionally check your bounced emails Label to see which emails that you sent through a GMass campaign did not actually make it to their intended recipients–that is, they “bounced”.
Use this search query:
label:gmass-reports-bounces
This will bring up all the bounced emails:
Showing a search to display all bounced emails.
Checking your bounced emails is important in carrying out GMass campaigns, because this will let you know who didn’t get an email that you expected should have. When that occurs and isn’t caught by you, that’s a wasted opportunity for a sale or notification!
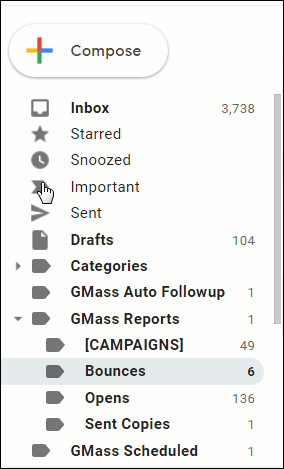
Another way to see this “folder” (it’s really a Gmail Label) is to, of course, click on the Bounces Label on the left side of your Gmail screen:
The GMass Bounces label (highlighted)
And, of course, you can click on any of those Labels and see which emails are filed there, such as “Opens” or “GMass Auto Followup”. The nice thing about searching in the search bar, though, is you can create arbitrarily complex searches. For example, you could choose to search for any emails that fulfill all of these criteria:
To a certain set of recipients.
The emails bounced.
With a certain subject keyword.
During a particular date range.
The search query you would use for that kind of complex search might look like this:
label:gmass-reports-bounces to:
(jacklovich501@gmail.com,  brandonwalsh8477@silicomm.com)
 subject:("Follow up") after:2018/4/1 before:2018/6/2
Example 5: Searching for a particular campaign’s report
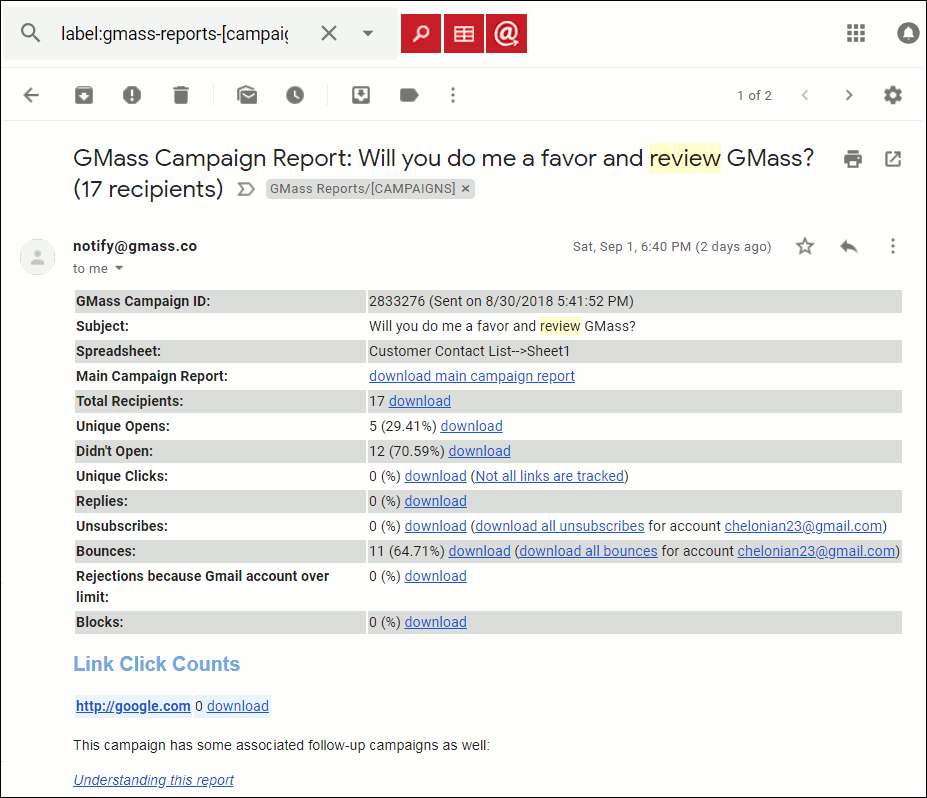
What if you sent a campaign in the past and you would like to find it, and you know there was a particular word in the Subject line? That’s also easy to search for in GMass.
And the result would bring up any campaign with the word “review” in the Subject line:
The searched-for campaign is found by a keyword.
Now, if we click on the GMass Campaign Report, you can easily see information about that campaign:
The GMass campaign report from the searched-for campaign.
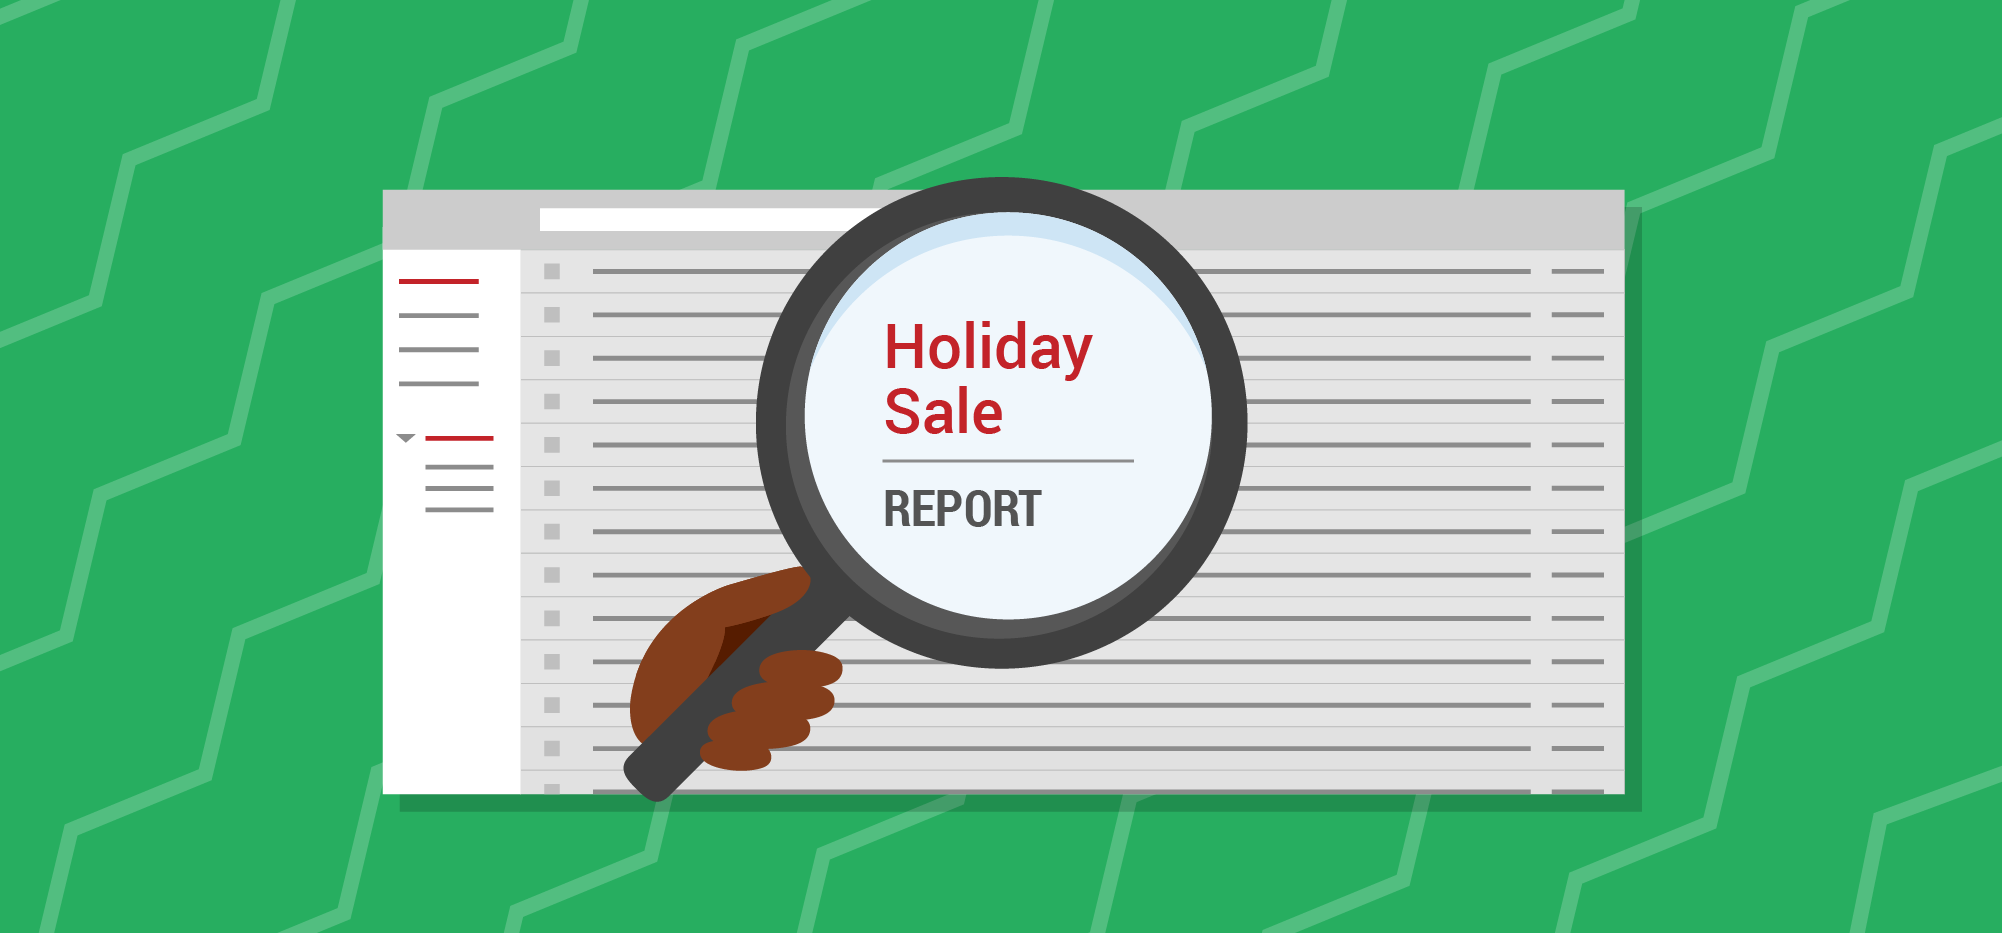
You can see how this type of search is a fast way to go from one word to a nice report about how any campaign(s) associated with that keyword is doing. This eliminates a lot of overhead in tracking your success. For example, you could make a point to use Subject lines that serve as useful keywords, such as:
Spring, Summer, Fall, Winter for seasonal sales.
Version numbers of new versions of software.
Magazine or other journal issue names.
Book titles (if you are an author with multiple titles, or a publisher)
The names of memorable holiday-associated sales, such as “Columbus Day Sale”, “St. Patrick’s Day Sale” and so forth.
As you can tell, GMass makes extensive use of Labels. Labels are where everything related to GMass is stored, from your scheduled campaigns, to your individually sent emails, to your reports, to your open and click notifications. If you’re interested in learning more about the Labels specific to GMass, see this guide to the Gmail Labels used by GMass.
Email marketing, cold email, and mail merge inside Gmail
Send incredible emails & automations and avoid the spam folder — all in one powerful but easy-to-learn tool
Love what you're reading? Get the latest email strategy and tips & stay in touch.
Customer reviews are essential to a product’s rankings, but it’s not always easy to get the quantity of reviews you want. The the best way to get a large number of reviews is to create an email outreach campaign to automatically ask users for a review.
Without the automated campaign I have running to get people to review my products GMass and Wordzen, I probably would have only 5% of the reviews I actually do have.
Even more importantly, GMass is ranked higher than its competitors in both the Chrome Web Store and the Gmail Add-on Storethan other products that do mail merge in Gmail–even though some competitors have a significantly larger number of users. Why do they have more users than GMass when GMass is clearly superior? That’s a story for another day, but mainly because they’re the Silicon-valley big-money venture-capital-funded TechCrunch-type of companies…and GMass is organically grown, in the midwest, and focuses solely on its product and not all that other fluff. But I digress.
The proof is in…the search results!
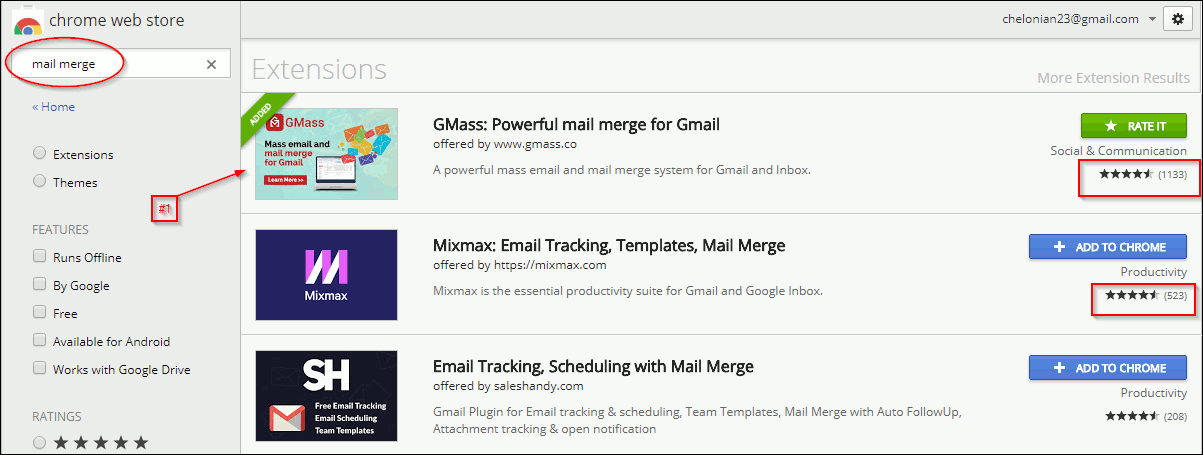
Let me prove what an obvious difference this makes. GMass is available in two places: The Chrome Web Store and the GMail Add-on Store. First, let’s examine the Chrome Web Store and see how GMass ranks for the search term “mail merge”:
Showing GMass at the #1 position for “mail merge” on the Chrome Web Store.
Notice that GMass ranks #1, and it has 1,133 reviews, and the #2 product, M*xmax, has only 523 reviews. The effect of reviews is even more impressive when you consider how many users each of the two extensions has:
Number of GMass users: 63,271Number of M*xmax users: 93,732
Wow! Even though M*xmax has almost 50% more users than GMass, GMass is ranked higher because it has more than twice the number of reviews, and better ones to boot.
Now let’s apply the same analysis to the Gmail Add-on Store (aka the G Suite Marketplace). The Marketplace offers about 60 apps. Where is GMass on that list? Let’s take a look at the first page:
GMass at the #13 position of 60 apps in the Gmail Add-on store.
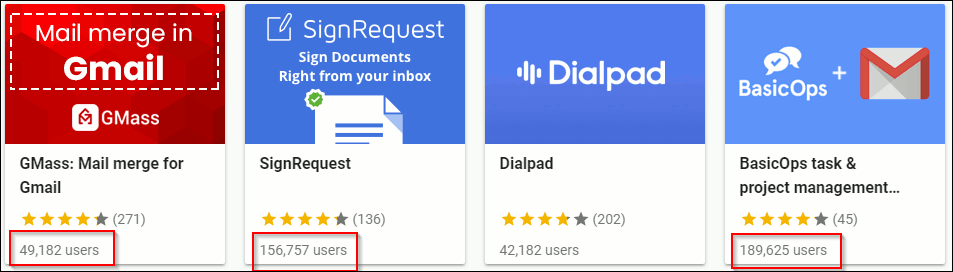
GMass is doing decently well at #13 out of 60. In fact, GMass is ahead of many apps that have more users. Let’s zoom into the row where GMass appears:
GMass ranked higher than other add-ons with many more users.
Notice that GMass, with 49,182 users, ranks above SignRequest, with 156,757 users, and even BasicOps, with 189,625 users–both more than three times as many users as GMass! But, of course, look again at the number of reviews: GMass leads with 271 reviews, whereas SignRequest only has 136–and BasicOps only 45! Reviews boost rankings.
Better rankings means more visibility for any application, not just GMass. In the same way, your product will be more or less visible based on the number of reviews it has in whatever marketplace it competes, whether it be Yelp, the iPhone App Store, or the Google Play Store.
So, today I am going to show you how to set up a review request email campaign, and how you can apply it to promote your business.
How the outreach campaign works
Here is the basic process:
Get the names and email addresses of people who are using your product into a Google Sheet. This should be a system that updates regularly, so new active users of your product are periodically automatically added to the Google Sheet. This can be done by Zapier, or any tool that can connect your CRM system to a Google Sheet.
Create a daily recurring campaign with at least one auto follow-up asking people to write a review.
Example 1: Reviews for your software product
A common use case for this type of campaign is for requesting reviews for your software product, whether that’s a web, mobile, or desktop app. In this example, we will use GMass itself as the example software product and look at how I use GMass to get reviews for GMass. How meta!
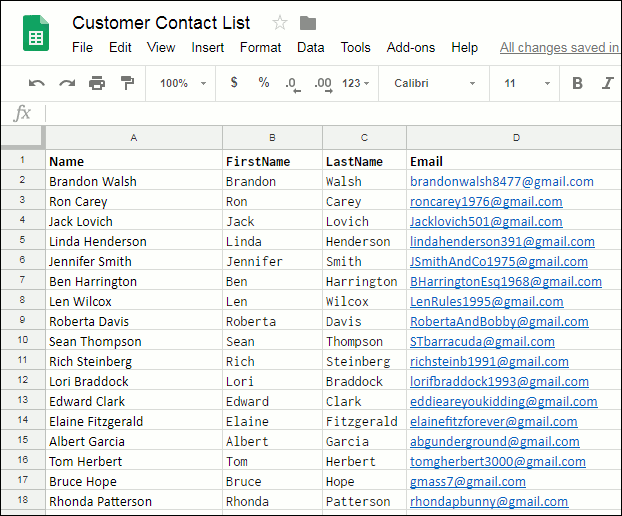
Start by creating your Google Sheet with the names and email addresses of people who are using your software. For this tutorial, I’m going to assume you know a way to do that, either by exporting data from your internal CRM system into a Google Sheet, or by using Zapier or a similar product.
Note: GMass uses Microsoft SQL Server as its backend and has written a proprietary tool to take data fromSQL Server and dump it to a Google Sheet, something we plan on eventually making publicly available so that anyone who uses SQL Server as their back-end can easily get their active customers into a Google Sheet.
Here is a screenshot of an example Google Sheet:
Showing your Google Sheet with your Gmail-using recipients.
Now you’re ready to reach out to your customers, asking them for a review.
Click the GMass Spreadsheet button at the top of your Gmail page to connect to a spreadsheet.
About to click on the Spreadsheets button in GMass.
Choose the spreadsheet you are using with this product review invitation campaign and click “Connect to Spreadsheet”.
About to connect to a Google Sheets spreadsheet with GMass.
In the Gmail Compose window that is then launched, create a new email with your invitation to review your product–in my case, GMass. Outgoing review request for a software application (in this case, GMass)
Bonus: Notice how we can use GMass’s personalization feature (“{FirstName|there}”) here? This way, if there is a FirstName column with information, GMass will address the email recipient by his or her first name (such as, “Hi, Bob”).
Now let’s schedule this email sequence. Click the GMass Settings button.The GMass Settings button (up arrow)
The Settings window will be displayed. Click the plus next to Schedule.
About to open the Schedule option from the Settings Window.
Click the “repeat” checkbox, and choose daily or hourly in the dropdown. You can also set a few other settings, such as not sending on weekends.IMPORTANT: Keep in mind, this scheduling doesn’t mean you are going to be pestering the same people daily or hourly, asking them repeatedly if they will write a review of your product. It means that this campaign will check the Google Sheet daily or hourly to see if there are new people on the list who have not yet been contacted, and only email the new people.
Set your settings for repeating, daily or hourly.
Note: If, and only if, you have launched a Gmail compose window through the Spreadsheet button (Step 2 in this section), the Settings will include an option for scheduling repeated sends of this email. It will not show this if you compose an individual email without using the Spreadsheet button.
Let’s also set up one reminder email. The reality is, people need to be reminded to write reviews, even if they are willing. Fortunately, GMass has a great feature for this (one that I’ve blogged about before). In the Settings box, click on the blue plus mark to the right of “Auto Follow-Up” to expand it. Here you will have options to set an auto follow-up email that will be sent to each recipient based on the rules you specify. In this case, I have set the follow-up email to occur a day after the initial email, but only if the recipient hasn’t replied to my first email.
Bonus: You can even send up to seven more reminder emails, at some pacing you choose, using the various “stages” shown in the image below.
Using the Auto Follow-up feature of GMass
That reminder, by the way, will look like this when they get it the next day:
Showing what the automatic follow-up email will look like.
Reminders are essential in getting people to reply, because often it is only after someone has been reminded of something once–or even twice–that they will take action. In this case, that will often make the difference between another review or not getting one.
Finally, click the red GMassbutton to start this automated email sequence. The first email addresses on the Google Sheet will be sent emails immediately, and then as new rows are added to the spreadsheet, GMass will send out this same email to those new people in an automated fashion. GMass is smart enough to avoid sending the previously emailed recipients the same email again.
That’s it! Now people will be invited to write a review of GMass, and each will get one (or more, if you prefer) follow-up email to remind them. Furthermore, new addresses added to the spreadsheet will automatically get the same email sequence.
Example 2: Reviews for your brick-and-mortar business
Remember, customer reviews aren’t only beneficial to software products like GMass. They are vitally important for getting the good word out about your shop, restaurant, or any other “brick and mortar” business in your community.
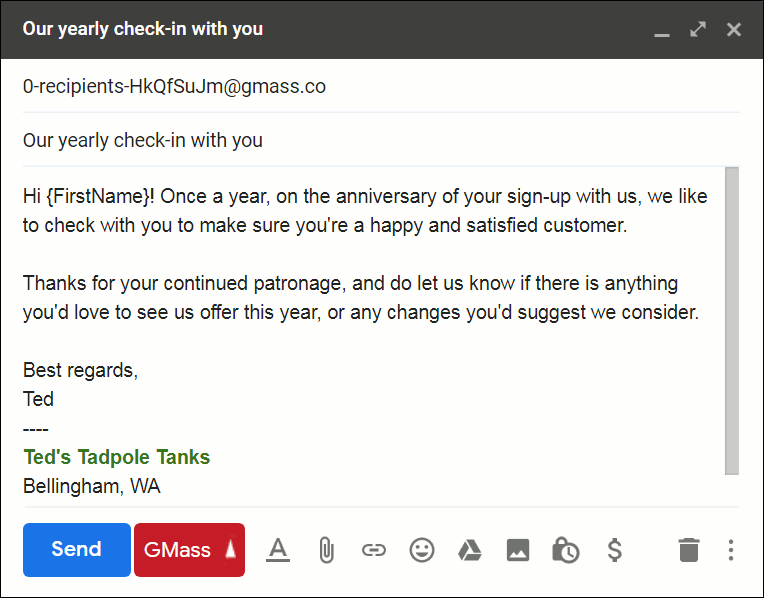
In this tutorial, I’m going to use Ted’s Tadpole Tanks as an example of a brick and mortar establishment, but it could easily be any sort of local establishment.
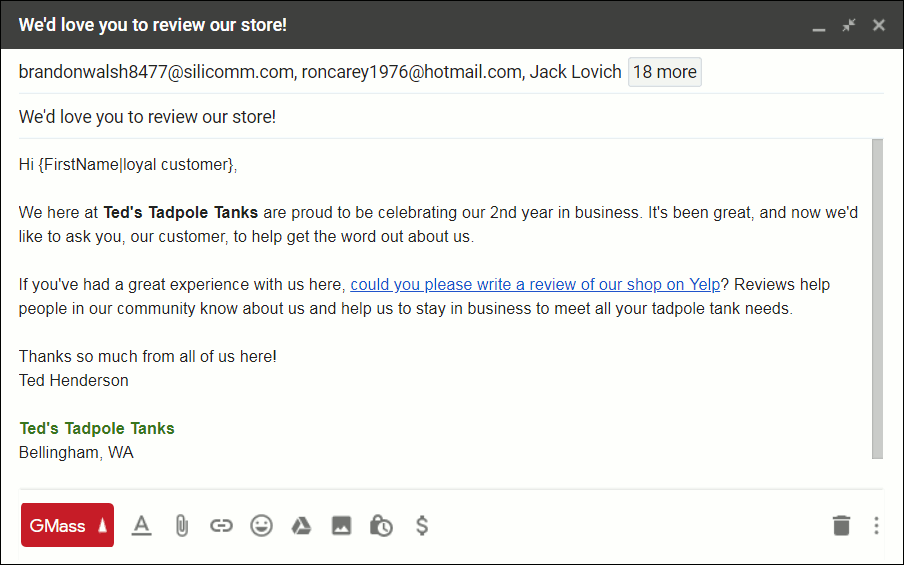
The steps here are the same as the first example, but with a different outgoing email that makes sense for a brick-and-mortar business. In that case, asking for reviews on Yelp.com might be the way to go. Here is the outgoing email:
Example of an outgoing email requesting reviews for a brick and mortar shop.
The rest of the process is the same as shown in the previous example.
Other uses:
The world of public opinion about products and services runs on reviews. They can make or break not just businesses, but any creative or public effort that requires people to make decisions in your favor. So consider using GMass for any of the following ways to automatically request reviews for your:
band’s new music album.
new book (such as on Amazon or Goodreads, for your new book).
funeral home (that may seem strange, but having a trusted place to go when it is a family’s time to need this service is actually very important. You may wish to only request reviews after an appropriate amount of time has passed, of course.).
non-profit community center
auto mechanic’s shop
massage therapy business
photography service
in-home tutoring business
What if you have a lot of customers?
Sometimes you have a runaway hit on your hands and have tons of customers. That doesn’t mean your company should rest on its laurels–reviews can drive even further growth. In that case, however, you will have a lot of emails to send!
If so, you might need to connect GMass to an SMTP account like Sendgrid. This allows you to send a large volume of emails without bumping up against Gmail’s limits while still using the familiar Gmail interface to do all your work.
Email marketing, cold email, and mail merge inside Gmail
Send incredible emails & automations and avoid the spam folder — all in one powerful but easy-to-learn tool
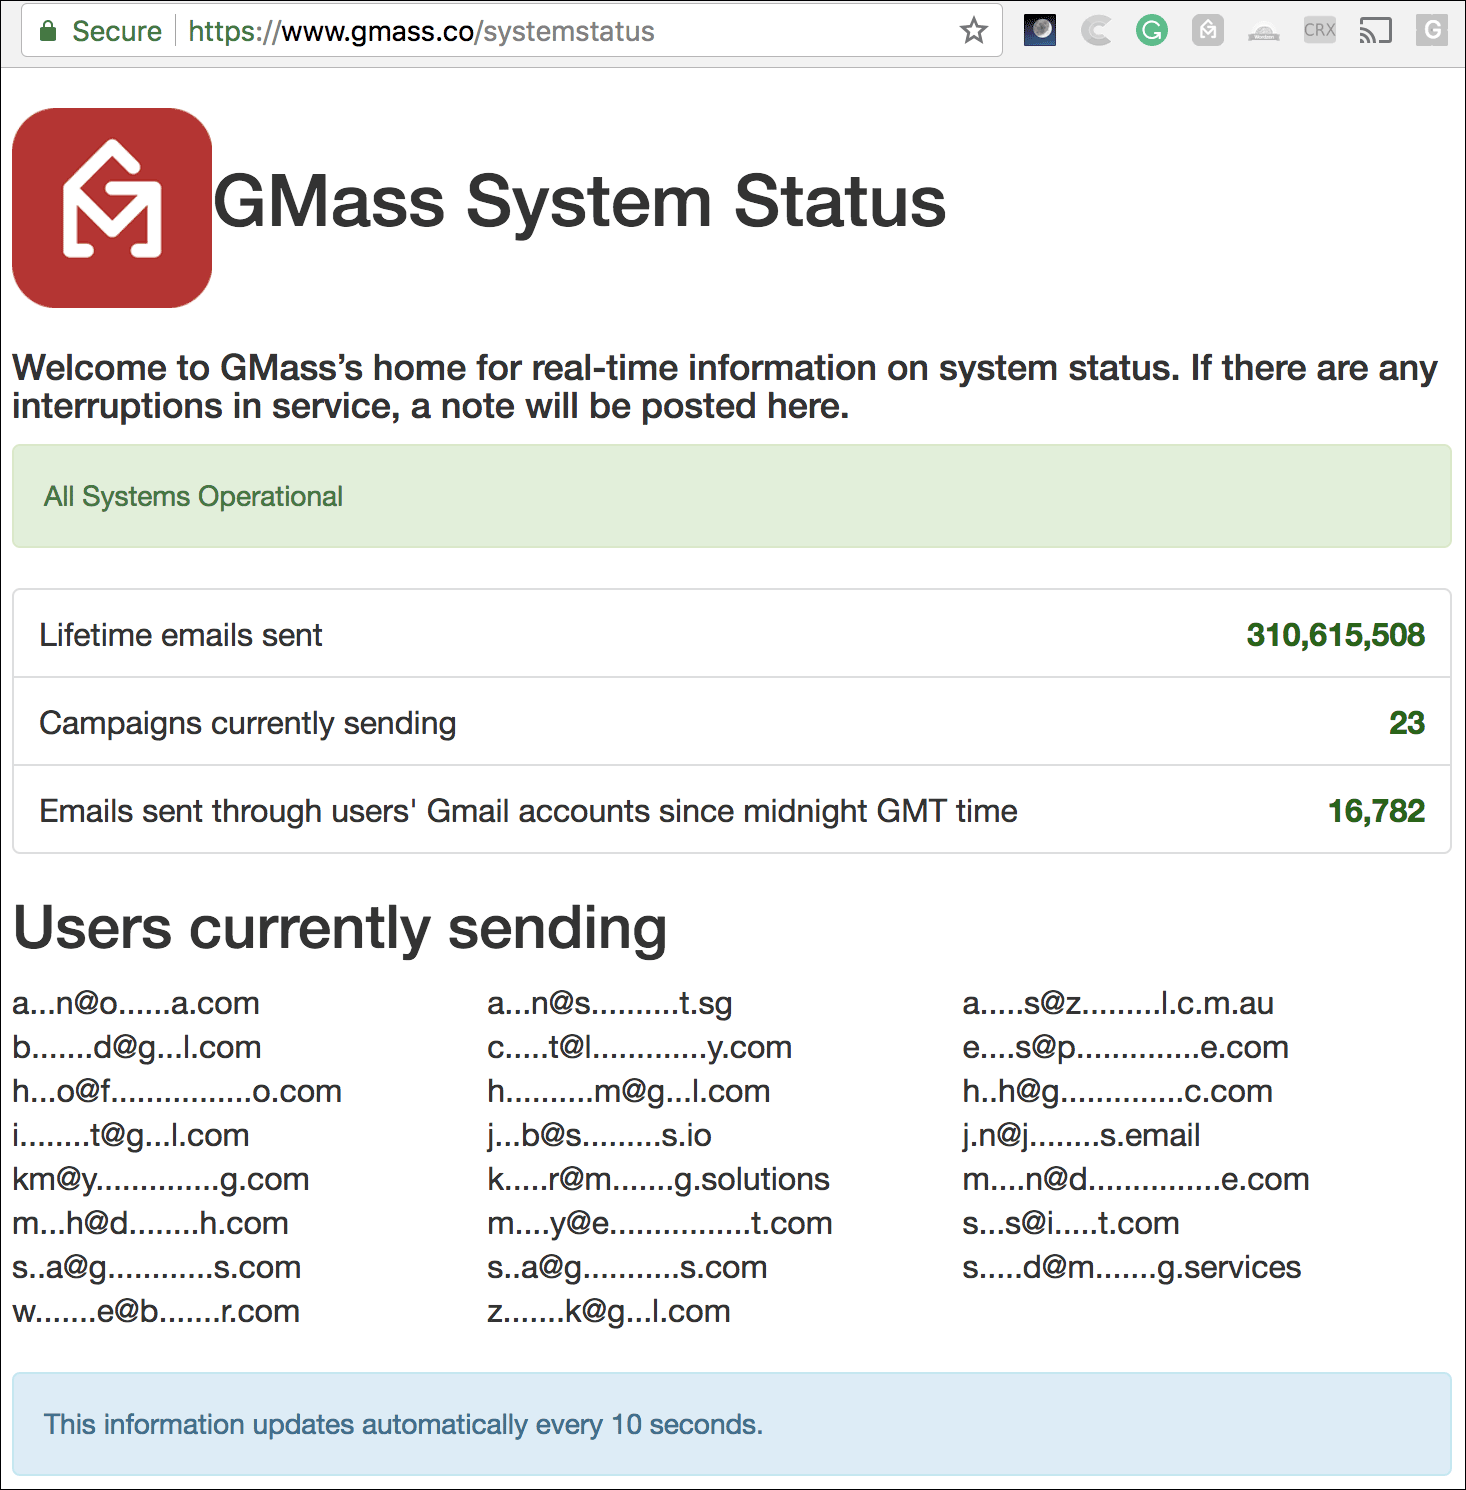
The System Status page shows a bunch of interesting statistics and data, including the total number of emails GMass has sent lifetime, which is currently around 310 million. Whoa! 310 million emails all sent from users’ Gmail accounts!
Additionally, we show you how many campaigns are currently sending and a list of users who are “active senders”. We of course obfuscate the email address of the user so that you can identify yourself but nobody else can.
Over time we’ll expand this page to include more system statistics, charts, and useful data.
Ready to transform Gmail into an email marketing/cold email/mail merge tool?
Only GMass packs every email app into one tool — and brings it all into Gmail for you. Better emails. Tons of power. Easy to use.
Love what you're reading? Get the latest email strategy and tips & stay in touch.
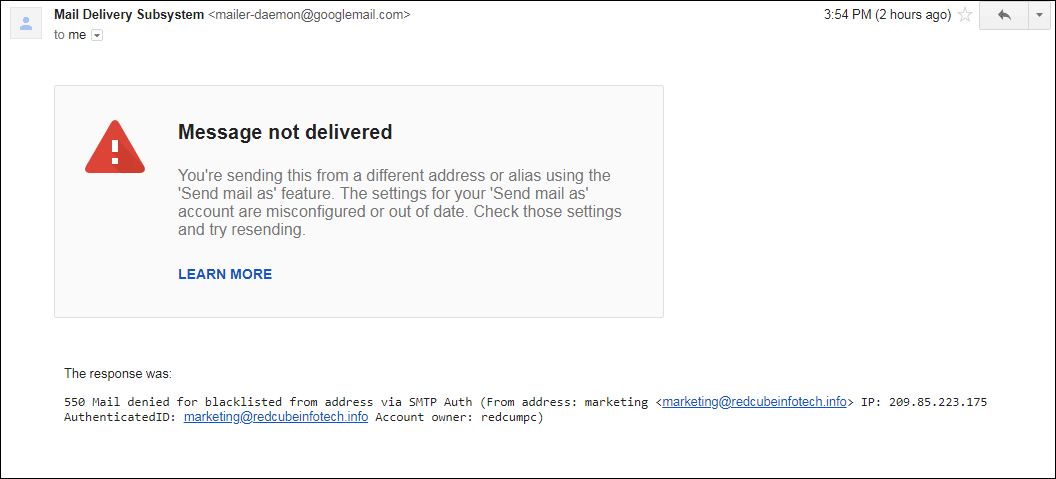
If you’re getting Message not delivered bounces from Gmail indicating that your “Send mail as” settings are misconfigured, here is why it’s happening and how to resolve it.
First, this is what this particular type of Gmail bounce message looks like:
A bounce because your SMTP server is rejecting your From Address.
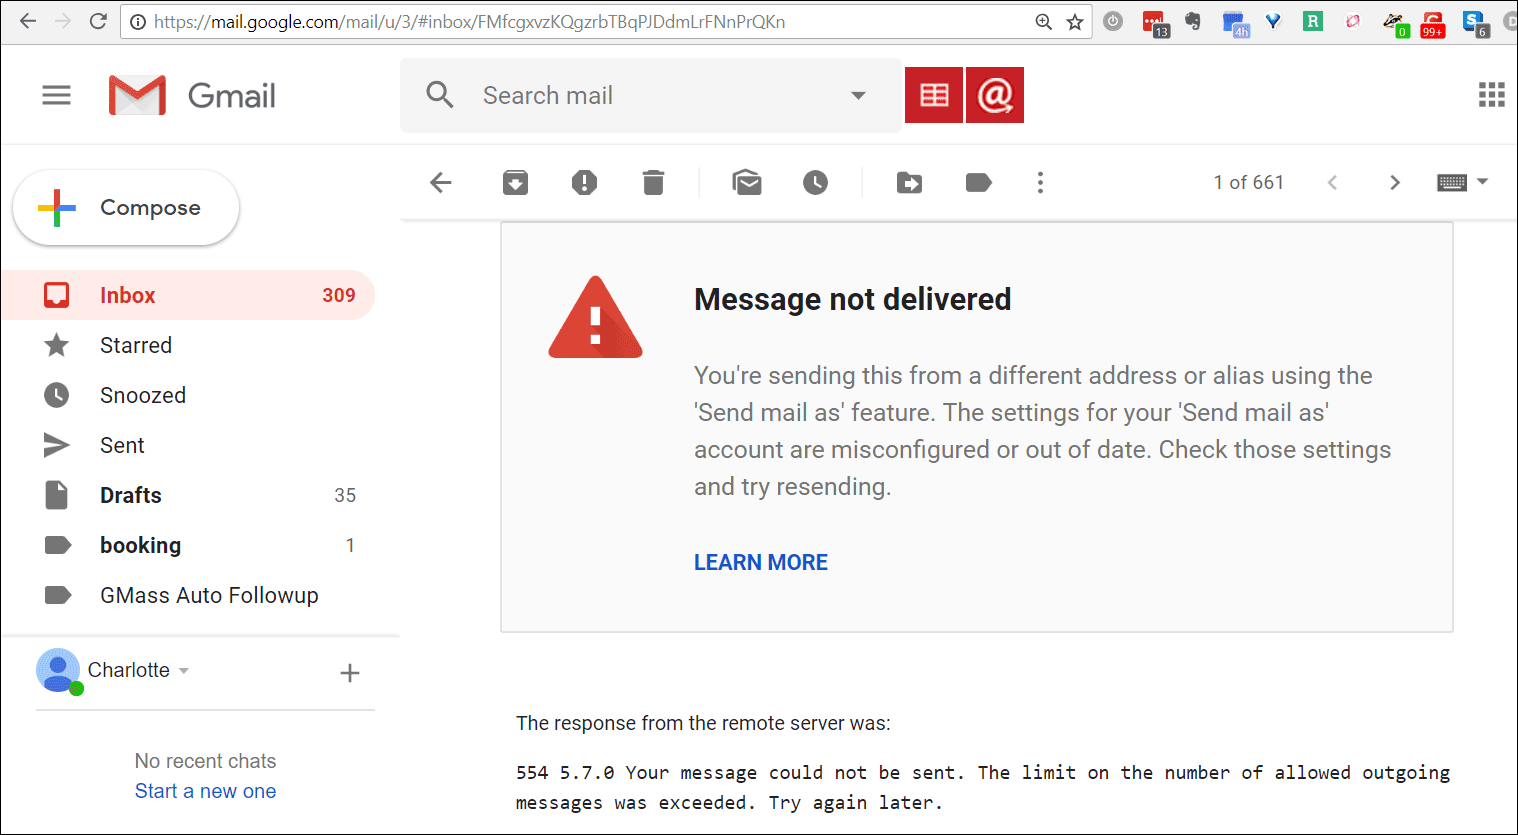
Here’s another example, indicating that you’ve exceeded your sending limits. Don’t get confused though…this has nothing to do with your Gmail sending limits:
When you want to send an email in Gmail from an address other than your Gmail address, you can do that. You just set up an email address that you own as an additional From Address in your Gmail account, and that email address doesn’t have to be a Gmail account, although it can be. You do that by following the instructions provided by Google to add an additional From Address. Part of the setup requires you to provide an SMTP server for that new From Address. That means you were forced to input an SMTP server, its username, and its password in order to send “from” that additional address that you own.
These bounces that you’re receiving are being generated by that SMTP server that you chose — not by Gmail’s server and not by GMass.
In the second example, the SMTP Server bounces the message because of a limit issue. This has nothing to do with Gmail’s sending limits. This is a limit imposed by your SMTP server that you set when you configured the additional From Address.
How do you fix these bounces?
Whether you send a normal email with the Gmail Send button or a mail merge campaign with the GMass button, if you set your alternate From Address, the emails will be sent via that SMTP server that you used to set up that alternate From Address, not Gmail’s servers. You are essentially bypassing Gmail’s sending servers when you send “from” your non-Gmail address.
So when you get a bounce like this, you can resolve this by either:
Resolving the issue with the company in charge of that SMTP server.
Sending from your Gmail address rather than the additional From Address.
Usinger a commercial SMTP server like Sendgrid instead of your current SMTP server.
I’m confused…SMTP Server huh?!
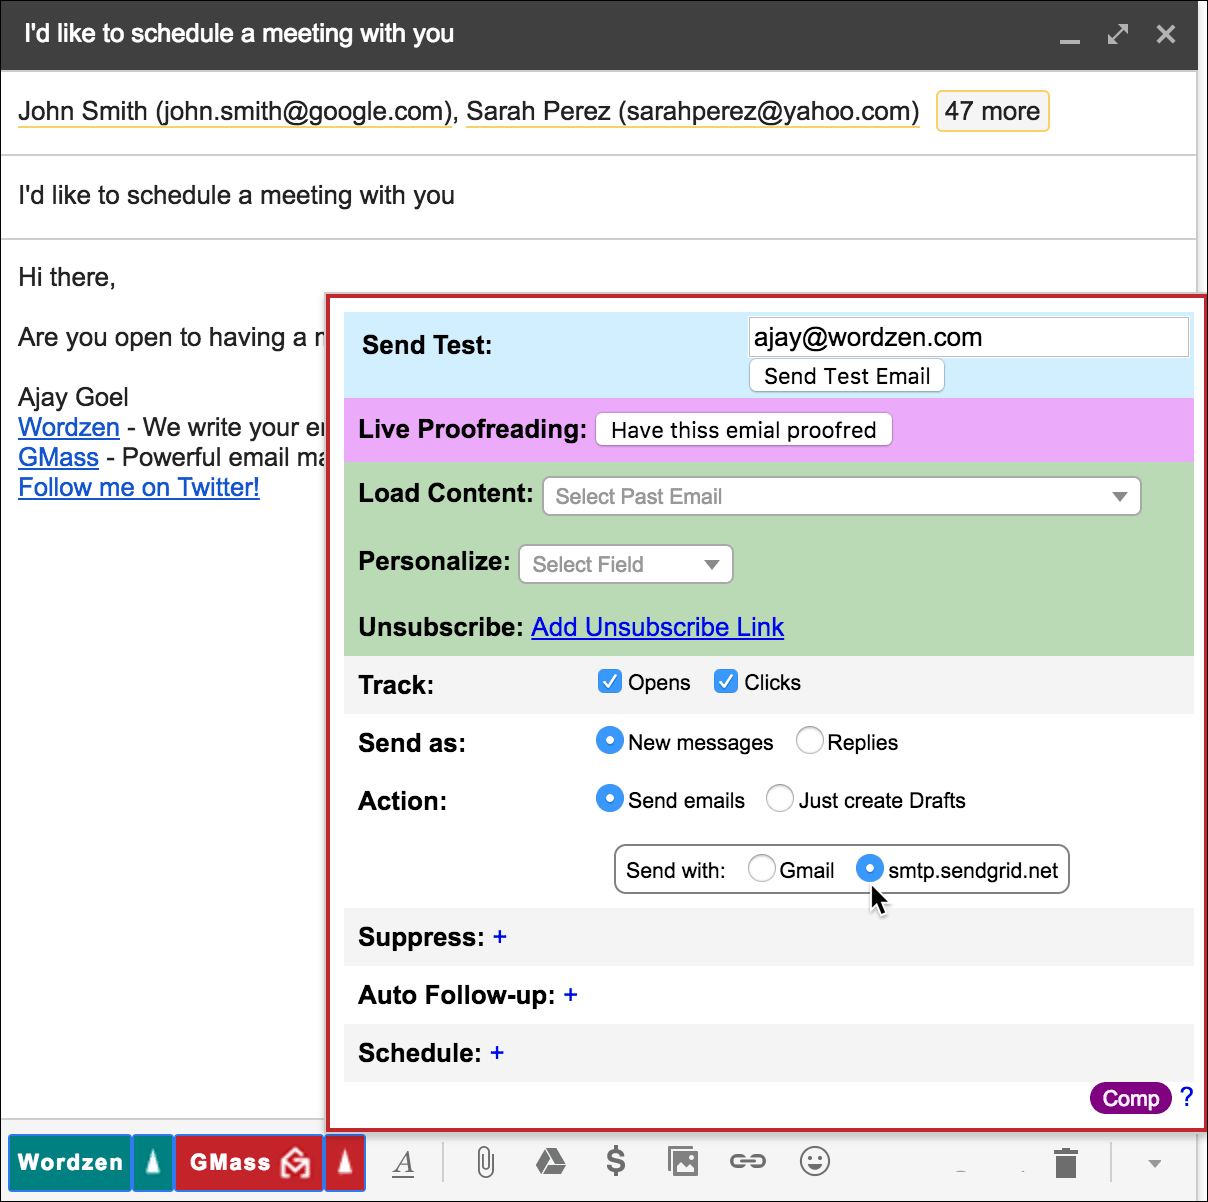
You might be confused because GMass allows you to set an SMTP server to send unlimited emails with your Gmail account. This is not the same SMTP server that Gmail requires you to specify when you configure an additional From Address.
The SMTP server you set with GMass is used to send emails when:
You use the GMass button instead of the Gmail Send button…AND…
You specifically designate the SMTP server to send the emails rather than Gmail’s servers in your GMass Settings:
You use either the Gmail Send button or the GMass button, and if you used the GMass button, you elected to “Send with” Gmail. It might be confusing because even when selecting “Send with” Gmail in this case, your emails are not sent through Gmail’s servers. They’re going through the SMTP server you set as part of your From Address configuration.
More information
We’ve written an extensive explanation of the differences between sending from your Gmail email address versus an additional From Address that you set up in your account. There are deliverability implications to factor, the biggest being that when you send from an additional From Address, your emails aren’t going through Google’s high deliverability email servers.
See why GMass has 400k+ users and 9,000+ 5-star reviews
Email marketing. Cold email. Mail merge. Avoid the spam folder. Easy to learn and use. All inside Gmail.
Love what you're reading? Get the latest email strategy and tips & stay in touch.
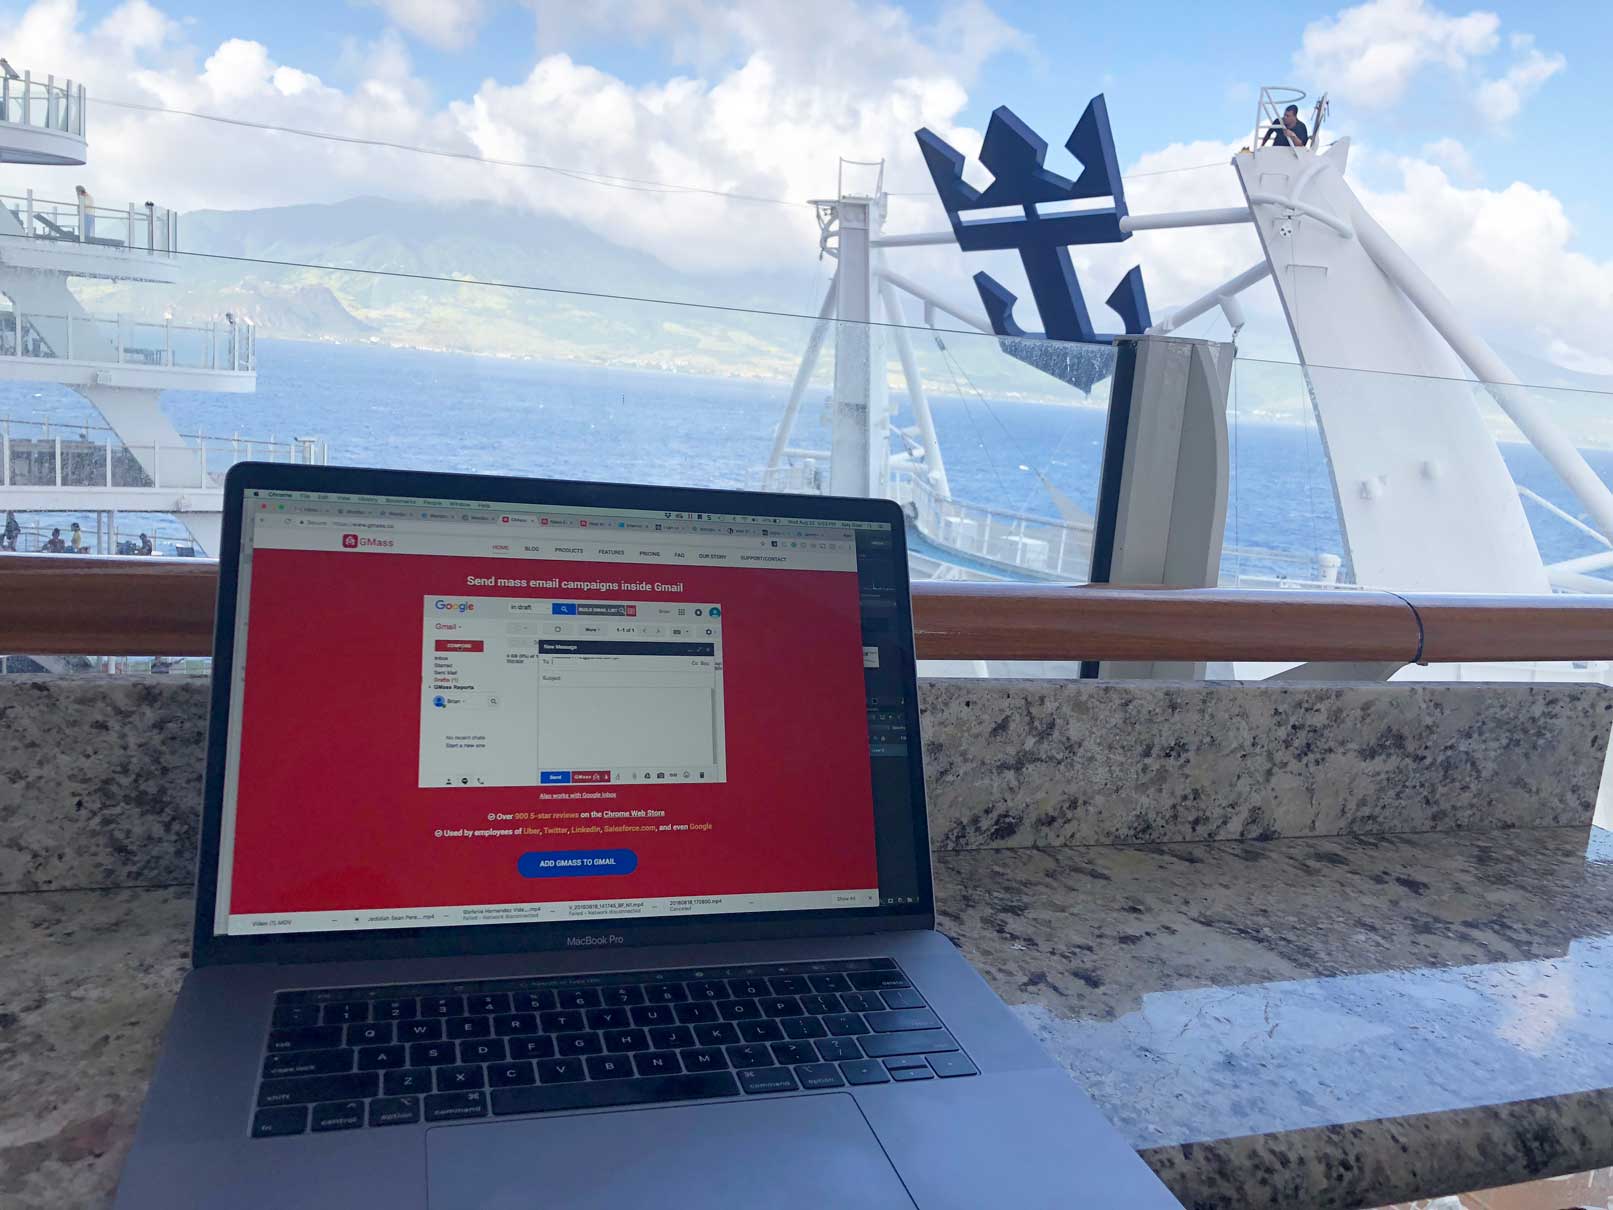
Right now, my family and I are sailing on Royal Caribbean’s Harmony of the Seas, and because I’m always watching over GMass, we couldn’t have gone on this trip if it weren’t for the ship’s Voom Internet offering. Royal Caribbean’s WiFi offering claims to be the “fastest Internet at sea”.
So, is it really the fastest?
Royal Caribbean claims it’s 6x faster than any other Internet access offering on the sea, which is believable, but as a sysadmin, I’m only happy if it’s fast enough for me to manage my servers and deploy emergency bug fixes.
The Obligatory Speed Test
Let’s see just how fast it is, and if it’s fast enough for me, as a systems administrator, to be able to do my job and control the GMass network remotely. I’ve been running speed tests every day since boarding the ship four days ago, and the speed has been consistently around 2-4 Mbps downstream and about 1-2 Mbps upstream. Here’s one of the tests from speedtest.net.
A speed test from Harmony of the Seas, using Voom Internet
By comparison, here is Carnival’s WiFi offering, which states that even on their Premium Wi-Fi Plan, video streaming services like Netflix, video calling services like Facetime, and WiFi calling are blocked, although an exception is apparently made for Skype. It’s even worse with Norwegian Cruise Lines, which outright states that NO video streaming services are allowed and that if you’re used to speedy Internet at home, expect slow Internet on the ship. In that sense, Royal Caribbean’s claim to have the best Internet access on the sea holds true.
Neither Carnival nor Royal Caribbean actually come out and state what Internet speeds a user can expect, which is strange to say the least. I suppose they don’t want to be held accountable if speed falls short of what they promise.
My Sysadmin Needs
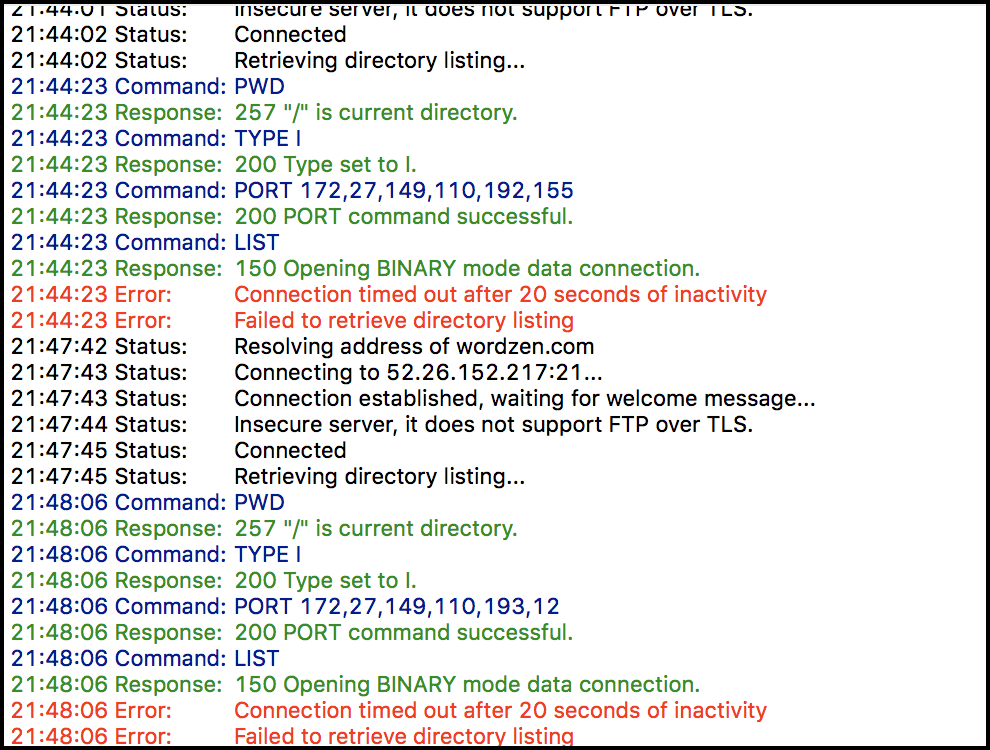
As a developer and sysadmin, my main concern is being able to transfer files and being able to remotely access servers via Windows RDP. Since Royal Caribbean actually offers two packages, a “surf” package which is limited to web and email access, and a “surf and stream” package which allows you to stream video and make video calls, I was concerned there might be some “port” blocking happening. Get it? “Port” blocking? 🙂 RDP runs on port 3389, surely a non-standard port for most cruise ship passengers, but much to my delight, it worked.
I’m able to Remote Desktop into my server from the cruise ship.
Now, although I found that port 3389 worked, that doesn’t mean that all ports are open. I was unable to FTP files to my server. Most sysadmins know that FTP uses a data channel on port 21 and a control channel on a port specified by the server at the time of the connection. My FTP is able to connect to the FTP server but not to the control channel to list any files or perform any functions related to files.
I couldn’t FTP from the cruise ship.
Overall Assessment
I’m thankful that Royal Caribbean has WiFi on their ships to begin with, because without it, we wouldn’t be able to cruise with them. The WiFi connection allows me to manage my servers, check my email, and monitor the GMass system. Transferring files was more difficult because of the FTP issues, but I’m able to work around that by using Amazon S3 as a file holding area. Overall, I’ve been able to be productive even when I’m supposed to be relaxing with my family on vacation. While Royal Caribbean’s claims about the speed may be exaggerated, the speed is still highly usable in many ways, including the ability to publish this very article!
Ready to transform Gmail into an email marketing/cold email/mail merge tool?
Only GMass packs every email app into one tool — and brings it all into Gmail for you. Better emails. Tons of power. Easy to use.
Love what you're reading? Get the latest email strategy and tips & stay in touch.
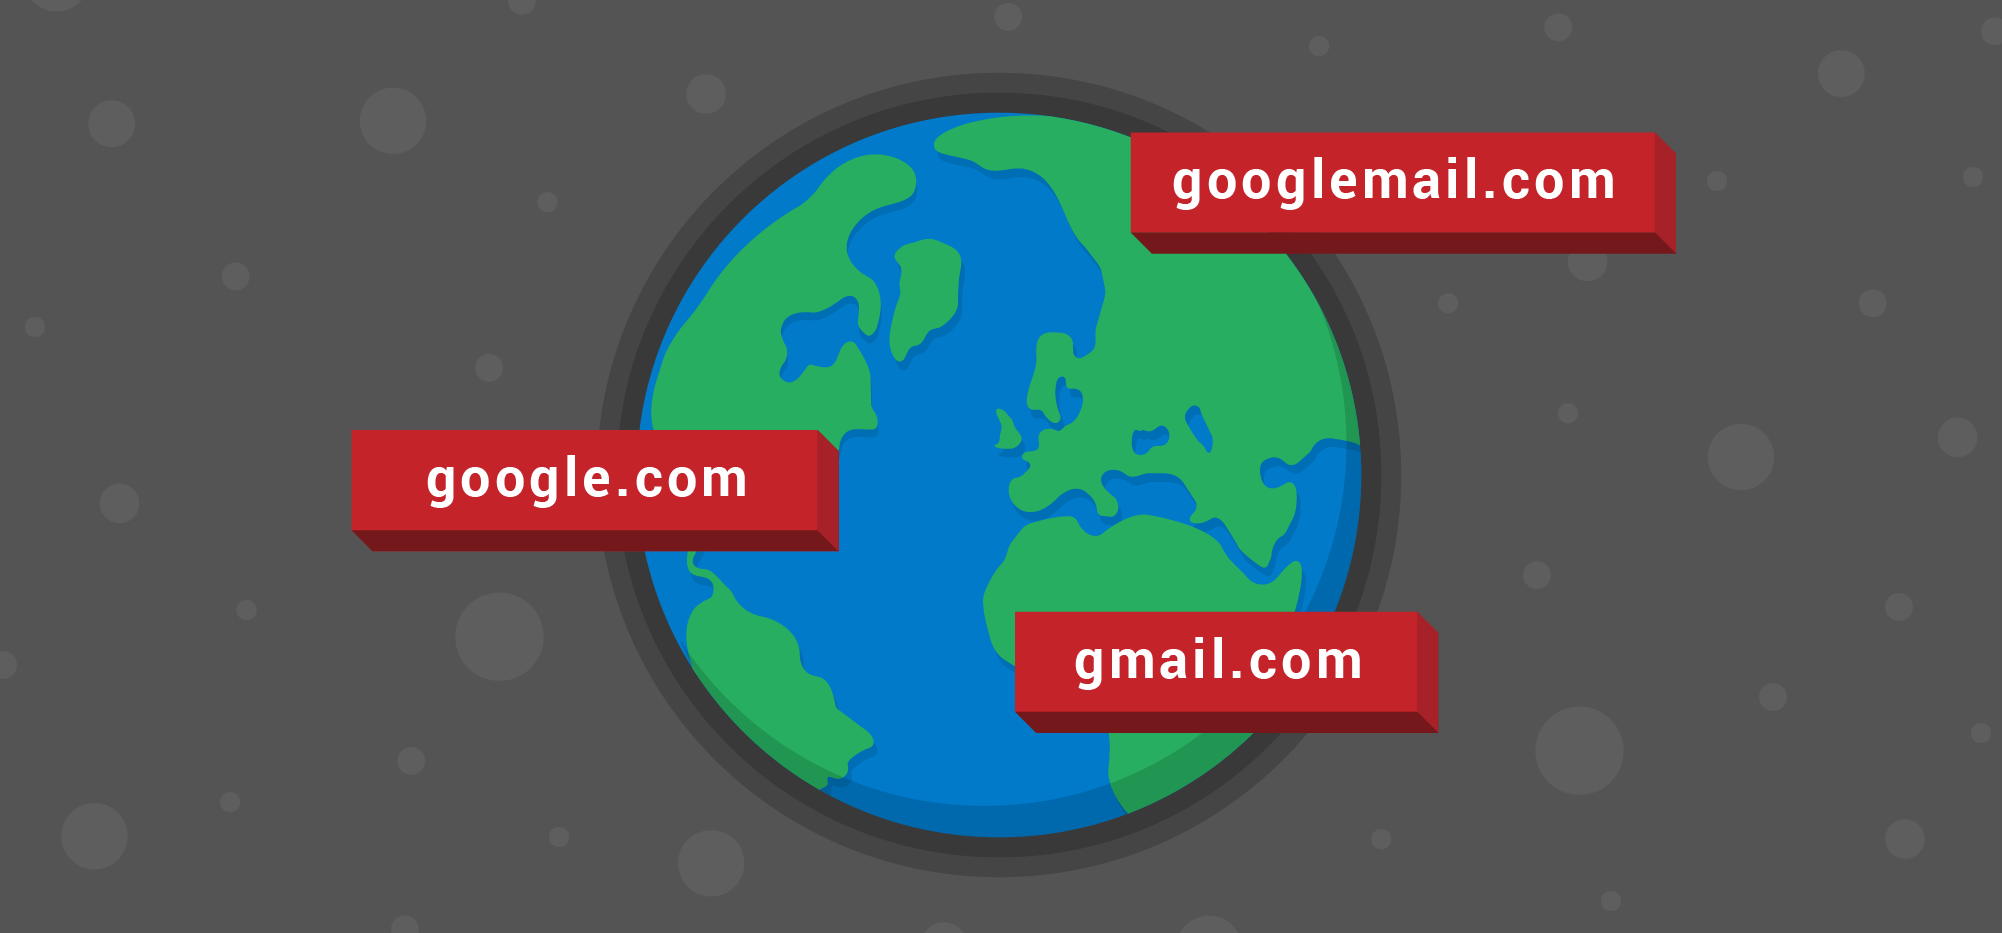
Whether or not you use GMass, it’s useful to understand the difference between the three different domains that Google uses for email: gmail.com, googlemail.com, and google.com. Let´s take a quick look at how these three differ.
The “gmail.com” Domain: What most of us have for email
The most well-known domain for email is, of course, gmail.com. This is for regular Gmail users, and takes the form of “name@gmail.com“.
The gmail.com email domain in use.
Before we get to the other domains, here are two fun facts about using your gmail.com domain.
One is that you can put one or more dots within the name part, however you want, and it won’t affect anything. So, for example, happy.hippo@gmail.com is treated exactly the same as happyhippo@gmail.com, though the first one might be slightly easier to read, because the words are separated with the dot.
Another is that you can put a plus sign (“+”) anywhere in the name portion and Gmail will ignore everything to the right of that plus until it gets to the “@” symbol. So, emails sent to happyhippo+parakeet@gmail.com will be sent to the happyhippo@gmail.com inbox (although I should also note that when I tested this by sending an email to myself, for some reason I didn’t receive the email at all—but it did work when someone else sent me an email using the same address with the plus symbol in it).
One possible use for this “+” trick is that you can “tag” email that are coming in from certain sources. So, for example, your friends might write you to happyhippo@gmail.com, but you could give out to business contacts happyhippo+consulting@gmail.com and it will also go to that same inbox. This way, you could immediately know which incoming emails were personal and which were business related. Plus, if you see you are getting spam sent to a particular “name+suffix” email address, you will know which sources have somehow gotten your email address in the hands of spammers.
The “googlemail.com” Domain: For two countries
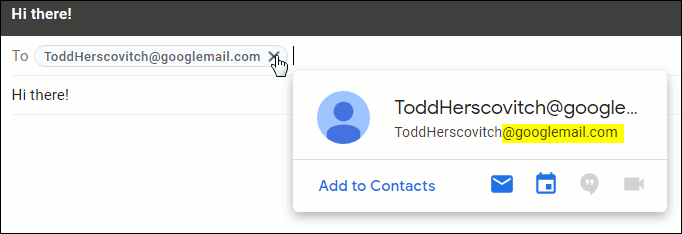
Alternatively, googlemail.com is for Gmail users of a particular country where “Gmail”, as a trademark, was already taken. Those countries originally were Germany, the Russian Federation, and Poland. In each case, the Gmail trademark was unavailable, so Google was forced to use “googlemail” and therefore googlemail.com instead.
An email to the googlemail.com domain.
In Poland, the Gmail trademark domain is owned by a Polish poet group, Grupa Mlodych Artystów iLiteratów—which is abbreviated “GMAiL”. In the Russian Federation, the trademark is owned by a Russian mail redirect service, Gmail.ru. So, with the Gmail trademark already taken, users there were assigned an email address of the format: name@googlemail.com.
As of 2012, the situation with Germany was straightened out and new users to Gmail there get assigned a gmail.com domain. People who signed up for Gmail prior to this switch have the option to switch to using gmail.com as well. In order to do that, they would go to the Accounts tab under Settings. The good thing about this change—if you haven’t already done it—is that Gmail will smartly update everything, so that there will be no disruption in receiving emails. For example, if someone emails you to your old name@googlemail.com address, it will automatically arrive at your name@gmail.com inbox.
In fact, name@googlemail.com and name@gmail.com point to the same mailbox. You can test this out right now by sending an email to yourself by taking your normal email address and using the googlemail.com domain. You’ll get the email instantly, proving that these domains are the same.
What’s also good about this is a new person can’t register your name at the other domain. For example, if you use HappyHippopotamus1990@gmail.com, no one would be able to register HappyHippopotamus1990@googlemail.com–which prevents someone using a very similar email as yours without your permission.
The “google.com” Domain: For Google employees
Finally, the google.com email domain is used for Googleemployees. So, as a fictional example, an email address like “HappyHippopotamus@google.com” would mean that Happy Hippopotamus was a Google employee.
What’s useful about this fact is that if you receive an email with a google.com domain, it should mean that the person who sent it does actually work for Google—as opposed to being a scammer or hacker doing a phishing attack for information about you.
The final option: your own domain with G Suite
The final way with which to use Gmail is to bring your own domain and set it up on G Suite. About half the world’s companies and almost all of the world’s startups bring their domain to G Suite to let Google manage their email.
The Upshot: They all work with GMass!
Whichever domain you use, they will all work with GMass. So don’t let these options stand in your way from making effective email marketing campaigns, whether for politics, recruiting, or any other way you can use GMass to automate reaching out to many people easily with Gmail.
Email marketing, cold email, and mail merge inside Gmail
Send incredible emails & automations and avoid the spam folder — all in one powerful but easy-to-learn tool
If you’re sending strictly opt-in email, you might be eligible to use one of GMass’s own SMTP servers, rather than setting up an SMTP service on your own.
Important: This is different than our cold email sending server. You can find all the info you need for that server on our page about ColdSMTP.
We are selective about who we let use our own SMTP servers, so please don’t take offense if we deny your request.
Note: We require you to include an unsubscribe link and a physical address on all messages sent through GMass’s SMTP server.
Thanks to our instant approval system, you’ll find out right away if you can continue sending your campaign through our server. (If you’re denied, our team will manually review your case.)
If approved, your account will be linked to one of our SMTP services.
We won’t provide you with the username/password, but behind the scenes, your account will be linked to the server. And you’ll now see the choice to send either via the SMTP service or via Gmail in the GMass Settings box for your account.
There is no extra fee if you qualify, but do note that sending over SMTP is subject to usage-based billing, outlined here.
Ready to send better emails and save a ton of time?
GMass is the only tool for marketing emails, cold emails, and mail merge — all inside Gmail. Tons of power but easy to learn and use.
Love what you're reading? Get the latest email strategy and tips & stay in touch.
GMass has many great options for mail merge personalization options, from simple mail-merge personalization to fallback values and even automatic first name detection. But did you know you can also include a personalized image for each recipient of your email marketing campaign?
The best practice for including a personalized image is to include an “img” tag in a column in your Google Docs spreadsheet. Let’s walk through an example of how to do that.
Example: Different Zodiac Signs
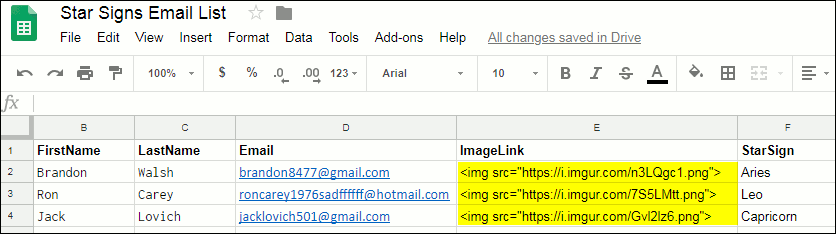
Below is an example of a Google Docs spreadsheet for a fictional business, Star Signs Essential Oils, which is offering a different Zodiac-themed essential oil to each customer based on his or her star sign. Here the personalized image links are included as values in one of the columns.
Example customer spreadsheet. Note the highlighted image links.
In those highlighted sections, note the “src=”https…” text in each customer’s ImageLink cell. These are links to images hosted somewhere online–ones that you have created for the purpose of this mail campaign. Each source link is different because each of these three people have a different zodiac sign (of course, in the case in which multiple people shared the same sign, they would all use the same src link for their image).
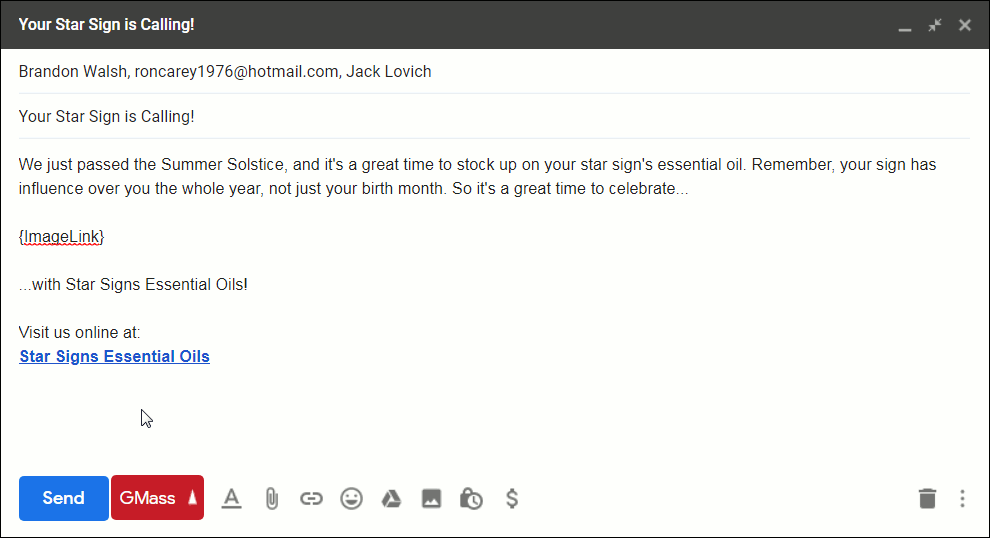
Note the presence of the text “{ImageLink}” in the center of the email. That is how GMass will know to replace that with the image indicated in the spreadsheet.
When your email is sent, each recipient will get the same text, but a unique image. For example, the recipient Brandon, who is an Aries, will receive the following email:
The email Brandon (the Aries) receives.
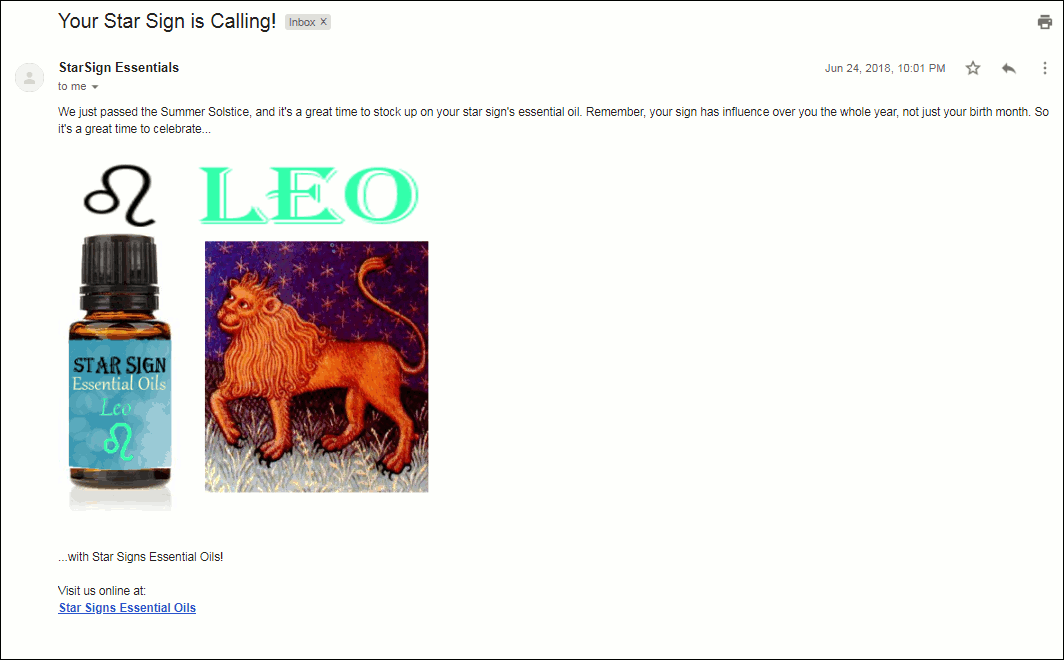
Ron, who is a Leo, will get the same text, but an entirely different personalized image:
The email Ron (the Leo) receives.
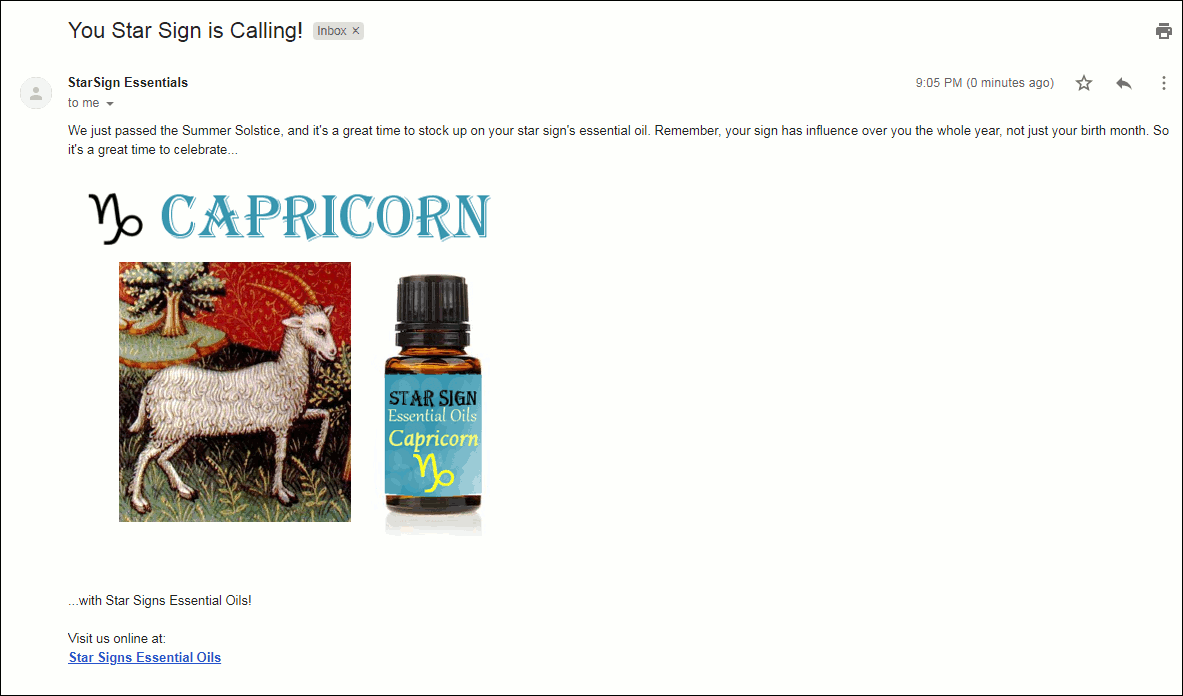
Finally, Jack, who is a Capricorn, will receive yet a different image:
The email Jack (the Capricorn) receives.
Other Use Cases
You can personalize emails using any images you want, of course, but just to give a sense for how this GMass feature could be used, here are some example cases:
Put a player’s name on the sports jersey or hat you are selling them.
Include a photo of the person taken as part of his or her interaction with your business. For example, at a tourist site in which souvenir photos are taken.
Include a different theme image depending on whether the recipient is male or a female, older or younger, from a particular country, or of some other demographic grouping that you could respectfully represent with an image.
Provide a photo of the branch of your business that is local to the recipient.
Show photos of specific products or services that each particular client is likely to be interested in based on customer data you already have.
Using Google Drive images
Google Drive is a great place to store images for your GMass campaigns. But… it takes a few steps. One, giving GMass permission to access Google Drive. Two, making sure your images have proper sharing permissions. And three, getting the actual image URLs (not the URLs to the images’ Google Drive page).
Click this link to give GMass permission to access your Google Drive images. We don’t ask for this permission by default; only in situations like this when we need it.
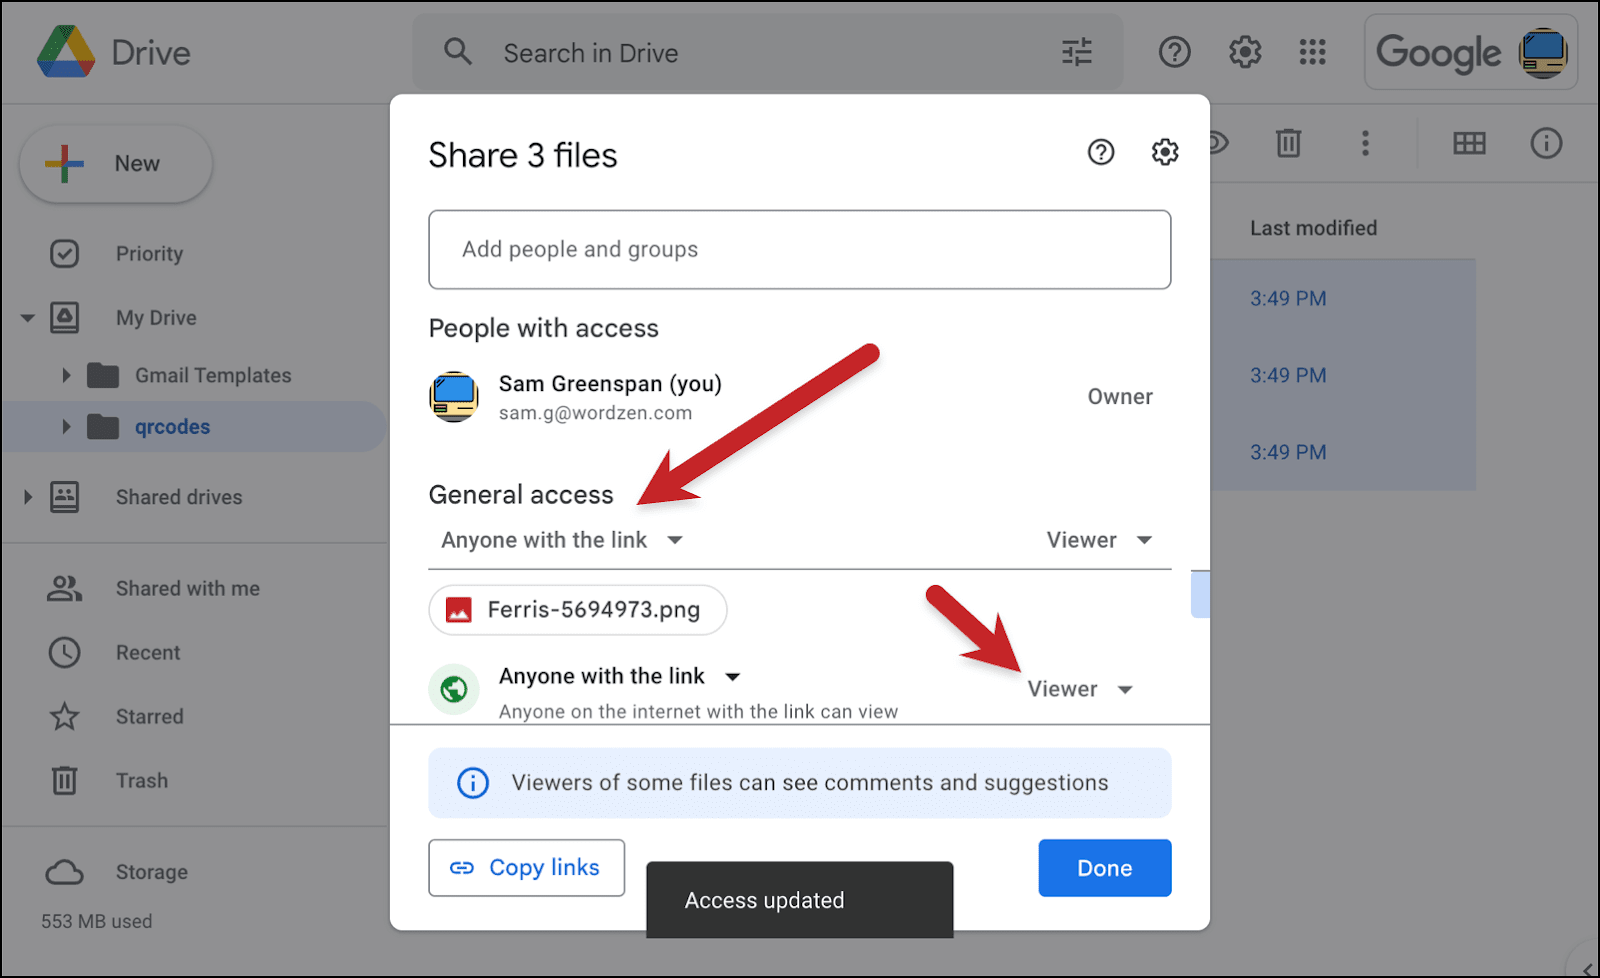
Now upload your images to Google Drive. Then select your images and give everyone with the link permission to view.
Now hit that Copy links button at the bottom of the popup.
Follow these steps to turn Google Drive’s string of URLs into actual images you can use.
Open a new Google Sheet
Click into cell A1 and hit paste.
In cell A2, enter this formula: =SPLIT(A1,", "). Don’t forget the space after the comma that’s inside the quotes.
Select everything in the second row. Click Copy.
In cell A3, click Edit > Paste special > Values only.
Select everything in the third row. Click Copy.
In cell A4, click Edit > Paste special > Transposed.
Now we have every Google Drive image URL on its own line.
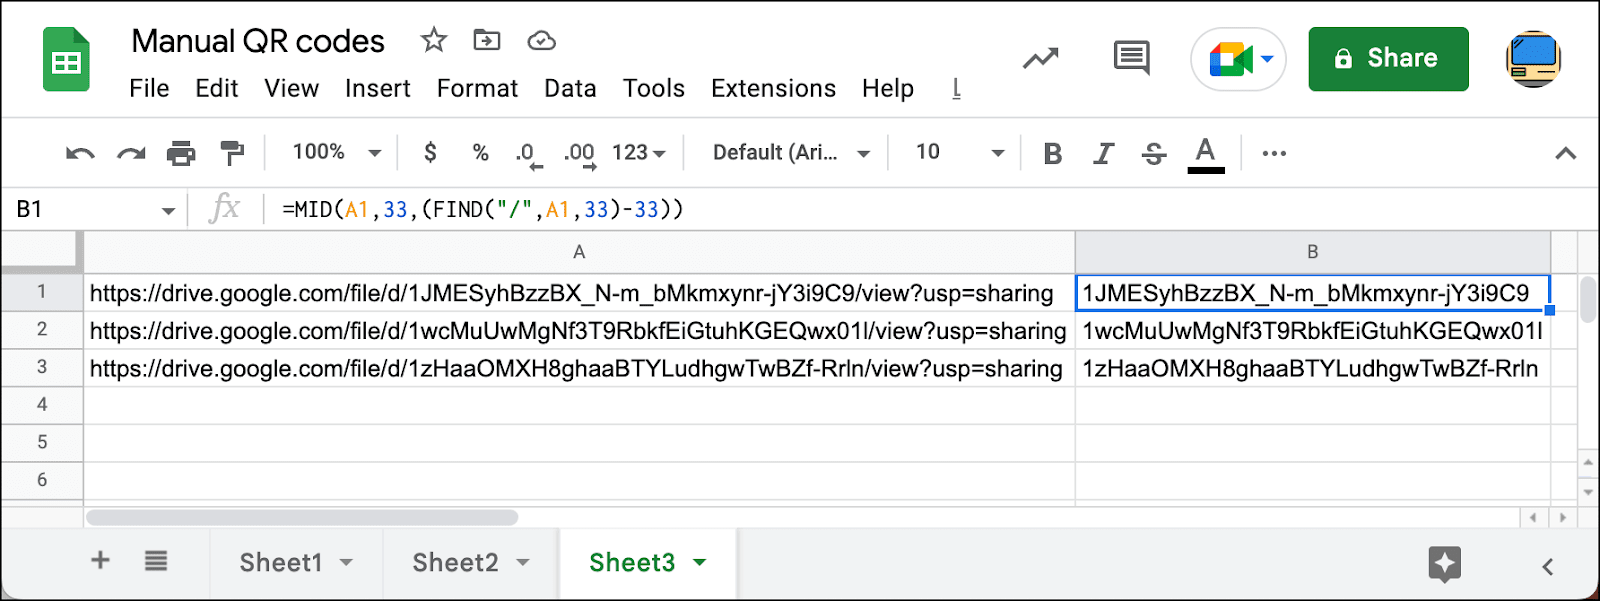
Delete rows 1, 2, and 3. That will leave you with just the URLs as they’re supposed to be for mail merge. That’s because Google didn’t give you direct links to the images — the links are to Google Drive pages featuring those images. And to mail merge the images, we need to grab the image links themselves.
In B1, type in the following formula: =MID(A1,33,(FIND("/",A1,33)-33)). We’re extracting the file ID from the string. We know it starts at the 33rd character and we’re accounting for the possibility it could be any length. Then drag that formula down to the rest of the rows.
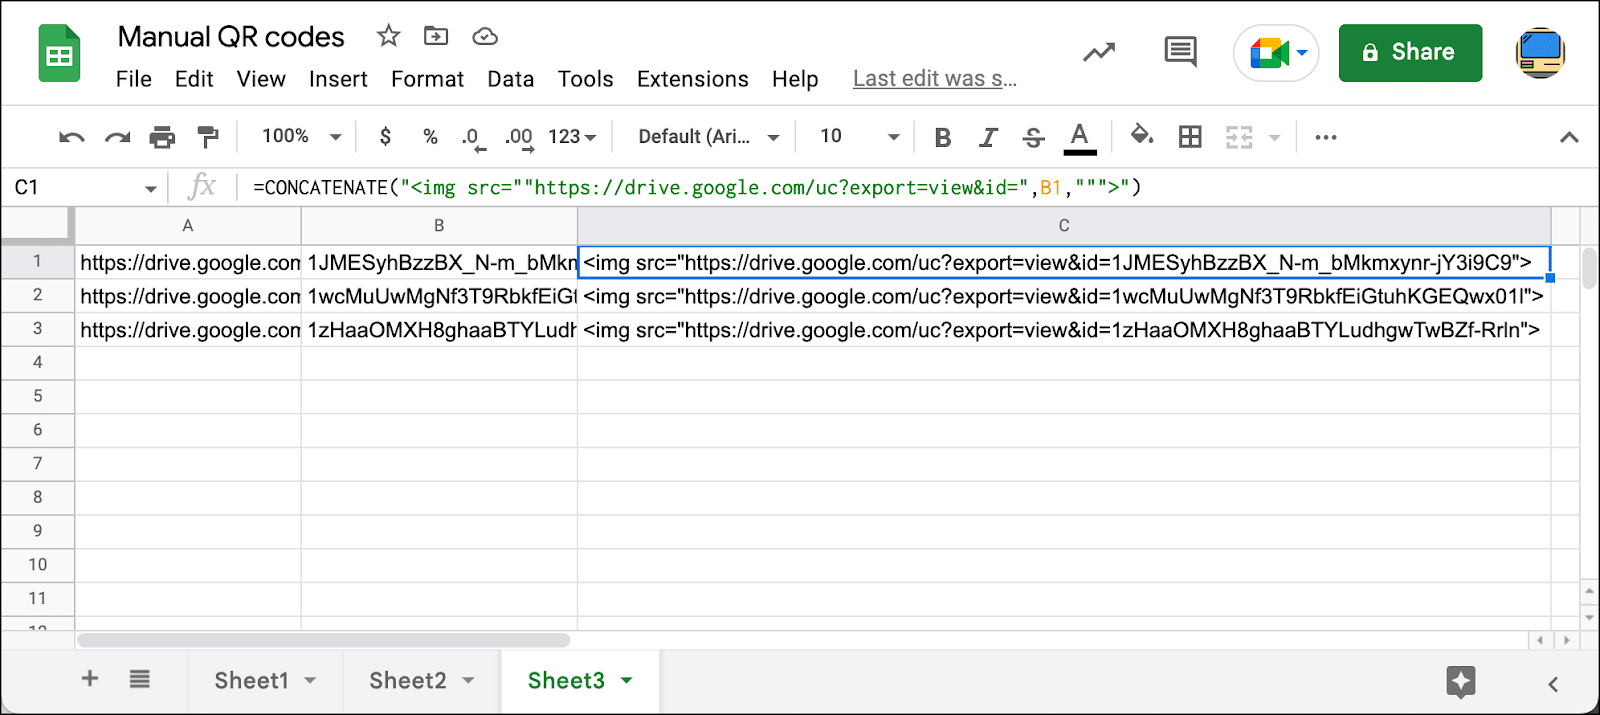
It’s finally time to build mail merge links.
In C1, type the following =CONCATENATE("<img src=""https://drive.google.com/uc?export=view&id=",B1,""">") . You need all those double quotes in there because that’s how you escape quotation marks in this particular Google Sheets scenario. Now drag that formula down to the rest of the cells in the column.
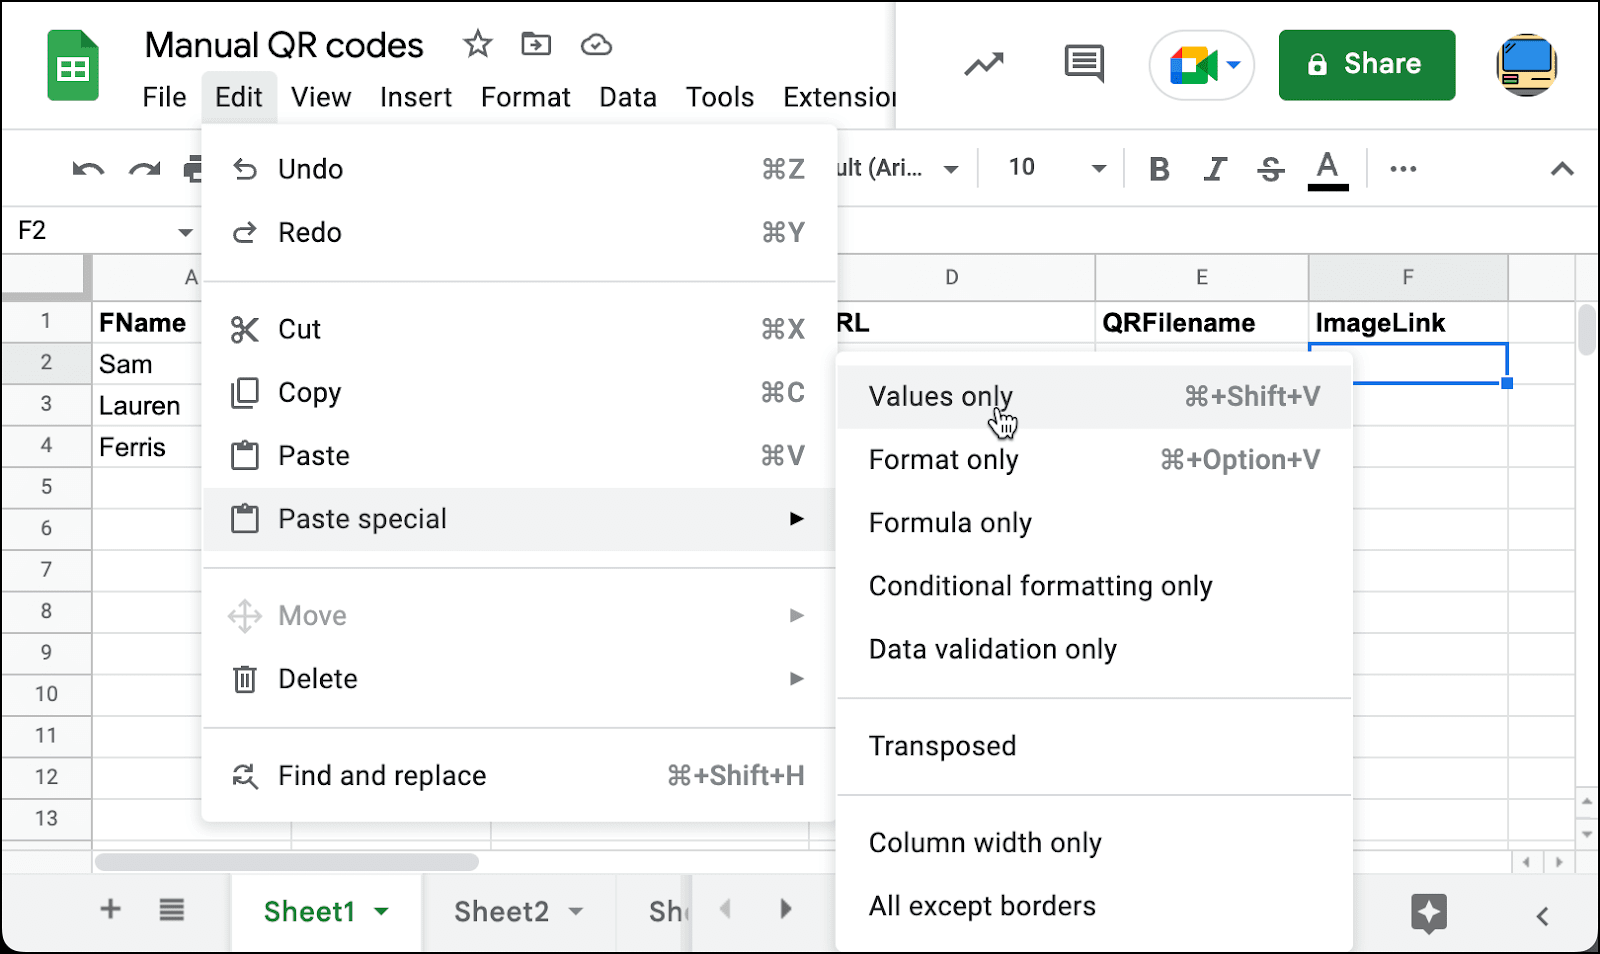
Now copy everything in column C. Go to your main spreadsheet and paste those links in the right rows. Make sure to use Edit > Paste special > Valuesonly.
The images will now be properly embedded in your emails.
Using Dropbox images
Much like Google Drive, Dropbox doesn’t like giving you the direct URLs to your images — they give you links to Dropbox pages featuring your images. So again, we need to extract the URLs.
And with Dropbox, you have to do this one at a time. Plus the URLs are really long. So it’s not the ideal solution.
Upload your images to Dropbox.
Right click on one of your images and chose Share then Share with Dropbox.
Make sure the permission is Anyone with this link can view. Then click Copy Link.
Now open an incognito browser window. (It needs to be an incognito window so you get the public URL.) Paste in the link. Then right-click and choose Copy Image Address.
Now paste that URL into your spreadsheet. And add <img src=" before the image URL and "> after.
Now repeat for the rest of your images.
Things to Keep in Mind
Although that is the basic idea, here are a few other points to keep in mind about personalizing images:
To keep things simple, I’ve just used a regular typed-in email for the example above. However, in many cases you will want to use the personalized image technique in the context of a custom HTML email. It works exactly the same way: just paste in your HTML into the Gmail compose window and then type in your {ImageLink} tag where you want the personalized image to appear. You can read more about How to use custom HTML in a Gmail compose window.
You can also make the image a link itself, of course. That would require using the personalized link technique I’ve blogged about before, but, in your spreadsheet, including the <img> tag within the <a> tag, like this:
If you need to send personalized images as part of a Gmail-based email marketing campaign, just host the individual images somewhere online and then include the full personalized image links, one for each recipient, in your Google Docs spreadsheet. Finally, include the personalization tag (such as {ImageLink} or whatever you’d like to call it, as long as it matches to the spreadsheet column) in the body of your email. It’s that easy!
Want more?
Now that you know how to personalize images, learn how to personalize links as well.
Love what you're reading? Get the latest email strategy and tips & stay in touch.
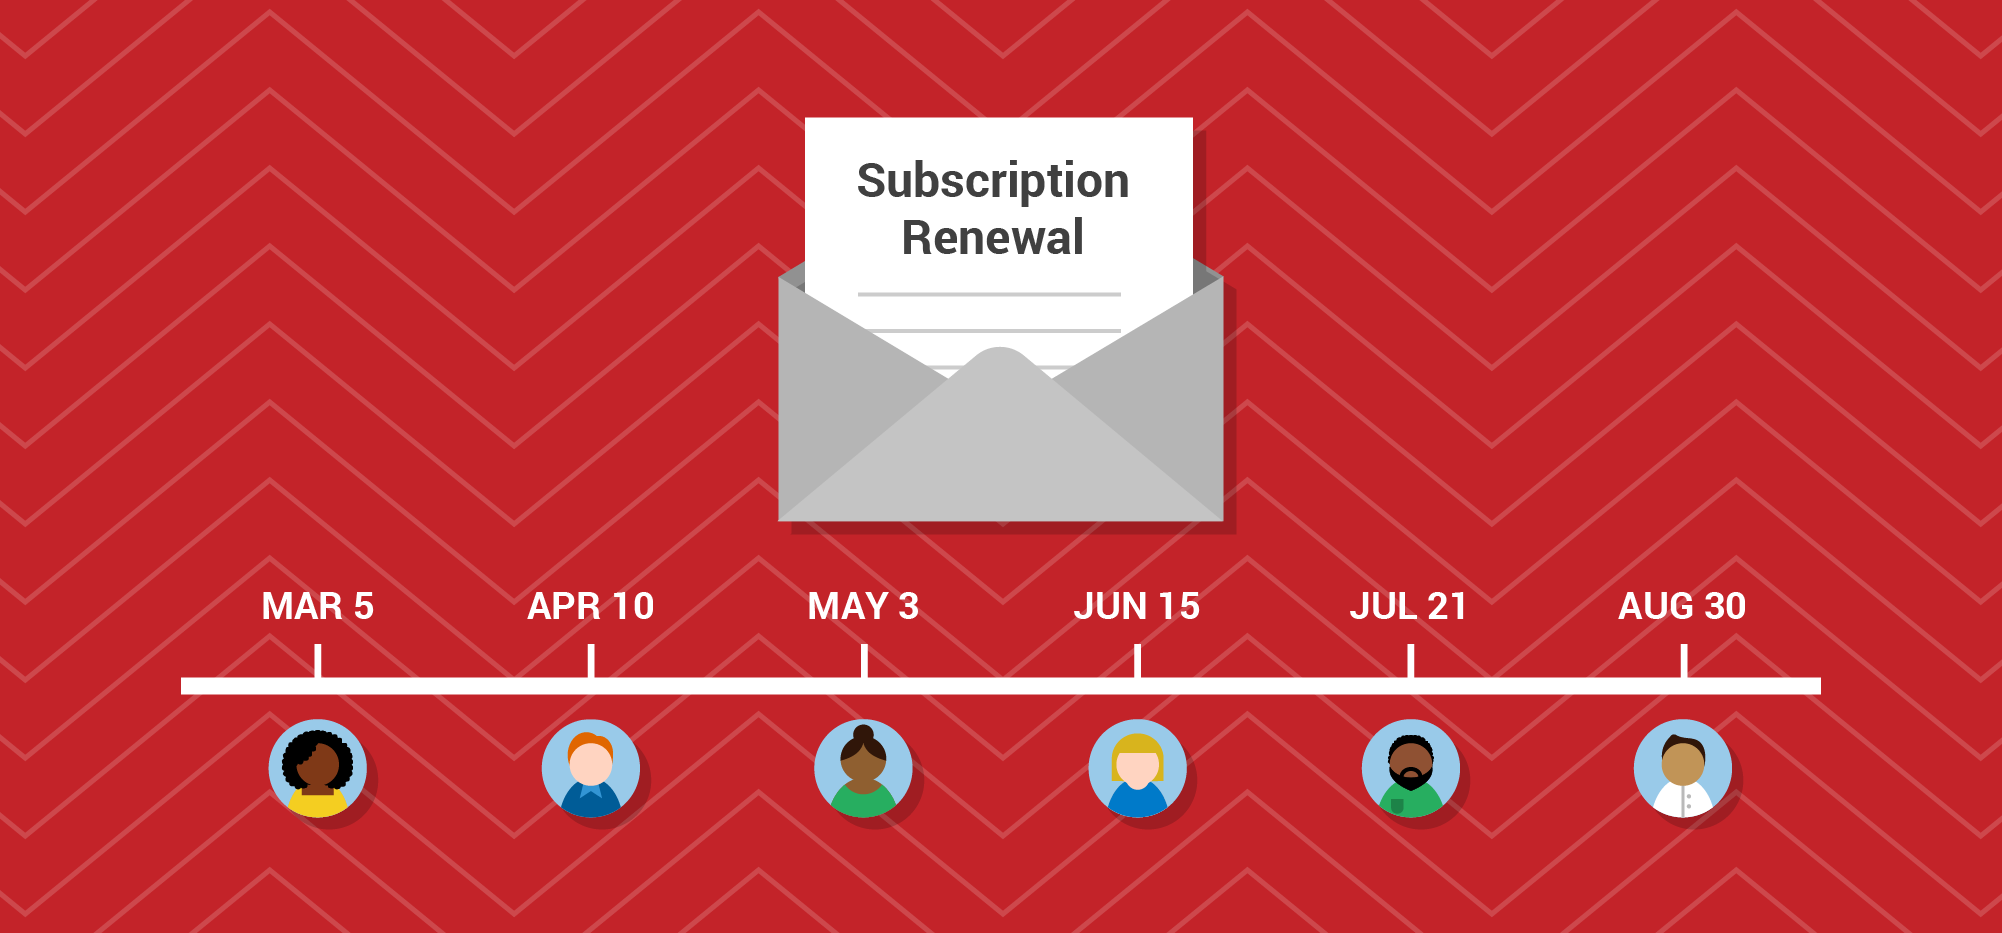
Using a combination of Gmail, Google Sheets, and GMass, you can easily email different people on different days. In the Google Sheets spreadsheet containing your email addresses, you simply need a Date column that includes the date on which you’d like that particular email sent.
Overview
The basic steps to send automatic emails on specific days in Gmail are:
Set up a Google Sheets spreadsheet containing email addresses and the dates to be sent.
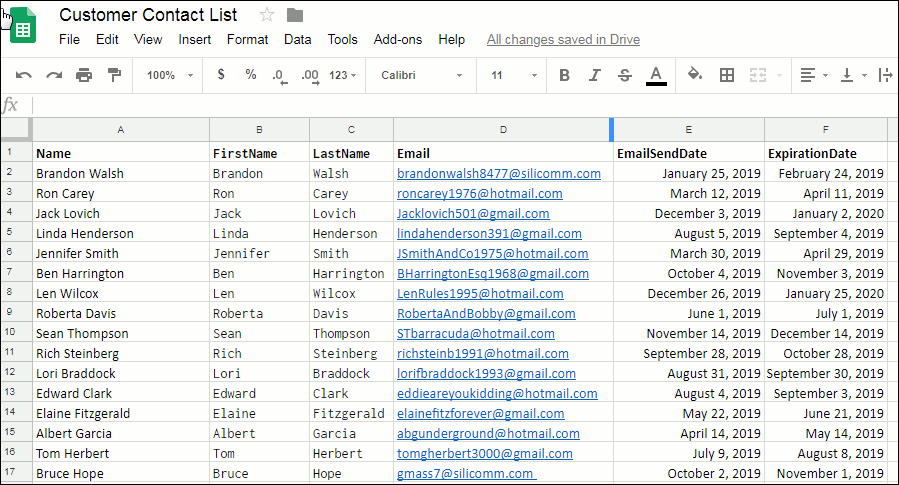
Your spreadsheet can contain any number of columns to personalize your emails, but for date-based sending, it needs to include a column for the email addresses and the EmailSendDate, for when you want each email sent out. That date can be anything that pertains to your use case (see Other Use Cases below after the example).
Customer contact spreadsheet showing dates on which emails are to be sent out.
Above is our sample spreadsheet containing a list of people and the corresponding EmailSendDates. Note that the dates can be in any valid date format. In the example above, I am showing a number of different dates, with or without the year information, and using different formatting, just to show the flexibility. In your actual spreadsheet, you would probably stick to a standard format.
In what format should the date be? For this example, your date column can contain dates with years or without years, and they can be in any recognizable U.S.-based date format. For a date of January 15, 2019 for example, the spreadsheet cell can contain “1/15/19”, “1/15/2019”, “01/15/19”, “January 15, 2019”. It should not contain, however, the European date format of “15/1/19”.
If you are sending something out on an annual basis on that date, and therefore the year does not matter, you can leave years off of the date. For example, “1/15” and “January 15” would be acceptable date values. In this example, that is the approach I will follow (see the last example in Other Uses Cases below if you do need the year information to be used).
Set up the filter criterion in GMass
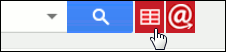
Click the GMass spreadsheet icon
GMass spreadsheet button, found at the top of Gmail page.
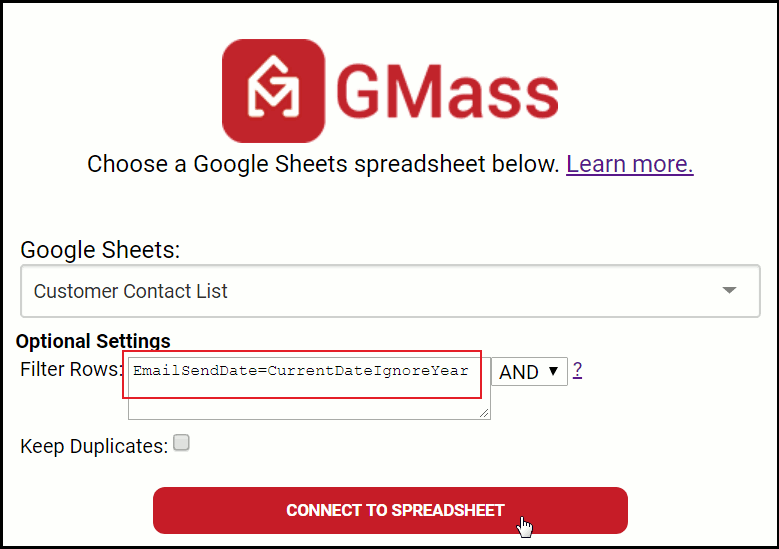
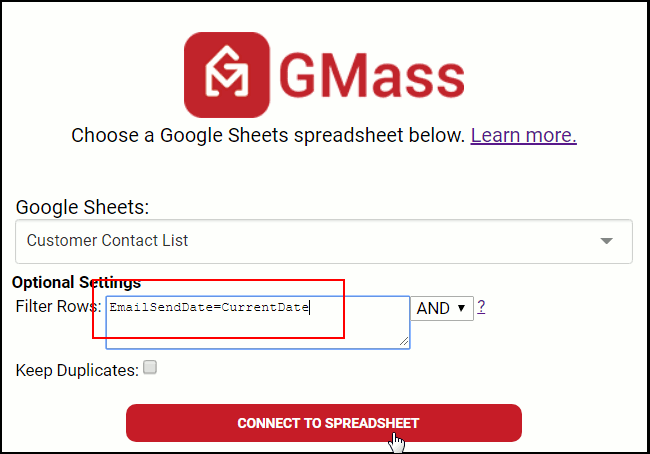
and choose the spreadsheet and worksheet that you just set up. Because we don’t want to send an email to everyone on the spreadsheet at once, we need to specify a filter criterion so that emails only go out when the current date matches the date in the EmailSendDate column.
Choosing the spreadsheet and applying the filter.
The filter criterion is based on the “EmailSendDate” column in the spreadsheet. We want to match rows where the EmailSendDate is equal to the current date. In this example, we are going to do it without regard to the year of the EmailSendDate.
Once you’ve inputted the filter criterion, click the CONNECT TO SPREADSHEET button to continue.
Note: If it’s no recipient has an EmailSendDate that matches today, then the Gmail Compose window will launch with an alias address in the To field representing 0 addresses. That is normal (and is shown in the next screenshot). It just means that right now, 0 emails will be sent. Since you’re going to set up the campaign to repeat daily, it will check to see if anyone has an EmailSendDate on each day the campaign runs, and send out the ones that do.
Set up the mail merge
A Compose window in Gmail should have launched where you can enter the Subject and the Message for the email. Here I’ve personalized the Message with the first name.
The outgoing email.
Again, don’t be alarmed by the alias address representing 0 recipients. That’s just because it happens that today’s date does not match any of the recipients’ EmailSendDate. If any had matched, they would be shown in the To: field.
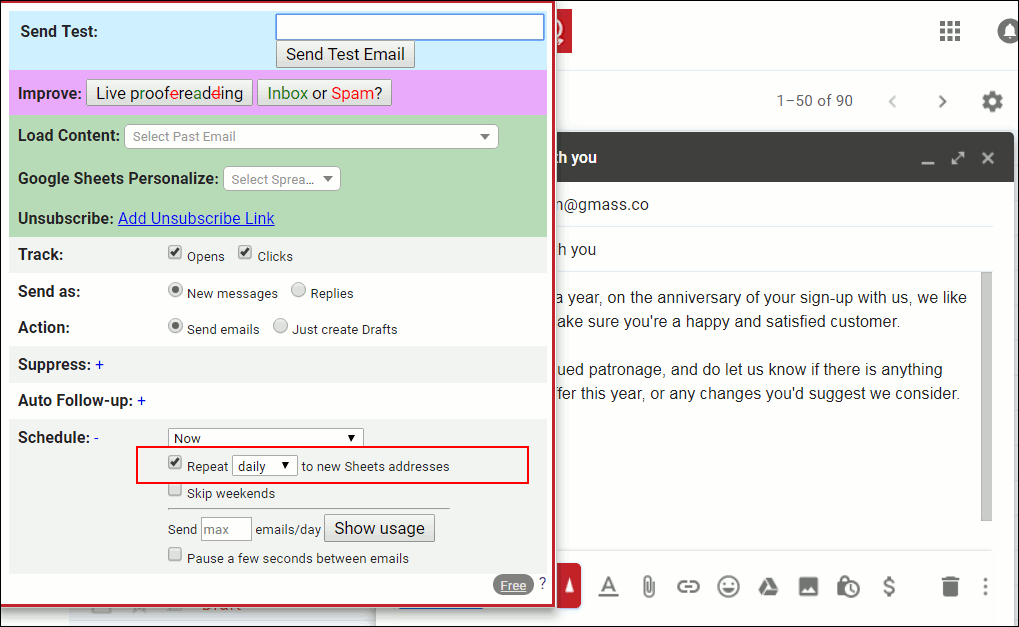
Now, in order to get this email to send every day to just the recipients whose EmailSendDate is that day, you must check the Repeat daily checkbox, which is found in the GMass Settings window.
Checking the “repeat daily” checkbox in GMass Settings.
Setting this to “Repeat daily to new Sheets addresses” will cause GMass to query the spreadsheet daily to see what email addresses match the filter criterion. Without this setting, the email would send today to anyone whose EmailSendDate is today–and then would just stop.
Instead, this setting will tell GMass to:
Query the spreadsheet daily for rows where the current date is equal to the EmailSendDate.
Send an email to just those people.
Bonus: You can keep adding rows to your spreadsheet, even after the campaign has started.
You can add more rows to your spreadsheet anytime you wish, and GMass will automatically pick up the new email addresses and dates. You don’t need to edit your GMass campaign. Just add the new data to the spreadsheet and GMass will detect them and send the emails accordingly on the daily schedule you’ve already set.
Other Use Cases
This is a general pattern that works for a number of use cases, either in business or your personal life.
Automated shipping alerts. If you have a spreadsheet of orders your company has received, and one of the columns is the buyer’s email address, and the other is the buyer’s order ship date, you can have an email sent out automatically on the day that a buyer’s product ships, to let them know to expect their package in the mail soon.
Automated emails for birthdays, graduations, others’ anniversaries, and other special personal dates. See our guide to sending birthday emails.
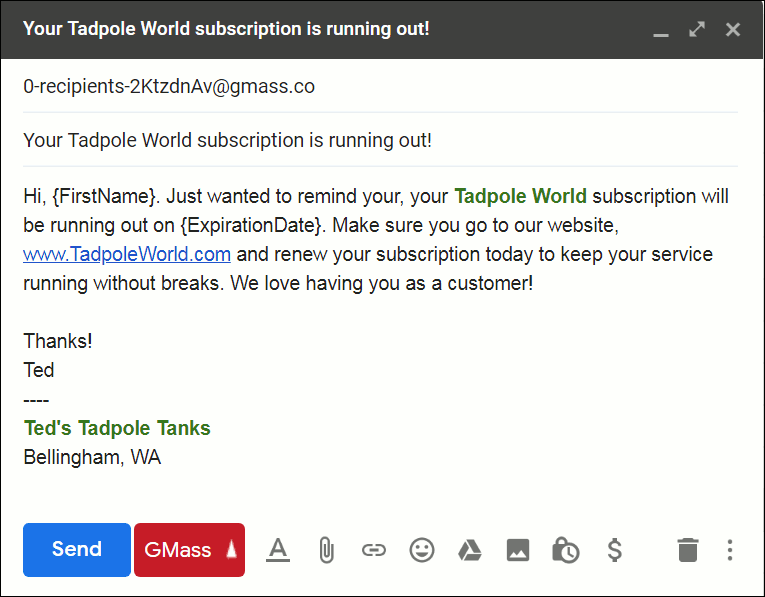
Subscription or membership ending reminders. This is a really useful one, and can be used with software subscriptions, magazines and newsletters subscriptions, society memberships, web domain yearly registrations, and other services that are paid in a repeating manner, whether annually or at some other scheduling. This one works particularly well if you include two date columns in the spreadsheet: one for the reminder send-out date, and one for the final day the service is expiring. You can then reference that expiration date in the body of the email using {ExpirationDate} as a GMass tag.
This case is important enough to take a look at a quick example of the spreadsheet, filter criterion, and a sample message you might compose.
Here is the spreadsheet–note the new ExpirationDate column to the right.
A Google Sheets spreadsheet that also has an expiration date column.
Here is the filter–in this case, we are going to include the year information, so note that the filter is slightly different than what was used in the previous campaign example above.
A different connection to our spreadsheet. Note the filter is changed from the previous example.
Finally, this might be the message that you write to all customers–but it will only be sent out to each a month before his or her particular subscription is running out:
An email that makes use of the ExpirationDate tag used in the previous spreadsheet.
Is your email list not in Google Sheets?
GMass integrates extensively with Google Sheets to make features like sending automatic date-based emails possible. What if you don’t use Google Sheets as the main warehouse for your email list data? Using one of the many Google Sheets integrations from Zapier, you can automatically sync data from almost any database system with Google Sheets.
 The code “69585” is unique to Gmail and is not a standard SMTP code. A while back I wrote a detailed explanation of what this bounce means and how to handle it. And now, if you Google “69585” or some derivative of that search phrase, look what happens:


 When you start sending mass emails from your Gmail account, you’ll have many more emails filed in your Sent Mail folder than you’re used to. For users who are inexperienced with narrowing Gmail’s search results, having many additional emails in the Sent Mail folder can feel overwhelming. Google has published an


 Whether or not you use GMass, it’s useful to understand the difference between the three different domains that Google uses for email: gmail.com, googlemail.com, and google.com. Let´s take a quick look at how these three differ.
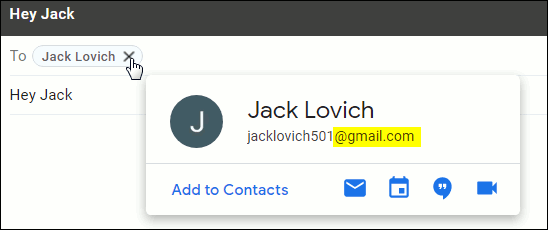


 Using a combination of Gmail, Google Sheets, and GMass, you can easily email different people on different days. In the Google Sheets spreadsheet containing your email addresses, you simply need a Date column that includes the date on which you’d like that particular email sent.
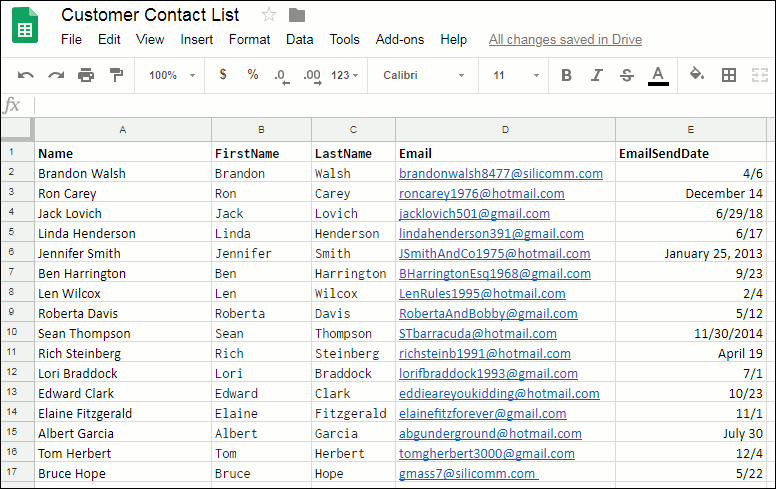