<img height="1" width="1" style="display:none" src="https://www.facebook.com/tr?id=1822615684631785&amp;ev=PageView&amp;noscript=1"/>
If you sent a mail merge campaign with GMass and found that you experienced some blocking, you may want to re-send your email to the email addresses that blocked you the first time. You may especially want to do this if you’ve taken some action to fix the blocking issue, like setting up a dedicated tracking domain.

Using the GMass manual follow-up tool, doing so is just a matter of a few clicks.

1. Click the red @ button near the Gmail Search bar. This is the manual follow-up tool.

2. Choose the campaign from the dropdown that experienced the blocking.

3. Under Behaviors, choose Blocks.

4. Next click the main COMPOSE FOLLOW-UP button.

5. A Gmail Compose window will launch and the To field will be filled with the addresses you want to send to, the addresses that previously blocked your campaign.

6. Next load up the content of your campaign by clicking the GMass Settings arrow and choosing your original campaign from the Load Content dropdown. Your Subject and Message will be set.

7. Lastly, ensure all other GMass Settings are how they should be, such as Tracking of opens and clicks, and make sure the Schedule is set to the desired time of sending.

8. Finally, hit the red GMass button to send. Your campaign will now go to the email addresses that blocked you the first time.

See why GMass has 300k+ users and 7,500+ 5-star reviews


Email marketing. Cold email. Mail merge. Avoid the spam folder. Easy to learn and use. All inside Gmail.


TRY GMASS FOR FREE

Download Chrome extension - 30 second install!
No credit card required
Love what you're reading? Get the latest email strategy and tips & stay in touch.


Sometimes specifying who is getting your mail merge campaign is just as important as specifying who should NOT get your mail merge Gmail campaign… thanks to our Suppression feature, now you have even more control of exactly who does and doesn’t get your emails.

There are three groups of people who will not receive a campaign you send (even if you include those email addresses in that campaign’s Google Sheet or other mailing list):

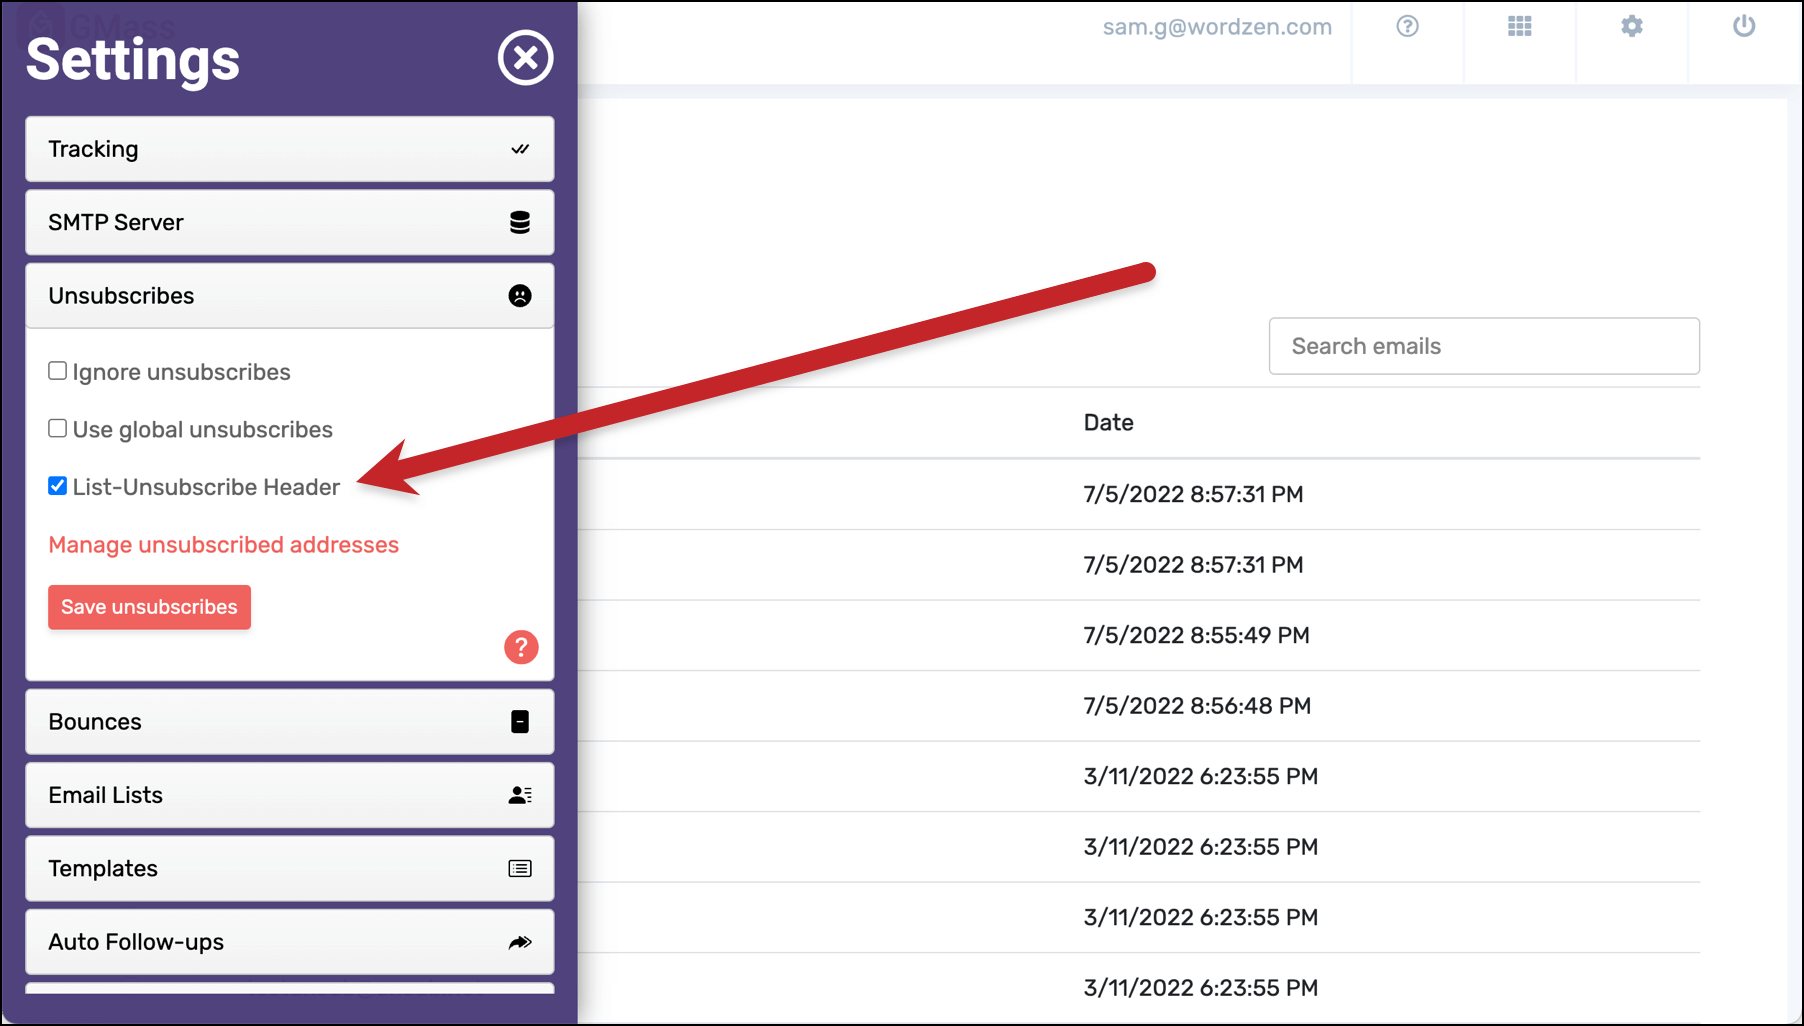
  1. People on your unsubscribe and bounce lists
  2. People you suppress for just that specific campaign
  3. People you remove from a dynamic list

In this post, we’re talking about the latter two: How to remove email addresses for one specific campaign, either via suppression or via a dynamic list.

How to Use Suppression to Remove Recipients from an Individual Campaign

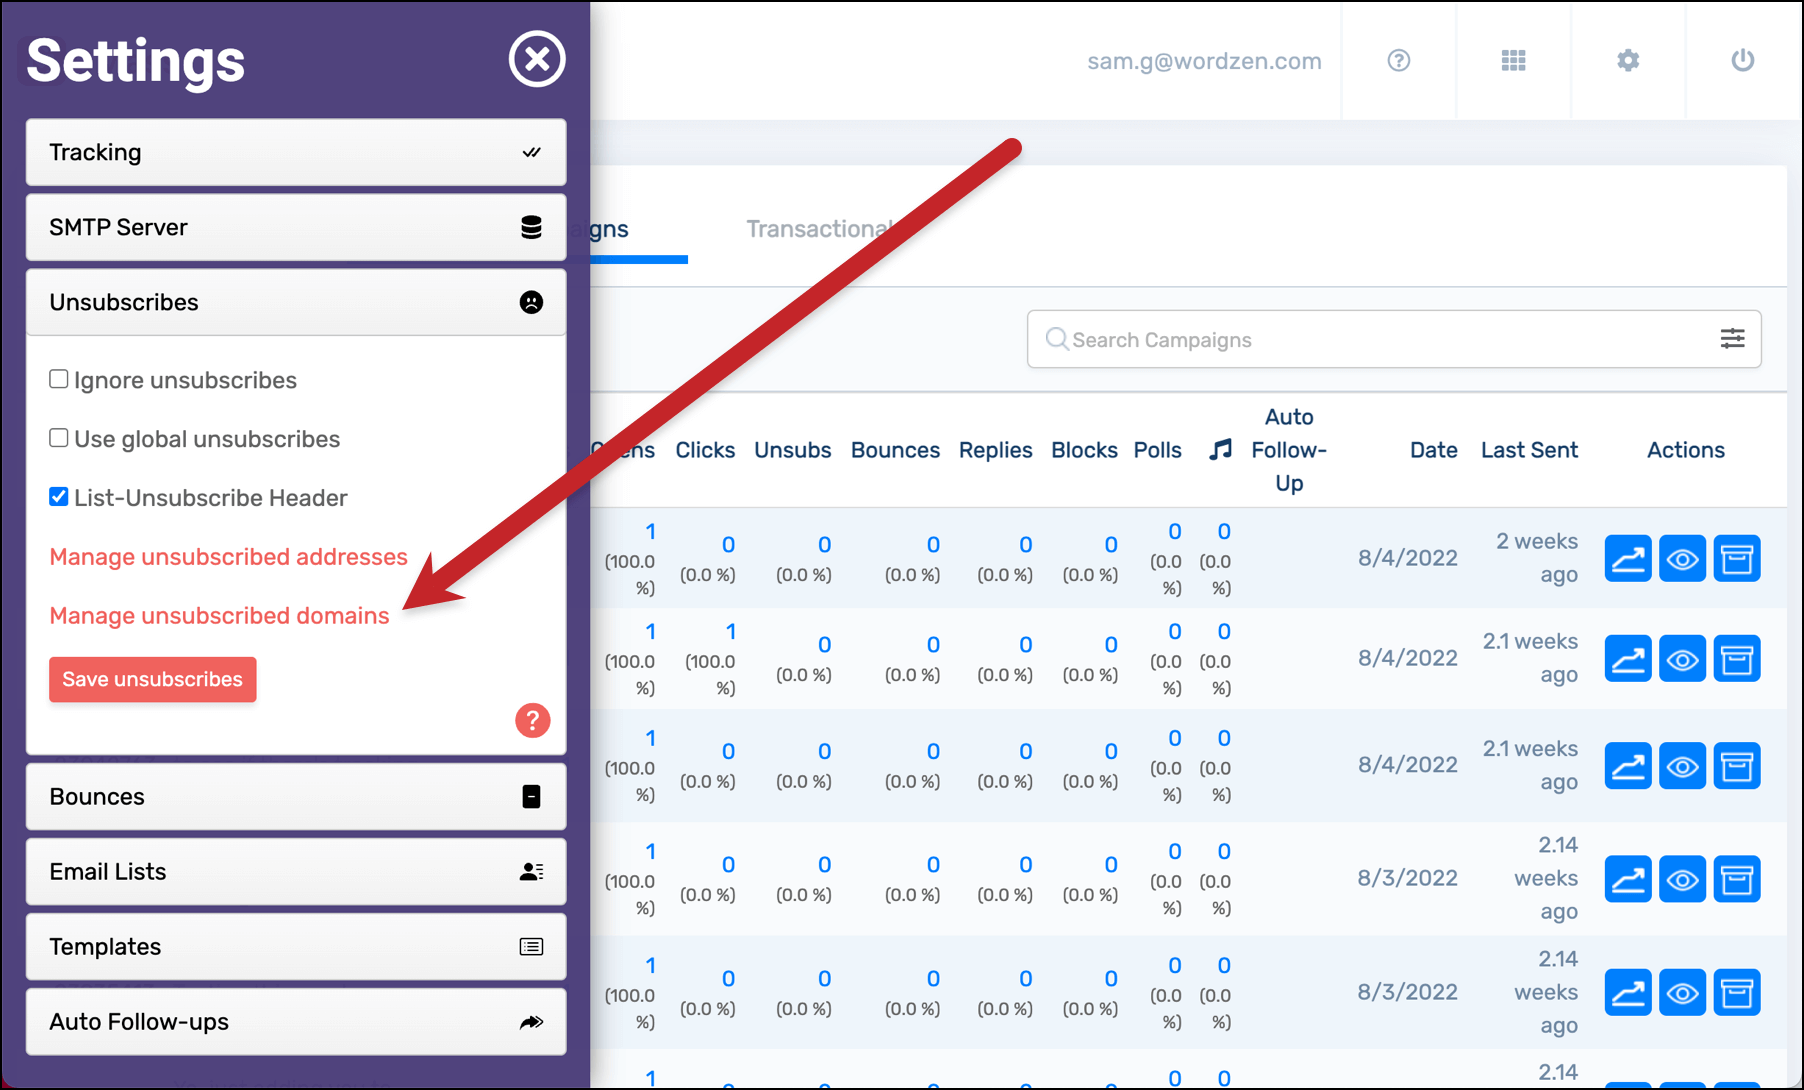
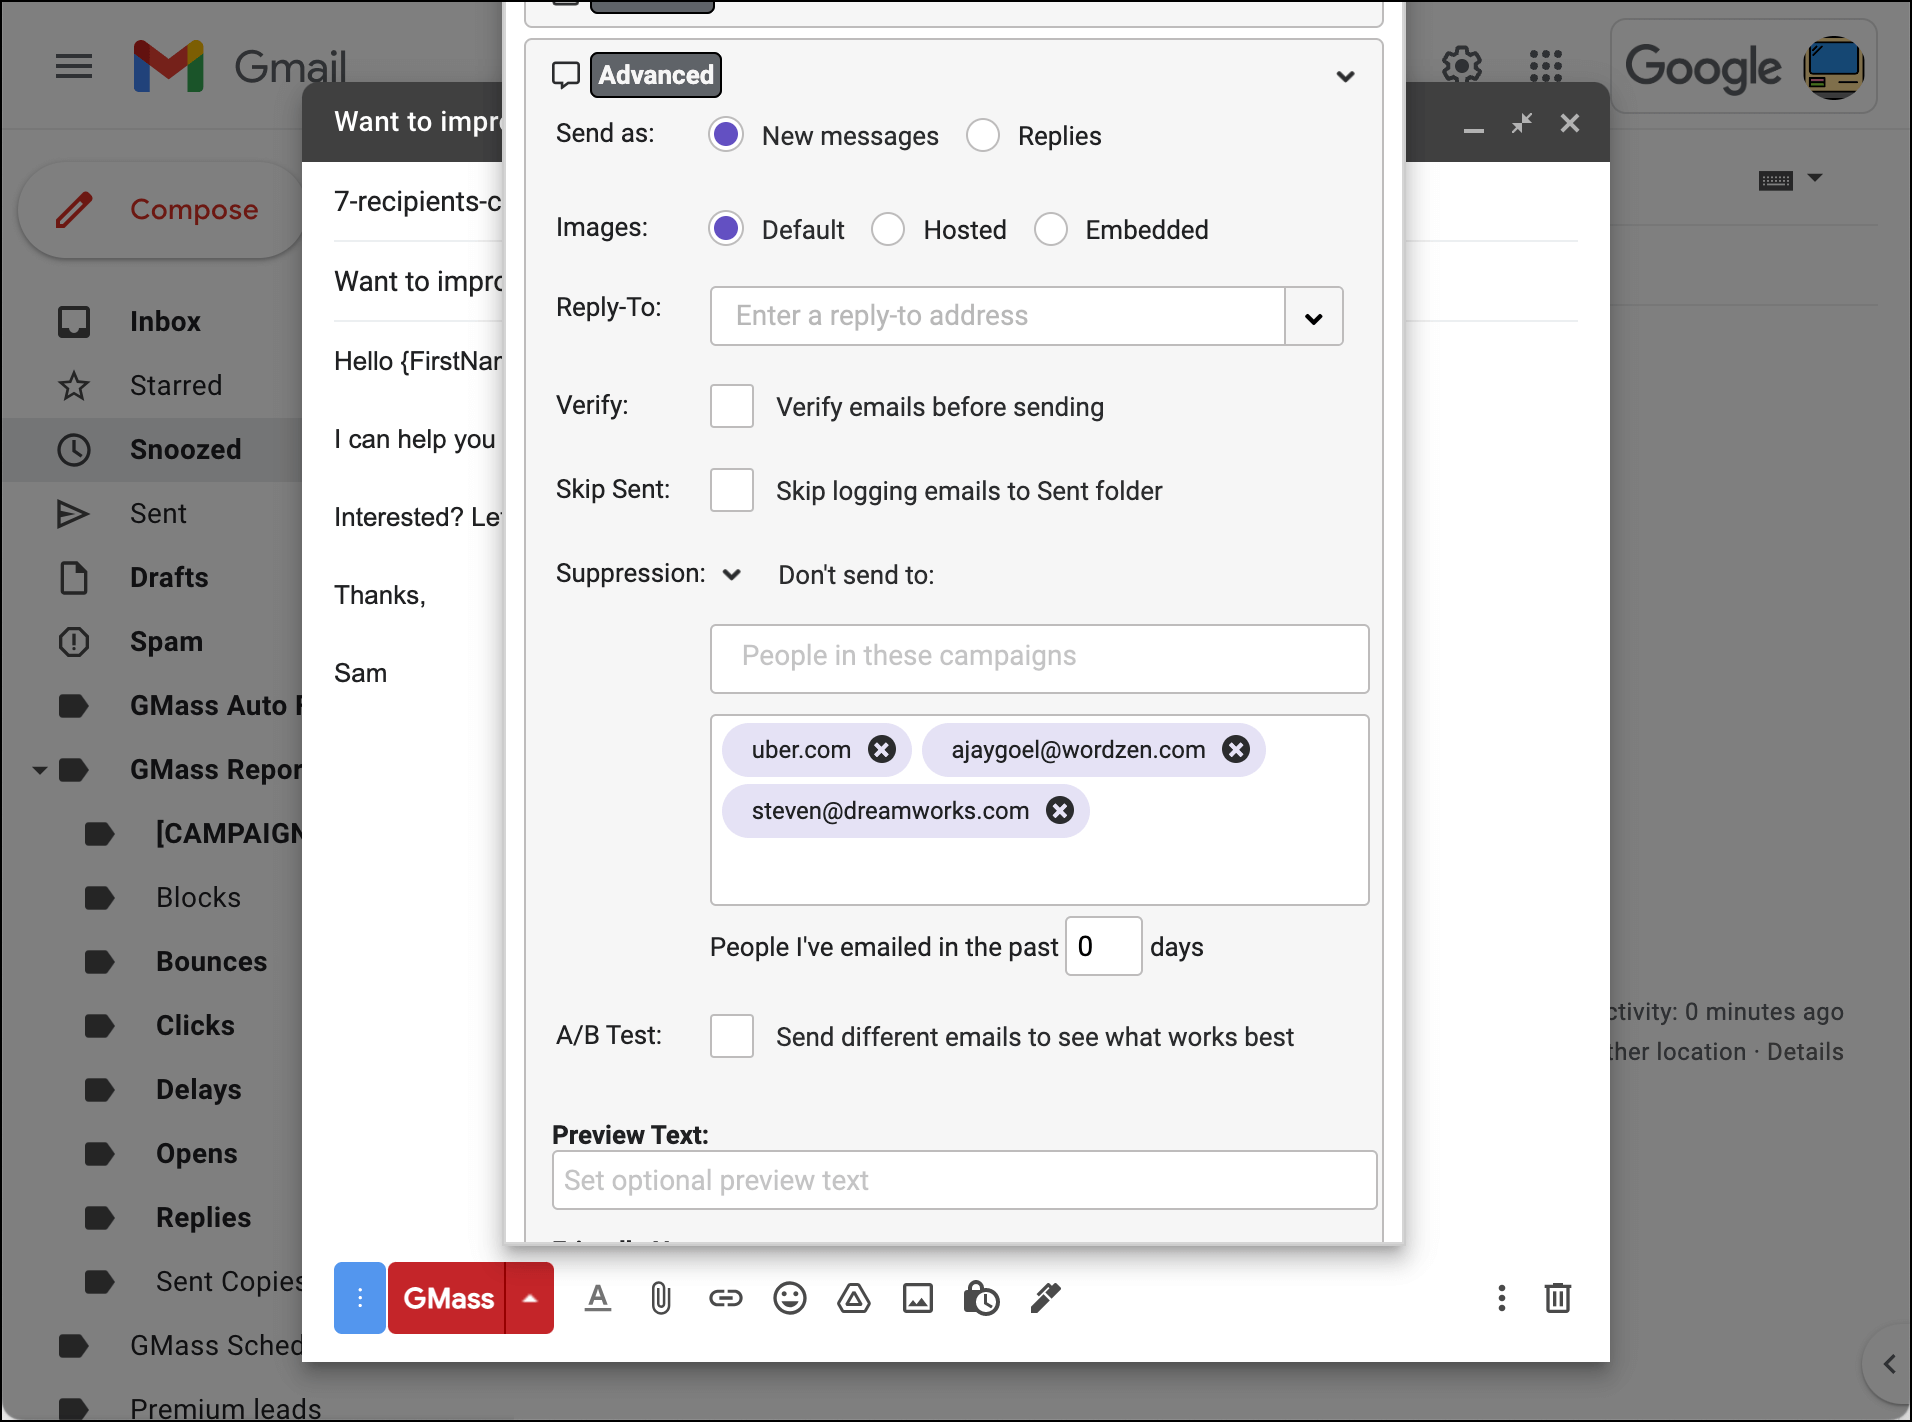
You can find the suppression options for a GMass campaign in the GMass settings box, under the Advanced options.

Suppression settings in GMass

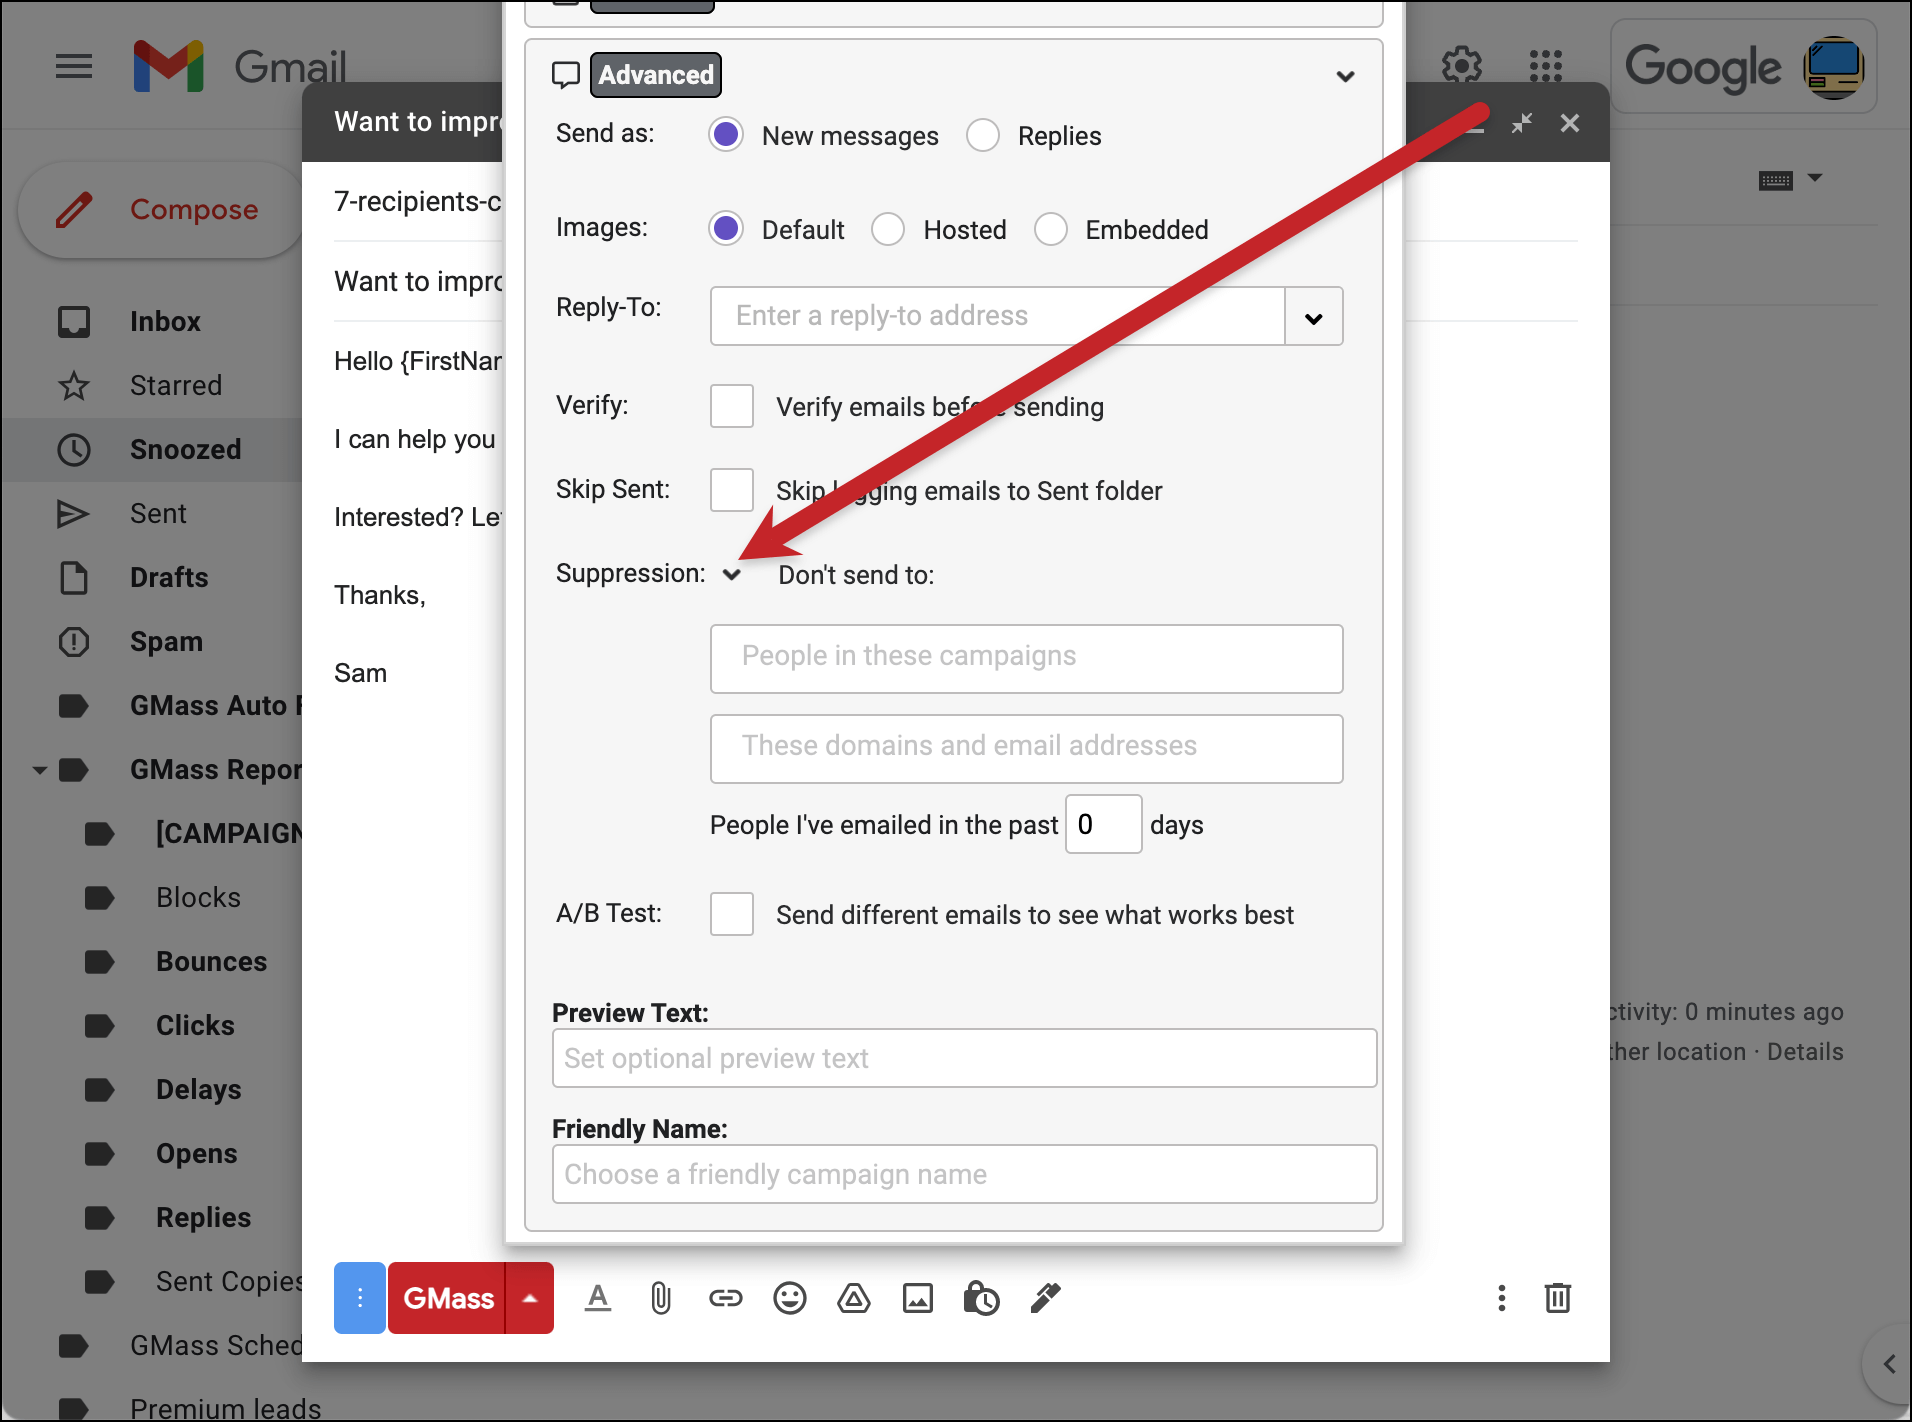
You can see three options for ways to suppress recipients for your campaign:

  • People in other campaigns
  • People at specific domains or email addresses
  • People you’ve recently emailed

Here’s how to use each of those methods for suppression.

Using your previous (or other active) campaigns as suppression lists

Every campaign in your account can be used as a suppression list.

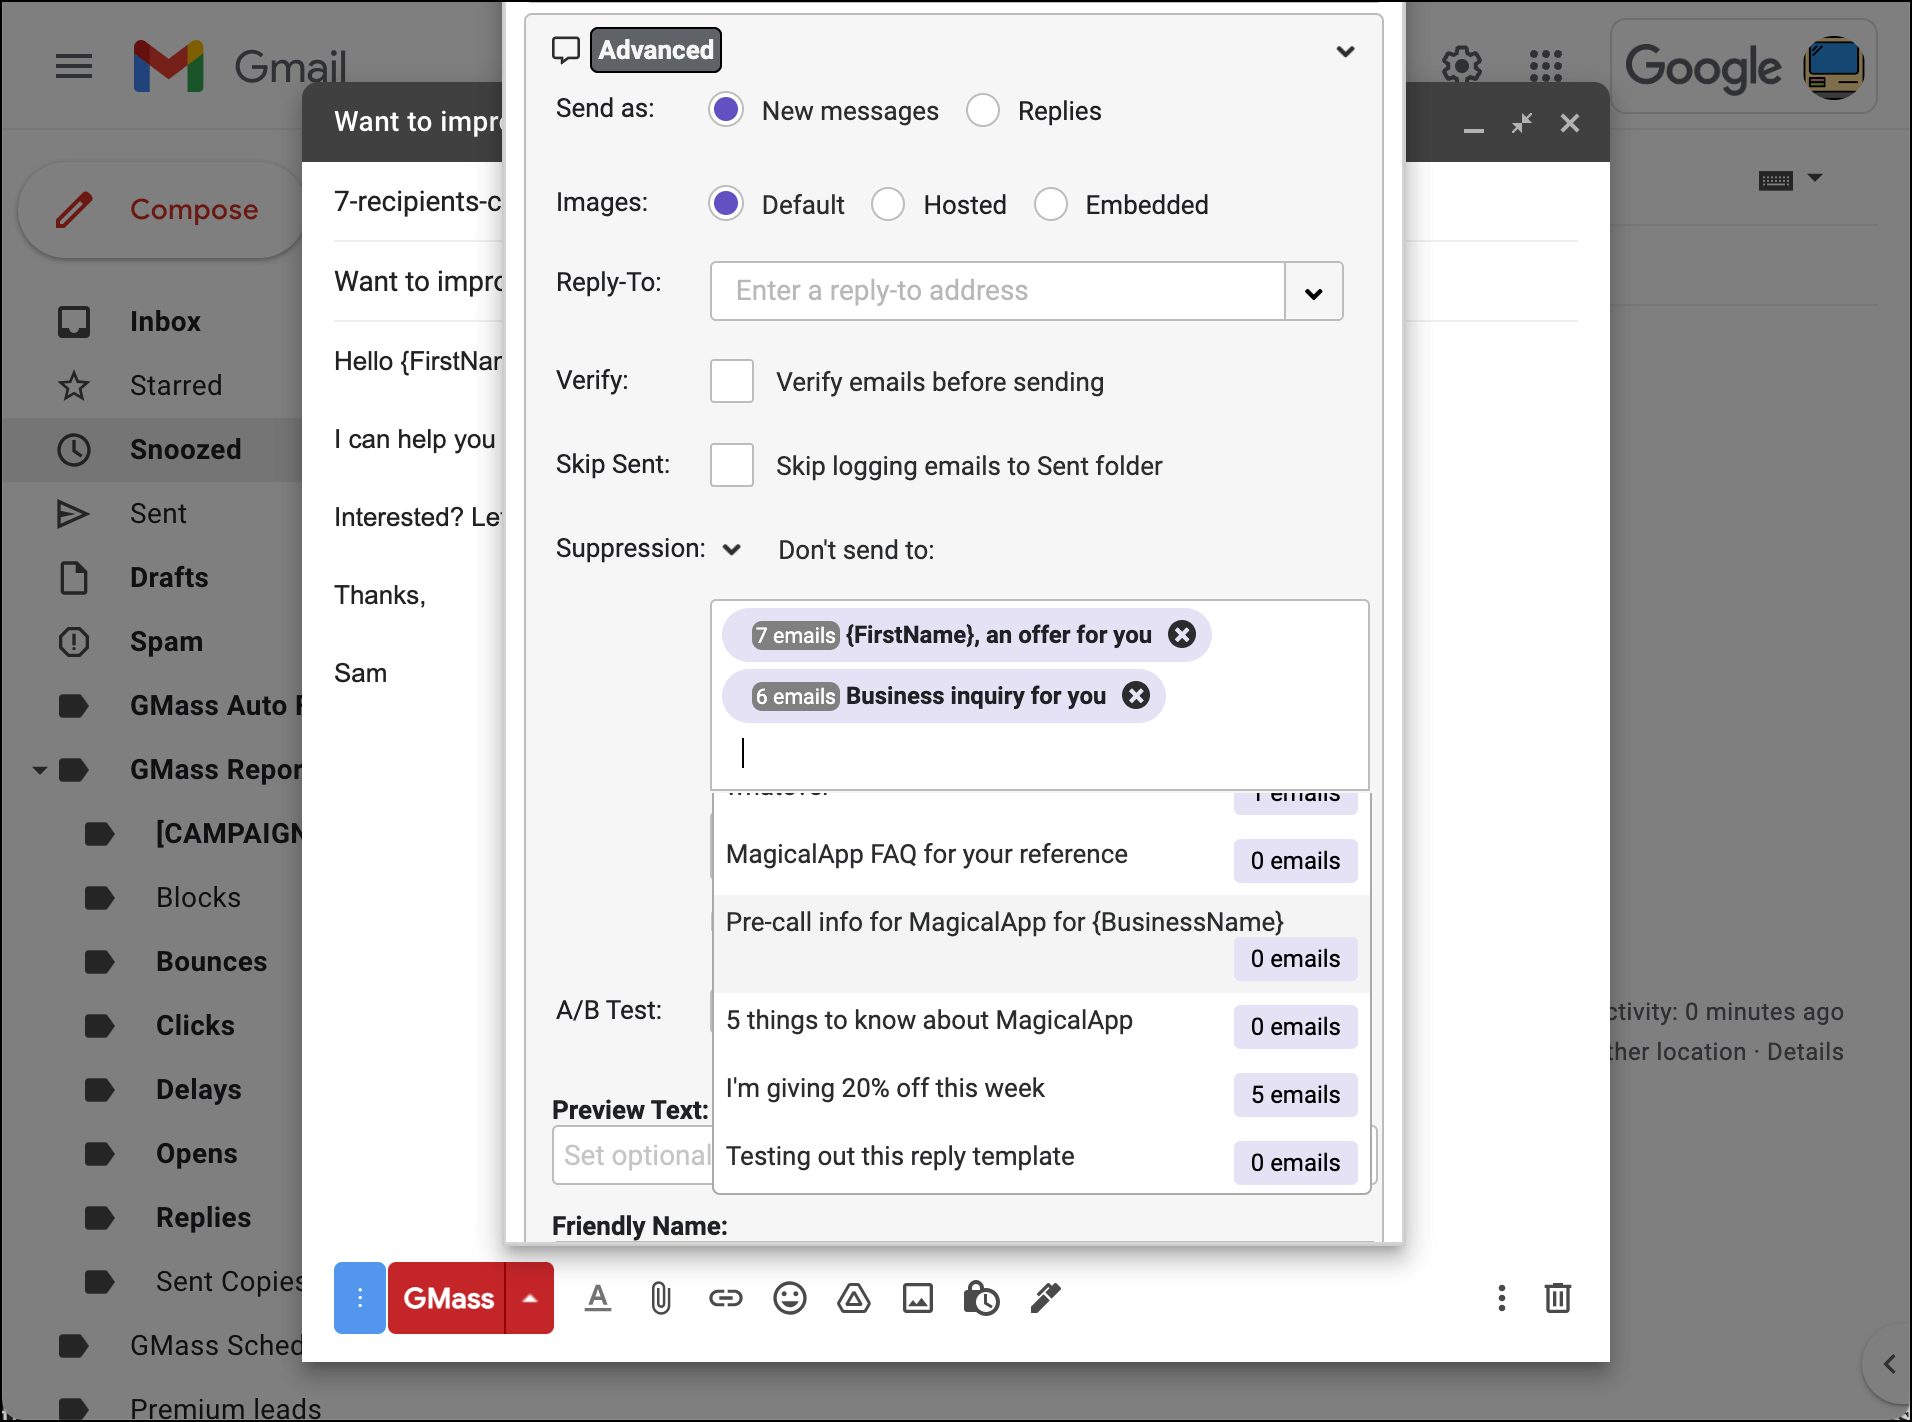
When you click into the “People in these campaigns” field in the Suppression section, you’ll see a dropdown list of your past and currently-running campaigns. You can choose any of those campaigns (or multiple campaigns) to serve as suppression lists.

Any email address that was part of the chosen campaign will be suppressed, or eliminated from, this current campaign.

For instance, let’s say you’re sending a 20% discount offer to a list of prospective customers. You don’t want to send to anyone who was on a 15% discount campaign a week earlier. You can suppress everyone from that 15% discount list by selecting that campaign in the dropdown.

There’s one more step: To decide if you want to suppress emails to everyone who received those campaigns, or everyone who received and will receive those campaigns in the future.

That’s where we use regular suppression and aggressive suppression.

Regular suppression vs. aggressive suppression

There’s a checkbox underneath the campaigns field in the GMass settings for Aggressive suppression.

Aggressive suppression

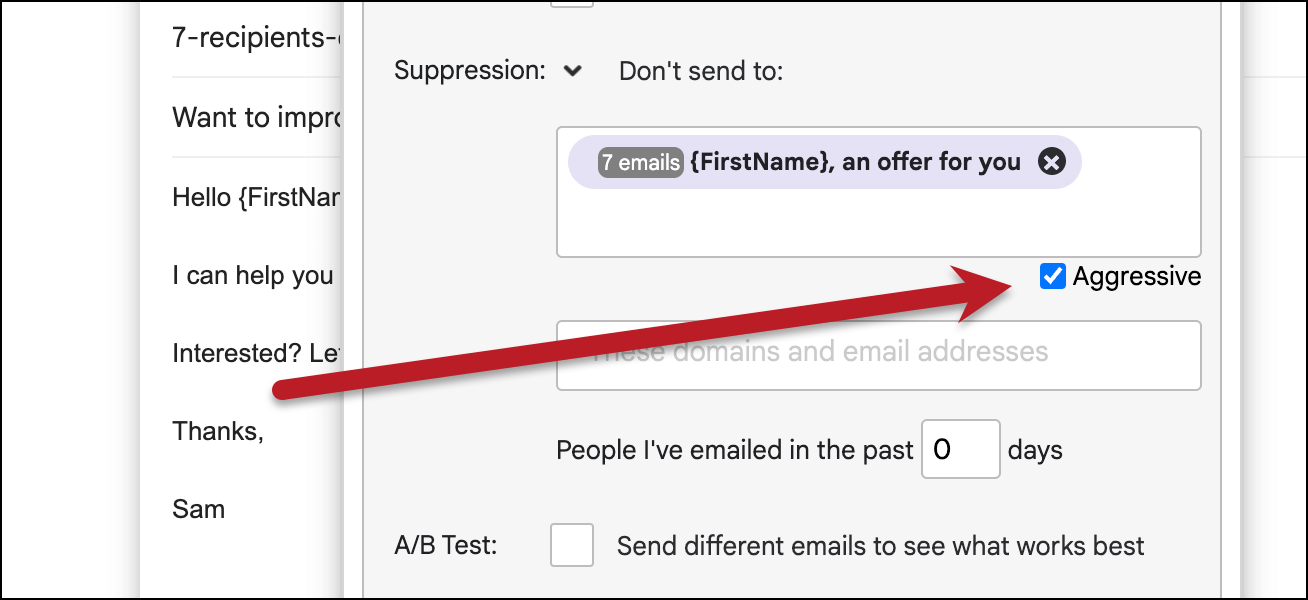
When that box is checked and Aggressive suppression is turned on, everyone who’s received the suppression campaign AND anyone who is scheduled to receive it will be suppressed in the current campaign.

When that box is unchecked and Aggressive suppression is turned off, only people who received the suppression campaign will be suppressed in the current campaign.

Here’s an example to illustrate the difference.

Let’s say you’ve scheduled “Campaign A” to send to 10,000 people over the course of a week. As of today, 2,000 people have received it. And now you’re sending “Campaign B.” With Campaign B, you choose Campaign A as your suppression campaign.

If you go with non-aggressive suppression, only the 2,000 people who’ve received Campaign A will be suppressed in Campaign B.

If you go with aggressive suppression, all 10,000 people in Campaign A will be suppressed in Campaign B, even though many of them have not yet received Campaign A.

When to use regular suppression or aggressive suppression

Both techniques can come in handy in different scenarios.

A situation for regular suppression could be…

  • You sent a campaign to 1,000 people.
  • After 100 people have received it, there are errors and the campaign can’t resume.
  • You create a new campaign and suppress the prior campaign in regular mode, meaning only the 100 people who received the first one would be suppressed in the new one.
  • If you used aggressive mode, then no one on your list would get the new campaign because all 1,000 of them would be suppressed (since aggressive includes those who received and were scheduled to receive).

A situation for aggressive suppression could be…

  • You create two email lists from your two CRMs, Hubspot and Salesforce.
  • You know there are duplicates in the lists but you can’t manually go through thousands of people to weed those out.
  • You create a campaign to the Hubspot list.
  • Then you create a campaign to the Salesforce list and choose the Hubspot list as your suppression list with aggressive mode on.
  • That way, the Salesforce campaign will suppress its messages to everyone who’s entered in the Hubspot campaign, even if some of them haven’t received their emails yet. Which means no duplicates will go out.

Suppressing specific domains or email addresses from a campaign

The next option in the Suppression area of settings is the “freehand” suppression box. Here, you can manually enter any domains or email addresses you want to suppress on this specific campaign.

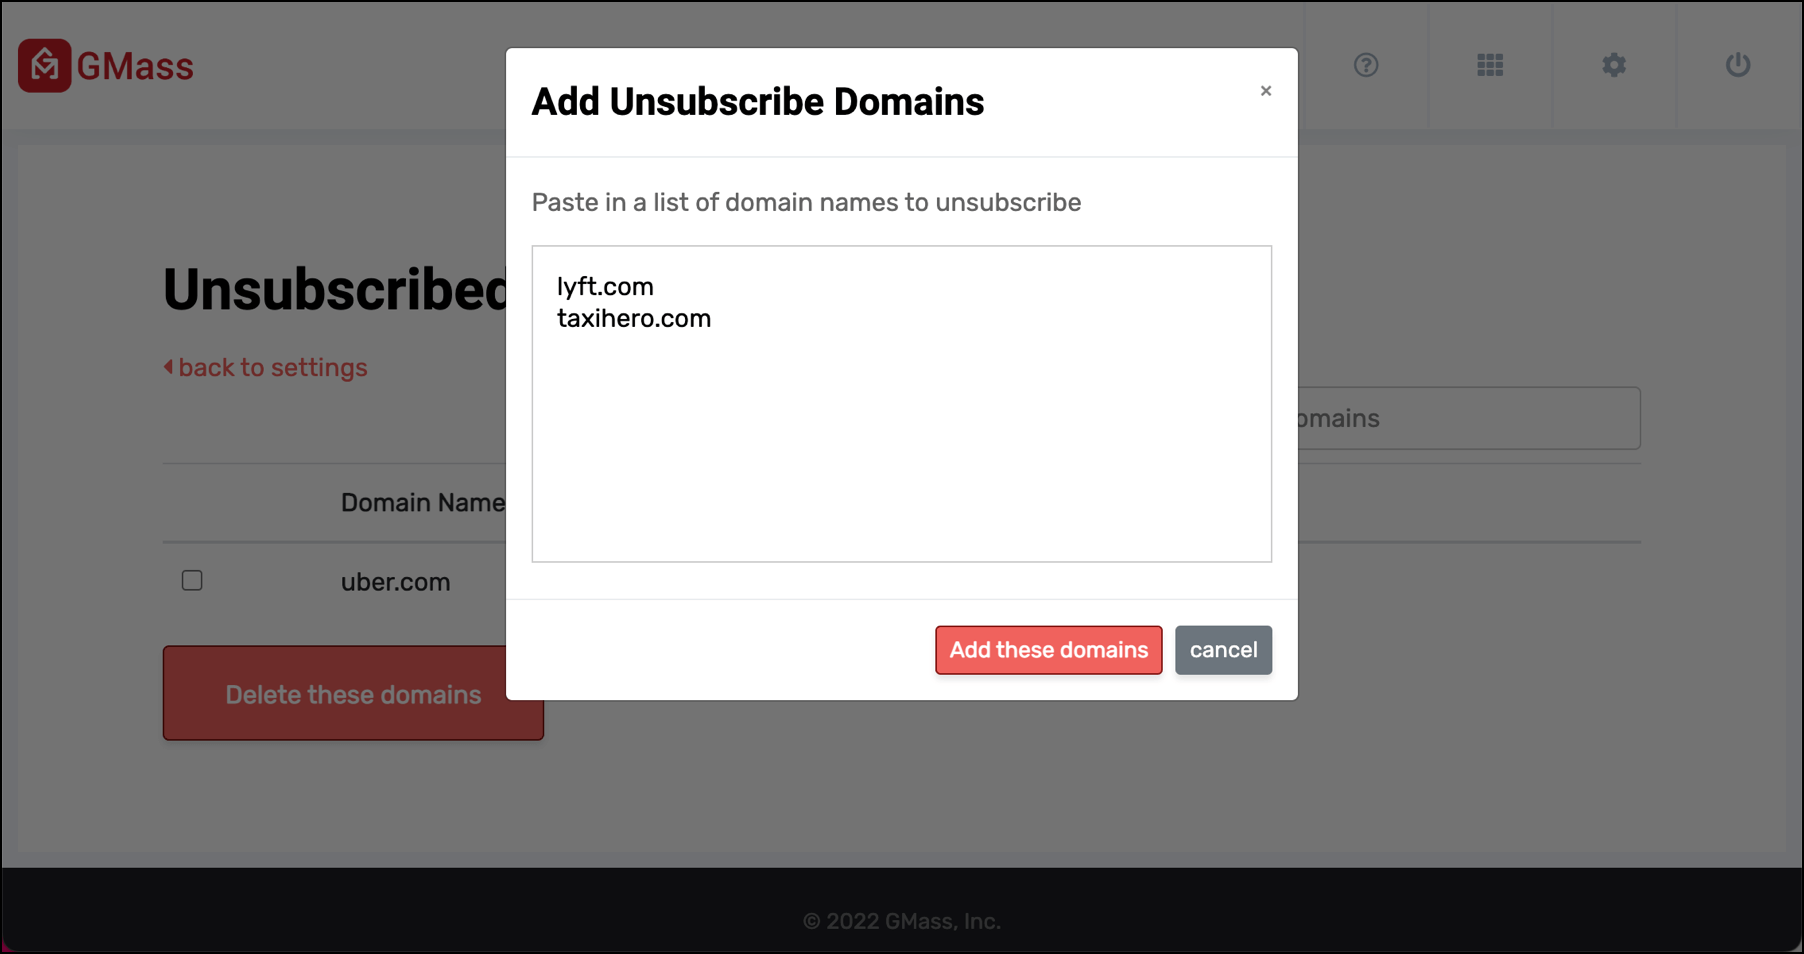
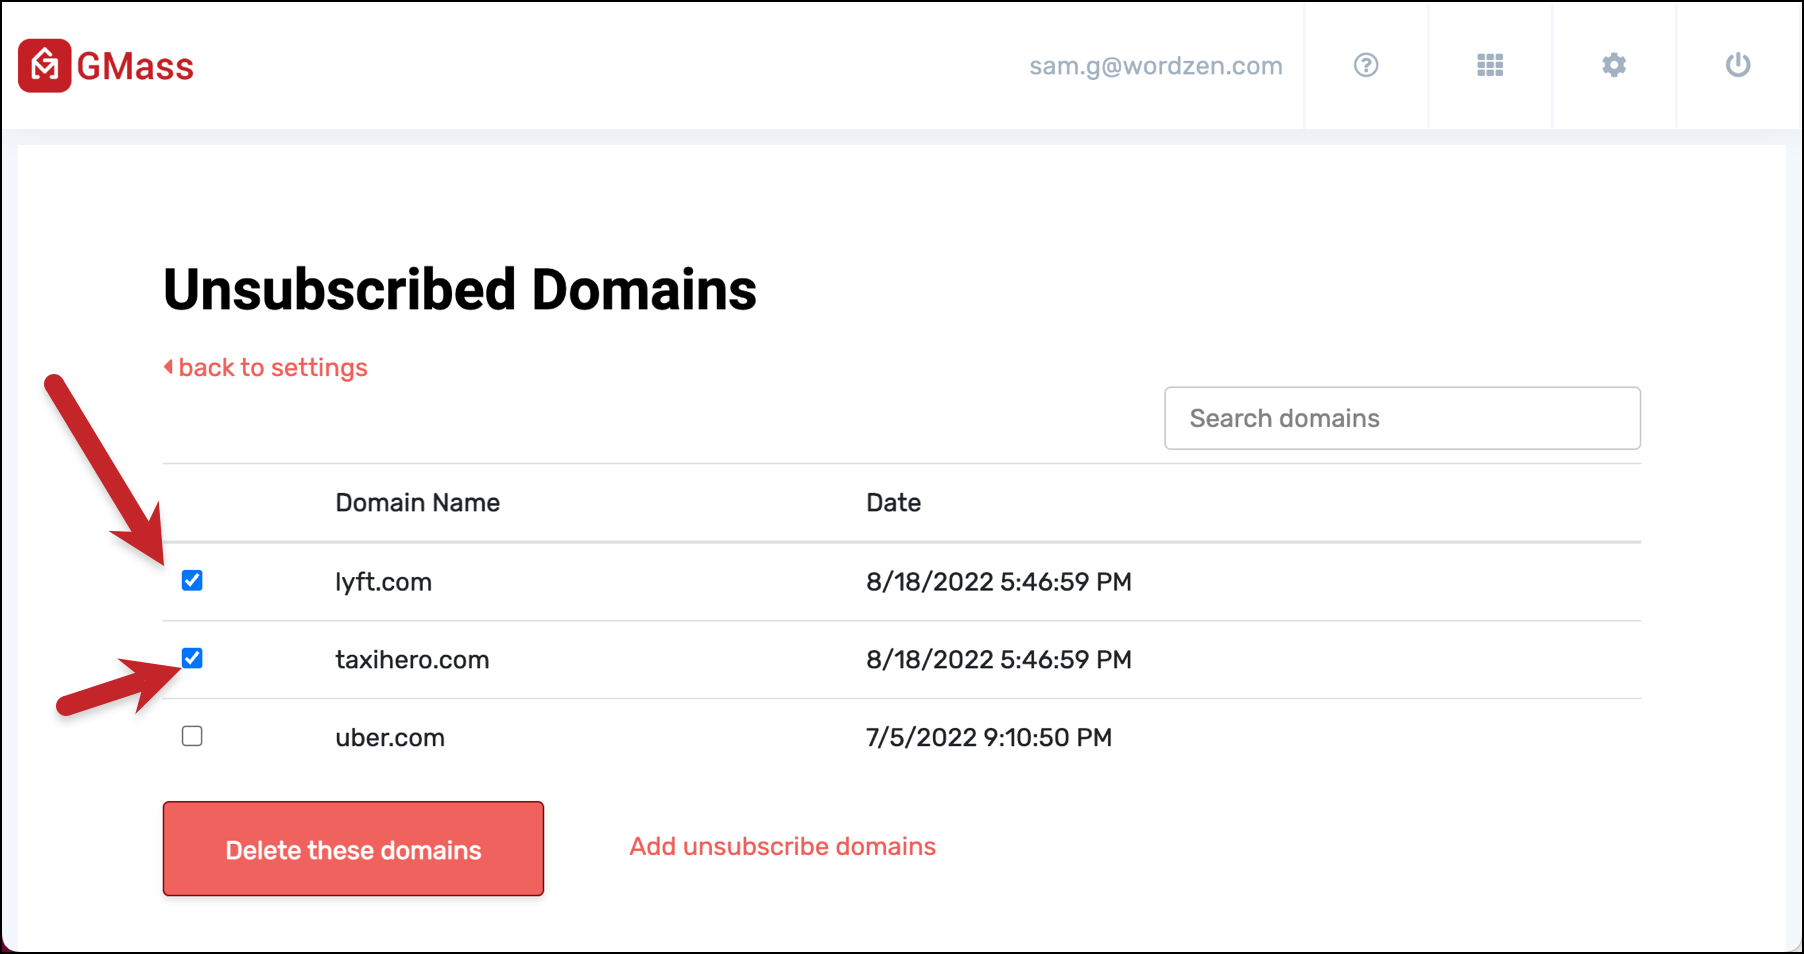
The domain-wide option is handy if you want to make sure not to email anyone at a specific company on a campaign. (Let’s say you’re already in talks with Uber about a service you provide. Now you don’t want your new pitch email to go out to anyone at Uber, which might muddy the waters.)

Note: The domain option will work for anyone at the primary domain (e.g., john@uber.com) or a multi-part/subdomain (e.g., john@ext.uber.com).

The email address option is useful when you need to remove handpicked contacts from a list.

Just separate the domains and/or email addresses in this field with a comma, semicolon, or space. You can type or paste in as many as you need.

Suppressing emails to specific emails or domains

Suppression based on recent emails sent

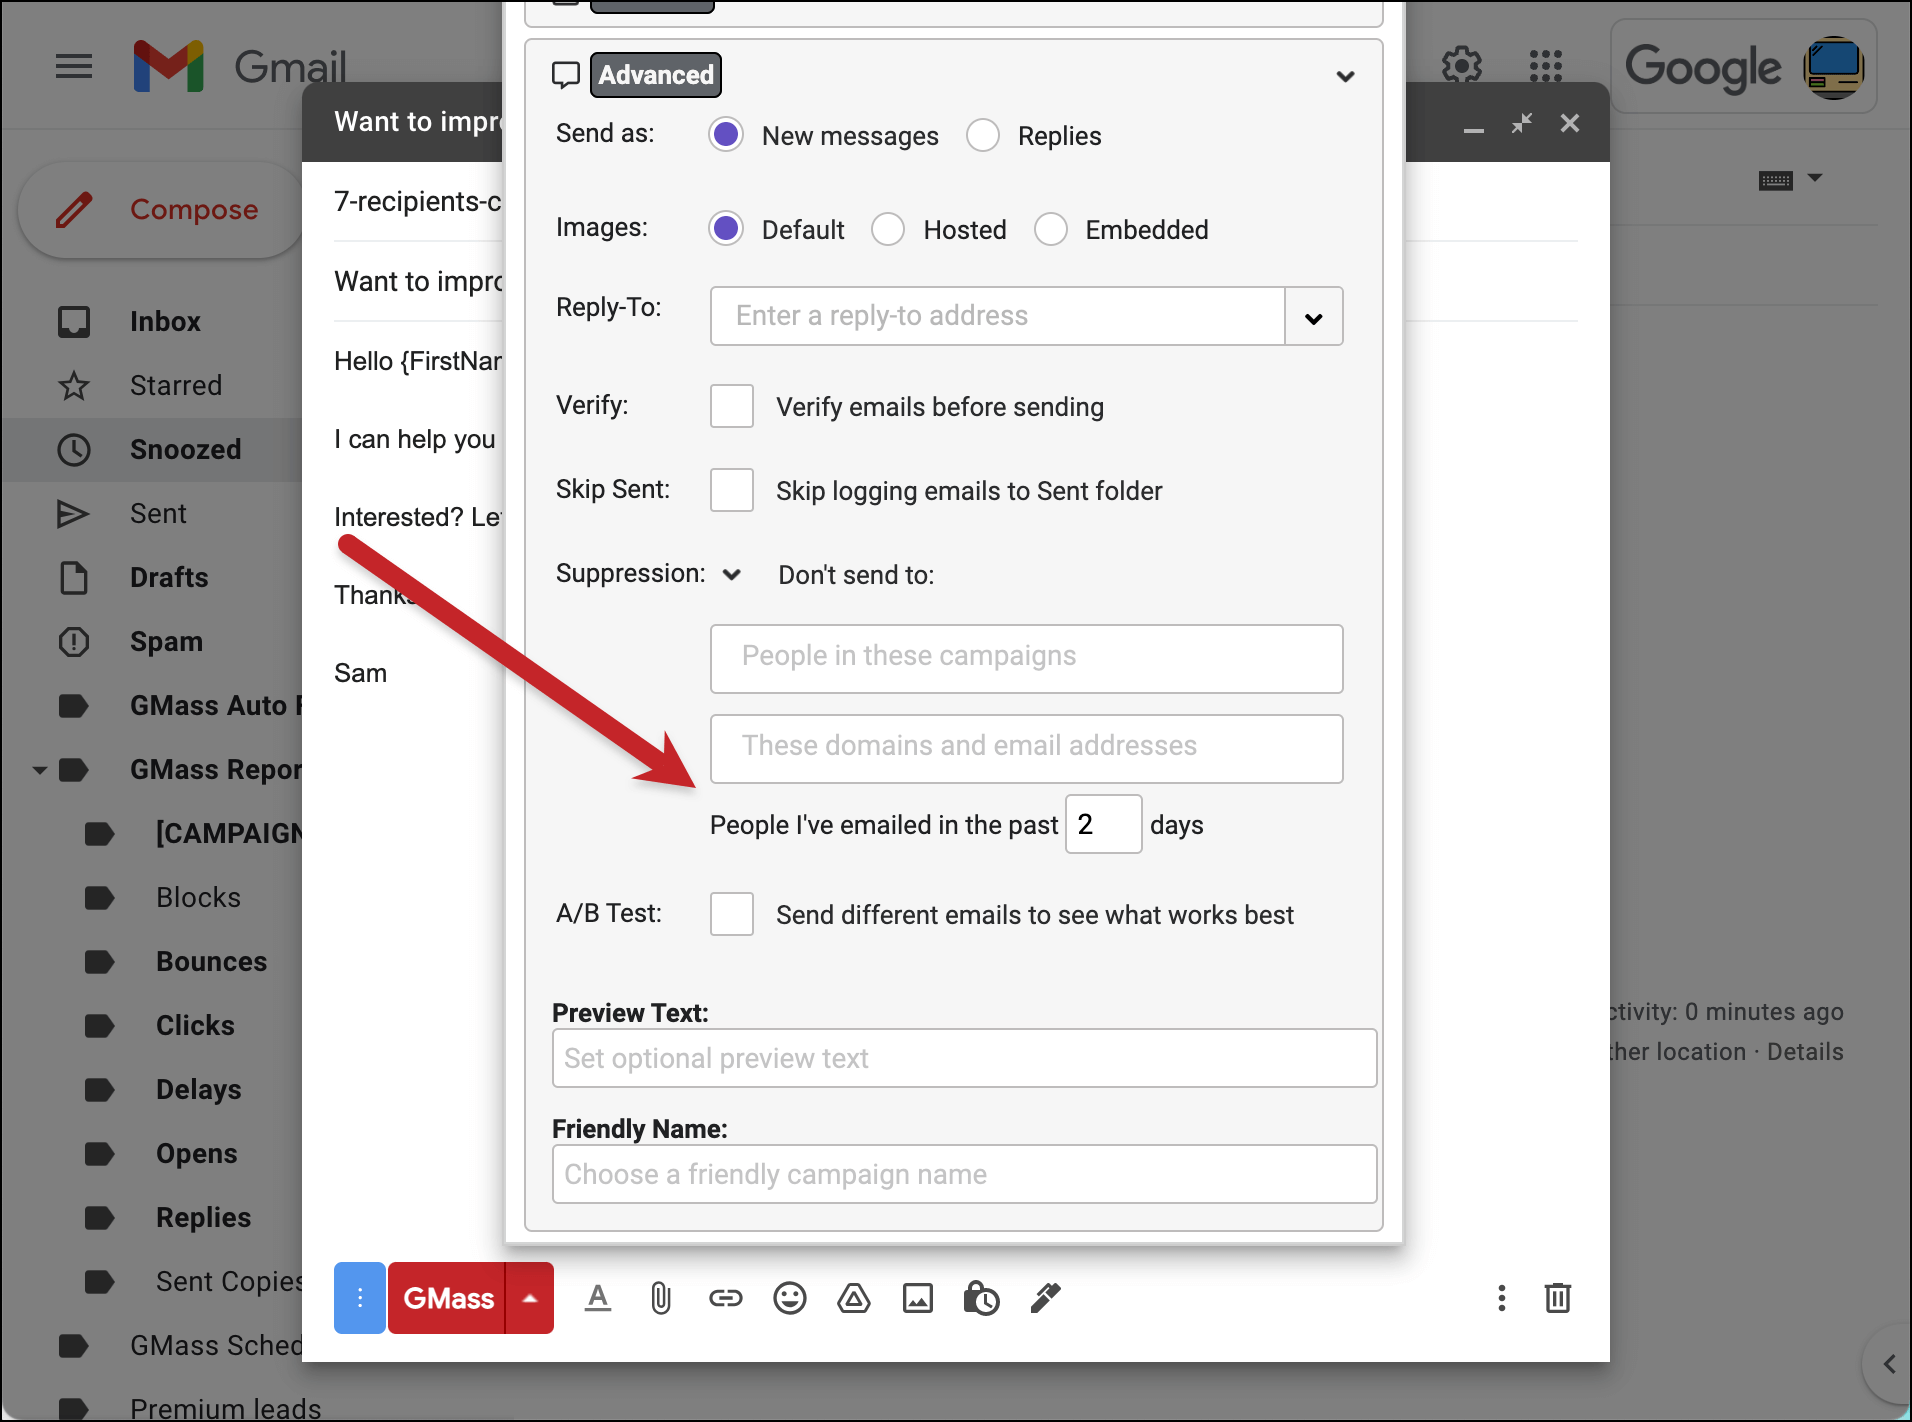
The last option in the Suppression area of the GMass campaign settings is “People I’ve emailed in the past n days.” With this option, you can suppress emails to recent recipients of other campaigns.

It’s a good way to make sure you’re not overwhelming people or sending conflicting messages. It’s also popular if you run drip campaigns (like welcome series, or post-purchase series) and don’t want to also send more emails to people in those sequences.

Note: This suppression list is calculated on the fly every time your campaign runs. So if you set this value to 2 days, GMass will look back at the past 48 hours when you send your campaign to create the suppression list.

And if you use this feature with a recurring campaign, GMass will continue to build the list on the fly before each scheduled send. Let’s say you schedule a campaign to go out every Monday at 10:00 AM and you set the suppression at “people I’ve emailed in the past 2 days.” Every Monday at 10:00 AM, GMass will look back at the past 48 hours to come up with the suppression list for that week’s send.

Days since suppression lists

How to Use Dynamic Lists to Remove Recipients from an Individual Campaign

With GMass’s dynamic lists, you can remove recipients from a campaign just by removing them from your Google Sheet.

You can also use that method to remove them from your campaign’s auto follow-up sequence or a behavior-based segmented campaign based off the campaign.

The first step is to make your campaign’s email list dynamic. So after you connect your Google Sheet of contacts to your campaign, edit the GMass alias email address to add “-dynamic”.

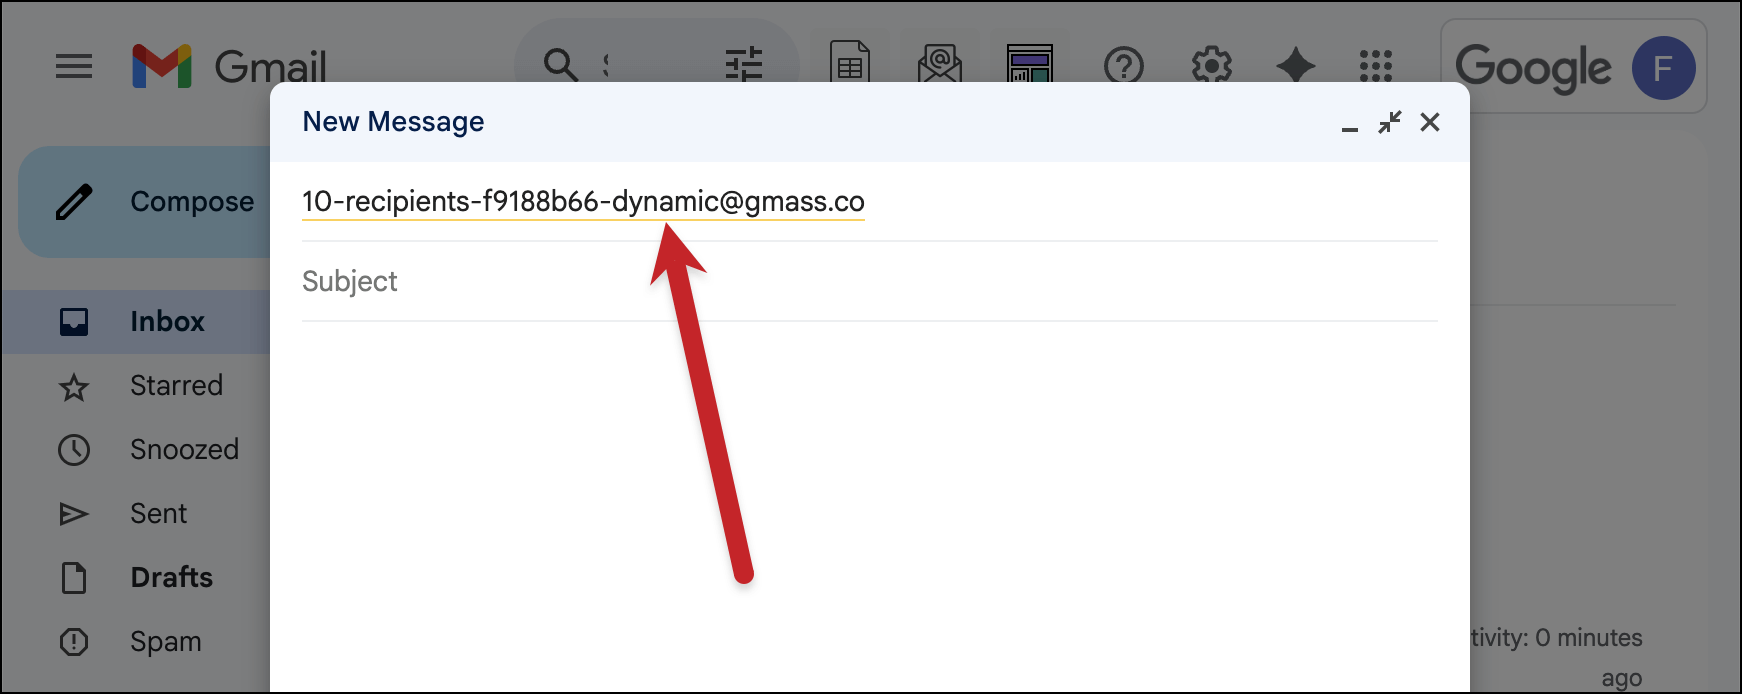
Now you can remove people from your campaign just by deleting them from your Google Sheet.

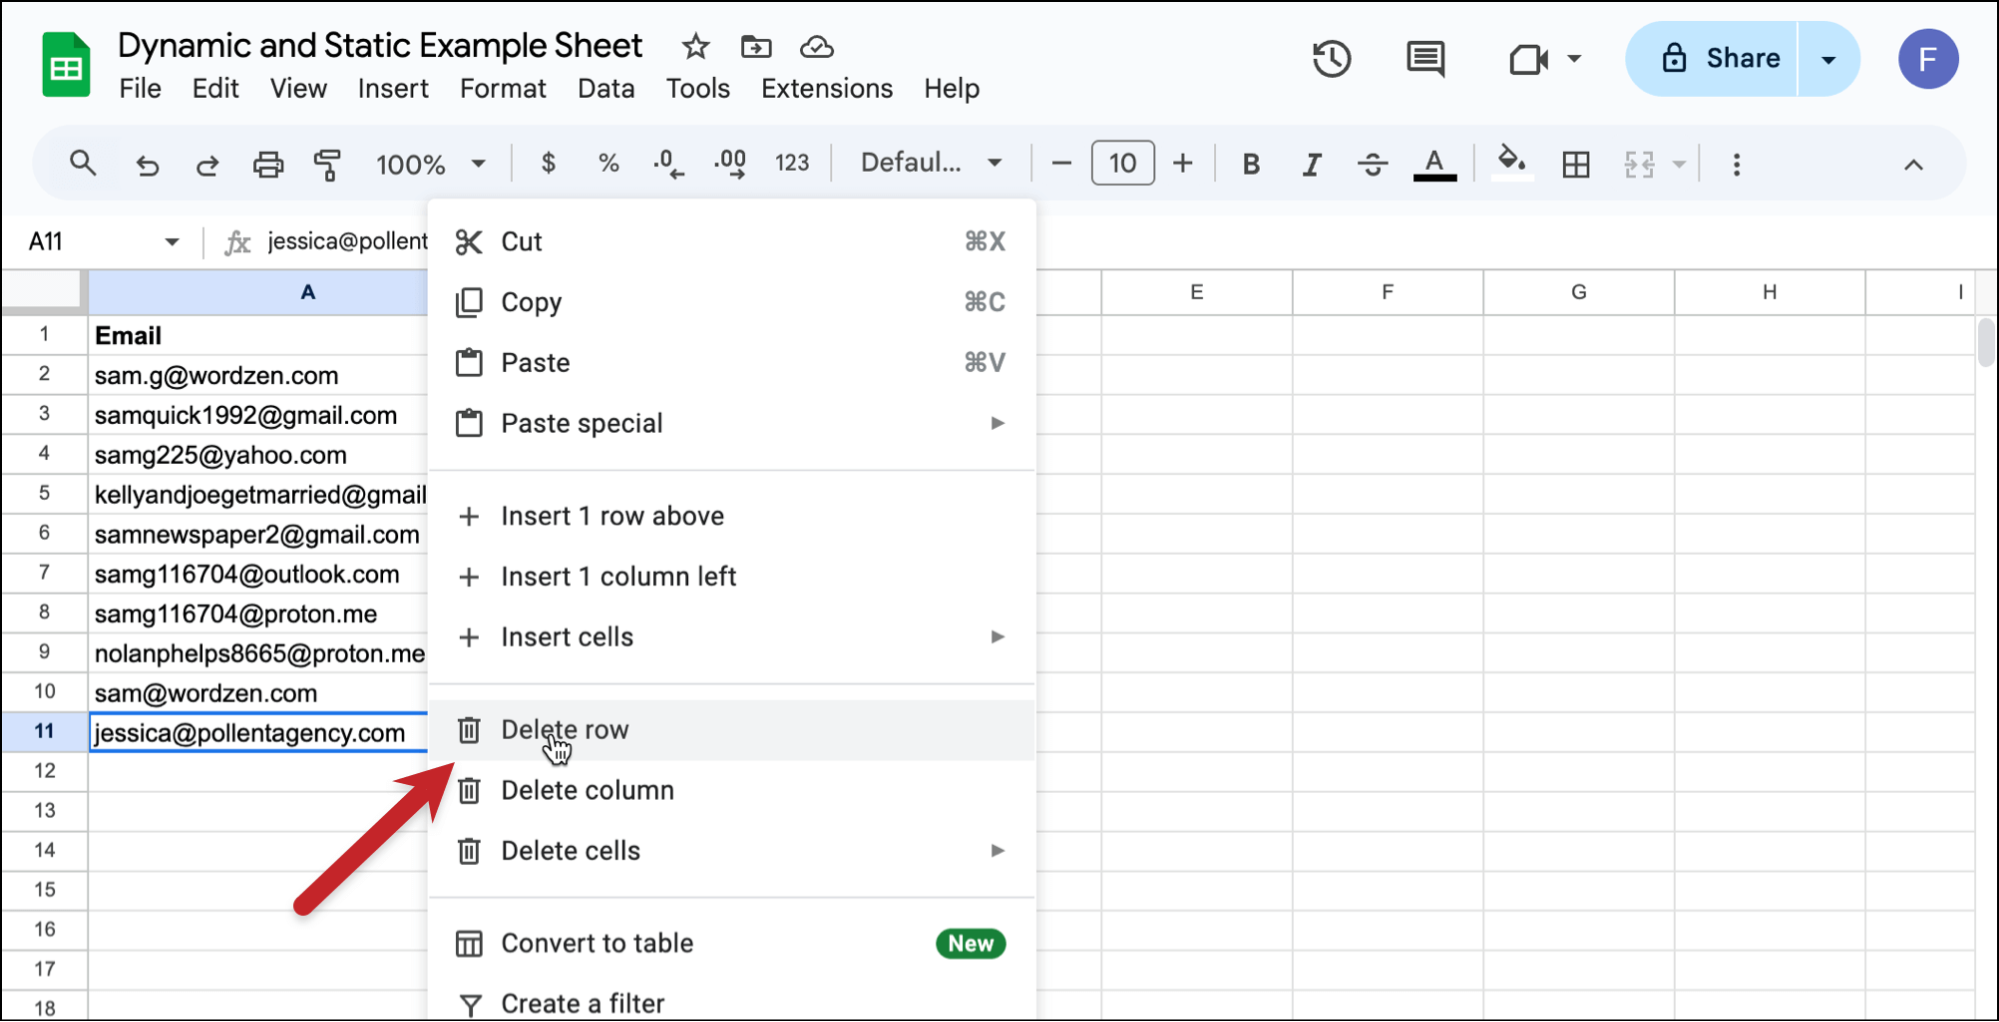
If you delete those rows before your campaign is scheduled to send, those contact won’t get the email.

You can also remove them from auto follow-up sequences this way.

When Do Suppression Lists Come in Handy?

Let’s say you’re using GMass to invite 100 people to a party. You create a Google Sheet with your 100 invitees. You then send a GMass campaign to the people on this spreadsheet.

The next day, you realize you forgot to invite 5 of your friends. Oh no, how can you easily re-send your invite to just those 5 missing friends?!

You could just add the 5 email addresses to your master spreadsheet, use the GMass spreadsheet button to connect to the whole sheet and send to the same list, but then the first 100 people will get the same email again, making you look sloppy. If you use yesterday’s campaign as your Suppression List, however, then only the 5 new people will receive the email.

(This is another scenario where a dynamic list is great. If you make your initial invitation email dynamic and set your campaign to recur, you could just add those new friends.)

Another use might be if you’ve collected a do-not-send list over time, and want to ensure that a particular campaign doesn’t go to anyone on this list. You could add your do-not-send list to your Unsubscribe List, but that would prevent them from getting any future email campaign from you, and you may just want to use your do-not-send list on this one particular email campaign. In that case, you can paste those email addresses into the manual “These domains and email addresses” suppression field.

An alternative workaround, which can be a little clunky but might save you some time if you’re using that do-not-send list a lot, is to create a manual Suppression List.

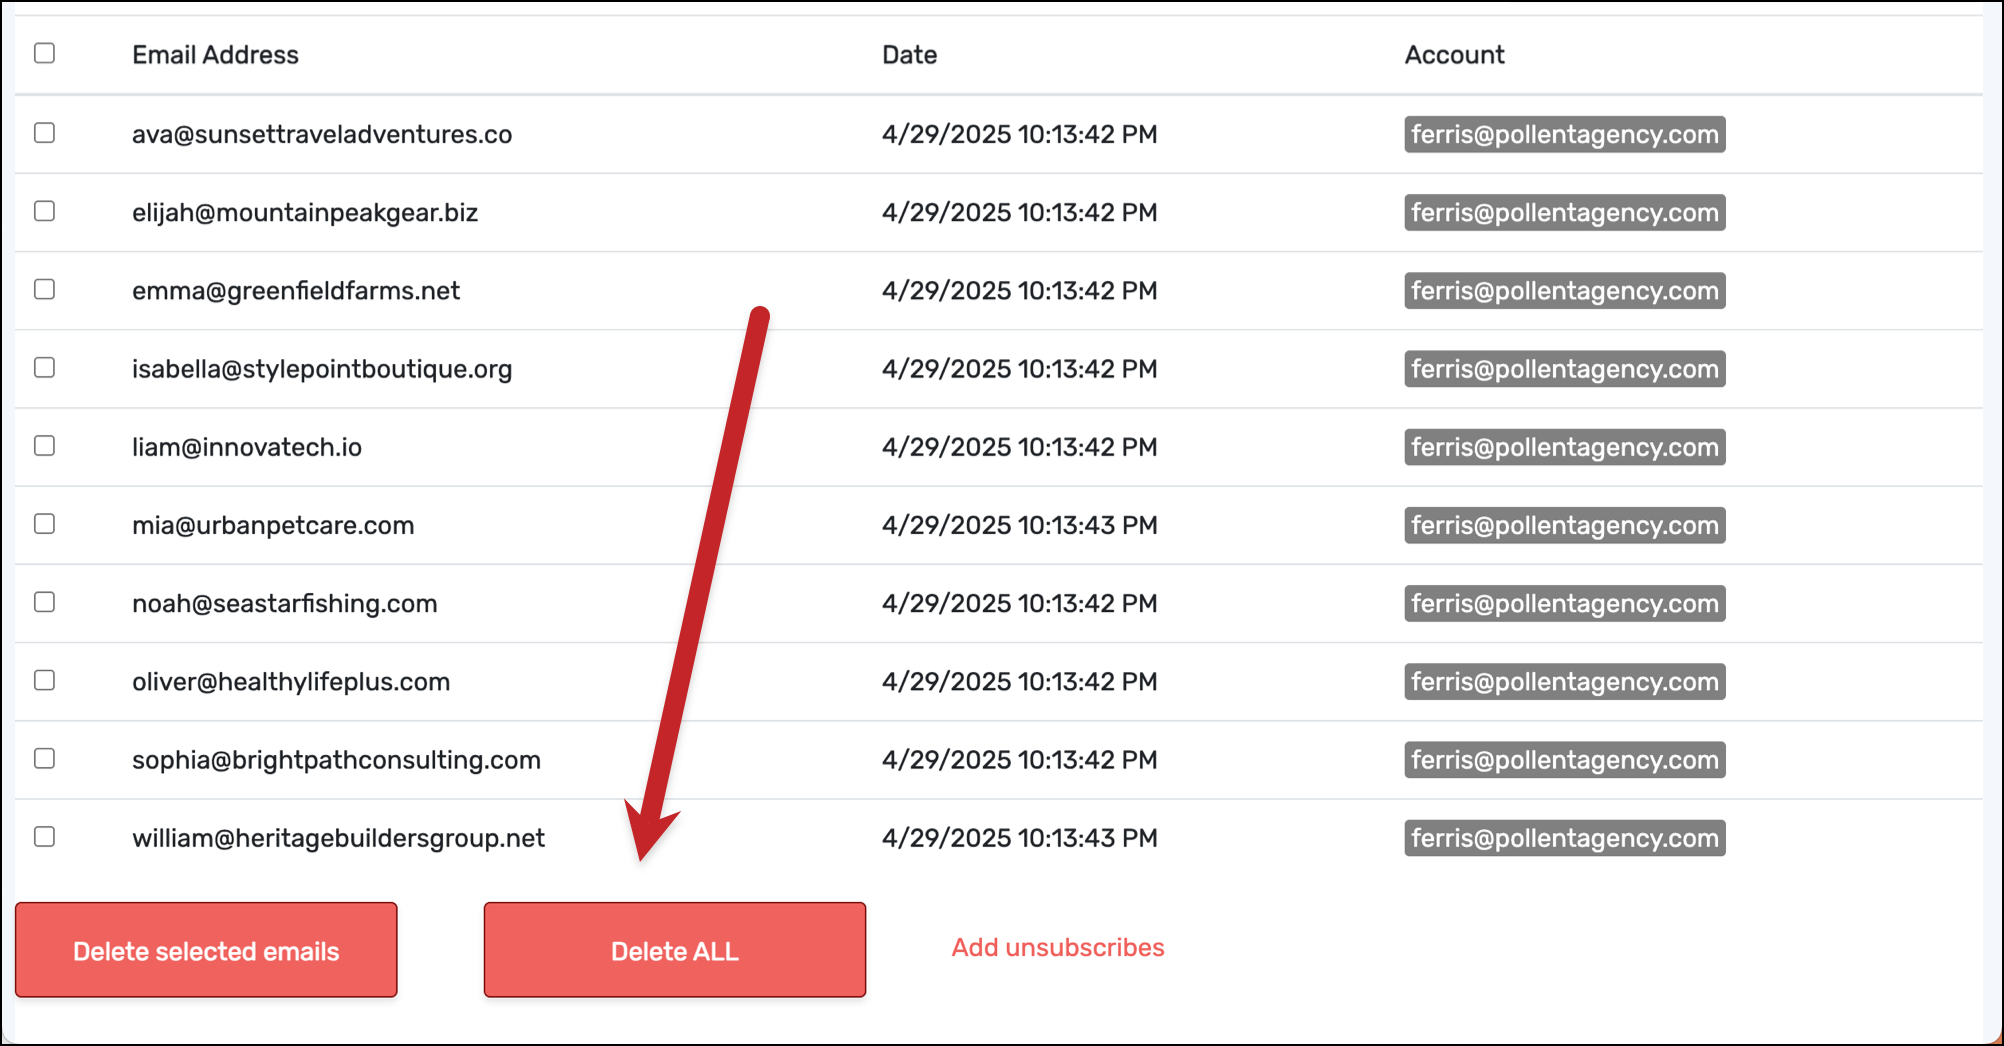
How to manually create a Suppression List

The best way to create a manual suppression list is using GMass’s dynamic lists.

Check out the technique described here.

Basically, you…

  1. Enter the suppression addresses a Google Sheet.
  2. Connect that sheet to GMass as if you were going to send it a campaign. You’re not — you just need GMass to make an alias email address.
  3. Add that email address to the Suppression box in your campaign settings.
  4. If you think you might add more suppression addresses to your Google Sheet, add “-dynamic” to the alias address.

Now your Suppression List has been created and you can choose this campaign to suppress these addresses.

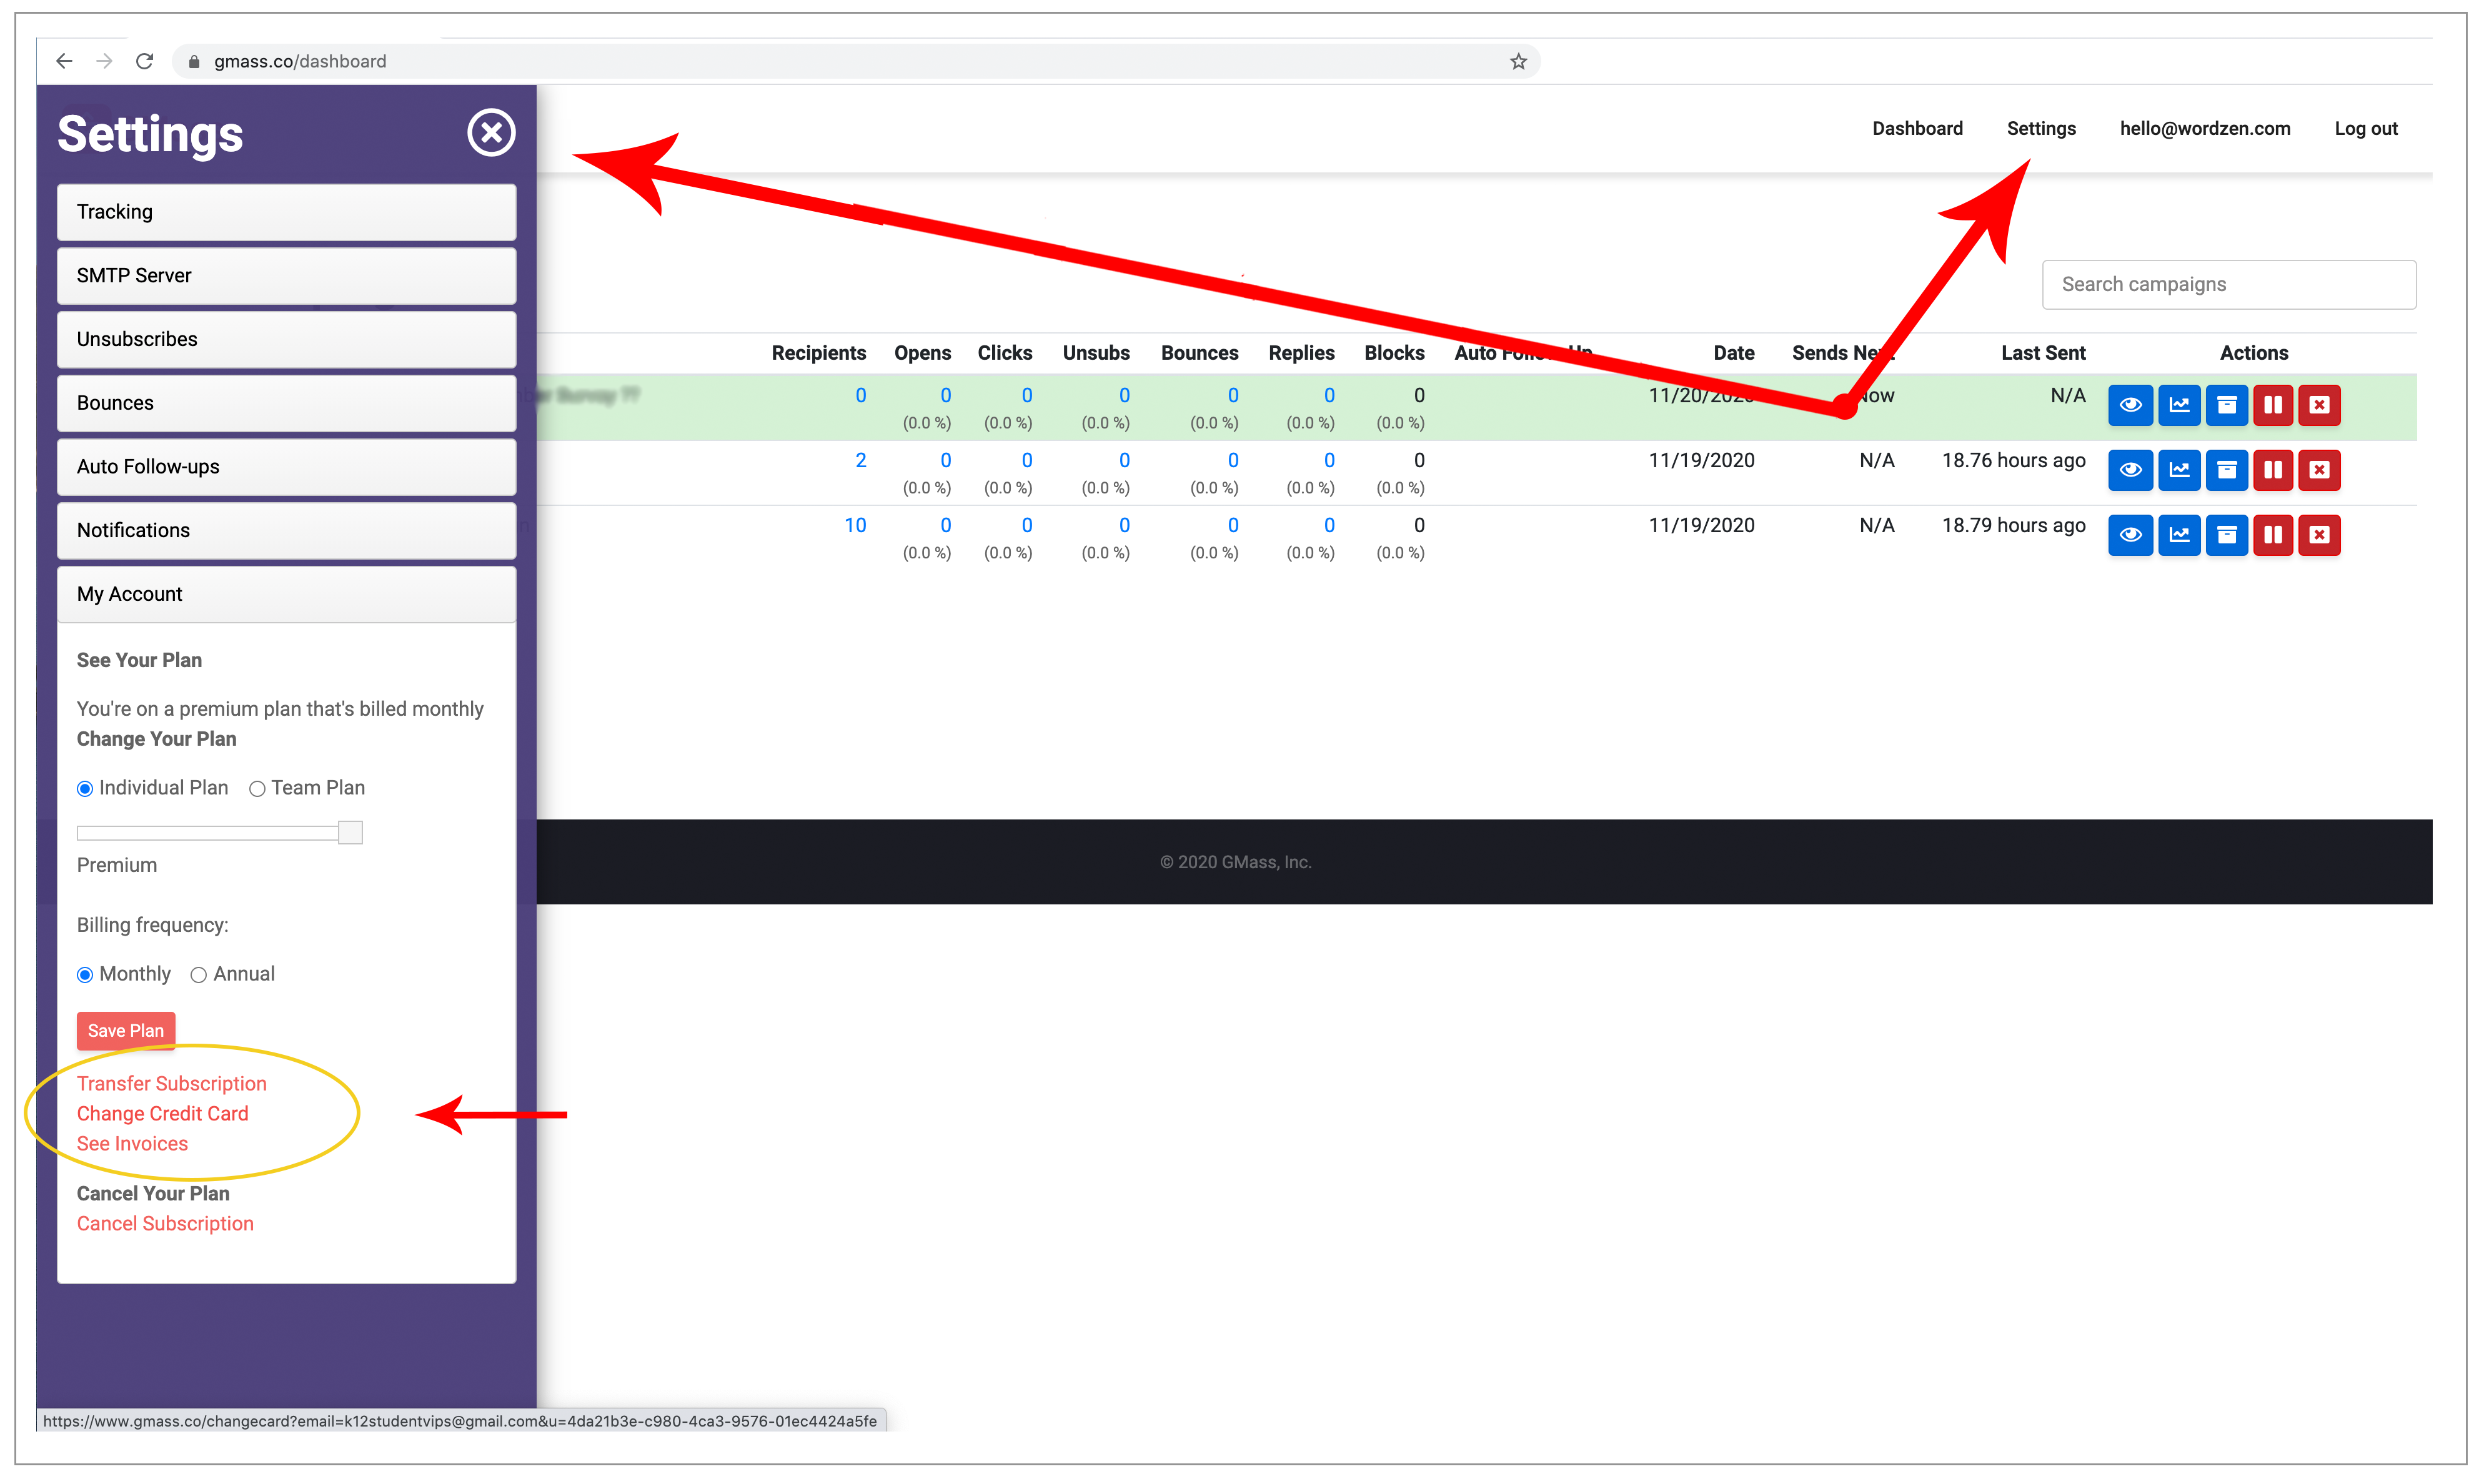
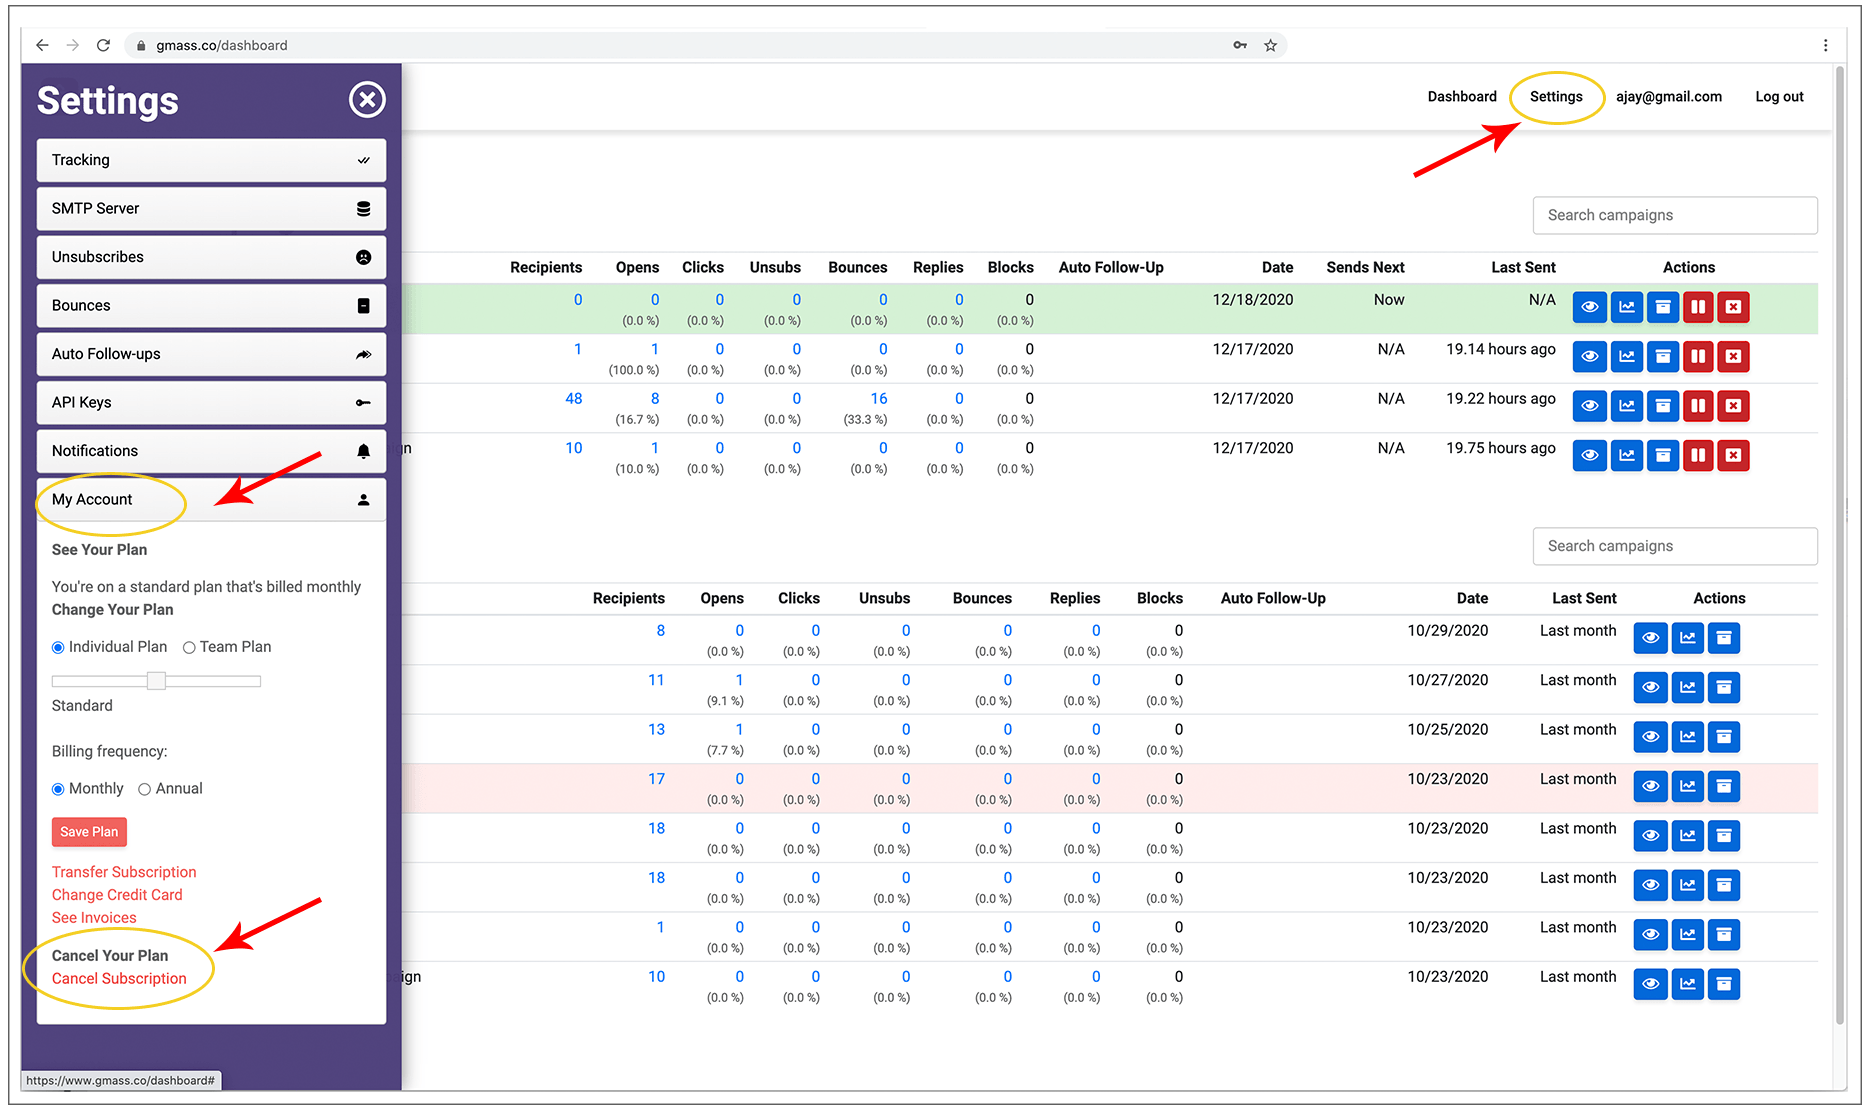
What’s the difference between my Unsubscribe List and a Suppression List?

They are actually quite similar, in that both lists are used to filter out recipients from a campaign.

Your Unsubscribe List, however, is universal to your account, and is used to filter out recipients for all of your campaigns automatically. You can’t control when the Unsubscribe List is used to filter out recipients, because it is always used on every campaign sent from your account. Email addresses are added to your Unsubscribe List when they click the unsubscribe link at the bottom of your emails (if you included it), or if you manually import email addresses into your Unsubscribe List.

Suppression Lists must be applied to specific campaigns where you want to eliminate that set of email addresses for just the current campaign. Any past campaign can be used as a Suppression List, which is why all of your past campaigns show up in the Suppression dropdown menu.

Resources

See why GMass has 300k+ users and 7,500+ 5-star reviews


Email marketing. Cold email. Mail merge. Avoid the spam folder. Easy to learn and use. All inside Gmail.


TRY GMASS FOR FREE

Download Chrome extension - 30 second install!
No credit card required
Love what you're reading? Get the latest email strategy and tips & stay in touch.


When you send a campaign with GMass, event notifications and campaign reports are generated as emails and placed under the GMass Reports label as activity takes place after you send.

Event notifications refer to anything actions that happen with your campaign. For example, every time an email is opened, an “open” notification goes into the Opens label, every time an email is clicked, a “click” notification goes into the Clicks label.

Campaign reports with detailed campaign analytics are placed in the [CAMPAIGNS] label.

In most cases, GMass report and event notifications are tucked away in these special Labels and won’t clog up your Inbox. In some cases, however, like if you’re using an email client like Apple Mail that doesn’t respect Gmail’s Labels, GMass report notifications will fill up your Inbox and you may wish to turn off GMass report notifications.

GMass report notifications
In the Gmail interface, GMass Reports are tucked away under sub-labels of the GMass Reports label. Categories include Opens, Clicks, and the main [CAMPAIGNS] area that stores detailed campaign-level reports.

The benefit of this approach

While it may seem cumbersome to have every open and every click logged into a special Label like this, most users find it valuable to monitor what’s happening with their campaigns in real-time. This also makes it easy to monitor campaign activity on a mobile device running the Gmail app. Just pop into one of the GMass Report labels to see what’s happening.

Additionally, if you ever want to send a campaign to everyone that’s ever opened any email from you or anyone that’s ever clicked any email from you, all you have to do is go into the appropriate label and click the GMass build email list button.

Turn notifications OFF

You can turn off notifications in the GMass dashboard. Click on the gear icon in the top right to open the settings, then scroll down on to the Notifications section.

Notification settings in the GMass dashboard

  • Check the box next to Turn off event notifications to stop receiving messages about events (e.g., opens, clicks, unsubscribes).
  • Check the box next to Turn off campaign report notifications to stop receiving messages with your campaign reports (e.g., the report in the [CAMPAIGNS] label).
  • Check the box next to Archive tiny “send complete” notifications to stop receiving notifications on campaigns that send 10 or fewer emails. For instance, if you have a lot of recurring campaigns that often send 0 messages.
  • Check the box next to Don’t use direct message insert if you’d prefer we not use the Gmail API to place these messages in your mailbox.

How to get reports if you turn notifications off

If you turn notifications off, you can still access the reporting data for your campaigns. There are a few ways to access your campaign reports.

  1. You can still manually request a campaign report which will then be placed under the GMass Reports–>[CAMPAIGNS] label at the time you request it.
  2. Any time you receive a notification that sending has been completed, there’s a link to a web-based campaign report in that notification. Notifications about completed sends cannot be turned off.
  3. You can access campaign reports from your dashboard at gmass.co/dashboard and you can always access your web-based campaign report as well.
See why GMass has 300k+ users and 7,500+ 5-star reviews


Email marketing. Cold email. Mail merge. Avoid the spam folder. Easy to learn and use. All inside Gmail.


TRY GMASS FOR FREE

Download Chrome extension - 30 second install!
No credit card required
Love what you're reading? Get the latest email strategy and tips & stay in touch.


Occasionally, after you’ve composed your mail merge campaign in Gmail and hit the GMass button, instead of sending, you may receive this error in the yellow status bar up top:

Your mass email has NOT been processed by GMass. Error details: Google.Apis.Requests.RequestError Requested entity was not found. [404] Errors [ Message[Requested entity was not found.] Location[ – ] Reason[notFound] Domain[global]

This is a temporary and rare error that sometimes surfaces due to how GMass communicates with your Gmail account. Technically it means that GMass wasn’t able to retrieve an identifier to your message that is assigned by Gmail.

In almost all cases, this error will disappear and you can send your campaign by re-loading Gmail in your Chrome browser. When you do so, your Compose window should re-appear with your Message just as you left it. You will not lose any of your work. After you re-load, just hit the GMass button again and your campaign should send as normal.
Ready to transform Gmail into an email marketing/cold email/mail merge tool?


Only GMass packs every email app into one tool — and brings it all into Gmail for you. Better emails. Tons of power. Easy to use.


TRY GMASS FOR FREE

Download Chrome extension - 30 second install!
No credit card required
Love what you're reading? Get the latest email strategy and tips & stay in touch.


GMass is a low-cost, self-service system. We use Zendesk as our support ticketing system. We do not offer phone support or chat support. Before you submit a request, please try to find the answer yourself by vising our support portal or searching using the search field to the right. It’s powered by Google and only returns results related to GMass. For example, if you want to know how to edit your campaign, you would search “edit campaign”.

Here are some additional steps you can take to ensure the best possible GMass support.

Note that our support contact form (link below) has two premium pay-per-incident support options for urgent issues.

Please do:

  1. Make sure you specify the correct Gmail or G Suite account with which you’re using GMass and you need help. If you have multiple account with which you use GMass, specify the one most closely related to the issue.
  2. Attach screenshots and videos where applicable to illustrate the issue. Both Windows and Mac computers have keyboard shortcuts to capture your screen. If you want to get fancy, you can use a tool like Snagit to capture your screen and annotate it. And if you want to make a video demonstrating an issue, you can use the free version of Screencastify.
  3. If your question has to do with a specific campaign, include the campaign ID in your request.
  4. GMass is deeply integrated with Google Sheets. If your issue concerns a specific campaign connected to a Sheet, like personalization or conditional content issues, you can expedite our ability to help you by sharing your Sheet in advance with ajay.goel@wordzen.com.

Please don’t:

  1. Please do not email team members directly for new requests. This can either result in no response or a severely lower response time (a month or more), since the team member has to first notice the email, and then has to turn the email message into a support ticket. In most cases, emails sent directly to team members asking for support are missed or discarded.
  2. Do not respond to mass emails from GMass staff announcing new features asking for account-specific support.
  3. Do not contact us on Facebook, Twitter, or LinkedIn with a support request. Your messages will be read but not responded to. You can contact us on social media with a comment, complaint, or compliment but if you want a question answered, then contact us using the form below.
  4. Usually a support requested can be answered by a blog post. Please do not be offended if your support question is responded to with a simple link to a blog post rather than a complete sentence. We use Chrome’s link to fragment feature to link you to the exact text inside a blog post that answers your question.
  5. Do not respond to an old support ticket from a long time ago introducing a new issue unrelated to the previous issue. Instead, create a new ticket by sending a new email to our support address, given below.
  6. Do not comment on a blog post, including this one, and expect a timely response. Blog comments are read, but a blog doesn’t make a good environment from which to provide thorough technical support.

Common questions and answers

  1. To cancel a campaign, read this article.
  2. To stop other types of GMass emails from sending, read this article.
  3. To cancel a paid subscription, follow these instructions.
  4. If your emails are bouncing because with a “You have exceeded your limit” message, read this first.
  5. If you are trying to cancel a GMass subscription or request a tracking domain or do anything that requires an @gmass.co command in the To field, and you get a bounce, it’s because you hit the Send button when you were supposed to hit the GMass button. Please do not contact us to tell us that an email to an @gmass.co address bounced.

External support options

Both Fiverr and Upwork have over 50 freelancers each that list GMass as a skill.

Contact us with the support form

The support form is here.

Ready to transform Gmail into an email marketing/cold email/mail merge tool?


Only GMass packs every email app into one tool — and brings it all into Gmail for you. Better emails. Tons of power. Easy to use.


TRY GMASS FOR FREE

Download Chrome extension - 30 second install!
No credit card required
Love what you're reading? Get the latest email strategy and tips & stay in touch.


If you’re a current or past paid subscriber, you can now view the invoices for your account. You can also customize your invoices with your company’s information.

How to get your invoices

As of November 2020, you can view your invoices from our dashboard. Here’s a direct link to the “My Account” section that contains your invoices.

New way

how to get your invoices
Just click “See Invoices.”


view your invoices
A list of invoices. Click each one for the actual detailed invoice.


Old way

1. Launch a regular Gmail Compose window.

2. Set the To field to invoice@gmass.co.

3. Type anything you like in the Subject Line, so long as it’s not blank.

4. Click the GMass main button. Refresh your Inbox and you will see an email message with a list of all of your invoices.

Important: Be sure to hit the red GMass button, and not the regular Gmail Send button. Hitting the regular Send button will result in a bounce.

How to customize invoices with your company information

1. Launch a regular Gmail Compose window.

2. Set the To field to myinfo@gmass.co.

3. Type anything you like in the Subject Line, so long as it’s not blank.

4. Set the Message area to your company’s information. If you have a signature that appears in the Message area, clear it out, and replace it with your company name, address, Tax ID number, VAT number, or any other information you would like to appear on your GMass invoices.

5. Click the GMass main button to save your information.

Important: Be sure to hit the red GMass button, and not the regular Gmail Send button. Hitting the regular Send button will result in a bounce.

Ready to transform Gmail into an email marketing/cold email/mail merge tool?


Only GMass packs every email app into one tool — and brings it all into Gmail for you. Better emails. Tons of power. Easy to use.


TRY GMASS FOR FREE

Download Chrome extension - 30 second install!
No credit card required
Love what you're reading? Get the latest email strategy and tips & stay in touch.


You can transfer your paid GMass subscription from one account to another, even if one account is a Gmail account and the other is a G Suite account..

Why would you want to transfer your subscription?

  1. Perhaps you accidentally subscribed the wrong account. Instead of canceling and re-subscribing, you can just transfer the subscription over.
  2. Maybe you misspelled your email address when you subscribed.
  3. Perhaps you entered a non-Google account, like a yahoo.com account or a hotmail.com account as the email address to subscribe.
  4. Maybe Google has deactivated the gmail.com account that you subscribed and so you no longer have access to it.
  5. Perhaps you changed your mind after subscribing, because you realized that a different Gmail account has a better reputation and more sending ability than the account you originally subscribed.
  6. Perhaps you are the leader of a Team Plan for your organization, and you want to transfer the ownership of the Team Plan to someone else, because you are leaving the organization.

How to transfer your GMass subscription

As of November 2020, you can now transfer your GMass paid subscription from one account to another through our web-based dashboard. If, however, the account that currently has the subscription is not a Google account that you can access, then you must use the “old way”.

New way

The account with the current subscription must exist to transfer it through the dashboard. If the account with the current subscription was misspelled or doesn’t exist, then you must use the old way.

Go to your account dashboard and log in if you’re not already logged in. Then click Settings at the top and My Account on the left, and then “Transfer Subscription.”

how to transfer your subscription

If the dashboard doesn’t work for you, you can still transfer your subscription the old way.

Old way

In this example, I’m about to transfer my paid GMass subscription from ajay@wordzen.com to meredith@wordzen.com. You can’t tell from the screenshot, but the account I’m logged into is ajay@wordzen.com.
  1. Log into the account that currently has the subscription. If you don’t have access to that Gmail account anymore, then log into the account that you would like to transfer the subscription to.
  2. Launch a new Compose window in Gmail.
  3. Set the To field to transfer@gmass.co. Do not hit the Send button.
  4. If you are currently logged into the account that has the subscription, then set the Subject to the Gmail account that you wish to transfer the GMass subscription to.If you don’t have access to the account that has the subscription and are instead logged into the account that you wish to transfer the subscription to, then you need to specify the account that already has the subscription. Set the Subject to “from:email@domain.com” (without the quotes). For example, if you accidentally subscribed a hotmail.com or a yahoo.com address, log in to the account that you wish to have the subscription and use this method. Do not click the Send button. You must click the GMass button.

    This is how you transfer a subscription when you DON’T have access to the account that currently has the subscription but DO have access to the account you WISH to have the subscription. Here I’m transferring the subscription from ajaygoel@gmail.com into the account I’m logged into, ajaygoel8477@gmail.com.
  5. Hit the main GMass button. Do not hit the Send button. Your subscription will be immediately transferred.

Important notes about transferring a subscription

  1. You can only transfer a subscription from an account with an active subscription to an account that is currently not on a paid plan. So if the account you’re trying to transfer the subscription to is already subscribed on its own or is part of a Team Plan, then the transfer will fail.
  2. A GMass account must exist for the account you wish to transfer the subscription TO. That means the Gmail account must exist, and it must already be connected to GMass for the GMass account to exist. If a GMass account doesn’t exist, create it first.
  3. It’s okay if the account that currently has the subscription does not exist. Only the account that you wish to have the subscription must exist as a Google account for a transfer to work.
  4. Subscription transfers work for Stripe and PayPal-based subscriptions.
  5. Once a subscription has been transferred away from a particular Gmail or Google Workspace account, it cannot be transferred back to that same account.
  6. On that note, you can only transfer a subscription to an email address that has never had a paid subscription to GMass before.
  7. A single subscription can only be transferred a maximum of five (5) times.
See why 99% of users say they’ve had their best deliverability ever with GMass


Email marketing, cold email, and mail merge all in one tool — that works inside Gmail


TRY GMASS FOR FREE

Download Chrome extension - 30 second install!
No credit card required
Love what you're reading? Get the latest email strategy and tips & stay in touch.


If you’ve previously subscribed to a paid GMass plan, at some point you may need to change or update the credit card associated with your account. This is how you do it.

As of November 2020, you can now change your credit card through our web-based dashboard.

New way

Just go to your account dashboard and log in if you’re not already logged in. Then click Settings at the top and My Account on the left, and then “Change Credit Card.”

change update credit card

If the dashboard doesn’t work for you, you can still update your credit card the old way.

Old way

1. Compose a new email in Gmail and set the To field to card@gmass.co.

2. Type anything you wish for the Subject and Message.

3. Click the main GMass button. Do not click the Gmail Send button.

4. You’ll then get a link at the top of your screen to change your credit card. Click that link. You’ll be taken to a web page with a button to enter your new credit card.

See why 99% of users say they’ve had their best deliverability ever with GMass


Email marketing, cold email, and mail merge all in one tool — that works inside Gmail


TRY GMASS FOR FREE

Download Chrome extension - 30 second install!
No credit card required
Love what you're reading? Get the latest email strategy and tips & stay in touch.


How to cancel your subscription to GMass’s mail merge tool depends on whether you subscribed with a credit card or PayPal.

Credit Card Subscriptions

Two ways to cancel a credit card-based subscription:

New Way:

Log in to our dashboard at https://gmass.co/dashboard with the account you subscribed. Then click Settings at the top, then Account at the left, and then the Cancel option.

Cancel subscription


Old Way:

First, you must have the GMass extension installed. If the GMass buttons aren’t showing up in your Gmail interface, then it’s not installed. You can install it from our homepage.

Then, log in to the Gmail account whose GMass subscription you wish to cancel. If you don’t have access to that Gmail account anymore, log in to ANY Gmail account that is connected to GMass.

1. Launch a regular Gmail Compose Window.

2. Set the To field to cancel@gmass.coDo not hit Send.

3. If you are logged into the Gmail account whose subscription you want to cancel, leave the Subject blank. Do not hit Send.

Leave the Subject blank if you’re logged into the Gmail account whose GMass subscription you want to cancel.

If you are logged into a different account, put the email address of the account whose subscription you are cancelling in the Subject line.

Set the Subject to the address of the GMass subscription you want to cancel, if you’re not logged into that same Gmail account. Here, I’m logged into ajaygoel@gmail.com but I’m cancelling the GMass subscription for ajay@wordzen.com.

4. Optionally, please tell us the reason for your cancellation in the Body of the email. This is optional. Do not hit Send.

5. Do not click the Gmail Send button. Click the GMass button. Your subscription will end immediately, but your account will remain on its plan until your paid period is up. So if you’re a monthly subscriber, you can still use GMass until the end of your monthly period. The same applies if you’re an annual subscriber. You will receive a message in your Inbox telling you when your account will be demoted to free status.

Important: Be sure to hit the red GMass button, and not the regular Gmail Send button, because cancel@gmass.co is not a real email address; it is a command. Hitting the regular Send button will result in a bounce. If you do not have the GMass button because you uninstalled the extension, you must re-install the GMass extension to cancel your subscription.

So that means: If you receive a message from Mail Delivery Subsystem saying “Delivery to the following recipient failed permanently: cancel@gmass.co, ” then you have pressed the Gmail Send button. Try again, and be sure to hit the red GMass button.

Another note: It’s easiest if you’re logged into the Gmail account that has the GMass subscription you wish to cancel. But if you can’t log in to that account, you can log into ANY other Gmail account that is connected to GMass. We will then verify that the logged-in Gmail account has permission to cancel the subscription of the other account before the cancellation is final.

Last note: Uninstalling the GMass extension does not automatically cancel your subscription to GMass. Just like, if you remove the Netflix app from your mobile device, it doesn’t automatically cancel your Netflix subscription.

PayPal Subscriptions

If you paid with PayPal, you must log in to your PayPal account and cancel your GMass subscription from there. Your GMass account will be demoted to “free” account status within a few minutes after canceling. When you cancel a PayPal subscription to GMass, you do not get the unused time for the month or year. Your account will be demoted to “free” status right away and its limits will reset to the free account sending limits right away. With credit card subscriptions, you would get the unused time.

Bitcoin Subscriptions

If you paid with Bitcoin, your subscription already has a pre-determined life, and it will automatically cancel after your paid time has expired. Bitcoin transactions are one-time transactions and are not recurring.

See why GMass has 300k+ users and 7,500+ 5-star reviews


Email marketing. Cold email. Mail merge. Avoid the spam folder. Easy to learn and use. All inside Gmail.


TRY GMASS FOR FREE

Download Chrome extension - 30 second install!
No credit card required
Love what you're reading? Get the latest email strategy and tips & stay in touch.


In case you didn’t know, you can easily add email addresses to your account’s Unsubscribe List in GMass.

With GMass’s unsubscribe management, any email addresses on your Unsubscribe List will be suppressed from your GMass campaigns. That means they will be eliminated from any campaign you send with the GMass button. Additionally, if you’re a Google Workspace user or on a Team plan, anyone on your domain or team who’s enabled Global Unsubscribes will have the addresses on your unsubscribe list suppressed in their campaigns.

Here’s how to manually edit your unsubscribe list.

How to Add or Remove Emails from Your GMass Unsubscribe List

Unsubscribe list management all takes place in the GMass dashboard. (You may remember the old method of adding and subtracting by sending emails to a specific GMass address. That method still works, and we’ll cover it later in this article, but the dashboard management is far more efficient.)

Head to your GMass dashboard. Click on the Settings, then go to the Unsubscribes section and click “Manage unsubscribed addresses.” Or, for a shortcut, just go directly to this link.

Unsubscribe add and remove in the GMass dashboard

How to add email addresses to your Unsubscribe List

Click the “Add unsubscribes” link at the bottom of your list of unsubscribed addresses in the GMass dashboard.

You’ll get a pop-up window where you can paste in email addresses to add to your unsubscribe list. You can also upload a text, Excel, or CSV file of unsubscribed addresses (useful when you’re switching from another platform to GMass).

If you’re typing or pasting in your list, make sure every email address is on its own line. Then click the “Add these unsubscribes” button.

Paste in or upload your list of unsubscribed addresses

Those addresses are now added to your unsubscribe list.

How to remove email addresses from your Unsubscribe List

To remove email addresses from your unsubscribe list, check the boxes next to each address. Then click the “Delete these emails” button.

Remove unsubscribed addresses

You can also select email addresses to remove in bulk by clicking the checkbox at the top of the column.

Check the box to unsubscribe allThen click the Delete these emails button to remove all the selected addresses from your unsubscribe list.

As of April 2025, you can also now delete all with a single click.

Unsubscribing an entire domain

You can also unsubscribe an entire domain. Follow the same instructions as above, but go to the “Manage unsubscribed domains” section in the dashboard.

Manage unsubscribed domains in the GMass dashboard

Then paste in the domains you want to add to your unsubscribe list.

Add domains to unsubscribe

You can also use this area of the dashboard to remove unsubscribed domains. Check the boxes next to those domains, then click the “Delete these domains” button to re-subscribe them.

Resubscribe a domain by checking the boxes

Once again, you can select all the checkboxes on screen by clicking the box at the top of the column.


If you’re curious, here’s even more information on unsubscribing domains.

Unsubscribe management for teams

If you’re a team master, you can now see the unsubscribes (and bounces) for just your account, any individual team member, or your entire team.

At the top of your unsubscribe list, you’ll see a dropdown menu where you can view:

  • Just your unsubscribed addresses
  • The unsubscribed addresses for you and everyone on the team
  • Any individual team member’s unsubscribed addresses

And from here, you can manage these addresses as well.

(Remember: If you use global unsubscribes, anyone unsubscribed from one team member’s account will be unsubscribed from every team members’ account.)

The old method for adding and removing unsubscribes: Sending an email

Here’s the original GMass method for adding and removing emails from your unsubscribe list. To add/remove, you’d send a special email to a specific GMass address. This method still works if you want to use it; however, we recommend the dashboard method.

To add to your unsubscribe list via an email:

1. Launch a regular Gmail Compose Window.

2. Set the To field to unsubscribe@gmass.co.

3. Type anything you like in the Subject Line, so long as it’s not blank.

4. Paste in a list of email addresses to unsubscribe as the body of the message, with each email address on one line.

5. Click the red GMass button.

To remove addresses, follow the same instructions, but send the email to resubscribe@gmass.co.

GMass Dashboard Unsubscribe Options: Ignore, Global, List-Unsubscribe

There are three other options in the Unsubscribes settings area of the GMass dashboard: Ignore unsubscribes, use global unsubscribes, and List-Unsubscribe header. Here’s a look at how to use all three.

Ignoring your unsubscribe list

It’s possible to ignore your unsubscribe list if, for whatever reason, you want to send an email to everyone on a list regardless of whether or not they’ve unsubscribed.

This is a global setting, not one on a campaign-by-campaign basis, so you need to turn it on or off in the GMass dashboard.

To ignore unsubscribes, check the “Ignore unsubscribes” box in the Unsubscribes section of the GMass dashboard settings.

Ignore unsubscribes

Using global unsubscribes across your Google Workspace domain

If you’re using GMass for teams or there are multiple people with your Google Workspace domain using GMass, you can share unsubscribe lists.

For instance, let’s say you cold email a contact and they unsubscribe. If your coworkers have global unsubscribes turned on, GMass will automatically suppress their future emails to that contact.

And if you have global unsubscribes turned on, GMass will suppress emails you send to addresses on the unsubscribe lists of everyone at your domain or on your team plan.

To turn on global unsubscribes, check the box next to “Use global unsubscribes” in the Unsubscribes section of the GMass dashboard settings.

Global unsubscribes

Adding a list-unsubscribe header to your emails

When you add the list-unsubscribe header to your emails, email clients like Gmail, Outlook, and Apple Mail will add an “Unsubscribe” link or message at the top of your emails. Basically, it makes it easier for people to unsubscribe — which can cut down on people marking your emails as spam and hurting your deliverability in the process.

To add list-unsubscribe headers to your emails, check the “List-Unsubscribe Header” box in the Unsubscribes area of the GMass dashboard settings.

Adding the list-unsubscribe headers

You can read lots more about the list-unsubscribe header in GMass in our article about the feature.

How to “Unsubscribe” an Address From One Specific Campaign

What do you do if you want to “unsubscribe” an address, multiple addresses, or a domain from a specific campaign — but you don’t want to add those addresses to your unsubscribe list? GMass’s campaign-specific suppression features can help.

As you’re creating your campaign in the Gmail compose window, open the GMass settings box and go to the Advanced section. There you’ll see the Suppression options.

Suppression settings in GMass

You have three different options here:

  • You can suppress emails to people who have been part of other specific past campaigns. Pick one or more campaigns by clicking into the “People in these campaigns” field and choosing the campaigns from the dropdown.
  • You can suppress emails to people at specific domains or email addresses. Type or paste the domains and/or email addresses into the “These domains and email addresses” field. Emails in the new campaign will not go out to those domains/contacts.
  • You can suppress emails to people you’ve recently emailed. Set the number of days in the “People I’ve emailed in the past n days” field.

These suppressions are the equivalent of “unsubscribing” someone just for one specific campaign. Those people will still be eligible to receive all of your other emails — and will not be added to your unsubscribe list.

Final Thoughts on Unsubscribing in GMass

GMass has sophisticated unsubscribe management features; ideally, you won’t have to think about unsubscribe management because GMass handles it all for you.

To learn more, check out our article on how to add an Unsubscribe Link to your mail merge campaigns in Gmail. Or read up on all of GMass’s unsubscribe management features.

Email marketing, cold email, and mail merge inside Gmail


Send incredible emails & automations and avoid the spam folder — all in one powerful but easy-to-learn tool


TRY GMASS FOR FREE

Download Chrome extension - 30 second install!
No credit card required
Love what you're reading? Get the latest email strategy and tips & stay in touch.


If you’ve sent a Gmail mail merge campaign with GMass and were notified that this error was generated while sending to your email addresses:

An Error occurred, but the error response could not be deserialized

you might be perplexed, since the error doesn’t provide any actionable information. This is an error that is generated by the Gmail API when GMass connects to your Gmail account to send your mail merge campaign. While there’s not much information available from Gmail as to the cause of this error, we’ve found that the usual cause is the user of large attachments or inline images.

Gmail states that emails can be up to 25MB in size, and GMass places a further size limit of 12MB per individual email message, but still, Gmail may generate this error even if you are under both of these limits. The solution is to simply reduce the size of your email, either by shrinking your inline images, host your images and refer to them relatively in your HTML code, or by reducing the size of or eliminating attachments.

This Stack Overflow article corroborates our theory about this error.

Ready to send better emails and save a ton of time?


GMass is the only tool for marketing emails, cold emails, and mail merge — all inside Gmail. Tons of power but easy to learn and use.


TRY GMASS FOR FREE

Download Chrome extension - 30 second install!
No credit card required
Love what you're reading? Get the latest email strategy and tips & stay in touch.


GMass